
Libeica - Coffee machine Klarstein - Free user manual and instructions
Find the device manual for free Libeica Klarstein in PDF.

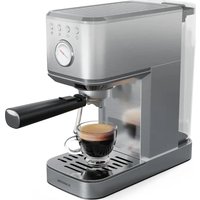
| Product type | Espresso coffee machine |
| Brand | Klarstein |
| Model | Libeica |
| Article numbers | 10041253, 10046426, 10046427 |
| Power supply | 220-240 V, 50/60 Hz |
| Power | 1230-1465 W |
| Pressure | 19 bar |
| Water tank capacity | 1.8 L |
| Recommended coffee dosage | 15-17 g per dose |
| Functions | Espresso, cappuccino, steam, hot water |
| Display | Digital |
| Pressure gauge | Yes (piezometer) |
| Housing material | Stainless steel |
| Included filters | Single and double filter, filter holder |
| Safety | Automatic shut-off, burn protection |
| Maintenance | Descaling every 2-3 months, regular cleaning |
| Spare parts | Available via customer service (filters, drip tray, etc.) |
| Usage | Ground coffee only |
Frequently Asked Questions - Libeica Klarstein
User questions about Libeica Klarstein
0 question about this device. Answer the ones you know or ask your own.
Ask a new question about this device
Download the instructions for your Coffee machine in PDF format for free! Find your manual Libeica - Klarstein and take your electronic device back in hand. On this page are published all the documents necessary for the use of your device. Libeica by Klarstein.
USER MANUAL Libeica Klarstein
INHALTSVERZEICHNIS
natural_image
Symbol of a trash bin with crossed lines indicating no waste or discharge, and a solid black rectangle below (no text or labels)Berlin Brands Group UK Limited
PO Box 42
272 Kensington High Street
London, W8 6ND
United Kingdom
Dear Customer,
Congratulations on purchasing this device. Please read the following instructions carefully and follow them to prevent possible damages. We assume no liability for damage caused by disregard of the instructions and improper use. Scan the QR code to get access to the latest user manual and more product information.

CONTENTS
Safety Instructions 20
Device Overview 21
Before First Use 22
Making Espresso 22
Making Coffee 23
Making Cappuccino 24
Heating Water 24
Heating Liquids (Steam Function) 25
Indicator Lights 26
Cleaning and Care 28
Troubleshooting 29
Disposal instructions 31
Manufacturer & Importer (UK) 31
TECHNICAL DATA
| Item number | 10041253, 10046426, 10046427 |
| Voltage 220-240 V | |
| Frequency | 50/60Hz |
| Power | 1230-1465 W |
| Water tank 1.8 L | |
| Pressure | 19 Bar |
SAFETY INSTRUCTIONS
- Read these operating instructions carefully to avoid hazards from physical damage, fire, electric shock, injury, and property damage.
- This appliance is intended for making coffee using a pressure filter ("espresso") and for domestic use indoors.
- Do not use the device for any purpose other than its intended use.
- Children from the age of 8 years and mentally, sensory and physically impaired persons may only use the device if they have been informed in detail about the functions and safety precautions by a supervisor responsible for them beforehand and understand the associated risks.
- Servicing is required when the device has been damaged in any way, such as when the power supply cord or plug is damaged, liquid has been spilled or objects have fallen into the device, the device has been exposed to rain or moisture, or does not operate normally.
- Please use only the accessories recommended by the manufacturer of this device to ensure proper functioning of the device.
- Before using the appliance, make sure that the water tank of the appliance is always filled with the required amount of water for the intended application to avoid damage to the appliance.
- Keep away from the hot steam coming out of the appliance. When moving hot components of the appliance, such as the frother or the filter, only use the handles or levers attached to the appliance or its components.
- To avoid electrical damage to the device, do not immerse the unit in water for cleaning.
- Do not touch the plug of the device with wet or damp hands. Moisture from your hands can bead up on the plug and cause a dangerous electric shock if it comes in contact with the outlet.
- Supervise the device during operation.
- Keep the device and its components dry, clean and out of reach of unauthorised persons.
- Supervise children while they are playing near the appliance to protect them from harm.
- Unplug the appliance from the mains outlet when not in use.
CAUTION
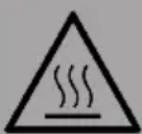
Risk of injury! Allow the appliance to cool completely before cleaning and before moving the appliance or any part of it. This will prevent burning on hot surfaces and injury from hot liquid.
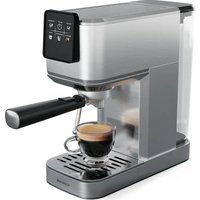
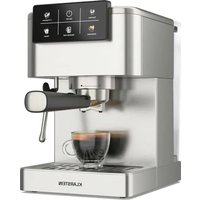
DEVICE OVERVIEW
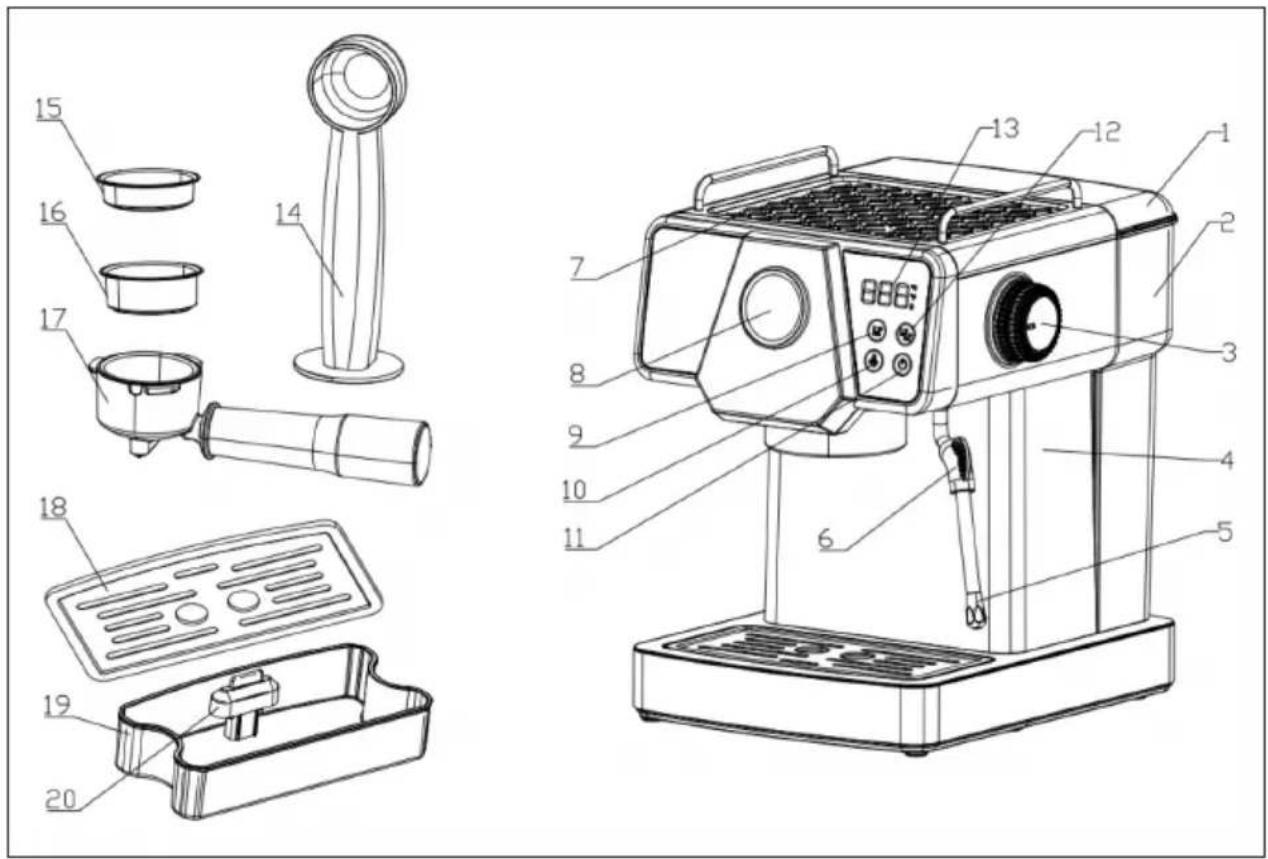
| 1 Water tank cover 11 On / off button | ||
| 2 Water tank 12 Button for two cups of coffee | ||
| 3 Steam button 13 Digital display | ||
| 4 Main housing 14 Coffee spoon | ||
| 5 Steam line and nozzle 15 Single coffee filter | ||
| 6 Steam line handle 16 Double coffee filter | ||
| 7 Warming compartment 17 Filter holder | ||
| 8 Piezometer 18 Drip tray cover | ||
| 9 Button for one cup of coffee 19 Drip tray | ||
| 10 Steam button 20 Floater |
Note: Only use ground coffee in this appliance and only use it for making coffee and frothing milk. Otherwise, it could be dangerous.
BEFORE FIRST USE
- Remove the appliance from the packaging and check that all of the contents are there.
- Clean all removable accessories.
- Use the machine as described in the sections 'Making espresso' and 'Making cappuccino' (without coffee powder in the filter). Repeat this 2-3 times.
- Remove the red silicone cap from the water tank before using the machine.
Size: 70x45 mm
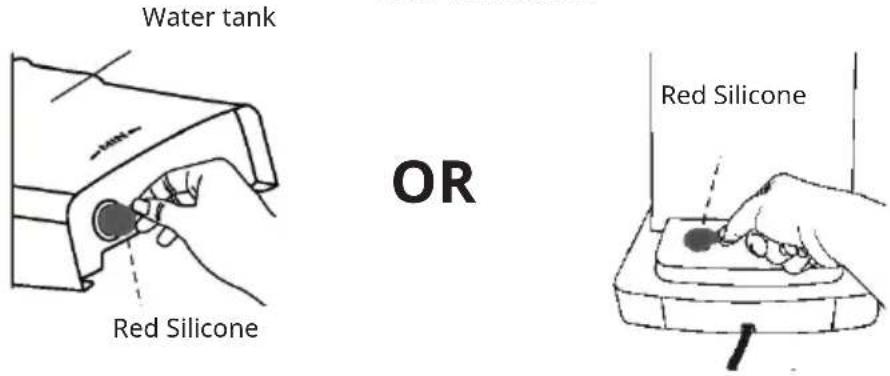
Note: Remove the red silicon before use!
MAKING ESPRESSO
For example for 2 cups
- Open the cover and remove the water tank. Fill the water tank with water up to the maximum mark. Make sure that the water level does not exceed the maximum mark.
- Put the water tank back into the appliance and close the cover.
- Plug the power plug into the mains socket. The appliance performs a self-test. The control panel lights up first and then goes out. The power indicator lights up red continuously. Press the on/off button. The cup indicator lights flash red, the steam button lights up red continuously and the appliance heats up. After about one minute, both button indicators light up red, the steam indicator lights up red and preheating is complete.
- Remove the filter holder and use the coffee spoon to put the appropriate amount of coffee (15-17 grams) into the filter. Press the coffee down firmly. Remove excess coffee powder from the rim to avoid damaging the sealing ring of the brew group head.
Note: If too much coffee powder remains on the edge of the filter, this can lead to an insufficient seal and water leaking out.
- Firmly hold the upper part of the appliance with your hand. Secure the filter holder in the brew group head in an anticlockwise direction (must be tightened).
- Place one (two) cup(s) under the coffee outlet of the appliance.
- Press the desired cup button (one or two cups). The appliance starts pumping water and the coffee flows out of the coffee nozzle.
- The espresso machine stops operating automatically (from flashing to steady light). The coffee is then ready and the cup can be removed.
Note: Do not leave the espresso machine unattended during use as your manual intervention may be required.
- When you have finished making coffee, remove the funnel by turning it anticlockwise. Remove the coffee grounds from the filter and rinse it with hot water. Press one of the cup buttons (one or two cups), rinse the outlet with water and reattach the funnel to the brew group head and wait until the next time you use the appliance.
- Use the single coffee filter to make a cup of coffee. Press the button for one cup of coffee. The steps are then the same as for the button for 2 cups of coffee.

CAUTION
Risk of burns! To avoid scalding, do not touch the hot appliance surfaces, especially when the steam nozzle is in use.
MAKING COFFEE
The ground coffee beans and the grinding quality largely determine the quality of the coffee. It should take 20-25 seconds to make a cup of coffee.
If the coffee powder is too coarse, the coffee extraction will be insufficient, the taste will be weak and the colour will be lighter. The foam will also be very thin and the colour will be white. If the coffee powder is too fine, the coffee will be extracted too much. It will look too dark and have no foam.
For a good cup of coffee, use the right amount of freshly ground coffee beans (use a coffee grinder). If you make coffee with coffee powder, the freshness of the beans is very important. Coffee bean oil can decompose if stored for a long time.
MAKING CAPPUCCINO
- First make a cup of espresso in a sufficiently large cup (see section "MAKING ESPRESSO").
- Use fresh whole milk from the refrigerator (8-10 °C) and fill a measuring cup 1/3 full with milk.
Note: Use a stainless steel cup with a diameter of at least 70 mm, as the milk expands during frothing
- Touch the steam button to start preheating. The buttons for one and two cups of coffee light up continuously in red and the steam indicator starts flashing red. As soon as the steam indicator lights up continuously in white, preheating is complete.
- Place an empty cup under the steam outlet and turn the steam control knob anticlockwise to the maximum position. Drain some water through the steam line and, as soon as steam comes out, turn the steam knob clockwise to close the steam outlet-
- Hold the cup filled with milk under the steam outlet and make sure that the steam nozzle is under the surface of the milk.
- To froth the milk, turn the steam knob to the maximum position.
- Once the milk has been frothed, turn the steam knob to close the steam outlet and remove the cup. Pour the frothed milk into the espresso you prepared earlier. Your cappuccino is now ready. You can add sugar or grated coconut, depending on your taste.
Note: Clean the steam outlet and steam line as soon as steam has stopped coming out. Make sure that no milk is left in the steam lines and on the steam outlet, otherwise it could deposit on the walls of the lines and dry out. Please note that the appliance will still be very hot immediately after use. There is a risk of scalding.
HEATING WATER
- Place a container under the hot water outlet.
- When the indicator lights for one and for two cups are permanently white, turn the steam knob up. Hot water comes out of the steam nozzle. The indicator light for one cup flashes during this time.
- Once the desired amount of water has been reached, turn the steam knob to close. Hot water will then no longer flow out.
The hot water function can also be used to cool down the appliance quickly.
Note: Take care when using the appliance as there are hot appliance components (especially the water outlet (filter holder), hot water nozzle and steam line). Do not place your hands on the unit when using it.
HEATING LIQUIDS (STEAM FUNCTION)
- Use a stainless steel cup. Fill it halfway with cold liquid.
Note: Use a stainless steel cup with a diameter of at least 70 mm, otherwise the liquid could overflow when steam escapes.
- Touch the steam button to start preheating. The buttons for one and two cups of coffee light up continuously in red and the steam indicator starts flashing red. As soon as the steam indicator lights up continuously in white, preheating is complete.
- Place an empty cup under the steam outlet and make sure that the steam nozzle is below the surface of the liquid.
- Open the steam knob and let the steam flow into the liquid.
- Close the steam knob as soon as the desired temperature has been reached. No more steam will come out.
Note: Clean the steam outlet and steam line as soon as steam has stopped coming out. Make sure that no milk is left in the steam lines and on the steam outlet, otherwise it could deposit on the walls of the lines and dry out. Please note that the appliance will still be very hot immediately after use. There is a risk of scalding.
INDICATOR LIGHTS
| On/off One cup | Two cups Steam ind | ator Digital display | ||
| Lights on (red) Lights off Lights off Lights off No display | ||||
| Lights on (white) | Flashing (red) Flashing (red) Lights on (red) Alternate | flashing | ||
| Lights on (white) | Lights on (white) | Lights on (white) | Lights on (red) 92 °C | |
| Lights on (white) | Flashing (white) Lights off Lights off Timing | |||
| Lights on (white) | Lights off Flashing (white) Lights off Timing | |||
| Lights on (white) | Lights on (red) Lights on (red) Flashing (red) Alternate | flashing | ||
| Lights on (white) | Lights on (red) Lights on (red) Lights on (white) | 130 °C | ||
| Lights on (white) | Lights off Lights off Flashing (white) Timing | |||
| Lights on (white) | Lights on (red) Lights on (red) Lights on (white) | 130 °C | ||
| Lights on (white) | Rapid flashing (red) | Rapid flashing (red) | Lights on (red) E-2 | |
| Lights on (red) Lights off Lights off Lights off No display | ||||
| Lights on (white) | Rapid flashing (red) | Rapid flashing (red) | Lights on (red) E-1 | |
| Cause Solution | |
| Switch on / | |
| Coffee and hot water preheats / | |
| Hot water and coffee heating completed / | |
| Make a single cup of coffee or water / | |
| Make a double cup of coffee / | |
| Steam preheats / | |
| Preheating of the steam is completed / | |
| Steam production / | |
| Steam release finished / | |
| Press the steam button after steam production (the temperature is too high) | Wait until the temperature drops normally or turn the steam knob to cool down the appliance faster by letting out hot water |
| Standby for longer than 30 minutes Touch the screen | |
| The steam knob is not closed properly Close the steam knob properly |
CLEANING AND CARE
- Switch off the unit and let it cool down completely.
- Use a damp cloth to clean the stainless steel surface.
Note: Do not use abrasive cleaners, alcohol or aggressive solvents. Do not clean the appliance by immersing it in water.
- Clean the outlet and the sealing ring with a professional brush.
- Clean the steam outlet. Make sure that it is not blocked.
- Remove the metal funnel by turning it anticlockwise. Remove the coffee grounds from the funnel. Clean the funnel with a cleaning agent and rinse it with clean water.
- Clean all accessories with water and dry everything thoroughly.
- Clean the drip tray and the drip tray cover regularly and dry them afterwards.
- Clean the water tank regularly.
Descaling
Over time, limescale residues form inside the appliance. Descale the appliance at least every 2-3 months.
1 Pour water and descaler in a ratio of 4:1 into the water tank until it is filled with water up to the maximum mark. Use a household descaler for this purpose. If you use citric acid for descaling, the ratio of water to citric acid is 100:3.
2 Secure the filter holder (without coffee powder) in the brew group head (see section 'Making espresso').
3 Press the coffee button and prepare approximately 150 ml of coffee (or make 3 cups of coffee). Then press the steam button. The appliance heats up. Open the steam knob as soon as the steam indicator lights up steadily. Allow steam to escape for about 2 minutes and turn the steam knob off. Now leave the descaler in the appliance for at least 15 minutes.
4 Repeat step 4 3 times.
5 Press the button for 2 cups of coffee and repeat this step until there is no descaler left in the appliance.
6 Press the coffee button again (without adding coffee powder) and repeat step 43 times (without waiting 15 minutes). Then brew coffee (without adding coffee powder) until there is no more water in the water tank.
7 Repeat step 6 at least 3 times to ensure that the lines are free of residues.
TROUBLESHOOTING
| Problem Possible cause Solution | ||
| No water comes out. The water tank is empty. Fill up the water tank. | ||
| No steam is produced. The steam nozzle is clogged. | Clean the steam nozzle. | |
| The water tank is empty. Fill up the water tank. | ||
| Appliance malfunctioning | ||
| Coffee runs out over the edge of the filter holder. | Too much coffee powder in the filter | Switch off the appliance and wait until it has cooled down. Clean the filter and fill it with the appropriate amount of coffee powder. |
| There is coffee powder under the sealing ring. | Remove the coffee powder from the sealing ring. | |
| The sealing ring is damaged/leaking. | Contact customer service. | |
| The coffee flows out too slowly or no coffee flows out. | The coffee powder is too fine and clogs the filter. | Use coarser coffee powder. |
| The filter holes are blocked. | Clean the filter. | |
| The water tank has not been inserted. | Insert the water tank. | |
| Water leaks from the bottom of the unit. | The drip tray is full. Empty | the drip tray. |
| Appliance malfunctioning | Contact customer service. | |
| The appliance does not work | The mains plug is not plugged in. | Plug the mains plug into the socket. |
| NTC was short-circuited. | Contact customer service. | |
| Appliance malfunctioning | Contact customer service. | |
| Frothing with steam does not work. | The steam indicator does not light up. | Wait until the steam indicator is on. |
| The container is too big or the shape is unsuitable. | Use a tall and narrow cup or mug. | |
| You are using low-fat milk. | Use whole milk. | |
DISPOSAL CONSIDERATIONS
natural_image
Symbol of a trash bin with crossed lines and a horizontal bar below (no text or labels)If there is a legal regulation for the disposal of electrical and electronic devices in your country, this symbol on the product or on the packaging indicates that this product must not be disposed of with household waste. Instead, it must be taken to a collection point for the recycling of electrical and electronic equipment. By disposing of it in accordance with the rules, you are protecting the environment and the health of your fellow human beings from negative consequences. For information about the recycling and disposal of this product, please contact your local authority or your household waste disposal service.
MANUFACTURER & IMPORTER (UK)
Manufacturer:
Chal-Tec GmbH, Wallstrasse 16, 10179 Berlin, Germany.
Importer for Great Britain:
Berlin Brands Group UK Limited
PO Box 42
272 Kensington High Street
London, W8 6ND
United Kingdom
Estimado cliente:
ÍNDICE
natural_image
Symbol of a trash bin with crossed lines and a horizontal bar below (no text or labels)Berlin Brands Group UK Limited
PO Box 42
272 Kensington High Street
London, W8 6ND
United Kingdom
Cher client, chère cliente,
SOMMAIRE
natural_image
Symbol of a trash bin with crossed lines and a horizontal bar below (no text or labels)Berlin Brands Group UK Limited
PO Box 42
272 Kensington High Street
London, W8 6ND
United Kingdom
Gentile cliente,
INDICE
natural_image
Symbol of a trash bin with crossed lines indicating no waste or discharge, and a solid black rectangle below (no text or labels)Berlin Brands Group UK Limited
PO Box 42
272 Kensington High Street
London, W8 6ND
United Kingdom

area
| Category | Value | | -------- | ----- | | 1 | 100 | | 2 | 100 | | 3 | 100 | | 4 | 100 | | 5 | 100 | | 6 | 100 | | 7 | 100 | | 8 | 100 | | 9 | 100 | | 10 | 100 | | 11 | 100 | | 12 | 100 | | 13 | 100 | | 14 | 100 | | 15 | 100 | | 16 | 100 | | 17 | 100 | | 18 | 100 | | 19 | 100 | | 20 | 100 | | 21 | 100 | | 22 | 100 | | 23 | 100 | | 24 | 100 | | 25 | 100 | | 26 | 100 | | 27 | 100 | | 28 | 100 | | 29 | 100 | | 30 | 100 | | 31 | 100 | | 32 | 100 | | 33 | 100 | | 34 | 100 | | 35 | 100 | | 36 | 100 | | 37 | 100 | | 38 | 100 | | 39 | 100 | | 40 | 100 | | 41 | 100 | | 42 | 100 | | 43 | 100 | | 44 | 100 | | 45 | 100 | | 46 | 100 | | 47 | 100 | | 48 | 100 | | 49 | 100 | | 50 | 100 | | 51 | 100 | | 52 | 100 | | 53 | 100 | | 54 | 100 | | 55 | 100 | | 56 | 100 | | 57 | 100 | | 58 | 100 | | 59 | 100 | | 60 | 100 | | 61 | 100 | | 62 | 100 | | 63 | 100 | | 64 | 100 | | 65 | 100 | | 66 | 100 | | 67 | 100 | | 68 | 100 | | 69 | 100 | | 70 | 100 | | 71 | 100 | | 72 | 100 | | 73 | 100 | | 74 | 100 | | 75 | 100 | | 76 | 100 | | 77 | 100 | | 78 | 100 | | 79 | 100 | | 80 | 100 | | Note: The actual values are not provided in the code. The code generates random data for the first three categories (categories) and is not included in the output. |
KLARSTEIN
- INHALTSVERZEICHNIS
- Dear Customer,
- CONTENTS
- SAFETY INSTRUCTIONS
- CAUTION
- DEVICE OVERVIEW
- BEFORE FIRST USE
- MAKING ESPRESSO
- For example for 2 cups
- MAKING COFFEE
- MAKING CAPPUCCINO
- HEATING WATER
- HEATING LIQUIDS (STEAM FUNCTION)
- CLEANING AND CARE
- Descaling
- DISPOSAL CONSIDERATIONS
- MANUFACTURER & IMPORTER (UK)
- Manufacturer:
- Importer for Great Britain:
- Estimado cliente:
- ÍNDICE
- SOMMAIRE
- Gentile cliente,
- INDICE
- KLARSTEIN
Brand : Klarstein
Model : Libeica
Category : Coffee machine