69365MB - Speaker Klein Tools - Free user manual and instructions
Find the device manual for free 69365MB Klein Tools in PDF.


User questions about 69365MB Klein Tools
0 question about this device. Answer the ones you know or ask your own.
Ask a new question about this device
Download the instructions for your Speaker in PDF format for free! Find your manual 69365MB - Klein Tools and take your electronic device back in hand. On this page are published all the documents necessary for the use of your device. 69365MB by Klein Tools.
USER MANUAL 69365MB Klein Tools
INSTRUCTION MANUAL Jobsite Speaker
- 30W DUAL-SPEAKER SYSTEM
- BASS BOOST
- UP TO 20 HOURS RUNTIME
- LINK UP TO 5 SPEAKERS VIA BROADCAST
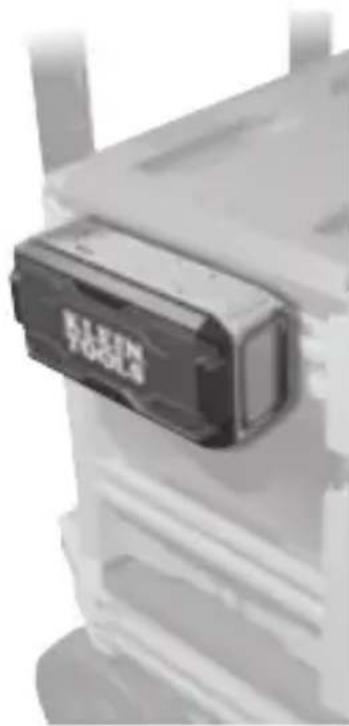
- MOUNT VIA MODbox™ RAIL LATCH OR EMBEDDED MAGNETS
- USB DEVICE CHARGING
ESPAÑOL pg. 13
FRANÇAIS p. 25
KLEIN TOOLS®

text_image
MOD BOX69365MB
text_image
KLEIN TOOLSENGLISH
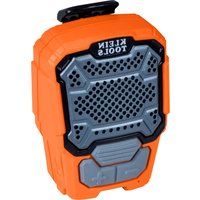
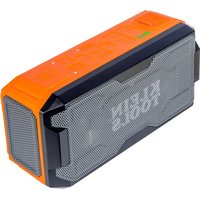
Klein Tools 69365MB Jobsite Speaker is a rugged, 30W dual-speaker system that delivers exceptional audio quality for both music and voice calls with a bass boost feature to further enhance audio experience. Bluetooth® technology enables reliable, long-range and multi-unit connectivity. It features convenient magnetic mounting to ferrous surfaces, and secure latching onto the MODbox™ rail system. It charges multiple portable devices via dual USB ports, and is designed to resist dust, water, and impact in tough indoor and outdoor jobsite environments.
CONTENTS
- Jobsite Speaker
- USB-C Charging Cable
- This Instruction Manual
GENERAL SPECIFICATIONS
- Operating Temperature: 5°F to 131°F (-15°C to 55°C)
- Charging Temperature: 41°F to 104°F (5°C to 40°C)
- Storage Temperature: 14°F to 113°F (-10°C to 45°C)
- Relative Humidity: <85% non-condensing
- Bluetooth® Version: 5.3
- Bluetooth® Connection Range: 100' (30 m) in open space
- Support Profiles: AD2P, AVRCP, HFP, SPP
- Battery Type: Internal, Li-Ion, 7.4V / 5200mAh (38.48Wh)
- Input: USB-C: 5V DC, 3A
- Output: USB-A: 5V DC, 2.4A; USB-C: 5V DC, 3A
- Maximum Output Power: (USB-A + USB-C): 18W
- Battery Life: 20 hours (may vary based on device connected and volume level)
- Broadcast Range: 30' (9 m) line-of-sight
- Dimensions: 9.07" × 4.61" × 3.72" (230.3 mm × 117 mm × 94.5 mm)
- Weight: 3 lbs (1.36 kg)
- Drop Protection: 6.6' (2 m)
- Ingress Protection (IP) Rating: IP67
- Standards: FCC, IC, DOE/CEC, NRCAN, RoHS, REACH, BQB

Intertek
5031504
Specifications subject to change.

WARNINGS
Read, understand, and follow these instructions to ensure safe operation. Failure to observe these warnings can result in risk of fire or electric shock. Keep these instructions for future reference.
- DO NOT use the product if it is damaged or modified. Damaged or modified batteries may exhibit unpredictable behavior resulting in fire, explosion or injury.
- Risk of fire and burns. DO NOT open, crush, heat above specified maximum temperature or incinerate. Prolonged exposure to direct sunlight can result in elevated temperatures.
- Properly seal the charging port cover to achieve specified water & foreign object ingress protection. Keep seal free of dirt, oil, sand, or other material that interferes with proper sealing. Failure to do so can result in risk of fire or electric shock.
- DO NOT open the charging port cover if wet or in a wet environment. Thoroughly dry the unit and the seal around water-resistant cover completely before opening water resistant cover.
- DO NOT subject to impacts or drops greater than 6.6' (2 m). Drops larger than this may not show signs of damage, but internal components may have been compromised. It is advisable to replace the unit if any such severe events occur.
- Subjecting battery to extremely low air pressure may result in an explosion or the leakage of flammable liquid or gas.
- DO NOT attempt to repair the product or charging cable. There are no user-serviceable parts.
SYMBOLS ON PRODUCT

Warning or Caution

Risk of Electrical Shock

Strong Magnetic Field

Read Manual

Conforms with particular Code of Federal regulations

Energy Efficiency Verified

This product has been independently tested by Intertek and meets applicable published standards

Do not place equipment and its accessories in the trash
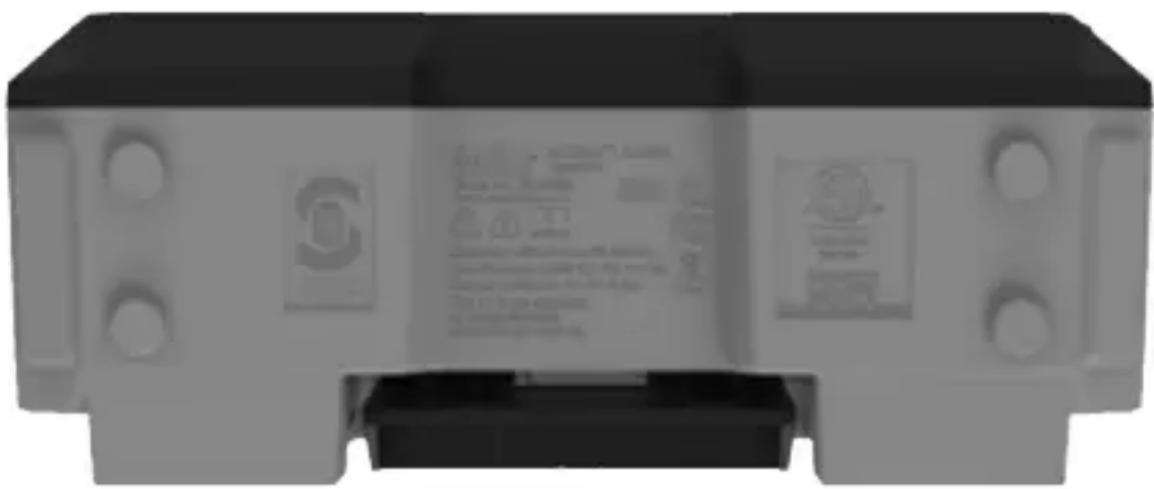
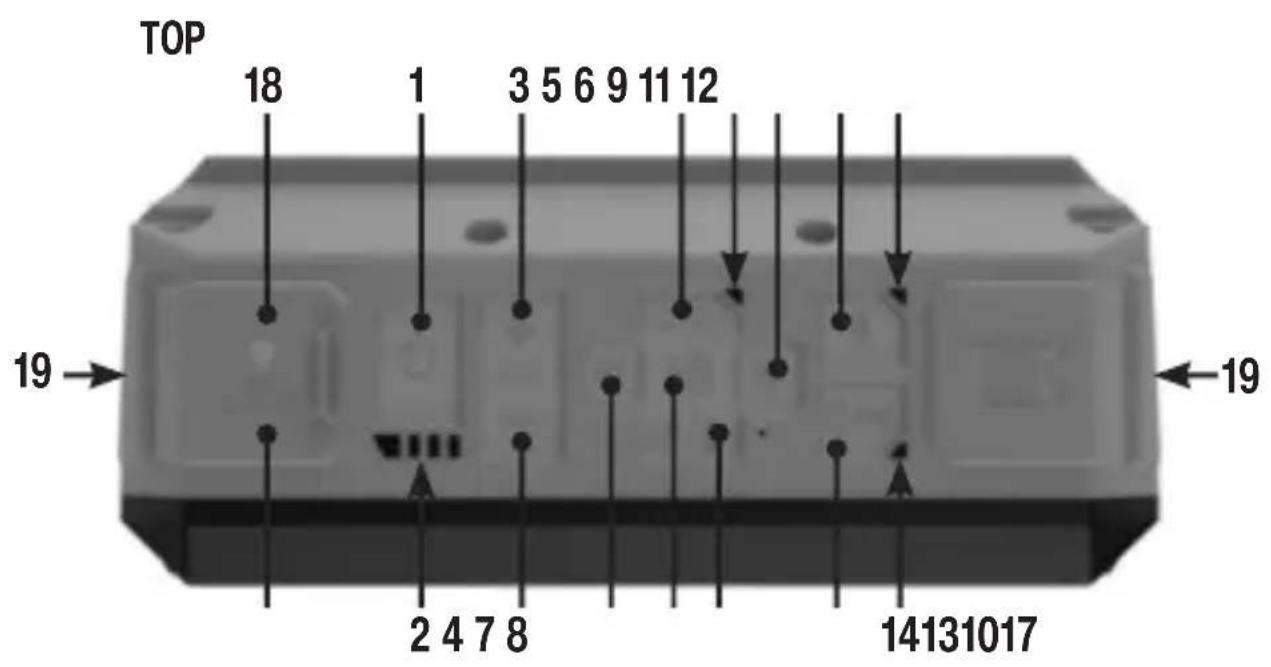
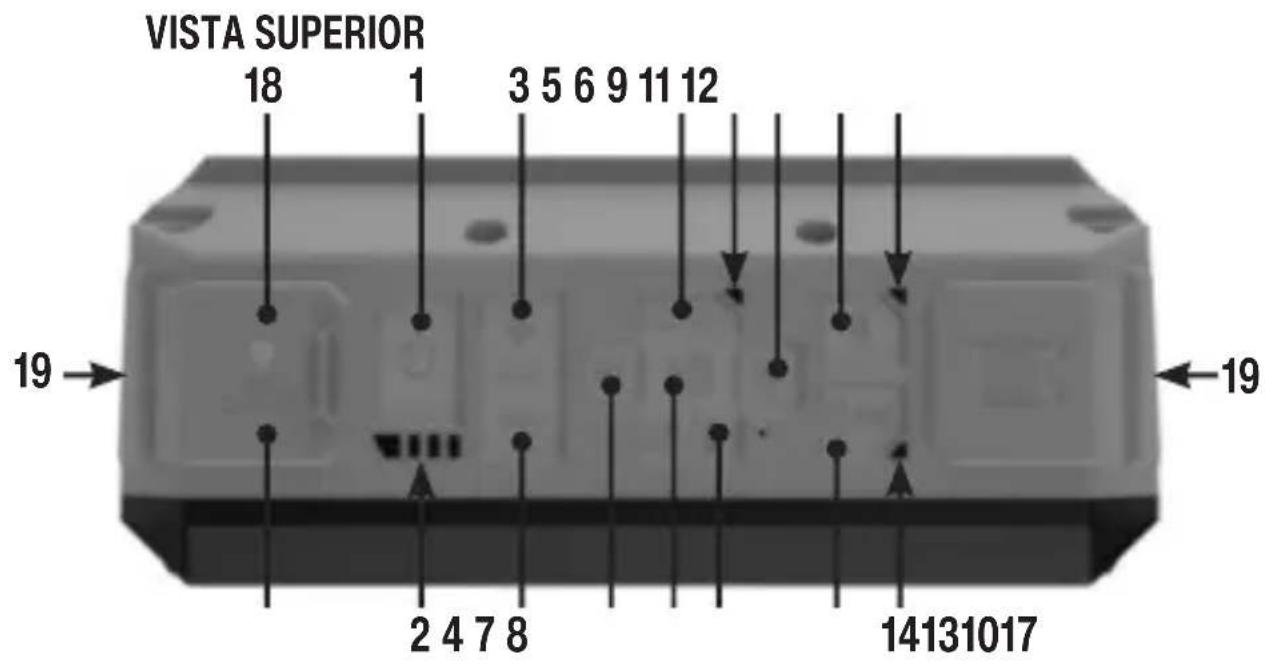
FEATURE DETAILS (FIG. A)
1Power Button 11Bluetooth
® Button
2 Battery Status Indicator
12 Bluetooth® LED Indicator
3“+” Volume Up Button 13Broadcast Button
4“-” Volume Down Button 14Broadcast LED Indicator
5 Bass Boost Button
15 Magnets (×5)
6 Bass Boost Indicator
16 MODbox ^TM Rail Latch
7Previous Track Button 17USB-A Charge Out Port
8 Play/Pause Button
18 USB-C Charge In/Out Port
9 Next Track Button
19 Passive Radiator ( × 2)
10 Voice Assistant/Call Button
BOTTOM
natural_image
Exterior view of a modern office building (no signage)FEATURE DETAILS (FIG. A)
text_image
TOP 18 1 3 5 6 9 11 12 19 2 4 7 8 14131017 19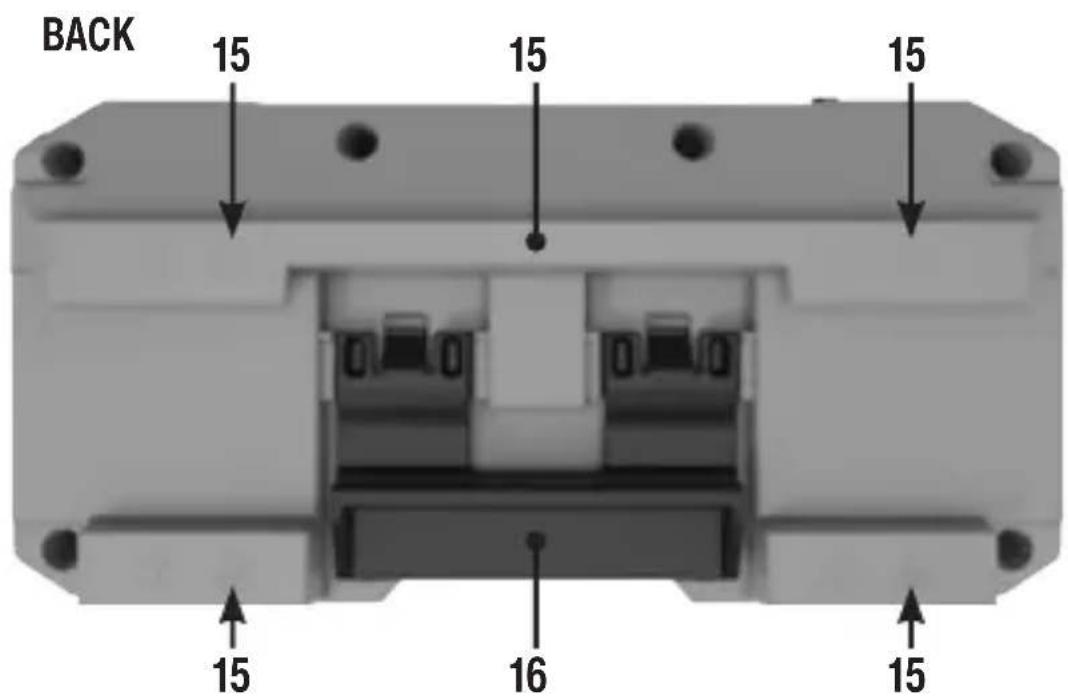
text_image
BACK 15 15 15 15 16 16 15OPERATING INSTRUCTIONS
CHARGING SPEAKER
NOTE: Fully charge speaker prior to use.
Connect the USB-C end of the included charging cable to the USB-C Charging port (18); and the other end to a USB power supply (not included). Charge times will vary depending on input. The battery level indicator will illuminate to indicate charging status:
| TABLE 1 - CHARGING STATUS | ||
| LED Status % Charged | ||
| Not illuminatedNot illuminatedNot illuminatedNot illuminated | 0% charged | |
| Not illuminatedNot illuminatedNot illuminatedBlinking red | 1% to 25% charged | |
| Not illuminatedNot illuminatedBlinking yellowSolid red | 26% to 50% charged | |
| Not illuminatedBlinking greenSolid yellowSolid red | 51% to 75% charged | |
| Blinking greenSolid greenSolid yellowSolid red | 76% to 99% charged | |
| Solid greenSolid greenSolid yellowSolid red | 100% charged(illuminates for one minute) | |
OPERATING INSTRUCTIONS
POWER ON / OFF: Press & hold the Power Button (1) for 1 second. A tone will sound.
NOTE: Unit will automatically power off (APO) after 5 minutes with no Bluetooth® connection.
NOTE: Unit cannot be powered off while actively on a call.
NOTE: If unit is in use as a Source speaker in Broadcast mode, manually powering off or automatic power-off due to lack of Bluetooth® connection will also power off any connected satellite speakers. If the Source speaker powers off due to depleted battery (red LED), satellite speakers will remain powered on until manually powered off.
PAIRING: Wireless connection activates automatically and is ready to pair when unit is powered on. On your device, enable Bluetooth® and search/scan for devices that can be paired. Select “Klein MODbox Jobsite Speaker” when it appears (refer to the user manual of your device). If necessary, enter “0000” as pairing passcode. A tone will sound and a voice prompt stating “Connected” will be heard after successful pairing.
NOTE: The unit automatically attempts to connect the last paired device but if not found, is ready to pair with a new device.
DISCONNECT CURRENT PAIRING:
- Turn unit off. -OR-
- Double-press Bluetooth® Button (11). Bluetooth® LED Indicator (12) will blink, and a voice prompt of "Disconnected", followed by "Pairing" will be heard. -OR-
- Turn off Bluetooth ^® wireless connection in paired device.
PAIRING DIFFERENT DEVICES:
- Double-press Bluetooth® Button (11) to enter pairing mode. The Bluetooth® LED Indicator (12) will blink.
- Follow instructions in PAIRING section to pair with a different device.
CLEAR PAIRING LIST:
- Press and hold Bluetooth® Button (11) for 6 seconds to clear the Bluetooth® pairing list. A voice prompt of "Pairing list cleared" will be heard, a tone will sound, and a voice prompt of "Pairing" will be heard.
- Follow instructions in PAIRING section to pair with new devices (a new pairing list will be created).
OPERATING INSTRUCTIONS
PLAYING AUDIO: Use your device to control the speaker or use the buttons on the speaker.
- Press the Play/Pause Button (8) once to play or pause audio on your device.
- Press the Previous Track (7) or Next Track (9) buttons to skip backward or forward.
- Press the “+” Button (3) to increase or “-” Button (4) to decrease the speaker volume. A tone will sound when either maximum or minimum volume is reached. Volume may also be controlled from your audio device.
BASS BOOST: Bass Boost is activated by default. The Bass Boost Indicator (6) will illuminate white while active. To deactivate Bass Boost, press the Bass Boost Button (5). The Bass Boost Indicator (6) will turn off. Subsequent presses will toggle Bass Boost on and off.
SPEAKERPHONE OPERATION: An incoming call will pause audio and a ring tone will sound:
- Answer call: Press the Voice Assistant/Call (10) Button.
- Reject call: Press and hold the Voice Assistant/Call (10) Button for 1 second.
- End call: Press the Voice Assistant/Call (10) Button.
- Hold current call and answer new call: Press the Voice Assistant/Call (10) Button.
- Switch between two active calls or activate call on hold: Double-press the Voice Assistant/Call (10) Button.
- Adjust ringer volume while receiving a call: Press the “+” (3) or “-” (4) Button. The ringer will remain at the set level until manually changed or the speaker is powered off.
VOICE ASSISTANT: Press the Voice Assistant/Call (10) Button to activate the voice assistant on your device.
CHARGING DEVICES: Connect cable to device, then to either the USB-A Charge Out Port (17) or USB-C Charge In/Out Port (18). Device will automatically begin charging. Device should provide indication that charging has begun.
NOTE: For best results, use the cable provided with your device.
NOTE: When the speaker's battery level drops below 25% (red LED), the unit may power off while charging devices.
NOTE: Devices can be charged while speaker is powered off.
NOTE: When the speaker's battery level falls below 10%, charge out capability will be disabled until the speaker battery is above 10% charge.
OPERATING INSTRUCTIONS
LOW BATTERY INDICATION: The Red LED on the Battery Status Indicator (2) will flash when battery level drops to approximately 10% and a voice prompt of "Low Battery" will be heard.
NOTE: Audio output volume will be restricted to conserve battery power and other functions when the battery level is below 10%.
BROADCAST: After a Bluetooth® connection is established, additional MODbox™ Jobsite Speakers can be connected as Satellite speakers:
- Press the Broadcast Button (13) on the Bluetooth ^® connected speaker. This will be your Source speaker. The Broadcast LED Indicator (14) will flash white and a voice prompt of "Syncing" will be heard.
NOTE: Syncing mode will remain active for 5 minutes. To reactivate, press and hold the Broadcast Button (13) for 2 seconds.
-
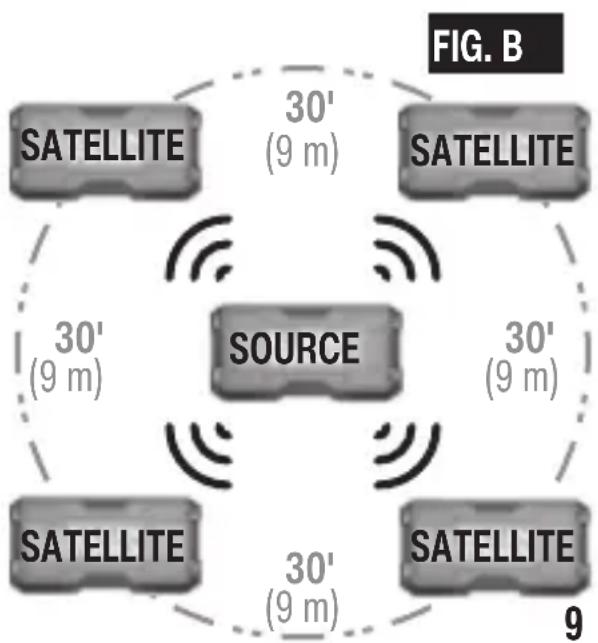
Power on the MODbox™ Jobsite Speakers to serve as Satellite speakers. For optimal performance, link no more than four Satellite speakers (five speakers in total, FIG. B).
-
Press the Broadcast (13) Button once on each Satellite speaker to enter Broadcast syncing mode. The Broadcast LED Indicator (14) will flash white and a voice prompt of "Syncing" will be heard.
NOTE: Bluetooth® connections on Satellite speakers must be disconnected to enter Broadcast mode.
NOTE: Bluetooth ^® signal on Satellite speakers will not be searchable or pairable while in Broadcast mode.
- Upon successful connection, the Broadcast LED Indicator (14) will turn solid green and a voice prompt of "Synced" will be heard.
NOTE: The volume of the Satellite speakers will initially match that of the Source speaker by default. Individual Satellite speaker volume can then be adjusted independently. However, if the Source speaker's volume is later adjusted, the volume of all Satellite speakers will automatically reset to match the Source speaker.
- To disconnect satellite speakers, press the Broadcast Button (13) once on each satellite speaker. A voice prompt of "Broadcast off" will be heard.
NOTE: The maximum effective range between speakers is 30' (9 m), however this range may be impacted by physical barriers or electromagnetic interference.
flowchart
graph TD
    A["SATELLITE"] --> B["SOURCE"]
    B --> C["SATELLITE"]
    C --> D["SATELLITE"]
    D --> E["SATELLITE"]
    E --> F["SATELLITE"]
    F --> G["SATELLITE"]
    G --> H["SATELLITE"]
    H --> I["SATELLITE"]
    I --> J["SATELLITE"]
    J --> K["SATELLITE"]
    K --> L["SATELLITE"]
    L --> M["SATELLITE"]
    M --> N["SATELLITE"]
    N --> O["SATELLITE"]
    O --> P["SATELLITE"]
    P --> Q["SATELLITE"]
    Q --> R["SATELLITE"]
    R --> S["SATELLITE"]
    S --> T["SATELLITE"]
    T --> U["SATELLITE"]
    U --> V["SATELLITE"]
    V --> W["SATELLITE"]
    W --> X["SATELLITE"]
    X --> Y["SATELLITE"]
    Y --> Z["SATELLITE"]
    Z --> AA["SATELLITE"]
    AA --> AB["SATELLITE"]
    AB --> AC["SATELLITE"]
    AC --> AD["SATELLITE"]
    AD --> AE["SATELLITE"]
    AE --> AF["SATELLITE"]
    AF --> AG["SATELLITE"]
    AG --> AH["SATELLITE"]
    AH --> AI["SATELLITE"]
    AI --> AJ["SATELLITE"]
    AJ --> AK["SATELLITE"]
    AK --> AL["SATELLITE"]
    AL --> AM["SATELLITE"]
    AM --> AN["SATELLITE"]
    AN --> AO["SATELLITE"]
    AO --> AP["SATELLITE"]
    AP --> AQ["SATELLITE"]
    AQ --> AR["SATELLITE"]
    AR --> AS["SATELLITE"]
    AS --> AT["SATELLITE"]
    AT --> AU["SATELLITE"]
    AU --> AV["SATELLITE"]
    AV --> AW["SATELLITE"]
    AW --> AX["SATELLITE"]
    AX --> AY["SATELLITE"]
ENGLISH
OPERATING INSTRUCTIONS
MOUNTING OPTIONS:
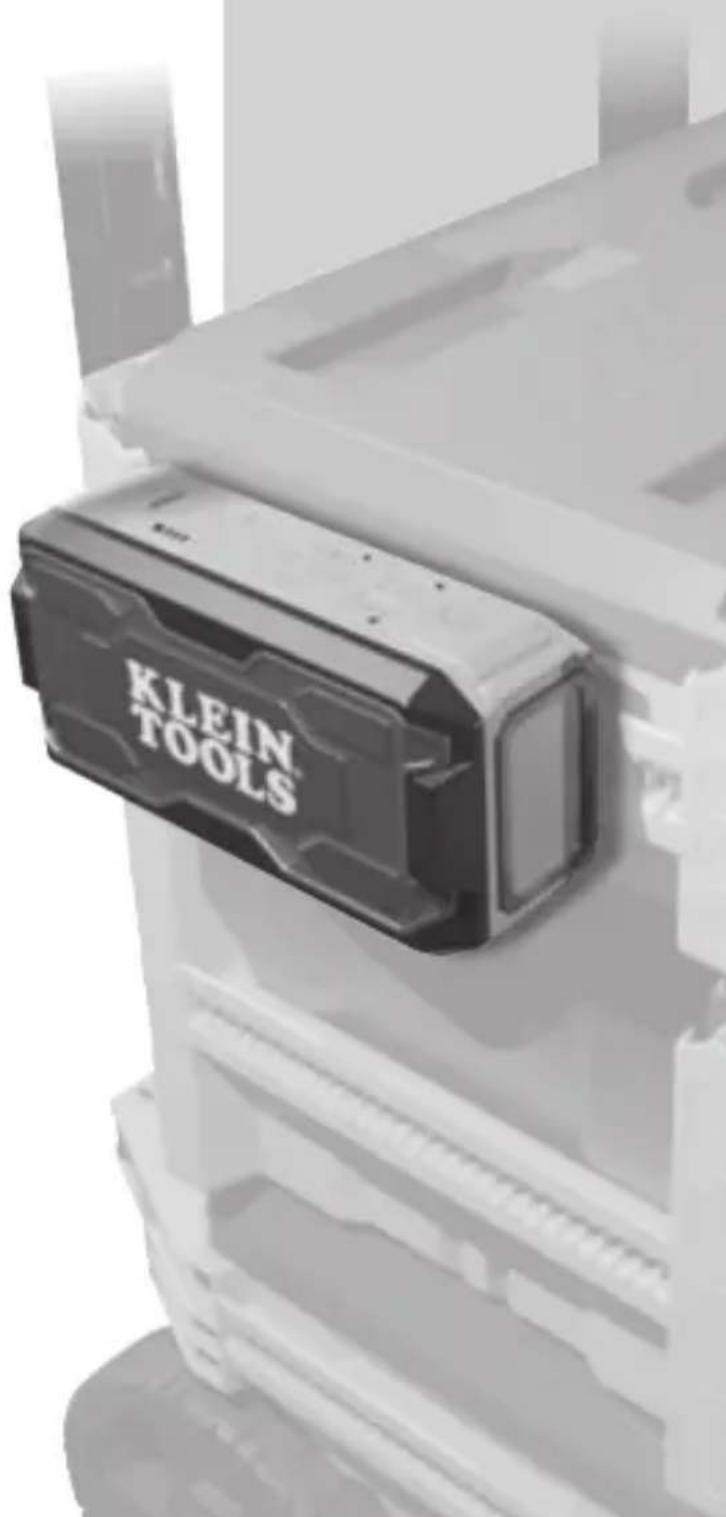
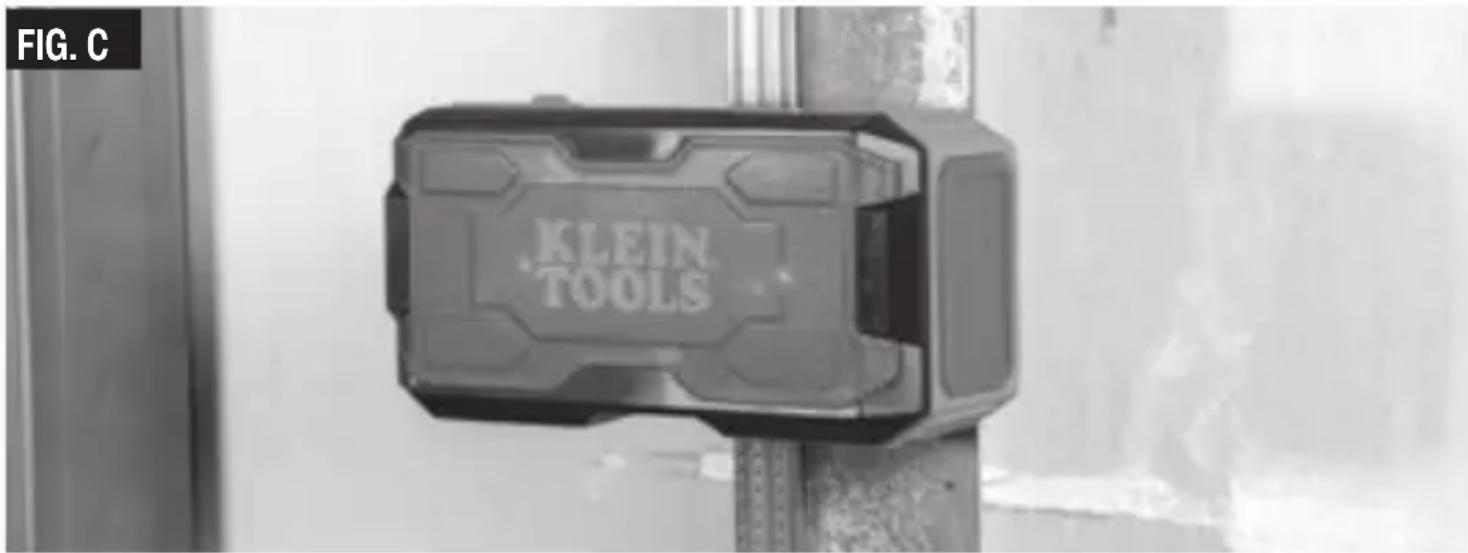
- Securely mount speaker to a ferrous surface via the built-in Magnets (15) on the back of the unit (FIG. C).
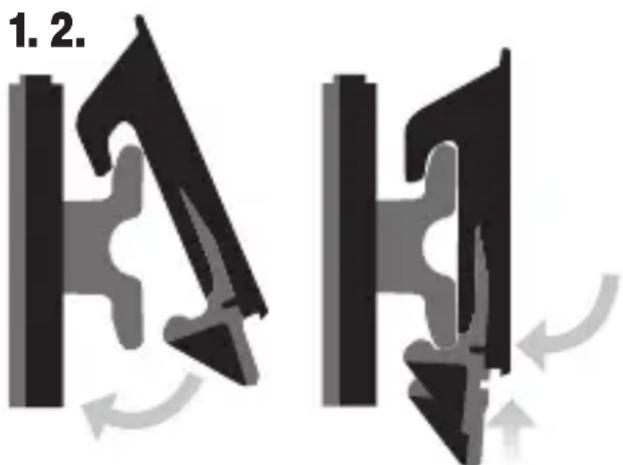
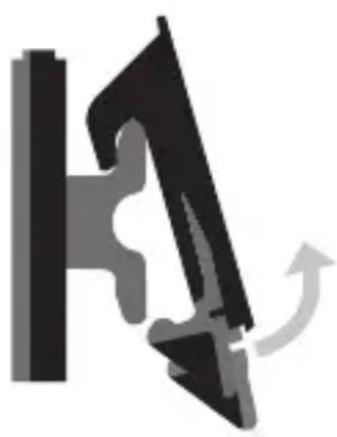
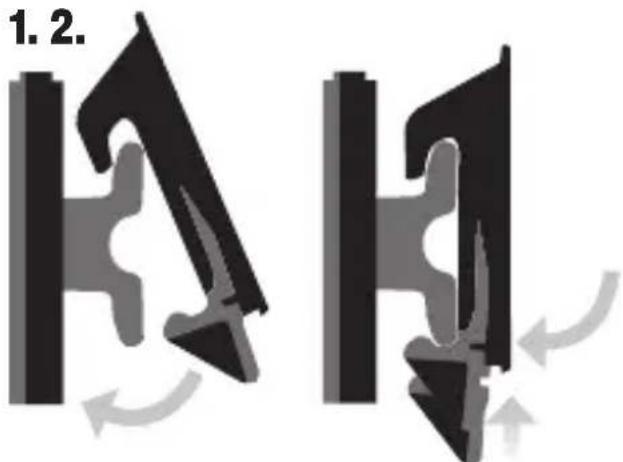
- Single-handed Latch (16) operation securely attaches the speaker to a MODbox™ rail (FIG. D).
DO NOT mount to electrical equipment.
text_image
FIG. C .KLEIN TOOLSFIG. D
ATTACH REMOVE
text_image
1.2.10
natural_image
Abstract 3D diagram with arrow and curved arrow, no text or symbols present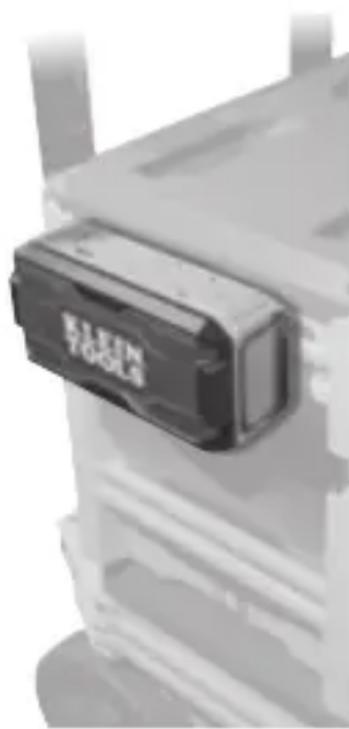
natural_image
Close-up of a black rectangular electronic device with 'YOUN' branding, mounted on a white shelf (no readable text beyond label)COMPLIANCE
FCC COMPLIANCE
This device complies with part 15 of the FCC Rules. Operation is subject to the following two conditions: (1) this device may not cause harmful interference, and (2) this device must accept any interference received, including interference that may cause undesired operation.
NOTE: The grantee is not responsible for any changes or modifications not expressly approved by the party responsible for compliance. Such modifications could void the user's authority to operate the equipment.
This equipment has been tested and found to comply with the limits for a Class B digital device, pursuant to part 15 of the FCC Rules. These limits are designed to provide reasonable protection against harmful interference in a residential installation. This equipment generates, uses and can radiate radio frequency energy and, if not installed and used in accordance with the instructions, may cause harmful interference to radio communications. However, there is no guarantee that interference will not occur in a particular installation.
If this equipment does cause harmful interference to radio or television reception, which can be determined by turning the equipment off and on, the user is encouraged to try to correct the interference by one or more of the following measures:
- Reorient or relocate the receiving antenna.
- Increase the separation between the equipment and receiver.
- Connect the equipment into an outlet on a circuit different from that to which the receiver is connected.
- Consult the dealer or an experienced radio/TV technician for help.
- Reorient or relocate the receiving antenna.
- Increase the separation between the equipment and receiver.
- Connect the equipment into an outlet on a circuit different from that to which the receiver is connected.
- Consult the dealer or an experienced radio/TV technician for help.
IC NOTICE TO CANADIAN USERS:
This device contains license-exempt transmitter(s)/receiver(s) that comply with Innovation, Science and Economic Development Canada's license-exempt RSS(s). Operation is subject to the following two conditions: (1) This device may not cause interference.(2) This device must accept any interference, including interference that may cause undesired operation of the device.
This device complies with RSS-247 of Industry Canada. Operation is subject to the condition that this device does not cause harmful interference. CAN ICES-003 (B) / NMB-003 (B).
SAR NOTICE:
This device meets the FCC and ISED radiation exposure requirements set forth for an uncontrolled environment. The requirements set a SAR limit of 1.6 W/kg averaged over one gram of tissue.
ENGLISH
MAINTENANCE
CLEANING: Be sure speaker is turned off and wipe with a clean, dry lint-free cloth. Do not use abrasive cleaners or solvents.
STORAGE: If the speaker is to be left unused for an extended period of time, charge before storing, and recharge periodically during storage, to maintain battery's charging capacity.
WARRANTY
Do not place equipment and its accessories in the trash. Items must be properly disposed of in accordance with local regulations. Please see www.epa.gov/recycle for additional information.
CUSTOMER SERVICE
KLEIN TOOLS, INC.
450 Bond Street Lincolnshire, IL 60069 1-800-553-4676
customerservice@kleintools.com www.kleintools.com
ESPAÑOL
text_image
KLEIN TOOLSESPAÑOL
text_image
Scanned image of a device casing with printed labels and technical specifications, including a logo and warning symbols.DETALLES DE LAS CARACTERÍSTICAS (FIG. A)
text_image
VISTA SUPERIOR 18 1 3 5 6 9 11 12 19 2 4 7 8 14131017 19
text_image
VISTA POSTERIOR 15 15 15 15 16 15text_image
FIG. C KLEIN TOOLSFIG. D
ASEGURAR RETIRAR
text_image
1.2. H H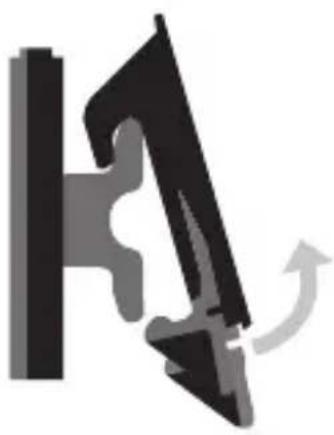
natural_image
Abstract 3D diagram of a mechanical or architectural component with directional arrows, no text or symbols present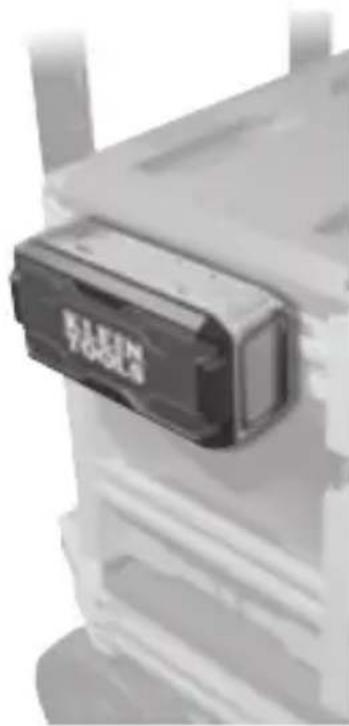
natural_image
Close-up of a black rectangular electronic device mounted on a white shelf (no visible text or symbols)CONFORMIDAD
CONFORMIDAD CON LA NORMATIVA FCC
text_image
KLEIN TOOLSFRANÇAIS
SYMBOLES SUR LE PRODUIT

natural_image
Exterior view of a modern office building (no signage)CARACTÉRISTIQUES DÉTAILLÉES (FIG. A)

text_image
DESSUS 18 1 3 5 6 9 11 12 19 2 4 7 8 14131017 19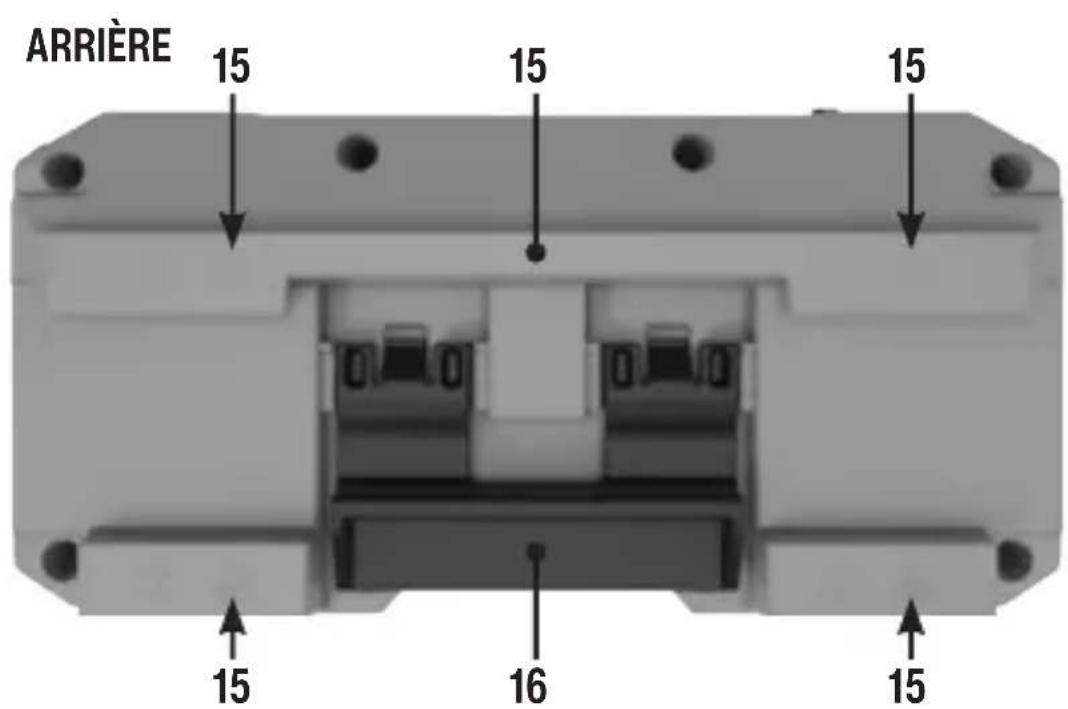
text_image
ARRIÈRE 15 15 15 15 16 15INSTRUCTIONS D'UTILISATION
text_image
FIG. C KLEIN TOOLSFIG. D
ATTACHER RETIRER
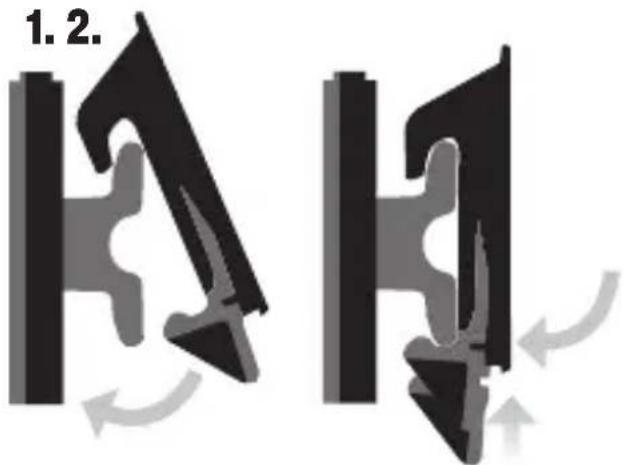
text_image
1.2. H H
natural_image
Abstract geometric shape composed of black and gray blocks forming a stylized 'H' (no text or symbols)