
RCS-100B - Saw Vevor - Free user manual and instructions
Find the device manual for free RCS-100B Vevor in PDF.


| Product type | Cordless circular saw |
| Brand | Vevor |
| Model | RCS-100B |
| Voltage | 14.8 V |
| Power | 3.6 - 150 W |
| Variable speed | 800 / 950 / 1100 / 1250 / 1400 rpm |
| Battery capacity | 2500 mAh (Li-ion) |
| Charging time | 120 minutes |
| Charging current | 2 A |
| Motor | High-torque servo micro-motor |
| Integrated lighting | LED, activation by long press of 3 s |
| Blade guard | Foldable blade guard |
| Lubrication | Via Kinfer oiler, every 30-40 hours |
| Blade sharpening | Integrated grinding wheel, performed at minimum speed |
| Blade and grinding wheel replacement | Possible with provided wrenches, battery must be removed |
| Weight | Approximately 2 kg (estimate) |
| Dimensions (L x W x H) | Approximately 300 x 150 x 200 mm (estimate) |
| Operating temperature | -10 °C to 45 °C |
| Operating humidity | ≤ 85% RH |
| Warranty | 2 years, free repair excluding human damage |
| Certifications | T/ZZB 0788-2018, EMC/LVD/MD |
| Box contents | Machine, 2 batteries, charger, grinding wheel, oil, wing key, hex key, abrasive paper, certificate, instructions |
Frequently Asked Questions - RCS-100B Vevor
User questions about RCS-100B Vevor
0 question about this device. Answer the ones you know or ask your own.
Ask a new question about this device
Download the instructions for your Saw in PDF format for free! Find your manual RCS-100B - Vevor and take your electronic device back in hand. On this page are published all the documents necessary for the use of your device. RCS-100B by Vevor.
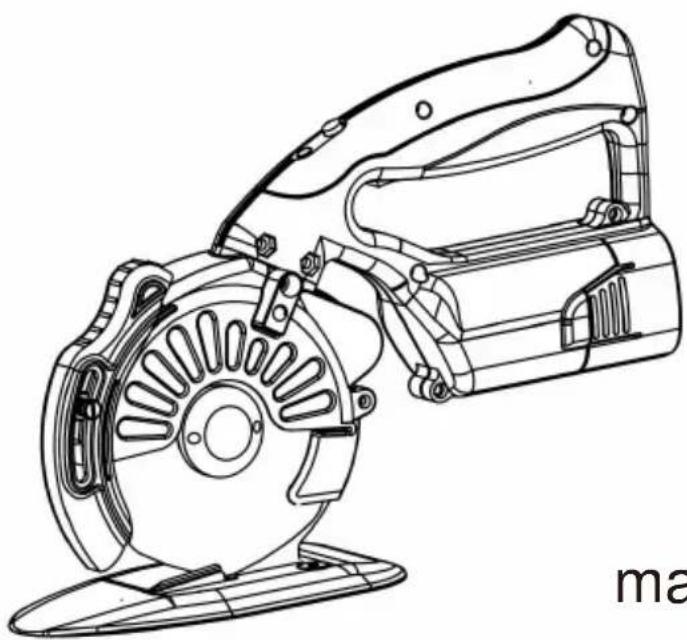
USER MANUAL RCS-100B Vevor
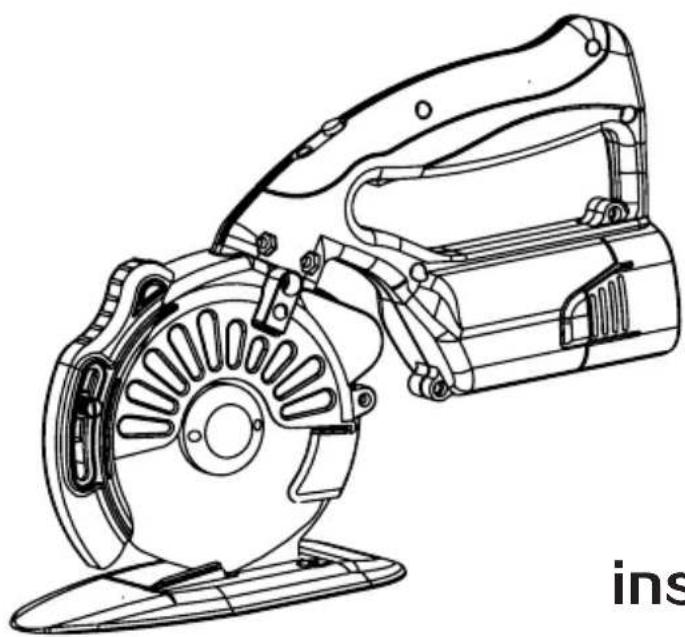
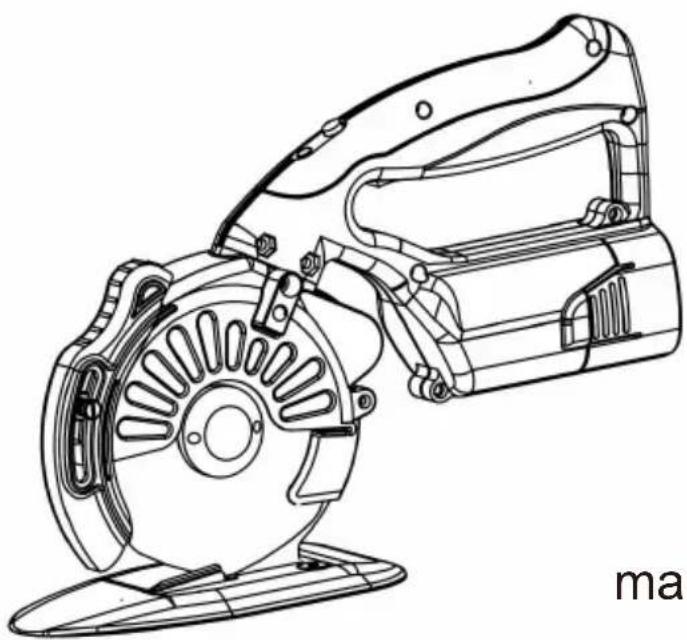
DDR CUTTING MACHINE RCS-100B/110B/125B
natural_image
Technical line drawing of a mechanical device with no visible text or symbolsinstruction manual
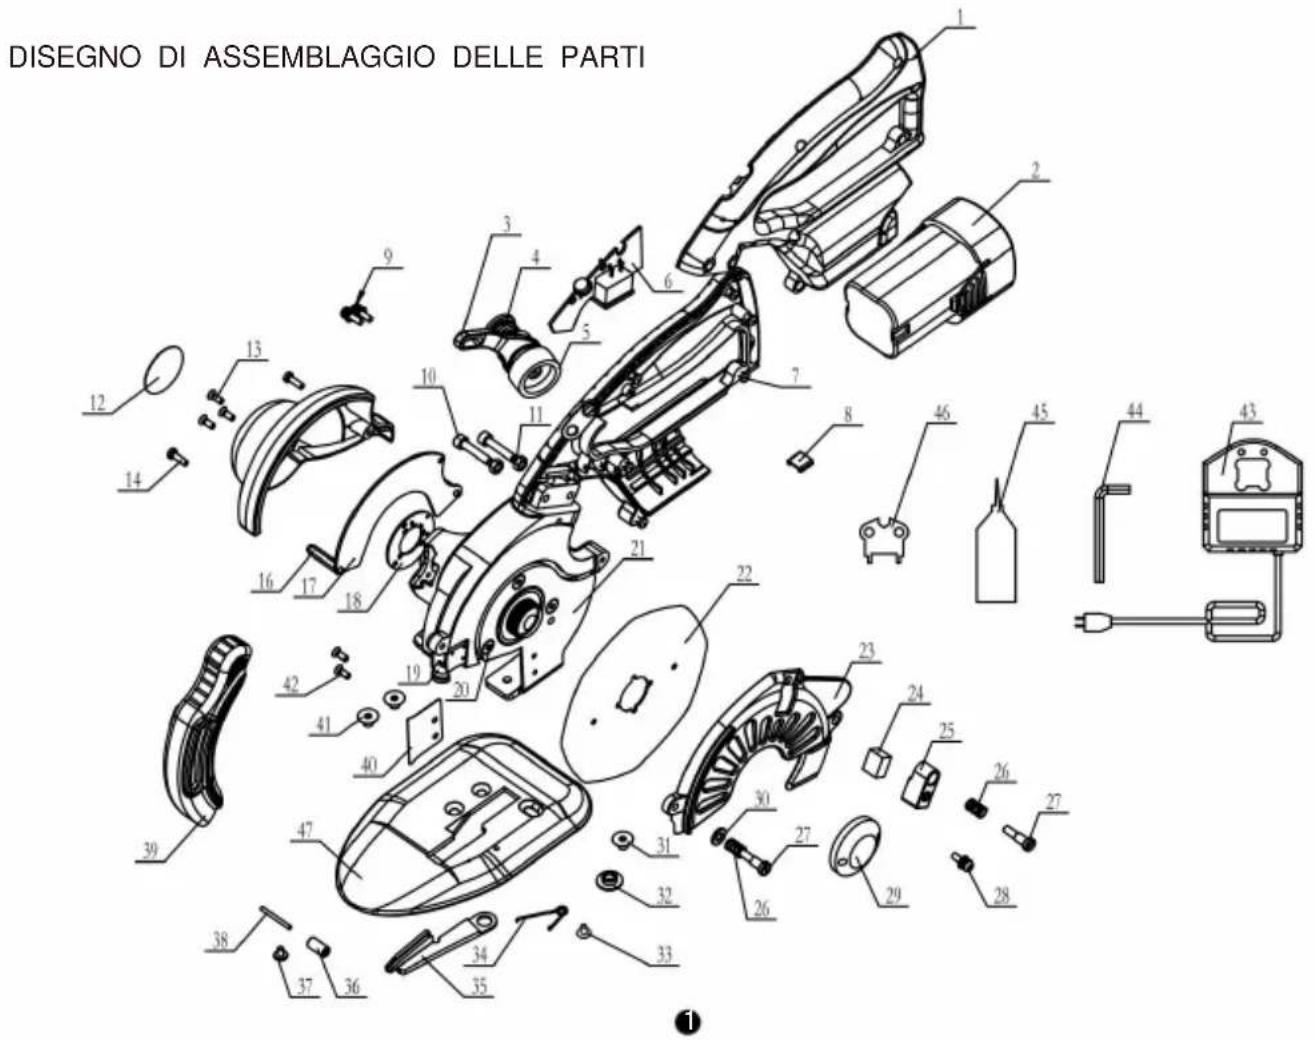
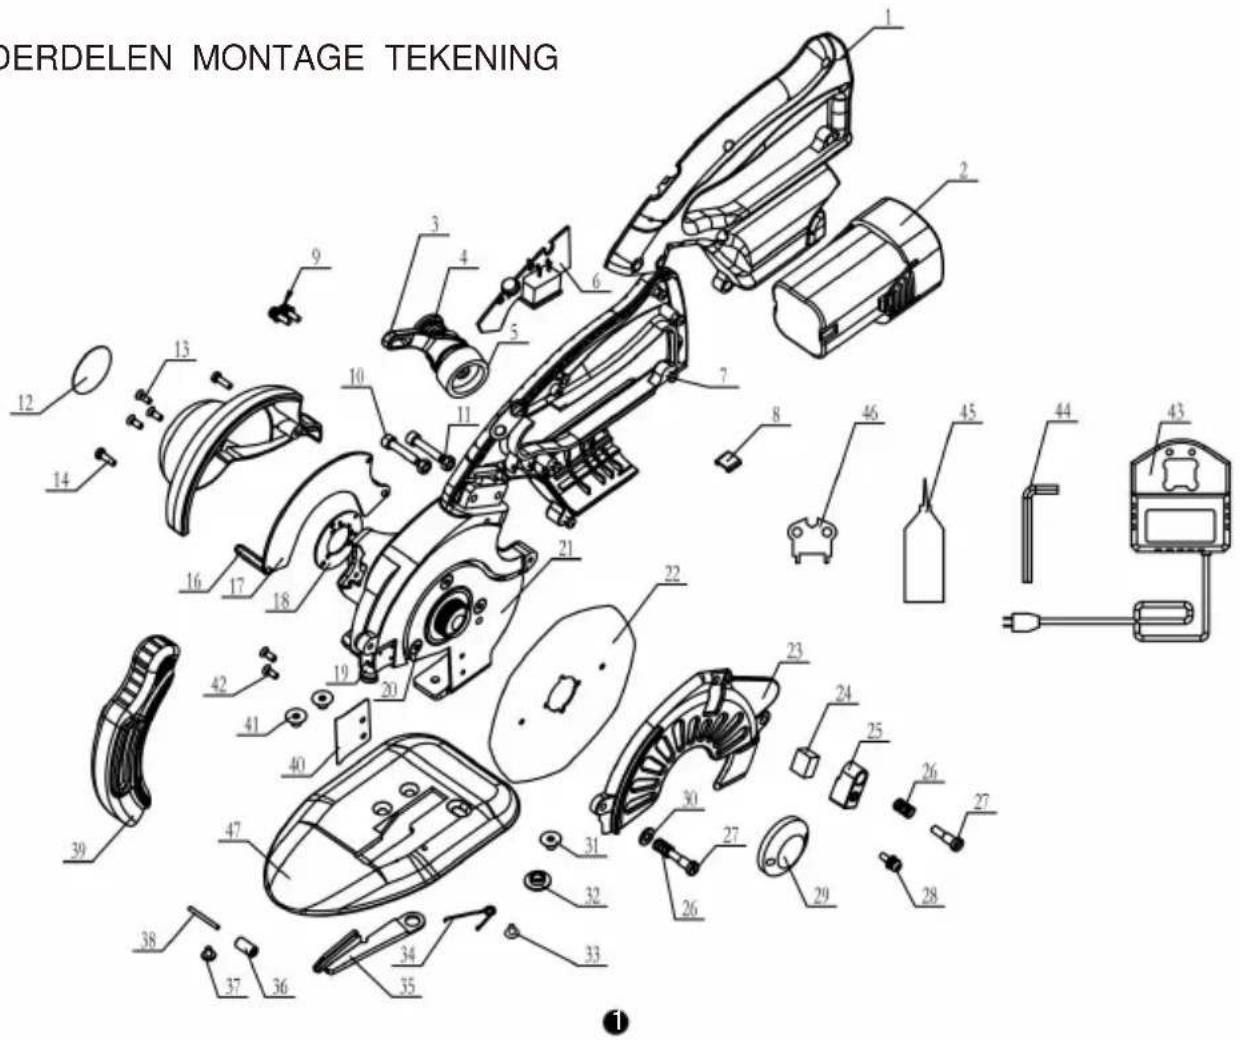
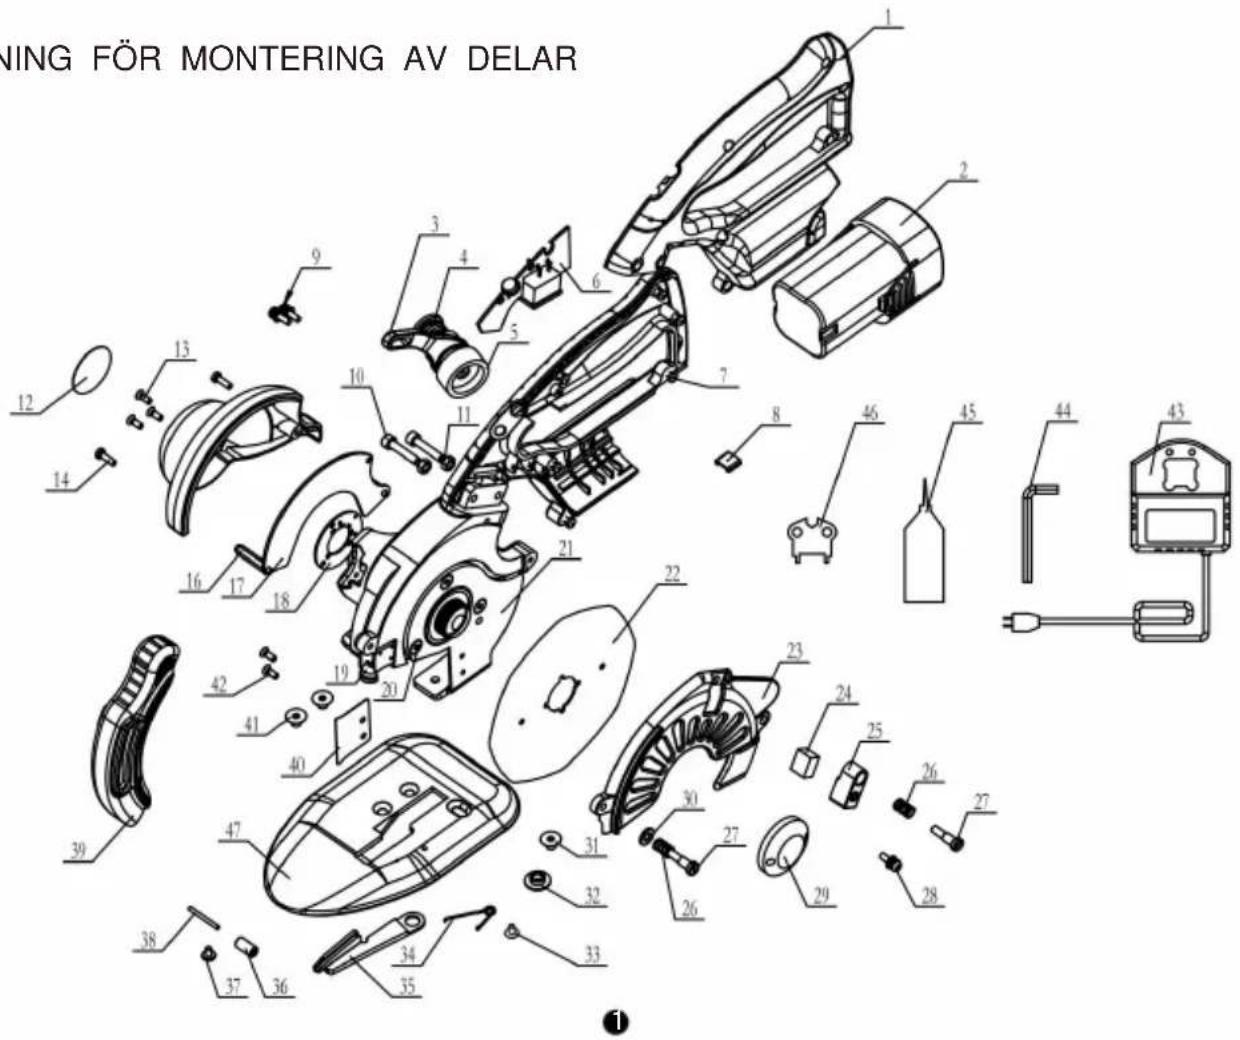
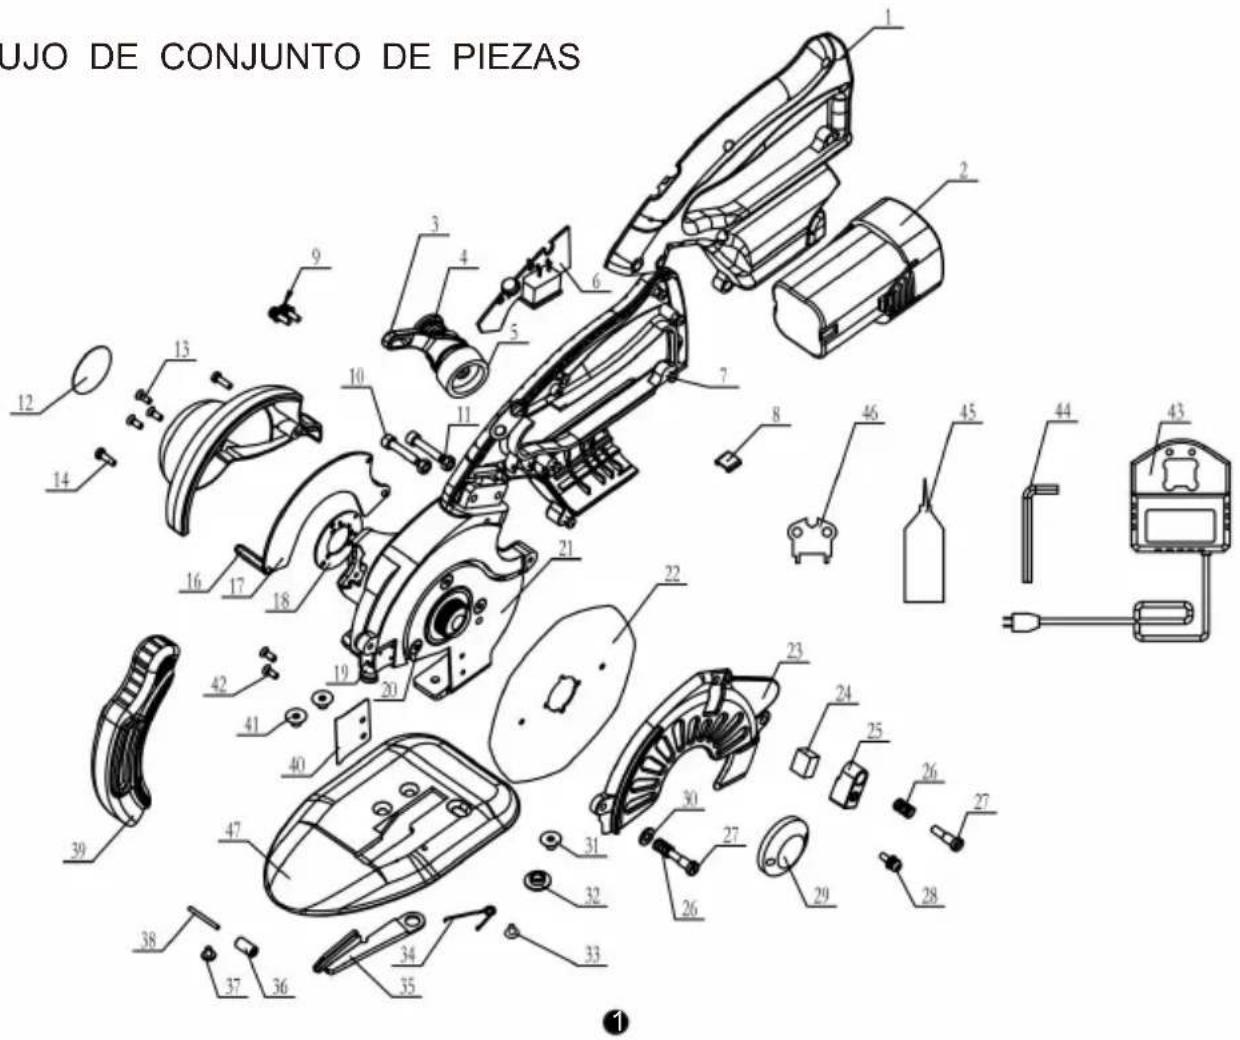
PARTS ASSEMBLY DRAWING
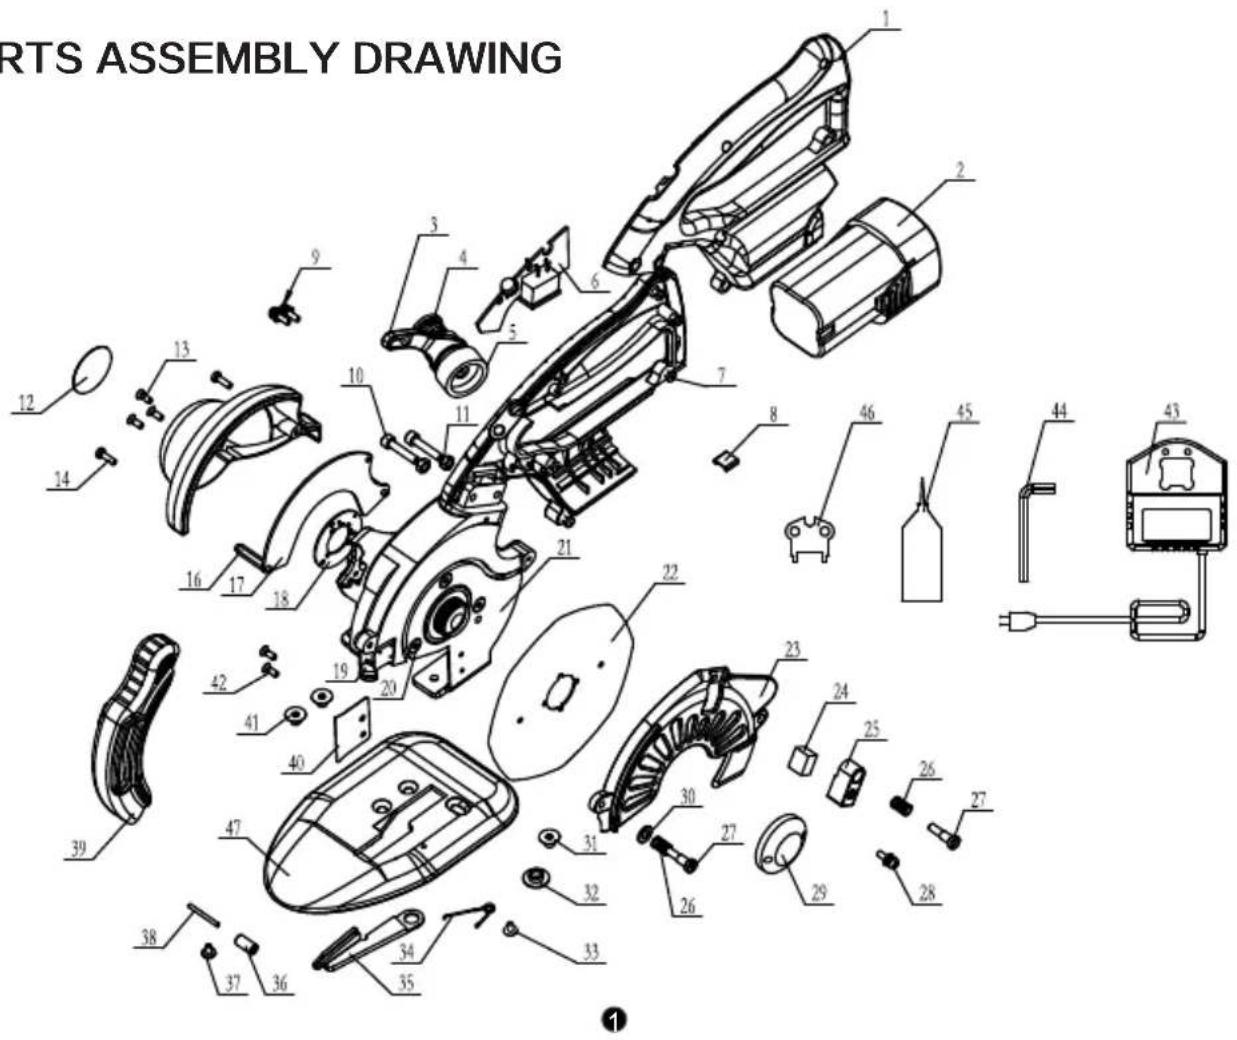
| NO. | NO. NO.Parts Name Parts Name | Parts Name | |||
| 1 | Drive handle | 17 | Main control panel | 32 | Two steps nut |
| 2 | 14.8vLi-ion battery | 18 | Hall panel | 33 | M3*6Step screw |
| 3 | Shapener frame | 19 | LED light | 34 | Under knife spring |
| 4 | Pressure spring | 20 | M4*8Screw | 35 | Under knife |
| 5 | Gring wheel | 21 | Standard | 36 | Roller |
| 6 | Button panel | 22 | Knife | 37 | M3*5Screw |
| 7 | M3*10Self-tapping screw | 23 | Shield | 38 | Roller shaft(rear) |
| 8 | Socket connector Oil felt | 24 | 39 | Knife guard | |
| 9 | M4*12Combination screw | 25 | Kinfer Oiler | 40 | Separator |
| 10 | 4*20Inner hexagon screw | 26 | Pressure spring | 41 | M5*6Inner hexagon screw |
| 11 | M4Nut | 27 | Screw for oiler | 42 | M3*4Sunk screw |
| 12 | Φ28Lable | 28 | M3*10Combination screw | 43 | Charger |
| 13 | M3*8*4Screw | 29 | Blade pressure plate | 44 | Internal Hexagon Wrench |
| 14 | M3*10Screw | 30 | 4.5*9*0.8Terminal plate | 45 | Oiler |
| 15 | Cover | 31 | M5*7Inner hexagon screw | 46 | Butterfly wrench |
| 16 | M3*26Hexagon screw insulated column | 47 | Chassis | ||
PRODUCT BRIEF INTRODUCTION
This product uses the micro large torque servo motor to drive the blade directly, Gearless transmission mechanism, it has energy saving, environmental protection, safety, light, durable and so on advantages, It is a pioneer in the international industry and has completely independent intellectual property rights.
This product implements the standard requirements of T/ZZB 0788-2018 "Direct Drive Round Cutter Cutting Machine", and meets the requirements of EMC/LVD/MD certification.
★Please check the packing list before unpacking
List
| No. | Description | Quantity | No. | Description | Quantity |
| 1 | Servo Cutting Machine | 1SET | 6 | Butterfly wrench | 1PC |
| 2 | Lithium battery | 2SETS | 7 | M3 internal hexagon wrench | 1PC |
| 3 | Charger | 1PC | 8 | Sandpaper | 1PC |
| 4 | Grinding wheel | 1PC | 9 | Certificate of approval | 1PC |
| 5 | Lubricating oil | 1PC | 10 | Instructions | 1PC |
Parameter list
| Model | voltage | Power | Speed | Battery capacity | Charging time | Charging Current |
| RCS-100B | 14.8V | 3.6-150W | 800\950\1100\1250\1400RPM | 2500mAh | 120minutes | 2A |
| RCS-110B | 14.8V | 3.6-150W | 800\950\1100\1250\1400RPM | 2500mAh | 120minutes | 2A |
| RCS-125B | 14.8V | 3.6-180W | 800\950\1100\1250\1400RPM | 2500mAh | 120minutes | 2A |
INSTRUCTIONS
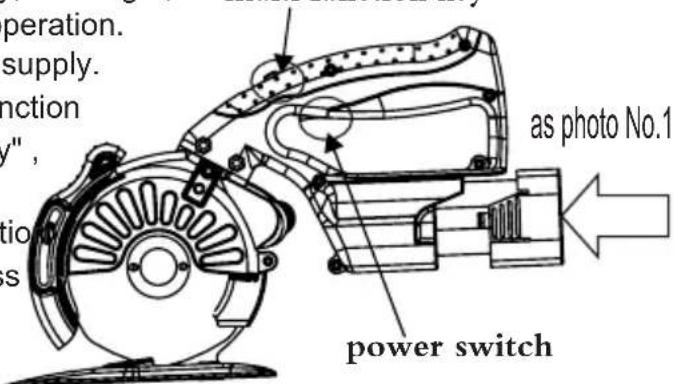
Step1 lithium battery installation: Before installing the lithium battery, please keep the power switch in the "O" position and install the lithium battery into the battery slot of the cutting machine. Please pay attention to the insertion direction of the battery, Battery shrapnel lock, as shown in picture 1
Step2Power on: Switch to "—" closed power supply, Red Light; double-click "multi function key", round knife 800rpm operation.
Step3Power off: Switch to "O", disconnect power supply.
Step4Adjust Speed : when running, Click "multi funct key",speed can be carried out. Click "multi function key", circulate speed within 800/950/1100/1250/1400rpm
Step5Turn on/off: the LED lights. Press multi-function button for 3 seconds to turn on the LED lamp, and press for 3 seconds to turn off the LED lamp.
Step6:Cutting.: First let the power supply in the closed state, pull the knife protector to the appropriate position, start the cutting knife, adjust to the appropriate speed, cutting operation. When cutting, the body part should be removed from the blade so as not to be damaged.
Step7Lithium battery charging: Insert the charger into the appropriate power socket, the green light will be on, and the lithium battery will be inserted into the charging tank in the prescribed direction. After 120 minutes of charging, the charger will be charged and the power supply will be unplugged.
Guide for replacement of blades and grinding wheels
Important tips: Before changing blades or grinding wheels, the lithium batteries must be removed to ensure that the machine is in a power-off state (the red power lamp above the handle goes out), and the replacement operation is strictly prohibited under the condition of power-on.
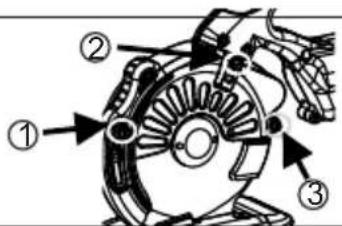
★Replace blade
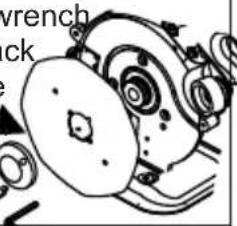
Step1: Remove the three bolts on the shield and remove the shield.
Step 3: Insert the inner hexagonal wrench into the blade and the hole of the rack.
plate, lock the blade, then insert the butterfly wrench into the locking nut loosen the nut counterclockwise, and remove the old blade.
natural_image
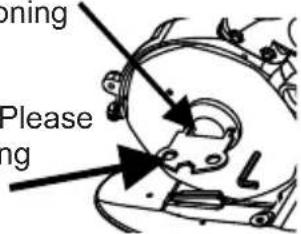
Illustration of a mechanical device with gears and a central component (no text or symbols)Step2: Align the positioning holes on the blade with the positioning holes on the back cushion.
Step 4: Install a new blade. Please note that the blade positioning groove matches the blade positioning tip.
★Replace grinding wheel
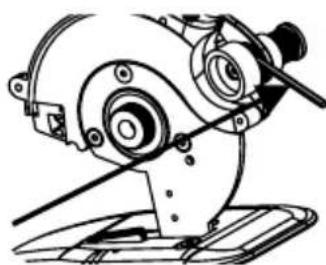
Hold the whel's outer circle with your hand, insert the bolt into the positioning hole on the shaft, lock the wheel, then rotate in the direction indicated by the arrow, remove the old wheel and replace it with a new one.
natural_image
Technical line drawing of a mechanical assembly with gears and levers (no text or symbols)Inspection and maintenance
★Oil injection: In order to ensure the best performance and life of the machine, please always keep the lubricating oil pot in an oily state, about 30-40 hours oil injection once.
★Grinding knife: Make sure the blade is sharp. Start the cutting machine to make the blade run at the lowest speed. The grinding wheel cap of the cutter is grinded by finger light side pressing, so that the grinding wheel and the blade touch slightly, the grinding wheel and the blade rotate synchronously until the edge of the cutter is sharp, the grinding tool is finished.
★Clean grinding wheel oil pollution: When more oil pollution deposits on the contact surface of grinding wheel grinding tool affects the function of grinding tool, it is necessary to clean the oil pollution on the grinding wheel in time, remove the grinding wheel and use grinding paper to clean it. Dismantling
and assembling method of grinding wheel, Please refer to this manual.
★Inspection of installation screw: In order to ensure the best performance and operation safety of the cutting machine, it is necessary to check whether the installation screw is tightened properly. If the screw is loose, it should be tightened again immediately. Otherwise, it will lead to serious accidents and ensure that the cutting machine is clean and dry.
Safety precautions
-
Workplaces should be kept clean and tidy, No sundries..
-
Workplace ambient temperature should be - 10 C - 45 C, and relative humidity should be less than 85%.
-
The blade is sharp. It is strictly forbidden to touch the body. Please use it carefully after the power is turned on, and children are forbidden to approach.
-
When the machine is not working, the cutter protector should be kept in the lowest position.
-
Before using the product, please inspect it visually to ensure the safety device is normal and the installation of screw and blade is safe.
-
If the cutting resistance is large and the cutting is not smooth, the cutting force should not be pushed hard. It is necessary to check whether the blade is sharp and whether the cutting material is too thick or too hard.
-
Before maintenance, please make sure that the battery is removed and the power supply is cut off, and the red power indicator is off.
-
In addition to routine maintenance, replacement of blades and grinding wheels, do not replace any other parts at will.
-
Connect the ground wire to ensure safety.
Notes: The company's products are being improved at any time to adapt to the latest technological progress. Therefore, some parts may be improved without prior notice. For improvement, the specifications contained in this manual may not be changed without prior notice.
Warranty Card
| User's address | |
| Model | |
| Sales Company | |
| Series No. | |
| Sales Company | |
| Fault description | |
| Date of manufacture | |
| Date of purchase |
Quality Service Commitment
This product will be repaired free of charge within two years when it is in normal use and no man-made damage occurs from the date of leaving the factory. Customers can inform the manufacturer by telephone, letter and other modern communication if they have service needs in the process of using the product, and the manufacturer can make processing reply within 24 hours.
Unauthorized maintenance, modification or replacement of services that will not be subject to factory warranty
Machine Translated by Google
MACCHINA DA TAGLIO DDR Modelli RCS-100B/110B/125B
natural_image
Technical line drawing of a mechanical device with a circular base and mounting bracket (no text or symbols)Machine Translated by Google
Machine Translated by Google
Machine Translated by Google
Machine Translated by Google
ISTRUZIONI
Machine Translated by Google
natural_image
Technical line drawing of a mechanical assembly with gears and levers (no text or symbols)Machine Translated by Google
Scheda di garanzia
Machine Translated by Google
MASZYNA DO CIĘCIA DDR RCS-100B/110B/125B
natural_image
Technical line drawing of a mechanical device with a circular base and mounting bracket (no text or symbols)instrukcja obsługi
Machine Translated by Google
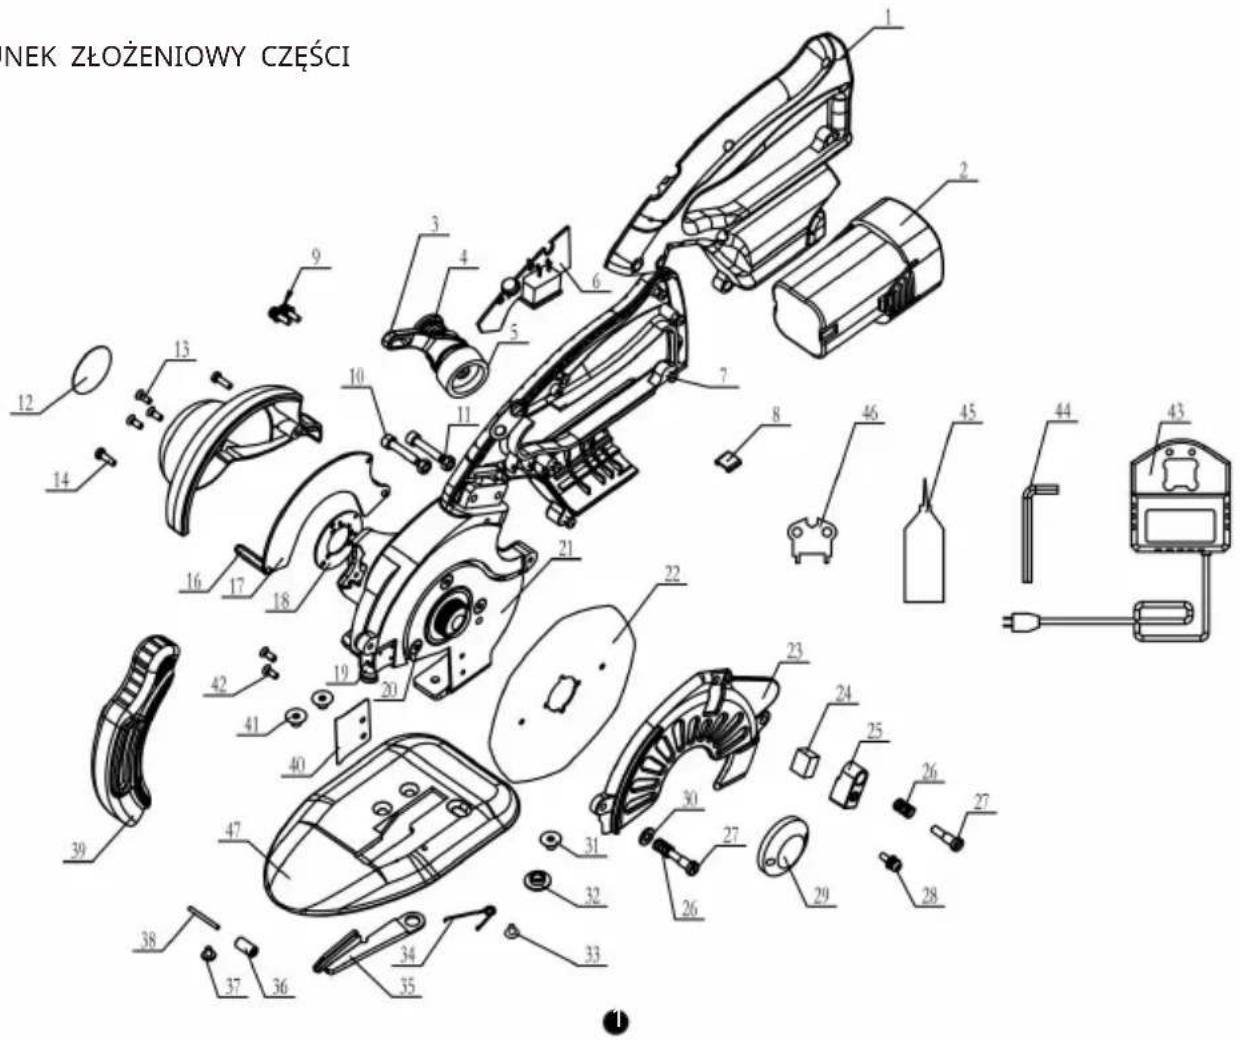
RYSUNEK ZŁOŻENIOWY CZĘŚCI
Machine Translated by Google
Machine Translated by Google
WSTĘP DO SKRÓTU O PRODUKCIE
Machine Translated by Google
INSTRUKCJE
Machine Translated by Google
Wymień ostrze
natural_image
Illustration of a stylized face with abstract patterns and no visible text or symbolsnatural_image
Technical line drawing of a mechanical assembly with gears and levers (no text or symbols)Machine Translated by Google
Karta gwarancyjna
Machine Translated by Google
natural_image
Technical line drawing of a mechanical device with a circular base and mounting bracket (no text or symbols)Bedienungsanleitung
Machine Translated by Google
Machine Translated by Google
Machine Translated by Google
Machine Translated by Google
ANWEISUNGEN
Machine Translated by Google
ÿKlinge ersetzen
natural_image
Mechanical assembly diagram showing a motor with gears and levers (no text or symbols)Machine Translated by Google
Garantiekarte
Machine Translated by Google
MACHINE DE COUPE DDR RCS-100B/110B/125B
natural_image
Technical line drawing of a mechanical device with a circular base and mounting bracket (no text or symbols)Machine Translated by Google
Machine Translated by Google
Machine Translated by Google
PRÉSENTATION DU PRODUIT
Machine Translated by Google
INSTRUCTIONS
Machine Translated by Google
Remplacer la lame
natural_image
Technical line drawing of a mechanical assembly with gears and a base plate (no text or symbols)Machine Translated by Google
Carte de garantie
Machine Translated by Google
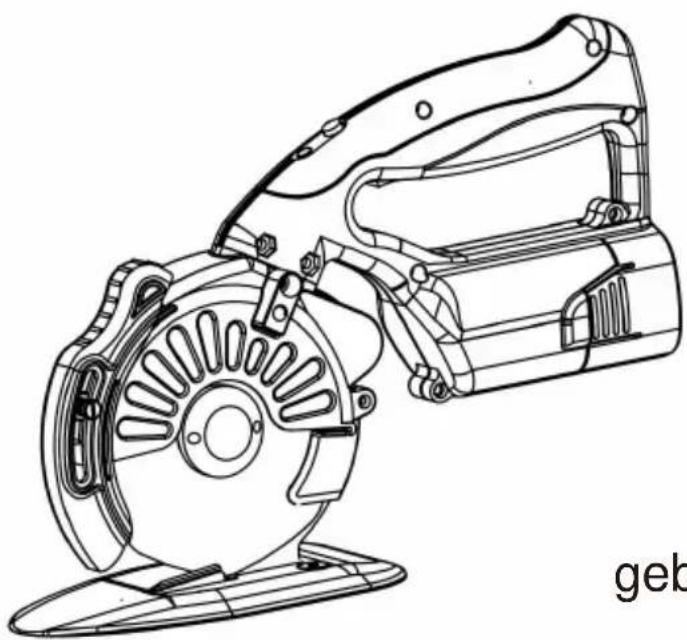
DDR SNIJMACHINE RCS-100B/110B/125B
natural_image
Technical line drawing of a mechanical device with a circular base and mounting bracket (no text or symbols)gebruiksaanwijzing
Machine Translated by Google
ONDERDELEN MONTAGE TEKENING
Machine Translated by Google
Machine Translated by Google
PRODUCTKORTE INLEIDING
Machine Translated by Google
INSTRUCTIES
Machine Translated by Google
ÿ Vervang het mes
natural_image
Mechanical assembly diagram showing a motor with rotating components and a labeled part (no readable text or symbols)Machine Translated by Google
Garantiekaart
Machine Translated by Google
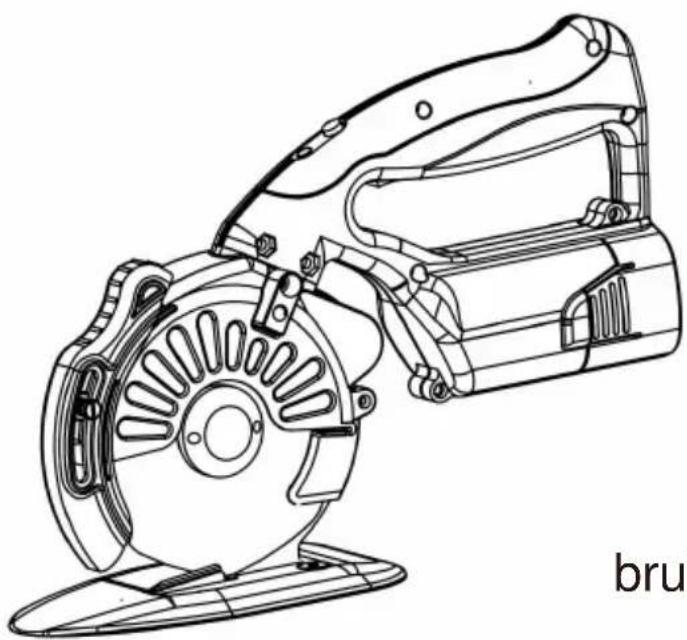
DDR SKÄRMASKIN
RCS-100B/110B/125B
natural_image
Technical line drawing of a mechanical device with a circular base and mounting bracket (no text or symbols)bruksanvisning
Machine Translated by Google
RITNING FÖR MONTERING AV DELAR
Machine Translated by Google
Machine Translated by Google
PRODUKT KORT INTRODUKTION
Machine Translated by Google
INSTRUKTIONER
Machine Translated by Google
ÿ Byt ut bladet
natural_image
Technical line drawing of a mechanical assembly with no visible text or symbolsMachine Translated by Google
Garantikort
Machine Translated by Google
MÁQUINA DE CORTE DDR RCS-100B/110B/125B
natural_image
Technical line drawing of a mechanical device with no visible text or symbolsMachine Translated by Google
DIBUJO DE CONJUNTO DE PIEZAS
Machine Translated by Google
Machine Translated by Google
Machine Translated by Google
INSTRUCCIONES
Machine Translated by Google
Reemplazar cuchilla
natural_image
Technical line drawing of a mechanical assembly with gears and a base plate (no text or symbols)Machine Translated by Google
Tarjeta de garantía



- DDR CUTTING MACHINE RCS-100B/110B/125B
- PRODUCT BRIEF INTRODUCTION
- ★Please check the packing list before unpacking
- INSTRUCTIONS
- Guide for replacement of blades and grinding wheels
- ★Replace blade
- ★Replace grinding wheel
- Inspection and maintenance
- Safety precautions
- Quality Service Commitment
- MACCHINA DA TAGLIO DDR Modelli RCS-100B/110B/125B
- ISTRUZIONI
- MASZYNA DO CIĘCIA DDR RCS-100B/110B/125B
- INSTRUKCJE
- Wymień ostrze
- ANWEISUNGEN
- ÿKlinge ersetzen
- MACHINE DE COUPE DDR RCS-100B/110B/125B
- PRÉSENTATION DU PRODUIT
- Remplacer la lame
- DDR SNIJMACHINE RCS-100B/110B/125B
- ONDERDELEN MONTAGE TEKENING
- PRODUCTKORTE INLEIDING
- INSTRUCTIES
- ÿ Vervang het mes
- DDR SKÄRMASKIN
- RCS-100B/110B/125B
- PRODUKT KORT INTRODUKTION
- INSTRUKTIONER
- ÿ Byt ut bladet
- MÁQUINA DE CORTE DDR RCS-100B/110B/125B
- INSTRUCCIONES
- Reemplazar cuchilla
Brand : Vevor
Model : RCS-100B
Category : Saw