YS-0115B - Braking tool Vevor - Free user manual and instructions
Find the device manual for free YS-0115B Vevor in PDF.

| Product Type | Brake Fluid Bleeding and Replacement Tool |
| Brand | Vevor |
| Model | YS-0115B |
| Power Supply | AC 120V / AC 220V, 60Hz |
| Maximum Power | 24W |
| Max. Flow Rate | 1.3 L/min |
| Working Pressure | 0.6 - 3.0 bar (max. 3.0 bar) |
| Liquid Reservoir | 1L |
| Noise Level | 50 dB |
| Main Functions | Brake bleeding, brake fluid replacement, compatibility with many brands (Mercedes, BMW, Audi, Volkswagen, etc.) |
| Included Accessories | 16 adapters, quick connector, hoses, reservoir |
| Safety | Max pressure 3 bar, wear goggles and gloves, toxic fluid |
| Maintenance and Cleaning | Clean any spilled liquid immediately, do not use steam jet cleaner |
| Technical Support | www.vevor.com/support |
| Warranty | According to terms and conditions of sale, contact manufacturer for returns |
| Electrical Compatibility | 12V battery (conversion cable included) |
| FCC Caution | Complies with Part 15, Class B |
Frequently Asked Questions - YS-0115B Vevor
User questions about YS-0115B Vevor
0 question about this device. Answer the ones you know or ask your own.
Ask a new question about this device
Download the instructions for your Braking tool in PDF format for free! Find your manual YS-0115B - Vevor and take your electronic device back in hand. On this page are published all the documents necessary for the use of your device. YS-0115B by Vevor.
USER MANUAL YS-0115B Vevor
Technical Support and E-Warranty Certificate www.vevor.com/support
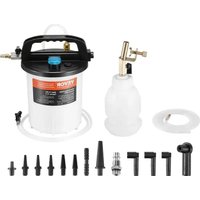
BRAKE BLEEDING SYSTEM
MODEL:YS-0115A/YS-0115B
We continue to be committed to provide you tools with competitive price. "Save Half", "Half Price" or any other similar expressions used by us only represents an estimate of savings you might benefit from buying certain tools with us compared to the major top brands and does not necessarily mean to co all categories of tools offered by us. You are kindly reminded to verify carefully when you are placing an order with us if you are actually Saving Half in comparison with the top major brands.
MODEL:YS-0115A/YS-0115B

NEED HELP? CONTACT US!
Have product questions? Need technical support? Please feel free to contact us:
Technical Support and E-Warranty Certificate www.vevor.com/support
This is the original instruction, please read all manual instructions carefully before operating. VEVOR reserves a clear interpretation of o user manual. The appearance of the product shall be subject to the product you received. Please forgive us that we won't inform you ag there are any technology or software updates on our product.
FCC INFORMATION
CAUTION: Changes or modifications not expressly approved by the party responsible for compliance could void the user's authority to operate the equipment!
This device complies with Part 15 of the FCC Rules. Operation is subject to the following two conditions:
1) This product may cause harmful interference.
2)This product must accept any interference received, including
interference that may cause undesired operation.
WARNING: Changes or modifications to this product not expressly
approved by the party.responsible for compliance could void the user's authority to operate the product.
Note: This product has been tested and found to comply with the limits for a Class B digital device pursuant to Part 15 of the FCC Rules, These limits are designed to provide reasonable protection against harmful interference in a residential installation.
This product generates, uses and can radiate radio frequency energy, and if not installed and used in accordance with the instructions, may cause harmful interference to radio communications. However, there is no guarantee that interference will not occur in a particular installation. If this product does cause harmful interference to radio or television
reception, which can be determined by turning the product off and on, the user is encouraged to try to correct the interference by one or more of the following measures.
- Reorient or relocate the receiving antenna.
·Increase the distance between the product and receiver. - Connect the product to an outlet on a circuit different from that to which the receiver is connected.
- Consult the dealer or an experienced radio/TV technician for assistance.
PRECAUTIONS (SAFETY INSTRUCTIONS)
This instruction manual describes the operation and operation of the brake maintenance device. The risk-free operation of this equipment can only be read if you read the operating instructions and safety instructions completely and s/he follow the instructions contained therein.
Please use and handle the brake maintenance device in a professional man. that complies with safety specifications.Only trained personnel are allowed to change the brake fluid.
For Your Safety
Work performed incorrectly can lead to injury or property damage!
- Operator must have basic structure and theoretical knowledge of automobile braking system.
- Only applicable to bleed DOT fluid in automobile brake system and clutch system. Any other kind of use beyond the scope shall be deemed as not b used as required, which may cause equipment failure and must be prohibited. case of incorrect application, the manufacturer shall not be liable for any dan caused. The risks arising therefrom shall only be borne by the operator.
- For safety reason, the working pressure shall NOT exceed 3 bar, otherwise vehicle brake pipeline and the pipeline of the equipment itself may be damag
-
Brake fluids are toxic and can lead to serious injury!
-
Avoid all contact with brake fluid.
- Wear safety goggles to minimize the risk of injury from splashing.
- Wear suitable, protective gloves to minimize the risk of injury caused by s contact.
- In case of skin contact with brake fluid, wash off immediately with water.
- Remove contaminated clothing.
Do not carry any rags or anything else that has been in contact with brake your clothes.
- Ensure the battery is healthy and the voltage is not lower than 12V.
- After bleed, the vehicle braking system performance shall be road tested.
- Perform self-bleeding on the equipment regularly.
Power supply mode
- Connect the AC-DC adapter to the host for power supply
- Connect the car battery conversion line to the main engine for posupply
PRODUCT DESCRIPTION
Startup Procedure
The startup procedure describes the connection of the brake maintenance dev to the containers with brake fluid, as well as the bleeding of the brake mair device. Bleeding of the device must be carried out with the initial startup procedure.
The safety instructions in the section "For your safety" must be strictly observed. 1. Before the initial startup procedure, make sure that the local voltage is the same as the information on the brake maintenance device's rating plate. The rating plate is located on the back of the brake maintenance device.
Only operate the brake maintenance device when the information matches
- Position the brake maintenance device on a stable, level surface.
- Unscrew the lid from the container.
- If the brake maintenance device is not equipped with a container (e.g. Pro Mini), please place a container in the holder of the brake maintenance device to secure the container against falling out.
- Feed the suction hose and the pressure balance hose down to the base container, One line is used for suction. The other line allows for the excess pressure to flow back into the container.
- To bleed the brake maintenance device, do not connect the adapter to the vehicle, but only to the filling hose and position it over a collection container
- Turn the "ON/OFF switch ON. Press the "Start" button and hold. The pun starts to deliver the brake fluid.
-
Place the adapter over a collection container until the brake fluid flows with any air bubbles.
-
Turn the "ON/OFF" switch OFF and wait for the pressure regulator drops bar. Remove the adapter.
- The brake maintenance device is now ready for use, even when the pre-gauge displays 0 bar The pressurized side of the brake maintenance device should be free of bubbles.
PRODUCT DESCRIPTION (ACCESSORIES LIST)
| ADAPT ERS | ||||
| NO. 1 | 2 3 4 | |||
| SIZE 4 | 3.3MM 51.4MM 47MM | 43.5MM | ||
| APPLIC ATIONS | Compatible with Mercedes-Benz, BMW, Audi, Skoda, Fiat, Lexus, Land Rover, Jaguar, Porsche, Buick, Ford, Chevrolet, Volvo, Citroen, Volkswagen, Peugeot, and Renault. | Compatible with Mitsubishi, JAC, Hyundai, Infiniti, Subaru, Renault, Kia series, and BAIC BJEV. | Compatible with Buick commercial vehicle series | Compatible with Ford Focus, Ford Edge, Audi, and Peugeot |
| ADAPT ERS | ||||
| NO. 5 | 6 7 8 | |||
| SIZE 6 | 7MM 41.5MM 47MM | 42MM | ||
| APPLIC ATIONS | Compatible with Honda series. | Compatible with Toyota series. | Compatible with Buick Ford Fiesta, FAW Mazda, and Cadillac | Compatible with Dodge, Chrysler, and Jeep series |
| NO. | 9 | 10 | 11 | 12 |
| SIZE | 43MM | 34.5MM | 35.4MM | 43MM |
| APPLIC ATIONS | Compatible with Dongfeng Fuxin series. | Compatible with Nissan series. | Compatible with Wuling. | Compatible with Chang'an Suzuki. |
| ADAPT ERS | ||||
| NO. | 13 | 14 | 15 | 16 |
| SIZE | 47MM | 51MM | 75MM | 48MM |
| APPLIC ATIONS | Compatible with Southeast DX5 and DX7. | Compatible with Teana, Qashqai, X-TRAIL (Nissan 2.0 and above) | Compatible with Mitsubishi, Southeast, and Lingyue | Compatible with Tesla. |
| ADAPT ERS | Quick connector | Liquid reservoir (1L) 2PCS | ||
| NO. | 17 | |||
INSTRUCTIONS FOR USE
Exchanging brake fluid
- The safety instructions in the section "For your safety" must be strictly observed.
-
Before starting any work, please note the instructions for the vehicle manufacturer for the maximum filling pressure and any other specific instructio
-
In general, always follow the recommended instructions and guidelines for bleeding the brake system as mandated by the manufacturer for each type of vehicle.
-
Factory settings for the pressure regulator are set to 1.6-2.0 bar. This ens that the brake fluid reservoir will not become deformed and that no leaks occur the secondary cuff. Bleeding or exchanging brake fluid with a lower or higher working pressure can be adjusted using the pressure regulator (Max. 3.0 bar)
-
Install the supplied adapter, or the appropriate adapter according to the instructions on the brake fluid reservoir.
-
Connect the filling hose to the already installed adapter.
-
Supply power to the brake maintenance device and turn the ON/OFF"switc ON.
-
Press the "Start" button and hold until the pressure is at least 1.0 bar, 1 operating pressure can be adjusted with the pressure regulator. With the press built-up successfully, release the "Start" button and the brake maintenance dev will still work. With the pressure built-up unsuccessfully, release the "Start" but and the brake maintenance device will still work.
With the pressure built-up unsuccessfully, release the "Start" button and the b maintenance device will stop working immediately. Possible cause:
1) New brake fluid in the container is not enough.
2) The pressure is set too low by the pressure regulator.
-
Check that the adapter is correctly seated and tight where it connects to brake fluid reservoir. If brake fluid leaks, immediately switch off the brake maintenance device and find the cause.
-
Now bleed the brakes, one-by-one, beginning with the back right brake and finishing with the front left brake. To do this, open the valve on the wheel cylinder. Catch the old brake fluid with the collection bottle. As soon as the bubble-free brake fluid begins to flow out of the drain hole, the valve can be again.
-
Then turn the"ON/OFF"switch OFF, to stop the brake maintenance device working.
-
On the pressure gauge check that the pressure has gone down to 0 bar Note: Usually the brake maintenance device automatically gets rid of the remaining pressure. However, if during the refilling process, the pressure was
regulated lower, there will still be pressure remaining. The pressure does not go down to 0 bar. The pressure regulator must be unloaded first. After turning off device, turn the pressure regulator to the right until the release point for the remaining pressure is reached. The working pressure drops to 0 bar.
9. Uncouple the depressurized filling hose from the adapter. Remove the adaj from the brake fluid reservoir.
10. The brake fluid reservoir is now full to the rim. Using a pipette, remove brake fluid from the brake fluid reservoir until the permissible fill level has been reached (A).
11. Close the brake fluid reservoir.
12. Under battery power supply, if insufficient pressure is found, the battery is to be charged in a timely manner. Interface 9 of the body only supports providing power to the host, not the charging port. To charge, remove the battery and connect the randomly supplied power adapter to the battery charging port for charging.
Important: After completing the bleeding process or exchanging brake fluid, should the operation of the brake or clutch pedal be too long or the pressu behind the operation be to "soft", repeat depressing the pedal several times, time applying stronger pressure to the pedal or clutch. If the situation remain unchanged, the bleeding procedure needs to be carried out again.
Technical Data
| Model | YS-0115A/YS-0115B |
| Voltage | AC120V/ AC220V 60Hz |
| Max Power | 24Watt |
| Max Flow Rate | 1.3LPM |
| Working Pressure | 0.6- 3.0 bar (the device shall not be set to pressure over 3.0 bar) |
| Anti-air | Supported |
| Noise | ≤50dB |
Operating / Device Schematic

- Balance tube
- oil suction pipe
- Oil outlet pipe
- Pressure gauge
- Pressure regulating valve
- Power switch
- Start button
- fuse
- DC power port
Troubleshooting
| Problem | Cause | Countermeasure |
| Pump does not suction, or does not build-up pressure, or build-up pressure not stable. | • Fluid reservoir empty • Pressure regulator fully closed or fully opened up • Kink in suction hose • Air in the hose • Strainer on suction hose | • Change the container • Set the correct working pressure(e.g.2.0 bar). • Remove kink, replace defective hose if necessary |
| No Power | Wiring faulty | • Check if the wiring is loose • Check if the PCB has power output. |
| Pump does not depressurized after filling | Pressure Balance Valve faulty | • Bleed brake maintenance device, as with the startup procedure After use 2.0 bar air |
| source to blow the pressure balance hose | ||
| Brake fluid spilled froPressure regulator | Pressure regulatordefective | Replace pressureregulator O ring. |
| Pressure gaugeneedle shaking | There is air in thepipeline | Refer to the self emptyirmethod of the equipment |
Maintenance and Care
- Before any work is performed on the brake maintenance device, pull out to main plug.
- Never clean the brake maintenance device with a high-pressure steam washer.
- Always keep the brake maintenance device clean. Immediately remove any spilled brake fluid.
Warranty and Liability
In principle our "General Terms of Sale and Delivery Terms" apply. These are available to the end-user/operator since contract signing.Warranty and liability claims for personal injury and property damage are excluded, when one or m the following causes apply:
- Improper use
- Improper startup procedure, operation and maintenance of the brake maintenance device.
- Failure to follow the instructions in the operating manual for the startup procedure, operation and maintenance.
- Unauthorized change of the brake maintenance device.
- Improper repair.
- Catastrophic events caused by exposure to foreign objects and acts of God
- Customer service requests and payment for the return costs will not be honored when they result fr not following the above-mentioned, itemized list of points.
- Before returning the product, please contact the manufacturer.
VEVOR®
TOUGH TOOLS, HALF PRICE
Technical Support and E-Warranty Certificate
www.vevor.com/support
VEVOR®
TOUGH TOOLS, HALF PRICE
www.vevor.com/support
VEVOR®
TOUGH TOOLS, HALF PRICE
elettronica www.vevor.com/support
SISTEMA DI SPURGO DEI FRENI
MODELLO:YS-0115A/YS-0115B
elettronica www.vevor.com/support
VEVOR
TOUGH TOOLS, HALF PRICE
Soporte专业技术o y certificate de garantia
electrónica www.vevor.com/support
SISTEMA DE PURGA DE FRENOS
MODELO:YS-0115A/YS-0115B
Seguimos comprometidos a brindarle herramentas a precios competisos.
www.vevor.com/support
HULP NODIG? NEEM CONTACT MET ONS OP!
garantiecertificaat www.vevor.com/support
VEVOR
TOUGH TOOLS, HALF PRICE
www.vevor.com/support