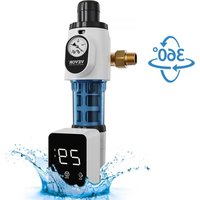
BSK-T4-Q2-G - Water filter pitcher Vevor - Free user manual and instructions
Find the device manual for free BSK-T4-Q2-G Vevor in PDF.


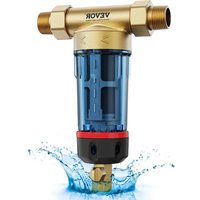
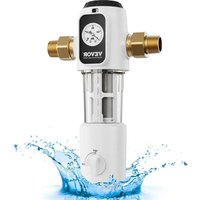
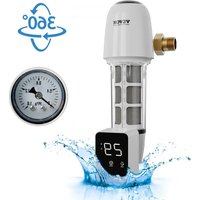
| Product Type | Whole House Pre-filter |
| Brand | Vevor |
| Model | BSK-T4-Q2-G |
| Dimensions (L × D × H) | 151 × 195 × 347 mm |
| Clean Water Flow Rate | 4 T/h |
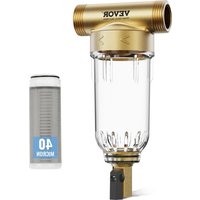
| Filtration Precision | 40 μm |
| Admissible Water Temperature | 5 to 38 °C |
| Admissible Water Pressure | 0.15 MPa to 1 MPa |
| Required Water Quality | Municipal Tap Water |
| Filter Screen Material | Food-grade 316L Stainless Steel |
| Connection | 1" or 3/4" NPT |
| Housing Material | Explosion-proof Transparent Plastic |
| Main Functions | Interception of sediments, rust, impurities; manual scraping; programmable automatic flush |
| Automatic Flush | Yes, adjustable interval from 1 to 99 days, duration 15/30/45/60/90 seconds |
| Manual Flush | Yes, via the scraping button and drain valve |
| Required Installation | By a professional, indoor only |
| Monthly Maintenance | Flush at least once a month; clean the screen if necessary |
| Valve Core Lifespan | 5 years (Q2 models) |
| Included Accessories | Mounting wrench, drain connector, drain hose, Teflon tape, user manual |
| Compliance | WEEE Directive 2012/19/EU; FCC Part 15 |
| Warranty | Electronic warranty certificate at www.vevor.com/support |
Frequently Asked Questions - BSK-T4-Q2-G Vevor
User questions about BSK-T4-Q2-G Vevor
0 question about this device. Answer the ones you know or ask your own.
Ask a new question about this device
Download the instructions for your Water filter pitcher in PDF format for free! Find your manual BSK-T4-Q2-G - Vevor and take your electronic device back in hand. On this page are published all the documents necessary for the use of your device. BSK-T4-Q2-G by Vevor.
USER MANUAL BSK-T4-Q2-G Vevor
Technical Support and E-Warranty Certificate www.vevor.com/support
PRE-FILTER
BSK-T4-F3-N BSK-T4-F3-G
BSK-T4-Q2-N BSK-T4-Q2-G
We continue to be committed to provide you tools with competitive price. "Save Half", "Half Price" or any other similar expressions used by us only represent estimate of savings you might benefit from buying certain tools with us compared top brands and does not necessarily mean to cover all categories of tools offered are kindly reminded to verify carefully when you are placing an order with us actually saving half in comparison with the top major brands.
MODEL:BSK-T4-F3--N BSK-T4-Q2--N
BSK-T4-F3-G BSK-T4-Q2-G
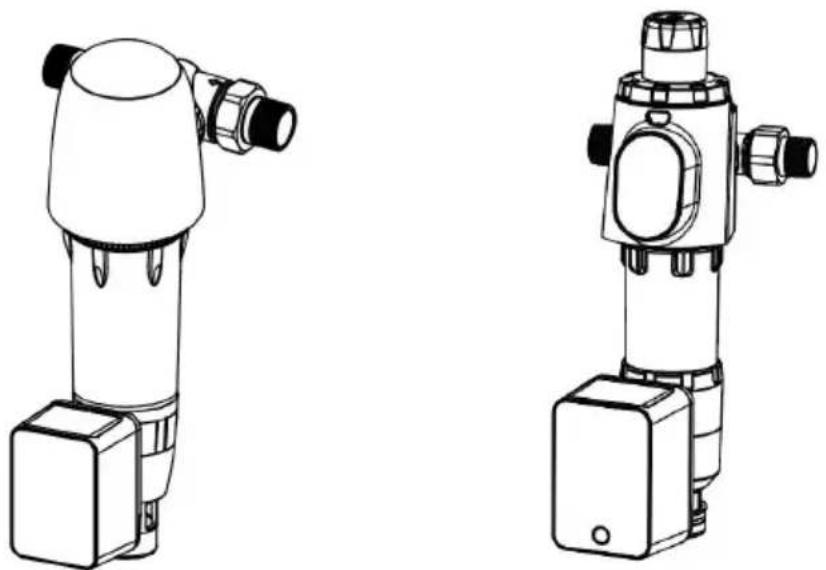
NEED HELP? CONTACT US!
Have product questions? Need technical support? Please feel fr contact us:
Technical Support and E-Warranty Certificate www.vevor.com/support
This is the original instruction, please read all manual instruction carefully before operating. VEVOR reserves a clear interpretation user manual. The appearance of the product shall be subject to product you received. Please forgive us that we won't inform you there are any technology or software updates on our product.
Product Introduction
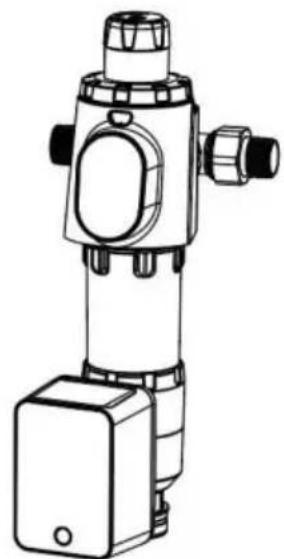
The Whole House Pre-filter is mainly used to intercept contaminants such as granules, impurities, sediment, rust, floating objects and so on. And can also provide positive protection for the downstream pipeline, water purifier, water heater, wall hung gas boiler, washing machine, shower other terminal water equipment.
PRODUCT CHARACTERISTICS
- Using 316L food grade stainless steel precision mesh;
- The core components are specially made of imported materials, with strong pressure resistance, safety and reliability;
- Special explosion-proof transparent outer cover, visualization of the use effect, visualization of the sewage effect, more convenient to use;
- Clean sewage disposal is more convenient by a few gentle rotations, resulting in the cleanse of the filter mesh and filter bottle.
- Intelligent timed sewage discharge for easier maintenance.
ATTENTIONS
- The installation, commissioning and maintenance should be carried by professionals.
- The series of products can only be installed at an indoor and dry environment. Please avoid getting close to any heat source; the series products only apply to municipal tap water at 5:40 use do not use for waste water or corrosive liquid.
- When it's installed, please pay attention to whether the direction of marked on the valve body are consistent with the flow direction of th
-
Please make sure that install position has reliable drainage system
-
Depending on the water quality of different locations, please wash filter normally at least once a month.
- In the normal cleaning and maintenance process, please pay attention to the protection of the components.
- BSK-T4-Q2 models suggest replacing the pressure control valve cor within 5 years.
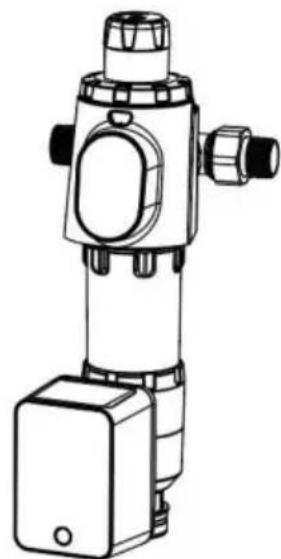
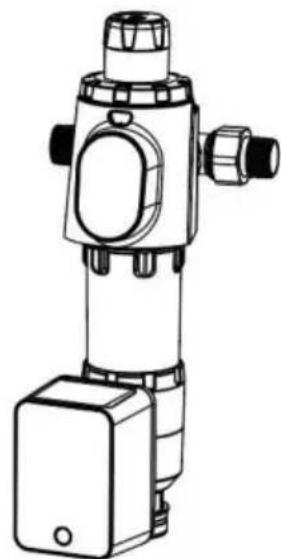
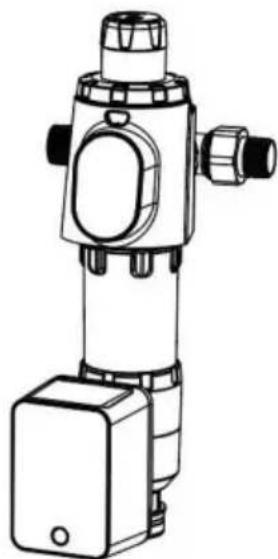
8.Product Example Line Diagram Taking BSK-T4-Q2-G as an Example - Our company provides complete and reliable products. We are not responsible for any product damage or loss of personal injury, property environment resulting from the replacement, installation and setting of a debugging parts of our products without our approval. If you have any questions about our products, please contact us.
CORRECT DISPOSAL

This product is subject to the provision of European Directive 2012/19/EU. The symbol showing a wheelie bin crossed through indicates that the product requires separate refuse collection in the European Union. This applies to the product and all
accessories marked with this symbol. Products marked as such may be discarded with normal domestic waste, but must be taken to a co-point for recycling electrical and electronic devices.
FCC Information
CAUTION: Changes or modifications not expressly approved by the pa responsible for compliance could void the user's authority to operate t equipment!
This device complies with Part 15 of the FCC Rules. Operation is such the following two conditions:
1) This product may cause harmful interference.
2) This product must accept any interference received, including interference that may cause undesired operation.
WARNING: Changes or modifications to this product not expressly approved by the party. Responsible for compliance could void the use authority to operate the product.
Note: This product has been tested and found to comply with the lir a Class B digital device pursuant to Part 15 of the FCC Rules. The are designed to provide reasonable protection against harmful interferer in a residential installation.
This product generates, uses and can radiate radio frequency energy, if not installed and used in accordance with the instructions, may cause harmful interference to radio communications. However, there is no guarantee that interference will not occur in a particular installation. If product does cause harmful interference to radio or television reception which can be determined by turning the product off and on, the user encouraged to try to correct the interference by one or more of the following measures.
- Reorient or relocate the receiving antenna.
- Increase the distance between the product and receiver.
- Connect the product to an outlet on a circuit different from that to the receiver is connected.
- Consult the dealer or an experienced radio/TV technician for assista. This product is subject to the provision of European Directive 2012/19. The symbol showing a wheelie bin crossed through indicates that the product requires separate refuse collection in the European Union. This applies to the product and all accessories marked with this symbol.
Products marked as such may not be discarded with normal domestic waste, but must be taken to a collection point for recycling electrical electronic devices.
TECHNICAL PARAMETERS
| Product Name | Pre-filter | |||
| Product Model | BSK-T4-F3-G | BSK-T4-F3-N | BSK-T4-Q2-G | BSK-T4-Q2-N |
| Connector | 1" or 3/4" | 1" NPT or 3/4" NPT | 1" or 3/4" | 1" NPT or 3/4" NPT |
| Product Sizes | 172*219*397 | 172*219*397 | 151*195*347 | 151*195*347 |
| Clean Water Flow | 8T/H | 4T/H | ||
| Filtration Precision | 40μm | |||
| Applicable Water Temperature | 5°C~38°C | |||
| Applicable Water Pressure | 0.15MPa~1MPa | |||
| Applicable Water | Quality Municipal Tap Water | |||
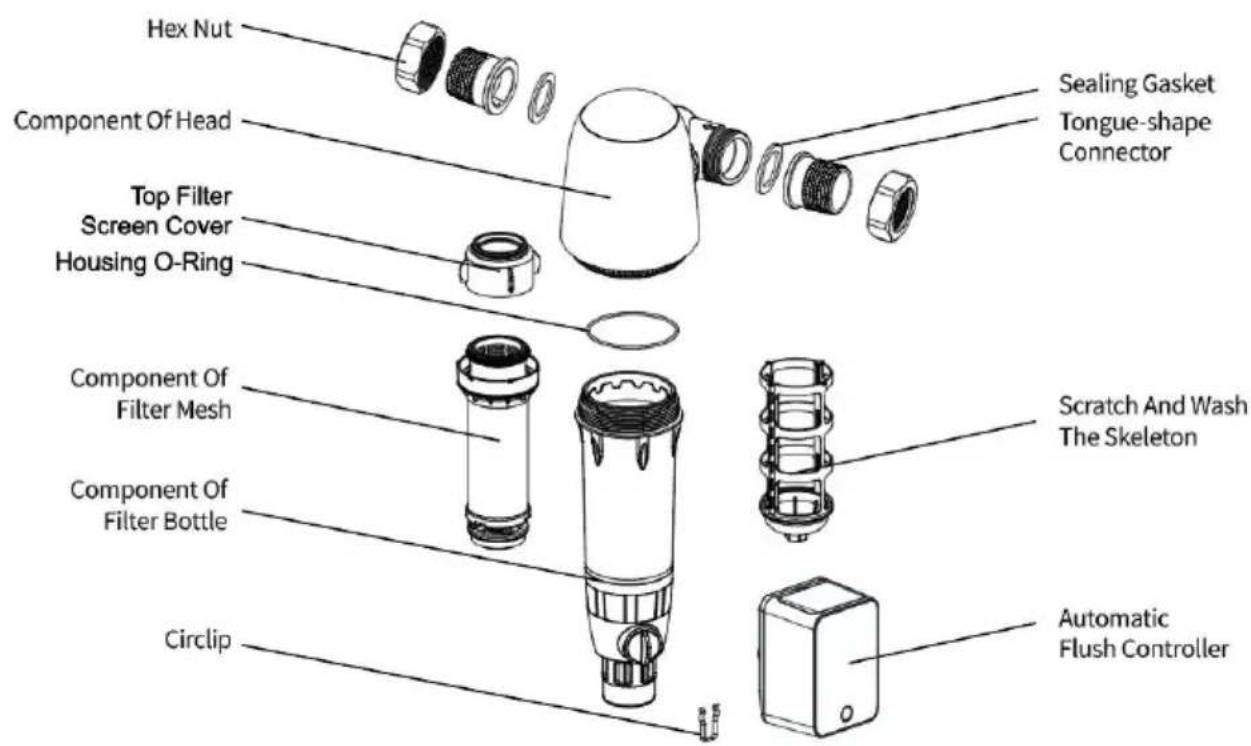
NAME OF EACH COMPONENT
BSK-T4-F3-N/BSK-T4-F3-G
BSK-T4-Q2-N/BSK-T4-Q2-G
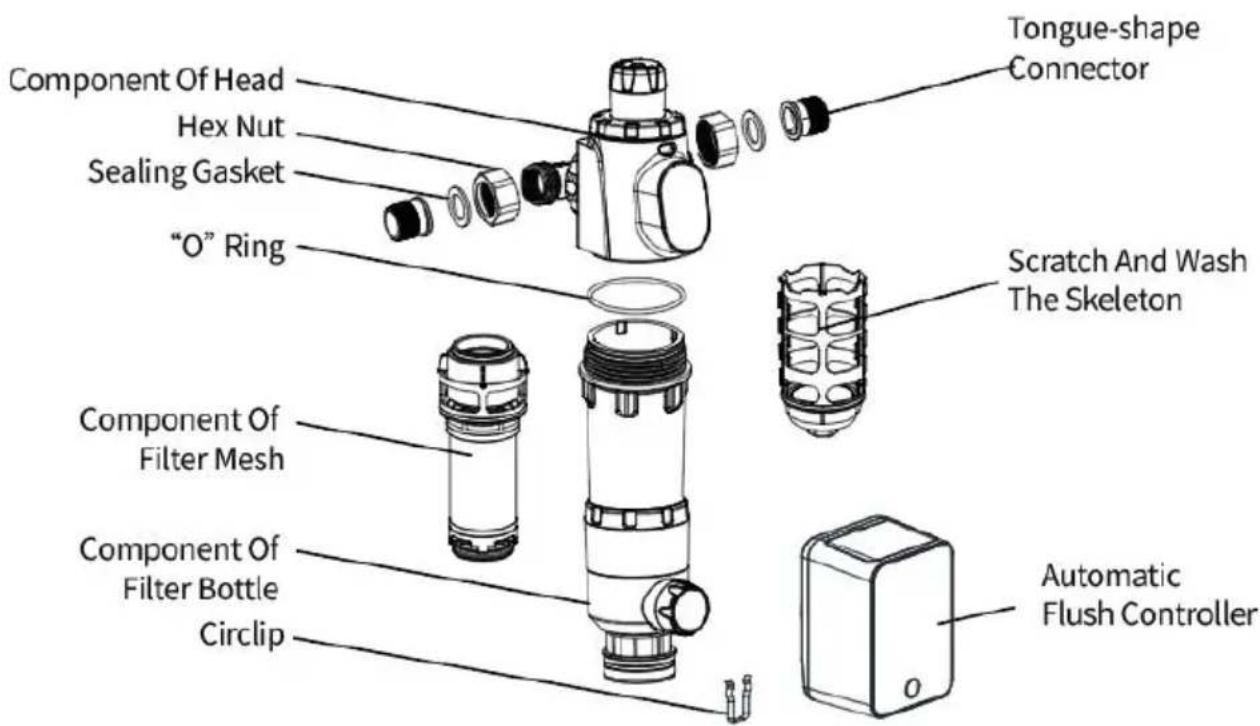
(Note: the decomposition of product structure is for reference o inconsistent with the actual product, it's subject to the actual
TECHNICAL PARAMETERS
① Product Installation Diagram Taking BSK-T4-Q2 as an
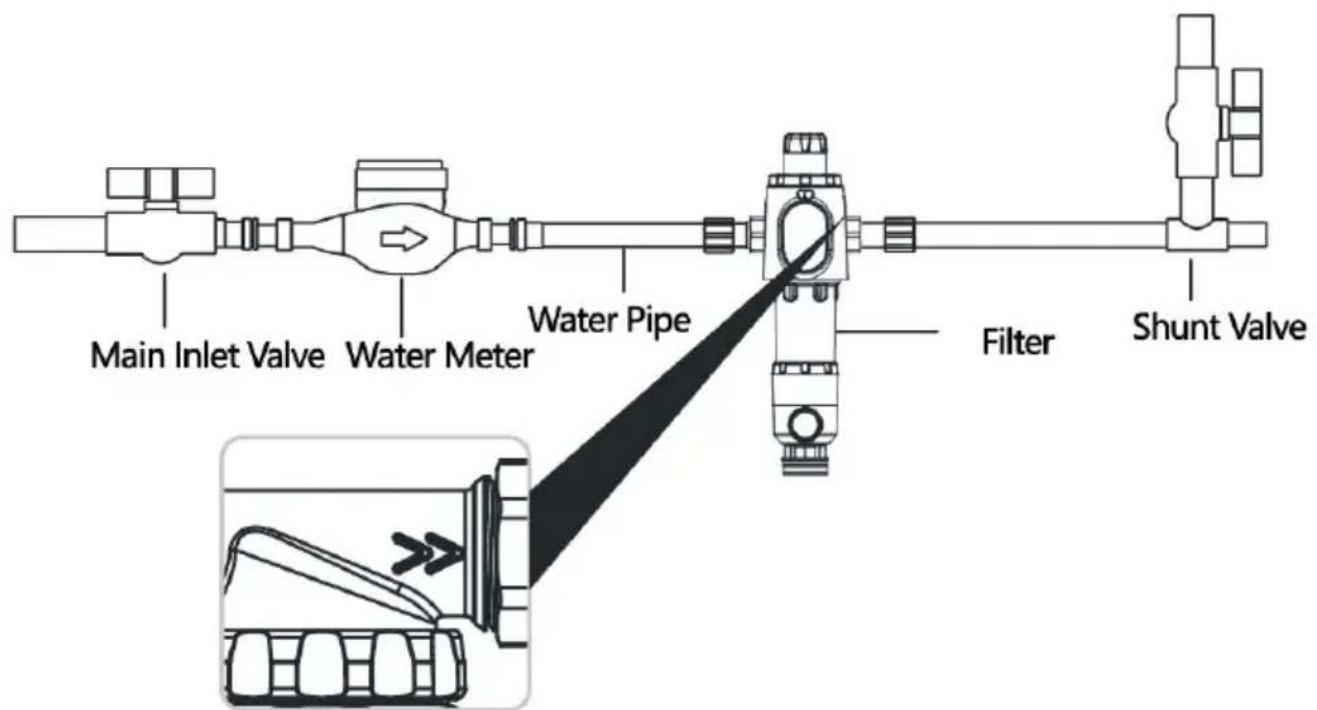
Note the Arrow Direction of the Water Flow
- Note the arrow direction of the water flow
- Close the main inlet valve and drain the remaining water from
- When it's installed, please note that the flow direction marked valve body is consistent with the water flow direction in the pip
- Insert one end of the PE drainage pipe in the accessory pad the drainage quick interface at the bottom of the machine, and end into the floor drain or other drainage outlet and fix it.
②
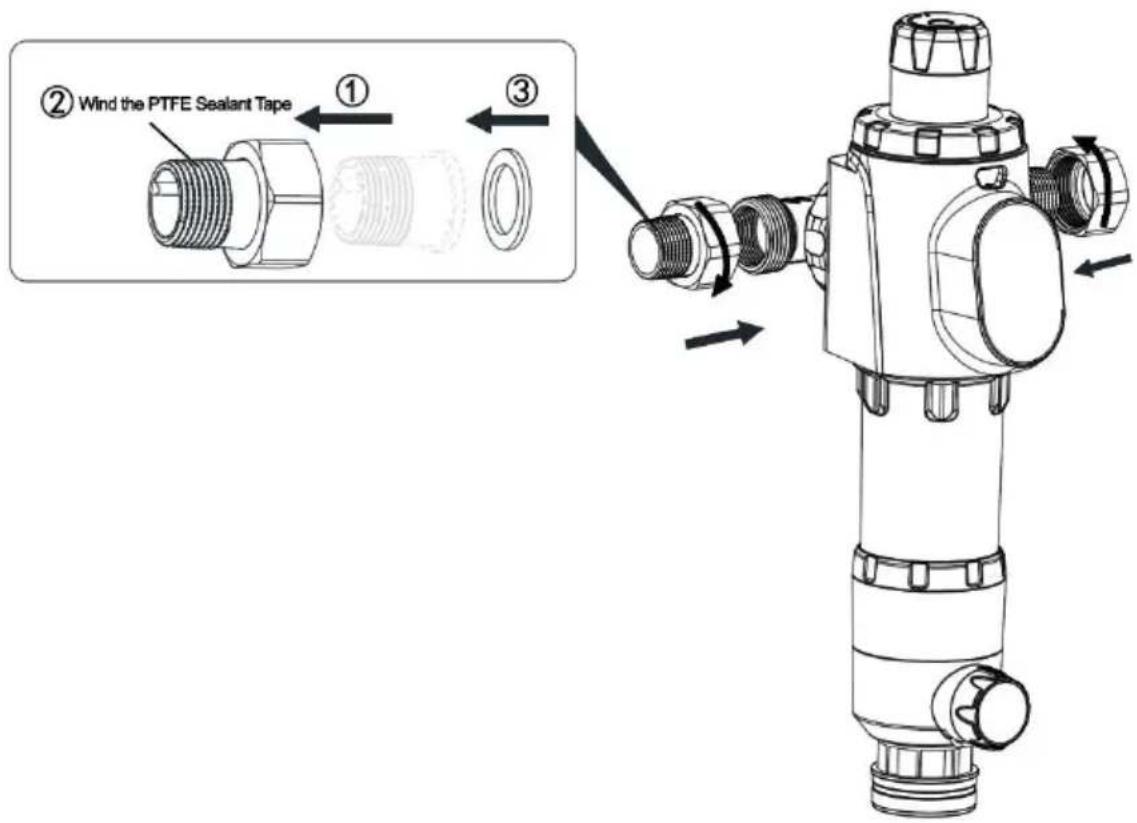
- The wrapping of Teflon tape should be installed by professional.
Before the installation, please check if the components are com
2.PPR pipe installation needs special welding equipment, and the welding should be strong. - If the metal hard pipe is installed, it is necessary to add the according to the actual situation.
- This product should not be installed outdoors, and it should be far as possible away from UV, heat sources, fuel and various
- When the Teflon tape is wrapped, it should be fully and ever wrapped.
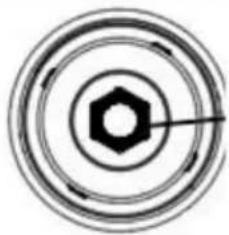
- When the hexagonal nuts are tightened with wrenches, make other parts do not rotate with the hexagonal nuts.
- After installation, observe carefully whether there is water leak the joint connectors.
USER MANUAL
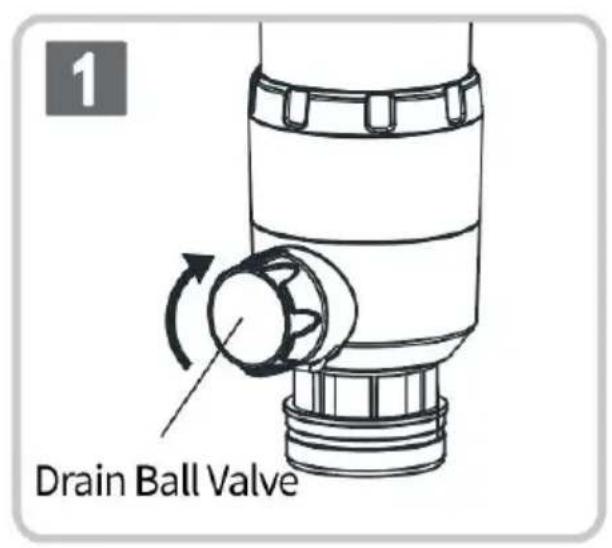
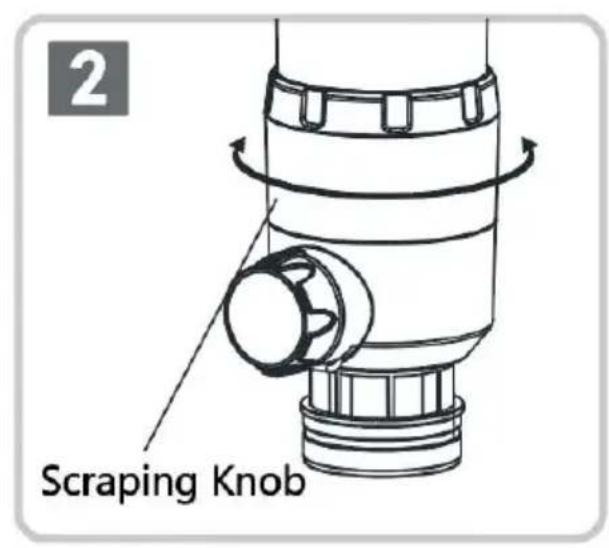
- After installation, open the main inlet valve and flush it.
- Before the flushing, make sure there is a reliable drainage system to use a suitable container to hold the waste water after flushing. The ball valve handle in the lower part of the filter counterclock was then turning the black scraping knob at the lower part of the first clockwise or counterclockwise for 3 or 4 rounds, then the internal the filter bottle can be cleaned and drained. Depending on the quality of different locations.
- Please wash the product at least once a month, and switch to drainage ball valve for flushing 3 times a month, each flushing seconds.
- During normal cleaning and maintenance, all parts should be performed and original parts should be used for maintenance.
Dismantle and Wash the Filtering Components
Professional operating is recommended.
When normal scraping or flushing can not remove the dirt on the filter mesh, an normal water use is affected it is recommended to take out the filter mesh and wait.
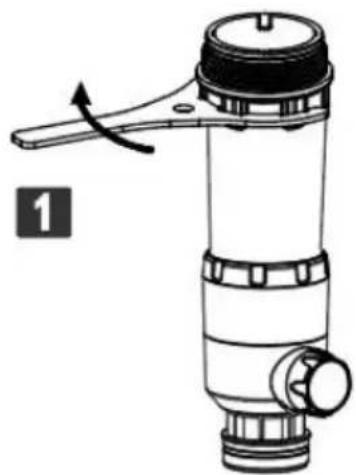
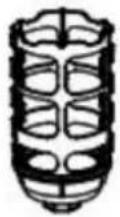
Open the filter bottle counterclockwise with the wrench offered in the pack Remove the filter mesh fro inside the bottle and softly clean off the dirt embedde (No need to take out the scraping component when washing the filter mesh)
Note: The scraping components do not need to be removed when the filter mesh components are being cleaned.
natural_image
Technical line drawing of a mechanical device with a handle and lever mechanism (no text or symbols)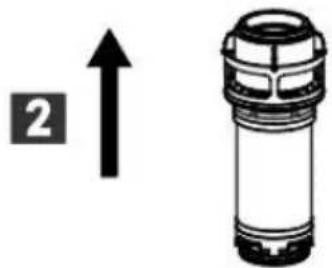
natural_image
Diagram showing a device with a labeled arrow pointing upward and a numbered box (2) on the left, next to a cylindrical device (no text or symbols present)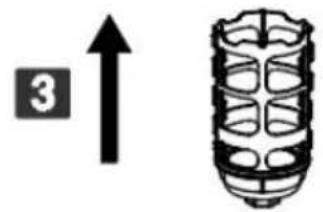
natural_image
Simple line drawing of a cylindrical object with internal grid pattern and a numbered label '3' (no text or symbols on the object itself)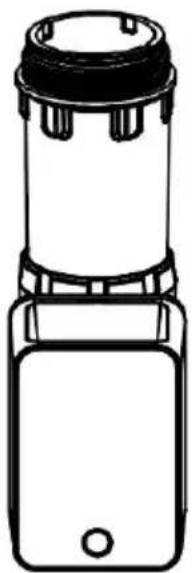
natural_image
Line drawing of a handheld device with a black lid and control panel (no text or symbols)Install the Scraper and Mesh
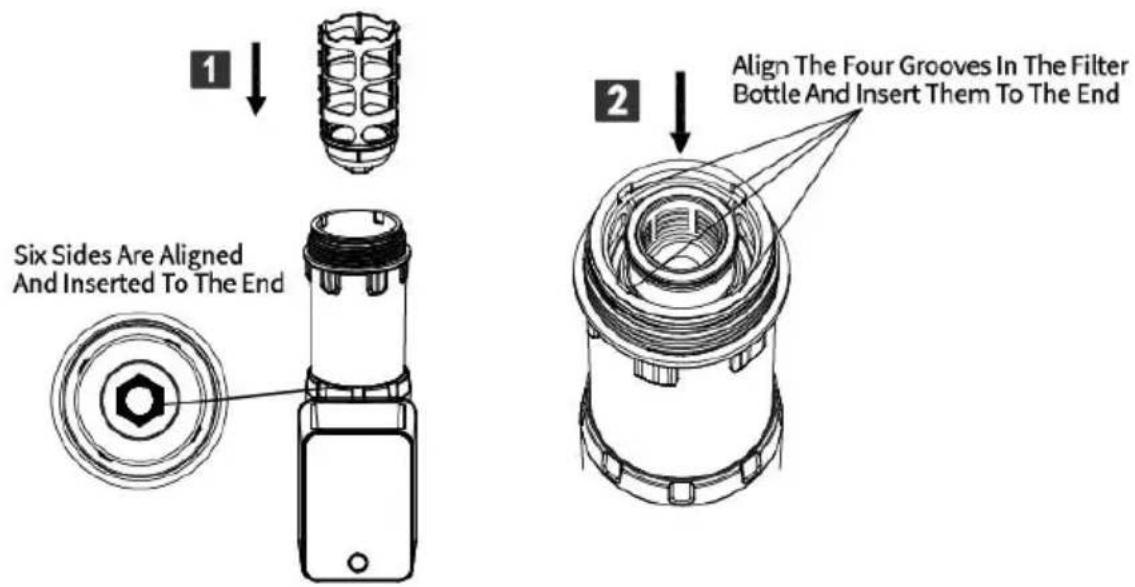
When the scraping components are installed into the filter bottle, please make sure the quadrilateral holes with round corner in the scraping components are fitted with the quadrilateral column on the water discharge copper parts at the bottom of the filter bot and the holes are inserted to the end of column.
When the filter bottle components are installed, pay attention insert the four bumps the inner filter component of the scraping component to the four grooves in the filter bottle, and insert them to the end of the grooves.
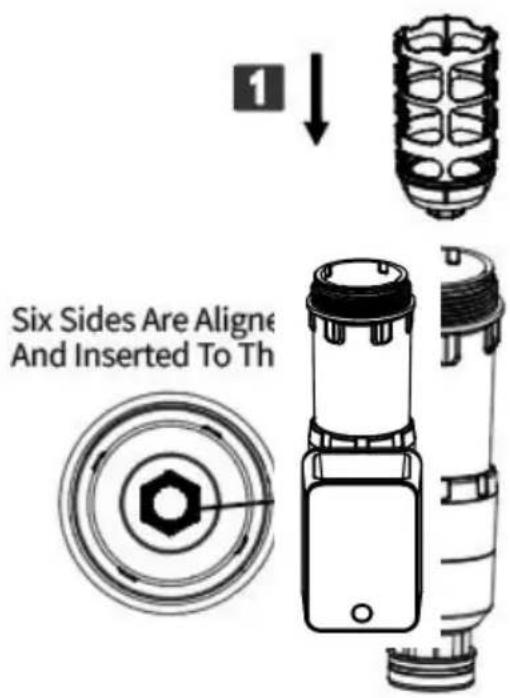

Installation Of Scraping Components And Filter Mesh Comp
It should be installed by professionals. Before the installation, pl check if the components are complete.
After installation, you must manually switch the controller several to see if there is any abnormal phenomenon.
The reverse operation process can remove the automatic control
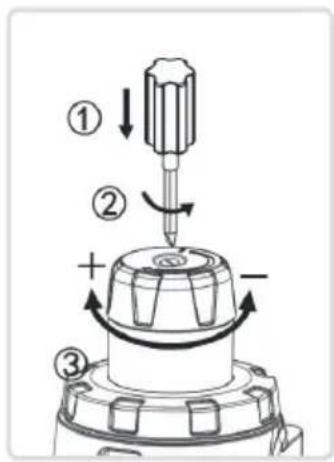
Description of Pressure Control Function(Pressure control products have this function)
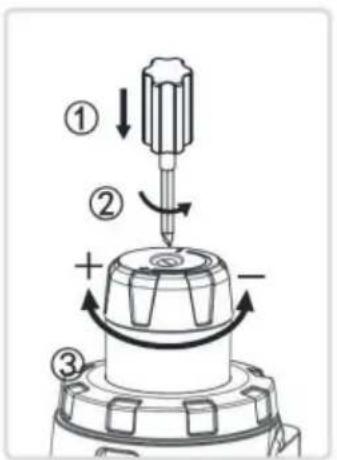
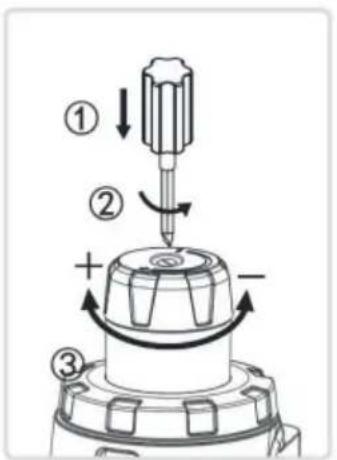
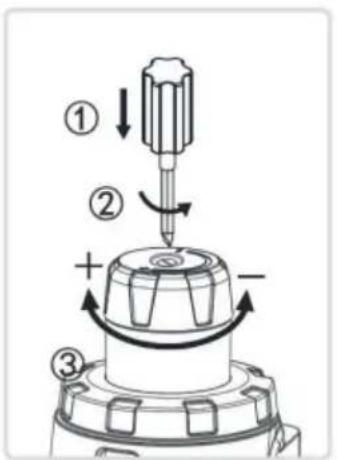
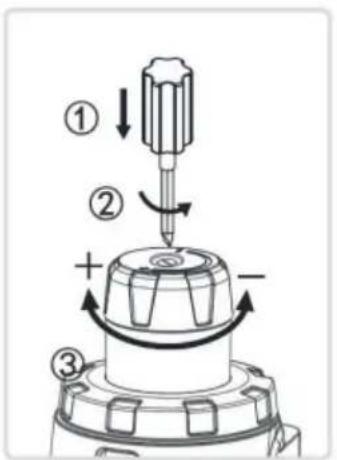
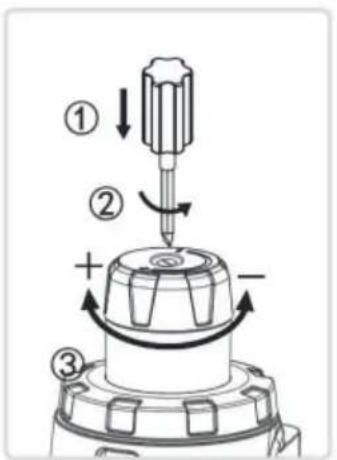
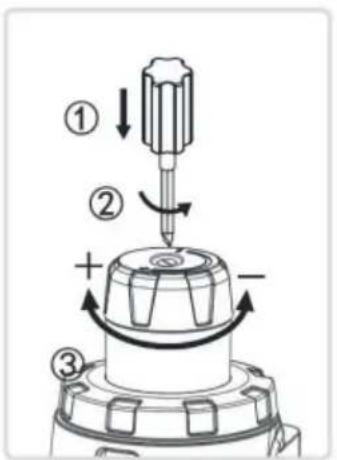
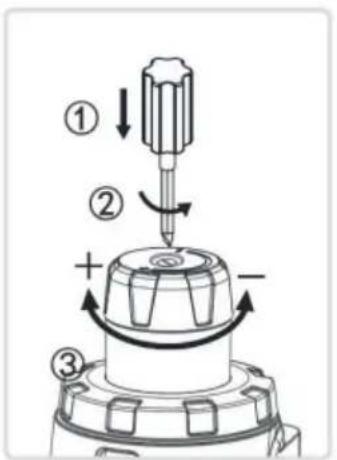
■ The product has the function of reducing pressure and stabilizing pressure, which can effectively prevent the damage caused by high water pressure or water hammer to the water pipe and water equipment. If the parameters of the pressure control need to be adjusted, please adjust according to the following steps.
■ With a straight screwdriver, loosen the screws in the pressure adjusting knob counterclockwise;
■ Turn the pressure adjusting knob clockwise to raise the water outlet pressure (but make sure the water pressure is always lower than the inlet pressure);
■ Turn the pressure adjusting knob counterclockwise to lower the water outlet pressure;
■ After adjustment, tighten the screw clockwise.
■ Notes: before adjusting the pressure, make sure that the domestic water equipment is closed. Open / close the drain ball valve several times during the pressure regulation, and check the number of the pressure gauge number in the closed state.
Operation Instructions of The Ball Valve Automatic Controller
Panel Display / Key Description
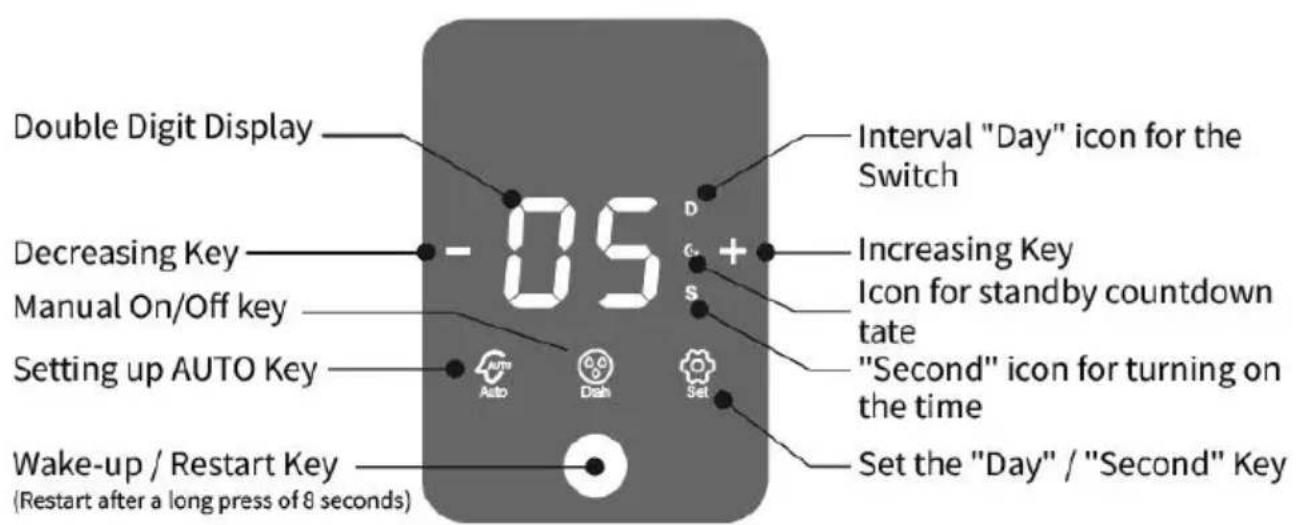
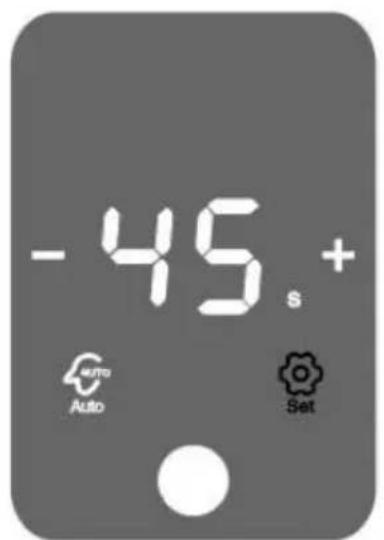
Set The Opening Time State For The Ball Valve
The left illustration shows the opening time state of the ball valve, and press"Set"Switch the state to "S", and set the op time for the ball valve 15 sec / 30 seconds / 45 seconds / seconds / 90 seconds, press "-" key to set the required op time for the ball valve.
| Show The Self-inspection Status | |
| The left illustration shows the self-inspection state of the ball valve after the product is recharged or restarted, and the drain icon flashes. Note: other functions cannot be used during self-inspection status. | 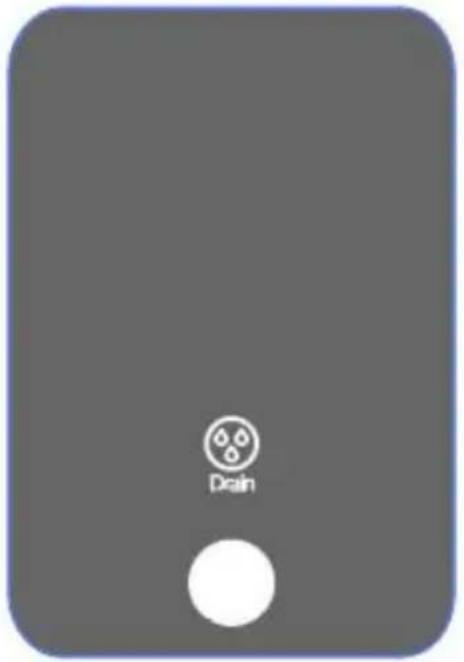 |
| Set The Switch Interval State Of The Ball Valve | |
| The left illustration shows settir the switch interval state of the valve. Press "set" key and it change to the state "D". In th state, the ball valve interval ca be set at every 1-99 days to on/off the ball vale once and such interval in circulation. Pre "+" "-" key to set the required days. | 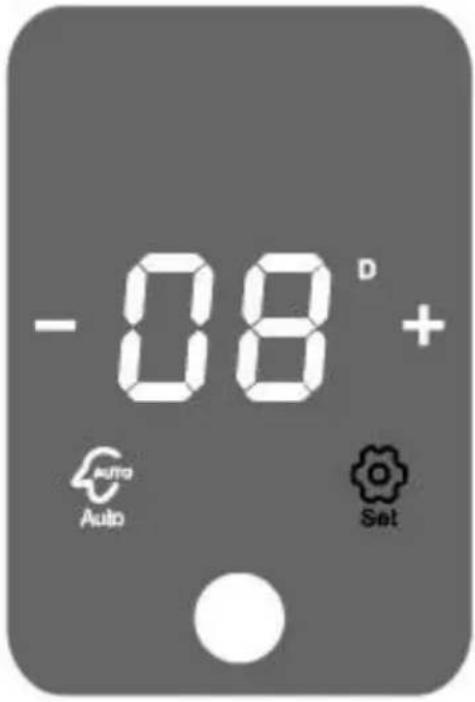 |
| Display The Standby State In Auto Mode | |
| The left illustration shows that under its factory default state( same as the state after restar the "AUTO" state, the controlle will open the ball valve for draining of 15 seconds after a interval of 15 days, and then automatically close the ball val And it will circulate at such c During the interval, press the wake-up key to show how ma days left for automatically opening the ball valve. In this wake-up state, you can press "drain" button to manually open the ball valve. After you manu open the ball valve, it will sta days' timekeeping again. | 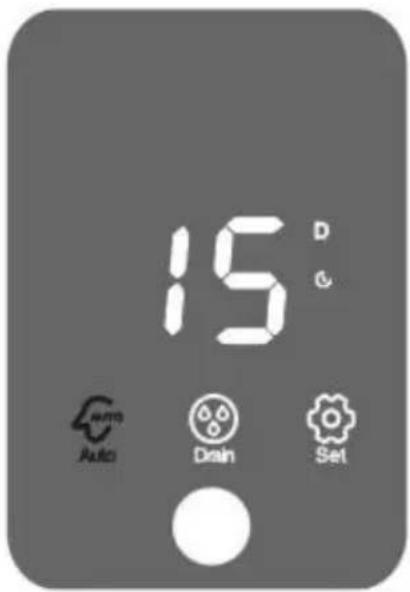 |
| Operation Instructions Of The Ball Valve Automatic Contro | |
| The left illustration shows that under the manual switch state, the countdown figure of the b valve such as "15" will flash during the switching time. Whe it's fully open, the number sta countdown. When the countdow is finished, it will display"00" flickering indicating the ball val in a closed state and the bal valve will always flash during opening and closing process. | 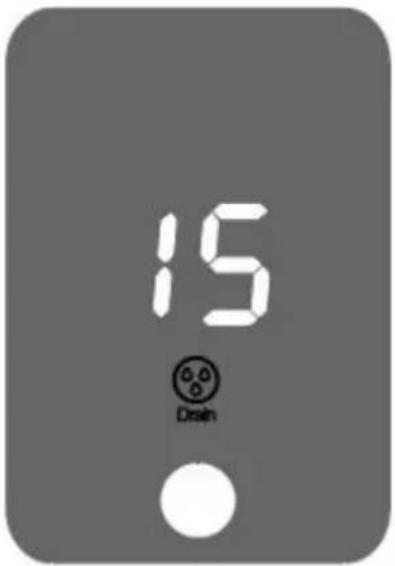 |
PRODUCT FAULT ANALYSIS
Troubleshooting
| Problem | Possible Causes | Possible Solution |
| No Product Water | 1.Water supply is shut off.2.Inlet valve is not open. | 1.Wait water supply restore.2.Open the inlet valve. |
| Not Enough Product Water | 1.Inlet valve is not fully open.2.Filter screen is clogged. | 1.Open the inlet valve completely.2.Flush and clean the filter screen assembly, remove the debris. |
| Leaks on Connection | 1.Connection is not installed well.2.Connection is not tightened.3.Not winding enough thread tape.4.Sealing gasket is aging and damaged. | 1.Check and make sure the sealing gasket is flat and not be squeezed.2.Use the wrench to tight it.3.Use enough thread tape and make sure it is winding evenly.4.Replace the sealing gasket. |
| No Pressure Displayed | 1.Pressure gauge damaged.2.No water supply. | 1.Replace the pressure gauge.2.Open the inlet valve. |
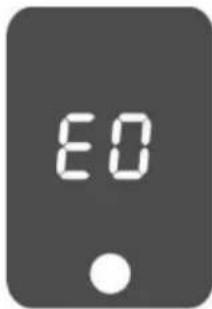
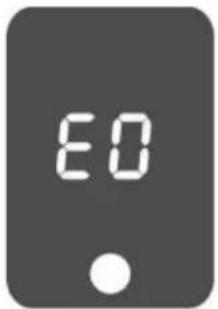
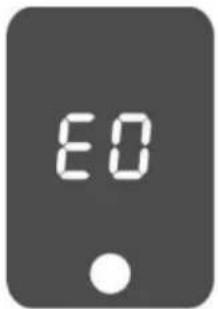
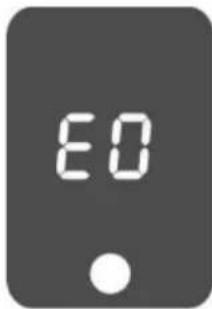
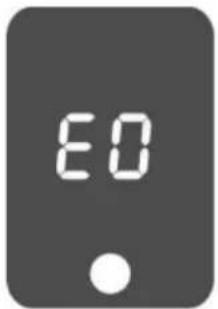
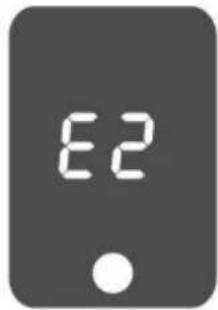
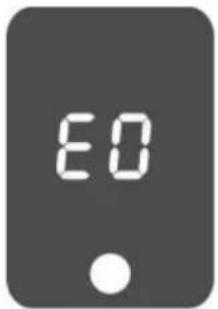
| Display Error Code "E0" | Low Battery Power | Replace Battery Power |
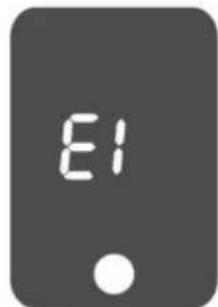
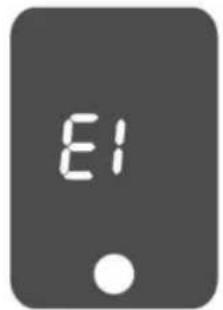
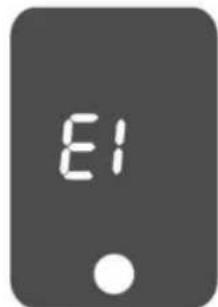
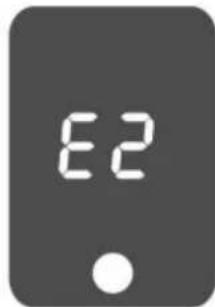
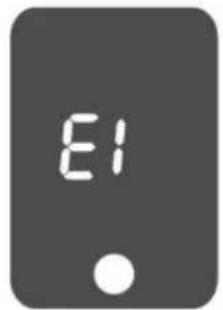
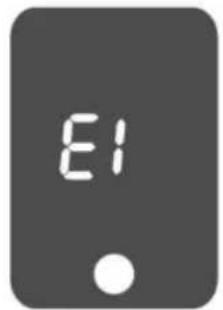
| Display Error Code "E1" | Ball valve not open completely. | 1. Press and hold Reset Key for 8s to reset control module.2. If Reset process not work, replace control module. |
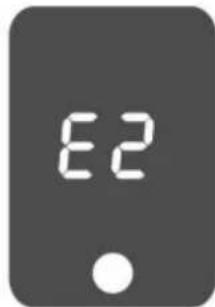
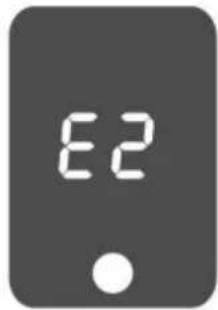
| Display Error Code "E2" | Ball valve not closed completely. | 1. Press and hold Reset Key for 8s to reset control module.2. If Reset process not work, replace control module. |
Fault Map
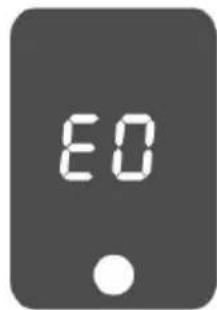
Power Shortage Alarm Prompt
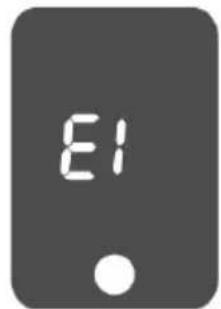
Open Fault Alarm Prompt
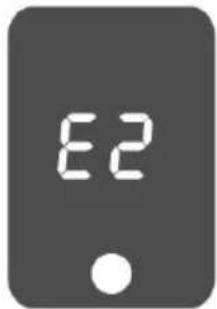
Turn Off Fault Alarm Prompts
Packing List
1 set of Pre-filter
1 set of User Manual
1 set of Attachment Package (mounting wrench, sewer drain connector sewage drain pipe, etc.)
Manufacturer: Shanghaimuxinmuyeyouxiangongsi
Address: Shuangchenglu 803nong11hao1602A-1609shi, baoshanqu, shanghai 200000 CN.
Imported to AUS: SIHAO PTY LTD. 1 ROKEVA STREETEASTWOOD NSW 2122 Australia
Imported to USA: Sanven Technology Ltd. Suite 250, 9166 Anaheim Place, Rancho Cucamonga, CA 91730
| UK | REP |
YH CONSULTING LIMITED. C/O YH Consultin Limited Office 147, Centurion House, London Road, Staines-upon-Thames, Surrey, TW18 4A>
| EC | REP |
Technical Support and E-Warranty Certificate
www.vevor.com/support
VEVOR®
TOUGH TOOLS, HALF PRICE
natural_image
Technical line drawing of a mechanical device with a cylindrical top and rectangular base (no text or symbols)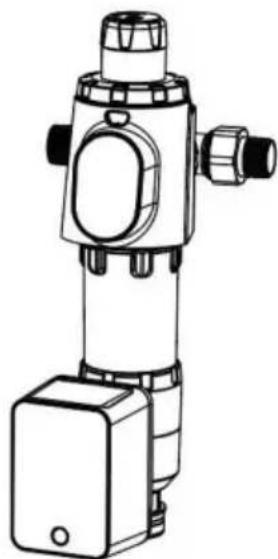
natural_image
Technical line drawing of a surveying instrument (no text or symbols)BESOIN D'AIDE? CONTACTEZ-NOUS!
CARACTÉRISTIQUES DU PRODUIT
Note the Arrow Direction of the Water Flow
natural_image
Technical line drawing of a mechanical device with no visible text or symbols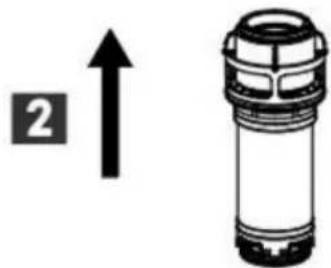
natural_image
Diagram showing a device with a numbered label '2' and an upward arrow, next to a cylindrical device (no text or symbols on the device itself)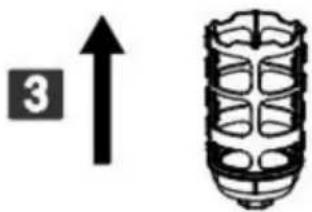
natural_image
Simple line drawing of a cylindrical object with internal structure and an upward arrow, no text or symbols present.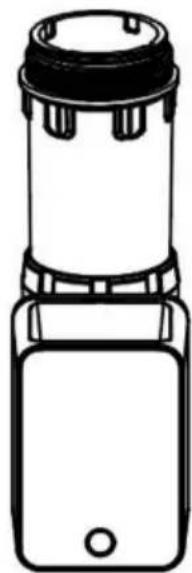
natural_image
Line drawing of a portable blender with black lid and control panel (no text or symbols)
natural_image
Abstract circular diagram with concentric rings and a central hexagon, no text or symbols present.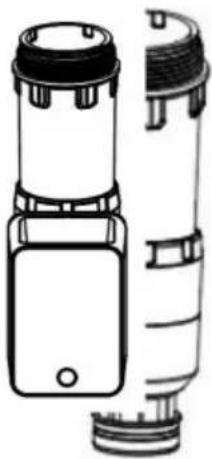
natural_image
Technical line drawing of a mechanical device with no visible text or symbolsAlign The Four Grooves In The Filter Bottle And Insert Them To The End
■ The product has the function of reducing pressure and stabilizing pressure, which can effectively prevent the damage caused by high water pressure or water hammer to the water pipe and water equipment. If the parameters of the pressure control need to be adjusted, please adjust according to the following steps.
■ With a straight screwdriver, loosen the screws in the pressure adjusting knob counterclockwise;
■ Turn the pressure adjusting knob clockwise to raise the water outlet pressure (but make sure the water pressure is always lower than the inlet pressure);
■ Turn the pressure adjusting knob counterclockwise to lower the water outlet pressure;
■ After adjustment, tighten the screw clockwise.
■ Notes: before adjusting the pressure, make sure that the domestic water equipment is closed. Open / close the drain ball valve several times during the pressure regulation, and check the number of the pressure gauge number in the closed state.
ANALYSE DES DÉFAUTS DU PRODUIT
Troubleshooting
| Problem | Possible Causes | Possible Solution |
| No Product Water | 1.Water supply is shut off.2.Inlet valve is not open. | 1.Wait water supply restore.2.Open the inlet valve. |
| Not Enough Product Water | 1.Inlet valve is not fully open.2.Filter screen is clogged. | 1.Open the inlet valve completely.2.Flush and clean the filter screen assembly, remove the debris. |
| Leaks on Connection | 1.Connection is not installed well.2.Connection is not tightened.3.Not winding enough thread tape.4.Sealing gasket is aging and damaged. | 1.Check and make sure the sealing gasket is flat and not be squeezed.2.Use the wrench to tight it.3.Use enough thread tape and make sure it is winding evenly.4.Replace the sealing gasket. |
| No Pressure Displayed | 1.Pressure gauge damaged.2.No water supply. | 1.Replace the pressure gauge.2.Open the inlet valve. |
| Display Error Code "E0" | Low Battery Power | Replace Battery Power |
| Display Error Code "E1" | Ball valve not open completely. | 1. Press and hold Reset Key for 8s to reset control module.2. If Reset process not work, replace control module. |
| Display Error Code "E2" | Ball valve not closed completely. | 1. Press and hold Reset Key for 8s to reset control module.2. If Reset process not work, replace control module. |
Fault Map
Power Shortage Alarm Prompt
Open Fault Alarm Prompt
Turn Off Fault Alarm Prompts
Liste de colisage
1 jeu de pré-filtre
YH CONSULTING LIMITÉE. C/O YH Consulting Limited Bureau 147, Centurion House, London Road, Staines-upon-Thames, Surrey, TW18 4AX
E-CrossStu GmbH
Mainzer Landstr.69,
natural_image
Technical line drawing of a mechanical device with a cylindrical body and rectangular base (no text or symbols)BSK-T4-Q2--N
BSK-T4-Q2-G
natural_image
Technical line drawing of a surveying instrument (no text or symbols)BRAUCHEN SIE HILFE? KONTAKTIERE UNS!
Note the Arrow Direction of the Water Flow
natural_image
Technical line drawing of a mechanical device with a lever and handle (no text or symbols)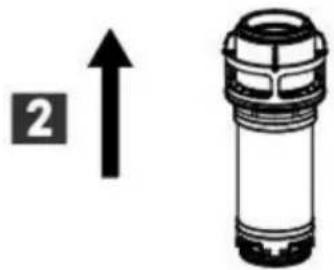
natural_image
Diagram showing a device with a numbered label '2' and an upward arrow next to it, alongside a cylindrical component (no text or symbols present)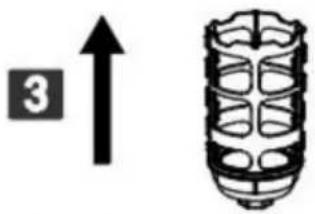
natural_image
Simple line drawing of a corn cob with a numbered label '3' and an upward arrow, alongside a wireframe illustration (no text or symbols)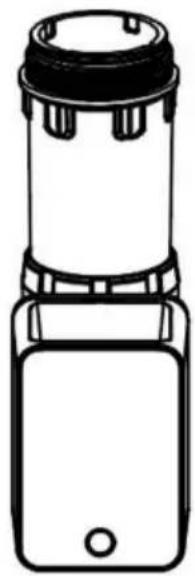
natural_image
Line drawing of a handheld device with a black lid and rectangular body (no text or symbols)natural_image
Abstract circular diagram with concentric rings and a central hexagon, no text or symbols present.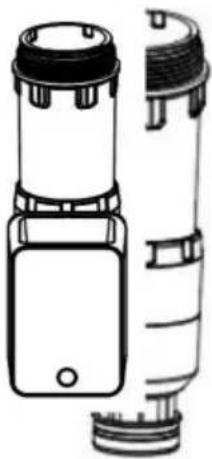
natural_image
Technical line drawing of a mechanical device with no visible text or symbols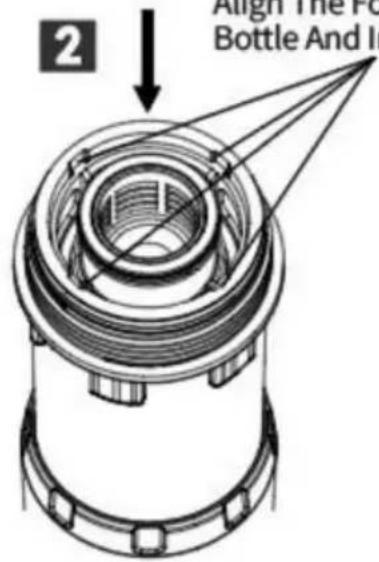
Align The Four Grooves In The Filter Bottle And Insert Them To The End
■ The product has the function of reducing pressure and stabilizing pressure, which can effectively prevent the damage caused by high water pressure or water hammer to the water pipe and water equipment. If the parameters of the pressure control need to be adjusted, please adjust according to the following steps.
■ With a straight screwdriver, loosen the screws in the pressure adjusting knob counterclockwise;
■ Turn the pressure adjusting knob clockwise to raise the water outlet pressure (but make sure the water pressure is always lower than the inlet pressure);
■ Turn the pressure adjusting knob counterclockwise to lower the water outlet pressure;
■ After adjustment, tighten the screw clockwise.
■ Notes: before adjusting the pressure, make sure that the domestic water equipment is closed. Open / close the drain ball valve several times during the pressure regulation, and check the number of the pressure gauge number in the closed state.
| Problem | Possible Causes | Possible Solution |
| No Product Water | 1.Water supply is shut off.2.Inlet valve is not open. | 1.Wait water supply restore.2.Open the inlet valve. |
| Not Enough Product Water | 1.Inlet valve is not fully open.2.Filter screen is clogged. | 1.Open the inlet valve completely.2.Flush and clean the filter screen assembly, remove the debris. |
| Leaks on Connection | 1.Connection is not installed well.2.Connection is not tightened.3.Not winding enough thread tape.4.Sealing gasket is aging and damaged. | 1.Check and make sure the sealing gasket is flat and not be squeezed.2.Use the wrench to tight it.3.Use enough thread tape and make sure it is winding evenly.4.Replace the sealing gasket. |
| No Pressure Displayed | 1.Pressure gauge damaged.2.No water supply. | 1.Replace the pressure gauge.2.Open the inlet valve. |
| Display Error Code "E0" | Low Battery Power | Replace Battery Power |
| Display Error Code "E1" | Ball valve not open completely. | 1. Press and hold Reset Key for 8s to reset control module.2. If Reset process not work, replace control module. |
| Display Error Code "E2" | Ball valve not closed completely. | 1. Press and hold Reset Key for 8s to reset control module.2. If Reset process not work, replace control module. |
Fault Map
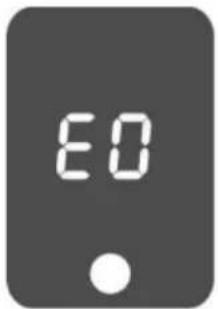
Power Shortage Alarm Prompt
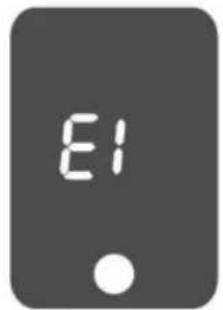
Open Fault Alarm Prompt
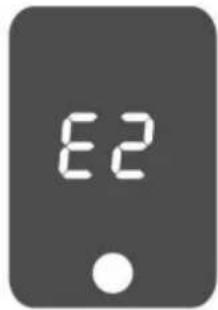
Turn Off Fault Alarm Prompts
Packliste
YH CONSULTING LIMITED. C/O YH Consulting Limited Büro 147, Centurion House, London Road, Staines-upon-Thames, Surrey, TW18 4AX
E-CrossStu GmbH
Mainzer Landstr.69,
60329 Frankfurt am Main.
VEVOR®
TOUGH TOOLS, HALF PRICE
www.vevor.com/support
VEVOR®
TOUGH TOOLS, HALF PRICE
natural_image
Technical line drawing of a mechanical device with no visible text or symbolsBSK-T4-Q2--N BSK-T4-Q2-G
natural_image
Technical line drawing of a surveying instrument (no text or symbols)HO BISOGNO DI AIUTO? CONTATTACI!
Note the Arrow Direction of the Water Flow
natural_image
Simple line drawing of a cylindrical object with internal structure, next to a square labeled '3' with an upward arrow (no text or symbols beyond the number)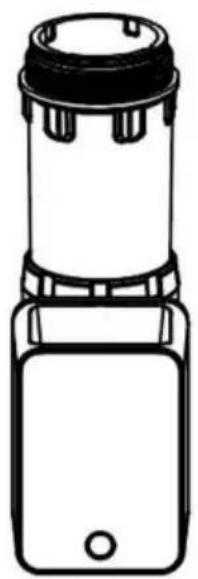
natural_image
Line drawing of a portable electronic device with a black lid and control panel (no text or symbols)■ The product has the function of reducing pressure and stabilizing pressure, which can effectively prevent the damage caused by high water pressure or water hammer to the water pipe and water equipment. If the parameters of the pressure control need to be adjusted, please adjust according to the following steps.
■ With a straight screwdriver, loosen the screws in the pressure adjusting knob counterclockwise;
■ Turn the pressure adjusting knob clockwise to raise the water outlet pressure (but make sure the water pressure is always lower than the inlet pressure);
■ Turn the pressure adjusting knob counterclockwise to lower the water outlet pressure;
■ After adjustment, tighten the screw clockwise.
■ Notes: before adjusting the pressure, make sure that the domestic water equipment is closed. Open / close the drain ball valve several times during the pressure regulation, and check the number of the pressure gauge number in the closed state.
| Problem | Possible Causes | Possible Solution |
| No Product Water | 1.Water supply is shut off.2.Inlet valve is not open. | 1.Wait water supply restore.2.Open the inlet valve. |
| Not Enough Product Water | 1.Inlet valve is not fully open.2.Filter screen is clogged. | 1.Open the inlet valve completely.2.Flush and clean the filter screen assembly, remove the debris. |
| Leaks on Connection | 1.Connection is not installed well.2.Connection is not tightened.3.Not winding enough thread tape.4.Sealing gasket is aging and damaged. | 1.Check and make sure the sealing gasket is flat and not be squeezed.2.Use the wrench to tight it.3.Use enough thread tape and make sure it is winding evenly.4.Replace the sealing gasket. |
| No Pressure Displayed | 1.Pressure gauge damaged.2.No water supply. | 1.Replace the pressure gauge.2.Open the inlet valve. |
| Display Error Code "E0" | Low Battery Power | Replace Battery Power |
| Display Error Code "E1" | Ball valve not open completely. | 1. Press and hold Reset Key for 8s to reset control module.2. If Reset process not work, replace control module. |
| Display Error Code "E2" | Ball valve not closed completely. | 1. Press and hold Reset Key for 8s to reset control module.2. If Reset process not work, replace control module. |
Fault Map
Power Shortage Alarm Prompt
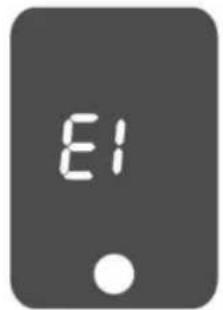
Open Fault Alarm Prompt
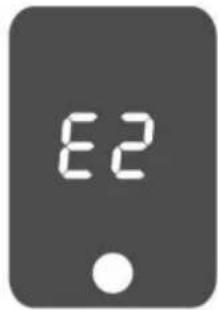
Turn Off Fault Alarm Prompts
Lista imballaggio
1 set di prefiltro
Importato in AUS: SIHAO PTY LTD. 1 ROKEVA STREETEASTWOOD NSW 2122 Australia
YH CONSULENZA LIMITATA. C/O YH Consulting Limited Office 147, Centurion House, London Road, Staines-upon-Thames, Surrey, TW18 4AX
E-CrossStu GmbH
Mainzer Landstr.69,
elettronica www.vevor.com/support
VEVOR®
TOUGH TOOLS, HALF PRICE
natural_image
Line drawing of a mechanical device with a cylindrical top and rectangular base (no text or symbols)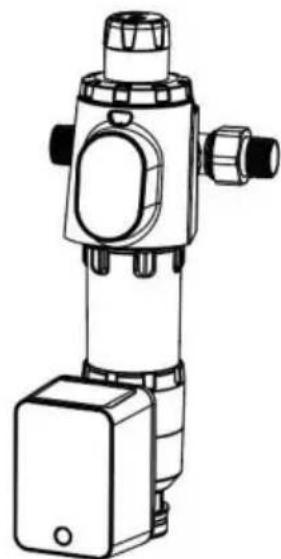
natural_image
Technical line drawing of a surveying instrument (no text or symbols)Note the Arrow Direction of the Water Flow
natural_image
Technical line drawing of a mechanical device with a lever and handle (no text or symbols)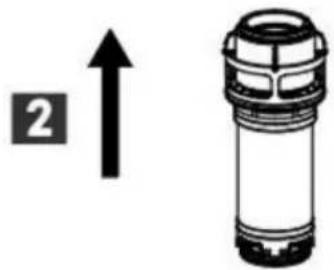
natural_image
Diagram showing a device with a numbered label '2' and an upward arrow next to it, alongside a cylindrical component (no text or symbols present)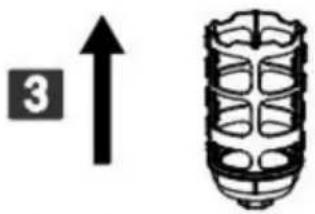
natural_image
Simple line drawing of a corn cob with a numbered label '3' and an upward arrow, alongside a wireframe illustration (no text or symbols)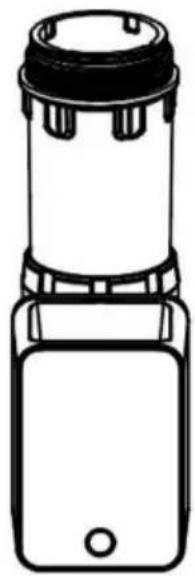
natural_image
Line drawing of a handheld device with a black lid and rectangular body (no text or symbols)■ The product has the function of reducing pressure and stabilizing pressure, which can effectively prevent the damage caused by high water pressure or water hammer to the water pipe and water equipment. If the parameters of the pressure control need to be adjusted, please adjust according to the following steps.
■ With a straight screwdriver, loosen the screws in the pressure adjusting knob counterclockwise;
■ Turn the pressure adjusting knob clockwise to raise the water outlet pressure (but make sure the water pressure is always lower than the inlet pressure);
■ Turn the pressure adjusting knob counterclockwise to lower the water outlet pressure;
■ After adjustment, tighten the screw clockwise.
■ Notes: before adjusting the pressure, make sure that the domestic water equipment is closed. Open / close the drain ball valve several times during the pressure regulation, and check the number of the pressure gauge number in the closed state.
| Problem | Possible Causes | Possible Solution |
| No Product Water | 1.Water supply is shut off.2.Inlet valve is not open. | 1.Wait water supply restore.2.Open the inlet valve. |
| Not Enough Product Water | 1.Inlet valve is not fully open.2.Filter screen is clogged. | 1.Open the inlet valve completely.2.Flush and clean the filter screen assembly, remove the debris. |
| Leaks on Connection | 1.Connection is not installed well.2.Connection is not tightened.3.Not winding enough thread tape.4.Sealing gasket is aging and damaged. | 1.Check and make sure the sealing gasket is flat and not be squeezed.2.Use the wrench to tight it.3.Use enough thread tape and make sure it is winding evenly.4.Replace the sealing gasket. |
| No Pressure Displayed | 1.Pressure gauge damaged.2.No water supply. | 1.Replace the pressure gauge.2.Open the inlet valve. |
| Display Error Code "E0" | Low Battery Power | Replace Battery Power |
| Display Error Code "E1" | Ball valve not open completely. | 1. Press and hold Reset Key for 8s to reset control module.2. If Reset process not work, replace control module. |
| Display Error Code "E2" | Ball valve not closed completely. | 1. Press and hold Reset Key for 8s to reset control module.2. If Reset process not work, replace control module. |
Fault Map
Power Shortage Alarm Prompt
Open Fault Alarm Prompt
Turn Off Fault Alarm Prompts
Lista de embalaje
YH CONSULTING LIMITADO. C/O YH Consulting Limited Oficina 147, Centurion House, London Road, Staines-upon-Thames, Surrey, TW18 4AX
E-CrossStu GmbH
Mainzer Landstr.69,
natural_image
Technical line drawing of a mechanical device with a cylindrical top and rectangular base (no text or symbols)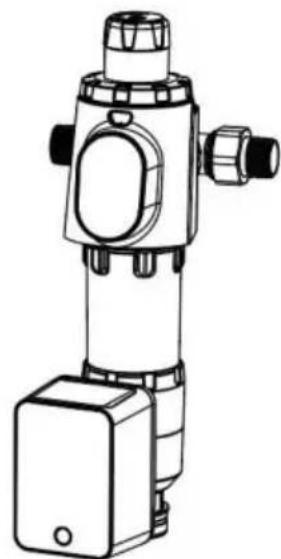
natural_image
Technical line drawing of a surveying instrument (no text or symbols)POTRZEBUJE POMOCY? SKONTAKTUJ SIĘ Z NAMI!
Note the Arrow Direction of the Water Flow
natural_image
Simple line drawing of a cylindrical object with internal structure, next to a square labeled '3' with an upward arrow (no text or symbols beyond the number)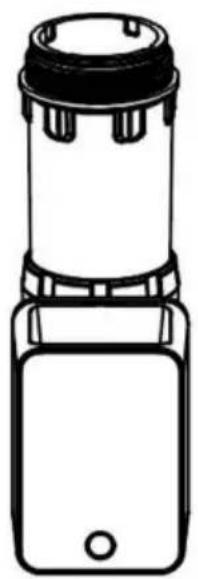
natural_image
Line drawing of a portable electronic device with a black lid and control panel (no text or symbols)Align The Four Grooves In The Filter Bottle And Insert Them To The End
■ The product has the function of reducing pressure and stabilizing pressure, which can effectively prevent the damage caused by high water pressure or water hammer to the water pipe and water equipment. If the parameters of the pressure control need to be adjusted, please adjust according to the following steps.
■ With a straight screwdriver, loosen the screws in the pressure adjusting knob counterclockwise;
■ Turn the pressure adjusting knob clockwise to raise the water outlet pressure (but make sure the water pressure is always lower than the inlet pressure);
■ Turn the pressure adjusting knob counterclockwise to lower the water outlet pressure;
■ After adjustment, tighten the screw clockwise.
■ Notes: before adjusting the pressure, make sure that the domestic water equipment is closed. Open / close the drain ball valve several times during the pressure regulation, and check the number of the pressure gauge number in the closed state.
| Problem | Possible Causes | Possible Solution |
| No Product Water | 1.Water supply is shut off.2.Inlet valve is not open. | 1.Wait water supply restore.2.Open the inlet valve. |
| Not Enough Product Water | 1.Inlet valve is not fully open.2.Filter screen is clogged. | 1.Open the inlet valve completely.2.Flush and clean the filter screen assembly, remove the debris. |
| Leaks on Connection | 1.Connection is not installed well.2.Connection is not tightened.3.Not winding enough thread tape.4.Sealing gasket is aging and damaged. | 1.Check and make sure the sealing gasket is flat and not be squeezed.2.Use the wrench to tight it.3.Use enough thread tape and make sure it is winding evenly.4.Replace the sealing gasket. |
| No Pressure Displayed | 1.Pressure gauge damaged.2.No water supply. | 1.Replace the pressure gauge.2.Open the inlet valve. |
| Display Error Code "E0" | Low Battery Power | Replace Battery Power |
| Display Error Code "E1" | Ball valve not open completely. | 1. Press and hold Reset Key for 8s to reset control module.2. If Reset process not work, replace control module. |
| Display Error Code "E2" | Ball valve not closed completely. | 1. Press and hold Reset Key for 8s to reset control module.2. If Reset process not work, replace control module. |
Fault Map
Power Shortage Alarm Prompt
Open Fault Alarm Prompt
Turn Off Fault Alarm Prompts
ODPOWIEDZIALNOŚCIĄ. C/O YH Consulting Limited
Office 147, Centurion House, London Road, Staines-upon-Thames, Surrey, TW1
E-CrossStu GmbH
Mainzer Landstr.69,
60329 Frankfurt nad Menem.
VEVOR®
TOUGH TOOLS, HALF PRICE
www.vevor.com/support
VEVOR®
TOUGH TOOLS, HALF PRICE
Technische ondersteuning en e-garantiecertificaat www.vevor.com/support
VOORFILTER
BSK-T4-F3-N BSK-T4-F3-G
BSK-T4-Q2-N BSK-T4-Q2-G
natural_image
Technical line drawing of a mechanical device with no visible text or symbolsBSK-T4-Q2--N
BSK-T4-Q2-G
natural_image
Technical line drawing of a surveying instrument (no text or symbols)HULP NODIG? NEEM CONTACT MET ONS OP!
Note the Arrow Direction of the Water Flow
Demonteer en was de filtercomponenten
natural_image
Technical line drawing of a mechanical device with no visible text or symbols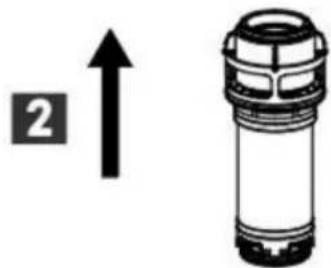
natural_image
Diagram showing a device with a numbered label '2' and an upward arrow, next to a cylindrical device (no text or symbols on the device itself)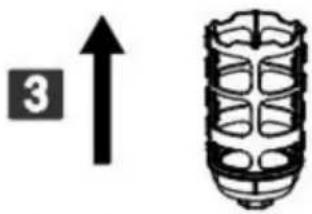
natural_image
Simple line drawing of a cylindrical object with internal structure and an upward arrow, no text or symbols present.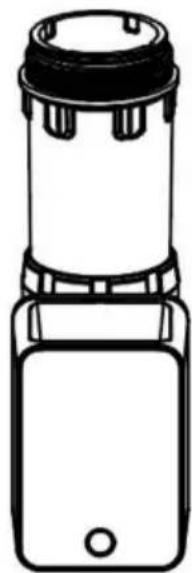
natural_image
Line drawing of a portable blender with black lid and control panel (no text or symbols)Align The Four Grooves In The Filter Bottle And Insert Them To The End
■ The product has the function of reducing pressure and stabilizing pressure, which can effectively prevent the damage caused by high water pressure or water hammer to the water pipe and water equipment. If the parameters of the pressure control need to be adjusted, please adjust according to the following steps.
■ With a straight screwdriver, loosen the screws in the pressure adjusting knob counterclockwise;
■ Turn the pressure adjusting knob clockwise to raise the water outlet pressure (but make sure the water pressure is always lower than the inlet pressure);
■ Turn the pressure adjusting knob counterclockwise to lower the water outlet pressure;
■ After adjustment, tighten the screw clockwise.
■ Notes: before adjusting the pressure, make sure that the domestic water equipment is closed. Open / close the drain ball valve several times during the pressure regulation, and check the number of the pressure gauge number in the closed state.
| Problem | Possible Causes | Possible Solution |
| No Product Water | 1.Water supply is shut off.2.Inlet valve is not open. | 1.Wait water supply restore.2.Open the inlet valve. |
| Not Enough Product Water | 1.Inlet valve is not fully open.2.Filter screen is clogged. | 1.Open the inlet valve completely.2.Flush and clean the filter screen assembly, remove the debris. |
| Leaks on Connection | 1.Connection is not installed well.2.Connection is not tightened.3.Not winding enough thread tape.4.Sealing gasket is aging and damaged. | 1.Check and make sure the sealing gasket is flat and not be squeezed.2.Use the wrench to tight it.3.Use enough thread tape and make sure it is winding evenly.4.Replace the sealing gasket. |
| No Pressure Displayed | 1.Pressure gauge damaged.2.No water supply. | 1.Replace the pressure gauge.2.Open the inlet valve. |
| Display Error Code "E0" | Low Battery Power | Replace Battery Power |
| Display Error Code "E1" | Ball valve not open completely. | 1. Press and hold Reset Key for 8s to reset control module.2. If Reset process not work, replace control module. |
| Display Error Code "E2" | Ball valve not closed completely. | 1. Press and hold Reset Key for 8s to reset control module.2. If Reset process not work, replace control module. |
Fault Map
Power Shortage Alarm Prompt
Open Fault Alarm Prompt
Turn Off Fault Alarm Prompts
Paklijst
1 set voorfilters
YH CONSULTING LIMITED. C/O YH Consulting Limited Office 147, Centurion House, London Road, Staines-upon-Thames, Surrey, TW18 4AX
| EG | REP |
natural_image
Technical line drawing of a mechanical device with no visible text or symbolsBSK-T4-Q2--N BSK-T4-Q2-G
natural_image
Technical line drawing of a surveying instrument (no text or symbols)BEHÖVS HJÄLP? KONTAKTA OSS!
Note the Arrow Direction of the Water Flow
natural_image
Technical line drawing of a mechanical device with a lever and handle (no text or symbols)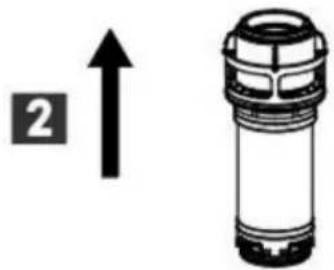
natural_image
Diagram showing a device with a numbered label '2' and an upward arrow next to it, alongside a cylindrical component (no text or symbols present)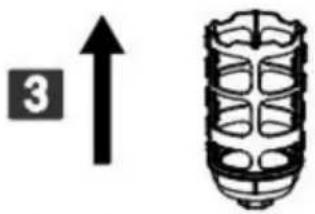
natural_image
Simple line drawing of a corn cob with a numbered label '3' and an upward arrow, alongside a wireframe illustration (no text or symbols)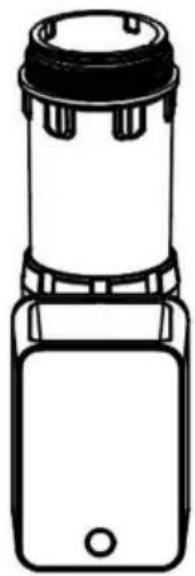
natural_image
Line drawing of a handheld device with a black lid and rectangular body (no text or symbols)■ The product has the function of reducing pressure and stabilizing pressure, which can effectively prevent the damage caused by high water pressure or water hammer to the water pipe and water equipment. If the parameters of the pressure control need to be adjusted, please adjust according to the following steps.
■ With a straight screwdriver, loosen the screws in the pressure adjusting knob counterclockwise;
■ Turn the pressure adjusting knob clockwise to raise the water outlet pressure (but make sure the water pressure is always lower than the inlet pressure);
■ Turn the pressure adjusting knob counterclockwise to lower the water outlet pressure;
■ After adjustment, tighten the screw clockwise.
■ Notes: before adjusting the pressure, make sure that the domestic water equipment is closed. Open / close the drain ball valve several times during the pressure regulation, and check the number of the pressure gauge number in the closed state.
| Problem | Possible Causes | Possible Solution |
| No Product Water | 1.Water supply is shut off.2.Inlet valve is not open. | 1.Wait water supply restore.2.Open the inlet valve. |
| Not Enough Product Water | 1.Inlet valve is not fully open.2.Filter screen is clogged. | 1.Open the inlet valve completely.2.Flush and clean the filter screen assembly, remove the debris. |
| Leaks on Connection | 1.Connection is not installed well.2.Connection is not tightened.3.Not winding enough thread tape.4.Sealing gasket is aging and damaged. | 1.Check and make sure the sealing gasket is flat and not be squeezed.2.Use the wrench to tight it.3.Use enough thread tape and make sure it is winding evenly.4.Replace the sealing gasket. |
| No Pressure Displayed | 1.Pressure gauge damaged.2.No water supply. | 1.Replace the pressure gauge.2.Open the inlet valve. |
| Display Error Code "E0" | Low Battery Power | Replace Battery Power |
| Display Error Code "E1" | Ball valve not open completely. | 1. Press and hold Reset Key for 8s to reset control module.2. If Reset process not work, replace control module. |
| Display Error Code "E2" | Ball valve not closed completely. | 1. Press and hold Reset Key for 8s to reset control module.2. If Reset process not work, replace control module. |
Fault Map
Power Shortage Alarm Prompt
Open Fault Alarm Prompt
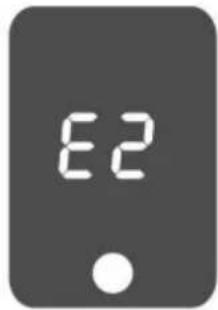
Turn Off Fault Alarm Prompts
Packlista
YH CONSULTING LIMITED. C/O YH Consulting Limited Office 147, Centurion House, London Road, Staines-upon-Thames, Surrey, TW18 4AX
E-CrossStu GmbH
Mainzer Landstr.69,
60329 Frankfurt am Main.
VEVOR®
TOUGH TOOLS, HALF PRICE
www.vevor.com/support
- PRE-FILTER
- NEED HELP? CONTACT US!
- Product Introduction
- PRODUCT CHARACTERISTICS
- ATTENTIONS
- CORRECT DISPOSAL
- FCC Information
- NAME OF EACH COMPONENT
- TECHNICAL PARAMETERS
- USER MANUAL
- Dismantle and Wash the Filtering Components
- Install the Scraper and Mesh
- Installation Of Scraping Components And Filter Mesh Comp
- Description of Pressure Control Function(Pressure control products have this function)
- Operation Instructions of The Ball Valve Automatic Controller
- PRODUCT FAULT ANALYSIS
- Packing List
- VEVOR®
- TOUGH TOOLS, HALF PRICE
- BESOIN D'AIDE? CONTACTEZ-NOUS!
- CARACTÉRISTIQUES DU PRODUIT
- ANALYSE DES DÉFAUTS DU PRODUIT
- Liste de colisage
- BRAUCHEN SIE HILFE? KONTAKTIERE UNS!
- Packliste
- HO BISOGNO DI AIUTO? CONTATTACI!
- Lista imballaggio
- Lista de embalaje
- VOORFILTER
- HULP NODIG? NEEM CONTACT MET ONS OP!
- Demonteer en was de filtercomponenten
- Paklijst
- BEHÖVS HJÄLP? KONTAKTA OSS!
- Packlista
Brand : Vevor
Model : BSK-T4-Q2-G
Category : Water filter pitcher