5800 - Saw Vevor - Free user manual and instructions
Find the device manual for free 5800 Vevor in PDF.

User questions about 5800 Vevor
0 question about this device. Answer the ones you know or ask your own.
Ask a new question about this device
Download the instructions for your Saw in PDF format for free! Find your manual 5800 - Vevor and take your electronic device back in hand. On this page are published all the documents necessary for the use of your device. 5800 by Vevor.
USER MANUAL 5800 Vevor
Affordable. Reliable. Home Improvement.
GAS CHAINSAWS
MODEL:4000 / 5200 / 5800 / 6200
Technical Support and E-Warranty Certificate
www.vevor.com/support
VEVOR
Affordable. Reliable. Home Improvement.
GAS CHAINSAWS
MODEL:4000 / 5200 / 5800 / 6200
natural_image
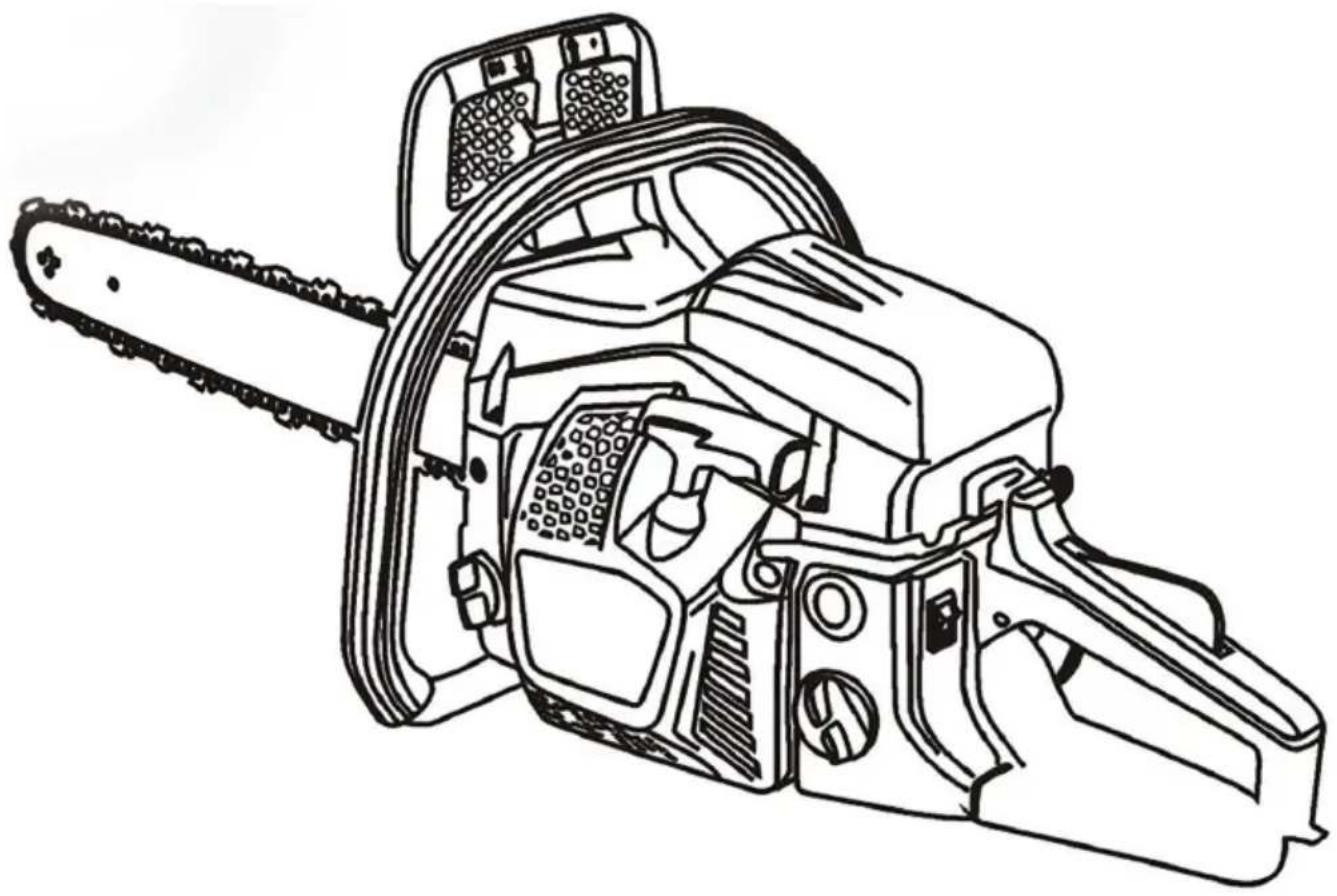
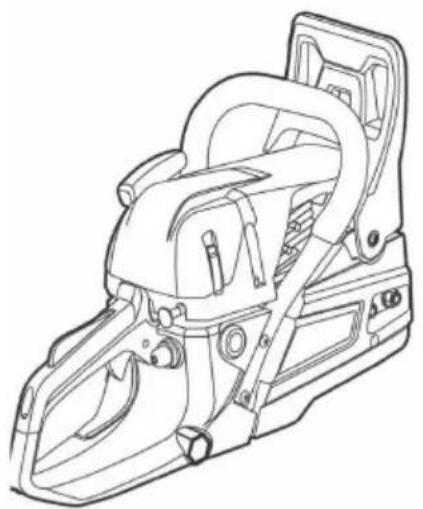
Line drawing of a chain-linking device with visible blades and housing (no text or symbols)This is the original instruction, please read all manual instructions care before operating. VEVOR reserves a clear interpretation of our user manual. The appearance of the product shall be subject to the product received. Please forgive us that we won't inform you again if there are technology or software updates on our product.
IMPORTANT
READ CAREFULLY BEFORE USE. KEEP FOR FUTURE REFERENCE.
Training
- Read the instructions carefully. Be familiar with the controls and the proper use of the product.
- Never allow children or people unfamiliar with these instructions to the product. Local regulations can restrict the age of the operator.
- Never operate the product while people, especially children, or pets nearby.
- Keep in mind that the operator or user is responsible for accident hazards occurring to other people or their property.
- The product must not be used by persons under the influence of drugs or medication.
- Do not operate the product if you are tired.
- Do not operate the product without guards or if it is damaged.
- Never use the product indoors.
- This product produces toxic exhaust fumes when the engine is sta
- During operation this product may generate dust, fumes and smoke containing chemicals that affect your health. So be careful when using product and protect yourself properly.
- Also avoid breathing exhaust fumes voluntarily; always hold the pro properly during operation.
- Wear gloves and keep hands warm.
Preparation
- This product can cause serious injuries. Read the instructions carefully for the correct handling, preparation, maintenance, starting and stopping the product. Become familiar with all controls and the proper use of product.
- Avoid operating while people, especially children, are nearby.
- Dress with proper clothing! Do not wear loose clothing or jewelry, can be caught in moving parts. Use sturdy gloves, non-skid footwear
and safety glasses is recommended.
-
Store the product in a dry, clean place protected from direct sunlight after the fuel tank has been emptied and the product is cleaned. The product must be stored inside only under these conditions.
-
If the cutting attachment strikes any foreign object or the product making any unusual noise or vibration, shut off the power source and the product to stop. Disconnect the spark plug connector from the sp plug and take the following steps:
-
inspect for damage,
-
check for, and tighten, any loose parts,
• have any damaged parts replaced or repaired with parts having equivalent specifications. -
Check the cutting attachment stops turning when the engine idles.
Operation
- This product should not be used for any other purpose than desc National regulations can restrict the use of the product.
- While operating, always wear substantial footwear and long trousers not operate the product when barefoot or wearing open sandals. Wea protective glasses or goggles.
- Ensure the area to be worked is clear from stones, sticks, wire e other objects that could damage the product.
- Thoroughly inspect the area where the product is to be used and all objects that can be thrown by the product.
- Before using the product and after any impact, check for signs of damage and repair as necessary.
- Never operate the product with damaged guards or without the gu place.
- Keep hands and feet away from the cutting attachment at all time especially when switching on the engine.
- Never allow children or people unfamiliar with the instructions to use product.
-
Stop using the product while people, especially children, or pets are nearby.
-
Only use the product in daylight or good artificial light.
-
Keep your body upright during operation. Do not lean forward. Make regular breaks and change your working position to stay concentrated.
-
Keep firm footing and balance during operation. Always use the half if provided.
-
Stop the engine before
-
cleaning or when clearing a blockage,
- checking, carrying out maintenance or working on the product,
-
adjusting the working position of the cutting attachment,
• leaving the product unattended, -
Ensure that the product is correctly located in a designated working position before starting the engine.
-
While operating the product, always ensure that the operating position is safe and secure.
-
Do not operate the product with a damaged or worn cutting attach
-
Keep the engine and silencer free of debris, leaves and excessive lubricant to reduce fire hazards.
-
Always ensure that all handles and guards are fitted when using t product. Never attempt to use an incomplete product or one fitted with unauthorised modification.
-
Always use two hands to operate a product fitted with two handles.
- Always be aware of your surroundings and stay alert for possible hazards of which you may not be aware due to the noise of the process.
-
Be careful when handling any cutting attachment / sharp edge fittings, trimming the filament line length. Ensure a new filament trimming line installed correctly before turning the product on.
-
Always ensure that air vents are kept clear of debris.
-
Only use cutting attachments as listed in the technical data within instructions. The use of other attachments leads to hazards resulting in personal injuries and property damage.
-
Never carelessly touch the product, you can burn yourself. While the product is in operation or shortly thereafter, its parts such as the ex pipe, engine, and other surfaces are extremely hot! Pay attention to t markings on the product.
Maintenance and storage
- Follow the maintenance and repair instructions for this product. New carry out any modifications to the product.
- When the product is stopped for servicing, inspection or storage, is the power source, disconnect the spark plug connector from the spark and make sure all moving parts have come to a stop. Allow the pro cool before making any inspections, adjustments, etc.
- Maintain and inspect your product regularly. Check for misalignment binding of moving parts, breakage of parts and any other condition that affect the product's operation. If damaged, have the product repaired before use. Many accidents are caused by poorly maintained products.
- Improper maintenance will lead to malfunction/ failure of the produc
- Inspect the product before each use, after dropping the product or exposing to other impacts to identify significant defects. Check for loose fasteners, fuel leaks and damaged parts, such as cracks in the cutting attachment.
- Never change the preset rotary speed or the engine and product Information about maintenance and repair is provided in this instruction manual.
- Store the product where the fuel vapour will not reach an open fl spark. Always allow the product to cool down before storing.
- When not in use, store the product out of the reach of children.
- Use only manufacturers recommended replacement parts and accessories.
- Secure the product during transport to prevent loss of fuel, damage injury.
- Clean and maintain the product as described in these instructions before storage. Always use guards on cutting attachments when storing
- Make sure that the air intake of the combustion engine is clear. It the air intake free of dust, dirt particles, gases and fumes.
- Make sure that air circulation is adequate and good. The product be easily accessible from all sides.
- Attach the transportation cover for the metal cutting attachment duri transport and storage.
Additional safety warnings for gas chainsaws
- Interrupt your work when you feel tired. Make regular breaks to regenerate. A moment of inattention while operating the product may in serious personal injury.
- Keep all parts of the body away from the saw chain. Do not ren material or hold material to be cut when saw chain is moving. Make the product is switched off when clearing jammed material. A moment inattention while operating the product may result in serious personal injury.
- Hold the product by insulated gripping surfaces only, because the chain may contact hidden wiring. Saw chains contacting a “live” wire make exposed metal parts of the product “live” and could give the o an electric shock.
- Keep all parts of the body away from the saw chain when the p operating. Before you start the product, make sure the saw chain is contacting anything. A moment of inattention while operating products I cause entanglement of your clothing or body with the saw chain.
- Always hold the product with both hands on the handles. Holding product with only one hand or on parts not intended for that increase risk of personal injury and should never be done.
- Wear safety glasses and hearing protection. Further protective equipment for head, hands, legs and feet is recommended. Adequate protective clothing will reduce personal injury by flying debris or accident contact with the saw chain.
- Do not operate a product in a tree. Operation of a product while tree may result in personal injury.
- Always keep proper footing and operate the product only when sta on a fixed, secure and level surface. Slippery or unstable surfaces su ladders may cause a loss of balance or control of the product.
- When cutting a limb that is under tension be alert for spring back the tension in the wood fibers is released the spring-loaded limb may the operator and/or throw the product out of control.
- Use extreme caution when cutting brush and saplings. The slender material may catch the saw chain and be whipped toward you or pu
off balance.
-
Carry the product by the handles/poles with the product switched c and away from your body. When transporting or storing the product a fit the guide bar cover. Proper handling of the product will reduce the likelihood of accidental contact with the moving saw chain.
-
Follow instructions for lubricating, chain tensioning and changing accessories. Improperly tensioned or lubricated chain may either break increase the chance for kickback.
-
Keep handles dry, clean, and free from oil and grease. Greasy, oil handles are slippery causing loss of control.
-
Cut wood only. Do not use product for purposes not intended. For example: do not use product for cutting plastic, masonry or non-wood building materials. Use of the product for operations different than inte could result in a hazardous situation.
-
Pay attention to national and local regulations. National and local regulations may restrict the use of this product.
-
Only use replacement guide bars and saw chains specified by the manufacturer or equivalent replacements. Using non-approved cutting attachments can result in personal injuries and damage to property.
-
Before using the product and after any impact or dropping, check signs of wear or damage and repair as necessary.
-
Never remove or modify any guard or safety component. Ensure the guards and other safety components necessary for machine operation in position, in good working condition and properly maintained to avoid injuries.
-
Remove branches in sections.
-
Beware of dangerous operating positions as well as of the risk of struck by falling branches or by those that rebound after hitting the
-
Beware of overhead power lines. Do not use the product in any p that causes any part to come within 10 m of overhead electrical line
-
Never cut in areas where the cutting attachment is out of sight.
Fuel handling
- Always switch the product off, disconnect the spark plug connector let the product cool down, before refueling it. Fuel and fuel vapor are flammable. Take care when handling fuel. Never smoke when you are refueling the product. Do not refuel the product, if there is an open the vicinity!
- Always use suitable aids such as funnels and filler necks. Do not any fuel on the product or its exhaust system. There is a risk of ig Remove spilled fuel carefully from all parts of the product.
Any residue that may be present must have been completely volatilize before the product is put into operation!
- Never refuel indoors.
- Never use the product in environments where there is a risk of e Exhaust gases and fuel fumes are noxious. Fuel fumes can ignite.
- Never breathe in any fuel fumes, when you are refueling the prod Never fill the tank in enclosed spaces, such as basements or sheds. There is a risk of poisoning and explosion!
- Avoid skin contact with petrol.
- Do not eat or drink, while you are refueling the product. If you have swallowed petrol or oil, or if petrol or oil has got into your eyes, the advice of a doctor immediately.
- Close the tank lid immediately after filling the tank. Make sure that properly closed.
- Never use the product without an air filter.
- Fuel vapor pressure may build up inside the fuel tank depending on fuel used, weather conditions and the tank venting system. To reduce the risk of burns and other personal injuries, remove the fuel cap can to allow any pressure build-up to release slowly.
- Be aware of fire risks, explosion and inhalation risks.
- Do not smoke while operating the product, handling fuel or near fuel
- Ensure the spark plug lead is secured, a loose lead may cause electrical arcing that could ignite combustible fumes and cause a fire explosion.
-
Check regularly for leaks from the fuel cap and fuel lines.
-
Use caution when handling fuel. To avoid any accidental fires, move product at least 3 metres (10') from the fuelling point before starting engine.
- Tighten the fuel cap thoroughly after refilling the fuel tank.
- Do not operate the product if it is leaking fuel. Do not remove the tank cap while the engine is running.
- Use only an approved container.
- Do not store cans of fuel or refill the fuel tank in any place whe a boiler, stove, wood fire, electrical sparks, welding sparks, or other sources of heat or fire which might ignite the fuel.
- If any fuel spillage occurs during refueling, use a dry rag to wipe spills and allow remaining fuel to evaporate before turning the engine again.
- If you have spilt fuel on yourself or on your clothes, change your and wash any part of your body that has come in contact with fuel turning the engine on again.
- If fuel is ignited, put out the fire with a dry powder fire extinguish
- If the fuel tank is drained, this should be done outdoors.
Vibration and noise reduction
To reduce the impact of noise and vibration emission, limit the time operation, use low-vibration and low-noise operating modes as well as wear personal protective equipment.
Take the following points into account to minimize the vibration and r exposure risks:
- Only use the product as intended by its design and these instruct
- Ensure that the product is in good condition and well-maintained.
- Use correct attachments for the product and ensure they in good condition.
- Keep tight grip on the handles/gripping surface.
- Maintain this product by these instructions and keep it well-lubricate (where appropriate).
- Plan your work schedule to spread any high vibration tool use ac
longer period of time.
- Prolonged use of the product exposes the user to vibrations that cause a range of conditions collectively known as hand-arm vibration syndrome (HAVS) e.g. fingers going white; as well as specific disease such as carpal tunnel syndrome.
- To reduce this risk when using the product, always wear protective and keep your hands warm.
- The symptoms of HAVS include any combination of the following: T and numbness in the fingers; Not being able to feel things properly; strength in the hands; Fingers going white (blanching) and becoming I and painful on recovery (particularly in the cold and wet, and probably in the tips at first). Seek medical advice immediately if such symptom experienced.
The European Physical Agents (Vibration) Directive has been brought in help reduce hand arm vibration syndrome injuries to users of product's vibration emission. The directive requires manufacturers and suppliers to provide indicative vibration test results to enable users to make inform decisions as to the period of time a product can be used safely on basis and the choice of tool.
Emergency
Familiarise yourself with the use of this product by means of this ins manual. Memorize the safety directions and follow them to the letter. will help to prevent risks and hazards.
-
Always be alert when using this product, so that you can recognize handle risks early. Fast intervention can prevent serious injury and data to property.
-
Stop the engine and disconnect the spark plug connector if there malfunctions. Have the product checked by a qualified professional and repaired, if necessary, before you operate it again.
-
In case of fire stop the engine and disconnect the spark plug cor Take fire-extinguishing measures immediately if the product switch is n longer accessible.

WARNING!
Never use water to extinguish a product on fire. Burn must be extinguished with special extinguishing agents! We recommend that you keep a suitable fire extinguisher within your work area!
Residual risks
Even if you are operating this product in accordance with all the safe requirements, potential risks of injury and damage remain. The following dangers can arise in connection with the structure and design of this product:
- Health defects resulting from vibration emission if the product is be used over long periods of time or not adequately managed and properly maintained.
- Injuries and damage to property due to broken cutting attachments the sudden impact of hidden objects during use.
- Danger of injury and property damage caused by flying and thrown objects.
- Burns, if touching hot surfaces.
- Kickback.
Symbols
On the product, the rating label and within these instructions you will among others the following symbols and abbreviations. Familiarise yourself with them to reduce hazards like personal injuries and damage property.
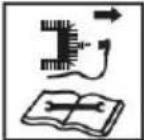
 | Read these operating instructions thoroughly before using the tool for the first time, and retain their future reference. |
 | Warning!Read the operating instructions before use! |
 | WARNING!Special safety precautions are required when wo with the appliance.Read and observe all warnings. |
 | Wear ear muffs. |
 | Wear safety goggles. |
 | Wear protective gloves. |
   | Starting the engine. If you pull out the choke (the back-right of the rear handle) to the point arrow, you can set the starting mode as follows:First-stage position - starting mode when the is warm.Second-stage position - starting mode when the engine is cold.Position: Upper-right of the aircleaner cover |
 | Fuel tank; mixing ratio: 40 parts petrol to 1 pa |
 | Petrol: ROZ 95/ROZ 98 |
 | 2-stroke motor oil: ISO-L-EGD/JASO FD |
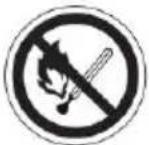 | Open flames and smoking in the vicinity of the appliance are strictly prohibited! |
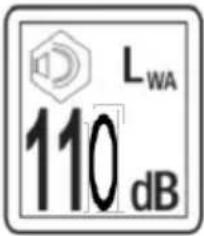 | Guaranteed sound power level of the appliance |
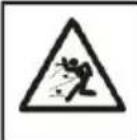
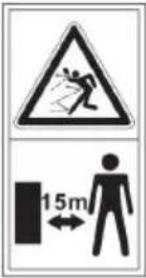 | Objects thrown by the product could hit the us other bystanders.Always ensure that other people and pets remai safe distance from the product when it is in op In general, children must not come near the are where the product is. |
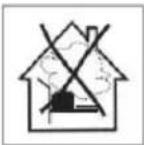 | Caution! Poisonous CO vapors (carbon monoxide vapors)!Do not use the appliance in closed rooms! |
 | WARNING!Hair can be sucked into the appliance! |
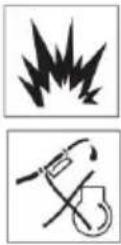  | Caution – petrol is highly flammable!Explosion hazard! Do not spill any fuel!Turn the appliance off and remove the spark pl connector before performing any maintenance wo |
 | Attention! Risk of suffocation! |
 | Attention, hot parts. Maintain a safe distance! |
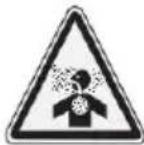
  | Watch out for flung away parts!Keep others away! Maintain a safe distance! |
 | Do not fill up on E10! |
 | Pour the gasoline mixture in here! |
natural_image
Line drawing of a chain-linking machine (no text or symbols)1
natural_image
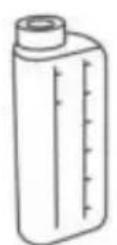
Simple line drawing of a rounded rectangular object with two small circular features on top and bottom (no text or symbols)2
natural_image
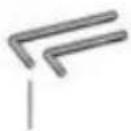
Simple line drawing of a U-shaped object with a flat top and rounded bottom (no text or symbols)3

natural_image
Close-up of a decorative metal bar with intricate floral and geometric patterns (no text or symbols)4

5

6
7
8
9

10

11

12

natural_image
Two blue wire loops with yellow connectors, no text or symbols visible13
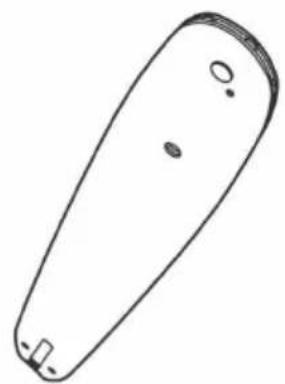
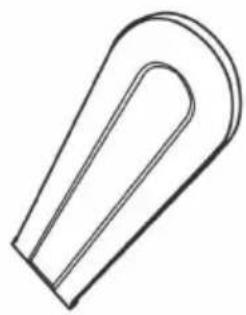
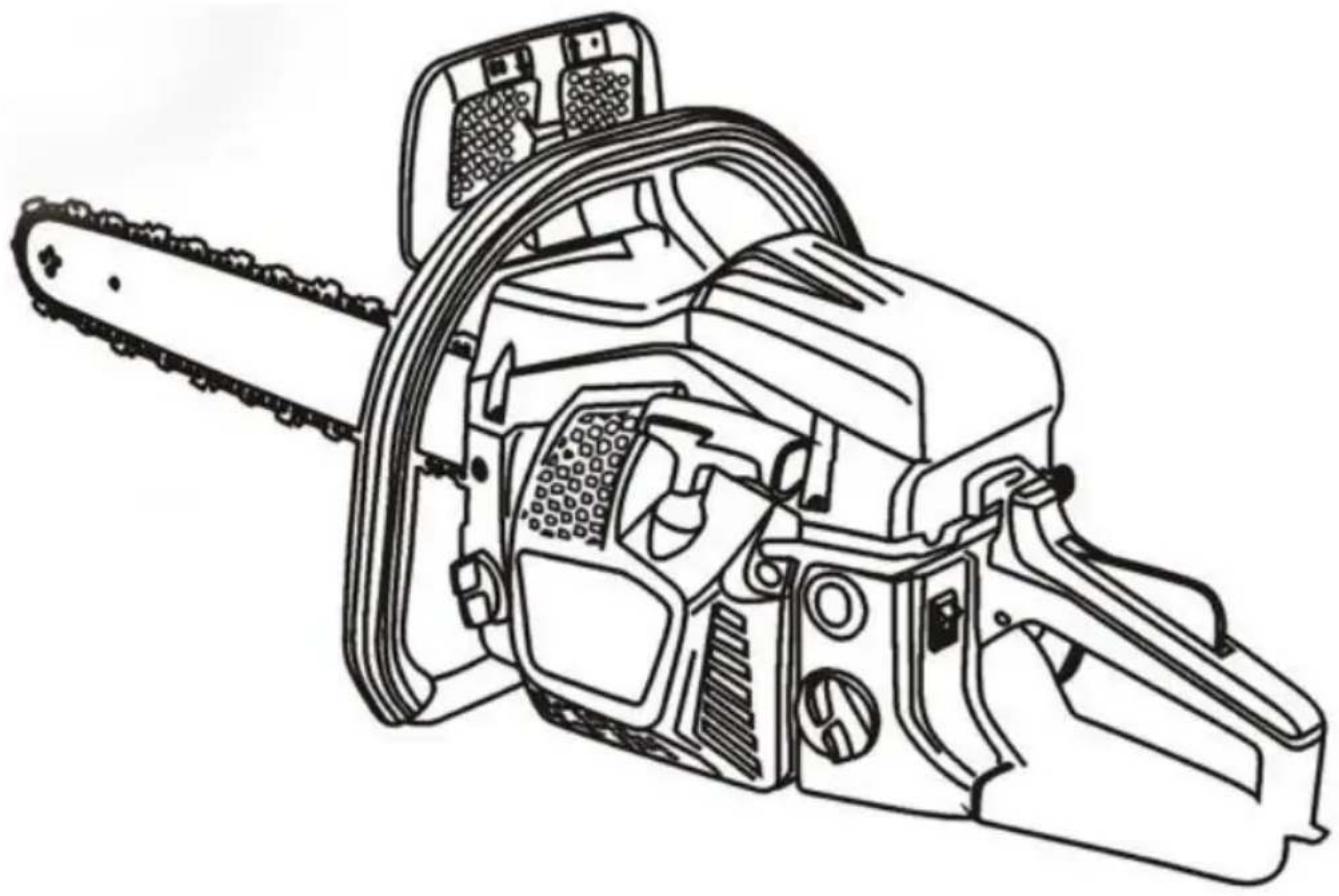
| 1 | Gasoline chainsaw(saw and cover from th chain brakes) | 8 | Hex key (4mm/5 mm) |
| 2 | Guide Bar | 9 | Slotted screwdriver |
| 3 | Guide bar scabbard | 10 | File |
| 4 | Saw chain | 11 | Insert teeth |
| 5 | Container | 12 | Screw (x2) |
| 6 | Multi tool | 13 | Earplug (x2) |
| 7 | Plug wrench |
ON/STOP switch. The ON/STOP switch should be used to stop the e A degree of noise from the machine is not avoidable. Route noisy w be licensed and limits for certain periods. Keep rest periods and they need to restrict the working hours to a minimum. For their personal protection and protection of people working nearby, an appropriate heat protection shall be worn.
WARNING: This machine produces an electromagnetic field during operation. Under some circumstances, this field may interfere with active or passive medical implants. To reduce the risk of serious or fatal in recommend persons with medical implants to consult their physician and the medical implant manufacturer before operating this machine.
- Do not operate a chain saw with one hand. Serious injury to the other helpers, bystanders or any combination of these persons may result from one-handed operation.
A chain saw is intended for two-handed use.
- Operate the chain saw only in a well-ventilated outdoor area.
- Do not operate saw from a ladder or in a tree, unless you are trained to do so.
Make sure the chain will not make contact with any object while star engine.Never try to start the saw when the guide bar is in a cut. - Do not put pressure on the saw at the end of the cut. Applying | can cause you to lose control when the cut is completed.
- Stop the engine before setting the saw down.
- Do not operate a chain saw that is damaged, improperly adjusted, completely and securely assembled. Always replace bar, chain, hand guard, or chain brake immediately if it becomes damaged, broken or otherwise removed.
- Keep the muffler away from your body and the guide bar and cha covered with a scabbard during transport.
-
Secure the machine during transportation.
-
Avoid touching rotating parts and use protective elements as design
- Ensure all bolts and nuts are tight before each start.
- Keep cables away from heat, oil, sharp edges, or moving parts.
- Wear personal protective equipment (PPE), including safety glasses, hard hat, ear plugs, gloves, special shoes, and tight-fitting clothing.
- Always use approved hearing protection.
- Regularly check your hearing due to potential noise damage from the chain saw.
- Keep body parts away from the chain when the engine is running.
- Maintain a minimum distance of 10 meters between children, bystand animals, and the work area.
- Do not operate the chain saw if you're tired, ill, upset, or under the influence of alcohol, drugs, or medication.
- Be physically fit and mentally alert while operating the chain saw.
- Consult your doctor if you have any health concerns that may affect ability to safely handle a chain saw.
Do not handle or operate a chain saw when you are fatigued, ill, or or if you have taken alcohol, drugs, or medication. You must be in physical condition and mentally alert. Chain saw work is strenuous. If have any condition that might be aggravated by strenuous work, check with your doctor before operating a chain saw.
Carefully plan your sawing operation in advance. Do not start cutting you have a clear work area, secure footing, and, if you are felling to planned retreat path.
Keep all parts of the body away from the saw chain when the chair operating. Before You start the chain saw, make sure the saw chain contacting anything. A moment of inattention while operating chain saw may cause entanglement of your clothing or body with the saw chain. Always hold the chain saw with your right hand on the rear handle left hand on the front handle. Holding the chain saw with a reversed configuration increases the risk of personal injury and should never be done.
NOTE: For chain saws, designed with the guide bar on the left side, reference to "right hand" and "left hand" positioning is reserved.
Do not operate the chainsaw with one hand! Serious injuries to the operator, assistants and others can result from operation with one har. The chainsaw is designed for two-handed operation. Start work only a freeing the work area from unnecessary objects.
Before starting the device, make sure that the chain is not in contact anything. During saw transportation, the motor must be turned off with bar and chain facing back. When carrying the chainsaw, always place cover on the bar.
WARNING: Always disconnect spark plug wire and place wire where i cannot contact spark plug to prevent accidental starting when setting i transporting, adjusting or making repairs except carburetor adjustments.
This chain saw for forest service is only designed for cutting wood.
Because a chain saw is a high-speed wood-cutting tool, special safety precautions must be observed to reduce the risk of accidents. Careless improper use of this tool can cause serious injury.
Handle fuel with caution
- Do not smoke while handling fuel or while operating the saw.
- Eliminate all sources of sparks or flame in the areas where fuel is or poured.
There should be no smoking, open flames, or work that could cause Allow engine to cool before refueling.
- Mix and pour fuel in an outdoor area on bare ground; store fuel is dry, well ventilated place; and use an approved, marked container for fuel purposes.
Wipe up all fuel spills before starting saw.
- Move at least 10 feet(3 meters) from fueling site before starting engi
- Turn the engine off and let saw cool in a non-combustible area, n leaves, straw, paper, etc. Slowly remove fuel cap and refuel unit.
- Store the unit and fuel in an area where fuel vapors cannot reach or open flames from water heaters, electric motors or switches, furnac
etc.
Be especially careful when trimming bushes and seedlings, as their el branches can fall into a chain, hit or unbalance you. When cutting a that is exposed to external load, beware of the impact after removing load. Before sawing, check the wood for foreign objects such as nails sure to remove them before cutting. Use the device only for its inter purpose. The saw is intended for cutting wood only. Do not use the other purposes not specified herein. For example cutting plastics, masc etc. Before work, clean and wipe the handles.
Do not cut above shoulder level, bend over too much and touch the with a saw chain. When sawing boards and logs, it is necessary to reliable stand (framing). Do not let the other person hold the log while sawing and never hold the log with your foot.
Do not work in low light conditions and on steep slopes.
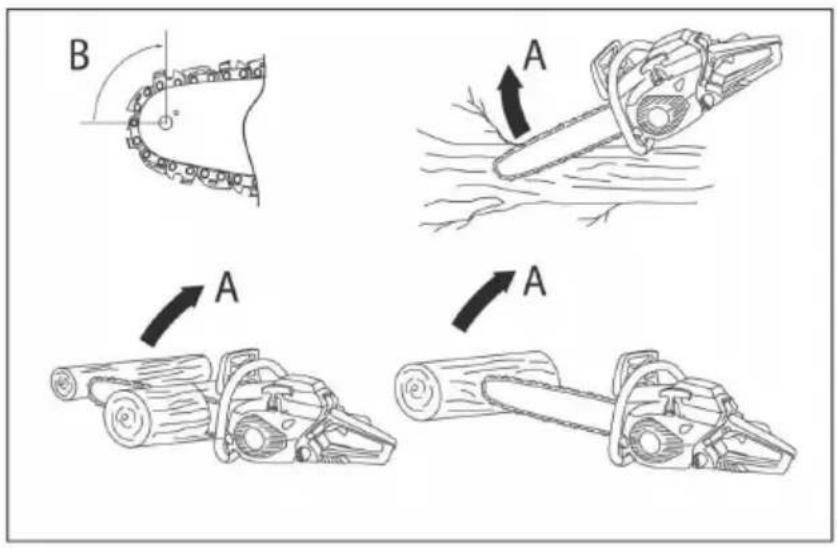
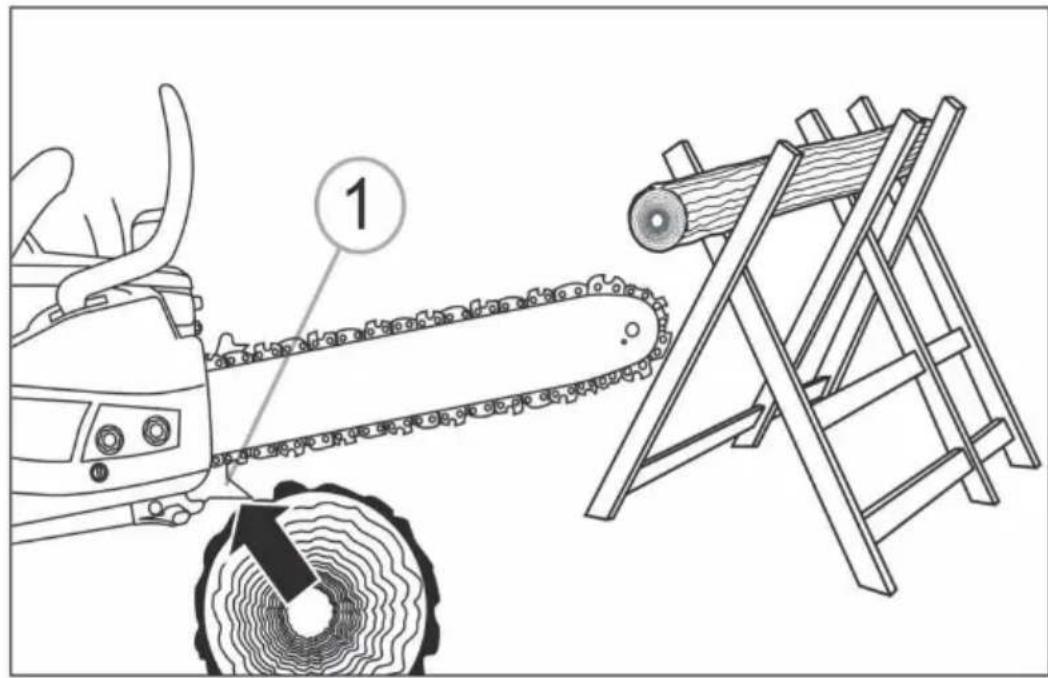
The saw should be guided in such a way that no part of the body cutting plane (Fig.1).
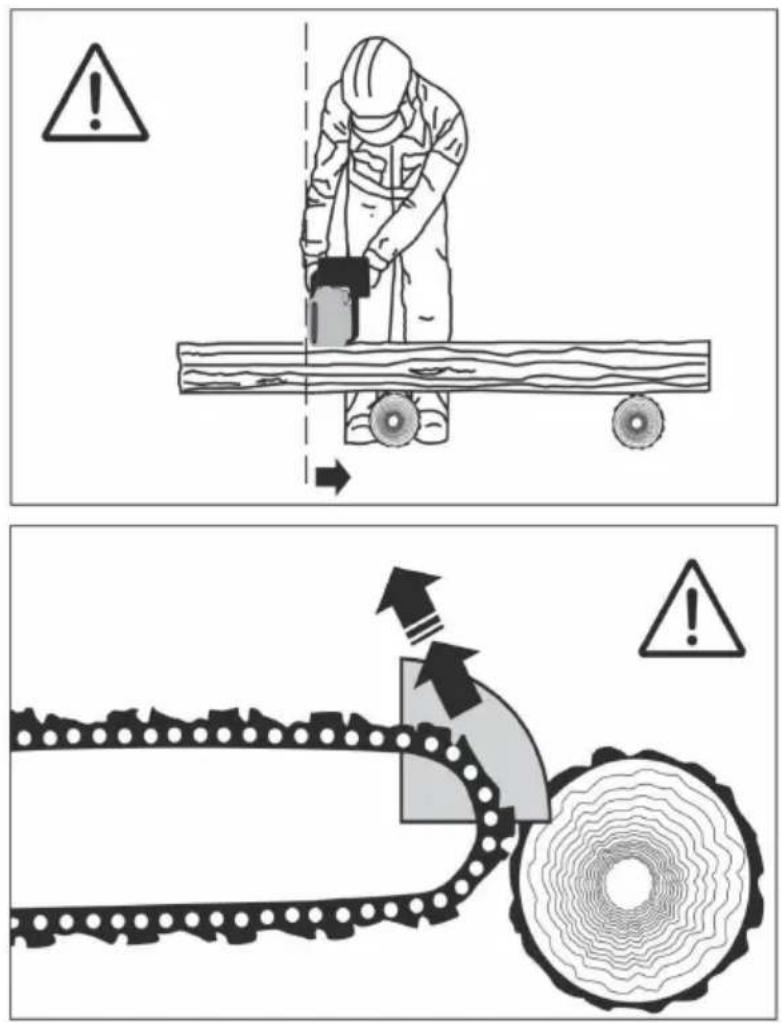
(Fig.1).
National regulation can restrict the use of the product.
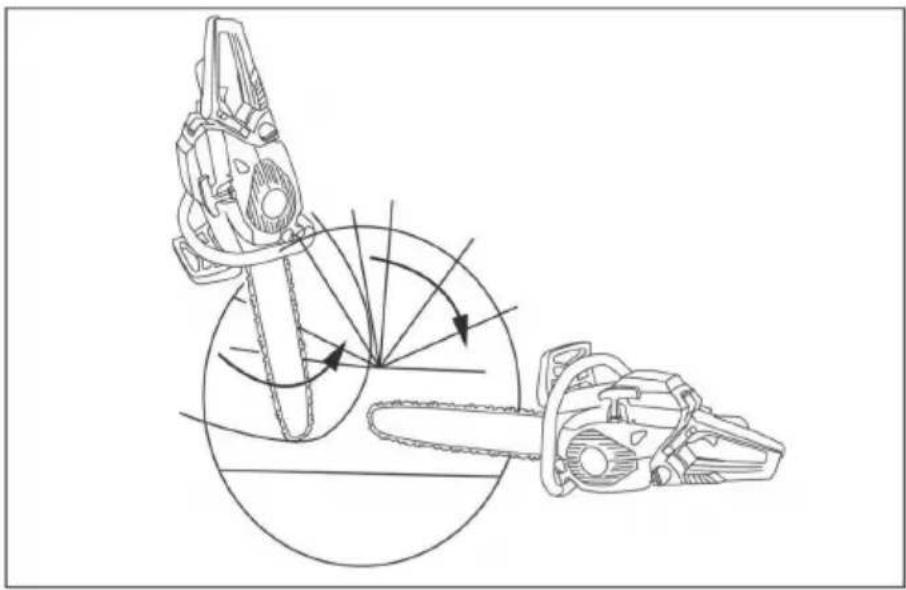
To avoid kickback
WARNING: Avoid kickback which can result injury. Kickback is the backward, upward or sudden forward motion of the guide bar occurring when the saw near the upper tip of the guide bar contacts any object such as a log or b when the wood closes in and pinches the saw chain in the cut.
Contacting a foreign object in the wood can also result in loss of chain saw
- Saw with guide bar at a flat angle.
- Never work with a loose, widely stretched or heavily worn-out chain.
- Ensure chain is sharpened correctly.
- Never saw above shoulder height.
- Never work with the tip of the guide bar.
- Always hold the product firmly with both hands.
- Always use a low kickback chain.
- Apply the metal gripping teeth for leverage.
- Ensure correct chain tension.
- Do only cut with the engine at high speeds.
- Do not let the nose of the guide bar contact a log, branch, or any other obstruction which could be hit while you are operating the product.
- Follow manufacturer's sharpening and maintenance instructions for the saw chain.
- Only use replacement guide bars and saw chains specified by the manufacturer or equivalent replacements.
Never use chainsaw as a planer.
Be careful! There is a danger of rebound when working with a chainsaw.
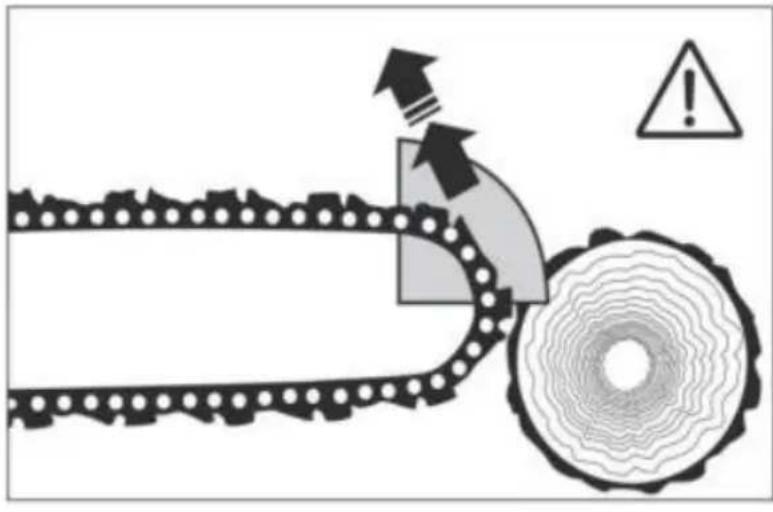
A rebound causes loss of control of the chainsaw and can cause serious or fatal injury. Bounce with rotation and bounce due to jamming represent the n danger when working with chain saws and are the main cause of most acci A rebound occurs when the front or top of the saw blade (especially the up quarter) touches the tree or other hard objects, and also when the cut in th closes and wedges the chain. Frontal contact with the upper part of the saw can cause a lightning fast reaction, in which the tool bounces up and back operator. Jamming of the chain at the bottom of the guide bar pushes the chainsaw out of the operator. Jamming of the chain at the top of the guide
pushes the device back to the operator. Any of these effects results in loss control of the saw and serious injury (Fig.2).
(Fig.2)
(Fig.2)
Do not operate the chainsaw with the air filter removed or the air filter covers removed. Avoid the poisonous effects of toxic gases! Exhaust fumes contain carbon monoxide (CO) and other gases hazardous to health and life. Do not have the device indoors. If during work you have experienced symptoms of poisoning, you need to catch your breath in fresh air and seek medical help. When find drain the fuel mixture from the tank.

WARNING!
Do not empty the fuel mixture into the sewer or to the ground. poured into special containers for fuel.
It is necessary to observe not only the general safety requirements given in section, but also the special instructions contained in other sections.
Non-observance of safety instructions can create a danger to the environment,
damage the tool, and also entail dangerous consequences for human health a life.
Failure to follow the safety instructions will void the warranty for damages.
Clothing and personal protective equipment (PPE)
- Secure long hair so that they are above the shoulder level.
- Do not wear loose fitting clothing or jewellery as those could be drawn in engine, catch the chain or undergrowth.
-
Use the following safety clothing and personal protective equipment (PPE) when operating the product:
-
helmet with visor and neck guard;
- hearing protection;
- dust mask;
- gloves with approved saw protection;
- protective leggings with approved saw protection;
- slip-resistant steel toe cap boots with approved saw protection.
PRECAUTIONS
To avoid personal injury, follow the rules:
- During operation, some parts of the device become very hot. Do not touch BEFORE they have completely cooled down.
- Do not place flammable objects on or near the unit.
- Do not transport, repair or service this product with fuel mixture in the tan
- Do not use your chain saw if it is damaged in any way.
- Do not use the machine in potentially explosive atmospheres or in the presence of naked flames.
- Do not use your chainsaw in an environment that does not comply with the requirements of this manual.
- Do not allow anyone to operate the tool without proper instruction.
- Do not operate the machine without the protective guards specified in the design. Wear the necessary personal protective equipment when operating the unit.
- Do not leave machine running unattended.
- Do not use the machine near other people or animals.
- For emergency action plans and procedures, and abnormal and alert situation turn off the machine immediately and contact a service center.
STRUCTUR

| 1 | Guide bar | 2 | Chain |
| 3 | Chain tensioner screw | 4 | Chain brake |
| 5 | Front handle | 6 | Starter handle |
| 7 | Air filter cover | 8 | Switch on/off |
| 9 | Oil tank cap | 10 | Starter cover |
| 11 | Fuel tank cap | 12 | Back handle |
| 13 | Throttle lock | 14 | Bar cover nut |
| 15 | Engine switch | 16 | Air flap lever |
TECHNICAL CHARACTERISTICS
| Model/Article | 4000 | 5200 | 5800 | 6200 |
| Maximum power (kW) | 1.3 | 1.8 | 2.0 | 2.7 |
| Engine displacement (cm3) | 39.59 | 51.5 | 54.53 | 61.49 |
| Tank volume for automatic chain lubrication (ml) | 210 | 260 | 260 | 260 |
| Fuel tank volume (ml) | 310 | 550 | 550 | 550 |
| Bar length (cm) | 14in/35cm | 18in/45cm | 20in/50cm | 20in/50cm |
| Chain pitch (inch) | 3/8 | 0,325 | ||
| Engine type | 2-stroke, air cooled | |||
| Type of fuel | gasoline mixture (regular gasoline) and oil for 2-stroke, air cooled | |||
Preparation for Operating
Unpacking:
At the time of purchase, your chainsaw is shipped to you in a cardboard sh box with special protective features inside to protect it during shipment.
To remove the tool from the carton, remove the packing tape, open the cart carefully remove the accessories carefully.

WARNING!
Always check the complete set and technical condition of the pro after unpacking and transportation.
Keep the packing materials in case you need to transport the unit.
Assembly requirements
Before you start up your chainsaw for the first time you must assemble the chain, adjust the chain, fill the fuel tank with fuel and add oil to lubricate th
Warning! Do not START the chain saw until it is completely set up for use. Read this manual carefully before using the machine. Pay particular attention safety precautions. This manual is a reference and instruction manual and
provides general information on the assembly, operation and maintenance of tl chainsaw.
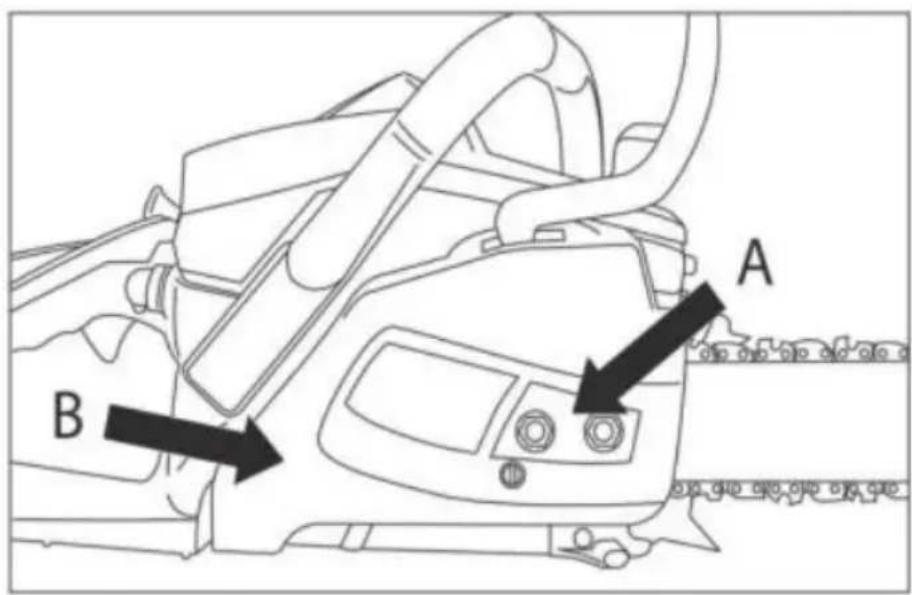
Drive bar and saw chain assemble.

WARNING!
Always wear protective gloves when working with the chain.
- Make sure that the device is turned off. Place the saw on a flat surface
- Move the chain brake shield to the operating position by pulling the lever you. Make sure the chain rotates around the bar (fig.4).
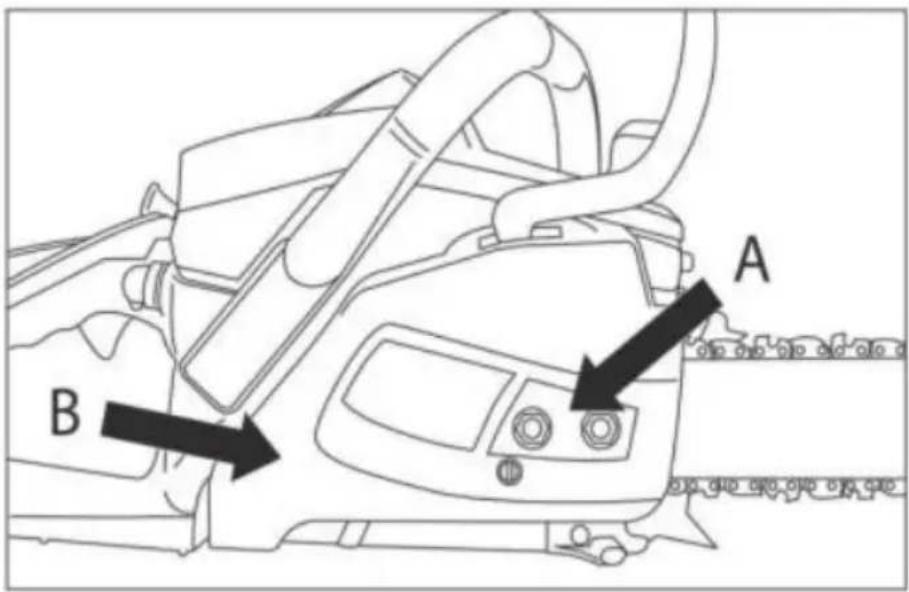
- Unscrew the two nuts (A) securing the bar and chain guard. Remove the protective cover together with the chain brake shield (B) (fig.5).
natural_image
Line drawing of a tractor's head and front view with no visible text or symbols(fig.4).

(fig.5)
- Install the bar so that the bar slot aligns with both bolts (C) (fig. 6).
- Spread the chain in a circle with the cutting edges (D) aligned with the on the chain saw guard and guide bar (fig. 7).

-
Run the chain behind the drive chain wheel (E). Check if the chain links a positioned between the teeth of the chain wheel.
-
Insert the links into the bar groove (F) on the periphery (Fig. 8).
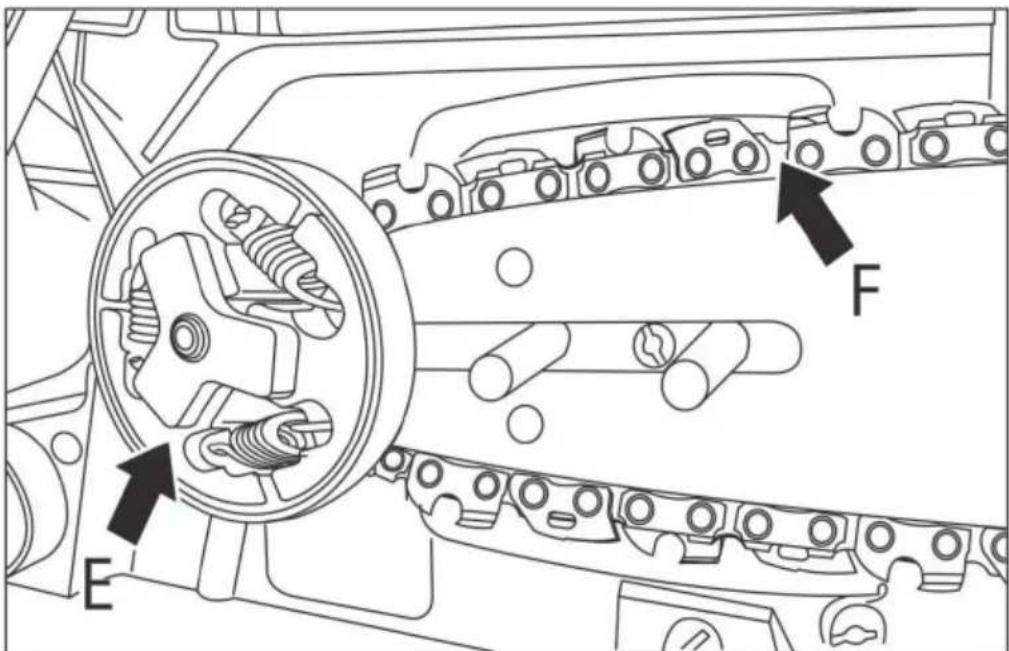
(Fig. 8)
- Rotate the chain to make sure the chain teeth are engaging the teeth of chain wheel. 9. Replace the chain guard and chain brake shield so that the into the holes provided and the chain tensioning pin fits into the lower hole bar (fig. 9).
natural_image
Technical line drawing of a mechanical assembly with gears and springs (no text or symbols)(fig. 9)
- Install both nuts, tighten them by hand, and then follow the instructions adjusting the chain tension. When the chain has reached the correct tension, tighten the nuts completely.
Chain tension adjustment

WARNING!
Always wear protective gloves when working with the chain.
Proper chain tension is extremely important and should be checked both before starting and periodically during operation. Taking the time to adjust the chain improve your performance and extend the life of your saw.

WARNING!
A new chain will sag quickly and require tensioning after 5 to 8
This is common with new chains and the tensioning interval incre
over time.
The cogwheel, tire, chain, and crankshaft will wear much faster if the chain loose or too tight. Look at fig. 10, which shows the correct tension for a cc (A), a warm chain (B), and a chain whose tension needs to be adjusted (C)
(fig. 10)
Chain tension adjusting procedure
-
Loosen the tire nuts (protective cover with brake shield) and turn the adjust screw (D) clockwise to tighten the chain. Turn the adjusting screw (D) counterclockwise to decrease chain tension. Make sure the chain is all the w around the bar (fig. 11).
-
After adjusting the chain, tighten the nuts securing the bar (protective cap
together with the brake shield) firmly. The chain is considered properly tension you can move it over the bar by hand with little effort. The chain should fit the underside of the saw blade and be pulled by hand away from the blade about 2-4 mm.

NOTE: If the chain has difficulty moving on the bar or stops, it is over tigh Loosen the tension.
Checking the chain brake
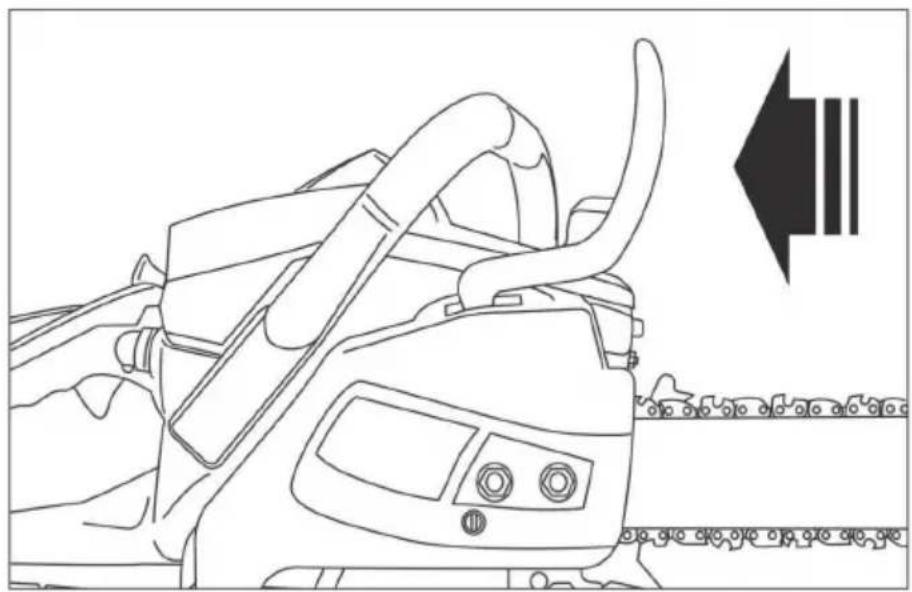
Your chain saw has a chain brake that reduces the chance of injury if the bounces. The safety device is triggered when pressure is applied to the brak guard. When the operator's hand strikes the shield, the chain stops sharply.
The chain brake has two positions:
-
The brake is off (the chain can move) when the brake shield is pulled by (fig. 12).
-
- The brake is on (the chain cannot move) with the brake shield pointin forward (B). In this case, the chain should not move on the bar (fig. 12).
To check the chain brake:
- Place the saw on a level surface and turn off the chain brake. The chain not come into contact with anything.
- Start the chainsaw by pressing the throttle lock key and the throttle key.
- Press the chain brake switch. The chain should stop quickly. Release the throttle key.

WARNING!
The brake shield must be in good condition and must make a distinctive click when moving from one position to another. Do
the unit if the brake shield cannot be moved to one of the positions does not stop when the brake is applied. Take the unit to a service repair.
Chain saw oil changing

WARNING!
Never use used oil! Waste oil is harmful to the environment and result in damage.
Chain saw oil should be used to lubricate the saw chain and bar. Use oil 1 contains additives to reduce friction and wear and to prevent resin build-up of bar and chain.

WARNING!
Before filling the oil tank, make sure that the chainsaw is turned
To fill the oil tank:
- Be sure to clean the surface around the oil tank cap to prevent dirt from inside.
- Unscrew the oil tank cap and pour in the chain saw oil (260 ml tank ca
- Screw the oil tank cap back on.
- Before you start, check the oil supply: switch on the chainsaw and hold in suitable bedding. If it is sufficiently lubricated, a light trail of dripping oil will 13).
natural_image
Line drawing of a hand using a chainsaw to cut tree stump with a dashed line indicating material flow (no text or symbols)(fig. 13)

WARNING!
Always check the oil level. Do not operate the chain saw if the insufficient oil to lubricate the chain.
Proper lubrication is essential to reduce chain and bar friction. Operating a cl saw with insufficient lubrication reduces performance and service life and caus fast chain and bar wear due to overheating. This chainsaw is equipped with a automatic lubrication system that provides the necessary amount of lubrication the bar and chain. As the engine speed increases so does the oil supply to
Chainsaw fuel mix
For best results use standard quality AI-92 gasoline without additives mixed with special oil for 2-stroke engines in the proportion indicated on the oil package recommended mixing ratio is 1:40, unless this differs from the oil manufacture recommendation. Mix fuel and 2-stroke oil in a special container until a homogeneous mixture is obtained.

WARNING!
Do not fill your chainsaw with pure gasoline. This will cause the malfunction and will void the manufacturer's warranty on the product.
It is not recommended to use a fuel mixture that has been stored for more days.
OPERATING PROCEDURE
Before starting work, check the work area and remove foreign objects that cause injury or damage the equipment.
Operate the tool only during daylight hours or in good lighting conditions.
Be careful and use common sense at all times when operating the saw. If an abnormal situation occurs, shut off the chainsaw immediately and contact an authorized service center.
Starting the engine
- Make good pillar and lay the chainsaw on the ground so that the chain
touch anything.
-
Hold the front handle with one hand and take the chainsaw to the ground the rear handle by stepping on it.
-
Set the ignition switch to the "on" position.
-
Pull the air damper lever toward you until it locks, the air damper will cl
-
Slowly pull the starter grip until you feel resistance, then pull the cable with steady and steady movement to a distance of no more than 50-60 cm. Repri procedure several times until the engine starts.
-
Press the throttle lock key and the throttle key, the carburettor air damper open automatically, the damper lever will return to its original position.

WARNING! Do not allow the cable to be pulled all the way out starter reel has stopped. This will cause the starter motor to bre not covered by the warranty.
Stop the engine
- Release the throttle lock key and throttle key to allow the engine to idle.
- To stop the engine, move the switch to the "off" position.
NOTE: To stop the engine in an emergency, engage the chain brake and switch to the "off" position.
Clipping
Small trees up to 15 cm diameter are usually cut off with a single cut. On trees, a pre-cut must be made. The notch determines the direction in which tree will fall.

WARNING!
Mark out your escape path (A) in advance and clear it of poss obstacles before you start cutting. The escape path must be in the dire opposite to the direction in which the tree is expected to fall (B) (fig. 1
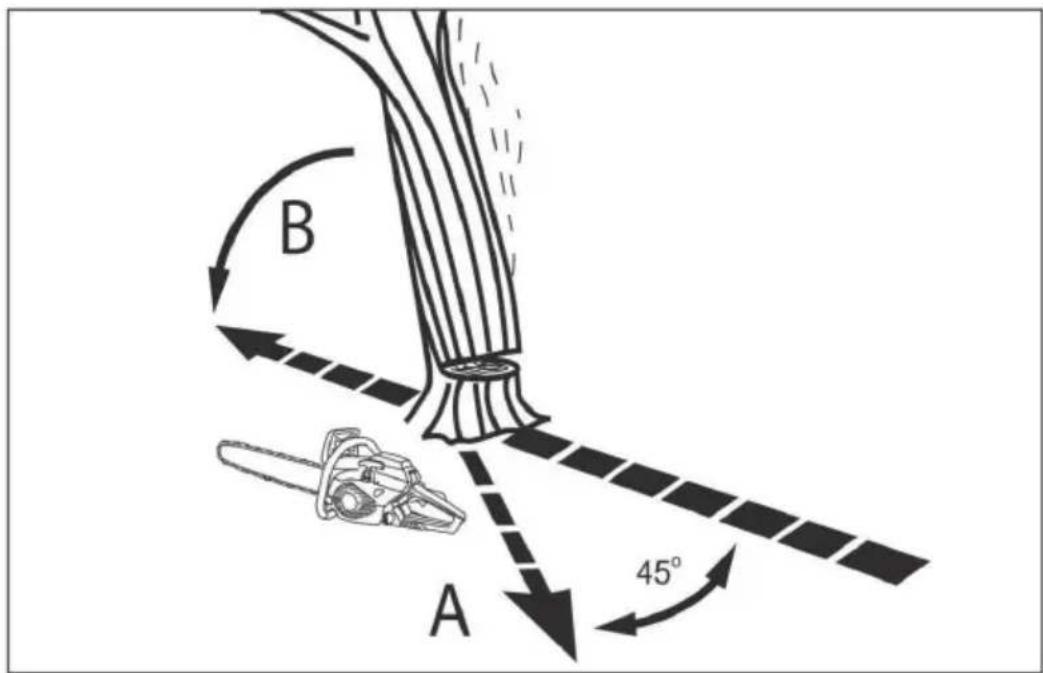
(fig. 14)

WARNING! When felling a tree is on a slope, the operator must higher on the slope as the felling tree may roll down.
NOTE: The direction of fell is determined by the notch. Before making the c assess the distribution of the large branches, the center of gravity of the cro and the natural slope of the tree to determine the direction of tree felling.

WARNING! Do not fell a tree in high or changing winds and if a risk of property damage. Do not fell a tree if there is a risk
wires. Coordinate felling with utilities and professionals.
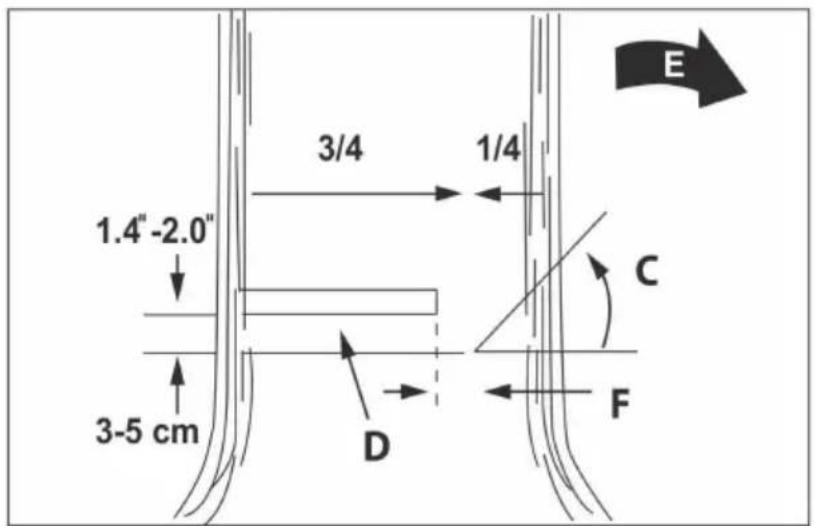
Felling a tree
Usually felling a tree consists of two basic operations: notching (C) and make final cut (D). Start the notching (C) on the side of the tree that is in the direction of fall (E). Make sure that the notch does not go too deep into the. The notch (C) must be made so that a sufficiently thick and strong part of (F) is left uncut. The notch must be wide enough to completely guide the face of the tree when felling. Warning! Do not walk in front of a tree that has already notched. The final cut (D) is made on the back side of the tree 3-5 cm at horizontal base of the notch (C) (fig. 15).
(fig. 15)
Never cut the trunk all the way down. Always leave an adequately thick and part of the trunk (F) uncut.
This uncut part prevents the tree from falling prematurely and guides it when. If you cut the trunk all the way down, you will lose control over the direction of fall. Place a wedge or lever in the cut before the tree becomes unstable and to move. This way, you will prevent the bar from jamming in the cut if you misjudged the direction of fall. Before you fell the tree, make sure that no c the fall area of the tree.

WARNING!
Before making the final cut, always make sure there are no ani any objects in the work area.
Final Cut
Use wooden or plastic wedges (A) to prevent the bar or chain (B) from jam the cut. The wedges also control the felling (fig. 16).

(fig. 16)
When the diameter of the trunk is greater than the length of the bar, two c made, as shown in (fig.17).
natural_image
Technical line drawing of a chain saw cutting through a gear (no text or symbols)(fig.17)
WARNING! During the final cut, if the chainsaw approaches the uncut pa trunk, the tree will begin to fall.
When the tree begins to fall, remove the chainsaw from the cut, stop the else place the chainsaw on the ground, and leave the area of the intended escape route. Perform all actions promptly, without delay.
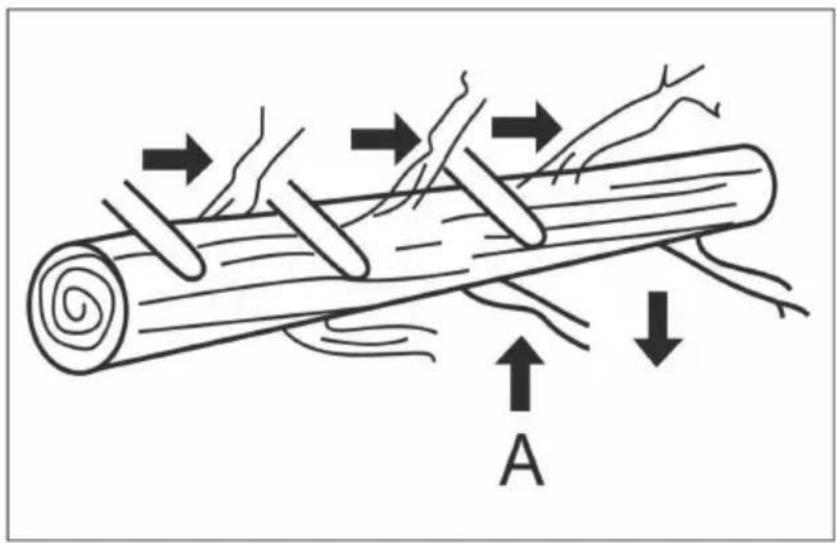
Branch pruning
WARNING! Do not trim branches while standing on the trunk. It may resu serious injury.
Branches are cut from the fallen tree. Do not cut branches that support the and keep it from rolling away (A) until you have cut the trunk (fig.18).
Branches subject to external loads should be cut from the bottom up to prev chainsaw from jamming.
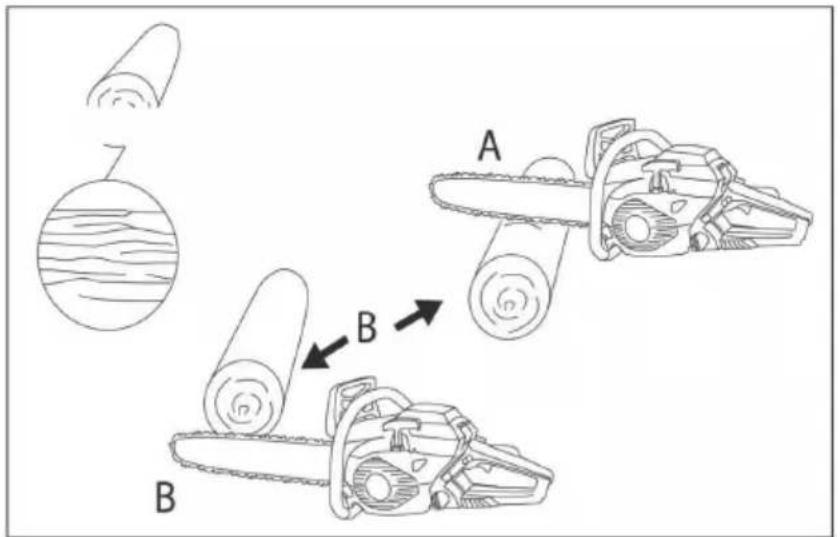
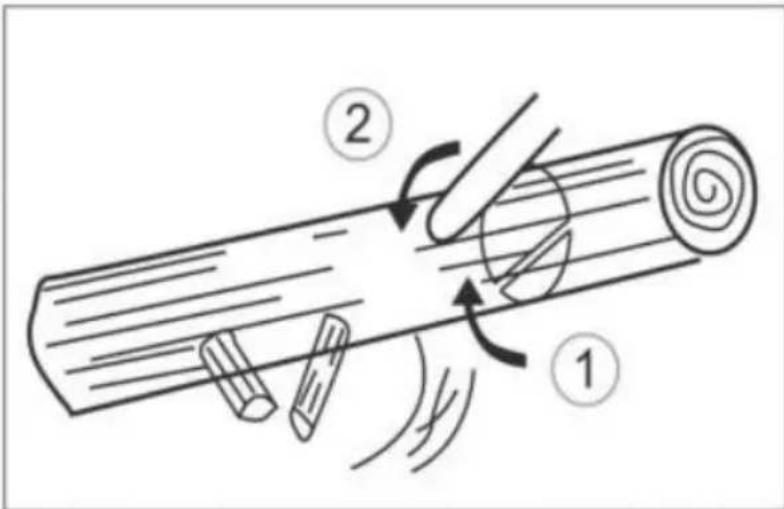
Crosscut sawing
The sawing is done across the wood fibers. When working on a slope, make that you are in a stable position and that you are standing on the higher slope in relation to the trunk.
Make sure that the trunk rests on its supports and that the end to be saw not on the ground. Make sure that the chain does not run into the ground, will cause rapid wear on the chain.
(fig.18)
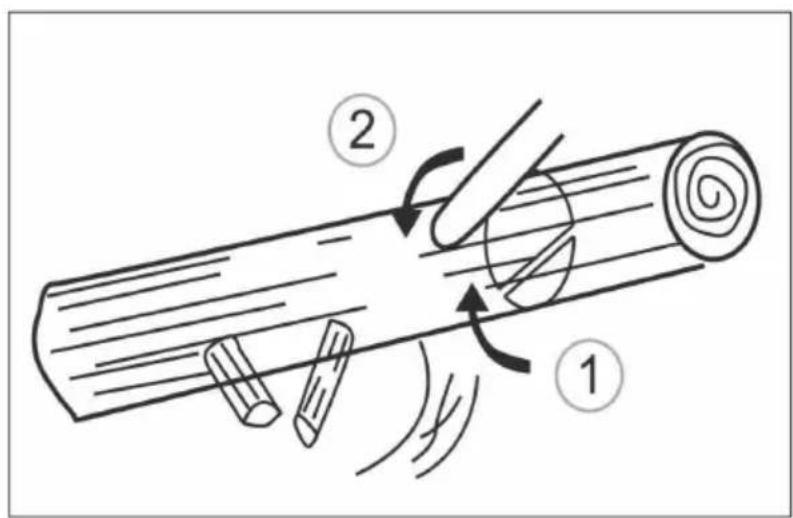
For cross-cutting sawing the toothed stop 1 (fig. 19) must be set on the log sawed off.
- If the log is supported along its entire length, drive the chain saw from the bottom while making sure that the chain does not run into the ground (fig. 2).
- When the trunk is at one end of its support, first cut down to about 1/3 diameter of the trunk to prevent splitting. Then finish the cut at the top so coincides with the first cut, avoiding jamming (fig. 21).

natural_image
Simple line drawing of a cylindrical object with a curved arrow pointing to its side (no text or symbols)(fig. 20)
(fig. 21)
- In the case where the trunk is supported at both ends, first cut from the of the diameter of the trunk to avoid splitting. Then finish the cut from below it coincides with the first cut, avoiding jamming (fig. 22).
For sawing into pieces, it is best to prop the trunk up with goaders. If this possible, the trunk should be lifted and placed on the logs. Make sure that trunk is securely fastened. For personal safety and to make sawing easier, obs the correct body position (fig. 23):
- Hold the saw firmly with both hands to the right of your body.
- Keep your left arm as straight as possible.
- Keep your balance by leaning on both feet.
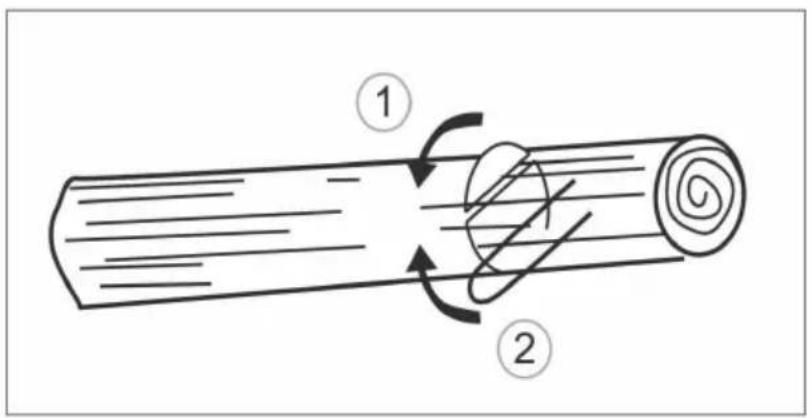
Fig. 22
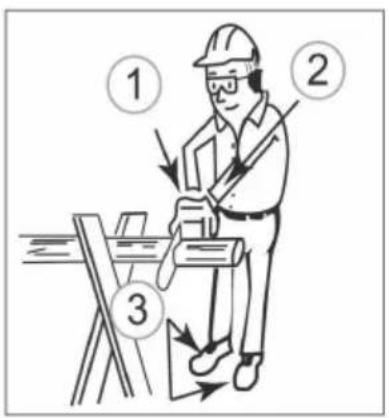
Fig. 23
TECHNICAL SERVICE

WARNING! All maintenance and repair work must be performed machine turned off.
Timely maintenance will extend the life of the tool and increase efficiency. W exception of the operations mentioned herein, the unit should be serviced by qualified personnel at an authorized service center.
Each time work is completed, check the unit for component integrity and tigh of connections. If necessary, contact an authorized service center.
Preventive maintenance
| Service Scheme | After finishing work/daily | After operating hours | ||
| Element | Action | 10 | 20 | |
| Screws/nuts/bolts | Checking/tensioning | • | ||
| Air filter | Cleaning/replacement | • | ||
| Spark plug | Cleaning/ regulating/ replacing | • | ||
| Fuel hoses | Check/replace if necessary | • | ||
| Chain brake components | Check/replace if necessary | • | ||
Air filter
Do not operate the saw without an air filter. Dust and particulate matter can the engine, dust and solid particles may get into the engine and cause dam and malfunction. Keep the air filter clean! Clean the air filter:
- Unscrew the plastic knob(A) and remove the air filter cover(B). (Fig. 24)
- Clean the air filter by tapping it lightly on a hard surface. Blow out the with compressed air (not more than 2 bar).(Fig. 25)
- Install the cleaned air filter element back, put the air filter cover in place, tighten the plastic knob.

WARNING!
Do not wash the filter with water.
Spark plug
For effective saw working keep the spark plug clean and free of carbon dep The distance between the electrodes must be correctly adjusted.
- Make sure that the saw is off.
- Clean the surface near the spark plug.
- Disconnect the high voltage cable from spark plug 1 (Fig. 26).
- Unscrew the spark plug 2 using the special spark plug wrench. DO NOT ANY OTHER TOOL. The electrodes of the spark plug should be light brown.
- Replace the spark plug if the ceramic insulator is chipped or if the electr burnt or soiled.
- Clean the electrodes to metal with fine sandpaper, check and adjust the g
- Check the gap between the ground electrode and the center electrode, us special probe. If necessary set the gap to 0.7-0.8 mm (Fig. 27).
- Install the spark plug into the engine and tighten securely. Insufficient tight of the spark plug can cause it to overheat and damage the engine.
- Connect it to the high-voltage wire.

Fig. 26
Fig. 27
Carburetor adjustment
The carburetor is factory set for optimum performance. If adjustments are necessary, contact your nearest authorized service center.
Preservation of the chain saw
When storing the chainsaw for more than 30 days, you must preserve it. If preservation instructions are not followed, the fuel remaining in the carburetor evaporate, leaving a viscous, jelly-like residue. This will cause engine start-up problems and costly repairs.

WARNING!
Do not store the chainsaw for more than 30 days unless the fo measures have been taken:
- Carefully open the fuel filler cap so that any excess pressure that may be present in the fuel tank is slowly released. Drain any remaining fuel.
- Start the engine and run it until it stops to allow the carburetor to evapo
- Allow the engine to cool (about 5 minutes).
- Use a spark plug wrench to remove the spark plug.
- Add 1 teaspoon of pure 2-stroke oil to the spark plug hole. Pull the star slowly several times to coat the internal components with oil. Reinsert the sp plug.
NOTE: Store the chainsaw in a dry place away from possible sources of fire as stoves, gas heaters, etc.
Preparing the machine for use after preservation
- Remove the spark plug.
- Retrieve the starter cord with a forceful pull to bleed excess oil from the tank.
- Clean and adjust the spark plug gap or insert a new spark plug with the gap.
- Prepare the chainsaw for operation.
- Fill the tank with a suitable fuel mix of gasoline and oil.
Cleaning the tool

WARNING!
Do not use water or other liquids for cleaning! Be careful when the tool. Always wear protective gloves.
Turn off the machine. Wait approximately 10-15 minutes for the engine to co completely. Wipe all surfaces and vents with a dry cloth or rag and use a brush if necessary.
To ensure proper operation of the oil pump, periodically clean the oil groove the oil inlet in the guide bar of the saw.
Bar maintenance
The toothed wheel on top of the guide bar should be lubricated regularly. Pr care of the bar, as described in this section, is essential to the quality of y saw.To lubricate the chain sprocket, we recommend the use of a grease gun included).
To maintain the bar chain wheel:
Turn off tool, allow bar and chain to cool.
Clean the toothed chain wheel. Place the needle-shaped nozzle of the syringe the grease hole and inject grease until it appears on the outside edge of the bar wheel (fig. 28).
Move the chain by hand. Repeat the above lubrication procedure until the end chain bar wheel is lubricated.
The bar should be rotated every 8 hours of operation for even wear. Keep groove and lubrication hole clean with the cleaning tool (not supplied) (fig. 29
natural_image
Illustration of hands assembling a chain link with a tool (no text or symbols)
natural_image
Illustration of a hand holding a pen or stylus, no text or symbols present(fig. 28)

(fig. 29)
Regularly inspect the rails for wear, remove burr if necessary, and clean the right angles with a flat file (fig. 30).
Chain Maintenance
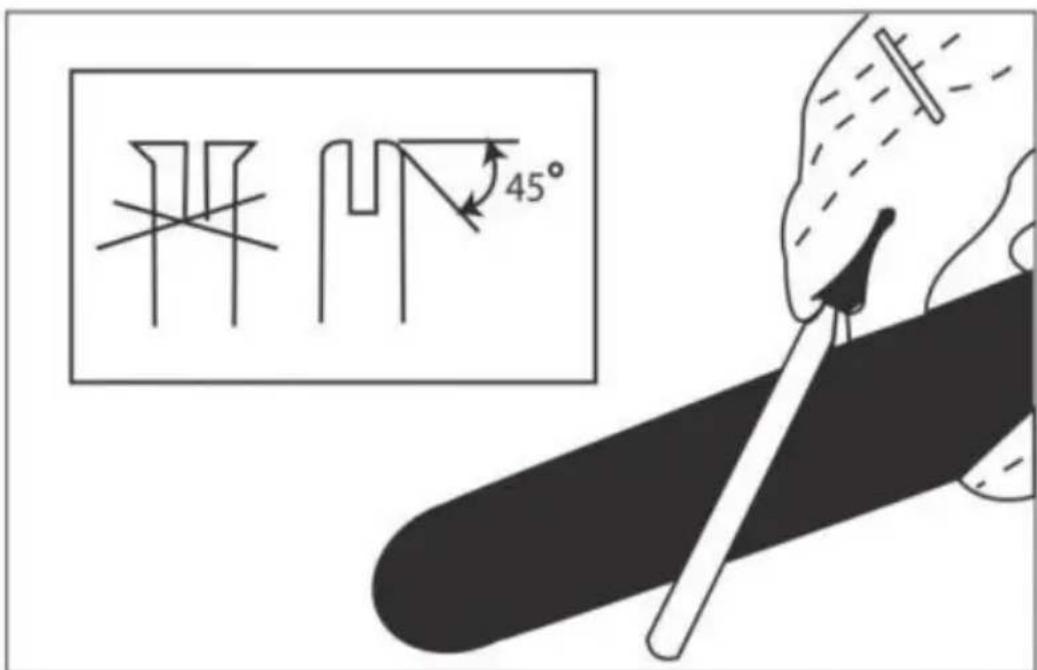
First the shortest saw tooth is sharpened. Its length is the target length for sharpening all other teeth of the saw chain. Guide the file as shown in the illustration. The file holder makes it easier to guide the file during sharpening has a marking for the correct 30^ sharpening angle (align the marking with the direction of the saw chain). It limits the penetration depth (4/5 of the file dia (fig. 30).
(fig. 30)
(fig. 31)
Even a slight excess of the depth gauge tooth should be ground down with special flat file. The depth gauge should be rounded at the front.
At the end of the sharpening process, the height of the depth stop should be checked with a chain gauge (fig. 31).
POSSIBLE MALFUNCTIONS AND TROUBLESHOOTING METHODS
| Problem | Possible reason | Corrective action/s |
| Engine does not start | Violation of start-up procedures. | Follow the instructions in manual. |
| Incorrect carburettor setting. | Adjust the carburettor at an authorized service center. | |
| Dirty spark plug. | Clean spark plug/adjust clearance replace spark plug. | |
| Fuel filter plugging. | Replace the fuel filter. | |
| Saw starts, but motor runs with low power. | Incorrect position of the air damper control. | Adjust the air damper. |
| Dirty spark plug. | Clean spark plug/adjust clearance replace spark plug. | |
| The air filter is dirty. | Remove, clean and reinstall the fi | |
| Incorrect carburettor adjustment. | Adjust the carburettor at an authorized service center. | |
| The engine stops. | Incorrect carburetor adjustment. | Adjust the carburetor at an author service center. |
| The engine mount is loose. | Clean spark plug/adjust clearance or replace spark plug. | |
| The chain brake does not work. | The brake mechanism damaged. | Contact an authorized service cent |
| Excessive smoke emission. | Incorrect carburettor adjustment. | Adjust the carburettor at an authorized service center. |
| Incorrectly prepared fue mixture. | Use a properly prepared fuel mixt the proportion indicated on the ca oil for 2-cycle internal combustion engines. | |
| The saw chain is no lubricated. | The oil pump is damaged. | Contact an authorized service cent |
| The oil tank is empty. | Fill up with chain saw oil. | |
| Oil filter is plugged. | Contact an authorized service cent |
Limit condition criteria.
The criterion for an end-of-life condition of a chainsaw is a condition in which further operation of the chainsaw is not permitted or considered sub-commercial. For example, excessive wear, corrosion, deformation, aging or destruction of p or their combination, if they cannot be repaired in authorized service centers original parts, or if it is economically inexpedient to repair.
Criteria for the limit state of the chainsaw are:
- Deep corrosion and cracks on the surfaces of the load-bearing and body p
- Excessive wear or damage to the engine and saw chain drive mechanisms combination of these;
- End of life.
CRITICAL PERSONNEL ACTIONS AND FAILURES
A list of possible malfunctions classified as an incident, accident or critical failure, the equipment and personnel actions in case of their occurrence is given in table:
| Problem | Classification | Personnel actions |
| Reducing the rotation speed of the working to | Incident | Contact an authorized service center. |
| Sparking and/or excessive vibration. | Accident | Take measures to prevent fire. Contact an authorized service center |
| Melting of the plastic. Loss of structural integri of the product. | Critical failure | Take measures to prevent fire.Contact an authorized service center |
The table shows the criteria for the limit states of the power tools (failure indications). If these signs appear, the product may be considered to have re a "limiting condition" - a condition of the machine and/or equipment in which operation is impractical, or restoration of their serviceable condition is impossible or impractical.
To confirm this condition, the equipment must be taken to an authorized service center for diagnostics.

Technical Support and E-Warranty Certificate www.vevor.com/support
VEVOR
Affordable. Reliable. Home Improvement.
BENZIN-KETTENSÄGEN
MODELL: 4000 / 5200 / 5800 / 6200
www.vevor.com/support
MODELL: 4000 / 5200 / 5800 / 6200

natural_image
Line drawing of a chain-linking device with visible blades and housing (no text or symbols)(Abb. 1).
(Abb.2)
natural_image
Line drawing of a tractor's front wheel and side-mounted sensors, with no visible text or symbols(Abb. 4).
(Abb. 5)
(Abb. 8)
natural_image
Technical line drawing of a mechanical assembly with gears and springs (no text or symbols)(Abb. 9)
natural_image
Line drawing of a tractor's head and front view with no visible text or symbols(Abb. 12)
natural_image
Line drawing of a tractor with visible control panel and gear mechanism, no text or symbols present(Abb. 12)
natural_image
Line drawing of a person using a chainsaw to cut tree stump, showing motion and dust trail (no text or symbols)(Abb. 13)

WARNUNG!
natural_image
Technical line drawing of a mechanical device with two chains, showing gear and blade alignment (no text or symbols)(Abb. 17)
natural_image
Simple line drawing of a log with a spiral pattern and an arrow indicating direction (no text or symbols)(Abb. 20)

(Abb. 21)
Fig. 22

Fig. 23
TECHNISCHER SERVICE

natural_image
Close-up of a hand holding a small white product box with grid pattern inside, next to a black industrial machine handle (no visible text or symbols)(Abb. 25)
Zündkerze
Fig. 26
Fig. 27
Vergasereinstellung
natural_image
Illustration of hands assembling a chain with a tool (no text or symbols)
natural_image
Illustration of a hand holding a pen or stylus (no text or symbols present)(Abb. 28)
(Abb. 29)
(Abb. 3 1 )
Affordable. Reliable. Home Improvement.
TRONÇONNEUSES À ESSENCE
MODÈLE : 4000 / 5200 / 5800 / 6200
www.vevor.com/support
VEVOR
Affordable. Reliable. Home Improvement.
GAS CHAINSAWS
MODÈLE : 4000 / 5200 / 5800 / 6200

natural_image
Line drawing of a chain-linking device with visible blades and mounting brackets (no text or symbols)
natural_image
Diagram of a conveyor belt system with gear and a circular pile, showing motion direction and warning symbol (no text labels)(Fig.1).
(Fig.2)
(Fig. 8)
natural_image
Technical line drawing of a mechanical assembly with gears and springs (no text or symbols)(fig. 9)
natural_image
Line drawing of a tractor's head and front view with no visible text or symbols(fig. 12)

natural_image
Line drawing of a tractor with visible control panel and gear mechanism, no text or symbols present(fig. 12)
natural_image
Line drawing of a person using a chainsaw to cut tree stump, showing motion and dust trail (no text or symbols)(fig. 13)

AVERTISSEMENT!
natural_image
Technical line drawing of a chain saw cutting process with directional arrows indicating motion (no text or symbols)(fig.17)

AVERTISSEMENT!
(fig.18)
natural_image
Simple line drawing of a cylindrical object with a curved arrow pointing to its side (no text or symbols)(fig. 20)

(fig. 21)
Fig. 22

Fig. 23
SERVICE TECHNIQUE

natural_image
Close-up of a hand holding a small white object with grid pattern inside a mechanical device (no visible text or symbols)(Fig.25)
Bougie
Fig. 26

Fig. 27
natural_image
Illustration of hands assembling a chain with a tool (no text or symbols)
natural_image
Illustration of a hand holding a pen or stylus, no text or symbols present(fig. 28)
(fig. 29)
(fig. 3 1 )
Affordable. Reliable. Home Improvement.
BENZINE KETTINGZAGEN
MODEL: 4000 / 5200 / 5800 / 6200
www.vevor.com/support
VEVOR
Affordable. Reliable. Home Improvement.
GAS CHAINSAWS
MODEL: 4000 / 5200 / 5800 / 6200

natural_image
Line drawing of a chain-linking device with visible blades and housing (no text or symbols)(Figuur 1).
(Figuur 2)
natural_image
Line drawing of a tractor's head and front compartment with no visible text or symbols(figuur 4).
(figuur 5)
(Afbeelding 8)
natural_image
Technical line drawing of a mechanical assembly with gears and springs (no text or symbols)(figuur 9)
natural_image
Line drawing of a tractor's head and front compartment with no visible text or symbols(figuur 12)

natural_image
Line drawing of a tractor's head and front wheel assembly, with no visible text or symbols(figuur 12)
Om de kettingrem te controleren:
natural_image
Line drawing of a hand using a chainsaw to cut tree stump, showing motion and dust trail (no text or symbols)(figuur 13)

WAARSCHUWING!
(figuur 16)
natural_image
Technical line drawing of a mechanical device with two chains, showing motion arrows around a central blade (no text or symbols)(figuur 17)

WAARSCHUWING!
(figuur 18)
natural_image
Simple line drawing of a cylindrical object with a curved arrow indicating direction (no text or symbols)(figuur 20)
(figuur 21)
Fig. 22
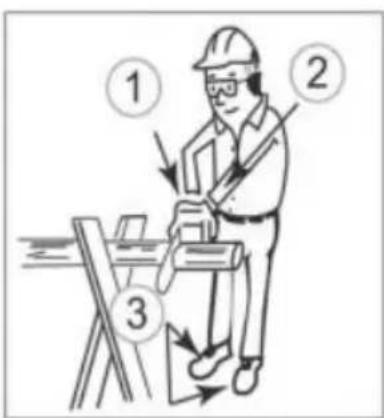
Fig. 23
TECHNISCHE SERVICE
natural_image
Close-up of a hand holding a small white plastic component next to a black industrial machine (no visible text or symbols)(Figuur 25)
Bougie
Fig. 26
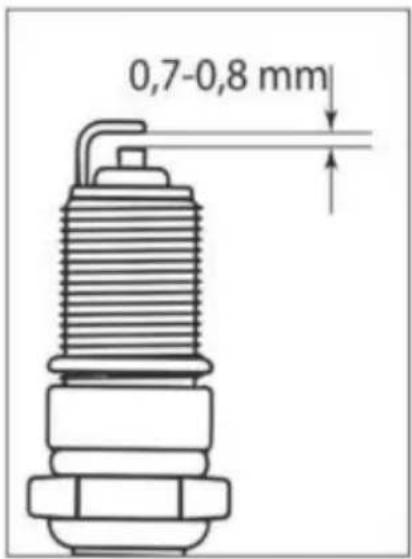
Fig. 27
natural_image
Illustration of hands connecting a chain to a mechanical component (no text or symbols)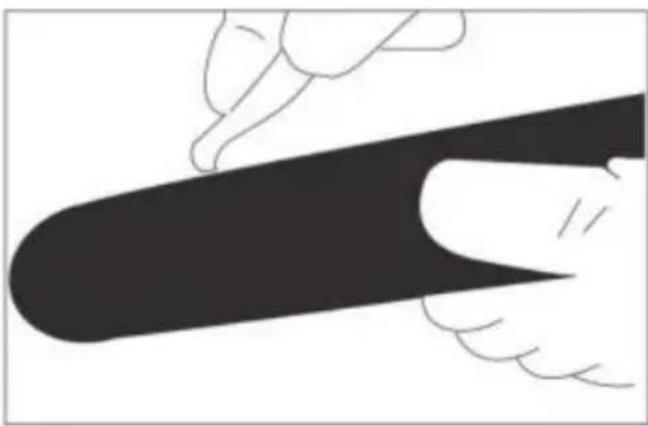
natural_image
Illustration of a hand holding a pen or stylus, no text or symbols present(figuur 28)
(figuur 29)
(figuur 3 1 )
Affordable. Reliable. Home Improvement.
BENSINDRIVNA MOTORSÅGAR
MODELL: 4000 / 5200 / 5800 / 6200
www.vevor.com/support
VEVOR
Affordable. Reliable. Home Improvement.
GAS CHAINSAWS
MODELL: 4000 / 5200 / 5800 / 6200

natural_image
Line drawing of a chain-linking device with visible blades and mounting brackets (no text or symbols)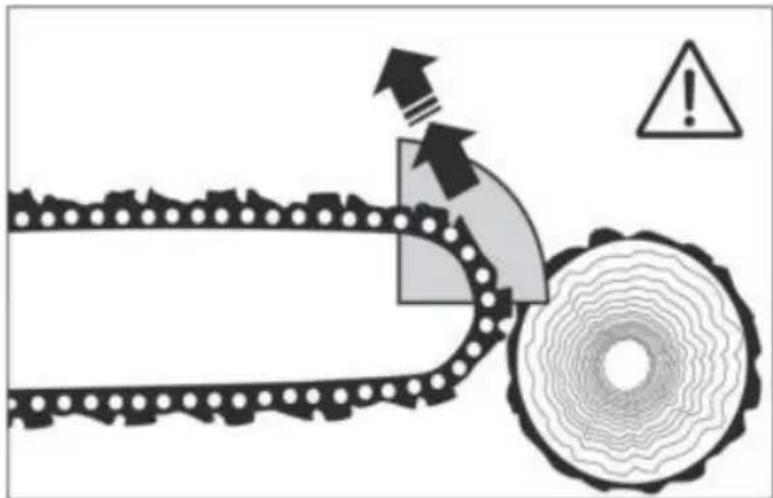
natural_image
Diagram of a conveyor belt system with gear and wheel, showing motion direction and warning symbol (no text labels)(Bild 1).
(Bild 2)
natural_image
Line drawing of a tractor's head and front wheel assembly (no text or symbols)(bild 4).
(bild 5)
(Bild 8)
natural_image
Technical line drawing of a mechanical assembly with gears and springs (no text or symbols)(bild 9)
natural_image
Line drawing of a manual chain cutter cutting into a tree stump (no text or symbols)(bild 13)

WARNING!
natural_image
Technical line drawing of a mechanical device with two chains, showing gear and blade alignment (no text or symbols)(bild 17)

WARNING!
natural_image
Simple line drawing of a cylindrical object with a curved arrow pointing to its side (no text or symbols)(bild 20)

(bild 21)
Fig. 22
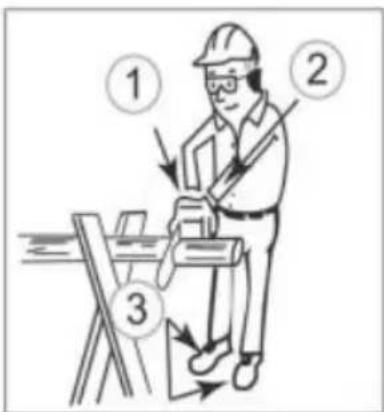
Fig. 23
TEKNISK SERVICE

natural_image
Close-up of a hand holding a small white product box with grid pattern inside, next to a black industrial machine handle (no visible text or symbols)(Bild 25)
Tändstift
Fig. 26

Fig. 27
Förgasarjustering
natural_image
Illustration of hands assembling a chain with a tool (no text or symbols)
natural_image
Illustration of a hand holding a pen or stylus (no text or symbols present)(bild 28)

(bild 29)
(bild 31)
Affordable. Reliable. Home Improvement.
MOTOSIERRAS DE GASOLINA
MODELO: 4000 / 5200 / 5800 / 6200
www.vevor.com/support
VEVOR
Affordable. Reliable. Home Improvement.
GAS CHAINSAWS
MODELO: 4000 / 5200 / 5800 / 6200

natural_image
Line drawing of a chain-linking device with visible blades and mounting brackets (no text or symbols)(Figura 1) .
(Figura 2)
(Figura 8)
natural_image
Technical line drawing of a mechanical assembly with gears and springs (no text or symbols)(figura 9)
natural_image
Line drawing of a tractor's head and front compartment with no visible text or symbols(figura 12)

natural_image
Line drawing of a tractor with visible control panel and gear mechanism, no text or symbols present(figura 12)
natural_image
Line drawing of a person using a chainsaw to cut tree stump, showing motion and dust trail (no text or symbols)(figura 13)

¡ADVERTENCIA!
natural_image
Technical line drawing of a mechanical device with two chains, showing gear and blade alignment (no text or symbols)(fig.17)

¡ADVERTENCIA!
(fig.18)
natural_image
Simple line drawing of a log with a spiral tip and an arrow indicating direction (no text or symbols)(figura 20)

(figura 21)
Fig. 22

Fig. 23
SERVICIO TÉCNICO

natural_image
Close-up of a hand holding a small white plastic object with grid pattern inside, next to a mechanical device (no visible text or symbols)(Fig.25)
Bujía
Fig. 26
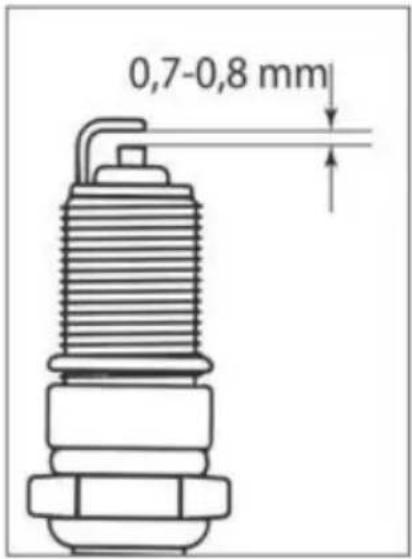
Fig. 27
Ajuste del carburador
natural_image
Illustration showing two hand positions: one with chains and a tool, the other with a tool (no text or symbols)(figura 28)

(figura 29)
(figura 3 1 )
Affordable. Reliable. Home Improvement.
MOTOSEGHE A GAS
MODELLO: 4000 / 5200 / 5800 / 6200
www.vevor.com/support
VEVOR
Affordable. Reliable. Home Improvement.
GAS CHAINSAWS
MODELLO: 4000 / 5200 / 5800 / 6200
natural_image
Line drawing of a chain-linking device with visible blades and mounting brackets (no text or symbols)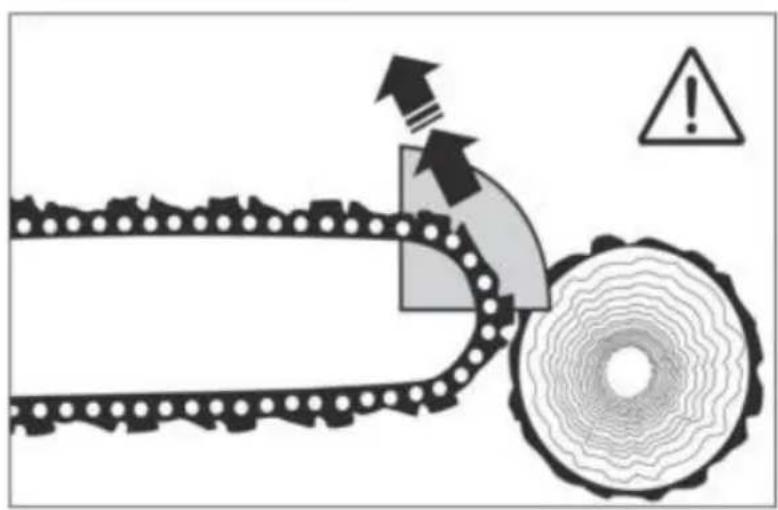
natural_image
Diagram of a conveyor belt system with gear and wheel, showing motion direction and warning symbol (no text labels)(Fig.1).
(Fig.2)
(Figura 8)
natural_image
Technical line drawing of a mechanical assembly with gears and springs (no text or symbols)(figura 9)
natural_image
Line drawing of a tractor's head and front wheel assembly (no text or symbols)(figura 12)

natural_image
Line drawing of a tractor with visible control panel and gear mechanism, no text or symbols present(figura 12)
natural_image
Line drawing of a person using a chainsaw to cut tree stump, showing motion and dust trail (no text or symbols)(figura 13)

AVVERTIMENTO!
(figura 16)
natural_image
Technical line drawing of a mechanical device with two chains, showing motion arrows around a central blade (no text or symbols)(fig.17)
(fig.18)
natural_image
Simple line drawing of a log with a spiral tip and an arrow indicating direction (no text or symbols)(figura 20)

(figura 21)
Fig. 22

Fig. 23
SERVIZIO TECNICO

natural_image
Close-up of a hand holding a small white plastic component next to a black industrial machine (no visible text or symbols)(Fig.25)
Candela
Fig. 26

Fig. 27
natural_image
Illustration of hands assembling a chain with a tool (no text or symbols)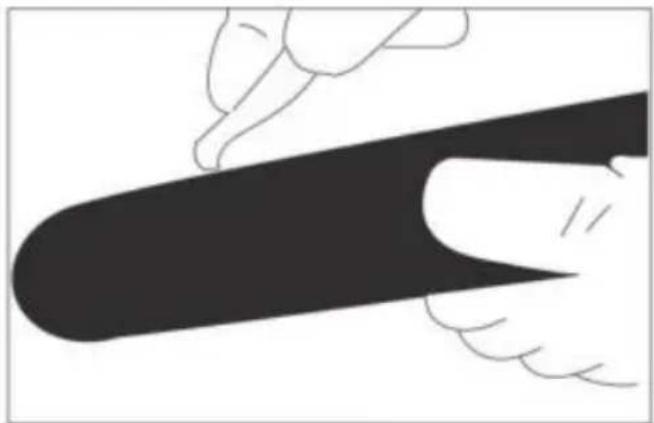
natural_image
Illustration of a hand holding a black object with a curved line, no text or symbols present(figura 28)

(figura 29)
(figura 3 1 )
Affordable. Reliable. Home Improvement.
PIŁY ŁAŃCUCHOWE GAZOWE
MODELE: 4000 / 5200 / 5800 / 6200
www.vevor.com/support
VEVOR
Affordable. Reliable. Home Improvement.
GAS CHAINSAWS
MODELE: 4000 / 5200 / 5800 / 6200

natural_image
Line drawing of a chain-linking device with visible blades and housing (no text or symbols)natural_image
Line drawing of a chain-linking device with no text or symbols①
natural_image
Simple line drawing of a rounded rectangular object with two small circular features on top and bottom (no text or symbols)2
natural_image
Simple line drawing of a U-shaped object with a flat top and side grooves (no text or symbols)3

natural_image
A decorative diagonal line with repeating diamond patterns, no text or symbols present.4
5

6

7
8

9

10

11

12

natural_image
Two identical blue wire loops with yellow connectors, no text or symbols present13
natural_image
Diagram of a conveyor belt system with gear and wheel, showing motion direction and warning symbol (no text labels)(Rys.1) .
(Rys.2)
natural_image
Line drawing of a tractor with visible control panel and gear mechanism (no text or symbols)(rys.4).

(rys.5)
(Rys. 8)
natural_image
Technical line drawing of a mechanical assembly with gears and springs (no text or symbols)(rys. 9)
natural_image
Line drawing of a tractor's head and front compartment with no visible text or symbols(rys. 12)

natural_image
Line drawing of a tractor with visible blades and head, no text or symbols present(rys. 12)
natural_image
Line drawing of a person using a chainsaw to cut tree stump, showing motion and dust trail (no text or symbols)(rys. 13)

OSTRZEŻENIE!
(rys. 16)
natural_image
Technical line drawing of a mechanical device with two chains, showing motion arrows and no text or symbols(rys.17)

OSTRZEŻENIE!
natural_image
Simple line drawing of a cylindrical object with a curved arrow indicating direction (no text or symbols)(rys. 20)

(rys. 21)
Fig. 22

Fig. 23
SERWIS TECHNICZNY
natural_image
Close-up of a hand holding a small white plastic component next to a mechanical device (no visible text or symbols)(Rys.25)
Świeca zapłonowa
Fig. 26

Fig. 27
Regulacja gaźnika
natural_image
Illustration of hands assembling a chain with a tool (no text or symbols)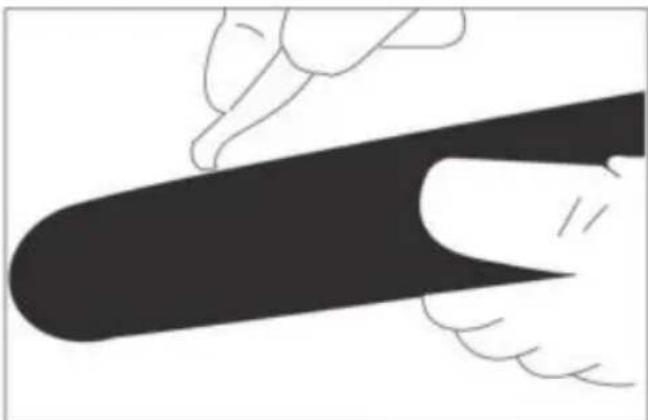
natural_image
Illustration of a hand holding a pen or tool, no text or symbols present(rys. 28)

(rys. 29)
(rys. 3 1 )