
AB-187 - Paint spray Vevor - Free user manual and instructions
Find the device manual for free AB-187 Vevor in PDF.
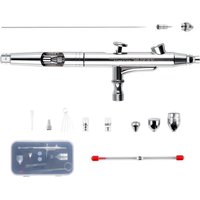


| Product Type | Airbrush Kit |
| Brand | Vevor |
| Model | AB-187 |
| Nozzle Diameter | 0.3 mm and 0.5 mm |
| Cup Capacity | 2CC, 7CC and 12CC |
| Body Material | Metal and plastic |
| Power Supply | Compressed air (compressor or can) |
| Main Use | Paint spraying, modeling, makeup |
| Safety | Wear safety goggles and dust mask |
| Maintenance | Empty and wash with water or solvent after each use |
| Spare Parts Available | Nozzles, needles, cups, seals, caps |
| Warranty | Technical support and electronic warranty via www.vevor.com/support |
| Dimensions (estimated) | Approximately 15 cm in length |
| Weight (estimated) | Approximately 100 g |
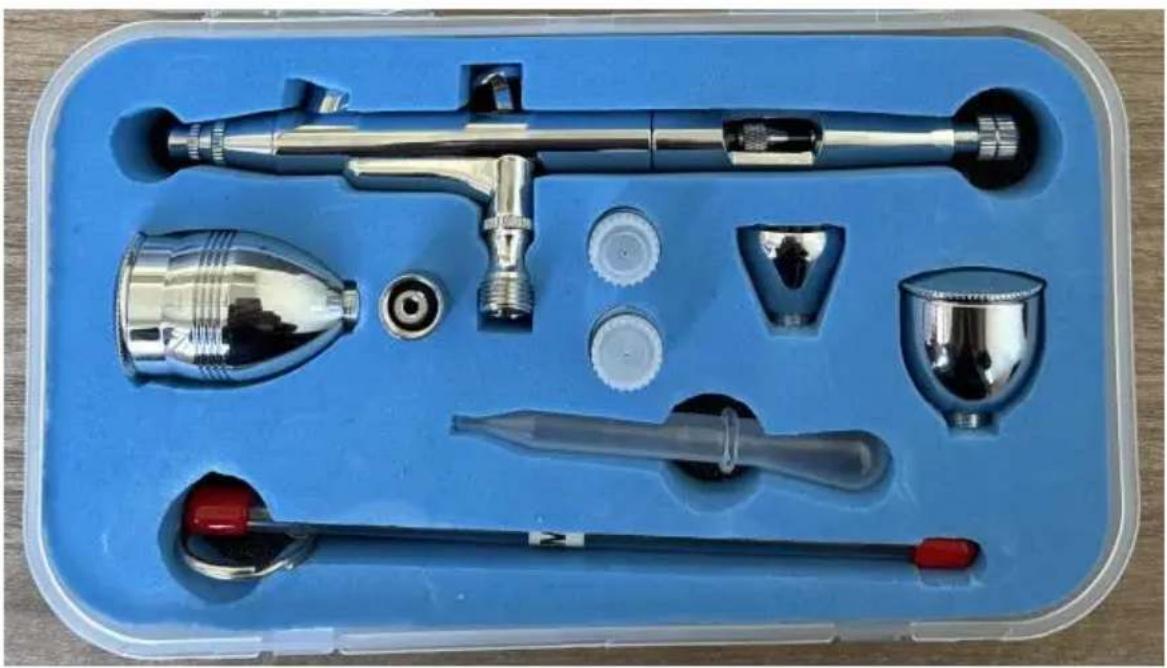
| Included Accessories | 3 cups (2CC, 7CC, 12CC), 2 nozzles (0.3 and 0.5), caps |
Frequently Asked Questions - AB-187 Vevor
User questions about AB-187 Vevor
0 question about this device. Answer the ones you know or ask your own.
Ask a new question about this device
Download the instructions for your Paint spray in PDF format for free! Find your manual AB-187 - Vevor and take your electronic device back in hand. On this page are published all the documents necessary for the use of your device. AB-187 by Vevor.
USER MANUAL AB-187 Vevor
Technical Support and E-Warranty Certificate
www.vevor.com/support
Airbrush Set
AB-187
We continue to be committed to provide you tools with competitive price. "Save Half", "Half Price" or any other similar expressions used by us only represent estimate of savings you might benefit from buying certain tools with us compared to top brands and does not necessarily mean to cover all categories of tools offered. We kindly remind you to verify carefully when you are placing an order with us that you are actually saving half in comparison with the top major brands.
VEVOR®
TOUGH TOOLS, HALF PRICE
Airbrush Set
AB-187
NEED HELP? CONTACT US!
Have product questions? Need technical support? Please feel free to contact us:
Technical Support and E-Warranty Certificate www.vevor.com/support
This is the original instruction. Please read all manual instructions carefully before operating. VEVOR reserves a clear interpretation of the user manual. The appearance of the product shall be subject to the product you received. Please forgive us that we won't inform you of any technology or software updates on our product.
 | Warning - To reduce the risk of injury, the user must r instructions manual carefully. |
 | Warning- Be sure to wear eye protectors when using th product. |
 | Warning- Be sure to wear dust masks when using this |
 | This symbol, placed before a safety comment, indicates of precaution, warning, or danger. Ignoring this warning lead to an accident. To reduce the risk of injury, fire, c electrocution, please always follow the recommendations s below. |
INSTRUCTIONS
Thank you very much for choosing this Airbrush Set.
Please read all of the instructions before using it. The information you achieve the best possible results.
The products carried in this catalog may be different in color than the item.
WARNING:
- Operate in a safe work environment. Keep your work area clean, and free of distractions.
- Use as intended only.
- This is not a toy, Not for use by children.
SAVE THESE INSTRUCTIONS
MODEL AND PARAMETERS
Nozzle Diameter:0.3&0.5mm
Fluid Cup Capacity: 2CC&7CC&12CC
PARTS DETAILS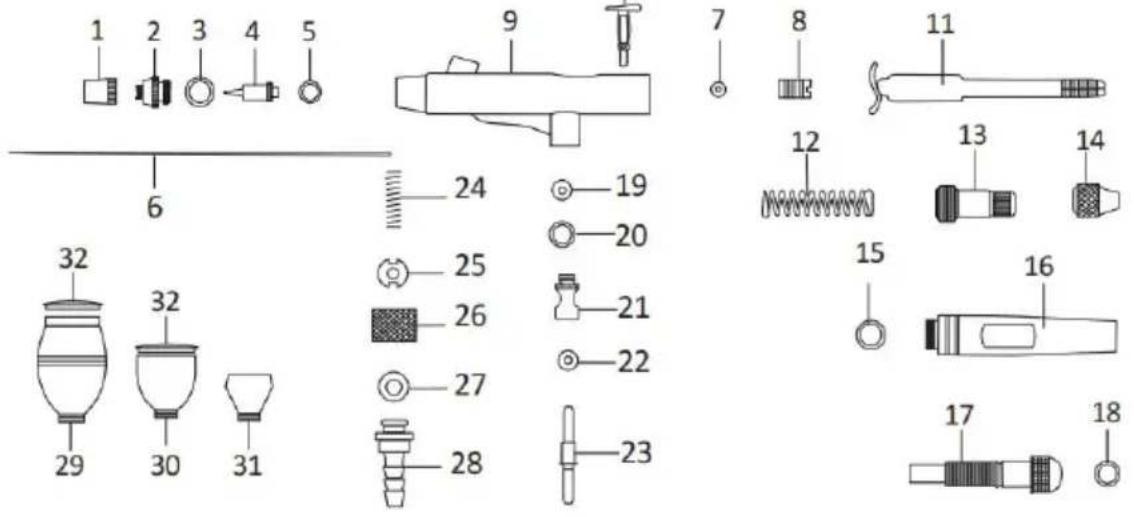
- Needle Cap
- Nozzle Cap 3.O-Ring for Nozzle Cap
- Nozzle 5.0-Ring 6.Needle 7.O-Ring for Needle Guide 8.Needle Guide 9.Main body
- Operation Lever
- Needle chucking guide 12. Spring 13. Spring Case 14. Needle chucking nut 15. O-ring 16. Handle
- Adjusting Screw 18. O-Ring
- Lever Guide O-Ring
- Valve O-Ring
- Valve Body
- Valve Rod O-Ring
- Valve Rod
- Valve Spring
- Valve screw 26. Hose Connector Nut 27. O-Ring for Hose Connector 28. Hose Connector 29. Cup 12cc 30. Cup 7cc 31. Cup 2cc 32. Lid for color cup x2
The installation process of replacing 0.3mm nozzle with 0.5mm nozzle 1.1 Remove #2 Nozzle Cap and #4 Nozzle and #6 Needle as shown in Figure 1-1.
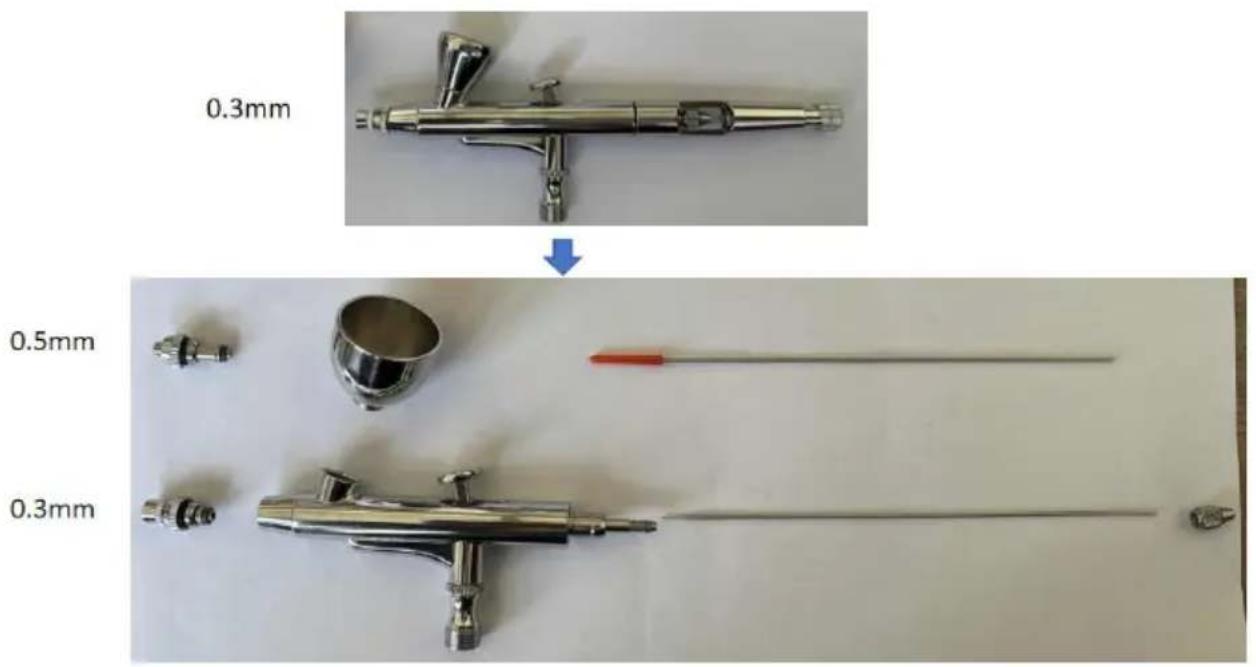
Figure 1-1
1.2 Install the needle and Handle as shown in Figure 1-2 and 1-3.
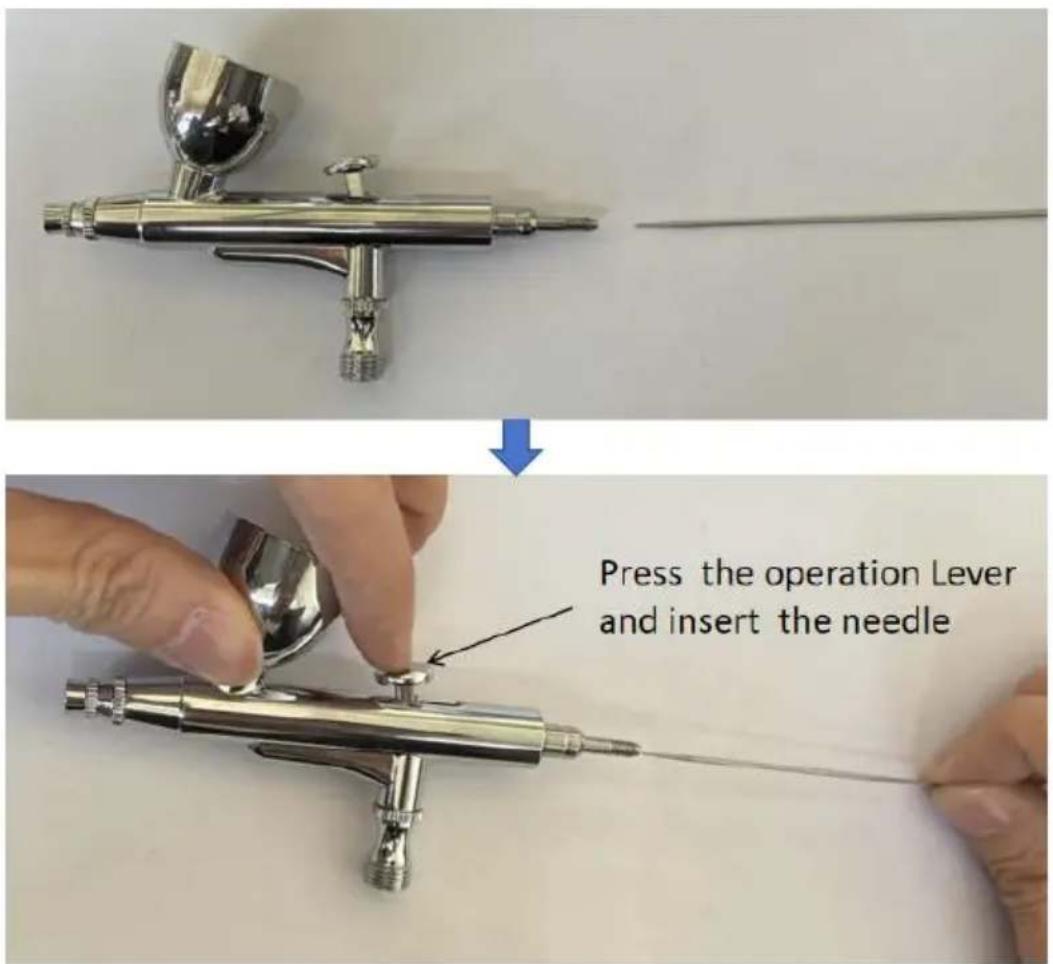
Figure 1-2.
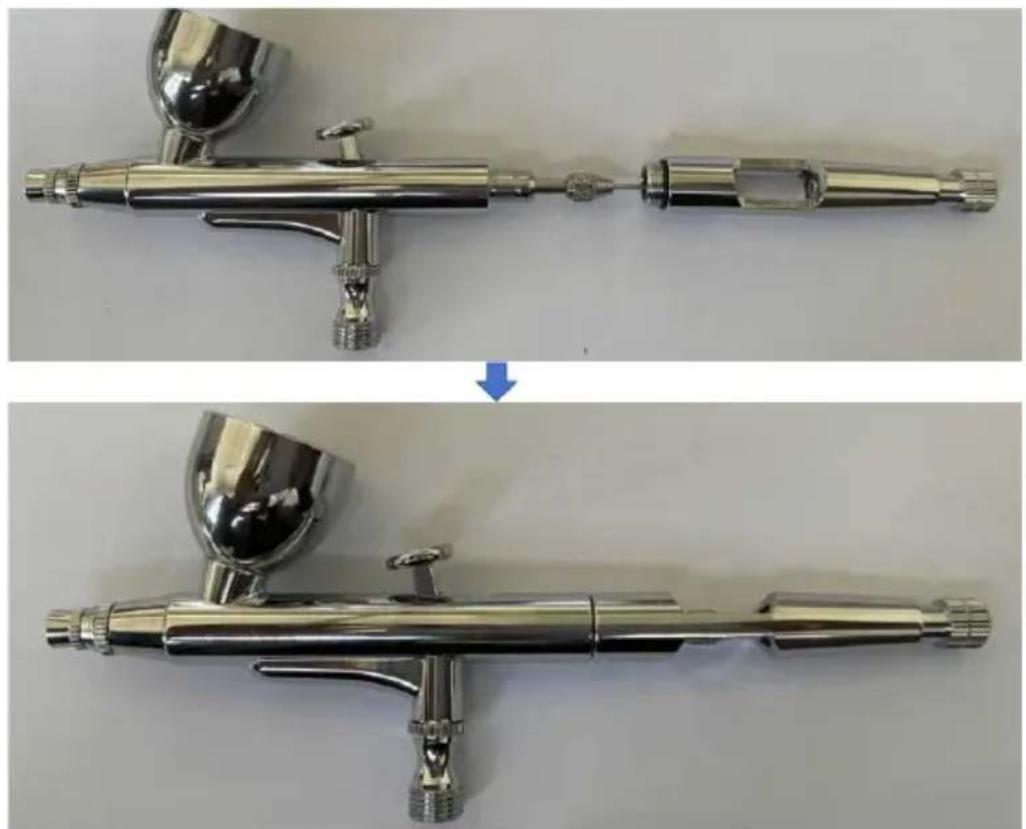
Figure 1-3.
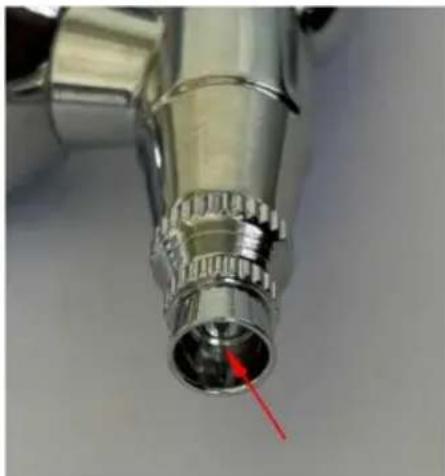
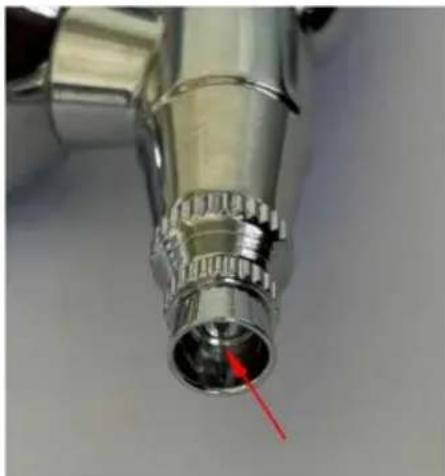
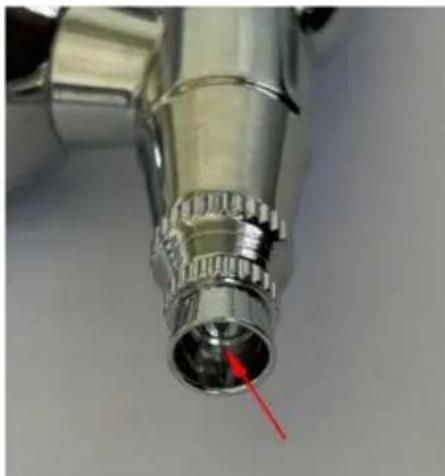
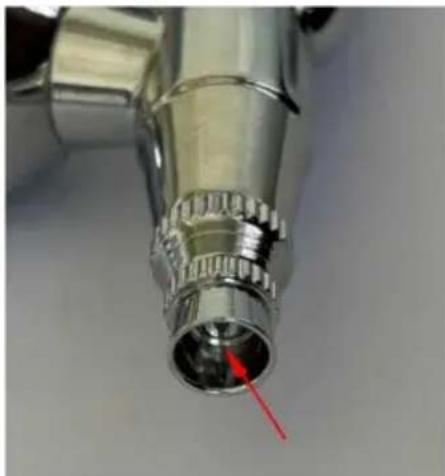
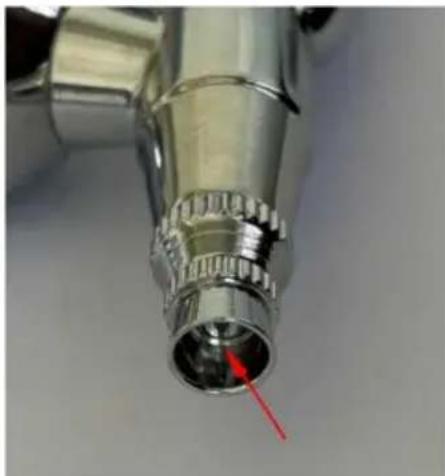
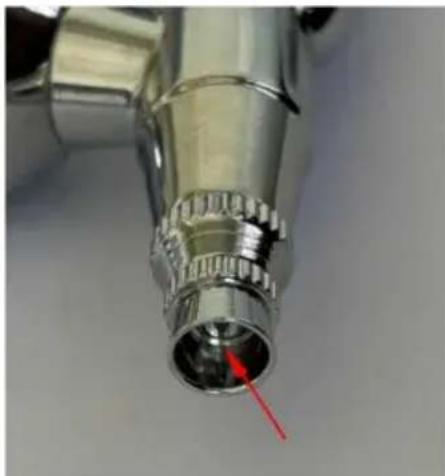
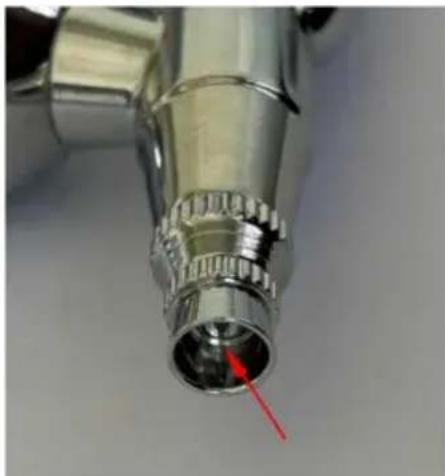
If you confuse #2 Nozzle Cap, #4 Nozzle and #6 Needle between 0.3mm and 0.5mm, it is difficult to distinguish. You get instructions as shown in Figure 2-1. The surface of 0.5mm Nozzle Cap has piping. Insert #6 into #4 Nozzle.
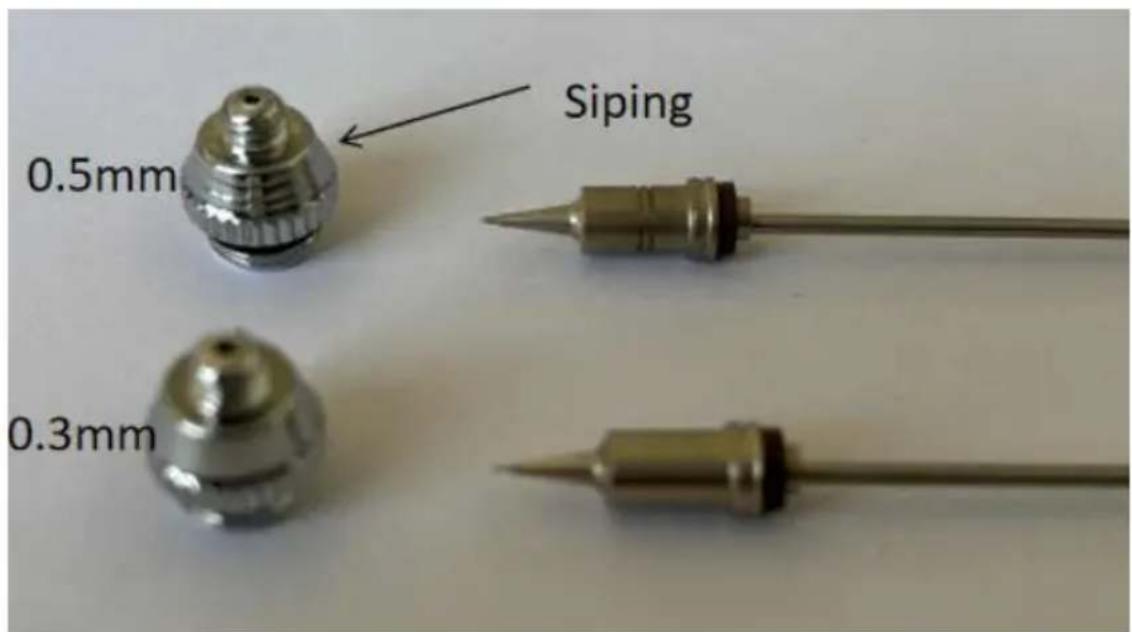
Figure 2-1
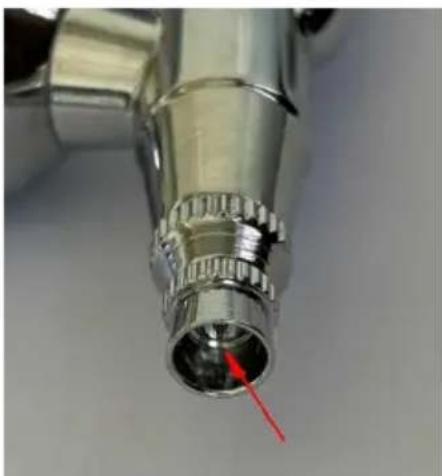
The thick needle (0.5mm) must match with both Nozzle and Nozzle Cap with siping, the thin needle (0.3) match with Nozzle and Nozzle Cap v siping. Before assembly #4 Nozzle and #6 Needle, we have to try th the pinhead must out of Nozzle head, otherwise, we must change No or Needle.
HOW TO SPRAY
- Fill the fluid in the cup after thinning appropriately.
2.Hold the airbrush lightly in your hand.
- By pressing the main lever, a stream of air emerges. Then d backward gradually for Color atomization.
- The spray pattern is in accordance with the distance between work surface and an airbrush.
- For fine line spray, remove the needle cover and hold the air near a work surface.
MAINTENANCE
- Empty the fluid cup and wash it with water or solvent by a brush.
- Refill the cup with water or solvent, then block the needle cover with finger and spray. The air flows backward into the nozzle to clean the air from the air brush.
Address: Shuangchenglu 803nong11hao1602A-1609shi, baoshanqu, shanghai 200000 CN.
Imported to AUS: SIHAO PTY LTD, 1 ROKEVA STREETEASTWOOD NSW 2122 Australia
Imported to USA: Sanven Technology Ltd., Suite 250, 9166 Anaheim Place, Rancho Cucamonga, CA 91730
| EC | REP |
E-CrossStu GmbH
Mainzer Landstr.69, 60329 Frankfurt am Main
| UK | REP |
YH CONSULTING LIMITED.
C/O YH Consulting Limited Office 147, Centurion House
London Road. Staines-upon-Thames. Surrey. TW18 4
VEVOR®
TOUGH TOOLS, HALF PRICE
Technical Support and E-Warranty Certificate www.vevor.com/support
VEVOR®
TOUGH TOOLS, HALF PRICE
Figure 1-2.
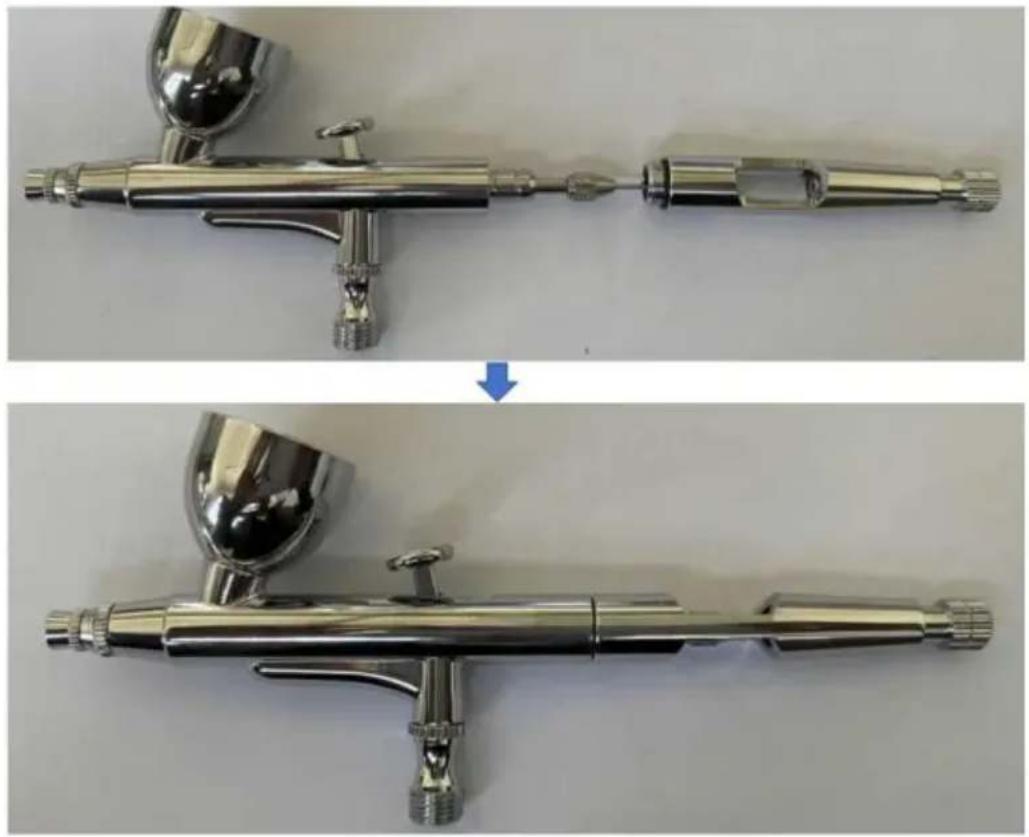
Figure 1-3.
Figure 2-1
C/O YH Consulting Limited Office 147, Centurion House, London Road, Staines-upon-Thames, Surrey, TW18 4AX
VEVOR®
TOUGH TOOLS, HALF PRICE
NEED HELP? CONTACT US!
Figure 1-2.
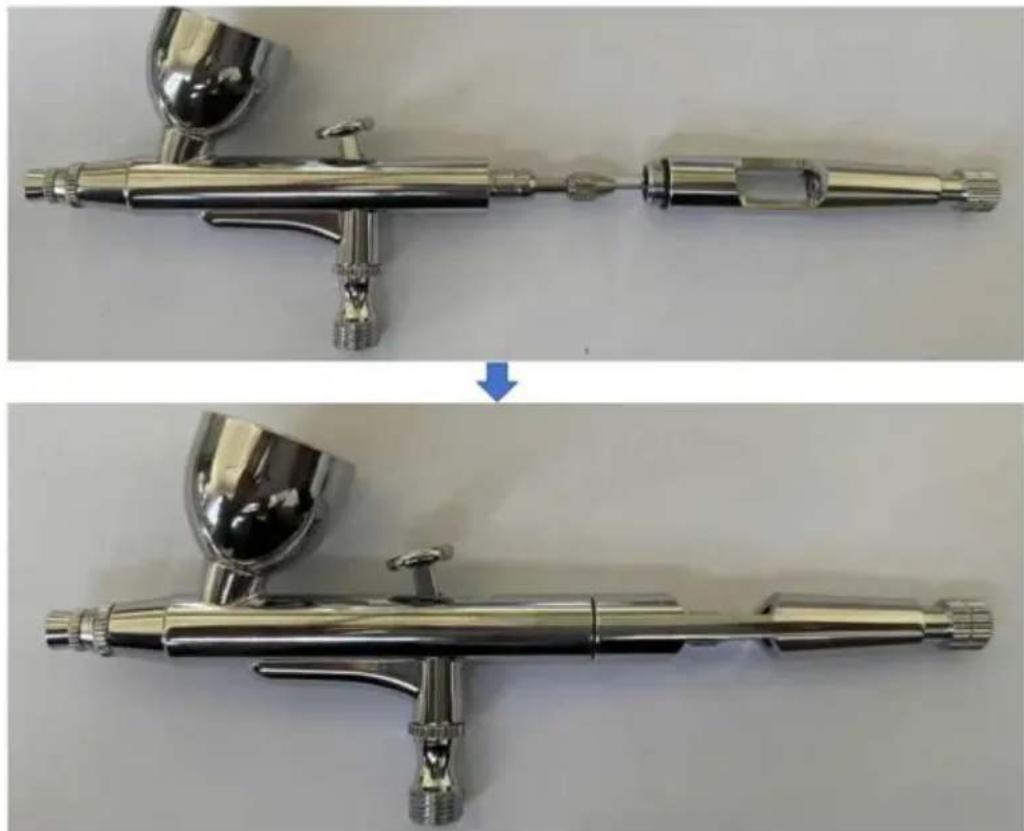
Figure 1-3.
Figure 2-1
C/O YH Consulting Limited Office 147, Centurion House, London Road, Staines-upon-Thames, Surrey, TW18 4AX
VEVOR®
TOUGH TOOLS, HALF PRICE
NEED HELP? CONTACT US!
Figure 1-2.
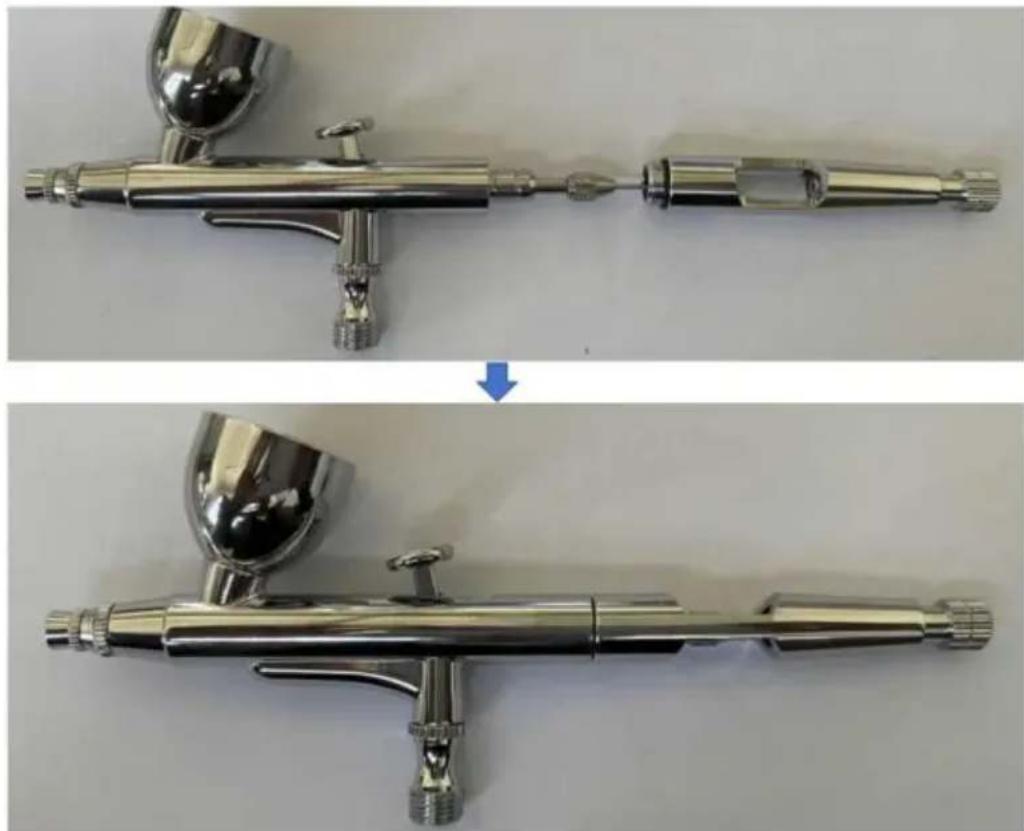
Figure 1-3.
Figure 2-1
C/O YH Consulting Limited Office 147, Centurion House, London Road, Staines-upon-Thames, Surrey, TW18 4AX
VEVOR®
TOUGH TOOLS, HALF PRICE
Technical support and e-warranty certificate www.vevor.com/support
VEVOR®
TOUGH TOOLS, HALF PRICE
NEED HELP? CONTACT US!
Figure 1-2.
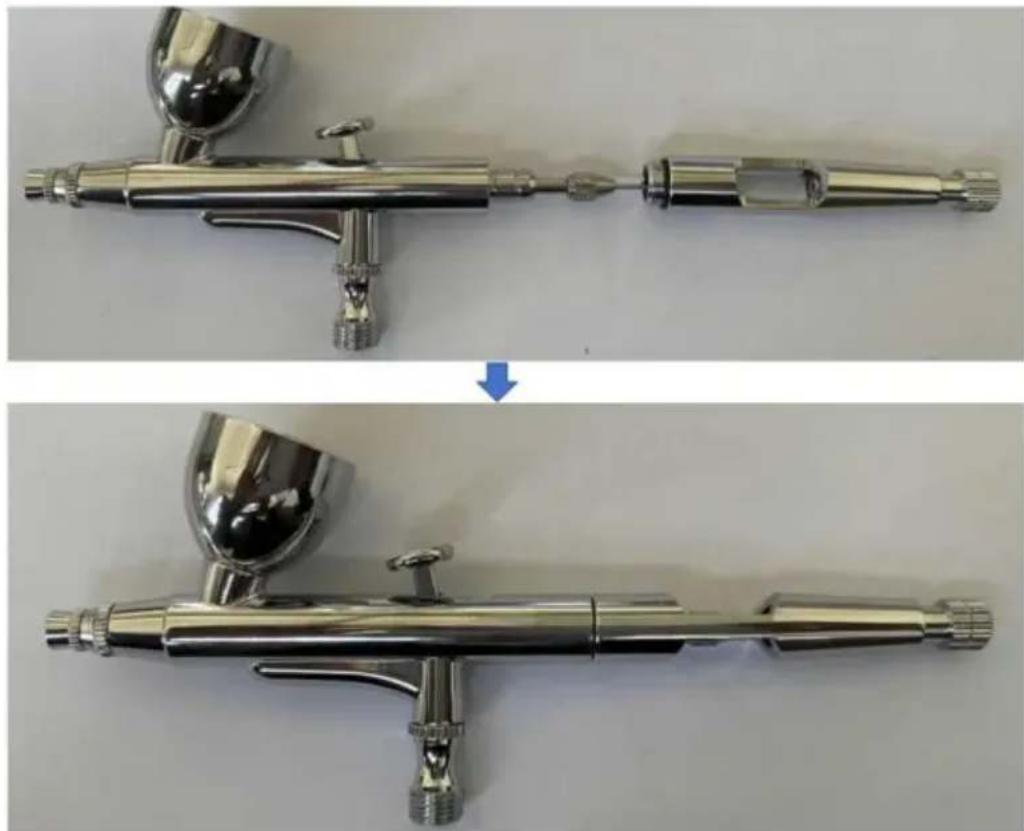
Figure 1-3.
Figure 2-1
C/O YH Consulting Limited Office 147, Centurion House, London Road, Staines-upon-Thames, Surrey, TW18 4AX
VEVOR®
TOUGH TOOLS, HALF PRICE
Figure 1-2.
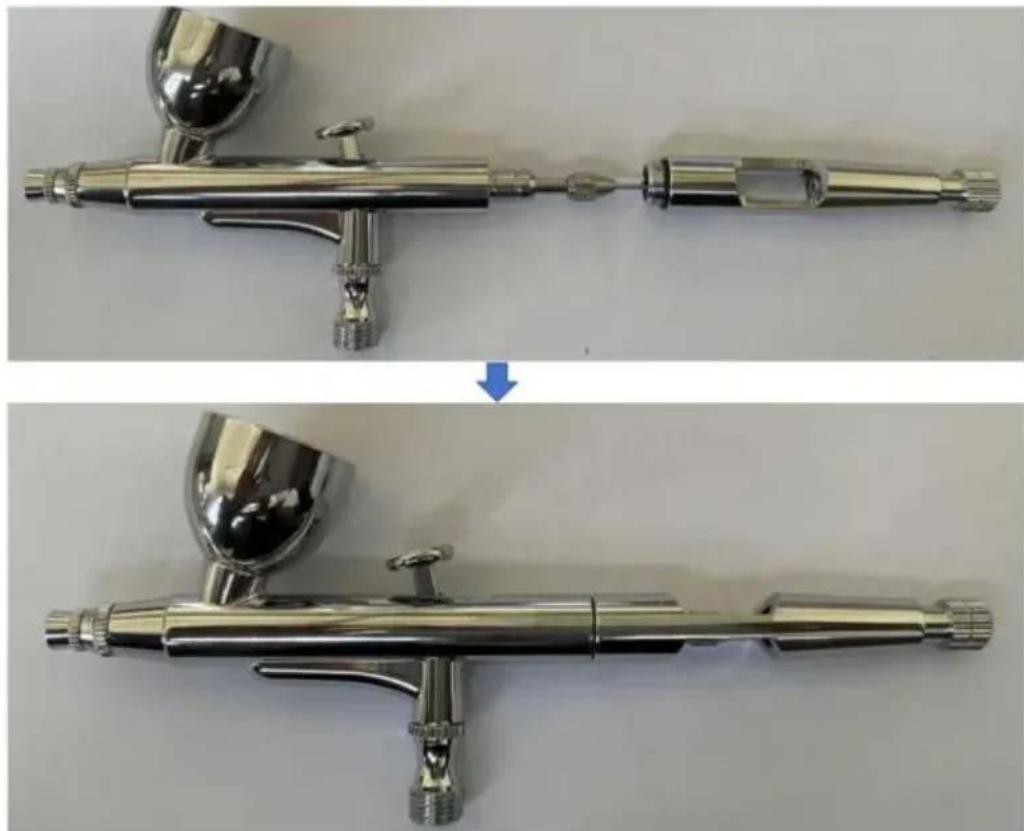
Figure 1-3.
Figure 2-1
C/O YH Consulting Limited, Office 147, Centurion House,
London Road, Staines-upon-Thames, Surrey, TW18 4AX
VEVOR®
TOUGH TOOLS, HALF PRICE
Figure 1-2.
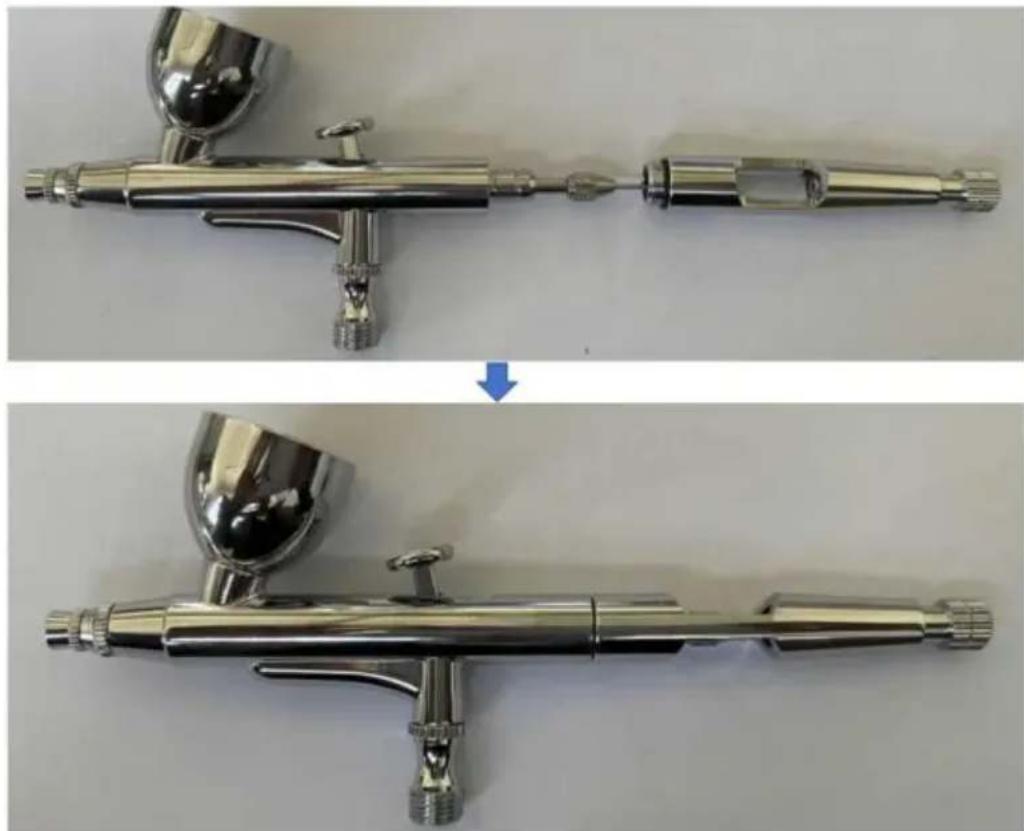
Figure 1-3.
Figure 2-1
Imported into AUS: SIHAO PTY LTD, 1 ROKEVA STREET, EASTWOOD
New South Wales 2122, Australia
NEED HELP? CONTACT US!
Figure 1-2.
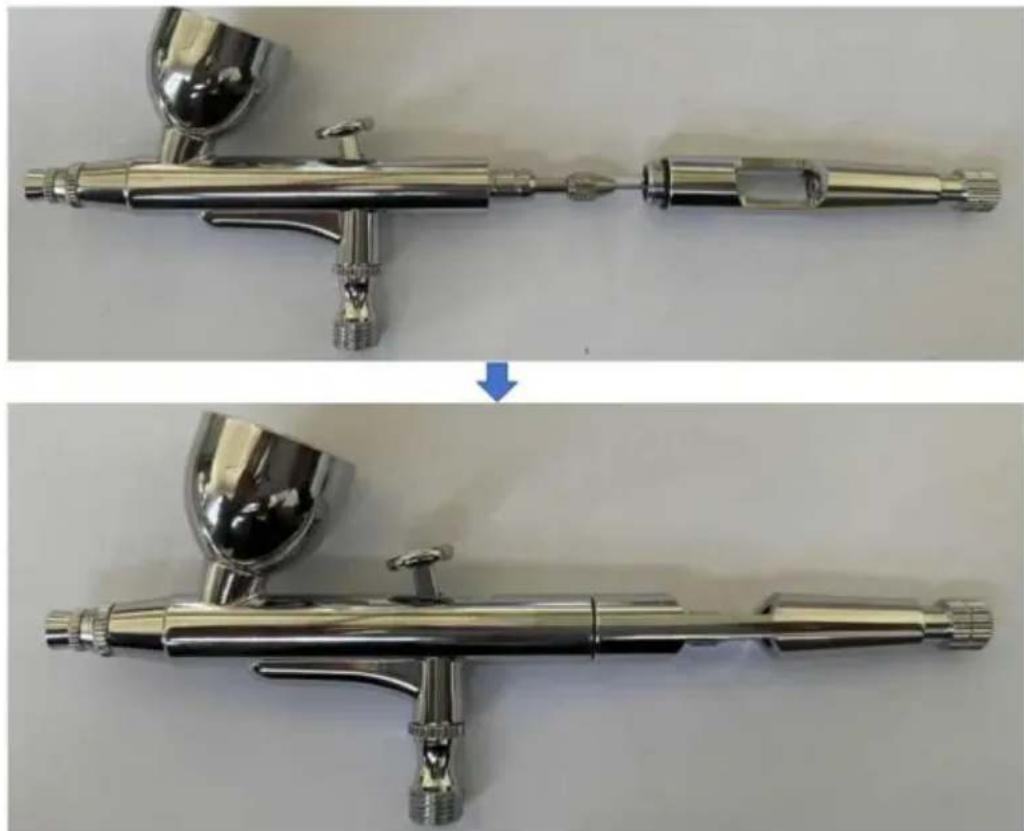
Figure 1-3.
Figure 2-1
Imported into AUS: SIHAO PTY LTD, 1 ROKEVA STREET, EASTWOOD NSW 2122, Australia
C/O YH Consulting Limited, Office 147, Centurion House, London Road, Staines-upon-Thames, Surrey, TW18 4AX
VEVOR®
TOUGH TOOLS, HALF PRICE
Brand : Vevor
Model : AB-187
Category : Paint spray