
XSJ23-F08 - Freight elevator Vevor - Free user manual and instructions
Find the device manual for free XSJ23-F08 Vevor in PDF.

User questions about XSJ23-F08 Vevor
0 question about this device. Answer the ones you know or ask your own.
Ask a new question about this device
Download the instructions for your Freight elevator in PDF format for free! Find your manual XSJ23-F08 - Vevor and take your electronic device back in hand. On this page are published all the documents necessary for the use of your device. XSJ23-F08 by Vevor.
USER MANUAL XSJ23-F08 Vevor
Technical Support and E-Warranty Certificate www.vevor.com/support
SCOOTER LIFT
MODEL: XSJ23-F08
We continue to be committed to provide you tools with competitive price. "Save Half", "Half Price" or any other similar expressions used by us only represent of savings you might benefit from buying certain tools with us compared top brands and does not necessarily mean to cover all categories of tools offered are kindly reminded to verify carefully when you are placing an order with us actually saving half in comparison with the top major brands.
VEVOR®
SCOOTER LIFT
MODEL: XSJ23-F08

natural_image
3D rendering of a black metal frame with mesh pattern, mounted on a support bracket (no text or symbols)NEED HELP? CONTACT US!
Have product questions? Need technical support? Please feel fr contact us:
Technical Support and E-Warranty Certificate www.vevor.com/support
This is the original instruction, please read all manual instruction carefully before operating. VEVOR reserves a clear interpretation user manual. The appearance of the product shall be subject to product you received. Please forgive us that we won't inform your data on our product.

Safety & Warning
- Read and understand this entire manual before assembling, installing operating, or servicing this product. Failure to follow these warning and instructions can cause death, personal injury or damage to valuable property.
- Adhere to all Department of Transportation (D.O.T.) requirements when using this product. Use ropes and tie downs (not included) securely hold all cargo in place.
- For the vehicle that will support the Cargo Carrier, read all pertinent vehicle instructions and warnings provided in the owner's manual. Make sure the vehicle's engine is OFF, with parking brake set, loading or unloading the Cargo Carrier.
- This Cargo Carrier must be attached to a 2" x 2" Class III or Cla hitch receiver. The hitch must be properly installed by a qualified service technician and be certified to support the weight of this C Carrier and its contents.
- This Cargo Carrier is designed to haul firewood, coolers, and other similar loads. Do not modify the Carrier and do not use this process purposes that it was not designed for.
- Do not overload the Cargo Carrier. Never exceed the maximum well capacity.
- When assembly is complete, check and test all vehicle systems including lights and brakes; make sure no damage occurred during product installation.
- Frequently check the condition of the Cargo Carrier and the vehicle' hitch receiver. Make sure all components are in good condition. If Cargo Carrier or hitch receiver becomes damaged through accident or if any weld damage is noted, the product should be replaced. to make sure that all hardware is tightly secured in place. Keep Cargo Carrier clean.
- Use common sense when working. Stay alert and concentrate when setting up and using the Cargo Carrier. Never work while under the influence of alcohol, drugs or medications.
- While assembling and using the Cargo Carrier keep the work area clean and well lighted. Keep spectators and children out of the w area.
- Dress appropriately. Never wear loose-fitting clothing or jewelry when working. Contain long hair, and keep hair, clothing and gloves aw from moving parts.
- Be aware of the danger of "dynamic loading". This situation arises when a load is dropped onto the Carrier, resulting in a short-term excessive load. Dynamic loading can result in damage and failure the Carrier and/or hitch receiver, and personal injury to the person loading the Carrier.
- Never load people or animals into the Cargo Carrier.
- The weight inside the Cargo Carrier should be evenly distributed, with heavier items positioned towards the center of the Carrier.
- Note the position of the vehicle's exhaust pipes before setting up the Cargo Carrier. Make sure exhaust pipes are not in close proximity the Cargo Carrier; flammable goods in the Cargo Carrier could ca on fire due to heat from the exhaust. If this risk exists on your do not use the Cargo Carrier.
- Do not ride in the vehicle being loaded or unloaded. Load and unl the vehicle slowly, according to manual instructions.
Specifications
| Model Series | XSJ23-F08 |
| Maximum Load Capacity (lbs) | 500 |
| For Use With | 2" x 2" Class III and IV Hitch Re |
| Cargo Basket Dimensions (mm) | 1200 x 680 x 112 mm |
| Material | Iron (spray painted) |
| Color | Black |
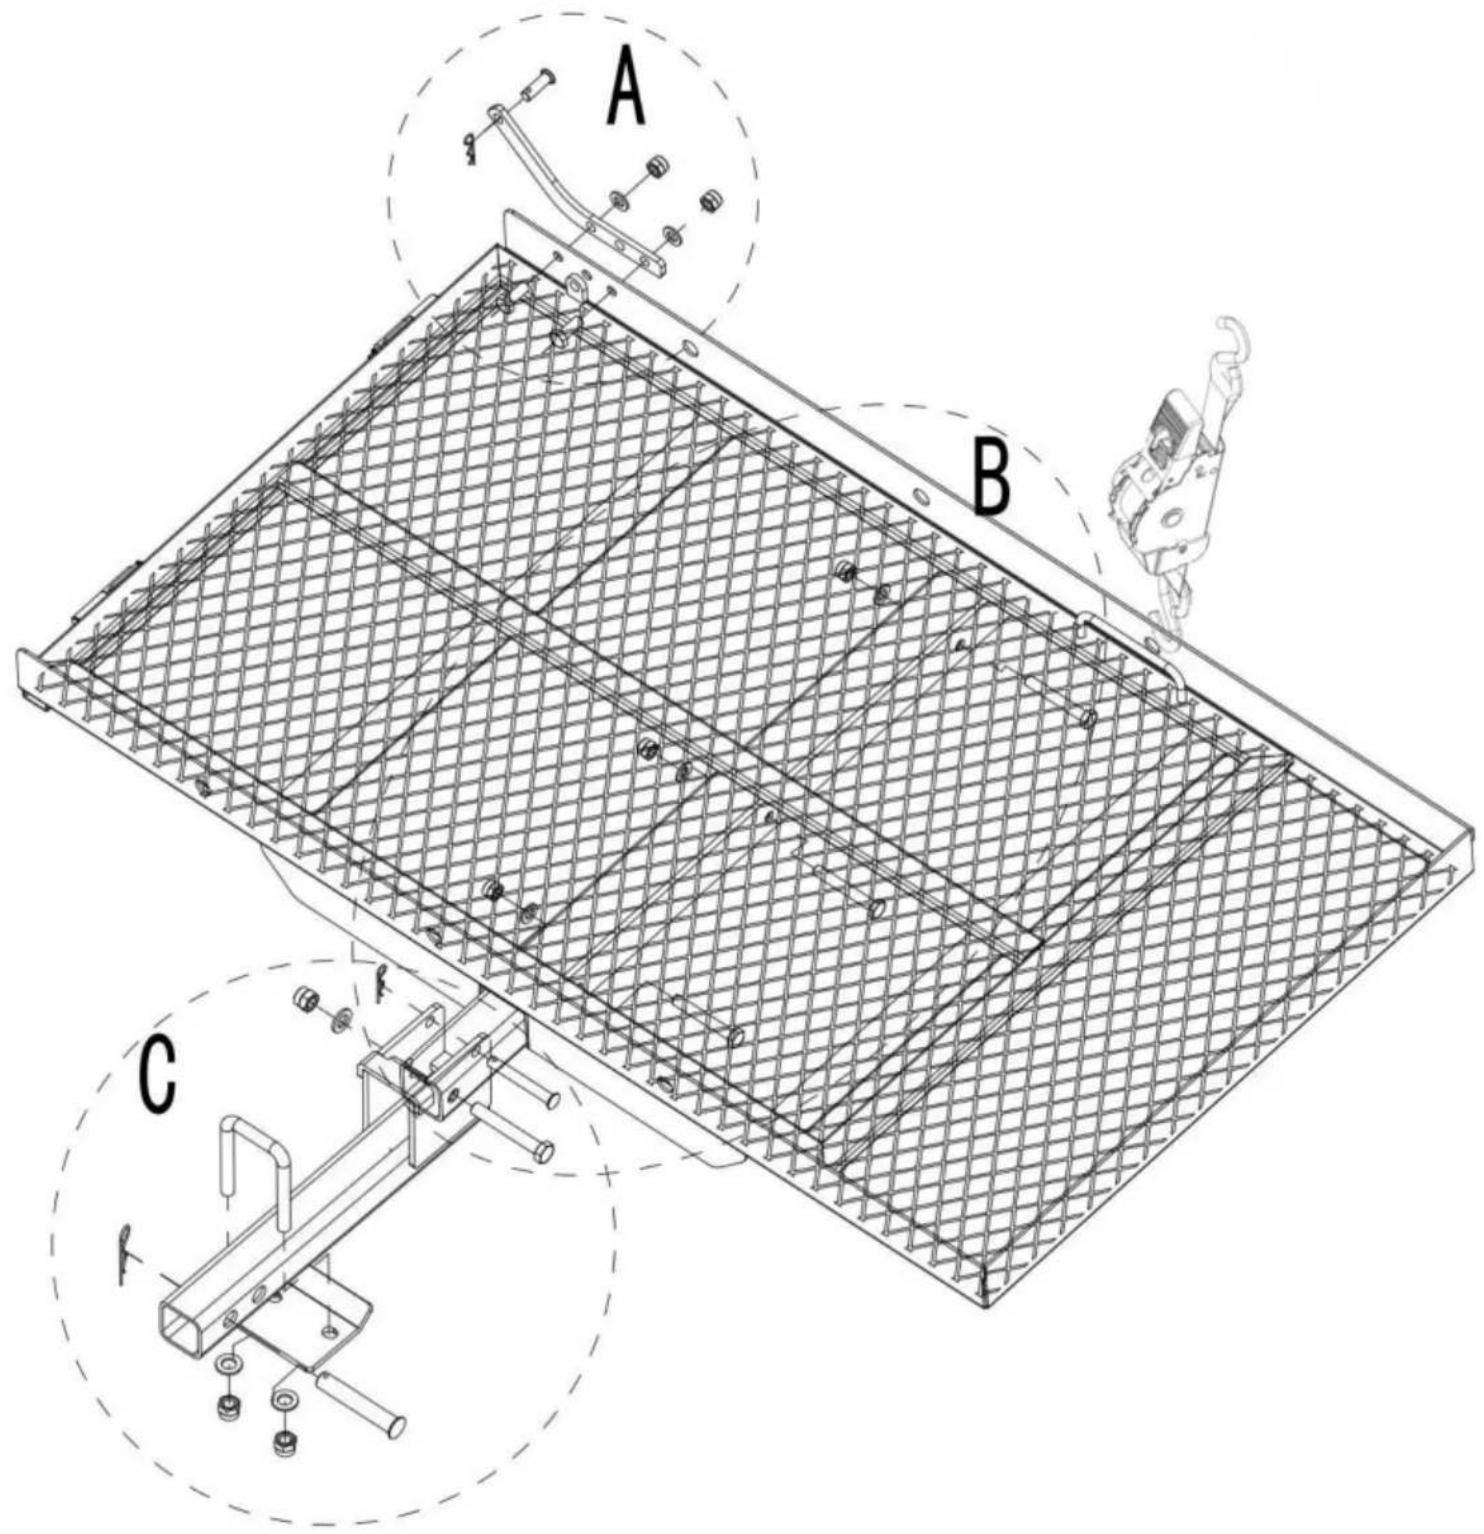
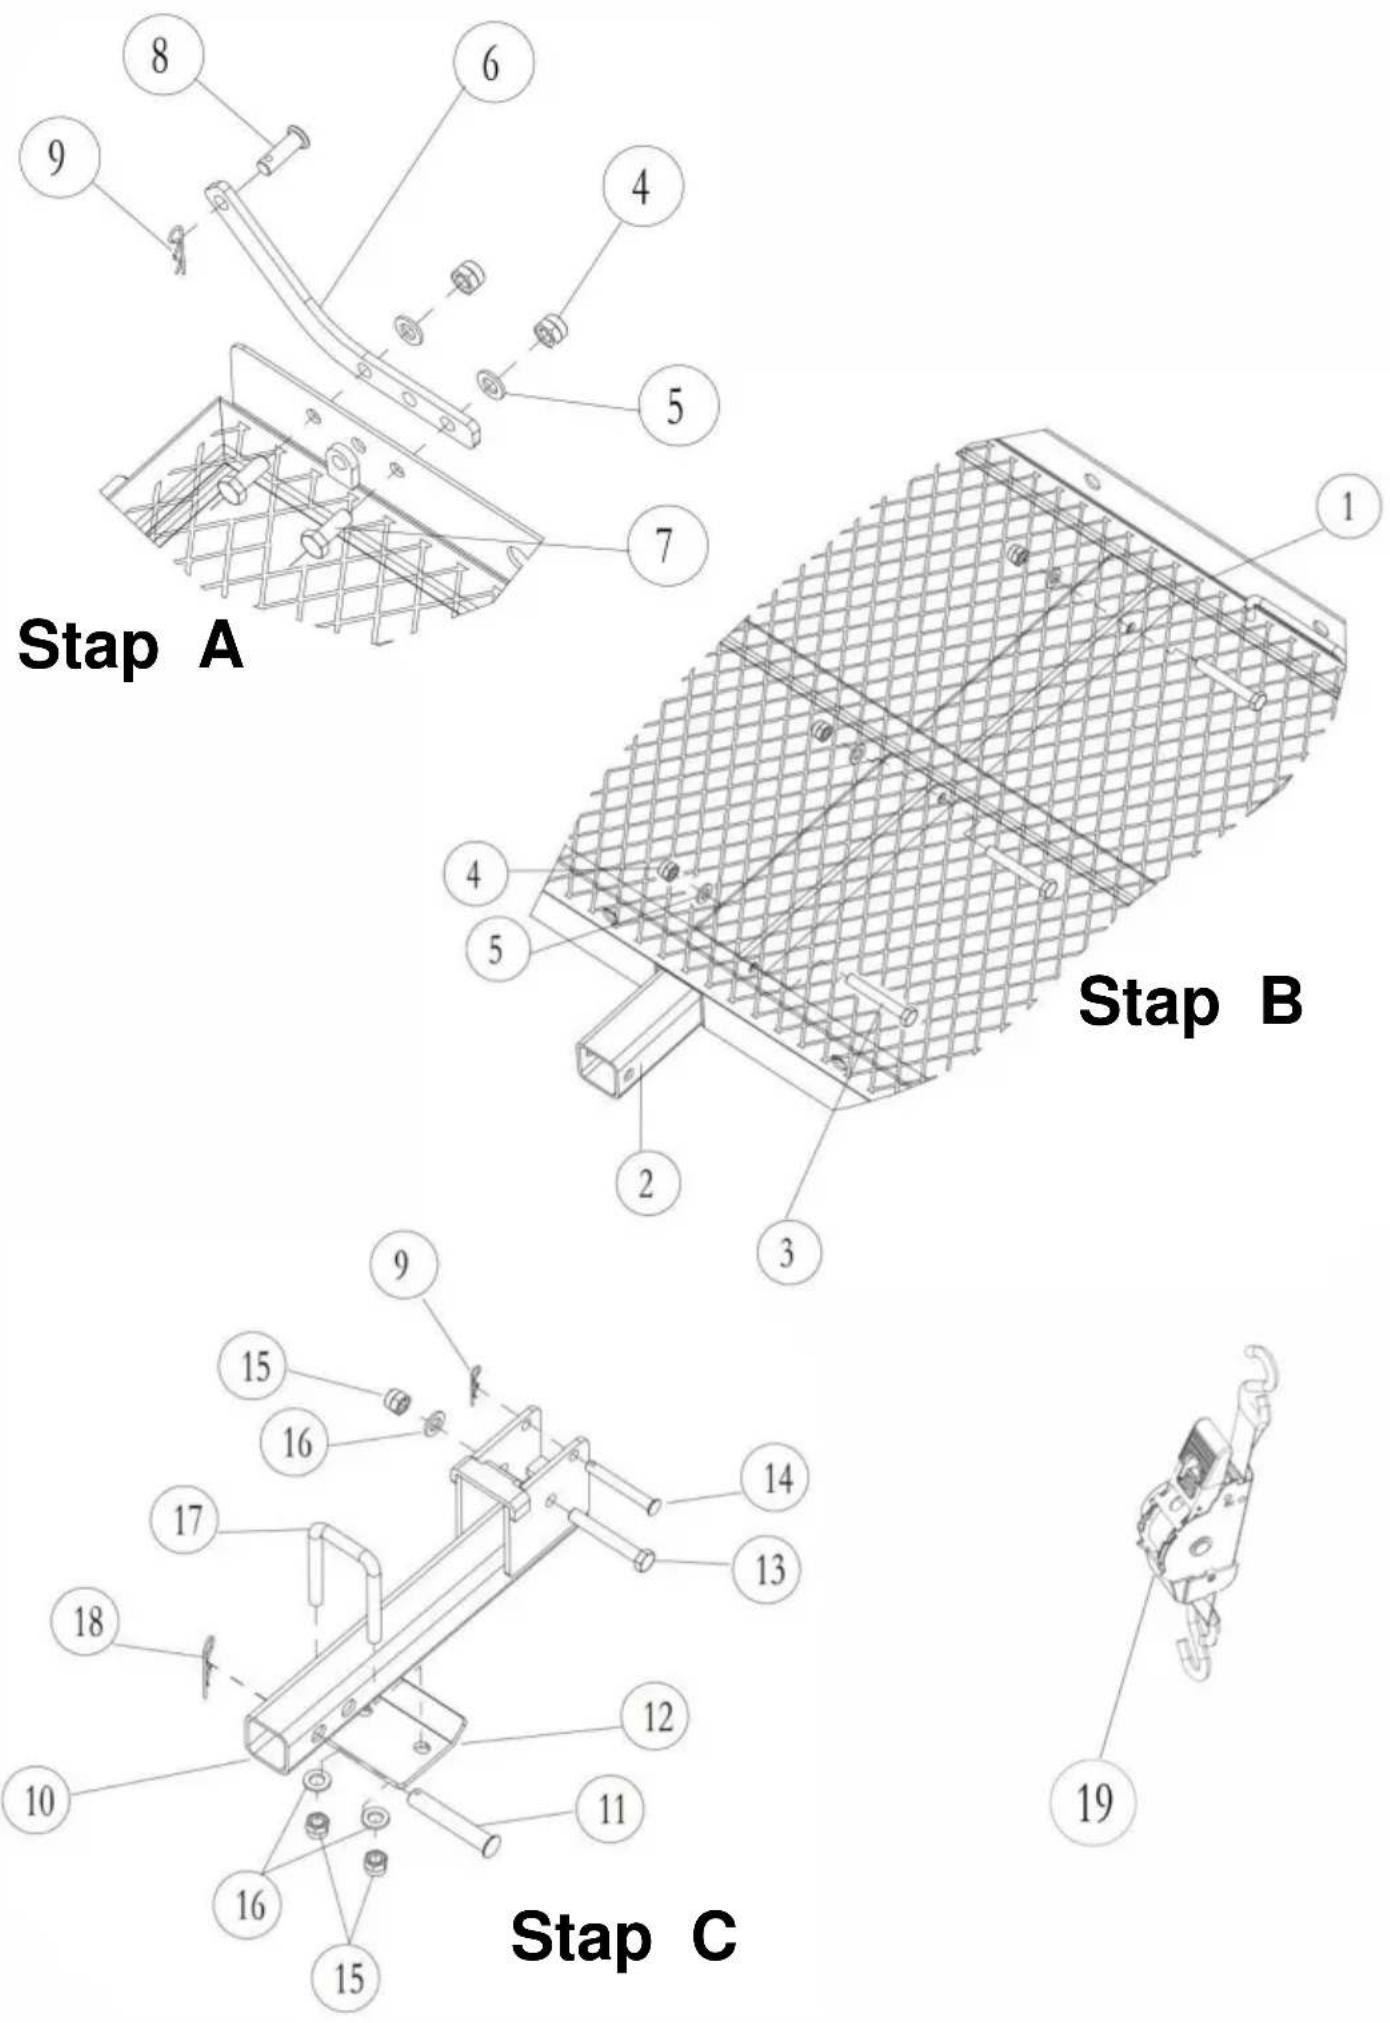
Installation Guide

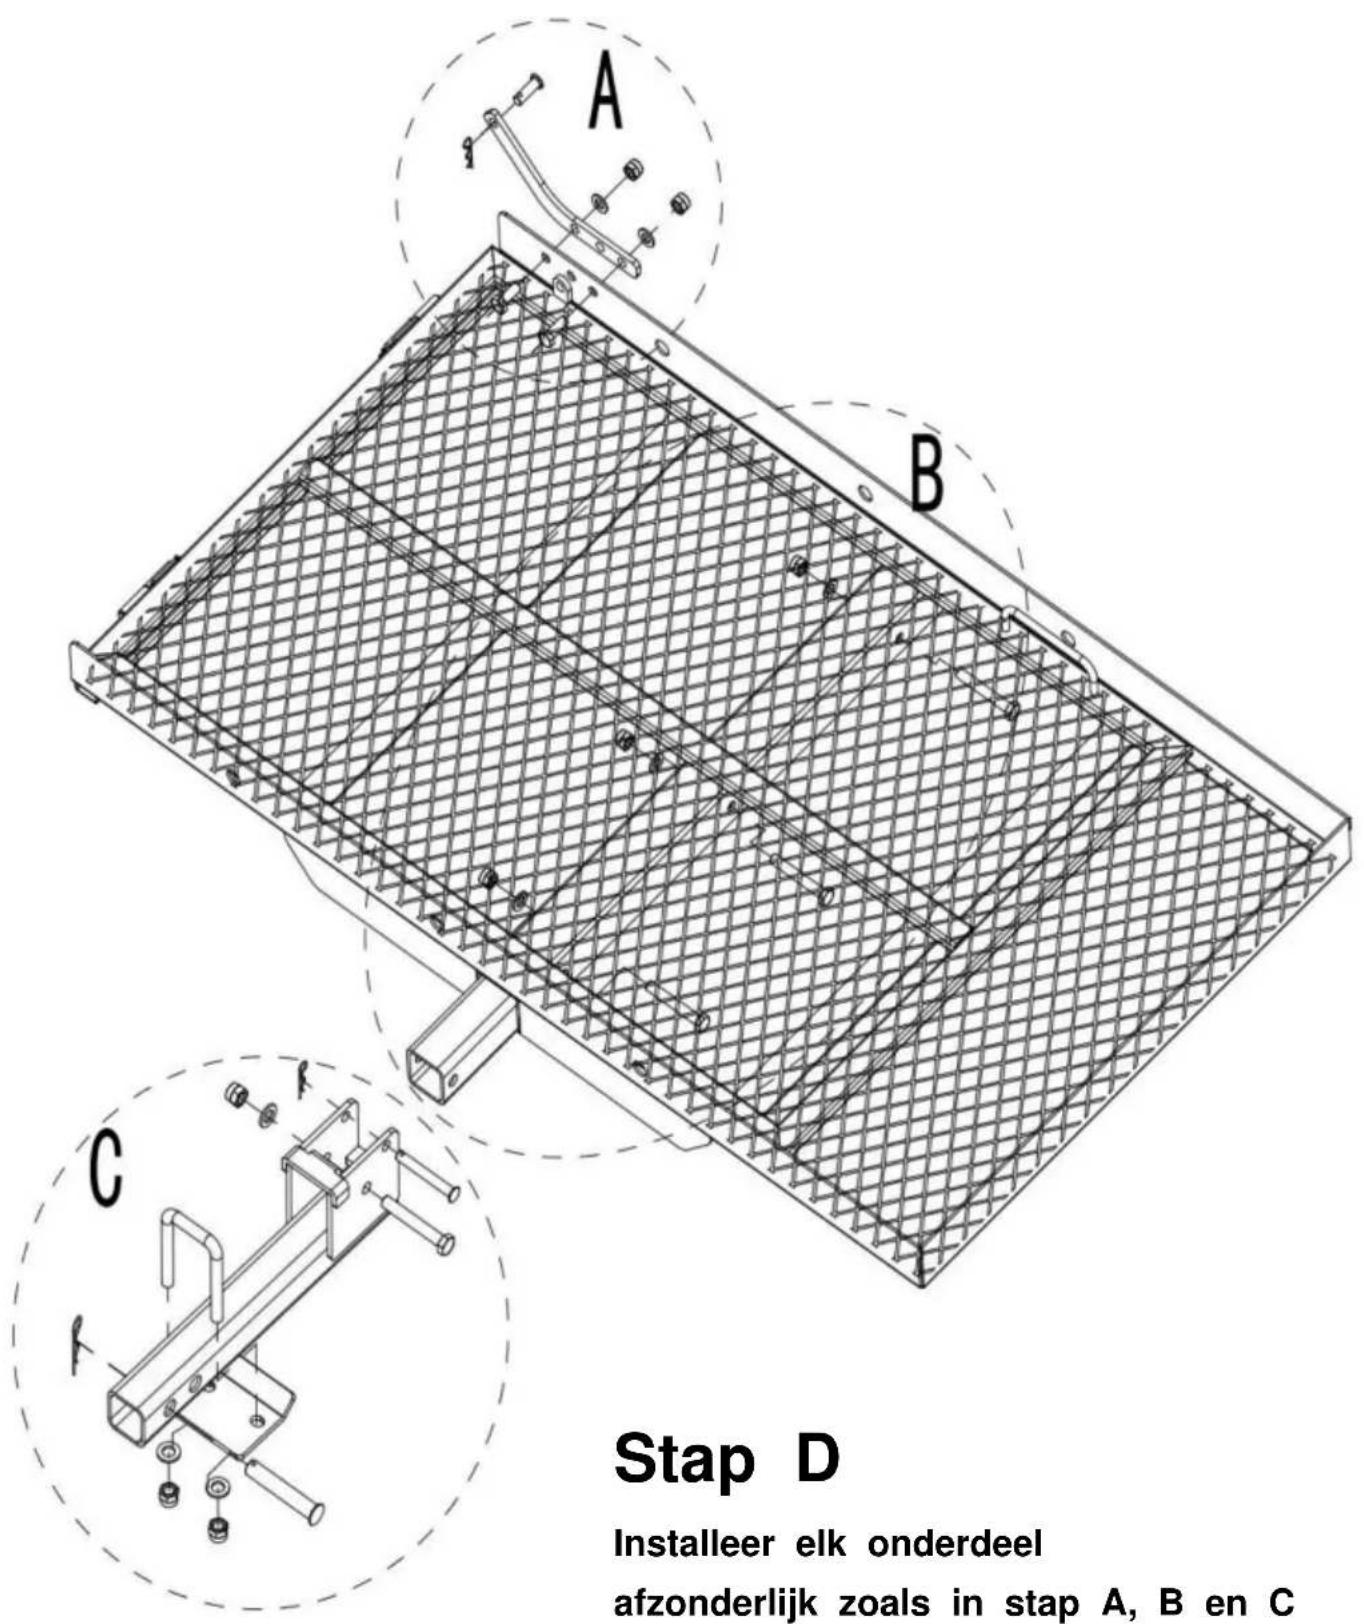
Step D
Install each part separately as in Steps A, B, and C
After the product is assembled, the connecting pipe is combined with the receiver at the rear of the car, as shown in the fig
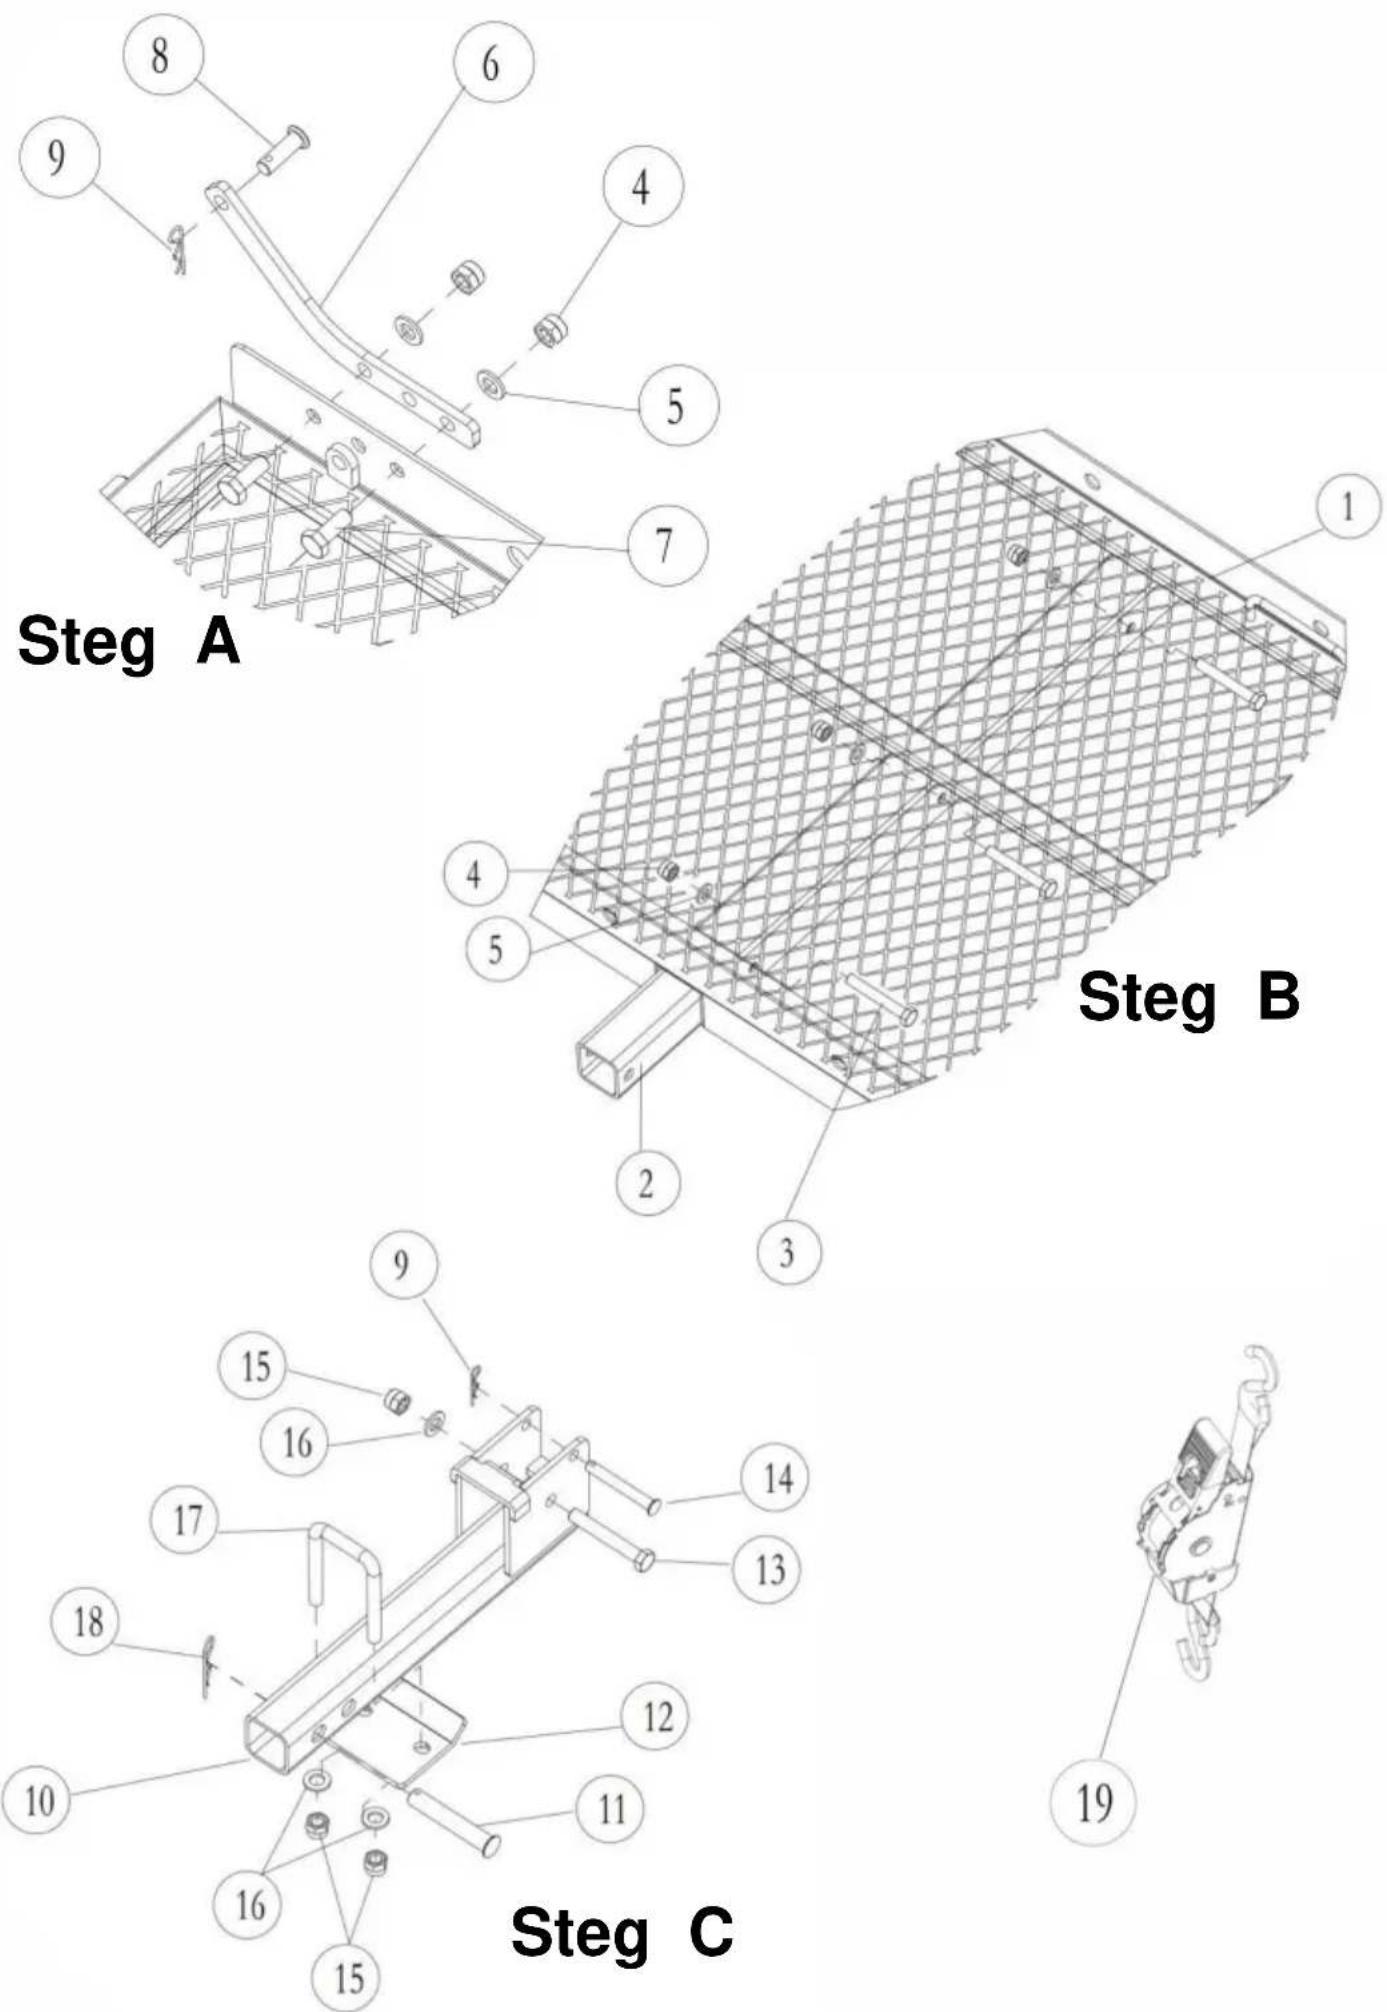
Parts List
| Part No. | Part name | Qty |
| 1 | Main box | 1 |
| 2 | Support tube | 1 |
| 3 | Bolt M10×70 | 3 |
| 4 | Lock nut M10 | 5 |
| 5 | Washer φ10 | 5 |
| 6 | Hinge plate | 1 |
| 7 | Bolt M10×25 | 2 |
| 8 | Rotary Bolt φ10×30 | 1 |
| 9 | R-pin φ1.5 | 2 |
| 10 | Connect the pipe | 1 |
| 11 | Rotary Bolt φ16×90 | 1 |
| 12 | Stabilize the block | 1 |
| 13 | Bolt M12×80 | 1 |
| 14 | Rotary Boltφ10×75 | 1 |
| 15 | Lock nut M12 | 3 |
| 16 | Washer φ12 | 3 |
| 17 | U-Shaped Wire | 1 |
| 18 | R-pin φ2 | 1 |
| 19 | Tensioner | 2 |
Cleaning And Maintenance
- For cleaning, wipe the surface with a damp (not wet) cloth or wipe with a clean lint-free cotton cloth.
- Window cleaning liquid or a similar cleaning liquid can be used to the surface.
- Regularly inspect and tighten the relevant fasteners.
Imported to USA: Sanven Technology Ltd. Suite 250, 9166 Anaheim Place, Rancho Cucamonga, CA 91730
Made In China
VEVOR®
TOUGH TOOLS, HALF PRICE
Technical Support and E-Warranty Certificate www.vevor.com/support
VEVOR®
TOUGH TOOLS, HALF PRICE
natural_image
Isometric view of a black metal frame with grid pattern, mounted on a support bracket (no text or symbols)BESOIN D'AIDE? CONTACTEZ-NOUS!

Lieu, Rancho Cucamonga, CA 91730
Fabriqué en Chine
VEVOR®
TOUGH TOOLS, HALF PRICE
natural_image
Isometric view of a black metal frame with grid pattern, mounted on a support bracket (no text or symbols)Installationshandbuch


natural_image
Isometric view of a black metal frame with grid pattern, mounted on a support bracket (no text or symbols)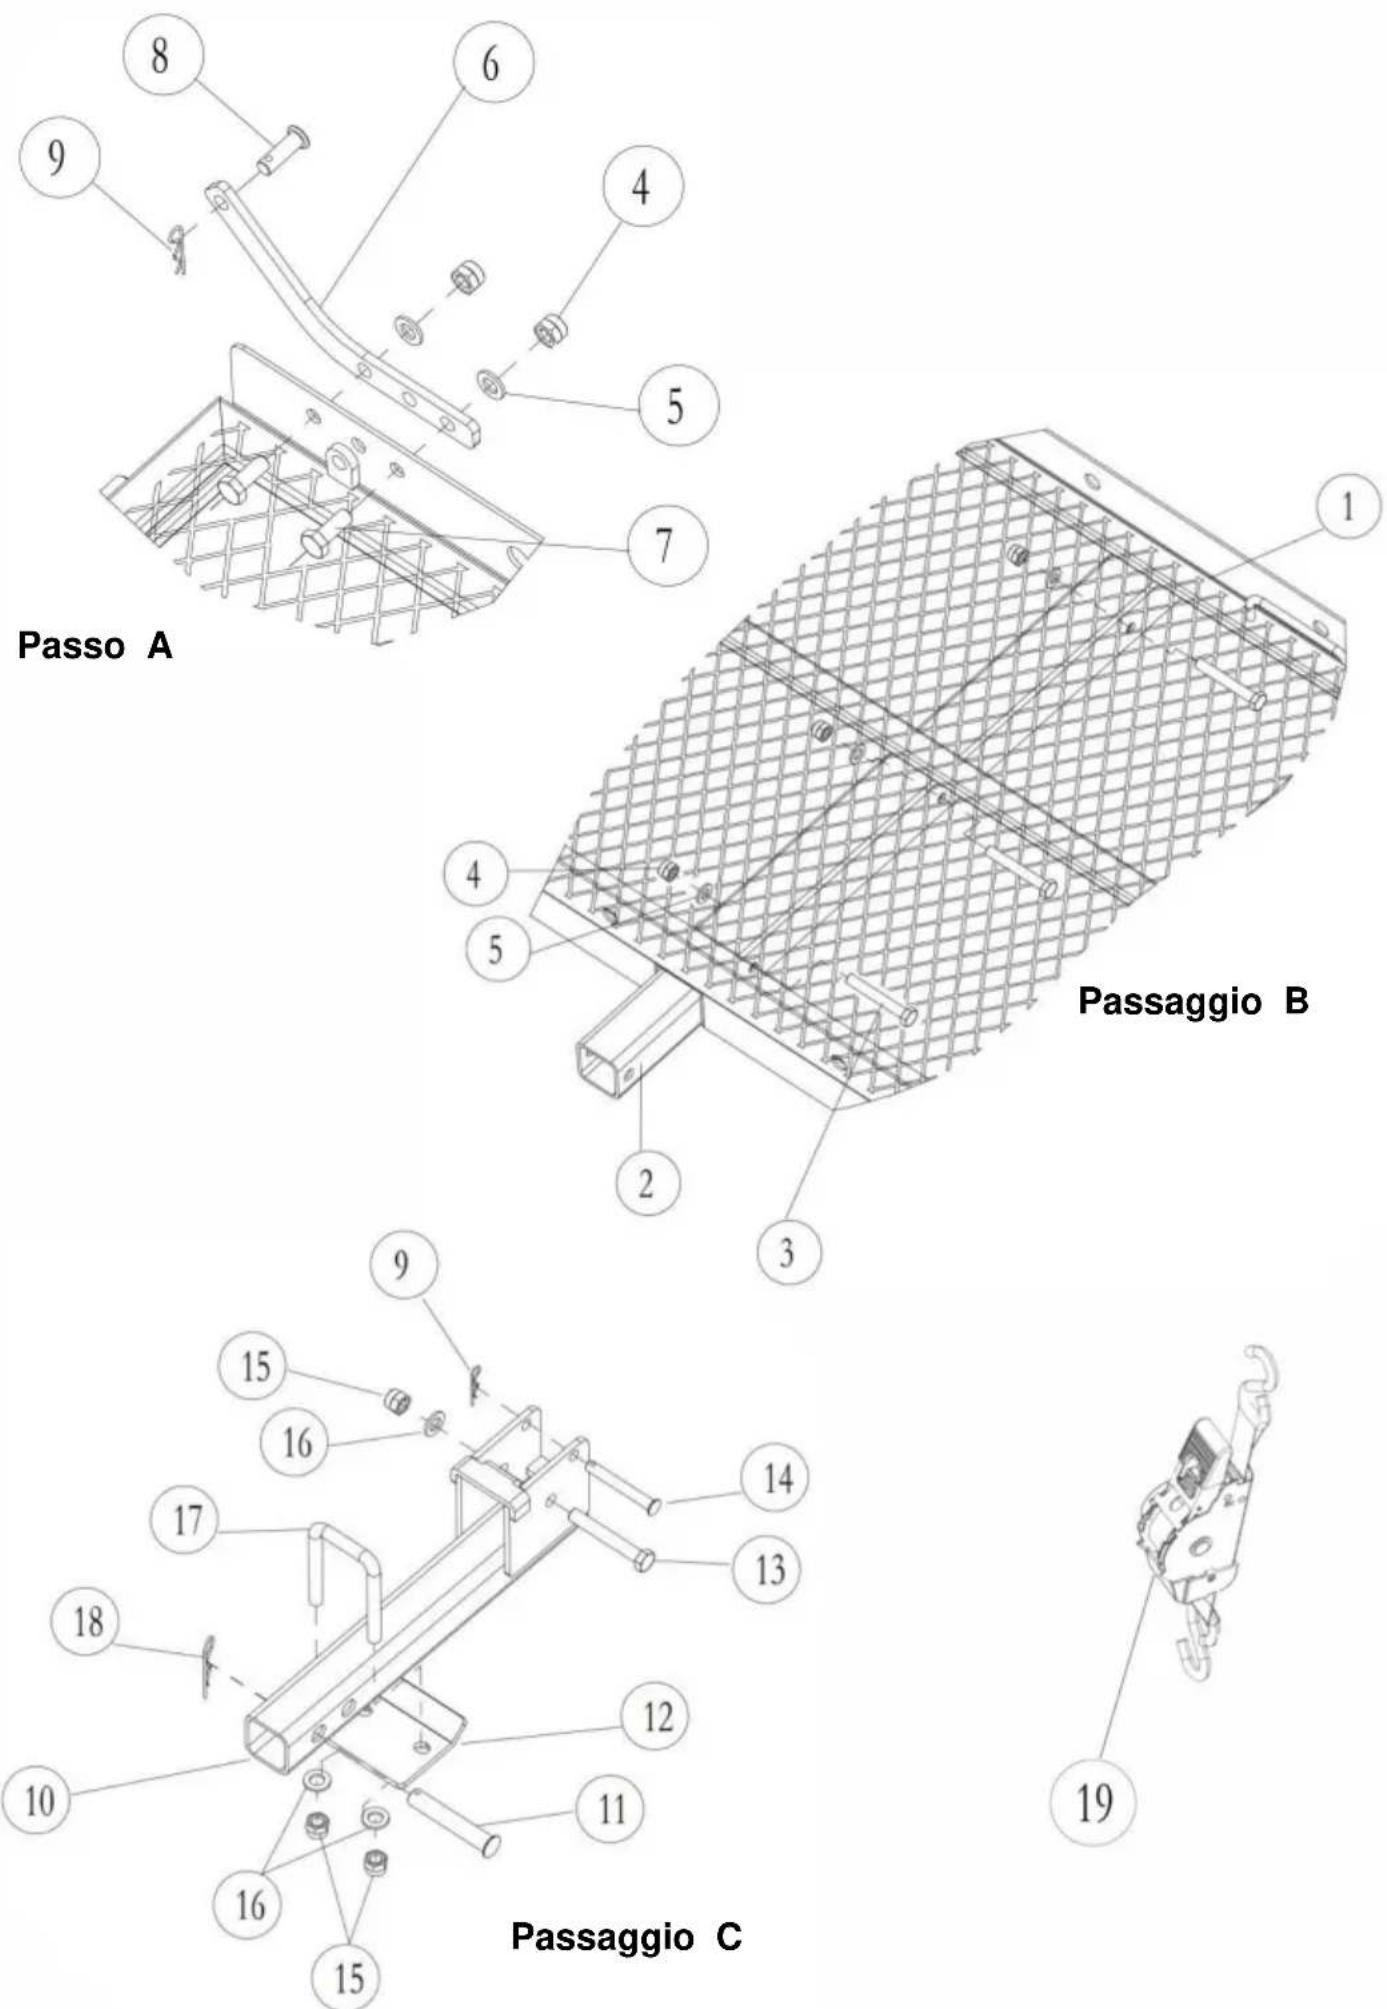

natural_image
Isometric view of a black metal frame with grid pattern, mounted on a support bracket (no text or symbols)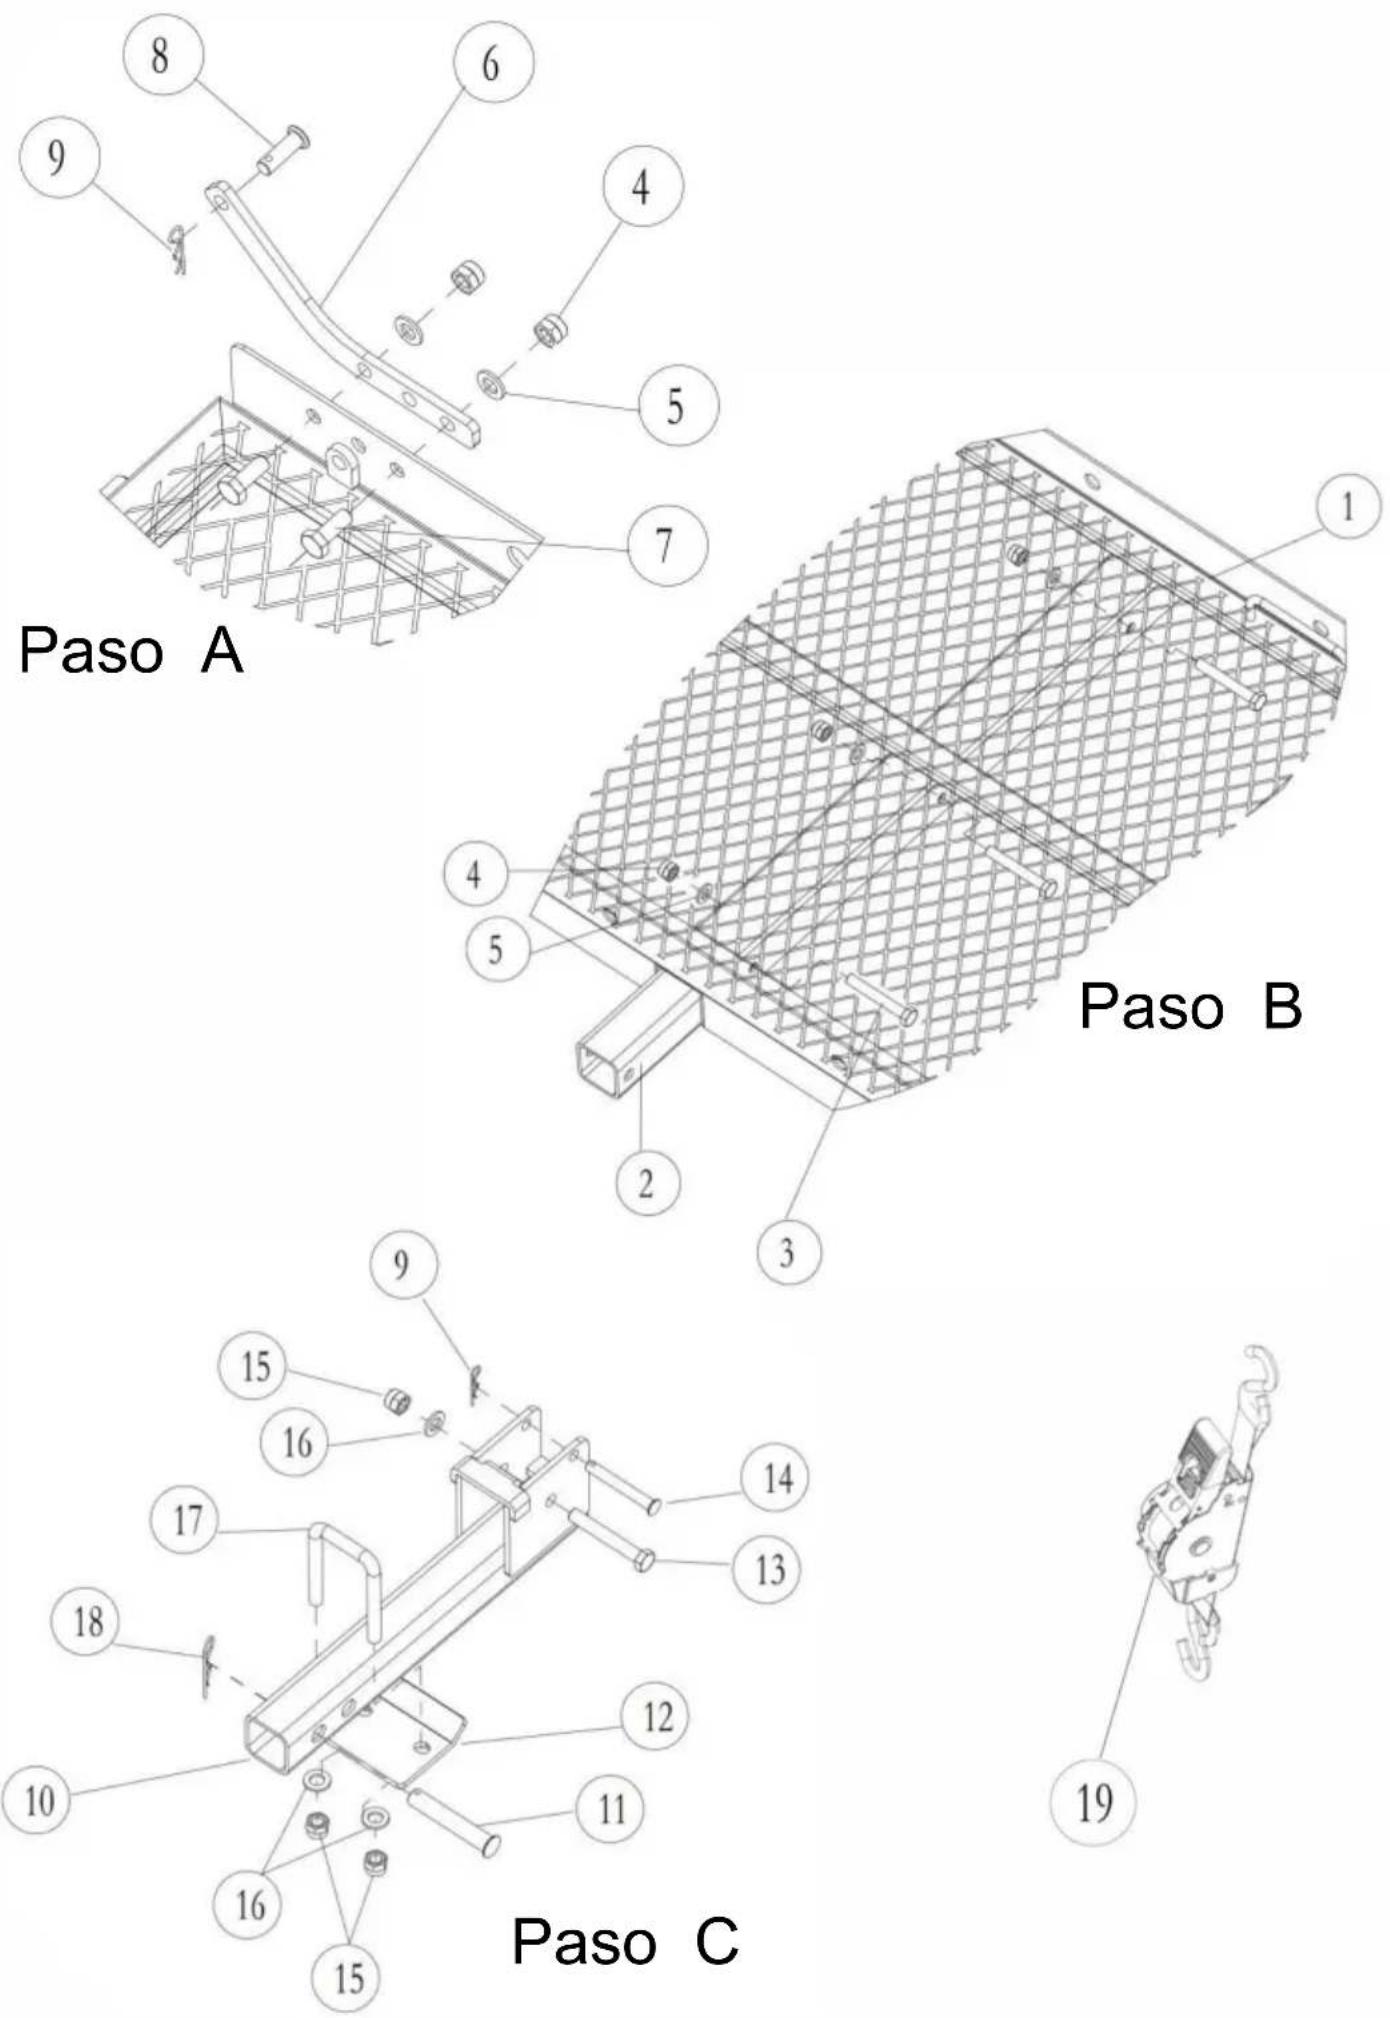

natural_image
Isometric view of a black metal frame with grid pattern, mounted on a support bracket (no text or symbols)POTRZEBUJESZ POMOCY? SKONTAKTUJ SIĘ Z NAMI!


natural_image
Isometric view of a black metal frame with grid pattern, mounted on a support bracket (no text or symbols)HULP NODIG? NEEM CONTACT MET ONS OP!
natural_image
Isometric view of a black metal frame with grid pattern, mounted on a support bracket (no text or symbols)BEHÖVER HJÄLP? KONTAKTA OSS!

Place, Rancho Cucamonga, CA 91730
Tillverkad i Kina
VEVOR®
TOUGH TOOLS, HALF PRICE


