
SC384M - Measuring equipment Vevor - Free user manual and instructions
Find the device manual for free SC384M Vevor in PDF.
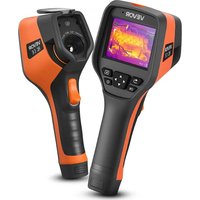


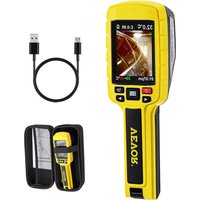
| Product type | Infrared thermal camera |
| Brand | Vevor |
| Model | SC384M |
| Detector resolution | 384 × 288 pixels |
| Spectral band | 8 ~ 14 μm |
| NETD | 35 mK |
| Field of view | 43.7° × 31.9° |
| Focus | Manual |
| Temperature measurement range | -20 °C ~ 150 °C / 100 °C ~ 550 °C |
| Accuracy | ±2 % or ±2 °C |
| Measurement modes | Central point, hot/cold point, custom points/lines/areas (up to 10 points, 10 areas, 10 lines) |
| Color palettes | 10 types |
| Digital zoom | 1×, 2×, 4×, 8× |
| Display | 3.5-inch touch screen (480 × 640) |
| Storage | MicroSD card 32 GB (expandable up to 512 GB) |
| Image formats | XX-IR.jpg (thermal + data), XX-DC.jpg (visible) |
| Video recording | H.264 without temperature data |
| Power supply | Rechargeable Li-ion battery, 4 h battery life |
| Charging interface | USB Type-C |
| Charging time | 3 h |
| Connectivity | USB, Wi-Fi |
| Analysis software | PC (thermal analysis) and mobile (iOS/Android) |
| Tripod mount | 1/4"-20 UNC |
| Protection rating | IP54 |
| Operating temperature | -10 °C ~ +50 °C |
| Drop resistance | 2 m |
| Lens cleaning | Isopropyl alcohol ≥30% or ethyl alcohol 96% with cotton |
| Safety | Do not point at intense light sources or laser; ambient temperature -20 ~ 60 °C; humidity 10 ~ 95% non-condensing |
Frequently Asked Questions - SC384M Vevor
User questions about SC384M Vevor
0 question about this device. Answer the ones you know or ask your own.
Ask a new question about this device
Download the instructions for your Measuring equipment in PDF format for free! Find your manual SC384M - Vevor and take your electronic device back in hand. On this page are published all the documents necessary for the use of your device. SC384M by Vevor.
USER MANUAL SC384M Vevor
HANDHELD THERMAL IMAGER
MODEL: SC384M, SC256M
This is the original instruction. Please read all manual instructions carefully before operating. VEVOR reserves a clear interpretation of our user manual. The appearance of the product shall be subject to the product received. Please forgive us that we won't inform you again if there are technology or software updates on our product.
| Warning-To reduce the risk of injury, user must read instruction manual carefully. | |
| CORRECT DISPOSAL This product is subject to the provision of european Directive 2012/19/EU. The symbol showing a wheele bin crossed through indicates that the product requires separate refuse collection in European Union. This applies to the product and all accessory marked with this symbol. Products marked as such may not be discarded with normal domestic waste, but must be taken to a collection point for recycling electrical and electronic devices. | |
| FC | FCC Information: CAUTION: Changes or modifications not expressly approved by party responsible for compliance could void the user's authority operate the equipment! This device complies with Part 15 of the FCC Rules. Operation subject to the following two conditions: 1) This product may cause harmful interference. 2)This product must accept any interference received, including interference that may cause undesired operation. WARNING: Changes or modifications to this product not expre-Approved by the party.responsible for compliance could void the user's authority to operate the product. Note: This product has been tested and found to comply with for a Class B digital device pursuant to Part 15 of the FCC These limits are designed to provide reasonable protection aga-harmful interference in a residential installation. This product generates, uses and can radiate radio frequency and if not installed and used in accordance with the instructio cause harmful interference to radio communications. However, it is no guarantee that interference will not occur in a particular installation. If this product does cause harmful interference to |
television reception, which can be determined by turning the product off and on, the user is encouraged to try to correct the interference by one or more of the following measures.
- Reorient or relocate the receiving antenna.
- Increase the distance between the product and receiver.
- Connect the product to an outlet on a circuit different from that to which the receiver is connected.
- Consult the dealer or an experienced radio/TV technician for assistance.
SAFETY INSTRUCTIONS
WARNING:
Read this material before using this product. Failure to do so can result in injury.
Safety instruction
WARNING
Make sure you read all applicable Material Safety Data Sheets (MSDS) and warning labels on containers before you use a liquid. The lid can be dangerous. Injury to persons can occur.
It is prohibited to use the product at temperatures above or below -20 °C.
It is recommended to use the product under conditions of relative humidity (RH) between 10% and 95% (no condensation).
Unauthorized disassembly or modification of the thermal camera is prohibited.
CAUTION
Regardless of whether a lens cover is present, do not point the infrared thermal camera towards strong light sources or equipment with laser radiation. This may affect the accuracy of the thermal camera and could even damage its detector.
Do not use the product under conditions that do not meet the environmental requirements. For specific usage environment requirements, refer to the product parameter table.
Do not apply solvents or equivalent liquids to the camera or other items.
Be careful when cleaning the infrared lenses. The lens has an anti-reflective coating that is easily damaged. Damage to the infrared lens can occur with excessive force or when cleaning with rough objects such as tissues.
2006/66/EC (battery directive): This product contains a battery that
cannot be disposed of as unsorted municipal waste in the European Union. See the product documentation for specific battery information. The battery is marked with this symbol, which may include lettering to indicate cadmium (Cd), lead (Pb), or mercury (Hg). For proper recycling, return the battery to your supplier or to a designated collection point. For more information, see: www.recyclethis.info
2012/19/EU (WEEE directive): Products marked with this symbol
cannot be disposed of as unsorted municipal waste in the European Union. For proper recycling, return this product to your local supplier upon the purchase of equivalent new equipment, or dispose of it at designated collection points.
For more information, see: www.recyclethis.info
Product Introduction
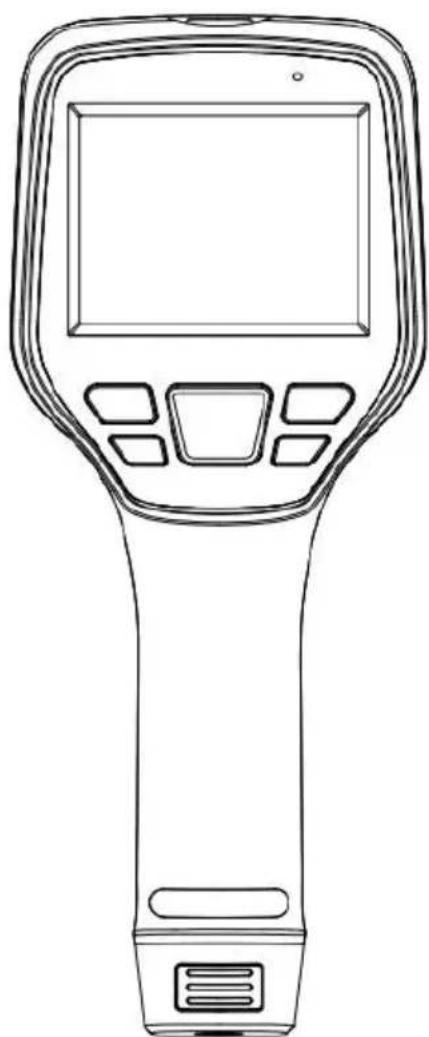
Camera (View from the front)
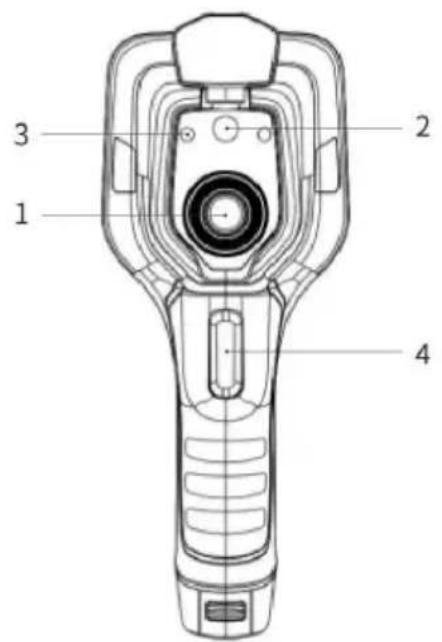
- Infrared Lens
- Digital Camera
- Laser Pointer
- Trigger
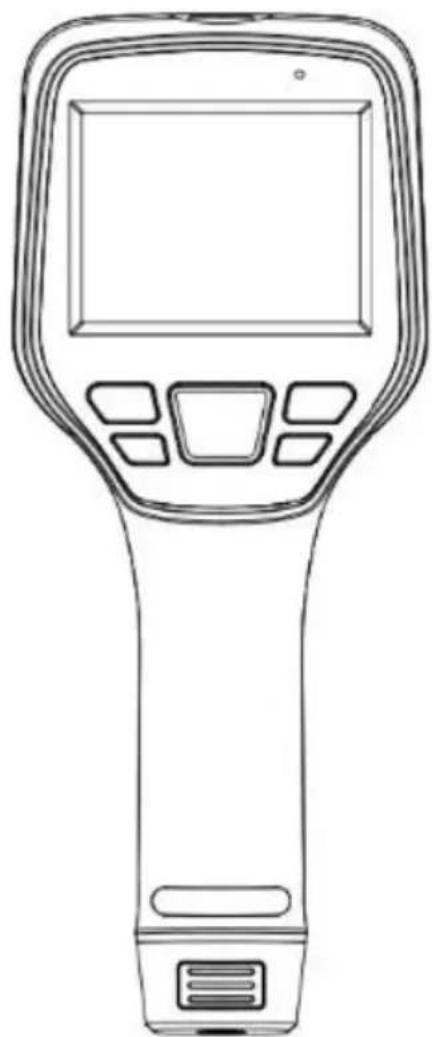
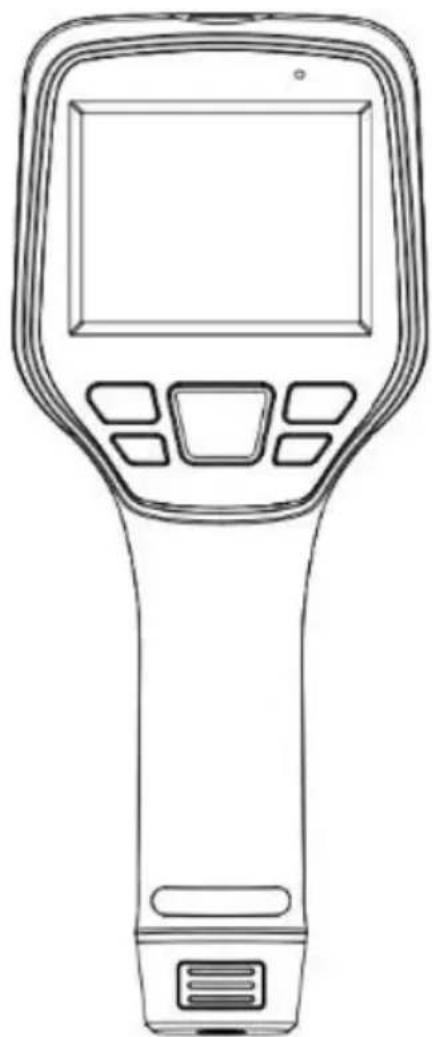
Buttons (view from the rear)
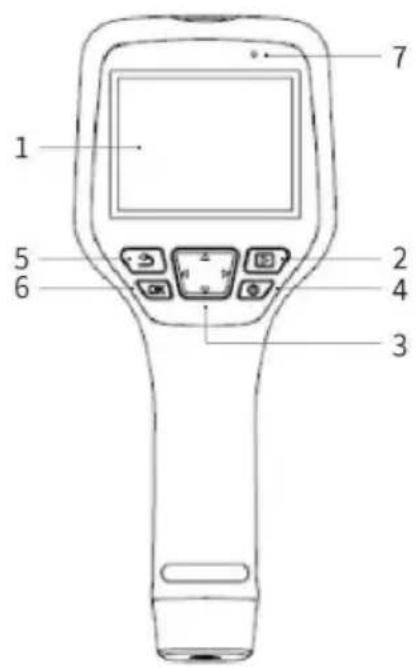
- Display screen
- Gallery button: Press to open the gallery. Long press to perform uniformity correction.
- Navigation button: Make selections for the menu, settings, gallery by clicking up/down/left/right.
- Power/Laser button: Long press to turn on/off. When it is on, click to turn on/off the laser pointer.
- Back button: Click to cancel the operation or return to the previous one. Long press to perform image uniformity correction.
- Enter button: Click OK to confirm the operation.
- Microphone: It's used to record voice notes after shooting.
Connector and Memory Card
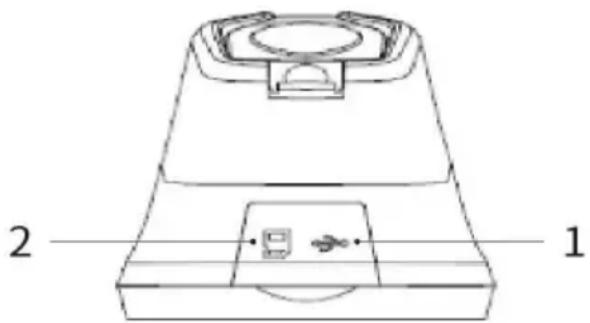
| No. | Name | Description |
| 1 | USB Interface | Connect a USB cable with the power adapter for charging. Connect a USB cable to a computer to charge transfer data. |
| 2 | SD Card | Standard MicroSD card, standard 32GB, it can sa 140,000 images at most (exFAT format), capacity |
| extendable to 512GB for some models. The SD card can be taken out and transfer data or other devices with a card reader. |
Quick Start Guide
Please follow the procedures:
Charging
- Power adapter and USB cable can be used to charge the device.
- You can charge the device by connecting the USB cable in the accessory to the computer.
Note: This method of charging takes longer time than using the power adapter.
- Charging base can also be used to charge the battery.
- Please charge the thermal camera at room temperature.
Power on
Long press the power button to start the device.
Target Searching
Point the thermal camera at the object of interest.
Image Capturing
Click the trigger button to capture the image, and record the video by pressing the trigger button.
Analysis by PC Software
Run the client after downloading the software to PC, and then use a cable or SD card to import data for further analysis.
Analysis by APP
Download and install the App on the mobile device. Enable the hotspot of the thermal camera to which the mobile device is connected, run the App, and import the data for further analysis.
C
Operation Instruction
Charging
Charge with a Power Adapter
- Plug the power adapter into the socket.
- Use a USB cable to connect the adapter and the camera to charge.
Note: It takes about 3 hours to get the device fully charged.
Charge with a Computer
Use a USB cable to connect the thermal camera to the computer to charge.
Note: When charging with a computer, the computer should be turned on, and the charging time is longer than using an adapter.
Charge with a Charging Base
- Connect the power adapter and the charging base with a USB port and plug the power adapter into the socket.
- Take out the battery and place it correctly in the charging base to charge.
Note: When the battery is not placed, the indicator of the charging base flashes; the indicator turns red when the battery is placed and charging, and the indicator becomes green when the battery is fully charged.
Power On/Off
- Press and hold the power button to turn on the device.
- Press and hold the power button for about 3 seconds to turn it off.
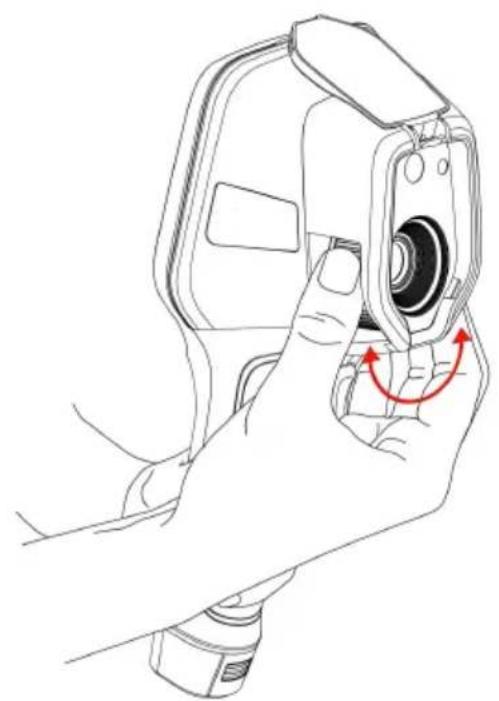
Focus Adjustment (Only available for some models)
Make sure the device is powered on. Align the camera with the scene to be measured, then rotate the focus ring beside the lens clockwise or counterclockwise to adjust the focal length and make the image clearer. See the following figure for detailed adjustment instructions.
Images/Videos Capture
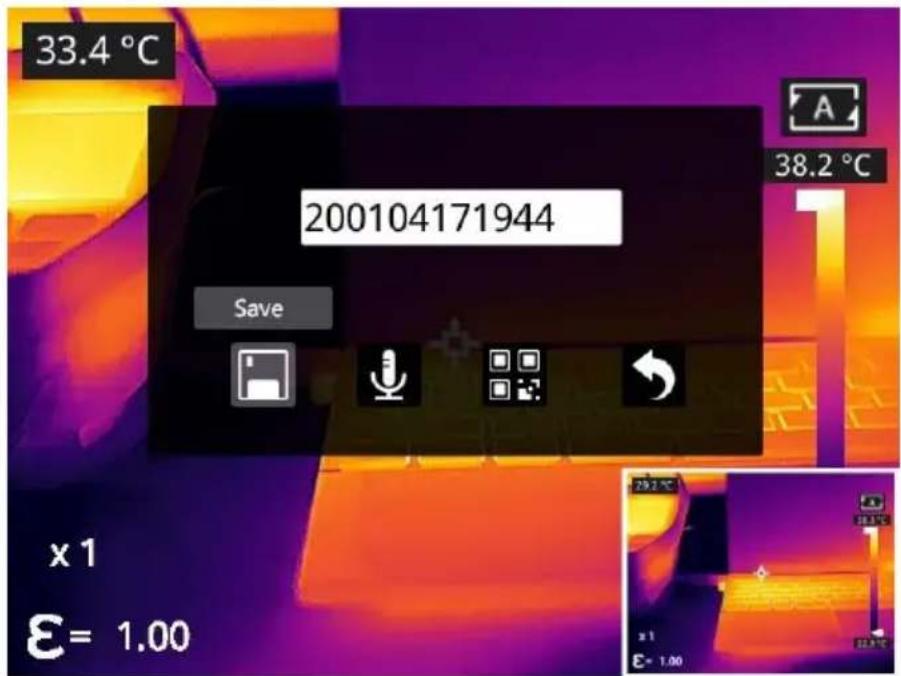
- In the observation interface, adjust the focus ring until the image is clear. Short press the trigger button to capture an image. Long press the button to record a video.
- Tap the save button on the touch screen, or click OK, or short press the trigger to save the picture. Tap other buttons on the screen or use the navigation button + OK to make recording annotations, scan the QR code, name the file, or cancel saving images.
View Photos/Videos
The images you capture are saved on the SD card. You can view them at any time by following the steps below:
- Enter the photo gallery by clicking the gallery button.
- Choose the image view mode by clicking the drop-down arrow. There are two modes: sort by filename or sort by time.
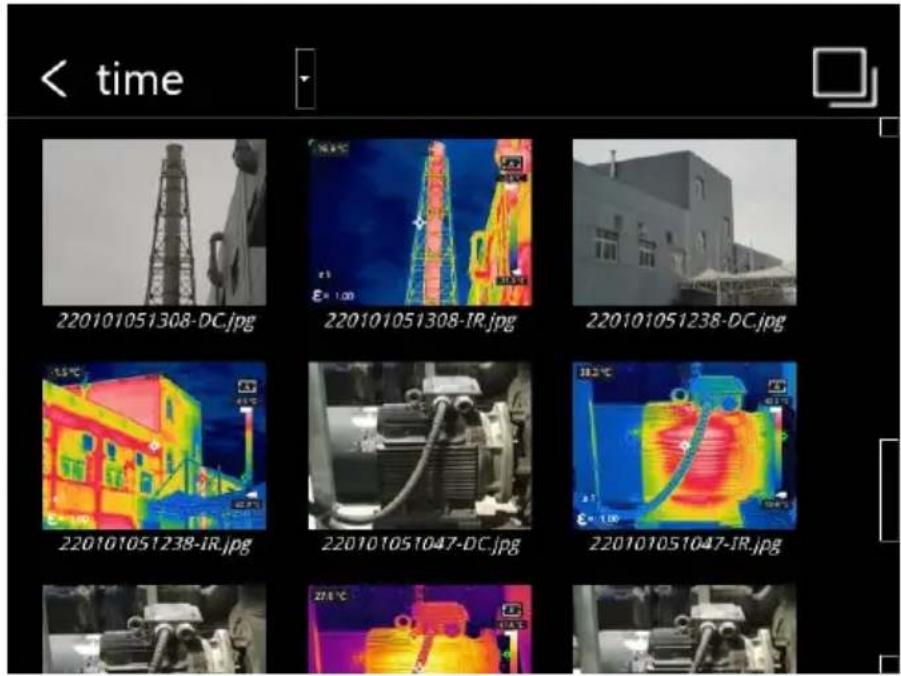
- Select the picture or video you want to view by pressing the nav button or touch screen.
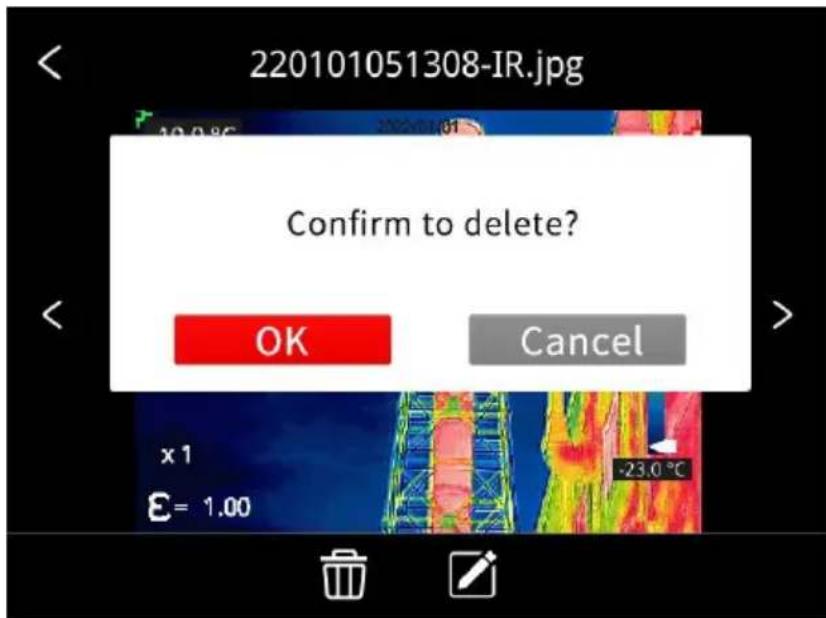
- Press OK or click the picture or video to view it in full screen. Select the delete option and then confirm to delete the current item. Select the rename option and confirm to rename the current item.
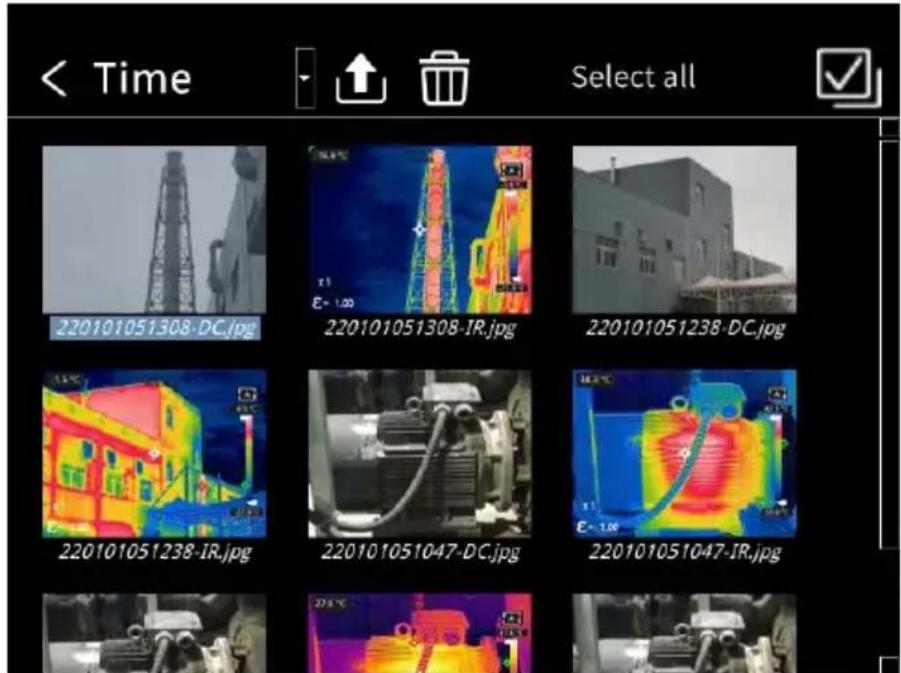
- When in the preview interface, click the multiple button in the upper right corner of the screen, then select the picture or video to be deleted, and delete the selected items by pressing the delete button.
- Return to observation interface by clicking the gallery button, back button, or touching the screen.
- Single-click the gallery button, press the return button, or use the touchscreen to return to the observation interface.
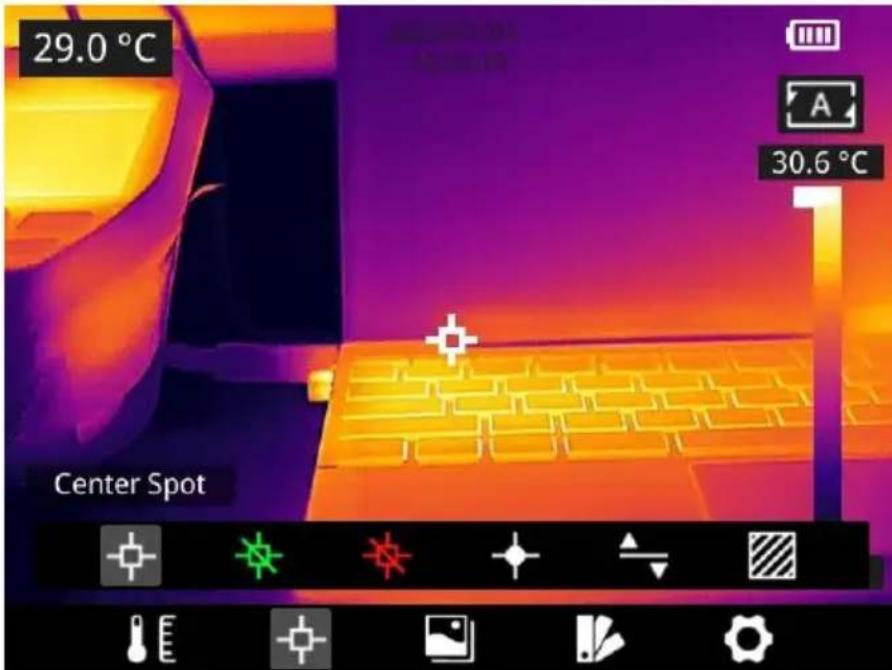
Measurement Mode
In the observation interface, press OK shortly to enter the main menu.
Select Measurement Settings with the navigation button. Press OK.
Again to enter the secondary menu, select different measurement mode by shifting left or right on the navigation button, and press OK to save the option.
In the observation interface, click anywhere on the screen to enter the menu. Then click Measurement Settings to select the desired
measurement mode, and make it effective by clicking the screen area.
Measurement Parameters
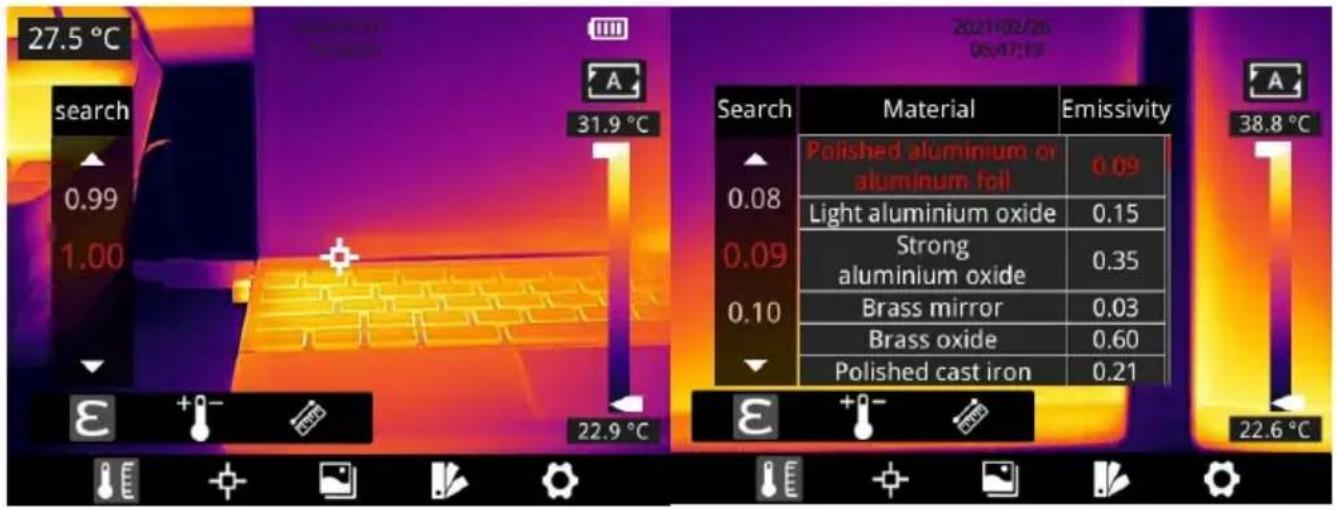
In the observation interface, press OK to enter the main menu. Use the navigation button to select the parameter E hg, then press OK again to enter the secondary menu. Select different temperature measurement parameters by shifting left or right, and press the enter button to parameterize. After setting, press OK again to save your option. In the observation interface, click anywhere on the screen to enter the menu. Click Parameter Settings to set the parameter. After finishing the setting, click the screen area to take effect.
- Emissivity: In order to obtain more accurate measurement results, you need to set the emissivity according to the target to be measured before each measurement, instead of using the default configuration. Emissivity refers to the ratio of the radiant ability of an object to the radiant ability of a blackbody at the same temperature, which is relative to the reflectivity of the object. The lower the emissivity, the higher the proportion of energy being reflected. The higher the emissivity, the lower the proportion of energy being reflected. For example, the emissivity of human skin is 0.98, and the emissivity of printed circuit boards is 0.91. In the home screen, click the 'Emissivity' button.
button and then click 'Search' to obtain more emissivity information (supported by certain models). You can also refer to the Quick Start Guide included in the packaging or check other sources for more information.
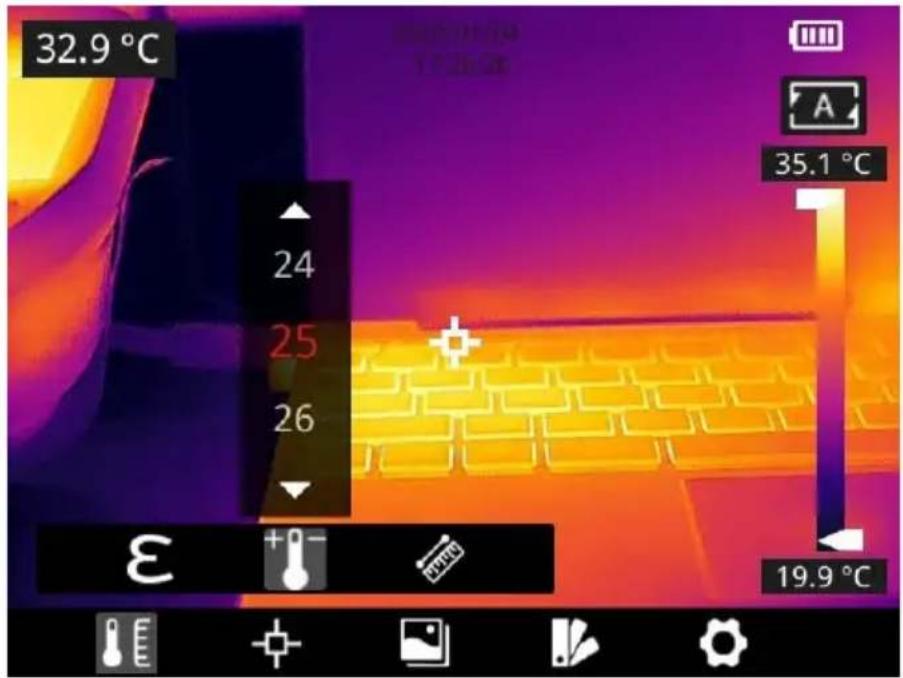
- Ambient temperature: The reflection temperature of the object surface will affect the measurement result, especially when the object emissivity is low or the object temperature and the reflection temperature differ greatly, this effect will increase. So, the result needs to be compensated to eliminate influences of the surface reflection temperature. However, it is usually difficult to determine the reflection temperature of an object. The ambient temperature can be used to replace the reflected temperature in actual measurement.
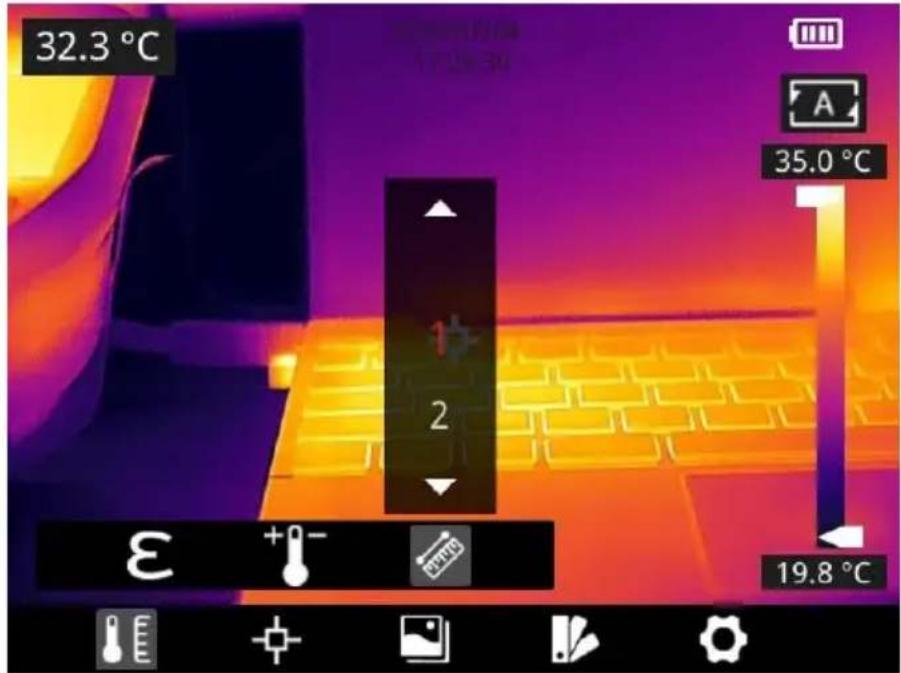
- Distance: Distances have effects on the measurement results. In order to get accurate measurement, distance information of the object is necessary for the thermal camera to compensate the result.
Palettes
In the observation interface, short press OK to enter the main menu. Select palette setting with the navigation button. Press OK again to enter the sub menu. Select different palettes by shifting left and right navigation button, and then press the enter button to save your option. In the observation interface, click anywhere on the touch screen to enter the main menu. Click palette setting to choose a palette and save your option by clicking the screen area.
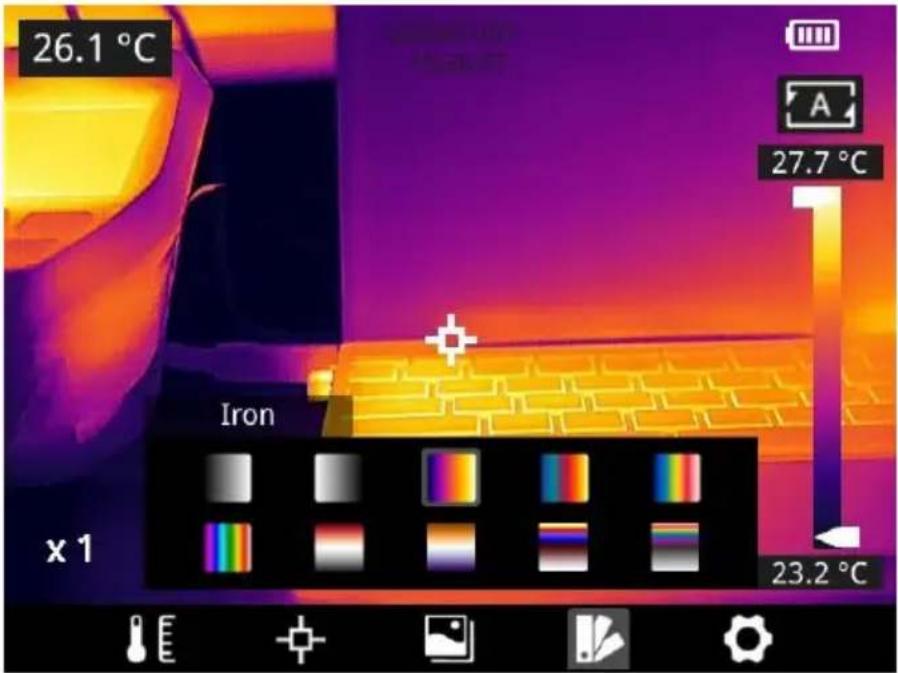
Image Mode
Image Mode Introduction
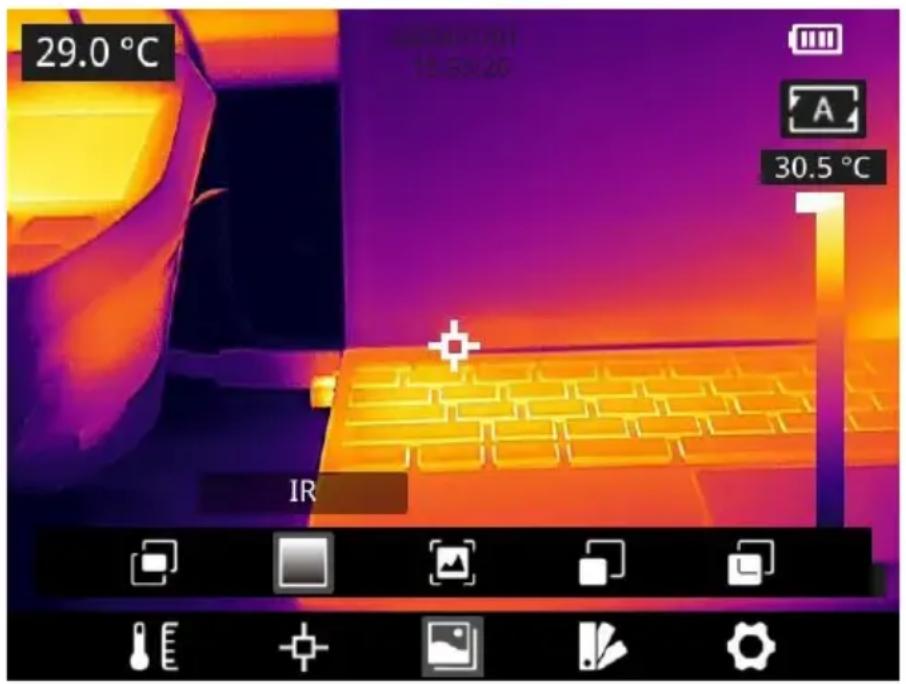
Five image modes are available.
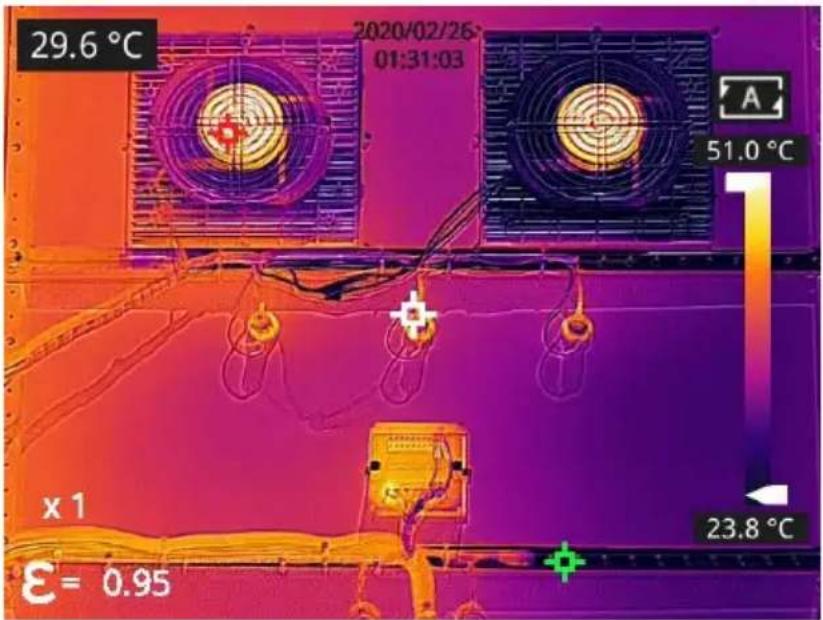
- DDE: Infrared image with enhanced object edge details.
Note: This function is not available for some models.
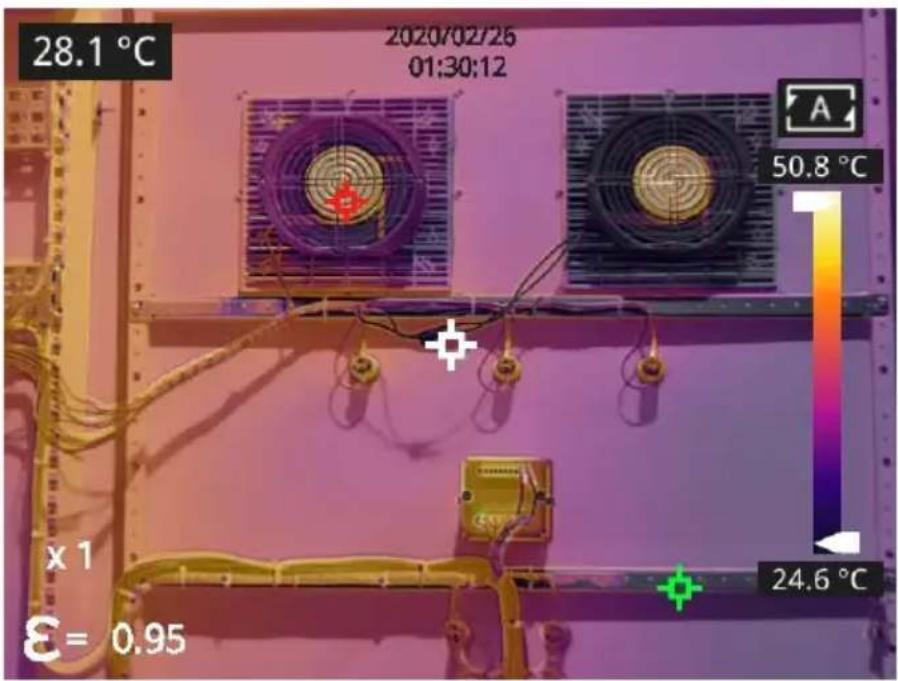
- Thermal Fusion: An image fused to a certain scale between an infrared image and a visible image.
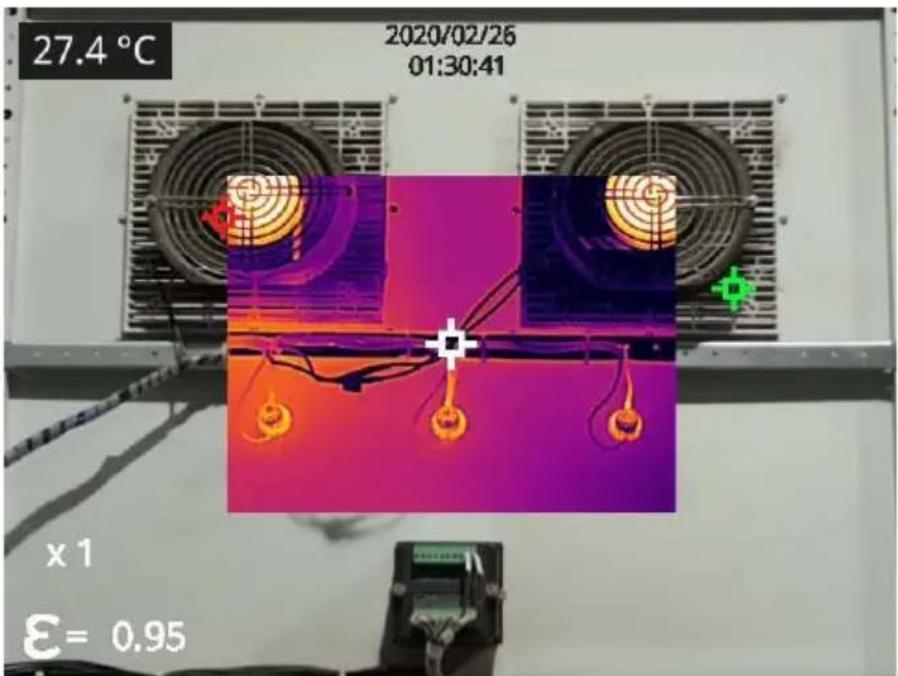
- PIP: infrared image superimposed at the center of the visible image.
- Thermal imaging: infrared images.
Digital camera: visible images.
Note: For better dual-light image effects, when in DDE, PIP, or therm fusion modes, you need to set the actual distance, that is, the approximate distance from the thermal camera to the object. If the preset alignment parameters cannot meet the requirements, you can also manually perform alignment in the settings or drag on the touch screen.
Setting Steps
In the observation interface, press OK shortly to enter the main menu.
Select image mode through the navigation button. Then press OK again to enter the secondary menu, where different image modes can be selected by shifting left or right on the navigation button. Save your selection by pressing the enter button.
In the observation interface, click any place on the screen to enter the menu. Click image mode and select the desired image mode, and then click on the screen area. The option is saved.
Non-uniformity Correction
Non-uniformity Correction Introduction
Non-uniformity correction is used to compensate for non-uniformity of detector pixels or non-uniformity caused by other optical interference. If there is more noise in the image, non-uniformity correction is needed, which is common when the ambient temperature changes rapidly.
Non-uniformity Correction Operations
In the imaging interface, press the back button or the gallery button
continuously to perform non-uniformity correction.
Contrast Adjustment
- In the observation interface, the contrast of the infrared image can be
adjusted by sliding up and down the arrow button on the
temperature range on the right side of the screen. The upper and lower limits of the temperature scale can be set manually.
Take the following image as an example: in auto mode, the default temperature range is 24.2°C to 34.6°C.
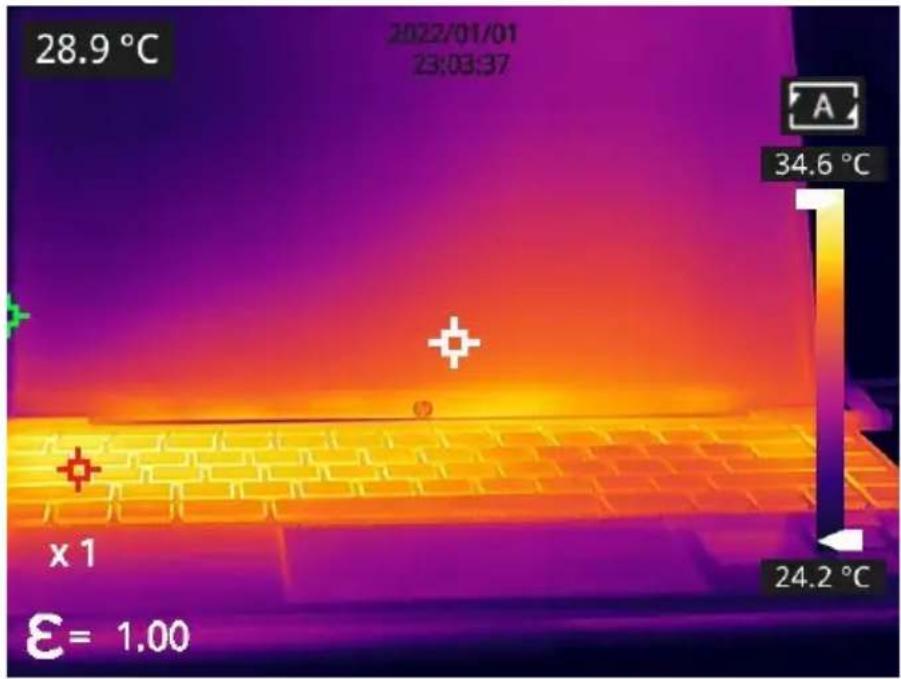
The lower limit of the temperature scale is manually adjusted to 27.7
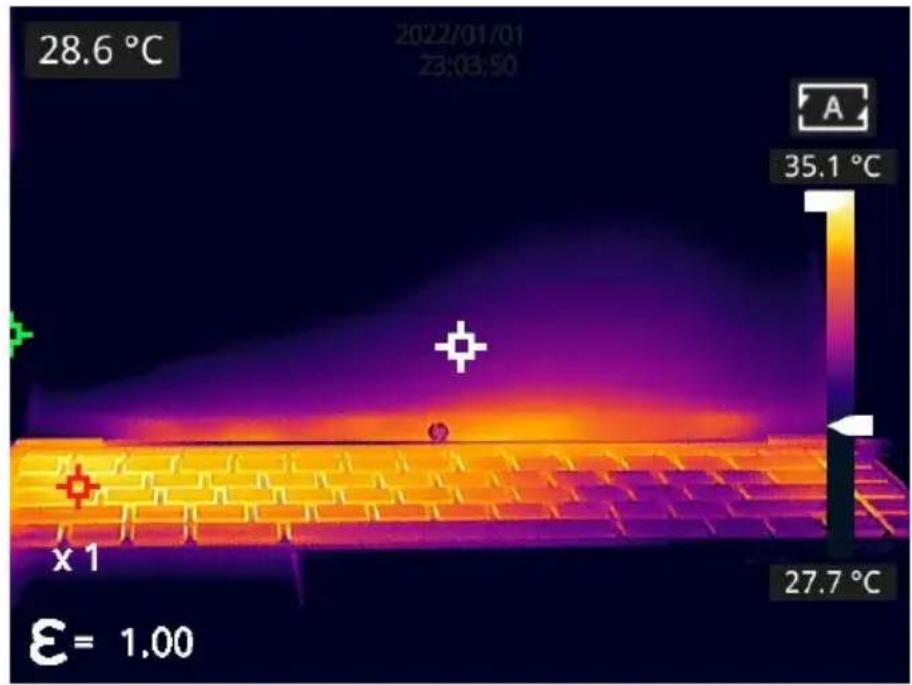
- Press the upper right corner of the interface to return to auto-contrast mode. In auto mode, the upper and lower limits are automatically adjusted according to the Max. temp and Min. temp. The
color is distributed based on the color of the temperature scale.
Digital Zoom
In the observation interface, press the navigation button to perform up to 8 × digital zoom.
- 1× digital zoom:
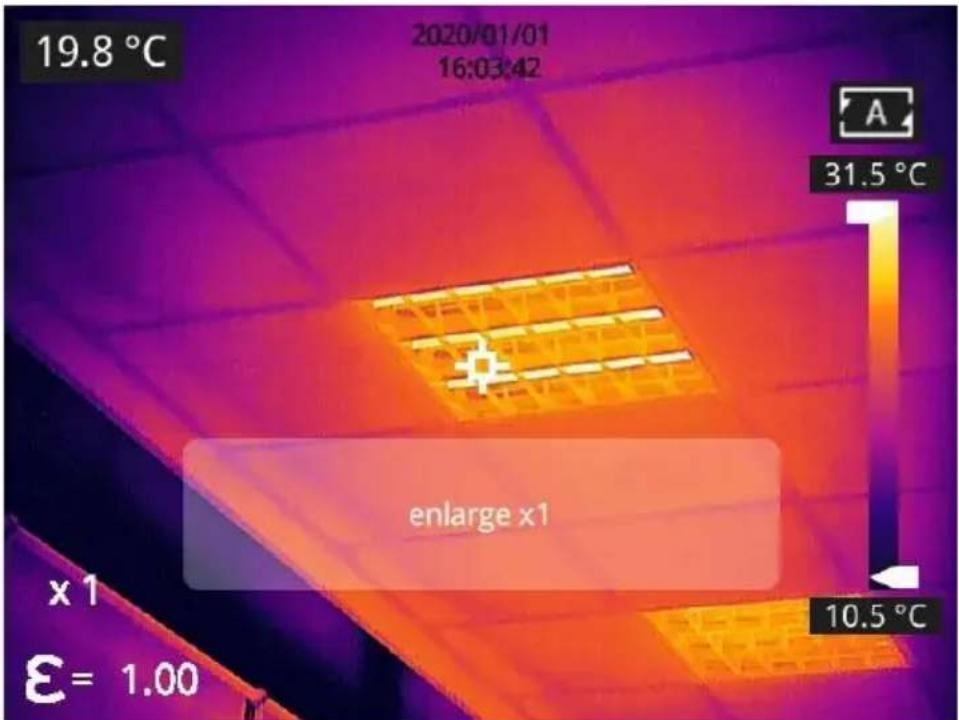
- 2× digital zoom:
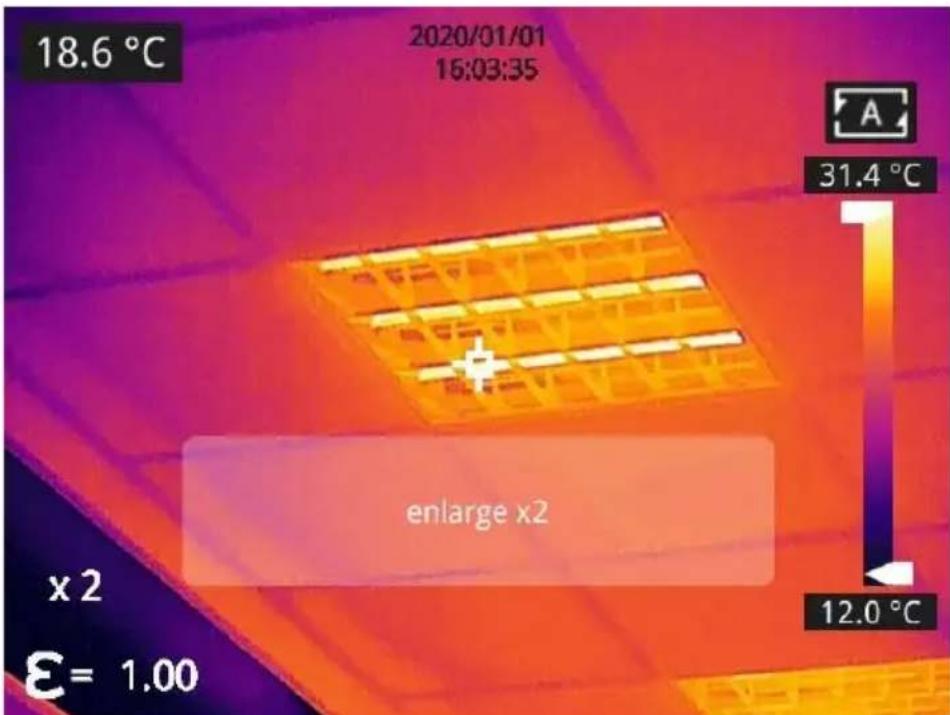
- 4× digital zoom:
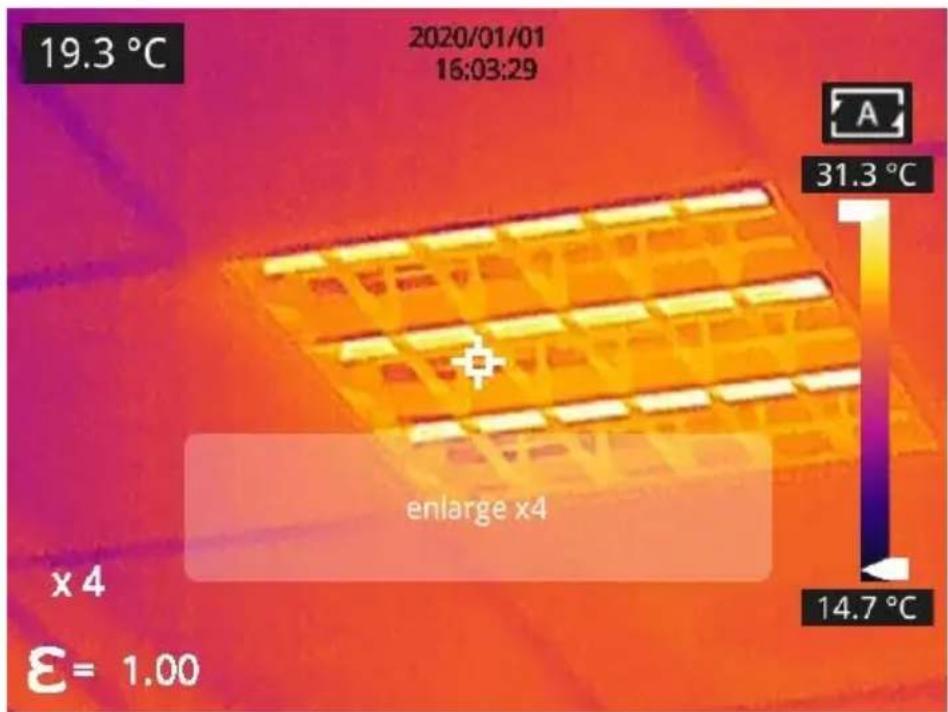
8× digital zoom: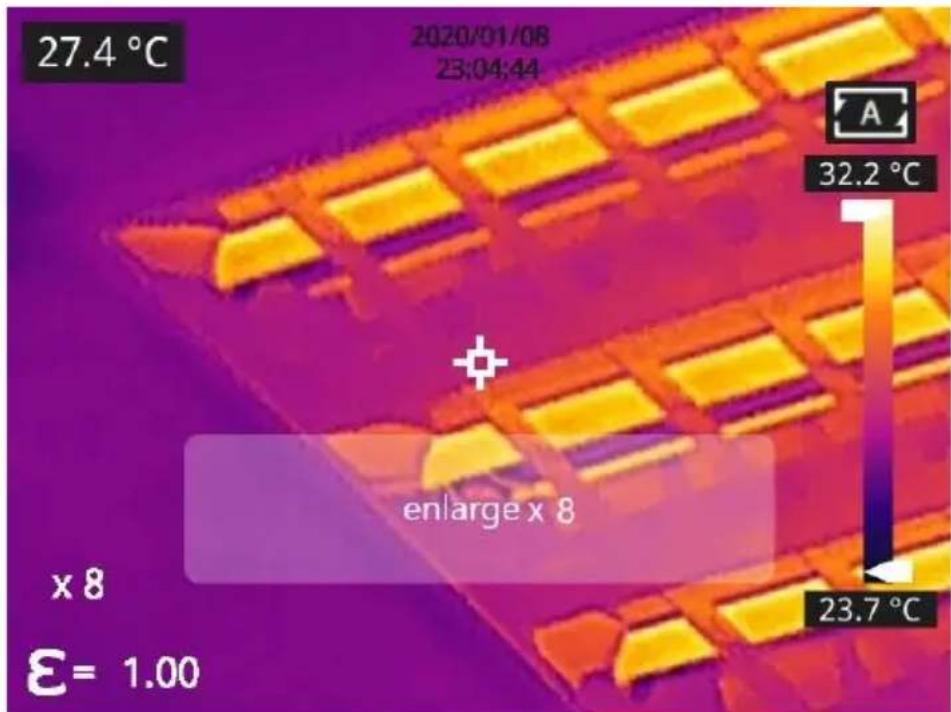
Note: This function can be enabled only in IR mode or Visible mode. Other Settings
Other settings include date and time, unit, and other items.
- In the observation interface, press OK briefly to enter the main menu, then select Settings to access other settings.
- In the observation interface, tap anywhere on the screen to enter
the main menu, and tap Settings to access other settings.
Temperature Measurement Mode
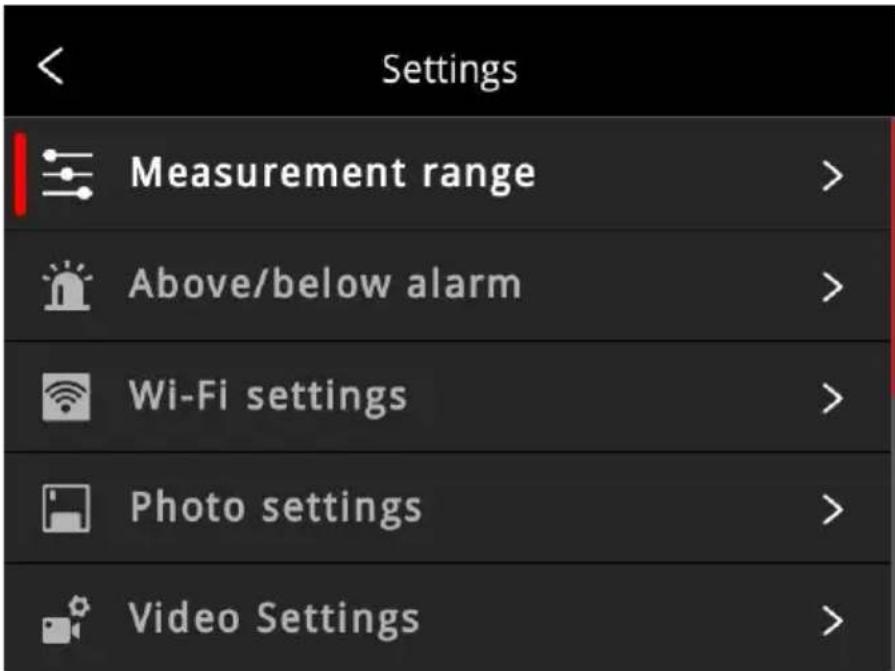
- -20~150°C: The image details are better, and the maximum temperature measured is 150°C. This mode is the default.
- 100~650°C: The image details are slightly worse, and the maximum temperature measured is 650°C (Certain models support measuring temperatures up to 550°C).
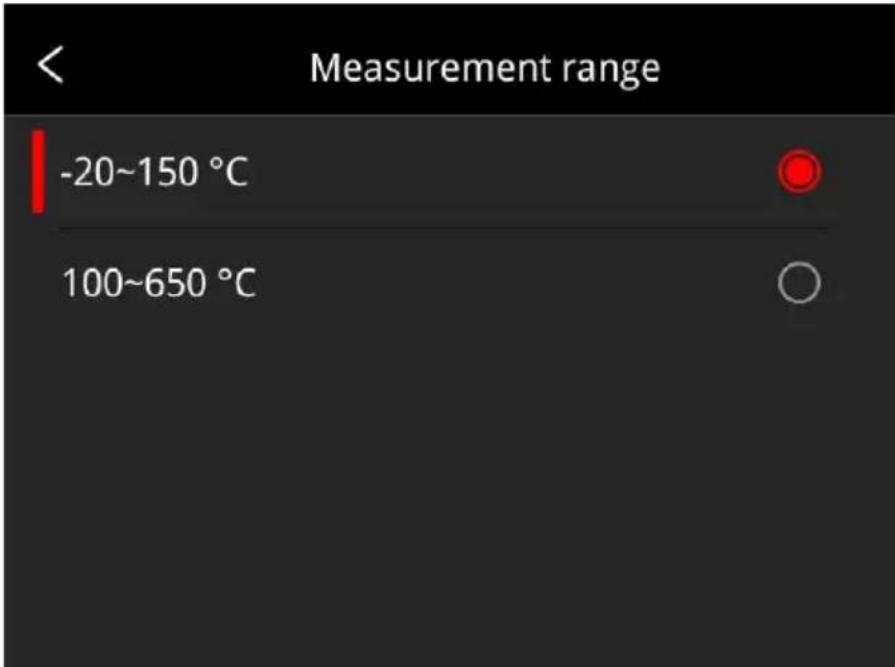
Select options using the up/down navigation buttons, and press OK to confirm. You can also select options via the touch screen.
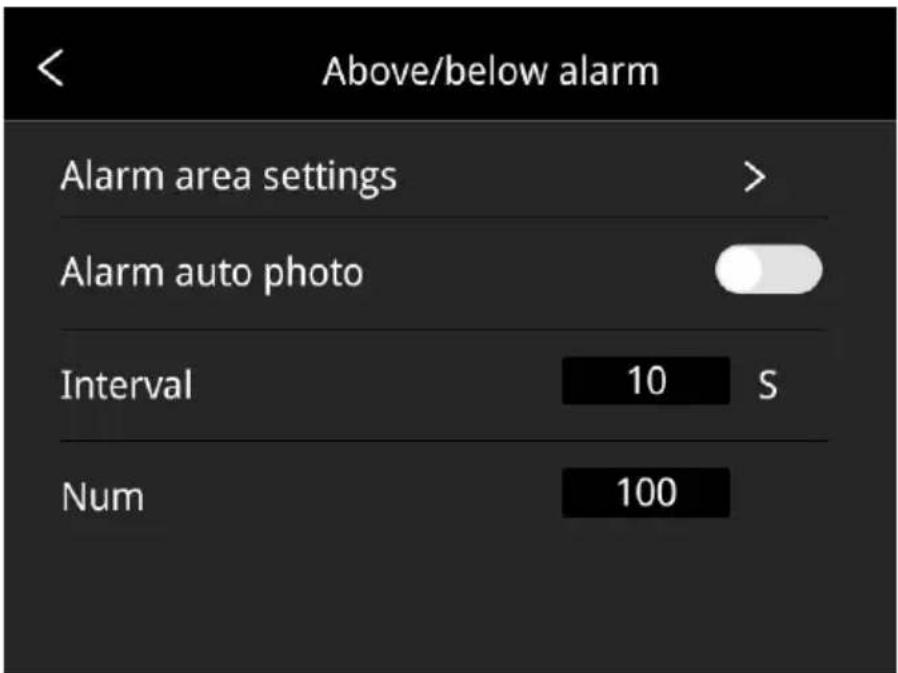
Above/Below Temperature Alarm
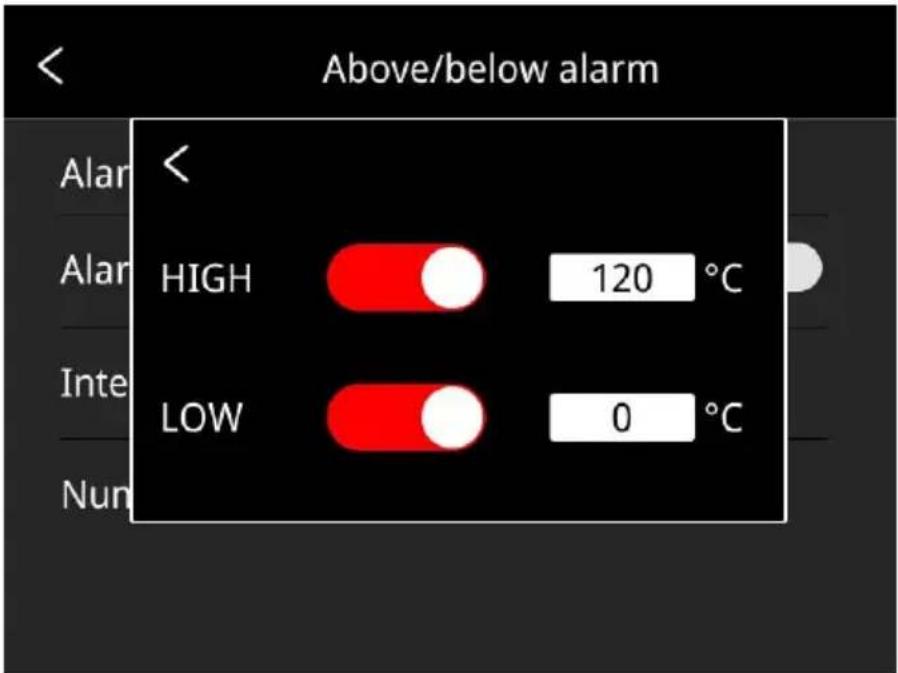
- Alarm temperature setting:
- High temperature alarm switch: Click to enable or disable the high temperature alarm function. Temperature setting for high temperature alarm: Click to open the pop-up keyboard and set the alarm temperature, 120°C by default.
- Low temperature alarm switch: Click to enable or disable the low temperature alarm function.
Temperature setting for low temperature alarm: Click to open the pop-up keyboard and set the alarm temperature, 0°C by default.
- Auto Alarm Snapshot: Click to enable or disable, disabled by default. Automatically captures an image during an alarm.
- Time Interval: the time interval of alarm snapshot is 10s by default, click to perform custom setup.
- Number of Snapshot: 100 by default, click to perform custom setup.
Cloud Service
After opening, click the register button and follow the prompts to complete the registration. After registering, enter your username, password, and device name, then click login to bind the device to your cloud service account.
Note:
1) The prerequisite for logging into the cloud service is a successful internet connection. Please refer to section 5.13.4. 2) After logging into the cloud service, to restore factory settings, you need to re-verify your account and password while ensuring an internet connection. Only after unbinding the account can you restore factory settings. 3) This function is not supported by certain models.
Wi-Fi Settings
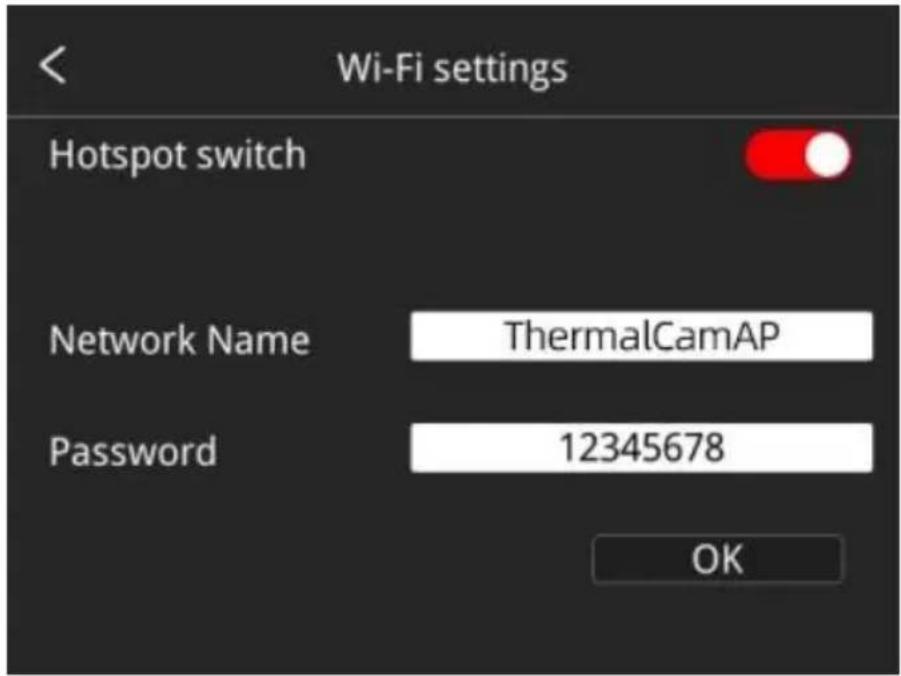
Click and enter Wi-Fi settings interface.
Hotspot Switch: turn on hotspot and set the network name and password, then click OK.
Note:
1) The specialized app is needed while this function is enabled. You can connect the hotspot manually after turning hotspot on, and you can transmit the saved pictures or videos to mobile device to perform secondary analysis. 2) Turn off hotspot when it is not used, or else the power consumption will be faster.
Photo Settings
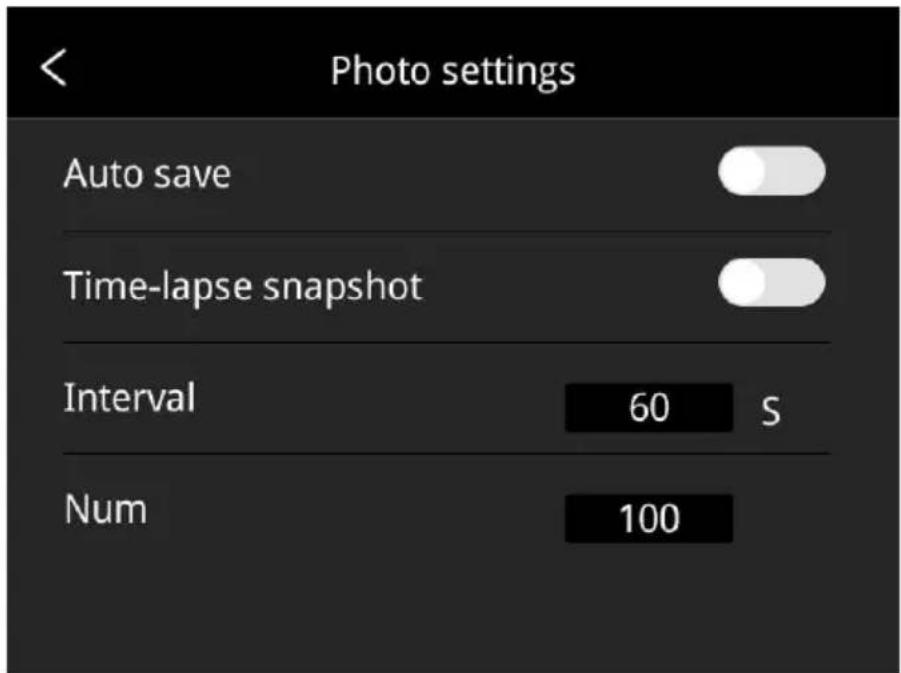
- Auto save of manual snapshot switch: click to enable or disable function of auto save of manual snapshot, disabled by default.
- Time-lapse snapshot: click to enable or disable the function of time-lapse snapshot.
- Time interval of time-lapse snapshot: 60s by default, click to perform custom setup.
- Number of time-lapse snapshots: 100 by default, click to perform custom settings.
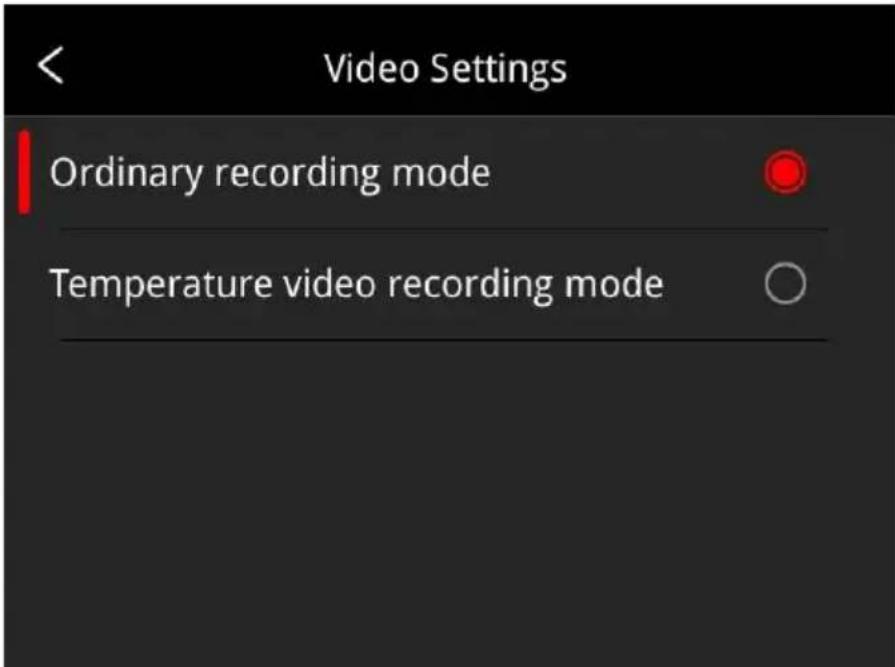
Video Settings (This function is only available for some models)
- Ordinary recording mode: defaulted video mode. The Max temp, M temp and Center spot of the full frame will be displayed on the captured video, the temp value is located on the top left screen.
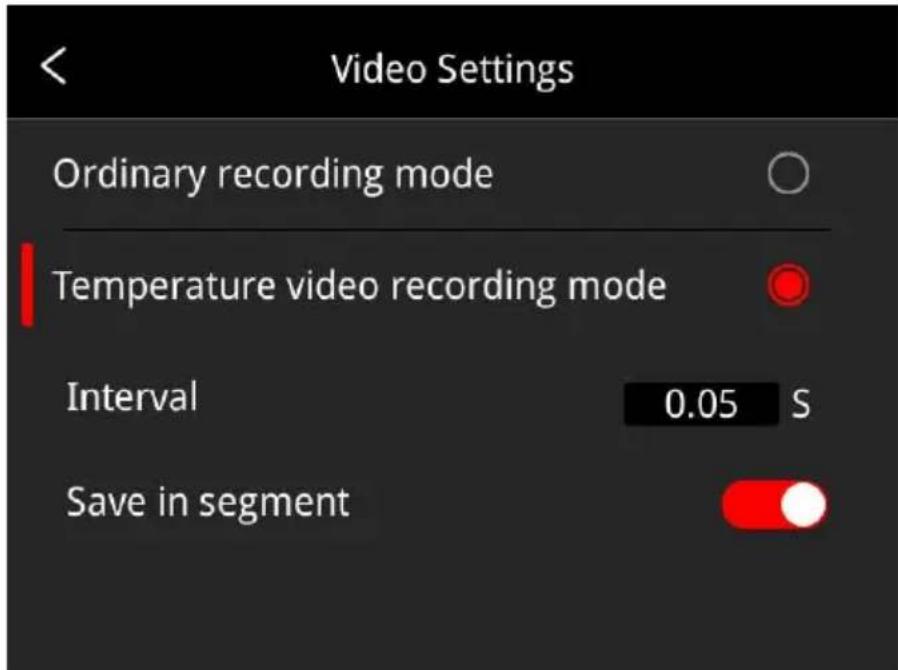
- Temperature video recording mode (Only available for some models): defaulted time interval is 0.05s, click to perform custom settings. - relating temperature data is saved in the captured videos, the off-secondary analysis is supported in the thermographic analysis software.
Smart Patrol Inspection (This function is only available for some models)
- By selecting different modes, you can help operations collect image according to preset task packages. The software can automatically standardize the naming of images. Click 'General' or 'Electric Power' freely switch between the two modes.
Electric Power Mode:
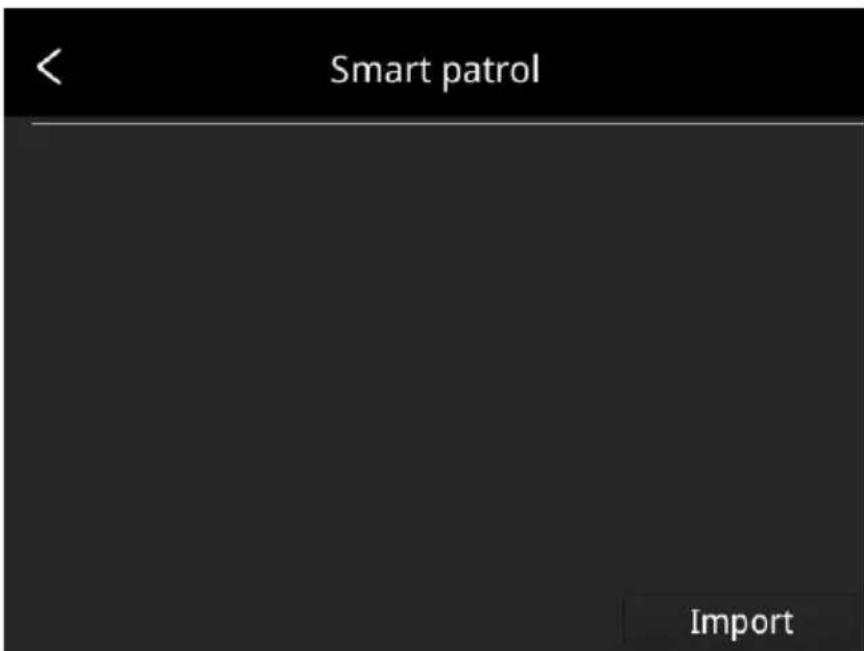
Click 'Import' and select the desired smart capture package, then click 'Import' again. After that, you can select the corresponding task to s smart capture. The specific operation method is: click the start button

on the right to begin inspection capture; to end, click the return

the left side of the screen to stop capture.
- General Mode:
Click 'Import' and select the desired smart capture package, then click 'Import' again. After that, you can select the corresponding task to s smart capture. The specific operation method is: click the start button

on the right to begin inspection capture; to end, click the return
the left side of the screen to stop capture.
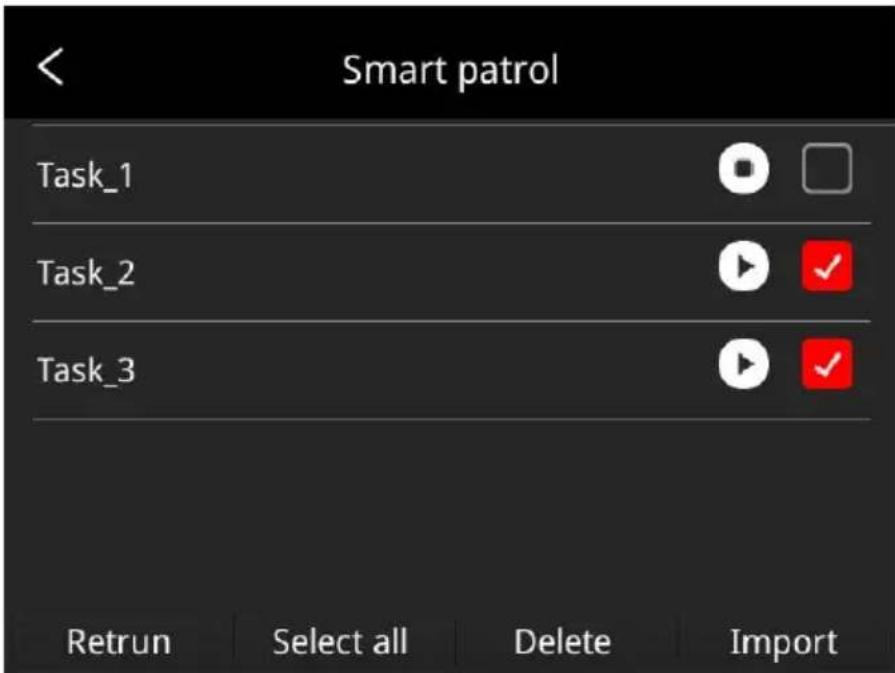
- Long press the patrol task to import new patrol tasks, delete the patrol task, select all patrol tasks or quit.
3. Method of making smart capture package:
- Users can fill in the file with the equipment that needs to be photographed according to the template format of the electric power smart capture package.
(1) The smart capture package does not have a fixed template; the user can design the title and contents according to actual situation. (2) The user can name the smart capture package to clearly distinguish different tasks according to the actual situation in the
general mode.
(3) Create a file folder named 'inspection' in the root directory of the SD card, put the newly created smart capture package in this folder, insert the SD card into the camera, then the package can be imported into the camera.
- The contents of the general smart capture package support custom settings. (1) The Excel-format smart capture package for the general modes does not have a fixed template. Users can design the headers and content according to their actual usage. The style can refer to the electric power smart capture package (see above image). (2) Users can name the smart capture package required for the general mode according to their actual situation, so as to clearly distinguish different tasks. (3) Create a new folder named 'inspection' in the root directory of the SD card, place the new smart capture package in this folder, and insert the SD card into the device. Then you can import the package in the device following the instructions above.
Analyze Settings (This function is only available for some models)
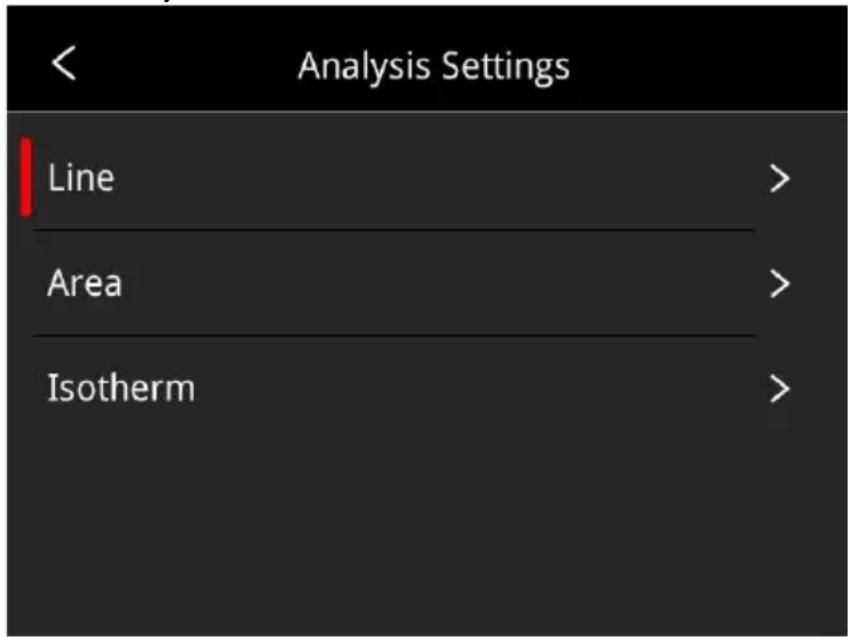
- Temperature measurement lines: temperature trend display can be enabled, disabled by default. The following is an illustration of temperature measurement line.
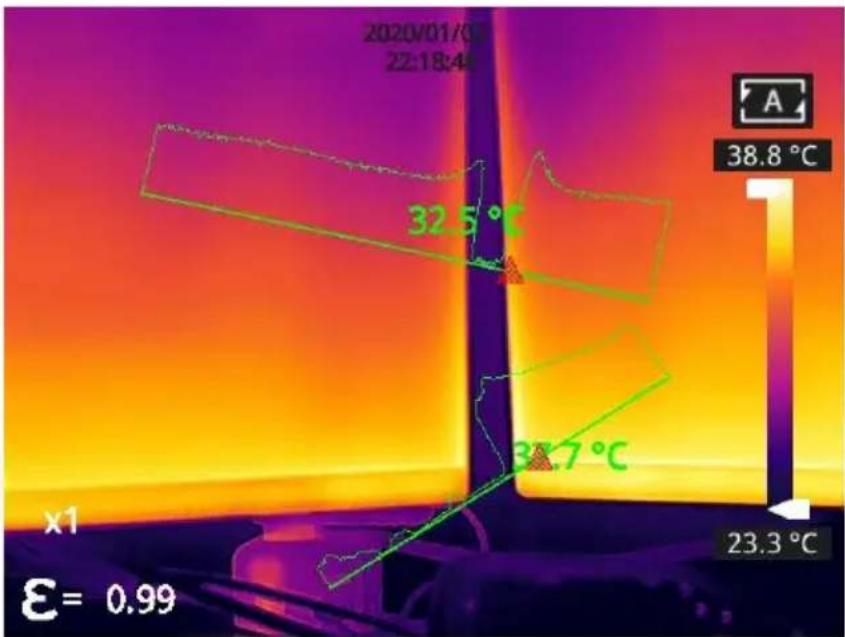
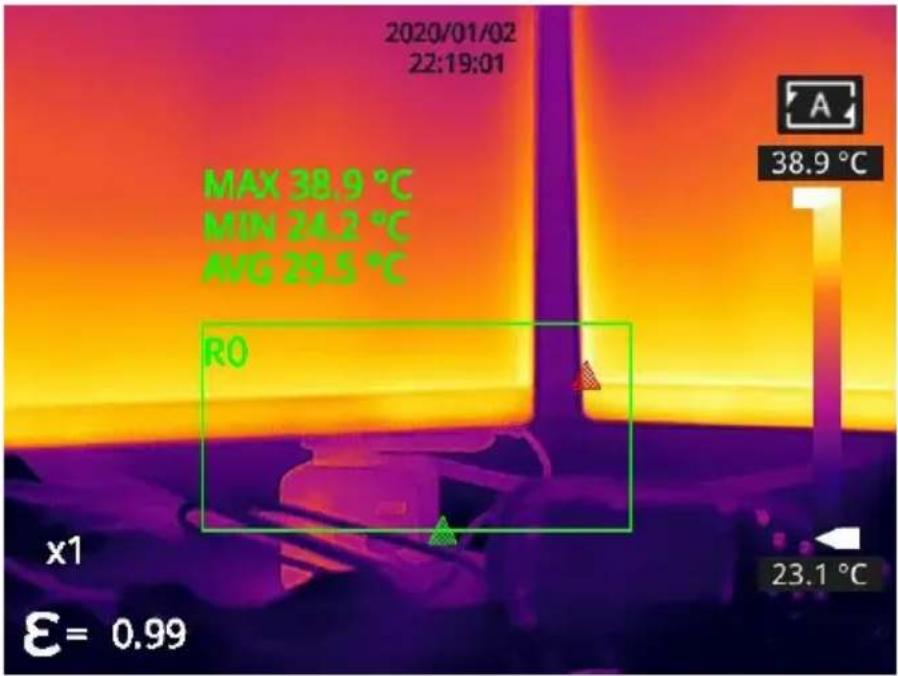
- Temperature measurement areas: the Max. temperature, the Min. temperature and the AVG temperature can be displayed; The Max temperature is enabled, the Min. temperature and the AVG. temperature are disabled by default.

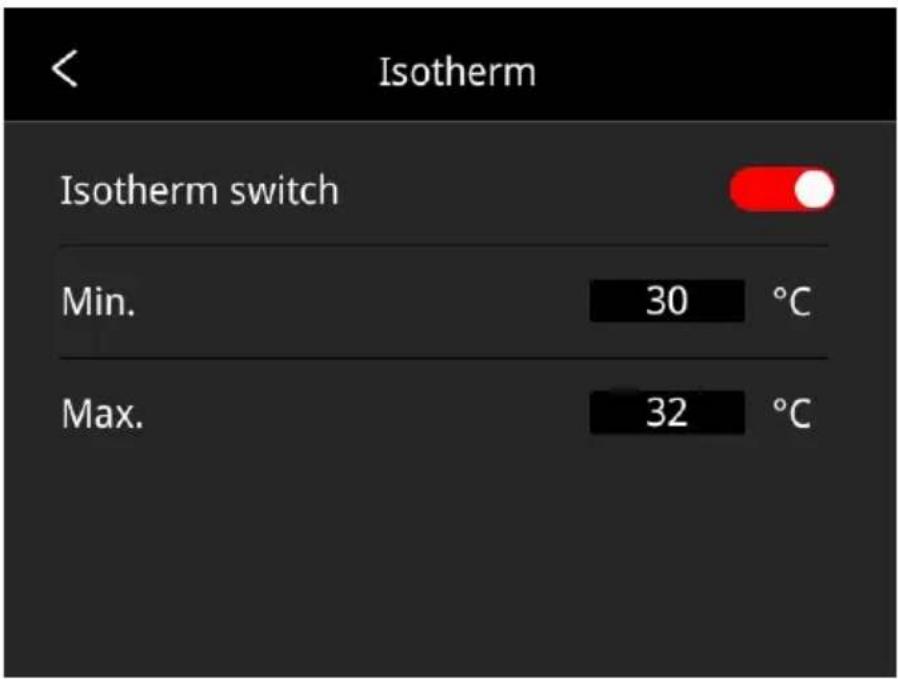
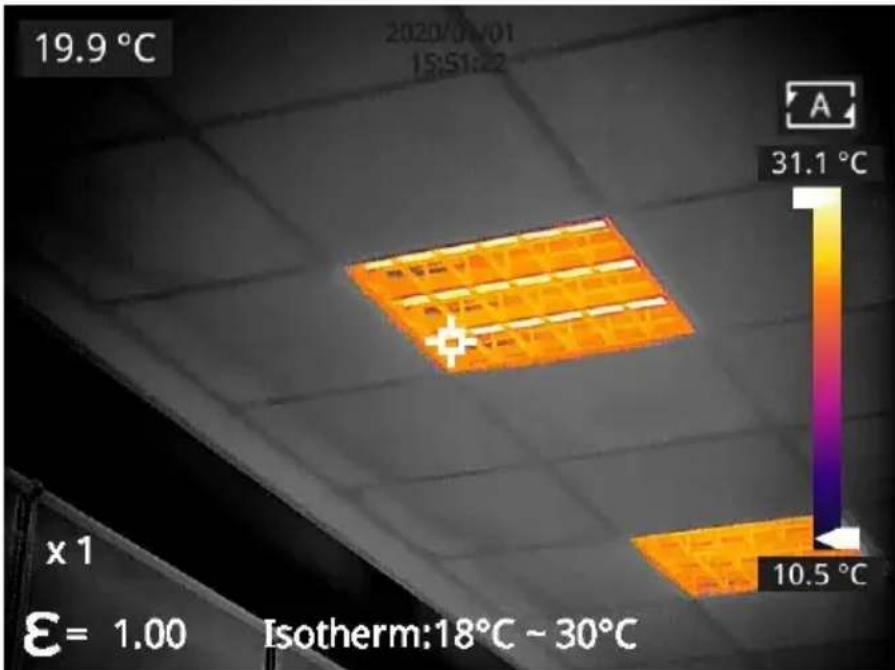
- Isotherm: click to enable or disable the function of isotherm, disabled by default. The Max and Min of isotherm value can be self-defined; an image in a certain temperature range can be selected and auto-fit image color according to the temperature scale to better view the temperature distribution of a certain interested temperature range.
Dual-spectrum Alignment
- Dual-spectrum Fusion Alignment
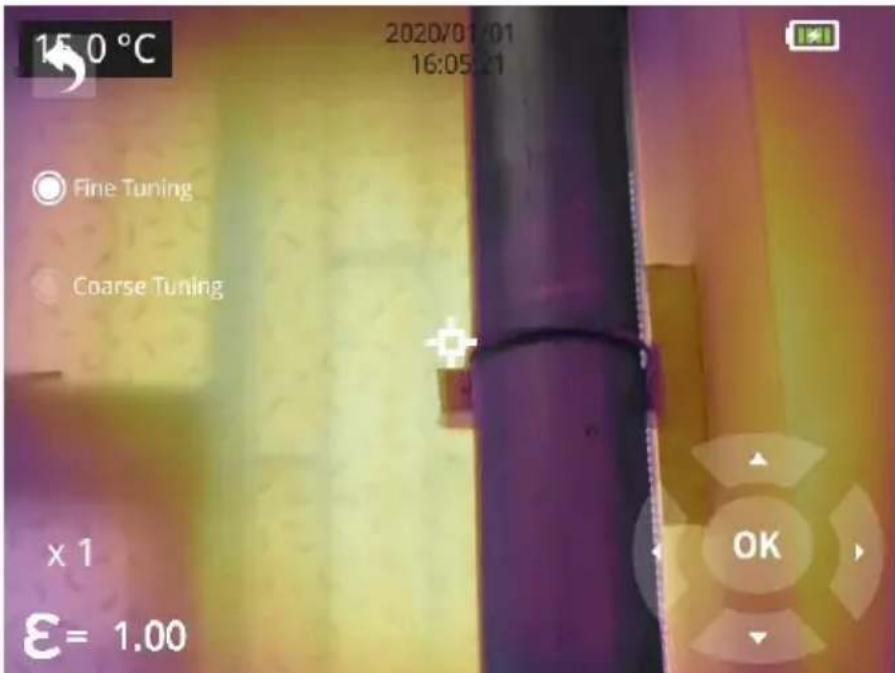
This function can be used to manually register infrared and visible image. First select coarse tuning and fine tuning, and then perform image alignment through navigation buttons. After finished, click OK or enter button to save the settings. (You can drag on the touch screen with finger to achieve fusion alignment in dual-spectrum fusion mode).
Picture-in-picture Adjustment
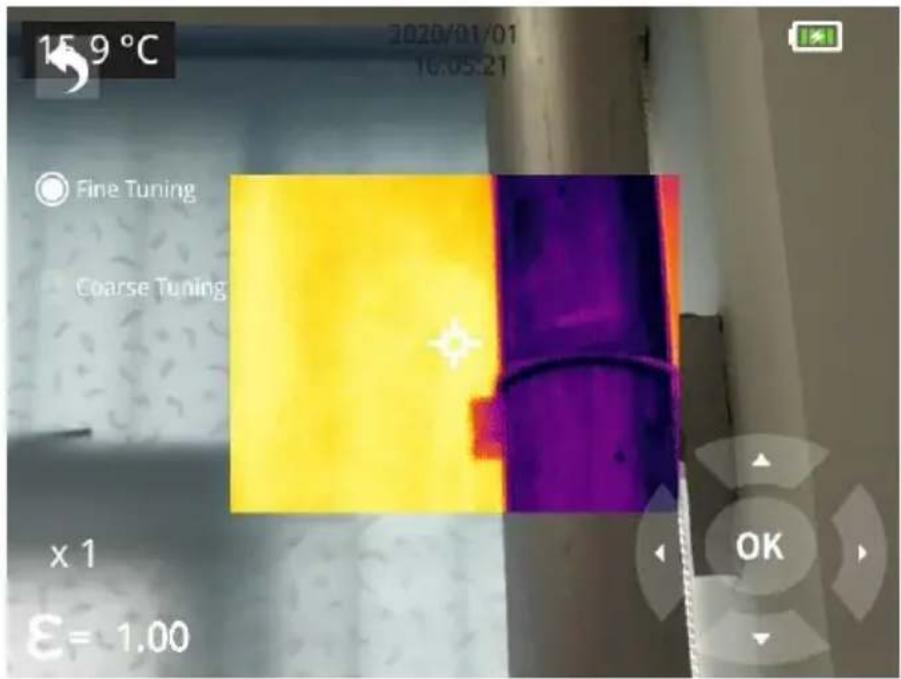
This function can be used to adjust the position of the picture-in-picture. First select coarse tuning and fine tuning, and then adjust the position
of the picture-in-picture by the navigation buttons. When finished, click Ok enter button to save the settings. (You can move the PIP by dragging picture with your one finger, and adjust the PIP size by dragging the edges).
Automatic Power-off
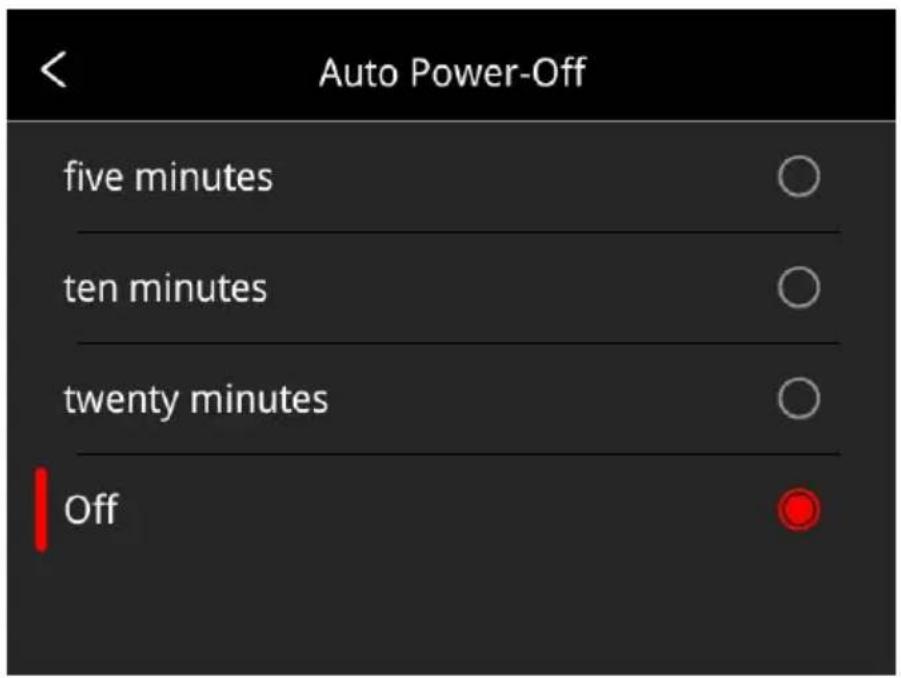
- 5Min: click to perform auto shut down after 5 minutes.
- 10Min: click to perform auto shut down after 10 minutes.
- 20Min: click to perform auto shut down after 20 minutes.
- Off: Click to disable the function of auto shutdown, this function is disabled by default.
System Settings
1. Device Information
Click to check model, version, SD card capacity and other information
2.Date & Time
Click to perform date and time settings. The year can be self-defined the Year 2020 to the Year 2037, the month, day, hour and min can changed.
3. Unit
(1) Temperature Unit: switch between Celsius, Fahrenheit and Kelvin. (2) Distance Unit: switch between meter and foot.
4. Screen Brightness
(1) High: click to set the screen brightness to high. (2) Medium: click to set the screen brightness to medium (default). (3) Low: click to set the screen brightness to low.
5. Formatting the SD Card
Click and then press OK to format the SD card as exFAT.
6. USB Mode
There are two options for data transmission: U disk and USB camera.
- U disk mode: the saved images and videos can be read and analyzed when the camera is connected to other devices via a data cable in this mode.
- USB camera: the real-time image view and spot/line/region analysis can be achieved on the PC when the camera is connected via a data cable in this mode.
7. Restore Factory Settings
Click and then press OK. The camera will power off automatically a few seconds later, and the settings will be restored to the factory default state after reboot.
8. Software Update
Download the latest software to the Update file in the SD memory, click Upd from SD memory to update. The camera will power off automatically, and the software will update to the latest version after reboot.
Technical Data
SC256M
| Thermal Module | |
| Detector Type | VOx Uncooled FPA detector |
| Resolution of Detector | 256*192 |
| Response Band | 8~14μm |
| Pixel | 12μm |
| NETD | 35mK |
| IFOV | 3.8mrad |
| Frequency | 25Hz |
| Focus | 3.2mm |
| FOV | 56°*42° |
| Focus Mode | Fixed |
| Temperature Measuring Range | -20 °C~150°C, 100°C~550°C |
| Temperature Measuring Accuracy | ±2% or ±2°C, the greater value shall prevail |
| Camera Functions | |
| Temperature Measuring Mode | Center spot/hot and cold spot tracking a temperature display |
| Custom Point/Line/Area Temperature Measurement | Movable spot/line/area temperature measurement, up to 10 spots, 10 areas lines |
| Temperature | Celsius, Fahrenheit, Kelvin |
| Measuring Unit | |
| Emissivity Setting | Adjustable between 0.01 and 1.0, step 0.01 |
| Ambient Temperature Setting | -10℃~50℃, step 1℃ |
| Distance Setting | 0.25~4m, step 0.25m |
| Image Mode | Thermal, visual, PIP, DDE(unavailable for some models), dual-spectrum fusion |
| Color Palettes | 7 kinds (Whitehot, Blackhot, Iron, Lava, Rainbow, Rainbow HC, Blackred) |
| E-zoom | 1x,2x,4x |
| Temperature Scale | Auto/Manual |
| Temperature Alarm | Make alarm when the temperature is above/below the threshold in the full fra |
| Temperature Scale | Manual/Auto |
| Laser Pointer | Available |
| Visual Camera | 2 MP |
| Image Capture | XX-IR.jpg (thermal image with temperature data) and XX-DC.jpg (visual image), short press the trigger to captu image |
| Time-lapse Image Capture | Set time interval and number of image captures according to actual needs |
| Annotation Function | Voice annotation via microphone |
| Video Recording | Long press the trigger to start the recording |
| Language | English, Polish, Korean, Hungarian, |
| Brazilian Portuguese, German, French, Spanish, Italian, Turkish, Traditional Chinese | |
| Screen | 3.5-inch touch screen (480*640) |
| Video Transmission | UVC video transmission, video stream+ temperature data of full frame |
| Above Alarm | Set value of high temperature and low temperature, set auto image capture |
| File Naming | Manual Input, QR code scanning |
| Memory | Micro SD card (max. 32G) |
| Battery Type | Rechargeable Li-ion Battery, dismountable |
| Power Interface | USB-C |
| Connecting Type | USB, Wi-Fi |
| Charging Time | 3h |
| Operating Time | 8h |
| Power Management | Automatic shutdown: 5 minutes, 10minutes, 20 minutes, disable |
| Others | |
| Analysis Software | PC (Thermal Analysis Software) or Mobi device (IOS/Android APP) |
| Tripod Mounting Socket | Yes, 1/4"-20-UNC |
| Operating Temperature | -10°C~+50°C |
| Storage Temperature | -20°C~+60°C |
| RH | 10% ~ 95%, non condensing |
| Drop | 2m |
| Encapsulation | IP54(IEC 60529) |
| Shock &Vibration | Shock 25g(IEC 60068-2-27); Vibration 2.5g(IEC60068-2-6) |
| FDA Accession No.: | 2511247-000 |
SC384M
| Thermal Module | |
| Detector Type | VOx Uncooled FPA detector |
| Resolution of Detector | 384*288 |
| Response Band | 8~14μm |
| Pixel | 12μm |
| NETD | 35mK |
| IFOV | 1.98mrad |
| Frequency | 30Hz |
| Focus | 6.2mm |
| FOV | 43.7°*31.9° |
| Focus Mode | Manual focus |
| Temperature Measuring Range | -20 °C~ 150°C, 100°C~ 550°C |
| Temperature Measuring Accuracy | ±2% or ±2°C |
| Camera Functions | |
| Temperature Measuring Mode | Center spot/hot and cold spot tracking a temperature display |
| Custom Point/Line/Area Temperature Measurement | Movable spot/line/area temperature measurement, up to 10 spots, 10 areas lines |
| Temperature Measuring Unit | Celsius, Fahrenheit, Kelvin |
| Emissivity Setting | Adjustable between 0.01 and 1.0, step length 0.01 |
| Ambient Temperature Setting | -10℃~50℃, step length 1℃ |
| Distance Setting | 1~20m, step length 1m |
| Digital Zoom | 1x, 2x, 4x,8x |
| Visible Light and Dual-spectrum Fusion | Available , thermal, dual-spectrum fusion, visible light, PIP, DDE(only available for some models) |
| Palette | 10 palettes |
| Temperature Alarm | Alarm when the temperature is above o below the threshold in the full frame |
| Camera Functions | |
| Temperature Scale | Manual/Auto |
| Laser Indicator | Available |
| Digital Camera | 5 MP |
| Image/video Storage | XX-IR.jpg (thermal image with temperature data) and XX-DC.jpg (visible image) |
| H.264 videos without temperature data | |
| Annotation Function | Make voice annotations through microphone. |
| Language | English, Polish, Korean, Hungarian, Brazilian Portuguese, German, French, Spanish, Italian, Turkish, Traditional Chinese |
| Display Size | 3.5-inch touchscreen (480*640) |
| Special Functions | Scan the QR code to name the image |
| Storage Card | Standard 32GB MicroSD card, extendable to Max. 512GB |
| Battery Type | Rechargeable and detachable Lithium battery |
| Power Interface | USB Type-C |
| Connecting Methods | USB, Wi-Fi |
| Charging Time | 3 hours |
| Operation Time | 4h |
| Battery Management | Auto shutdown: 5 minutes, 10 minutes, minutes, off |
| Others | |
| Analysis Software | PC (Infrared analysis software) or mobile (IOS/Android APP) |
| Tripod mounting interface | 1/4"-20-UNC |
| Operation Temperature | -10°C~+50°C |
| Storage | -20°C~+60°C |
| Temperature | |
| Relative Humidity | 10% ~95%,non-condensing |
| Drop | 2m |
| Encapsulation | IP54 (IEC 60529) |
| Shock and Vibration | Shock 25g(IEC 60068-2-27);Vibration2.5g(IEC60068-2-6) |
| FDA Accession No.: | 2511245-000 |
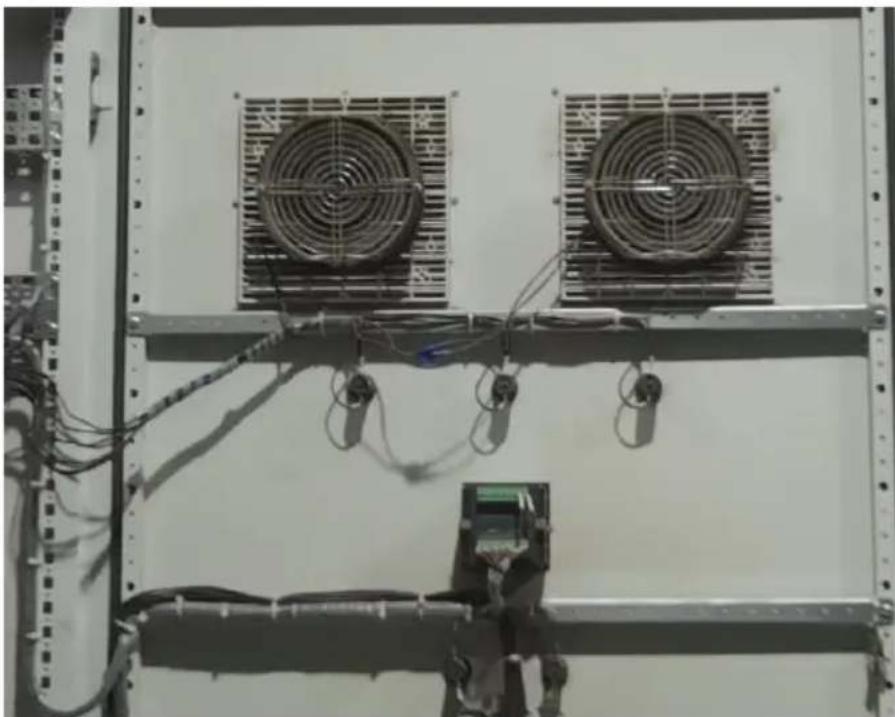
Introduction of Application Scenarios Detecting of Power Distribution Cabinet
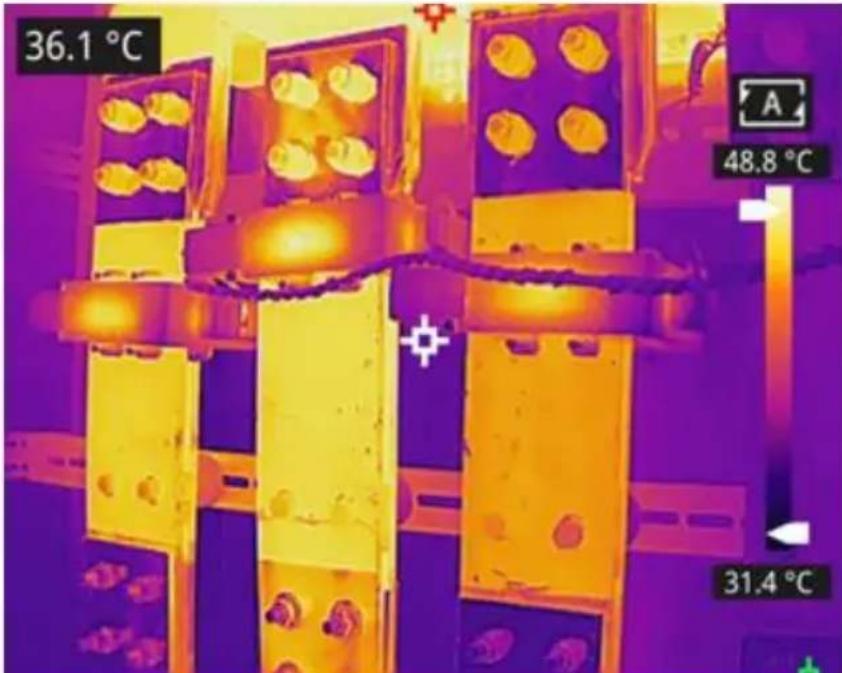
The temperature distribution of power distribution equipment can directly reflect the running status of the equipment. Improper contact or damage may cause abnormal high temperature. The inspection personnel can detect anomalies in time and ensure the safety of power distribution equipment with the aid of handheld thermal cameras.
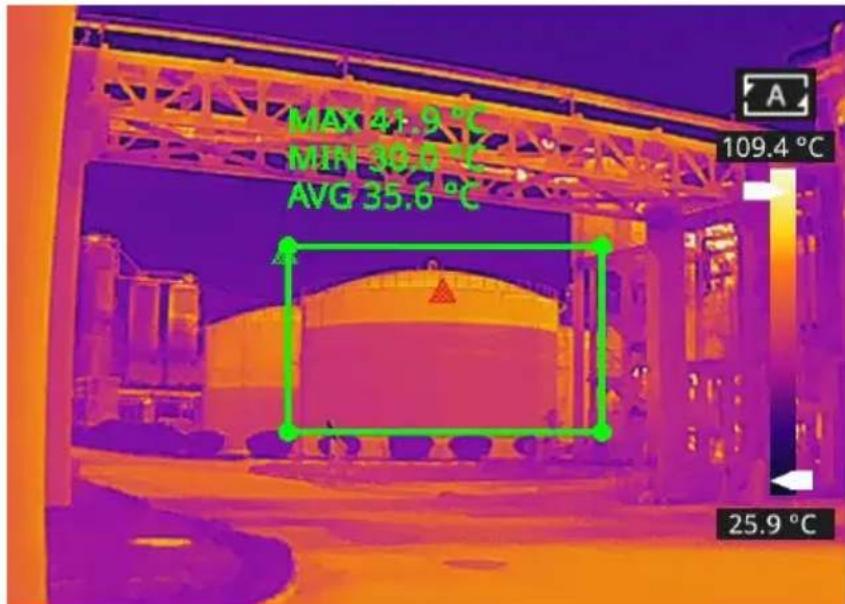
Liquid Level Detecting of the Storage Tank
There is a temperature difference between the liquid stored in the tank and the upper gas, which can be transmitted to the tank shell. The handheld thermal camera can be used to observe the liquid level of the storage tank from a far distance to prevent the accidental failure caused by the failure of the liquid level meter.
the liquid level meter.
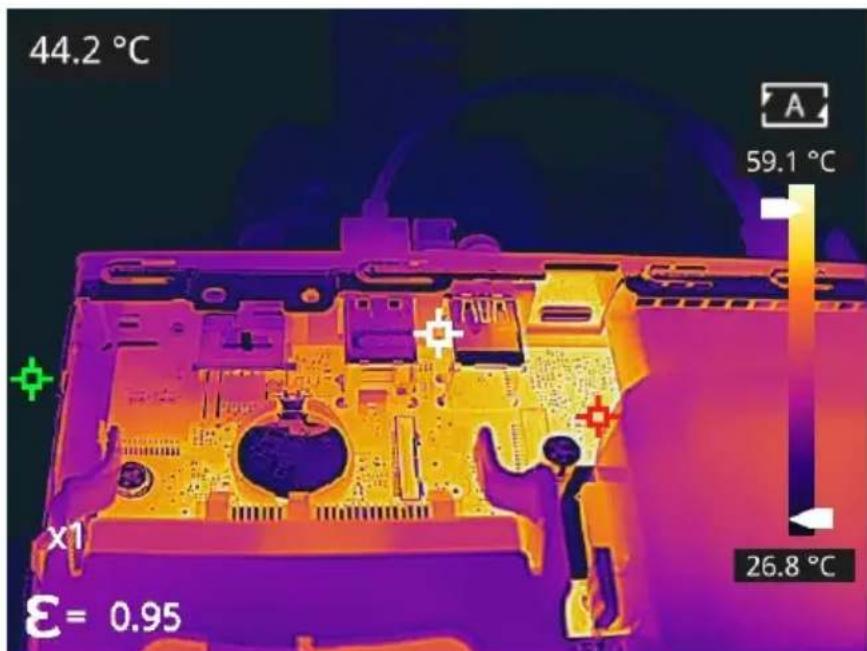
Circuit Board R&D
The circuit board is small in size, high in integration and complex in structure, so the traditional contact detection consumes lots of time and energy. Infrared thermal imaging technology has absolute advantage in detecting faulty circuit board. The handheld thermal cameras can be used to quickly find abnormal high or low temperature components and determine circuit board malfunctions.
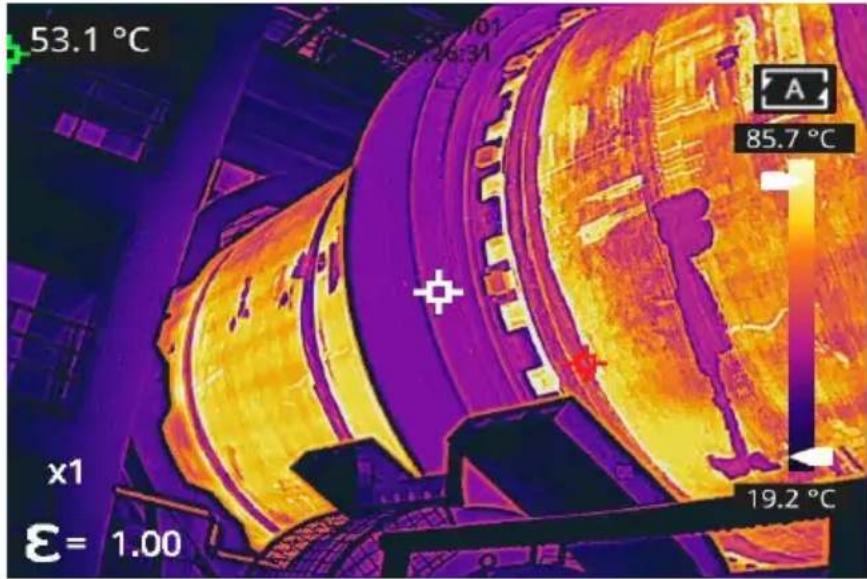
Defect Detecting of Refractory Material in Rotary Kiln
Rotary kiln is an important equipment for hazardous waste incineration. When the rotary kiln runs for a long time, the lining material may erode and become thin or even fall off, resulting in abnormal external temperature. The handheld thermal cameras can be used to detect the abnormal heat temperature of the outer wall, find and locate the high temperature point and take corresponding measures to avoid safety accidents.
become thin or even fall off, resulting in abnormal external temperature. The handheld thermal cameras can be used to detect the abnormal heat temperature of the outer wall, find and locate the high temperature point and take corresponding measures to avoid safety accidents.
Cleaning Thermal Camera
Cleaning Camera Housing, Cables and Other Items
| Camera Housing, Cables and Other Items | |
| Liquids | One of the following liquids can be used. 1.Warm water 2.A Weak detergent solution |
| Cleaning Tools | A soft cloth |
| Cleaning Procedure | Please follow this procedure: 1.Soak a soft cloth in the liquid. 2.twist the cloth to remove excess liquid. 3.Clean the camera parts with the cloth. |
CAUTION
Do not apply solvents or similar liquids to the camera, the cables, or items. This can cause damage.
Cleaning Infrared Lens
Cleaning Infrared Lens
| Liquids | One of the following liquids can be used. 1. Commercial lens cleaning liquid with more than 30% isopropyl alcohol. 2. 96% ethyl alcohol(C2H5OH). |
| Cleaning Tools | cotton wool |
| Cleaning Procedure | Please follow this procedure: 1. Soak the cotton wool in the liquid. 2. Twist the cotton wool to remove the excess 3. Clean the lens one time only and discard the wool. |
CAUTION
Do not clean the infrared lens too vigorously. This can damage the anti-reflective coating.
Appendix A Emissivity of Commonly Used Materials Metal
| Material | Temperature (℃) | Emissivity |
| Aluminum | ||
| Polished aluminum | 100 | 0.09 |
| Commercial aluminum foil | 100 | 0.09 |
| Mild aluminum oxide | 25~600 | 0.10~0.20 |
| Strong aluminum oxide | 25~600 | 0.30~0.40 |
| Brass | ||
| Brass mirror (highly polished) | 28 | 0.03 |
| Brass oxide | 200~600 | 0.59~0.61 |
| Chromium | ||
| Polished chromium | 40~1090 | 0.08~0.36 |
| Copper | ||
| Copper mirror | 100 | 0.05 |
| Strong copper oxide | 25 | 0.078 |
| Cuprous oxide | 800~1100 | 0.66~0.54 |
| Molten copper | 1080~1280 | 0.16~0.13 |
| Gold | ||
| Gold mirror | 230~630 | 0.02 |
| Iron | ||
| Polished cast iron | 200 | 0.21 |
| Machined cast iron | 20 | 44 |
| Completely rusted surface | 20 | 0.69 |
| Cast iron (oxidized at 600°C) | 19~600 | 0.64~0.78 |
| Electrolytic iron oxide | 125~520 | 0.78~0.82 |
| Iron oxide | 500~1200 | 0.85~0.89 |
| Iron plate | 925~1120 | 0.87~0.95 |
| Cast iron, heavy iron oxide | 25 | 0.8 |
| Melted surface | 22 | 0.94 |
| Melted cast iron | 1300~1400 | 0.29 |
| Pure molten iron | 1515~1680 | 0.42~0.45 |
| Steel | ||
| Steel (oxidized at 600°C) | ||
| Steel oxide | 100 | 0.74 |
| Melted mild steel | 1600~1800 | 0.28 |
| Molten steel | 1500~1650 | 0.42~0.53 |
| Lead | ||
| Pure lead (non-oxidized) | 125~225 | 0.06~0.08 |
| Mildly oxidized | 25~300 | 0.20~0.45 |
| Magnesium | ||
| Magnesium oxide | 275~825 | 0.55~0.20 |
| Mercury | ||
| Mercury | 0~100 | 0.09~0.12 |
| Nickel | ||
| Electroplating and polishing | 25 | 0.05 |
| Electroplating without polishing | 20 | 0.01 |
| Nickel wire | 185~1010 | 0.09~0.19 |
| Nickel plate (oxidized) | 198~600 | 0.37~0.48 |
| Nickel oxide | 650~1255 | 0.59~0.86 |
| Nickel alloy | ||
| Nickel-chromium (heat resistant alloy wire (bright) | 50~1000 | 0.65~0.79 |
| Nickel-chromium alloy | 50~1040 | 0.64~0.76 |
| Nickel-chromium (heat resistant | 50~500 | 0.95~0.98 |
| Silver | ||
| Polished silver | 100 | 0.05 |
| Stainless steel | ||
| 18/8 stainless steel | 25 | 0.16 |
| 304 (8Cr, 18Ni) | 215~490 | 0.44~0.36 |
| 310 (25Cr, 20Ni) | 215~520 | 0.90~0.97 |
| Tin | ||
| Commercial tin plate | 100 | 0.07 |
| Zinc | ||
| Oxidation at 400°C | 400 | 0.01 |
| Galvanized bright iron plate | 28 | 0.23 |
| Grey zinc oxide | 25 | 0.28 |
Non-metal
| Material | Temperature (℃) | Emissivity |
| Brick | 1100 | 0.75 |
| Firebrick | 1100 | 0.75 |
| Graphite (lamp black) | 96~225 | 0.95 |
| Enamel (white) | 18 | 0.9 |
| Asphalt | 0~200 | 0.85 |
| Glass (surface) | 23 | 0.94 |
| Heat-resistant glass | 200~540 | 0.85~0.95 |
| Wall plaster | 20 | 0.9 |
| Oak | 20 | 0.9 |
| Carbon sheet | - | 0.85 |
| Insulating sheet | - | 0.91~0.94 |
| Metal sheet | - | 0.88~0.90 |
| Glass tube | - | 0.9 |
| Coil type | - | 0.87 |
| Enamel product | - | 0.9 |
| Enamel pattern | - | 0.83~0.95 |
| Capacitor | ||
| Rotary type | - | 0.30~0.34 |
| Ceramic (bottle type) | - | 0.9 |
| Film | - | 0.90~0.93 |
| Mica | - | 0.94~0.95 |
| Flume type mica | - | 0.90~0.93 |
| Glass | - | 0.91~0.92 |
| Semiconductor | ||
| Transistor (plastic package) | - | 0.80~0.90 |
| Transistor (metal) | - | 0.30~0.40 |
| Diode | - | 0.89~0.90 |
| Transmitting coil | ||
| Pulse transmission | - | 0.91~0.92 |
| Flat chalk layer | - | 0.88~0.93 |
| Top ring | - | 0.91~0.92 |
| Electronic materials | ||
| Epoxy glass plate | - | 0.86 |
| Epoxy phenol plate | - | 0.8 |
| Gold-plated copper sheet | - | 0.3 |
| Solder-coated copper | - | 0.35 |
| Tin-coated lead wire | - | 0.28 |
| Copper wire | - | 0.87~0.88 |
Manufacturer: Shanghai Sishun International Trade Co., Ltd.
Address: Room JT2388, 4th Floor, Building 2, No. 599, Wanzhen Road, Zhenxin New Village Sub-district, Jiading District, Shanghai, China.
Imported to AUS: SIHAO PTY LTD. 1 ROKEVA STREET EASTWOOD NSW 2 Australia
Imported to USA: Sanven Technology Ltd. Suite 250, 9166 Anaheim Place, Rancho Cucamonga, CA 91730
| UK | REP |
YH CONSULTING LIMITED. C/O YH Consulting
Limited Office 147, Centurion House, London
Road, Staines-upon-Thames, Surrey, TW18 4AX
| EC | REP |
E-CrossStu GmbH
Mainzer Landstr. 69,
60329 Frankfurt am Main.
VEVOR
Affordable. Reliable. Home Improvement.
PORTABLE THERMAL IMAGER
MODEL: SC384M, SC256M
YH CONSULTING LIMITED. C/O YH Consulting
Limited Office 147, Centurion House, London
Road, Staines-upon-Thames, Surrey, TW18 4AX
E-CrossStu GmbH
Mainzer Landstr.69,
60329 Frankfurt am Main.
VEVOR
Affordable. Reliable. Home Improvement.
YH CONSULTING LIMITED. C/O YH Consulting
Limited Office 147, Centurion House, London
Road, Staines-upon-Thames, Surrey, TW18 4AX
E-CrossStu GmbH
Mainzer Landstr.69,
60329 Frankfurt am Main.
VEVOR
Affordable. Reliable. Home Improvement.
PORTABLE THERMAL CAMERA
MODEL: SC384M, SC256M

Imported into AUS: SIHAO PTY LTD. 1 ROKEVA STREETEASTWOOD NSW
2122 Australia
Imported into USA: Sanven Technology Ltd. Suite 250, 9166 Anaheim Plac Rancho Cucamonga, CA 91730
YH CONSULTING LIMITED. C/O YH Consulting
Limited Office 147, Centurion House, London
Road, Staines-upon-Thames, Surrey, TW18 4AX
E-CrossStu GmbH
Mainzer Landstr.69,
60329 Frankfurt am Main.
VEVOR
Affordable. Reliable. Home Improvement.
PORTABLE THERMAL CAMERA MODEL: SC384M, SC256M
YH CONSULTING LIMITED. C/O YH Consulting
Limited Office 147, Centurion House, London
Road, Staines-upon-Thames, Surrey, TW18 4AX
E-CrossStu GmbH
Mainzer Landstr.69,
60329 Frankfurt am Main.
VEVOR
Affordable. Reliable. Home Improvement.
Producer: Shanghai Sishun International Trade Co.,Ltd.
YH CONSULTING LIMITED. C/O YH Consulting
Limited Office 147, Centurion House, London Road, Staines-upon-Thames, Surrey, TW18 4AX
| EC | REP |
Affordable. Reliable. Home Improvement.
YH CONSULTING LIMITED. C/O YH Consulting Limited Office 147, Centurion House, London Road, Staines-upon-Thames, Surrey, TW18 4AX
Affordable. Reliable. Home Improvement.
YH CONSULTING LIMITED. C/O YH Consulting
Limited Office 147, Centurion House, London
Road, Staines-upon-Thames, Surrey, TW18 4AX
E-CrossStu GmbH
Mainzer Landstr.69,
60329 Frankfurt am Main.

- HANDHELD THERMAL IMAGER
- MODEL: SC384M, SC256M
- SAFETY INSTRUCTIONS
- WARNING
- SAFETY INSTRUCTION
- CAUTION
- PRODUCT INTRODUCTION
- CONNECTOR AND MEMORY CARD
- QUICK START GUIDE
- PLEASE FOLLOW THE PROCEDURES
- CHARGING
- POWER ON
- TARGET SEARCHING
- IMAGE CAPTURING
- ANALYSIS BY PC SOFTWARE
- ANALYSIS BY APP
- OPERATION INSTRUCTION
- CHARGE WITH A POWER ADAPTER
- CHARGE WITH A COMPUTER
- CHARGE WITH A CHARGING BASE
- POWER ON/OFF
- FOCUS ADJUSTMENT (ONLY AVAILABLE FOR SOME MODELS)
- IMAGES/VIDEOS CAPTURE
- VIEW PHOTOS/VIDEOS
- MEASUREMENT MODE
- MEASUREMENT PARAMETERS
- PALETTES
- IMAGE MODE
- IMAGE MODE INTRODUCTION
- SETTING STEPS
- NON-UNIFORMITY CORRECTION
- NON-UNIFORMITY CORRECTION INTRODUCTION
- NON-UNIFORMITY CORRECTION OPERATIONS
- CONTRAST ADJUSTMENT
- DIGITAL ZOOM
- NOTE: THIS FUNCTION CAN BE ENABLED ONLY IN IR MODE OR VISIBLE MODE. OTHER SETTINGS
- TEMPERATURE MEASUREMENT MODE
- ABOVE/BELOW TEMPERATURE ALARM
- ALARM TEMPERATURE SETTING
- CLOUD SERVICE
- NOTE
- WI-FI SETTINGS
- PHOTO SETTINGS
- VIDEO SETTINGS (THIS FUNCTION IS ONLY AVAILABLE FOR SOME MODELS)
- SMART PATROL INSPECTION (THIS FUNCTION IS ONLY AVAILABLE FOR SOME MODELS)
- ELECTRIC POWER MODE
- GENERAL MODE
- ANALYZE SETTINGS (THIS FUNCTION IS ONLY AVAILABLE FOR SOME MODELS)
- DUAL-SPECTRUM ALIGNMENT
- DUAL-SPECTRUM FUSION ALIGNMENT
- PICTURE-IN-PICTURE ADJUSTMENT
- AUTOMATIC POWER-OFF
- SYSTEM SETTINGS
- DEVICE INFORMATION
- DATE & TIME
- UNIT
- SCREEN BRIGHTNESS
- FORMATTING THE SD CARD
- USB MODE
- RESTORE FACTORY SETTINGS
- SOFTWARE UPDATE
- TECHNICAL DATA
- INTRODUCTION OF APPLICATION SCENARIOS DETECTING OF POWER DISTRIBUTION CABINET
- LIQUID LEVEL DETECTING OF THE STORAGE TANK
- CIRCUIT BOARD R&D
- DEFECT DETECTING OF REFRACTORY MATERIAL IN ROTARY KILN
- CLEANING THERMAL CAMERA
- VEVOR
- PORTABLE THERMAL IMAGER
- PORTABLE THERMAL CAMERA MODEL: SC384M, SC256M
Brand : Vevor
Model : SC384M
Category : Measuring equipment