
KSW850 - Coin and bill counter Vevor - Free user manual and instructions
Find the device manual for free KSW850 Vevor in PDF.
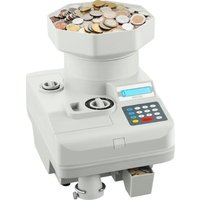


| Brand | Vevor |
| Model | KSW850 |
| Product Type | Coin Counter and Sorter |
| Dimensions (L x W x H) | 360 x 280 x 350 mm |
| Net Weight | Approx. 9.6 kg |
| Power Supply | 120 V~, 60 Hz, 100 W (US model) or 220-240 V~, 50 Hz, 100 W (EU model) |
| Main Functions | Counting, batching, add mode (ADD), memory, mixed coin sorting, speed selection (SP1/SP2), auto stop |
| Adjustments | Diameter and thickness adjustment knob for coins |
| Display | LCD screen with mode indicators |
| Hopper Capacity | Standard hopper + extendable hopper for large quantities |
| Outputs | Counted coin output, rejection tray for small coins, attachment for bag or tube |
| Safety | Protective fuse, stop if cover open, do not use in damp environment, unplug before maintenance |
| Maintenance and Cleaning | Clean the counting sensor and coin path with a brush or cotton swab soaked in denatured alcohol; check and replace the V-belt if worn |
| Spare Parts and Repairability | V-belt, fuse, coin bags; contact local distributor for service |
| General Information | Compliant with FCC Part 15, WEEE Directive 2012/19/EU; manufacturer: Shanghaimuxinmuyeyouxiangongsi, Shanghai, China |
Frequently Asked Questions - KSW850 Vevor
User questions about KSW850 Vevor
0 question about this device. Answer the ones you know or ask your own.
Ask a new question about this device
Download the instructions for your Coin and bill counter in PDF format for free! Find your manual KSW850 - Vevor and take your electronic device back in hand. On this page are published all the documents necessary for the use of your device. KSW850 by Vevor.
USER MANUAL KSW850 Vevor
Technical Support and E-Warranty Certificate
www.vevor.com/support
COIN SORTER
USER MANUAL
MODEL NO.: KSW850
We continue to be committed to provide you tools with competitive price. "Save Half", "Half Price" or any other similar expressions used by us only represents an estimate of savings you might benefit from buying certain tools with us compared to the major top brands and does not necessarily mean to cover all categories of tools offered by us. You are kindly reminded to verify carefully when you are placing an order with us if you are actually saving half in comparison with the top major brands.
VEVOR®
TOUGH TOOLS, HALF PRICE
Coin Sorter
MODEL NO.: KSW850
NEED HELP? CONTACT US!
Have product questions? Need technical support? Please feel free to contact us:
Technical Support and E-Warranty Certificate www.vevor.com/support
This is the original instruction. Please read all manual instructions carefully before operating. VEVOR reserves a clear interpretation of the user manual. The appearance of the product shall be subject to the product you received. Please forgive us that we won't inform you again if there are any technology or software updates on our product.

WARNING:
Please read this manual carefully before using the product. Failure to do so may result in serious injury.
For your safety, it is very important that you always follow the simple precautions as below:
- Do not operate the machine if you, or it, are damp. Operating it under wet, damp conditions can lead to an electrical shock hazard that might result in serious injury.
- Use only the same type and rating when replacing a fuse. Using an incorrect fuse can cause a potential fire hazard if a higher rating is used.
- Ensure that both the machine and the domestic mains supply system are of the same voltage. An incorrect supply voltage could cause a potential fire hazard.
- Turn off and unplug the power before performing maintenance.
- Do not start the machine when the back cover is open.
- Do not put your fingers inside the hopper or channel when the machine is under operation.
- Turn off and unplug the power when not in use for a long time.
- Should you have any doubts, please contact your local distributor, or agent, for further advice.
TECHNICAL SPECIFICATIONS
| Model | KSW850 |
| Rating(s) | 120Vac, 60Hz, 100WAC220-240V,50Hz, 100W |
| Product Dimensions (LxWxH)(mm) | 360*280*350 |
| Net Weight(kg) | About 9.6 |
*Products such as specifications, appearance, and design are subject to modification without prior notice.
MACHINE OVERVIEW
General Information
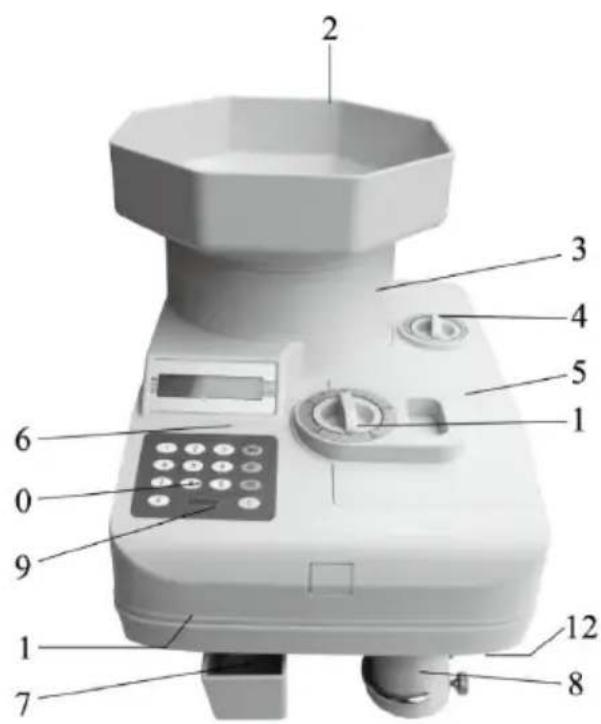
- Diameter Adjusting Knob
- Extended Hopper
- Hopper
- Thickness Adjusting Knob
- Side Cover
- Upper Cover
- Rejected Coin Box
- Coin outlet
- START/STOP Key
- Operation Panel
- Bottom Cover
- Rubber Washer
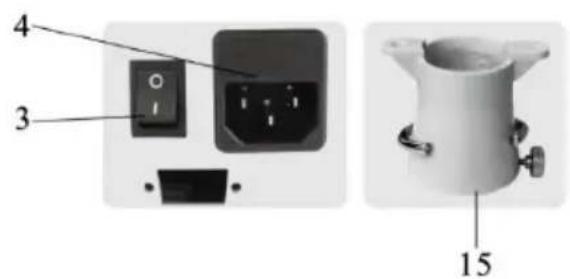
- Power Switch
- Power Socket
- Reject Coin Bag Attachment
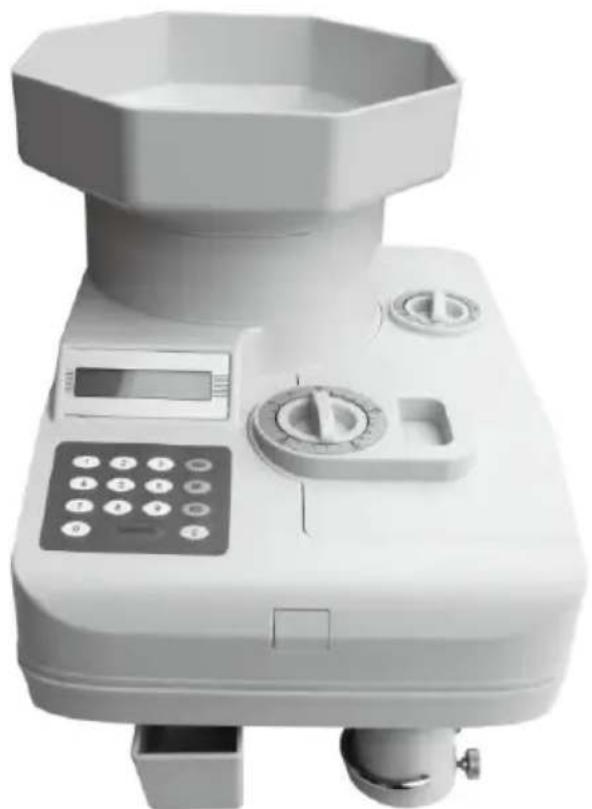
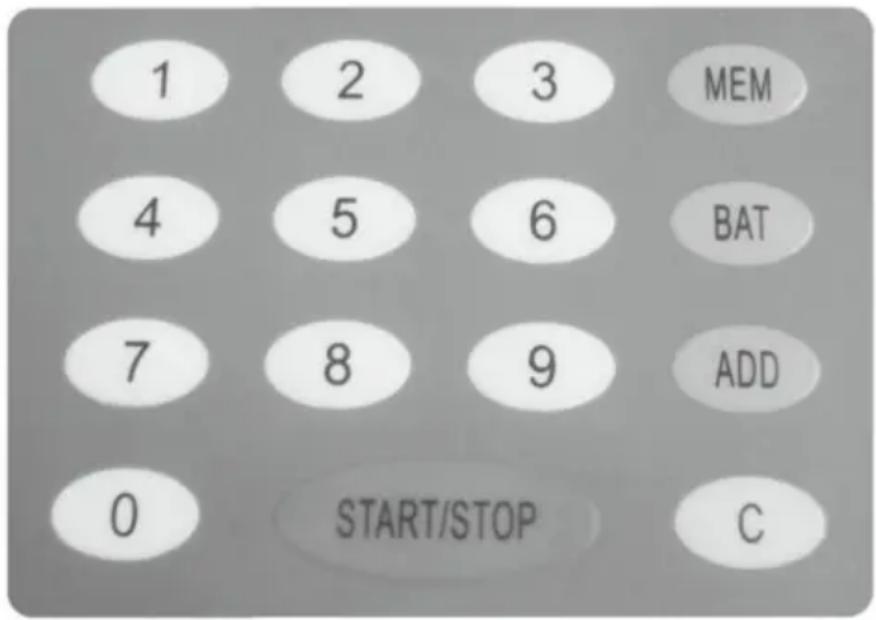
Key Panel
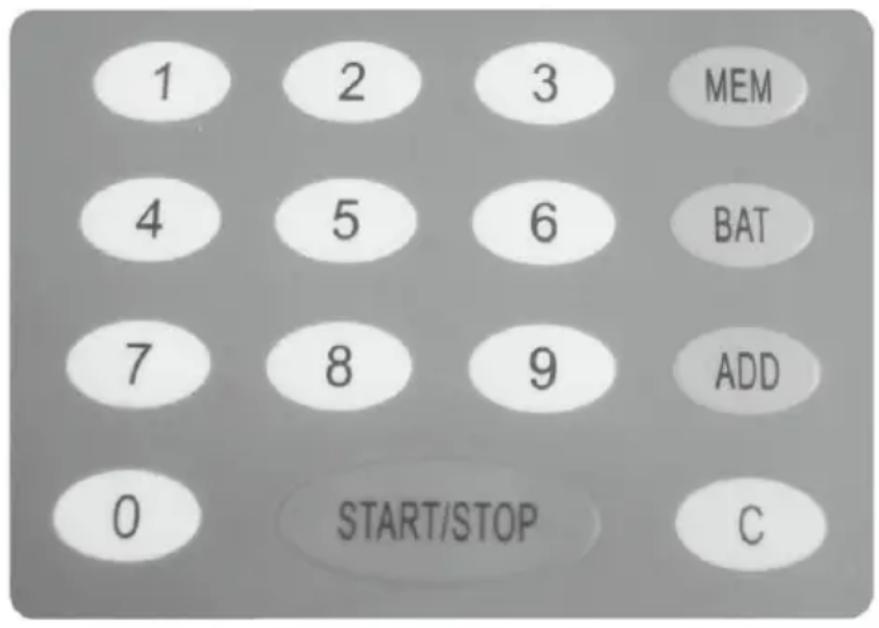
Key Function
| Key | Function Description |
| NUMERIC Key | Press the ten numeric key for inputting the desired b number. |
| BAT | Press this key for setting the desired batch number |
| MEM | Pressthis key for adding the present count number into |
| ADD | Press this key for counting under the Add counting m |
| C | Pressthis key to clear the presentcounting number. |
| START / STOP | Start or stop the machine. |
PRECAUTIONS
Precautions
- Before putting the coins into the hopper, please remove all paper scraps, lint, rubber bands, etc., which may be mixed with the coins. ● Foreign objects may cause jamming or faulty counting.
- Do not open the Top Cover when coins are in the Hopper.
- When using a bag to collect coins, please place the bottom of the bag on the floor, or on a stand, to prevent the machine from tipping over.
Operating Procedures
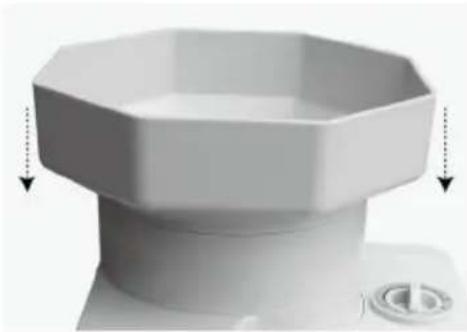
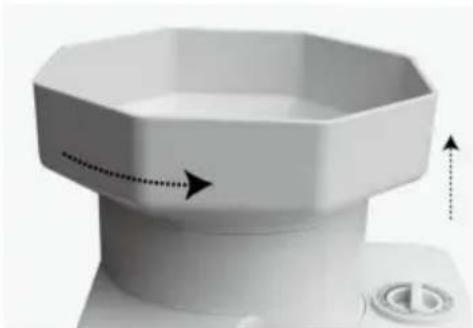
- If you have a large quantity of coins to be counted, install the Extended Hopper (supplied) as shown in the right diagram.
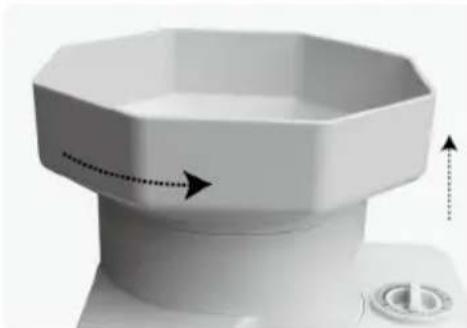
- If you don't need the Extended Hopper, you can turn the hopper anticlockwise and pull upward to remove the Extended Hopper.
- Turn on the power switch. The display will show "O" on the right and "sp1" or "sp2" on the left. The machine will choose sp1 or sp2 input speed of the coin hopper, and the machine is ready to start counting.
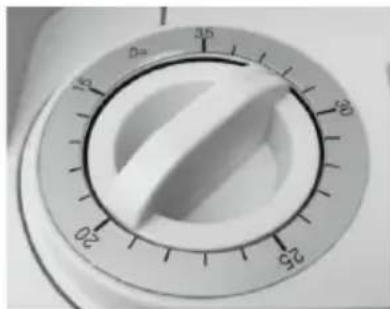
- Set the Coin Diameter Adjust Knob to the desired denomination according to the diameter of the coin in millimeters.
- Set the Coin Thickness Adjusting Knob to the desired denomination according to the thickness of the coin in millimeters.
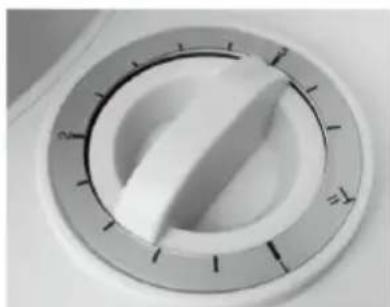
- Fix a coin bag or a coin tube on the coin outlet attachment. When using a coin bag, please place the bottom of the coin bag on the floor or stand to prevent the machine from tipping over. Install the coin Reject onto the side of the machine. If there are a lot of small coins mixed, install the Reject Coin Bag Attachment onto the Reject outlet, then hang the coin bag on it.
- Choose the inpouring speed of the coin hopper.
Press the "c" key and "1" key at the same time, the display will show or "SP2":
If the coin's diameter is <22mm, please choose "SP2."
If the coin's diameter is ≥22mm, please choose "SP1."
- Put the coins into the Hopper and press the "START/STOP" key. Counting will begin.
When the count total reaches the batch quantity, or there is no coin in the hopper, the machine will automatically stop.
- If the present counting should be stopped halfway, press "START/STOP" key, the counting will stop. With "START/STOP" key pressed again, the machine will restart. The previous counts are retained and new count will be added to them.
- When counting is completed, press "C" key to clear the display, the count display will reset to "0".
- After counting is completed, if the counting number on the display should be reserved in memory, press the "MEM" key. The display will show "MEM" on the left.
- If you want to look for the total number stored in memory, press key and then the "MEM" key. The display will show the total number in memory and clear the memory simultaneously.
Continuous Mode
When the batch number is 0, the machine will not stop counting until all coins have been counted.
Add Mode
Press the "ADD" key, the display shows "ADD" on the left, the machine is under the ADD counting mode, that is to say the counting number will accumulate on the basis of the counted number.
Batch Mode
Set Batch Number
Press the "BAT" key, then input the batch number, and finally press the "START/STOP" key to confirm. When the display shows "BAT" on the left side, the batch has been set.
Clear Batch Setting
Press the "BAT" key, then input 0, and finally press the "START/STOP" key to confirm.
When the "BAT" on the left side of the display disappears, the batch has been cleared.
Begin Counting
Counting can begin after the batch has been set. In this mode, the machine will automatically stop when the count total reaches the batch quantity. Press the "START/STOP" key to start the next batch counting.
Memory Function
The batch setting can be automatically memorized.
Operating Procedures for Sorting Mixed Coins
Before putting the coins into the hopper, please remove all paper scraps, lint, rubber bands, etc., which may be mixed with the coins. Foreign objects may cause jamming or faulty counting.
- Set the Coin Diameter Adjusting Knob and the Coin Thickness Adjusting Knob to the position of the biggest and thickest coin in the mixed coins.
- Fix a coin bag or a coin tube onto the Coin Outlet Attachment. Attach the Reject Coin Bag Attachment onto the side of the machine, then place the Coin Bag on it. Be sure the bottom of the coin bag is on the floor or stand, to prevent the machine from tipping over.
- Put all the mixed coins into the hopper and press the "START/STOP" key to start counting. The machine will stop when the count total reaches the batch quantity (in batch counting mode), or after the machine completes counting all the coins in the hopper (in continuous counting mode). The counted number will be shown on the display. After you finish counting all coins in the hopper, all the small coins will be rejected into the Reject Coin Bag. Then put all rejected coins into the hopper again to sort out the next biggest coins.
- Set the Coin Diameter Adjusting Knob and the Coin Thickness Adjusting Knob to the position of the next biggest coin in the mixed coins, and you can follow the above steps to sort out all the next biggest coins from the mixed coins.
Adjust the channel for unknown dimension coins
- Open the side cover, insert the coin at the channel opening, then press the thickness button, and maintain a 0.3 mm clearance between the channel opening's height and the coin's thickness.
- Pull coins into the orbit, then adjust the diameter button, and maintain a 0.2 mm
clearance between the orbit's width and the coin's diameter.
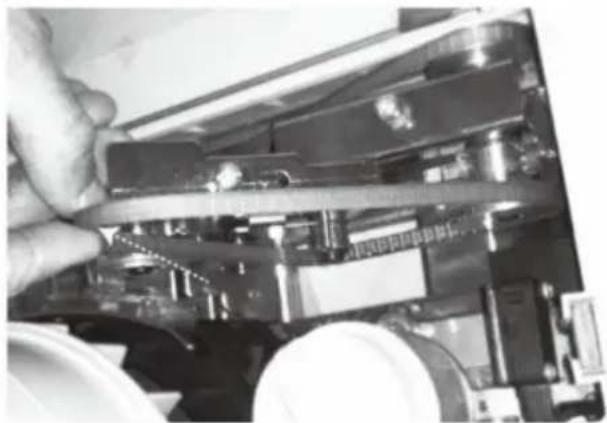
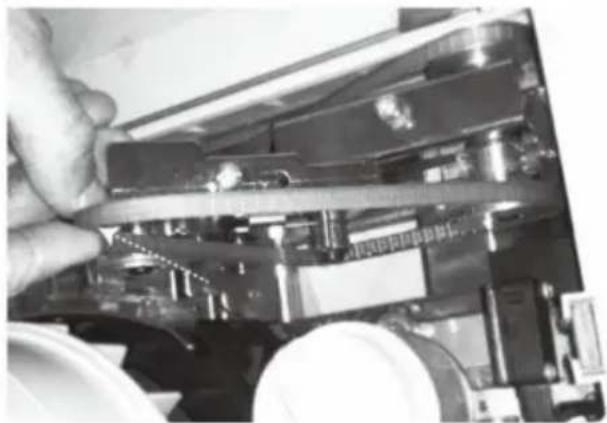
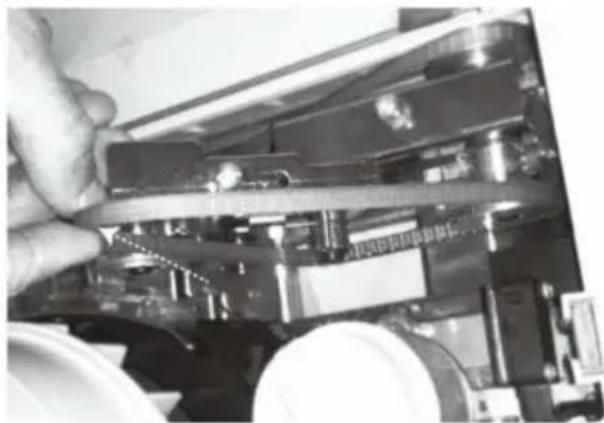
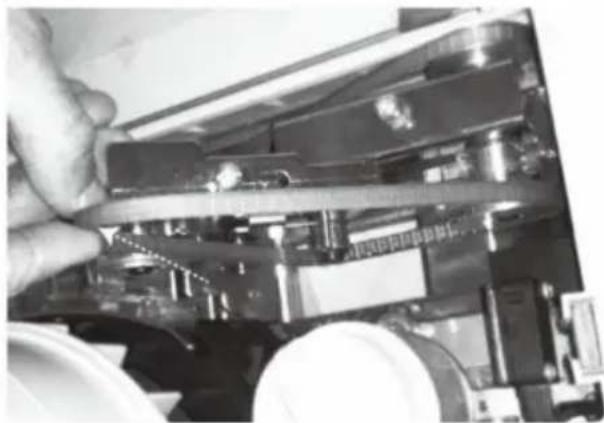
- Pluck the V-belt to make coins pass through the orbit smoothly.
- Test with a small quantity of coins several times, and if no errors occur, proceed with a large quantity.
Set up the Coin Tube Holder
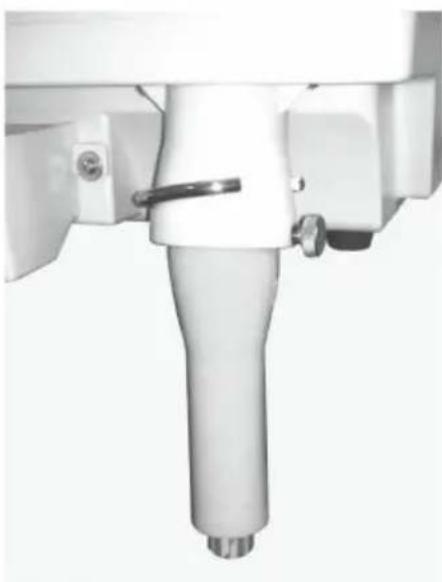
● Unscrew the clamping screw as shown in the right diagram.
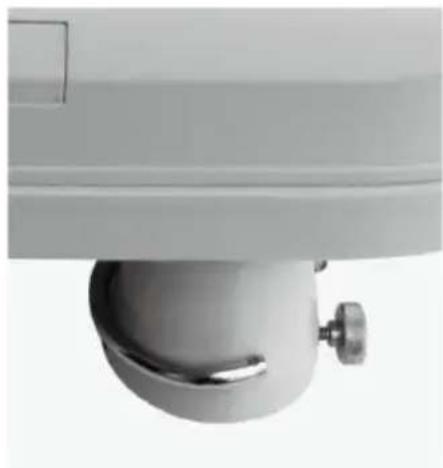
- Install the Coin Tube Holder as shown in the right diagram, then fasten the clamping screw to the Tube Holder.
TROUBLESHOOTING
Troubleshooting
Coin Runway Jamming:
When coins are jammed in the coin runway, rotate the diameter knob counter-clockwise to release the left guide plate. The jammed coin will fall into the Rejected Coin Box, and then you can readjust the diameter again.
Centrifugal Disc Jamming:
If foreign objects are mixed with coins in the Hopper, jamming may occur between the Centrifugal Disc and the Coin Guide Plate.
- Open the Side Cover
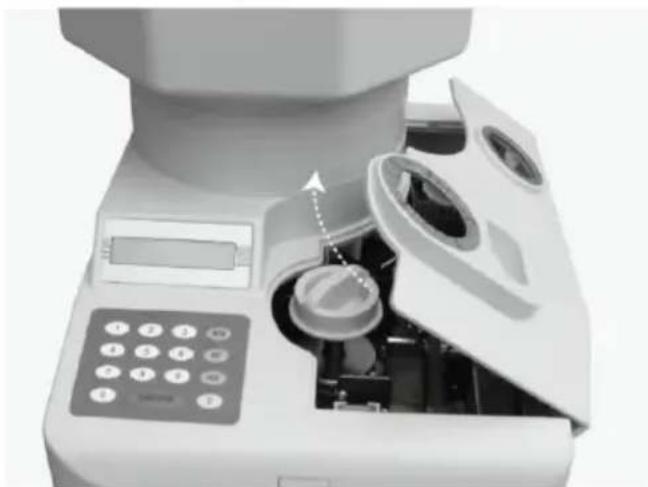
- Then pull up the Front Feed Pulley Arm and push & pull the Plate upward to remove the foreign objects.
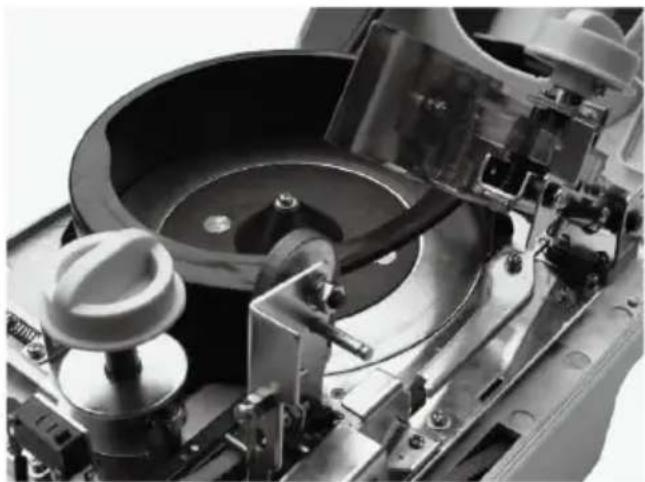
The LCD display "EJ":
Turn on the machine. If the count sensor is covered by dust, the LCD will display "EJ". Please remove the V-Belt, clean the counting sensor using a cotton stick with denatured alcohol.
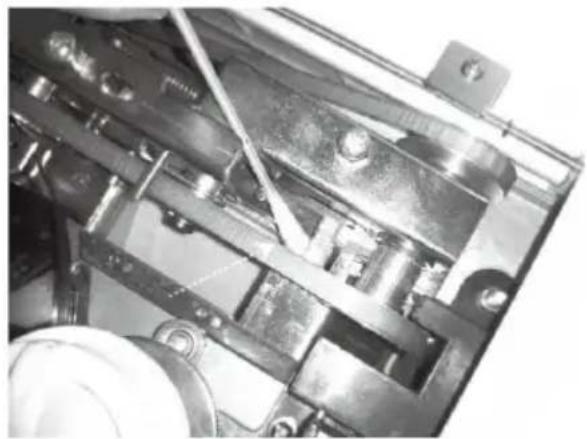
Daily Maintenance
- Be certain to turn the main power off before attempting daily maintenance.
- Clean the coin runway and the count sensor at least once a day with a brush.
- Check whether the feed belt is dirty or worn.
If it is dirty, clean it using a cloth saturated with denatured alcohol. If it is worn, replace it with a new one.
- If the machine requires service or additional repair parts, please contact your local distributor.
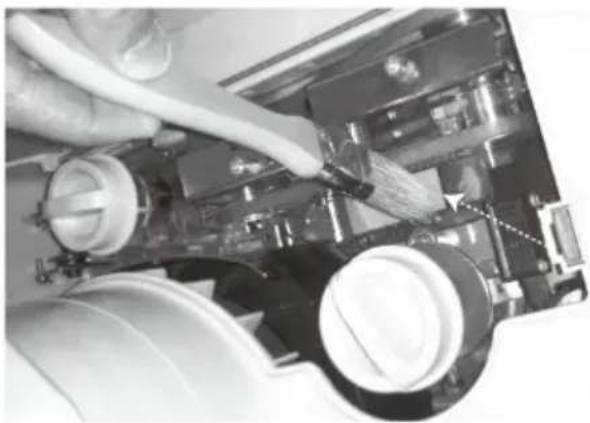
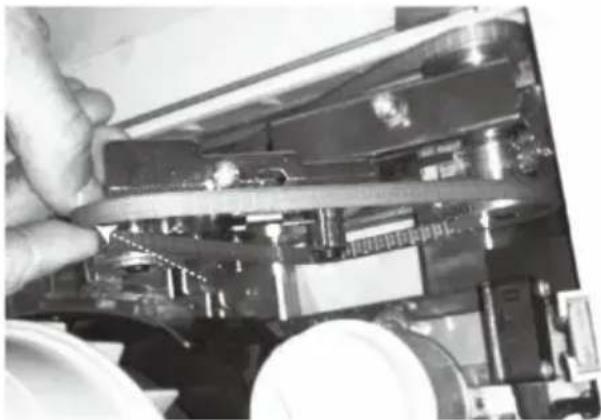
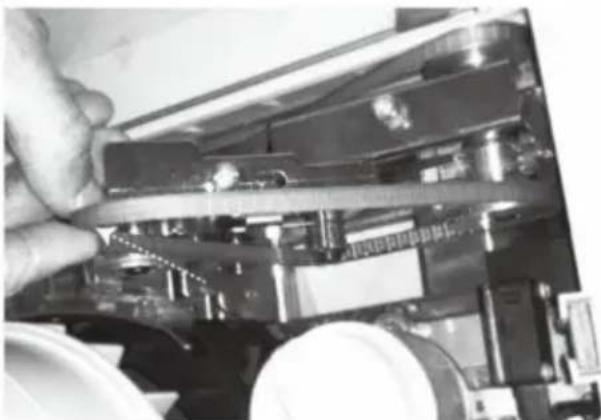
How to replace the V-Belt
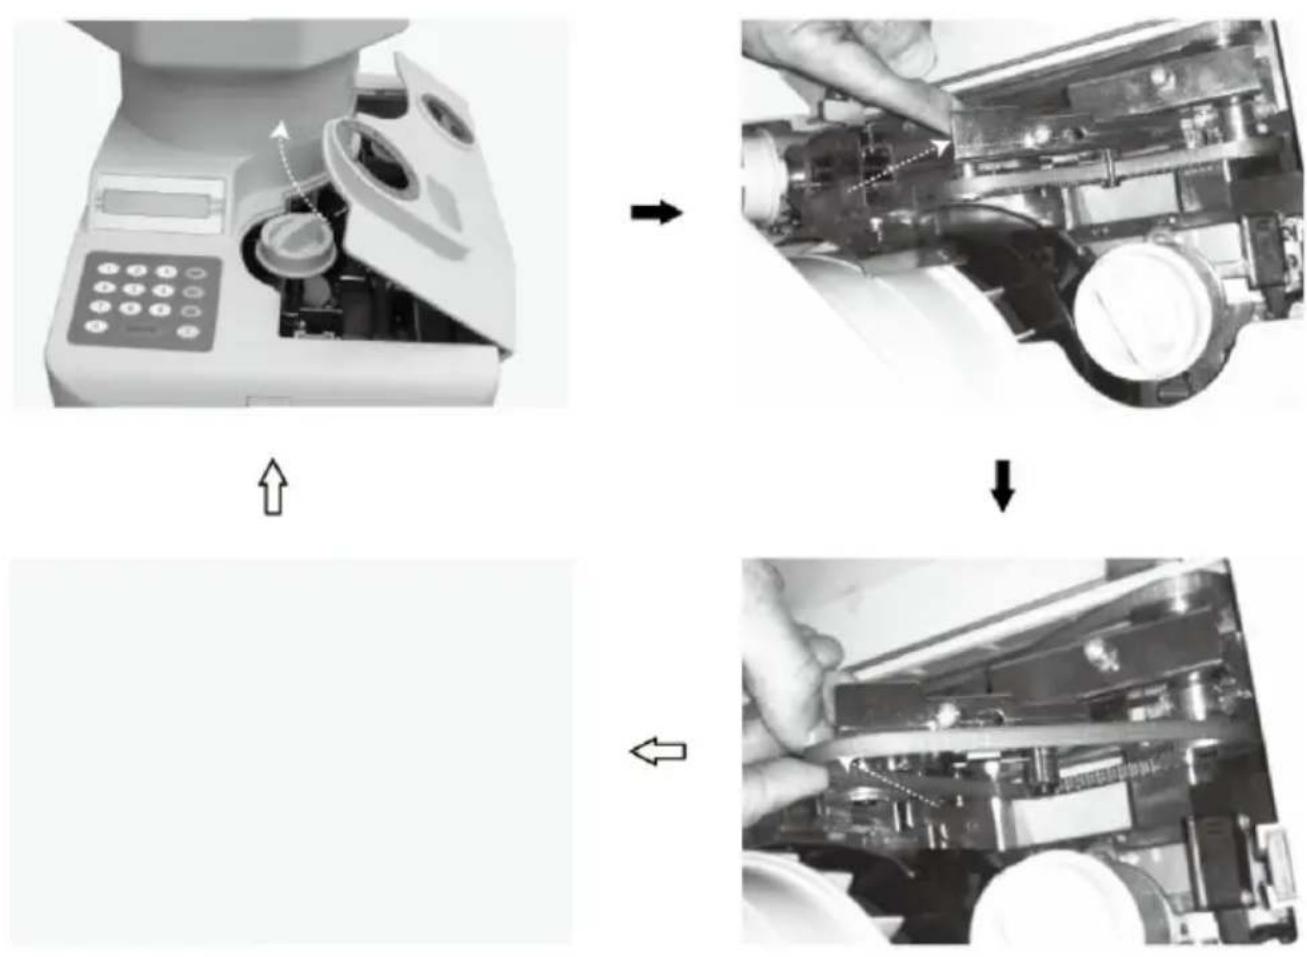
Open the upper cover, pull the Front Feed Pulley Arm upward, then remove the V-Belt from the machine, then put a new V-Belt on the pulleys.
Correct Disposal
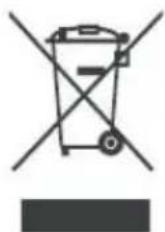
This product is subject to the provisions of European Directive 2012/19/EU. The symbol showing a wheelie bin crossed through indicates that the product requires separate refuse collection in the European Union. This applies to the product and all accessories marked with this symbol. Products marked as such may not be discarded with normal domestic waste, but must be taken to a collection point for recycling electrical and electronic devices.
FCC Information:
CAUTION: Changes or modifications not expressly approved by the party responsible for compliance could void the user's authority to operate the equipment!
This device complies with Part 15 of the FCC Rules. Operation is subject to the following two conditions:
1) This product may cause harmful interference. 2) This product must accept any interference received, including interference that may cause undesired operation.
WARNING: Changes or modifications to this product not expressly approved by the party responsible for compliance could void the user's authority to operate the product.
Note: This product has been tested and found to comply with the limits for a Class B digital device, pursuant to Part 15 of the FCC Rules. These limits are designed to provide reasonable protection against harmful interference in a residential installation.
This product generates, uses and can radiate radio frequency energy, and if not installed and used in accordance with the instructions, may cause harmful interference to radio communications. However, there is no guarantee that interference will not occur in a particular installation. If this product does cause harmful interference to radio or television reception, which can be determined by turning the product off and on, the user is encouraged to try to correct the interference by one or more of the following measures.
- Reorient or relocate the receiving antenna.
- Increase the distance between the product and the receiver.
- Connect the product to an outlet on a circuit different from that to which the receiver is connected.
- Consult the dealer or an experienced radio/TV technician for assistance.
Manufacturer: Shanghaimuxinmuyeyouxiangongsi
Address: Shuangchenglu 803nong11hao1602A-1609shi, Baoshan District, Shanghai 200000 CN.
Imported to AUS: SIHAO PTY LTD. 1 ROKEVA STREET, EASTWOOD NSW 2122 Australia
Imported to USA: Sanven Technology Ltd. Suite 250, 9166 Anaheim Place, Rancho Cucamonga, CA 91730
| UK | REP |
YH CONSULTING LIMITED. C/O YH Consulting
Limited Office 147, Centurion House, London
Road, Staines-upon-Thames, Surrey, TW18 4AX
| EC | REP |
E-CrossStu GmbH
Mainzer Landstr. 69,
60329 Frankfurt am Main.
VEVOR®
TOUGH TOOLS, HALF PRICE
Technical Support and E-Warranty Certificate
www.vevor.com/support
VEVOR®
TOUGH TOOLS, HALF PRICE
NEED HELP? CONTACT US!
KEY
Keypad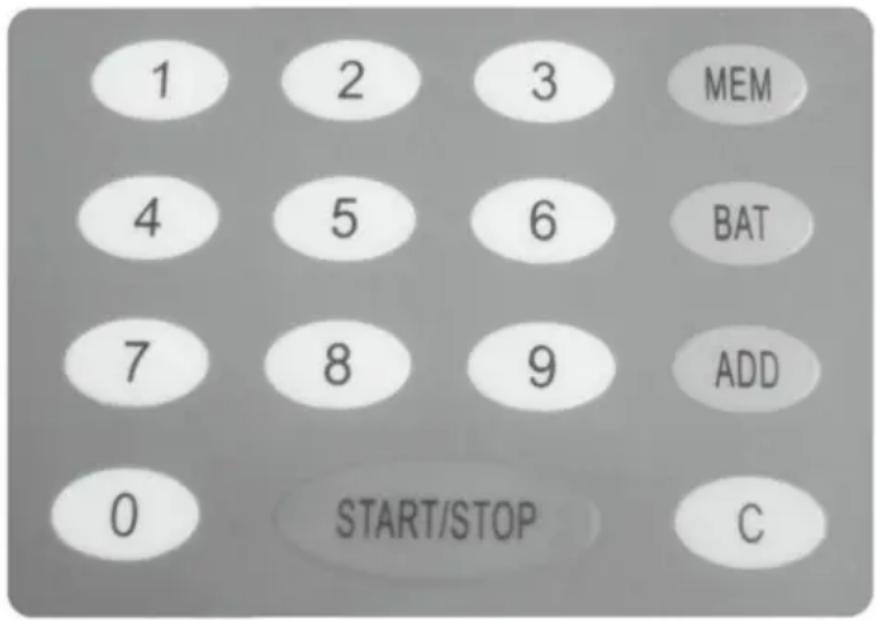
Key function
TROUBLESHOOTING
Troubleshooting
Daily maintenance
YH CONSULTING LIMITED. C/O YH Consulting
Limited Office 147, Centurion House, London
Road, Staines-upon-Thames, Surrey, TW18 4AX
E-CrossStu GmbH
Mainzer Landstr.69,
www.vevor.com/support
COIN SORTER
USER MANUAL
MODEL NO.: KSW850
KEY
Keypad
Key Function
TROUBLESHOOTING
Troubleshooting
Daily Maintenance
YH CONSULTING LIMITED. C/O YH Consulting
Limited Office 147, Centurion House, London
Road, Staines-upon-Thames, Surrey, TW18 4AX
www.vevor.com/support
VEVOR®
TOUGH TOOLS, HALF PRICE
www.vevor.com/support
COIN SELECTOR
USER MANUAL
MODEL NUMBER: KSW850
www.vevor.com/support
KEY
Key panel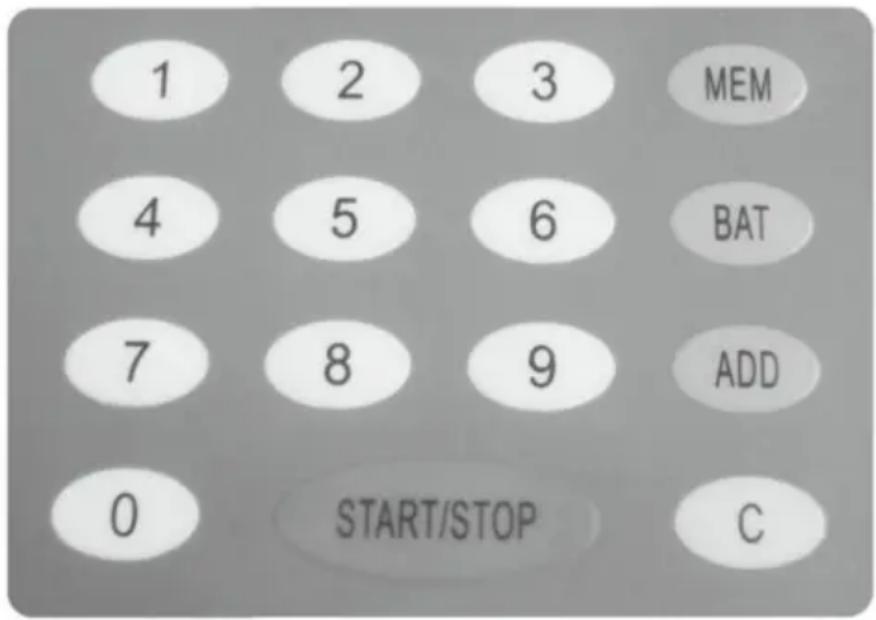
Key function
The LCD display shows "EJ":
Imported in AUS: SIHAO PTY LTD. 1 ROKEVA STREETEASTWOOD NSW 2122 Australia
Imported in USA: Sanven Technology Ltd. Suite 250, 9166 Anaheim Place, Rancho Cucamonga, CA 91730
| RAPPRESENTANZA DEL REGNO UNITO |
YH CONSULTING LIMITED. C/O YH Consulting
Limited Office 147, Centurion House, London
Road, Staines-upon-Thames, Surrey, TW18 4AX
KEY
Key panel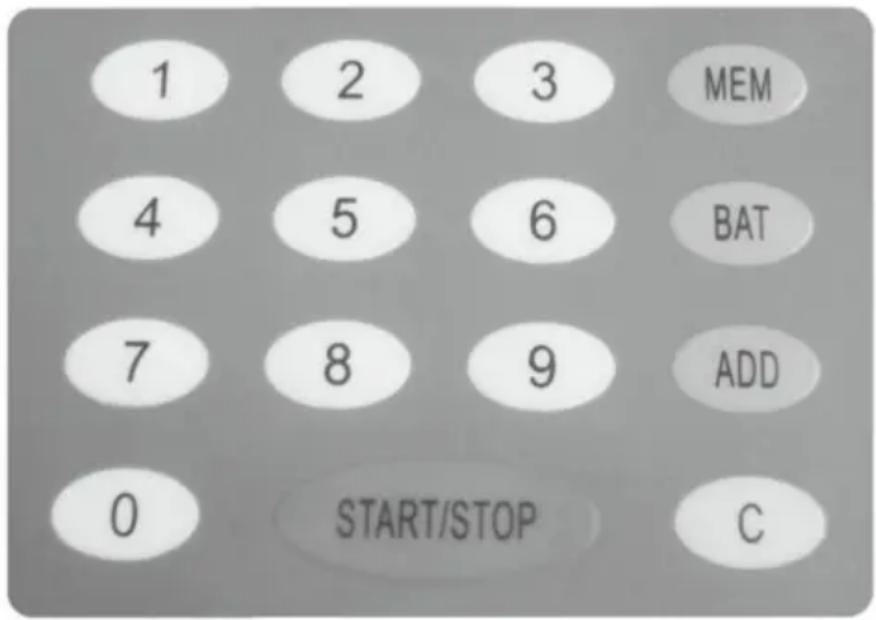
Key function
Road, Staines-upon-Thames, Surrey, TW18 4AX
E-CrossStu GmbH
NEED HELP? CONTACT US!
KEY
Key panel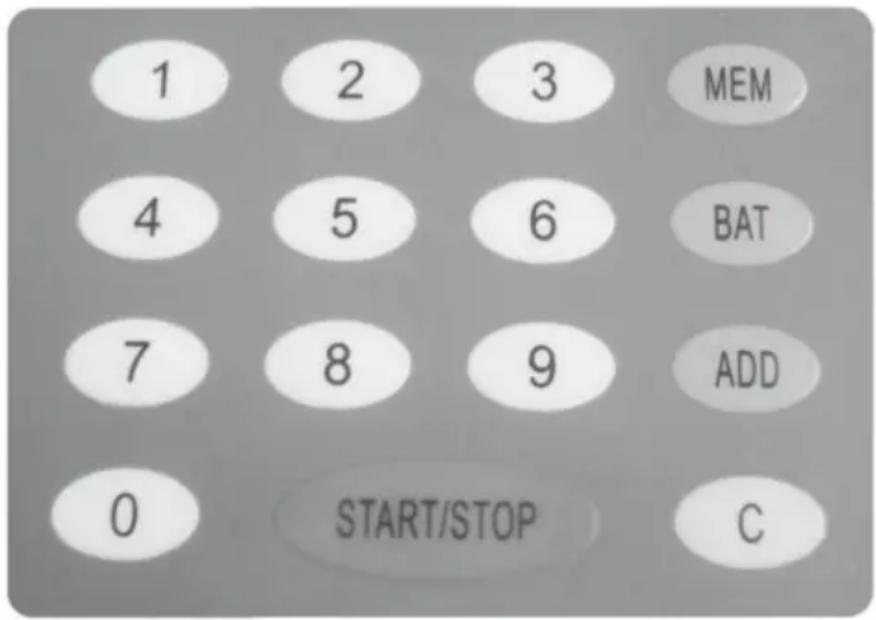
Key function
TROUBLESHOOTING
YH CONSULTING LIMITED. C/O YH Consulting Limited Office 147, Centurion House, London Road, Staines- upon-Thames, Surrey, TW18 4AX
| Przedstaw ciel UE |
E-CrossStu GmbH
Mainzer Landstr.69,
60329 Frankfurt am Main.
VEVOR®
TOUGH TOOLS, HALF PRICE
www.vevor.com/support
COIN SORTER
USER MANUAL
MODEL NUMBER: KSW850
NEED HELP? CONTACT US!
KEY
Keypad panel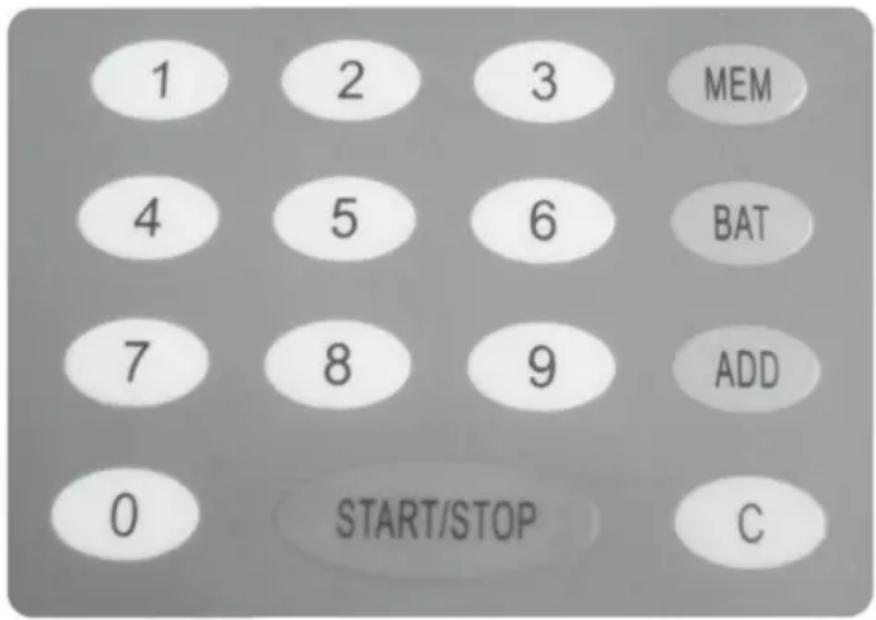
TROUBLESHOOTING
Troubleshooting
Coin path jam:
Daily maintenance
YH CONSULTING LIMITED. C/O YH Consulting
Limited Office 147, Centurion House, London
Road, Staines-upon-Thames, Surrey, TW18 4AX

E-CrossStu GmbH
Mainzer Landstr.69,
warranty certificate www.vevor.com/support
VEVOR®
TOUGH TOOLS, HALF PRICE
www.vevor.com/support
COIN SORTERING
USER MANUAL
MODEL NO: KSW850
NEED HELP? CONTACT US!
KEY
Control panel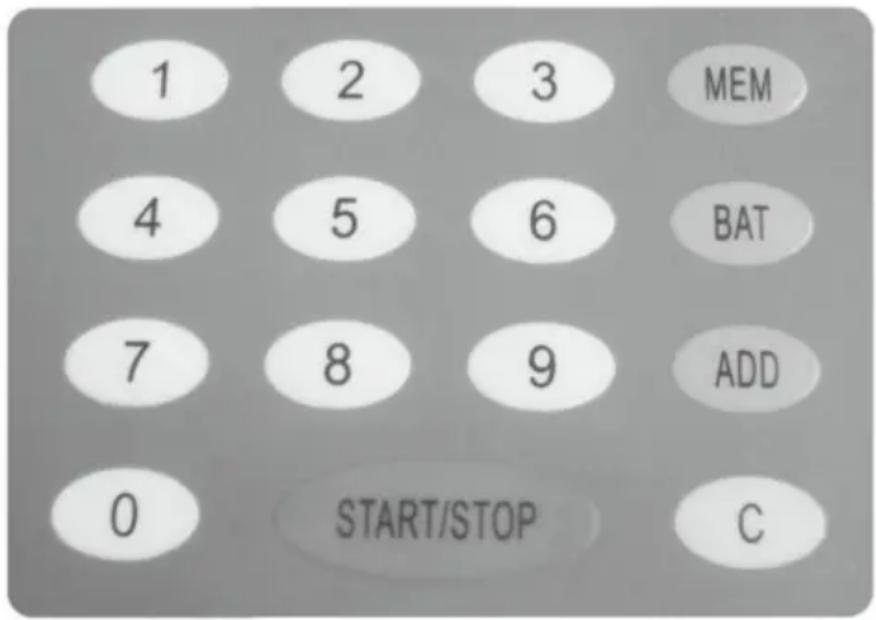
Button function
©
LCD display "OFF": Turn on
Daily maintenance
How to replace the V-belt
YH CONSULTING LIMITED. C/O YH Consulting
Limited Office 147, Centurion House, London
Road, Staines-upon-Thames, Surrey, TW18 4AX
| EC | REP |
E-CrossStu GmbH
Mainzer Landstr.69,
60329 Frankfurt am Main.
VEVOR®
TOUGH TOOLS, HALF PRICE
www.vevor.com/support
- COIN SORTER
- USER MANUAL
- VEVOR®
- NEED HELP? CONTACT US
- WARNING
- TECHNICAL SPECIFICATIONS
- MACHINE OVERVIEW
- GENERAL INFORMATION
- KEY PANEL
- KEY FUNCTION
- PRECAUTIONS
- OPERATING PROCEDURES
- CONTINUOUS MODE
- ADD MODE
- BATCH MODE
- CLEAR BATCH SETTING
- BEGIN COUNTING
- MEMORY FUNCTION
- OPERATING PROCEDURES FOR SORTING MIXED COINS
- ADJUST THE CHANNEL FOR UNKNOWN DIMENSION COINS
- SET UP THE COIN TUBE HOLDER
- TROUBLESHOOTING
- COIN RUNWAY JAMMING
- CENTRIFUGAL DISC JAMMING
- THE LCD DISPLAY "EJ
- DAILY MAINTENANCE
- HOW TO REPLACE THE V-BELT
- CORRECT DISPOSAL
- FCC INFORMATION
- TOUGH TOOLS, HALF PRICE
- KEY
- KEYPAD
- COIN SELECTOR
- THE LCD DISPLAY SHOWS "EJ
- COIN PATH JAM
- COIN SORTERING
Brand : Vevor
Model : KSW850
Category : Coin and bill counter