
JMY8-70 - Sharpener Vevor - Free user manual and instructions
Find the device manual for free JMY8-70 Vevor in PDF.

| Product Type | Sharpener |
| Brand | Vevor |
| Model | JMY8-70 |
| Voltage | 120 V ~ 60 Hz (North America) / 220-240 V ~ 50 Hz (EU) / 220 V ~ 50 Hz (Australia) |
| Power | 370 W |
| No-load speed | 3600 rpm |
| Compatible saw blade diameter | 3.15 to 27.5 inches (80.01 to 698.5 mm) |
| Grinding wheel diameter | 4.72 inches (120 mm) maximum |
| Cooling type | Built-in water tank |
| Main function | Sharpening circular saw blades |
| Angle adjustment | Adjustable blade holder angle |
| Positioning post | Yes (prevents blade rotation during sharpening) |
| Required safety equipment | ANSI safety glasses, protective gloves, hearing protection |
| Maintenance | Cleaning with brush and damp cloth, lubrication with industrial grease |
| Available spare parts | Replacement grinding wheel (model to choose according to motor speed) |
| Usage | Indoor use only, non-commercial |
| Housing material | Not specified (likely metal and plastic) |
| Manufacturer | Vevor, made in China |
| CE/UKCA | CE and UK certifications |
Frequently Asked Questions - JMY8-70 Vevor
User questions about JMY8-70 Vevor
0 question about this device. Answer the ones you know or ask your own.
Ask a new question about this device
Download the instructions for your Sharpener in PDF format for free! Find your manual JMY8-70 - Vevor and take your electronic device back in hand. On this page are published all the documents necessary for the use of your device. JMY8-70 by Vevor.
USER MANUAL JMY8-70 Vevor
Technical Support and E-Warranty Certificate www. vvor. com/support
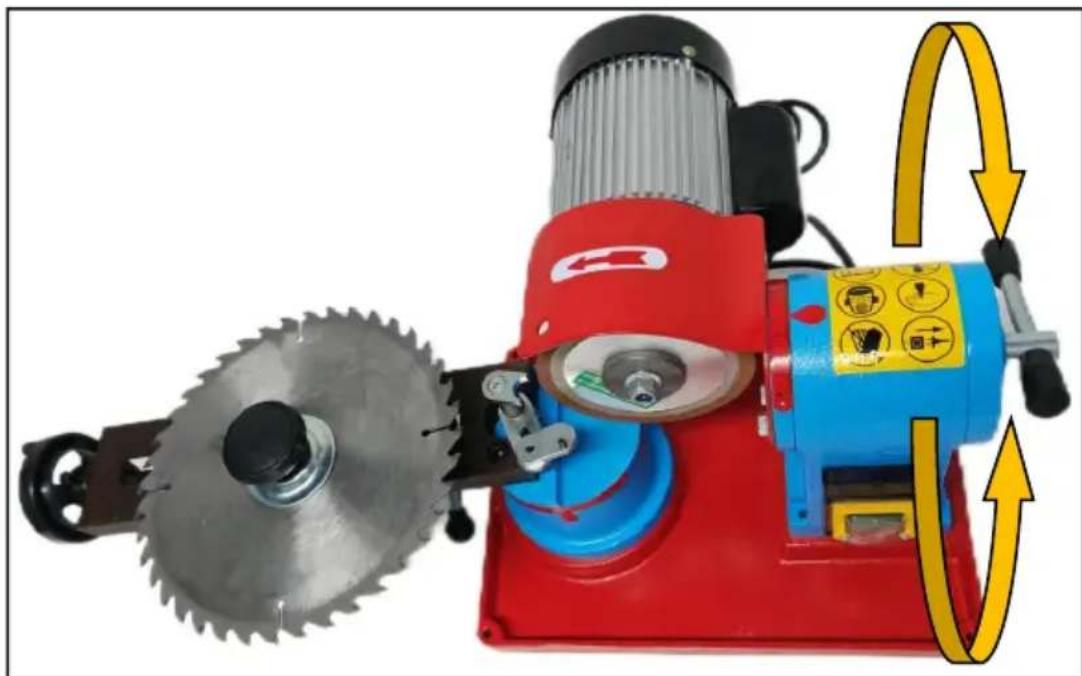
CIRCULAR SAW BLADE SHARPENER
MODEL: JMY8-70
We continue to be committed to provide you tools with competitive price. "Save Half", "Half Price" or any other similar expressions used by us only represent the estimate of savings you might benefit from buying certain tools with us compared to top brands and does not necessarily mean to cover all categories of tools offered. Are kindly reminded to verify carefully when you are placing an order with us actually saving half in comparison with the top major brands.
MODEL: JMY8-70

NEED HELP? CONTACT US!
Have product questions? Need technical support? Please feel fr contact us:
Technical Support and E-Warranty Certificate www. vvor. com/support
This is the original instruction, please read all manual instruction carefully before operating. VEVOR reserves a clear interpretation user manual. The appearance of the product shall be subject to product you received. Please forgive us that we won't inform y if there are any technology or software updates on our product
| Warning-To reduce the risk of injury, user must read instructions manual carefully. | |
| Always wear ANSI approved safety goggles when work with tools and equipment. Wear eye protection. Wear ear protection. Wear protective gloves. | |
| Compliance is a EC & UK security certification. | |
| This product is subject to the provision of European E 2012/19/EC. The symbol showing a wheelie bin cross through indicates that the product requires separate ref collection in the European Union. This applies to the and all accessories marked with this symbol. Products marked as such may not be discarded with normal de waste, but must be taken to a collection point for rec electrical and electronic devices |
SafetyWarnings and Precautions
Thank you for using this product. In order to make sure that you can operate the machine correctly, read this instruction carefully before operation and keep it properly for future reference. Please be sure to the precautions and safety rules in this page to ensure your safe use manual will outline safety warnings and precautions, operating, maintenance and cleaning. The warnings and instructions reviewed in manual cannot cover all possible conditions and situations that may of Caution and common sense are not built into this product, since we that the uses will comply with these codes.
Please read ALL the instructions before using your machine.
- Keep work area clean. Cluttered areas invite injuries.
- Observe work area conditions. Do not use machines or power to damp or wet locations. Don't expose to rain. Keep work area well lit. Do not use electrically powered tools in the presence of flammable gas or liquids.
- Keep children away. Children must never be allowed in the work. Do not let them handle machines, tools, or extension cords.
- Store idle equipment. When not in use, tools must be stored in location to inhibit rust. Always lock up tools and keep out of reach of children.
- Use the right tool for the job. Do not attempt to force a small attachment to do the work of a larger industrial tool. There are certain applications for which this tool was designed. It will do the job better more safely at the rate for which it was intended. Do not modify this and do not use this tool for a purpose for which it was not intended
- Dress properly. Do not wear loose clothing or jewelry as they can be caught in moving parts.
Protective, electrically non-conductive clothes and no-skid footwear are recommended when working. Wear restrictive hair covering to contain hair
- Use eye and ear protection. Always wear ANSI approved impact goggles. Wear a full face shield if you are producing metal filings or chips.
- Do not overreach. Keep proper footing and balance at all times. reach over or across running machines.
- Maintain tools with care. Keep tools sharp and clean for better a safer performance. Follow instructions for lubricating and changing accessories. Inspect tool cords periodically and if damaged, have them repaired by an authorized technician. The handles must be kept clean and free from oil and grease at all times. Please power off and unpa before maintenance and cleaning.
-
Avoid unintentional starting. Be sure the switch is in the Off position when not in use and before plugging in.
-
Stay alert. Watch what you are doing, use common sense. Do not operate any tool when you are tired.
- Check for damaged parts. Before using any tool, any part that appears damaged should be carefully checked to determine that it will operate properly and perform its intended function. Check for alignment and binding of moving parts; any broken parts or mounting fixtures; a any other condition that may affect proper operation. Any part that is damaged should be properly repaired or replaced by a qualified techn Do not use the tool if any switch does not turn On and Off properly
- Guard against electric shock. Prevent body contact with ground surfaces such as pipes, radiators, ranges, and refrigerator enclosures.
- Replacement parts and accessories. When servicing, use only identical replacement parts. Use of any other parts will void the warranty. Only use accessories intended for use with tool.
- Do not operate tool if under the influence of alcohol or drug Read warning labels on prescriptions to determine if your judgment or reflexes are impaired while taking drugs. If there is any doubt, do no operate the tool.
- Wire size rated at 16 AWG.
- Maintenance. For your safety, maintenance should be performed regularly by a qualified technician.
- Never use the machine around flammable materials.
- Do NOT immerse the appliance in water or any other liquid.
- This product cannot be used for other purposes. Not suitable for commercial use. INDOOR USE ONLY.
- Do not use alcohol, gasoline, etc. as coolant.
- Keep bystanders a safe distance away from work area. Any or entering the work area must wear personal protective equipment.
Fragments of work piece or of a broken accessory may fly away and injury beyond immediate area of operation. -
Operations for which the power tool was not designed may be a hazard and cause personal injury.
-
Do not use accessories which are not specifically designed a recommended by the tool manufacturer. Just because the accessory can be attached to your power tool, it does not assure safe operation
- The rated speed of the accessory must be at least equal to maximum speed marked in the user manual. Accessories running far than their rated speed can break and fly apart.
- This appliance is not intended for use by young or infirm persons unless supervised by a responsible person to ensure that they can use the appliance safely. Young children should be supervised to ensure that they do not play with the appliance. Children and pets should stay away from the product.
- Do not apply this unit to any other purposes than the indicated
- Do not use it outdoors or for commercial purposes. 29. DO NOT CLEAN IT WITH ANY ABRASIVE MATERIAL.
- Never leave it unattended while in use.
Note: Performance of this tool (if powered by line voltage) may depending on variations in local line voltage. Extension cord usage may also affect tool performance.
Warning: The warnings, cautions, and instructions discussed in this instruction discussed in this instruction manual cannot cover possible conditions and situations that may occur. It must be understood by the operator that common sense and caution are factors which cannot be built into this product, but must be sup by the operator of the tool.
30. If the grinding wheel comes loose, turn off the machine immediat and check that it is mounted securely, and that is not damaged.
31. Never try to stop the grinding wheel with your hands, even if yc wearing safety gloves. The wheel will cut through gloves and your ha causing serious injury. Never operate tool without the Grinding Wheel Cover in place.

Warning!!: This machine is designed to Lawn Mower Blade. not attempt to sharpen any other tools and do not attempt to grind any other objects.
PRODUCT PARAMETERS
| MODEL | Voltage | Motor Power | Rpm | Saw blade specifications |
| JMY8-70 | North America 120v~ 60Hz | 370W | Max 3600RPM | 3.15inch~27.5inch (φ80.01mm~φ698.5mm) |
| European Union 220-240v~ 50Hz | ||||
| Australia 220V~ 50Hz |
Grinding wheel diameter: Max 4.72inch ( φ120mm )
Attention:
- Do not use accessories which are not specifically designed an recommended by the tool manufacturer. Just because the accessory can be attached to your power tool, it does not assure safe operation
- Inspect tool cords periodically and if damaged, have them repaired authorized technician.
- The voltage used for this device must be the same as the power supply voltage.
- Users need to install it near the power switch and fuse.
TIPS
- Before use, slightly loosening the adjustment knob on the product facilitate the positioning of the saw blade and grinding wheel.
- Know the optimal blade angle for each type of saw blade ahead to get the best results.
- Mark each tooth of the saw blade with an oil pen after grinding omissions.
ADJUST
- Please dispose of all plastic bags carefully and keep them away for children.
- Check all components provided according to the list in this manual, sure you have all of the parts listed.
- Whilst every care is taken in the manufacture of this product, care be taken during assembly in case sharp edges are present.
- Wear eye protection, protective gloves,ear protection during assembly and using.
- Before starting to adjust, install the four foot supports on the while ensuring that the product is placed horizontally.
- It is strictly forbidden for the work piece to collide with the disc and not be started under load.

WARNING! Ensure the tool is switched off and disconnect from the power supply and unplug the plug before perform any of the following steps.
Attention: Always wear ANSI approved safety goggles when working tools and equipment.
STEP 1:
Install the water tank on the machine.
Water pipe passes through protective cover.

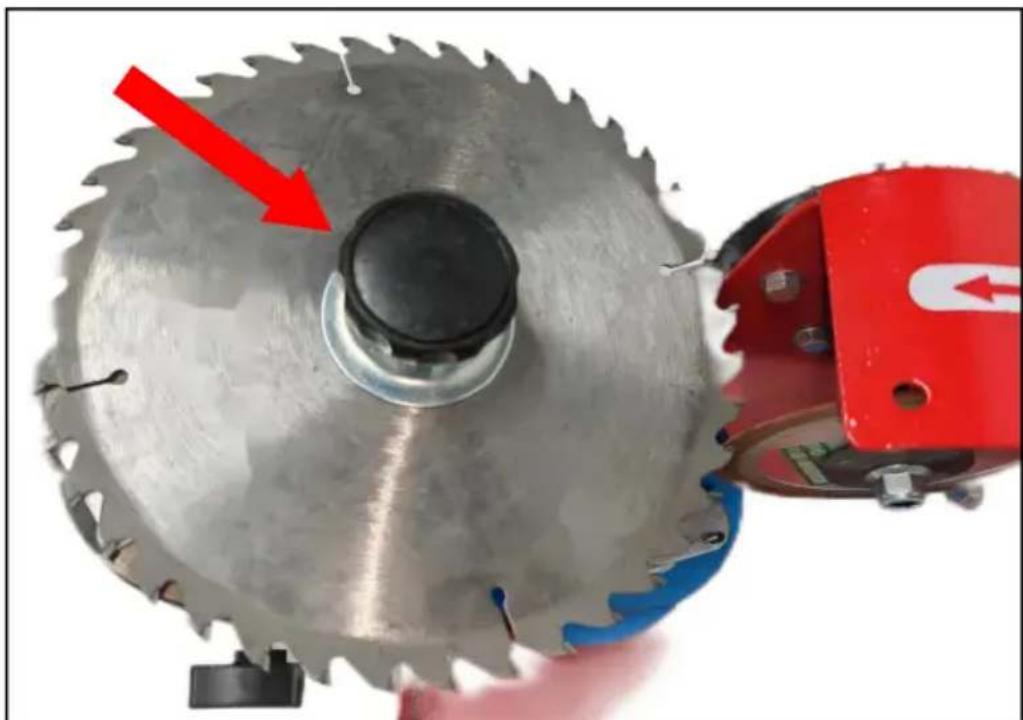
STEP 2: Select the appropriate saw blade fixing shaft and install the Attention:
-
The saw blade fixed shaft must match the blade to avoid loosenes
-
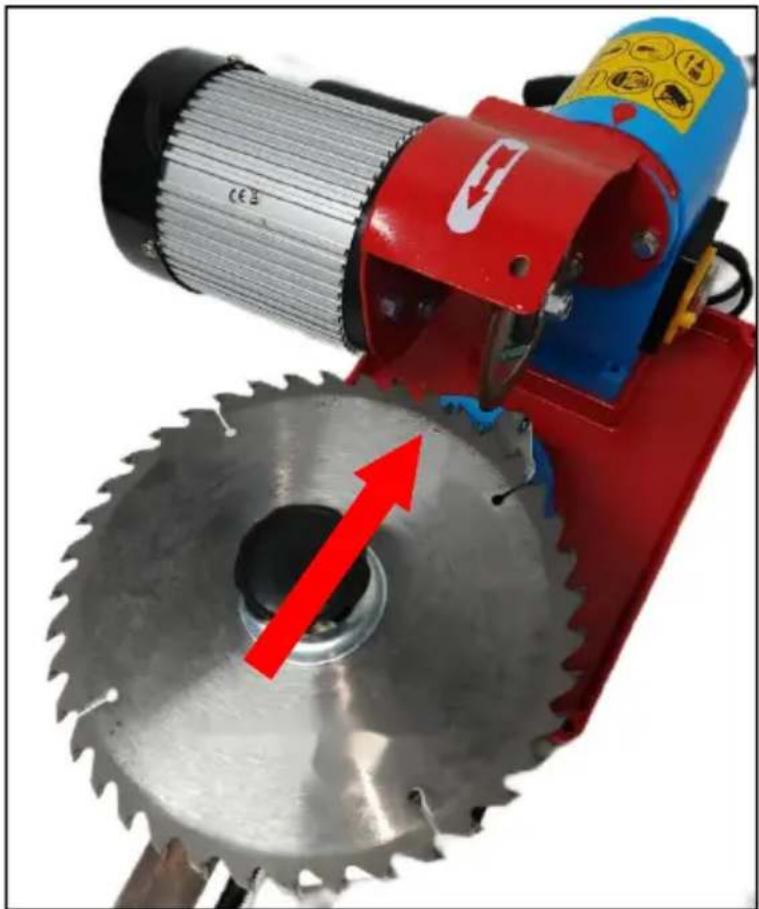
Pay attention to the installation direction of the saw blade.
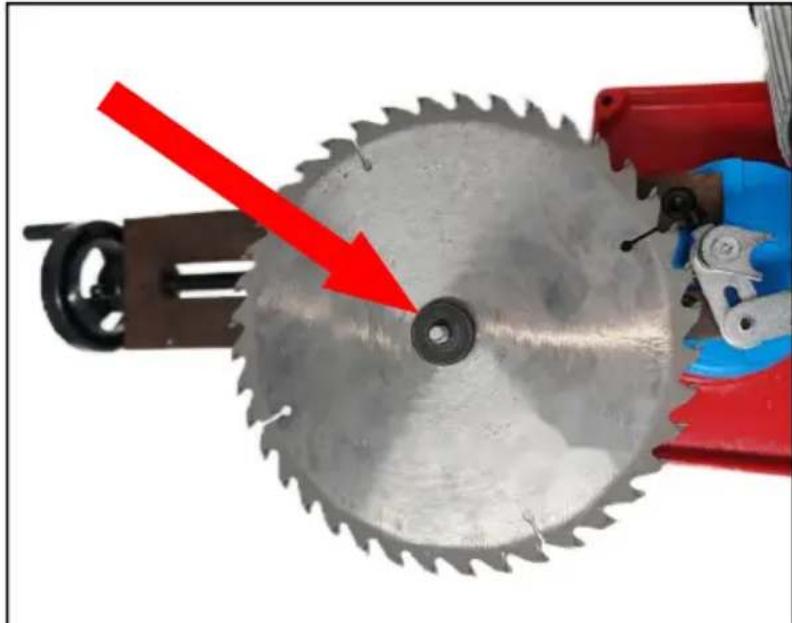
STEP 3: Tighten the knob to secure the saw blade. Tips: At this time, there is no need to tighten the saw blade to facilitate adjustment. Attention:
- To prevent cuts, protective gloves must be worn.
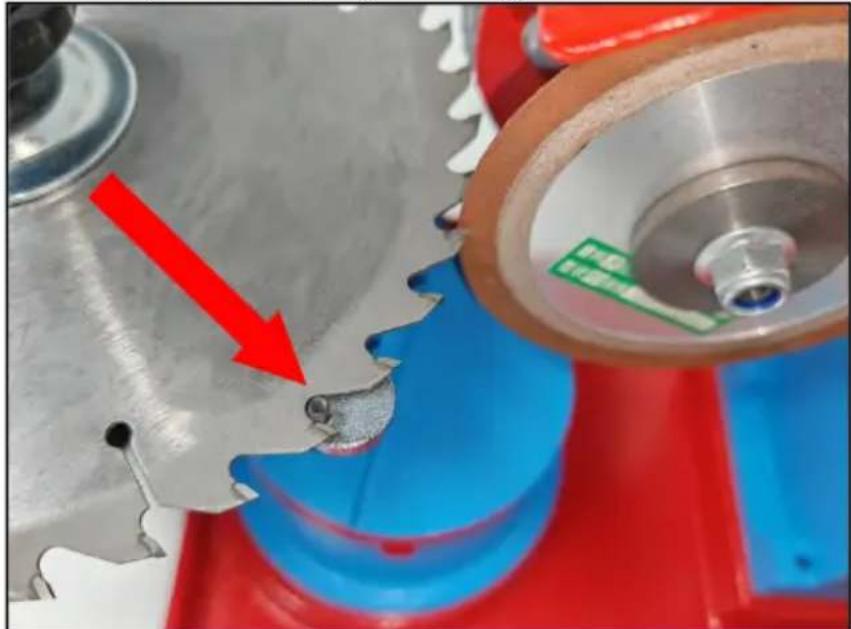
STEP 4:
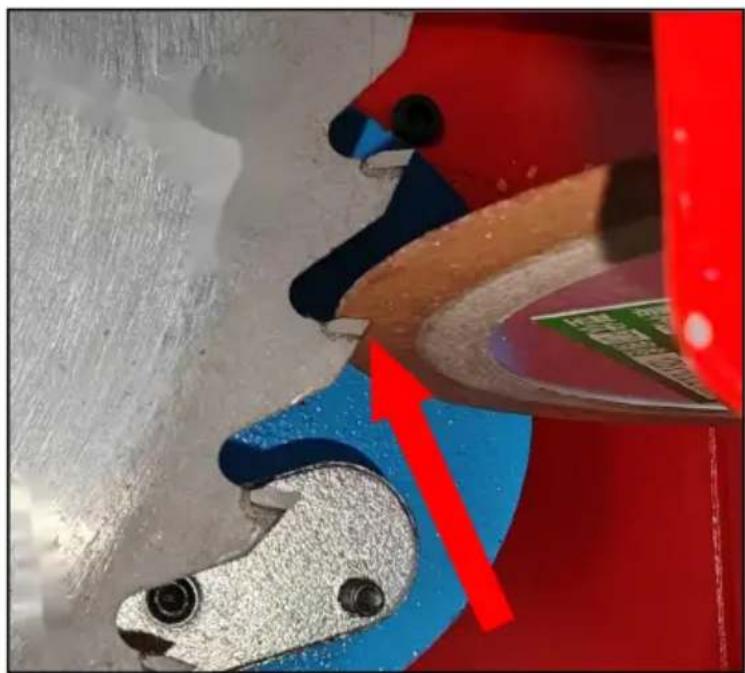
- To adapt to different saw blades, adjust the saw blade fixing bracl
- Keep the teeth on the saw blade in close contact with the grindin
- Locking saw blade fixing bracket.
STEP 5: Tighten the knobs on the upper and lower saw blade mourn Attention:
- To prevent cuts, protective gloves must be worn.
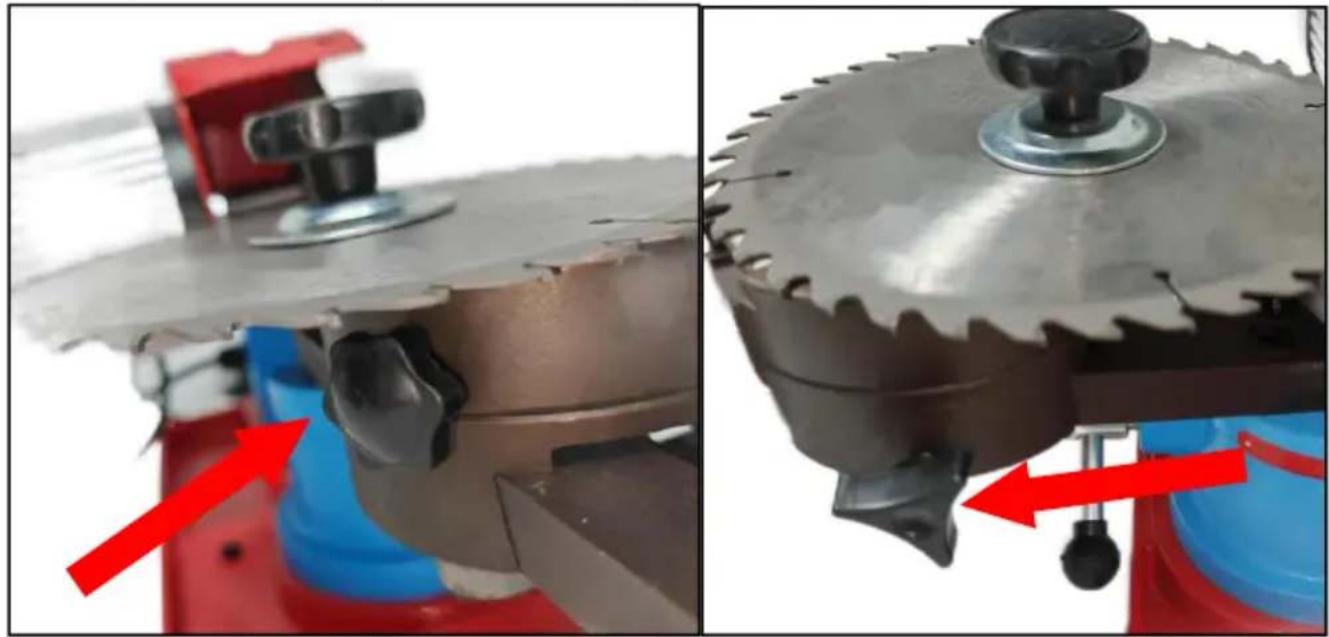
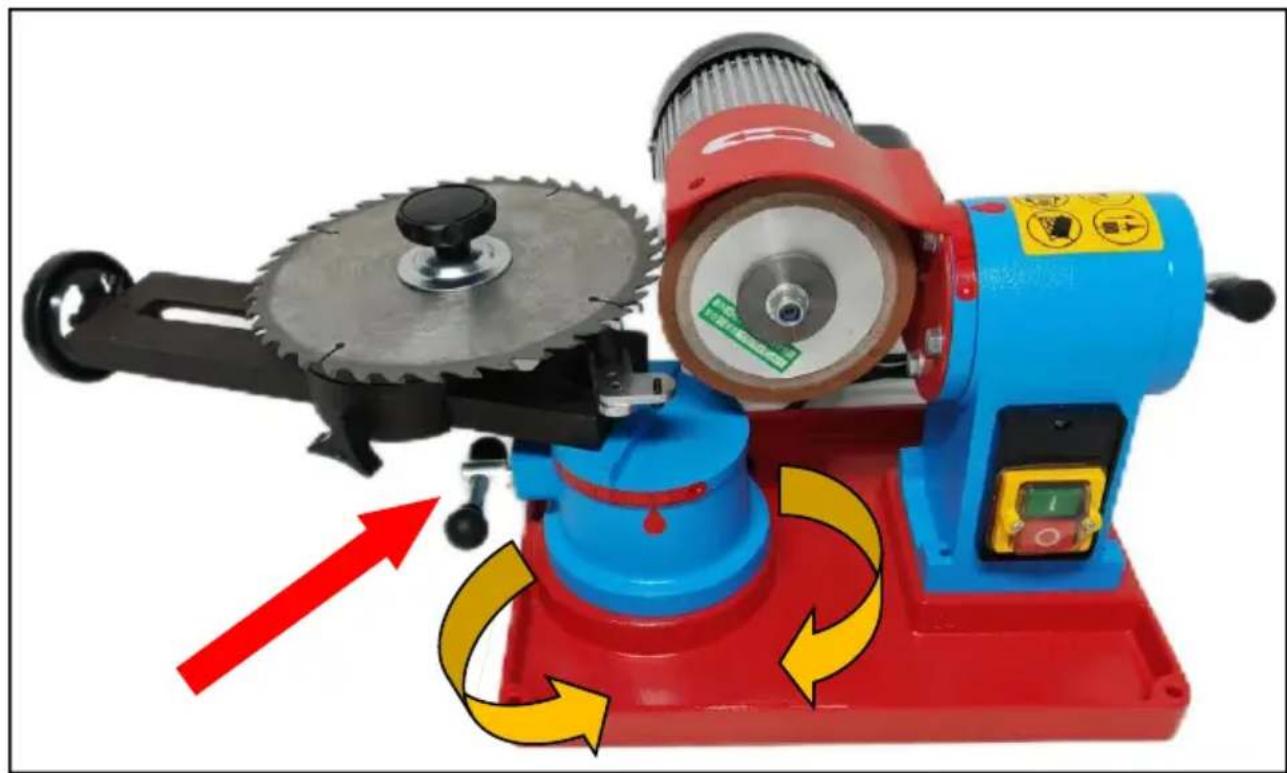
STEP 6: Rotate the motor assembly to the angle you need and second Attention:
- The motor assembly is heavy and must be supported by hand wh rotating to avoid excessive rotation.
- The motor assembly knobs must be tightened to prevent the motor falling.
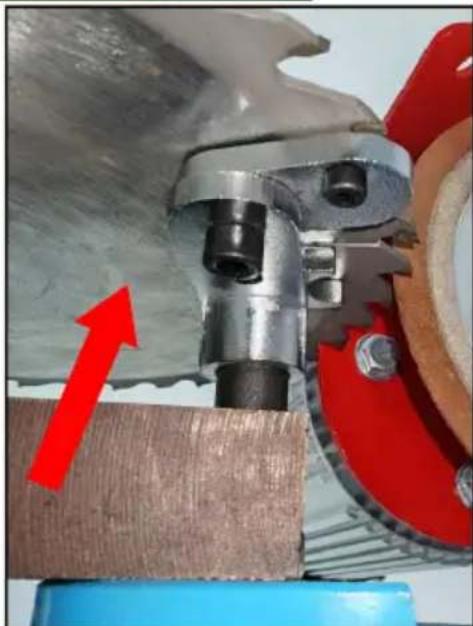
STEP 7:
- Place the positioning post that fixes the saw blade teeth in the ap position.
- Use an Allen screwdriver to tighten the two screws that control the positioning column assembly.
Attention: The positioning post assembly is used to prevent the blade from rotating during grinding, so it must be used.

STEP 8: Finally, fix the saw blade fixing knob and check whether ot and screws have been fixed.
OPERATION
Notice:
- Please confirm again that each knob is tightened before turn the power.
- Try it a few times to familiarize yourself with the operation, and then on the power switch after ensuring safety.
Attention! SafetyWarnings and Precautions must be read again!
- Turn on the power, and wait for the grinding wheel speed to stab
- Hold the saw blade fixing knob and slowly push the saw blade to the grinding wheel.
- After grinding a saw tooth, move the saw blade away from the g wheel and disconnect the power supply.
- After the grinding wheel stops rotating, loosen the saw blade fixing and rotate the saw blade to align the next saw tooth with the grindi wheel.
- After the entire saw blade has been sharpened, turn off the powe unplug it.
CLEANING AND STORAGE
- Ensure the machine is turned off and pull out the plug.
- Use a brush to clean, wipe the surface with a damp (not wet) cloth, wipe dry with a clean lint free cotton cloth.
- Keep the product dry after cleaning.
- Put the cleaned products and accessories into the carton.
- Coating machines (except motors, grinding wheels, switches, knobs) with industrial lubricating grease will increase the service life and prevent rust.
Attention:
- The grinding wheel must be replaced after reaching the end of service life.
- The selected grinding wheel model cannot be less than the most speed.
- Only clean when the product is not working.
- Wear safety goggles and heavy-duty work gloves during cleaning
COOLING SYSTEM
- If the water tank mounting hole is sealed, just use a small screw pierce it and it will be ready for use.
- Do not use alcohol, gasoline, etc. as coolant.
- After each use, empty the remaining solution in the water tank to odors.

Address: Baoshanqu Shuangchenglu 803long 11hao 1602A-1609shi Shanghai
Imported to AUS: SIHAO PTY LTD, 1 ROKEVA STREETEASTWOOD NSW 2122 Australia
Imported to USA: Sanven Technology Ltd., Suite 250, 9166 Anaheim Place, Rancho Cucamonga, CA 91730

Pooledas Group Ltd
Unit 5 Albert Edward House, The Pavilion
Preston, United Kingdom

SHUNSHUN GmbH
Romeracker 9 Z2021, 76351
Technical Support and E-Warranty Certificate www. vvor. com/support
VEVOR
TOUGH TOOLS, HALF PRICE
Assistance technique et certificat de garantie electronique www. vvor. com/support
AFFUTEUR DE LAME DE SCIE CIRCULAIRE
MODELE: JMY8-70
Rancho Cucamonga, CA 91730

Groupe Pooledas Ltd
Importato in Australia: SIHAO PTY LTD, 1 ROKEVA STREETEASTWOOD
NSW 2122Australia
Anaheim Place, Rancho Cucamonga, CA 91730
| REP. DEL | REGNO UNITO |
Gruppo Pooledas Ltd
Place, Rancho Cucamonga, CA 91730

Grupo Pooledas Ltd
Import do AUS: SIHAO PTY LTD, 1 ROKEVA STREETEASTWOOD
Rancho Cucamonga, CA 91730

Pooledas Group Ltd
Jednostka 5 Albert Edward House, pawilony
HULP NODIG? NEEM CONTACT MET ONS OP!
Enhet 5 Albert Edward House, The Pavilions


