
MR-13A - Sharpener Vevor - Free user manual and instructions
Find the device manual for free MR-13A Vevor in PDF.
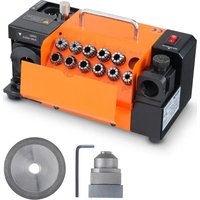


| Product Type | Electric Drill Bit Sharpener |
| Model | MR-13A |
| Brand | Vevor |
| Grinding Diameter | 2 mm to 13 mm (max. 15 mm) |
| Point Angle | 95° to 135° |
| Grinding Wheel | Diamond Grinding Wheel |
| Collets | ER20, diameters φ3-φ13 (11 pieces) |
| Collet Chuck | ER20 |
| Power Supply | 220-240 V, 50/60 Hz (estimated) |
| Motor | DC Motor, Electric Control |
| Center Point Adjustment Function | Yes, to coordinate material and rotation speed |
| Intended Use | Sharpening twist drill bits for indoor non-commercial use |
| Maintenance | Clean with compressed air, do not immerse in water, replace grinding wheel if worn |
| Safety | Wear safety glasses, hearing protection, and gloves required. Do not use in presence of flammable liquids. Unplug before maintenance. |
| Spare Parts and Repairability | Use only identical replacement parts. Contact manufacturer via www.vevor.com/support. |
| General Information | Made in China. Imported by Sanven Technology Ltd. (USA), UK representative: Pooledas Group, CE representative: SHUNSHUN GmbH. |
| Included Accessories | ER20 collets (11), collet chuck, power cord, hex keys (2 for European version, 1 for American) |
Frequently Asked Questions - MR-13A Vevor
User questions about MR-13A Vevor
0 question about this device. Answer the ones you know or ask your own.
Ask a new question about this device
Download the instructions for your Sharpener in PDF format for free! Find your manual MR-13A - Vevor and take your electronic device back in hand. On this page are published all the documents necessary for the use of your device. MR-13A by Vevor.
USER MANUAL MR-13A Vevor
Technical Support and E-Warranty Certificate www.vevor.com/support
DRILL BITS SHARPENER
MODEL: MR-1A
We continue to be committed to provide you tools with competitive price. "Save Half", "Half Price" or any other similar expressions used by us only represents an estimate of savings you might benefit from buying certain tools with us compared to the major top brands and does not necessarily mean to cover all categories of tools offered by us. You are kindly reminded to verify carefully when you are placing an order with us if you are actually saving half in comparison with the top major brands.
VEVOR®
TOUGH TOOLS, HALF PRICE
DRILL BITS SHARPENER
MODEL: MR-13A
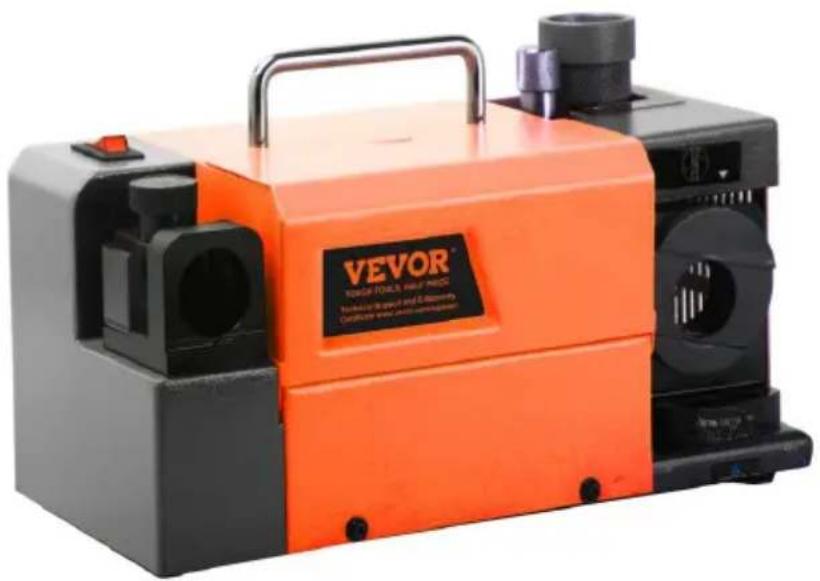
NEED HELP? CONTACT US!
Have product questions? Need technical support? Please feel free to contact us:
Technical Support and E-Warranty Certificate www.vevor.com/support
This is the original instruction. Please read all manual instructions carefully before operating. VEVOR reserves a clear interpretation of the user manual. The appearance of the product shall be subject to the product you received. Please forgive us that we won't inform you if there are any technology or software updates on our product.
 | Warning-To reduce the risk of injury, user must read instructions manual carefully. |
 | Always wear ANSI approved safety goggles when work with tools and equipment. |
 | Wear eye protection. |
 | Wear ear protection. |
| Wear protective gloves. | |
 | Compliance is a EC & UK security certification. |
 | CORRECT DISPOSALThis product is subject to the provision of European D 2012/19/EC. The symbol showing a wheelie bin crosse through indicates that the product requires separate ref collection in the European Union. This applies to the and all accessories marked with this symbol. Products marked as such may not be discarded with normal dc waste, but must be taken to a collection point for rec electrical and electronic devices |
Safety Warnings and Precautions
Thank you for using this product. In order to make sure that you can operate the machine correctly, read this instruction carefully before operation and keep it properly for future reference. Please be sure to follow the precautions and safety rules in this page to ensure your safe use. The manual will outline safety warnings and precautions, operating, maintenance and cleaning. The warnings and instructions reviewed in the manual cannot cover all possible conditions and situations that may occur. Caution and common sense are not built into this product, since we expect that the users will comply with these codes.
Please read ALL the instructions before using your machine.
- Keep work area clean. Cluttered areas invite injuries.
- Observe work area conditions. Do not use machines or power tools in damp or wet locations. Don't expose to rain. Keep work area well lit. Do not use electrically powered tools in the presence of flammable gases or liquids.
- Keep children away. Children must never be allowed in the work area. Do not let them handle machines, tools, or extension cords.
- Store idle equipment. When not in use, tools must be stored in a dry location to inhibit rust. Always lock up tools and keep out of reach of children.
- Use the right tool for the job. Do not attempt to force a small attachment to do the work of a larger industrial tool. There are certain applications for which this tool was designed. It will do the job better and more safely at the rate for which it was intended. Do not modify this tool and do not use it for a purpose for which it was not intended.
- Dress properly. Do not wear loose clothing or jewelry as they can be caught in moving parts.
Protective, electrically non-conductive clothes and no-skid footwear are recommended when working. Wear restrictive hair covering to contain hair.
- Use eye and ear protection. Always wear ANSI approved impact goggles. Wear a full face shield if you are producing metal filings or chips.
- Do not overreach. Keep proper footing and balance at all times. Do not reach over or across running machines.
- Maintain tools with care. Keep tools sharp and clean for better and safer performance. Follow instructions for lubricating and changing accessories. Inspect tool cords periodically and if damaged, have them repaired by an authorized technician. The handles must be kept clean and free from oil and grease at all times. Please power off and unplug before maintenance and cleaning.
- Avoid unintentional starting. Be sure the switch is in the Off position when not in use and before plugging in.
- Stay alert. Watch what you are doing, use common sense. Do not operate any tool when you are tired.
- Check for damaged parts. Before using any tool, any part that appears damaged should be carefully checked to determine that it will operate properly and perform its intended function. Check for alignment and binding of moving parts; any broken parts or mounting fixtures; and any other condition that may affect proper operation. Any part that is damaged should be properly repaired or replaced by a qualified technician. Do not use the tool if any switch does not turn On and Off properly.
- Guard against electric shock. Prevent body contact with ground surfaces such as pipes, radiators, ranges, and refrigerator enclosures.
- Replacement parts and accessories. When servicing, use only identical replacement parts. Use of any other parts will void the warranty. Only use accessories intended for use with the tool.
- Do not operate the tool if under the influence of alcohol or drugs. Read warning labels on prescriptions to determine if your judgment or reflexes are impaired while taking drugs. If there is any doubt, do not operate the tool.
- Maintenance. For your safety, maintenance should be performed regularly by a qualified technician.
- Never use the machine around flammable materials.
- Do NOT immerse the appliance in water or any other liquid.
- This product cannot be used for other purposes. Not suitable for commercial use. INDOOR USE ONLY.
- Do not use alcohol, gasoline, etc. as coolant.
- Keep bystanders a safe distance away from work area. Anyone entering the work area must wear personal protective equipment. Fragments of work piece or of a broken accessory may fly away and cause injury beyond the immediate area of operation.
- Operations for which the power tool was not designed may cause a hazard and cause personal injury.
- Do not use accessories which are not specifically designed and recommended by the tool manufacturer. Just because the accessory can be attached to your power tool, it does not assure safe operation.
- The rated speed of the accessory must be at least equal to the maximum speed marked in the user manual. Accessories running faster than their rated speed can break and fly apart.
- This appliance is not intended for use by young or infirm persons unless supervised by a responsible person to ensure that they can use the appliance safely. Young children should be supervised to ensure that they do not play with the appliance. Children and pets should stay away from the product.
- Do not use this unit for any purpose other than the indicated one.
- Do not use it outdoors or for commercial purposes. 29. DO NOT CLEAN IT WITH ANY ABRASIVE MATERIAL.
- Never leave it unattended while in use.
Note: Performance of this tool (if powered by line voltage) may depend on variations in local line voltage. Extension cord usage may also affect tool performance.
Warning: The warnings, cautions, and instructions discussed in this instruction manual cannot cover all possible conditions and situations that may occur. It must be understood by the operator that common sense and caution are factors which cannot be built into this product, but must be supplied by the operator of the tool.
- If the grinding wheel comes loose, turn off the machine immediately and check that it is mounted securely, and that it is not damaged.
- Never try to stop the grinding wheel with your hands, even if you are wearing safety gloves. The wheel will cut through gloves and your hands, causing serious injury. Never operate the tool without the Grinding Wheel Cover in place.
- If the supply cord is damaged, it must be replaced by a special assembly available from the manufacturer or its service agent.
SAVE THESE INSTRUCTIONS
MAIN APPLICATION AND CHARACTERISTICS
- Grinding is accurate and rapid, easy operation with no skill required.
- Economical price that greatly reduces the cost and improves the use effect.
- With diamond grinding wheel, it can be equipped directly with an accurate angle and long service life.
- The electrically controlled and powerful DC motor: stable frequency, strong horsepower and long service life.
- The machine is set up with the function of adjusting a point (center size), which can effectively coordinate with the material of drill hole and rotation speed. It can control the quality precision and prolong the service life of the drill bit.
PRODUCT PARAMETERS
| MODEL | Voltage | Motor Power | GRINDING RANGE | POINT ANGLE | GRINDING WHEEL |
| MR-13A | North America: AC120V 60Hz | 120W | 3 13mm | 95°~135° | CBN ( for HSS )×1 |
| European Union: AC220-240V 50Hz | CBN ( for HSS )×1 SD ( for Carbide )×1 |
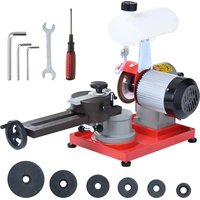
PARTS: ER20 collets: φ3-φ13 (11pcs),
collet chuck (ER20) ×1 Electric wire×1
European money: 2 pcs hexagon wrench
America money: 1 pcs hexagon wrench
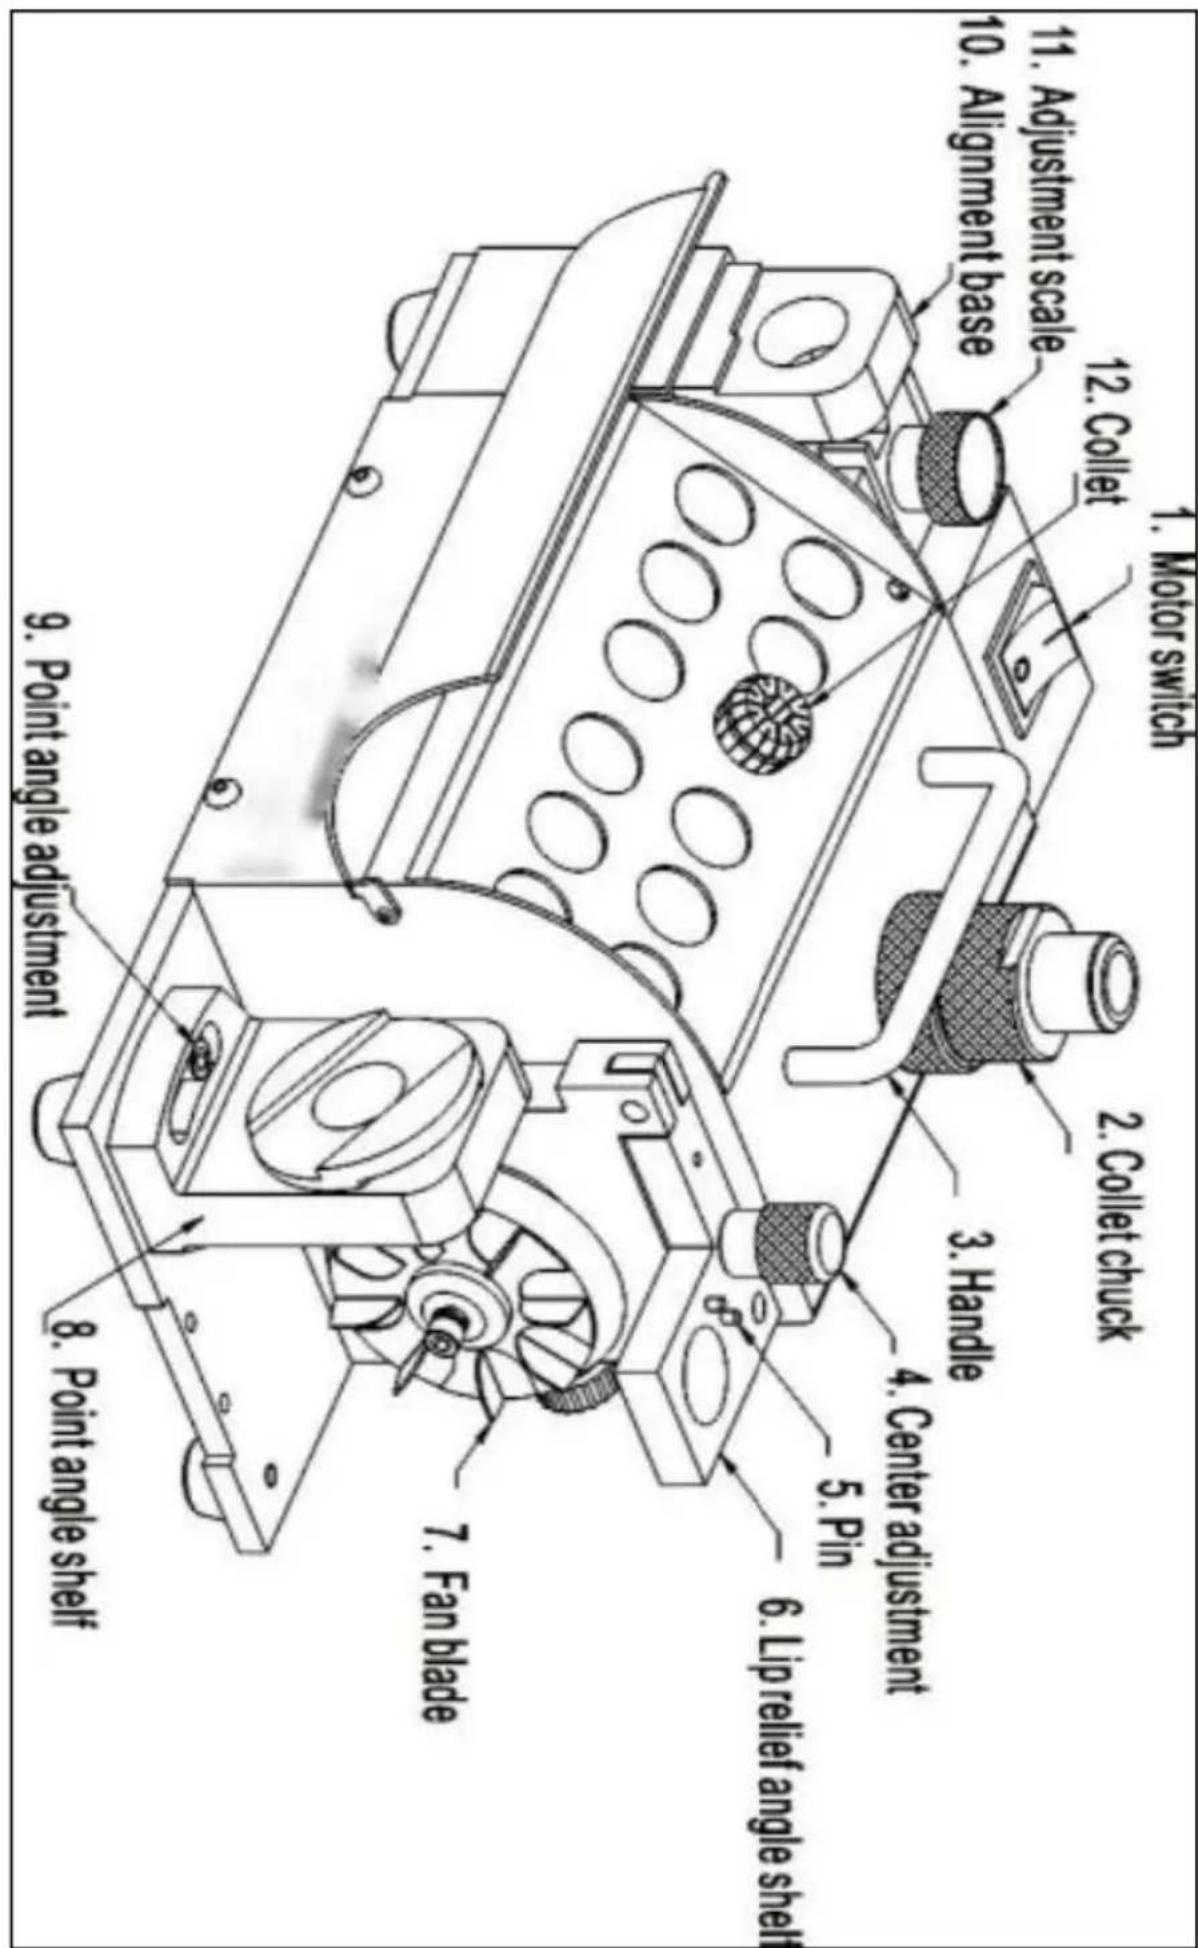
OPERATIONS
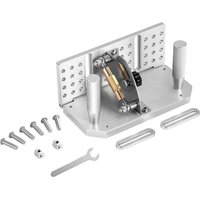
A. Setup the drill bit to the ER collet chuck.
*Please follow step 1,2 to set up the drill bit to the chuck (without tightening)
- Determine diameter of your drill bit, and then select the proper collet chuck.
- Insert collet into collet chuck by 45° angle, and tighten nut slightly.
- Insert drill bit into collet chuck and let it protrude about 35mm from the chuck, but do not tighten the drill too much.
※ Do not fully fasten the clamping nut with collet chuck, keep the drill able to be adjusted.
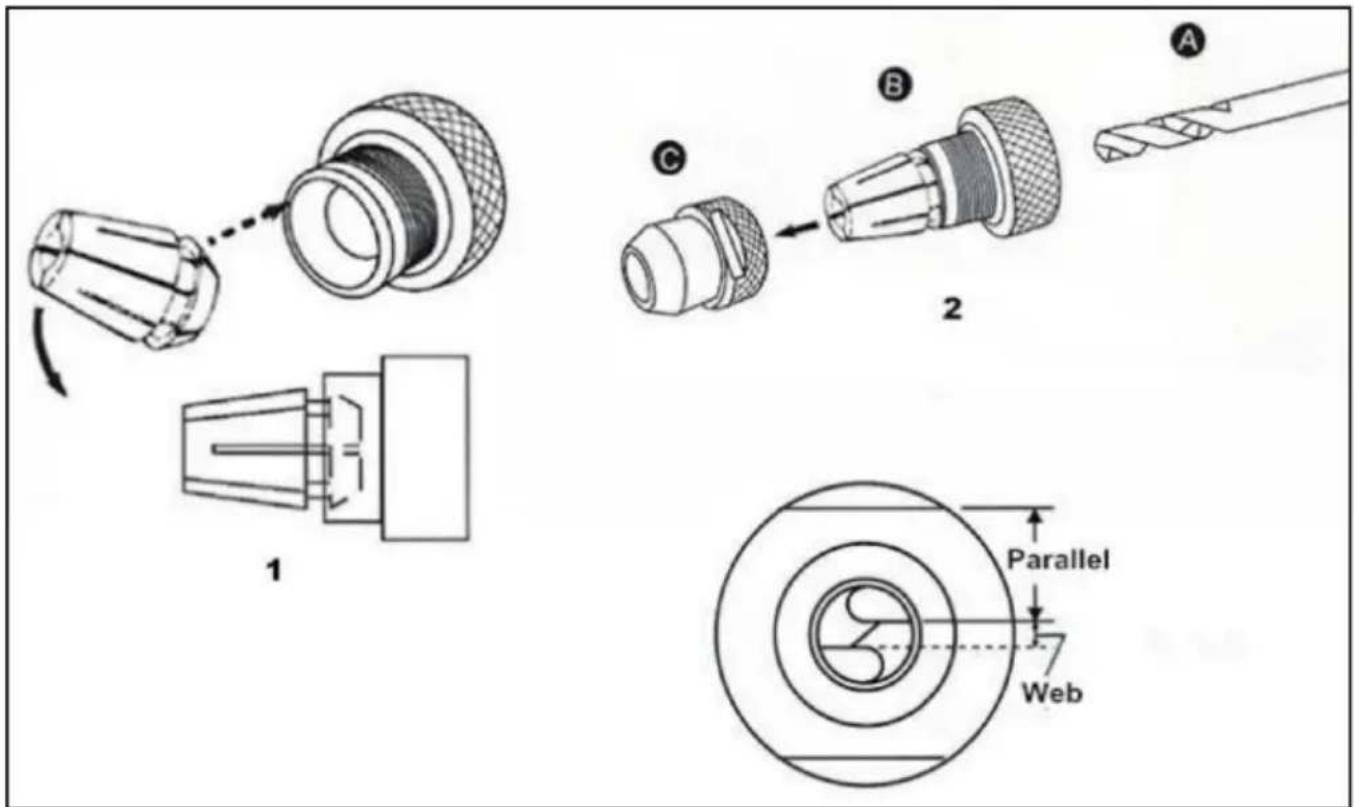
B. Align drill bit
- Reset the scale ring: turn the ring all the way clockwise, then anti-clockwise to the number same as the drill's size.
- Insert the chuck set into the web adjustment shelf. Then turn it clockwise to the end.
- Plug the drill to the end and turn it clockwise to the end.
- Turn the chuck set clockwise to the end and tighten it.
- Turn the chuck set a little anti-clockwise and take it out. ※ Make sure the cutting lip of drill is parallel with the slot of clamping nut before grinding job started. If it is not parallel, adjust it again.
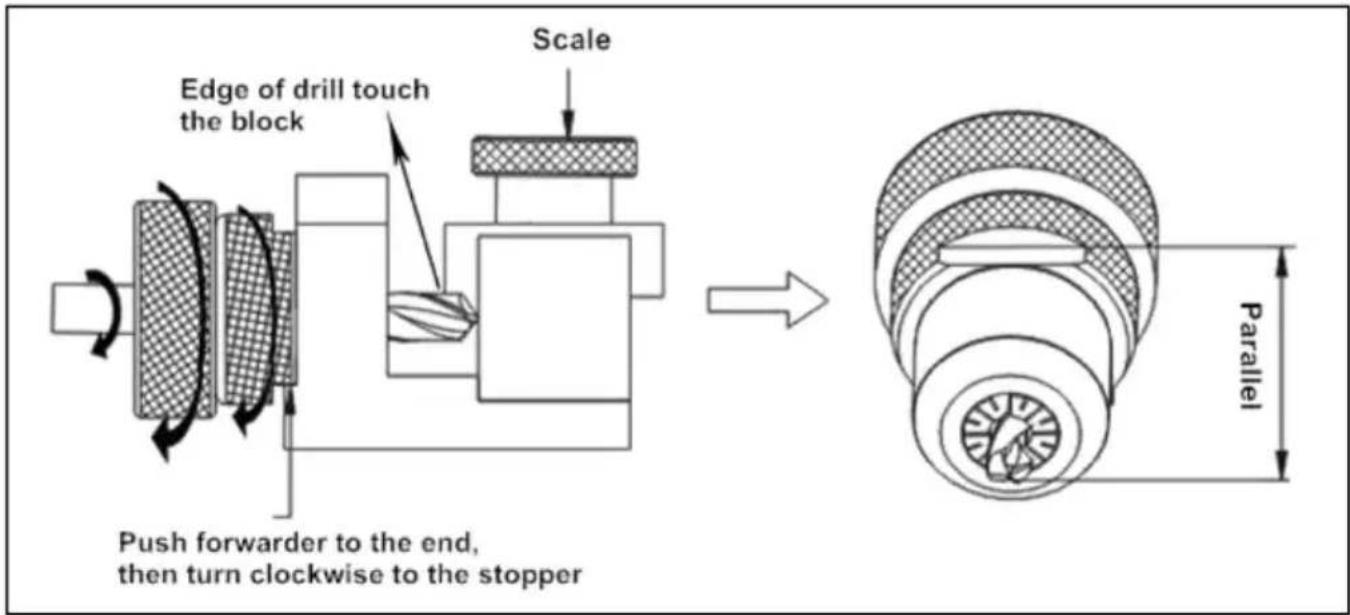
Attention: If the cutting lip is downward, must increase the scale of the adjustment shelf. If it is upward, please decrease the scale of the web adjustment shelf.
When the flute length of a drill becomes shorter, the web thickness would become thicker. So, for the same diameter of drills, the shorter length of a drill, the higher scale of web adjustment shelf need to be increased.
C. Grind the point angle
Turn the power switch on and wait until the motor rotation is stable (10 seconds), put the chuck set into the point angle grinding shelf. The slot of clamping nut must fit with the two pins of the grinding shelf. Insert the drill gently into grinding shelf until reach the grinding wheel. Grind the drill by moving left and right until the grinding sound disappears. And then turn to the other side, do the same to grind the drill.
* The grinding size of drill is 2mm-13mm (15mm)
* The point angle of drill is from 95° to 135°. * While grinding, don't hold the stem of drill, it will affect the accuracy.
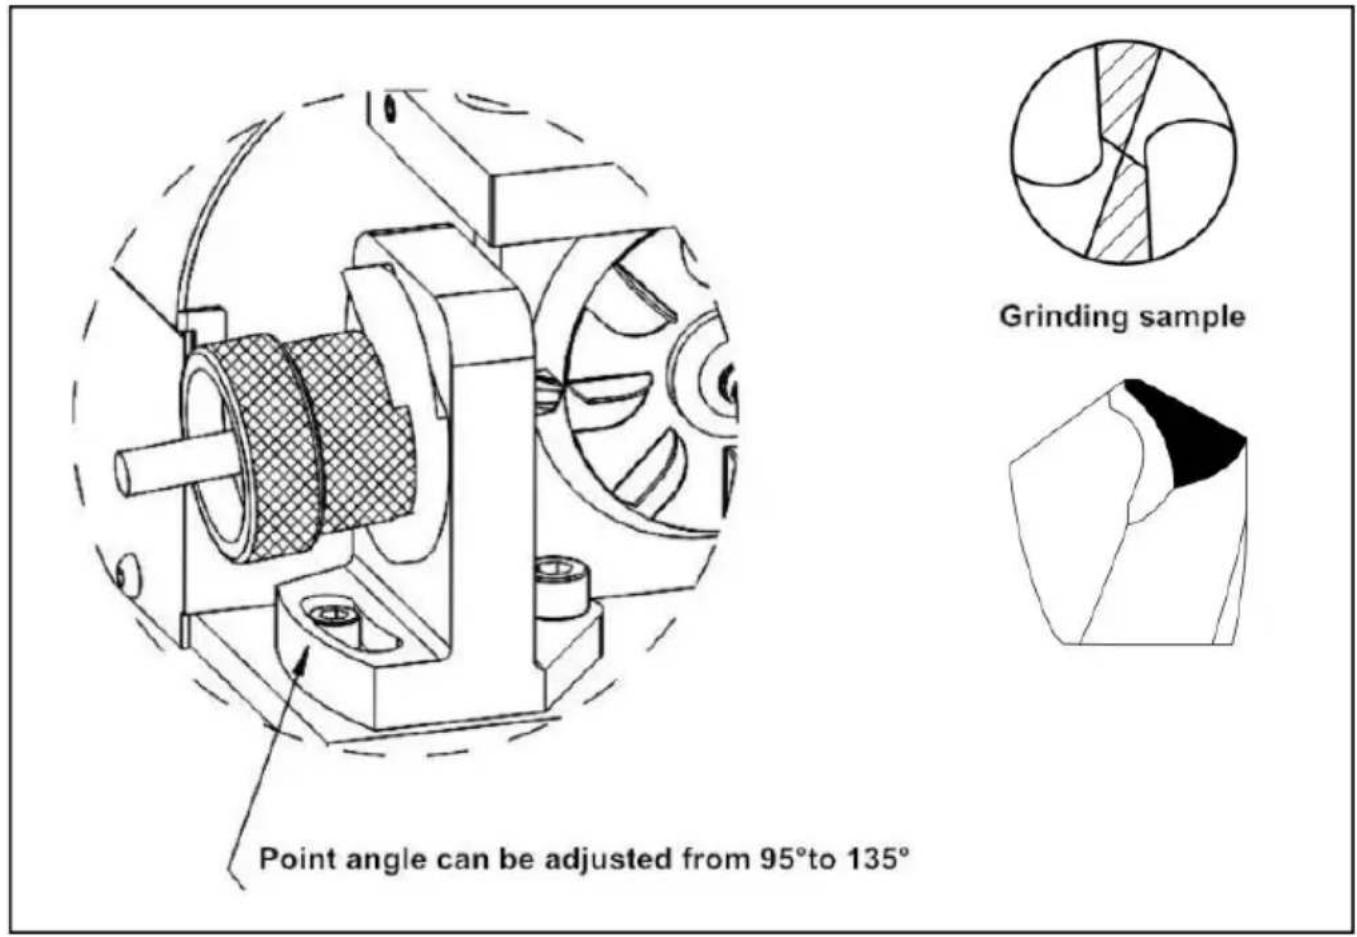
D. Grind the lip relief angle
Put the chuck set into the lip relief angle grinding shelf. The slot of nut must fit with the pin of the grinding shelf. Insert the drill gently into the grinding shelf until it reaches the grinding wheel. Grind the drill by moving it left and right until the grinding sound disappears. Then turn to the other side, do the same to grind the drill.
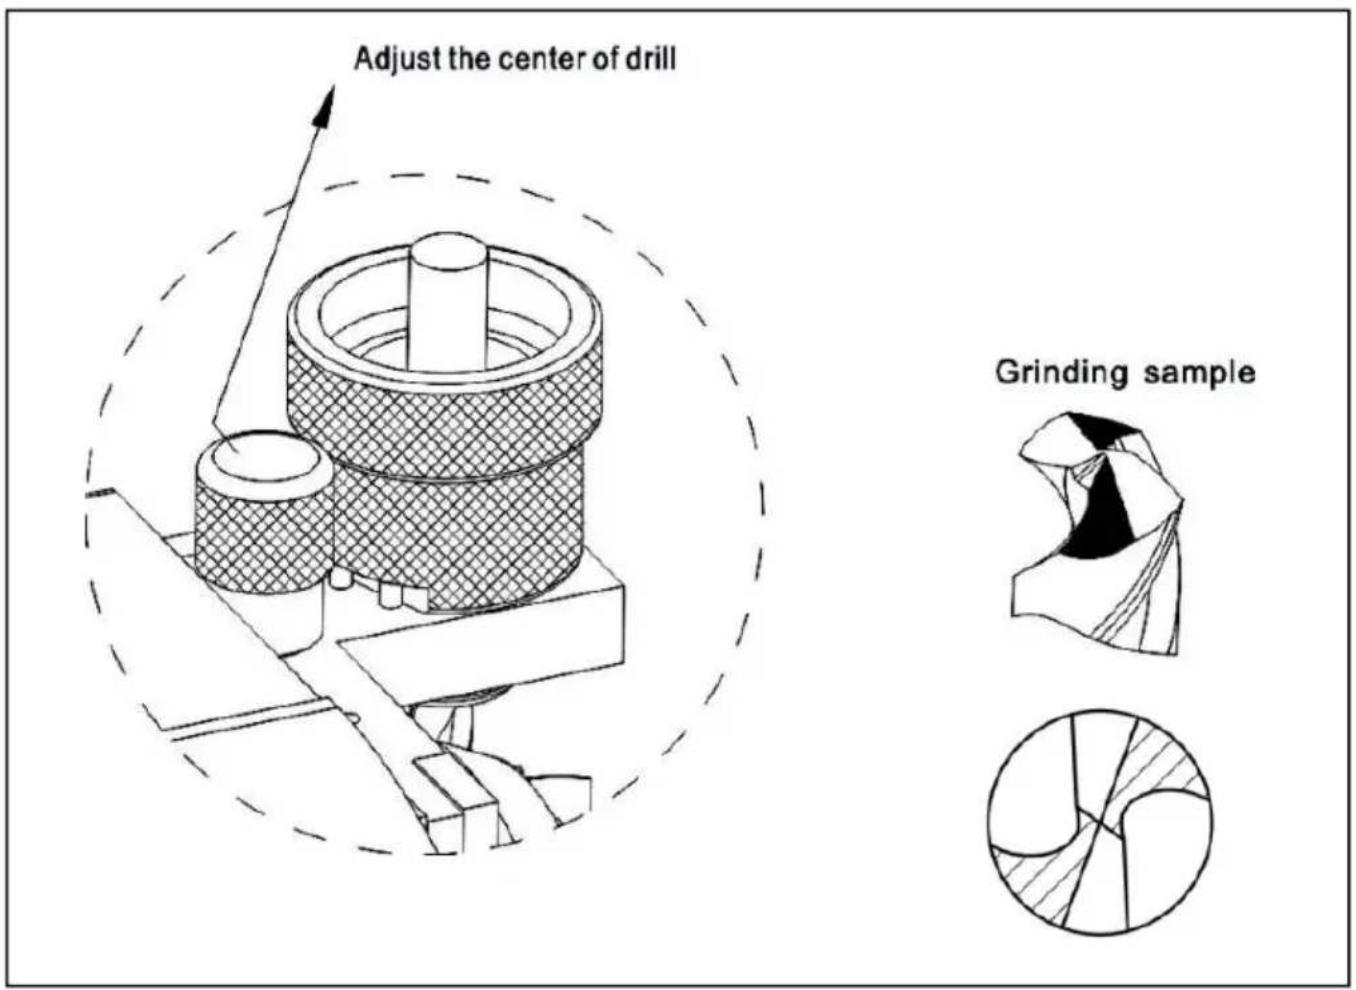
CLEAN AND MAINTENANCE
Please clean the whole unit with an air blow gun, especially the hole before and after use.
REPLACING THE WHEEL
A. Open the wheel cover
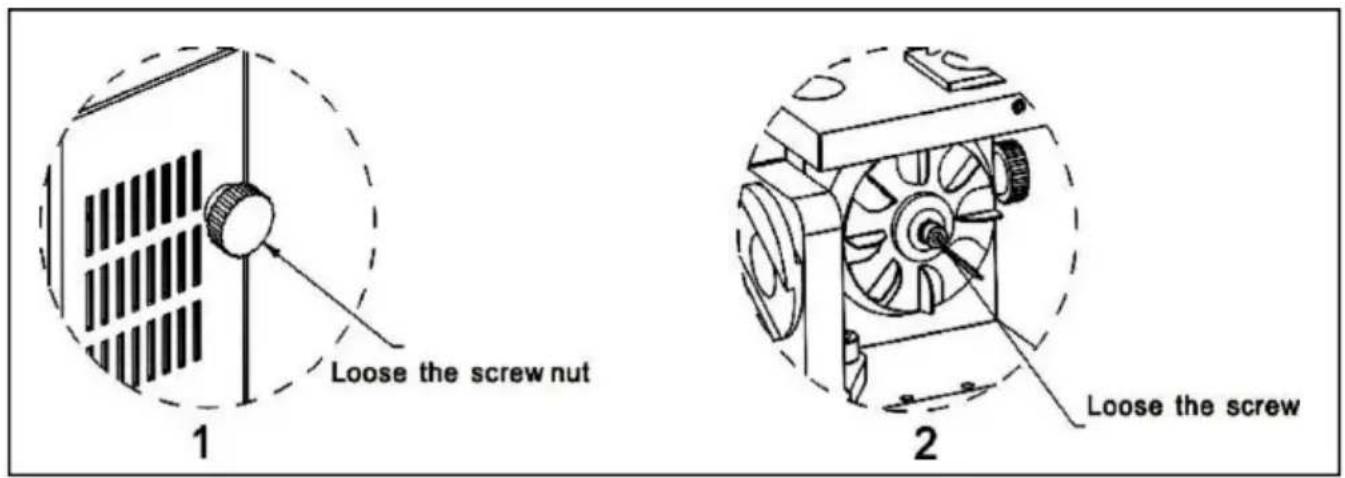
- Make sure it is safe that the power cord is unplugged.
- Then use the 4mm hex wrench to loosen the screw to open the cover.
B. Take out the grinding wheel
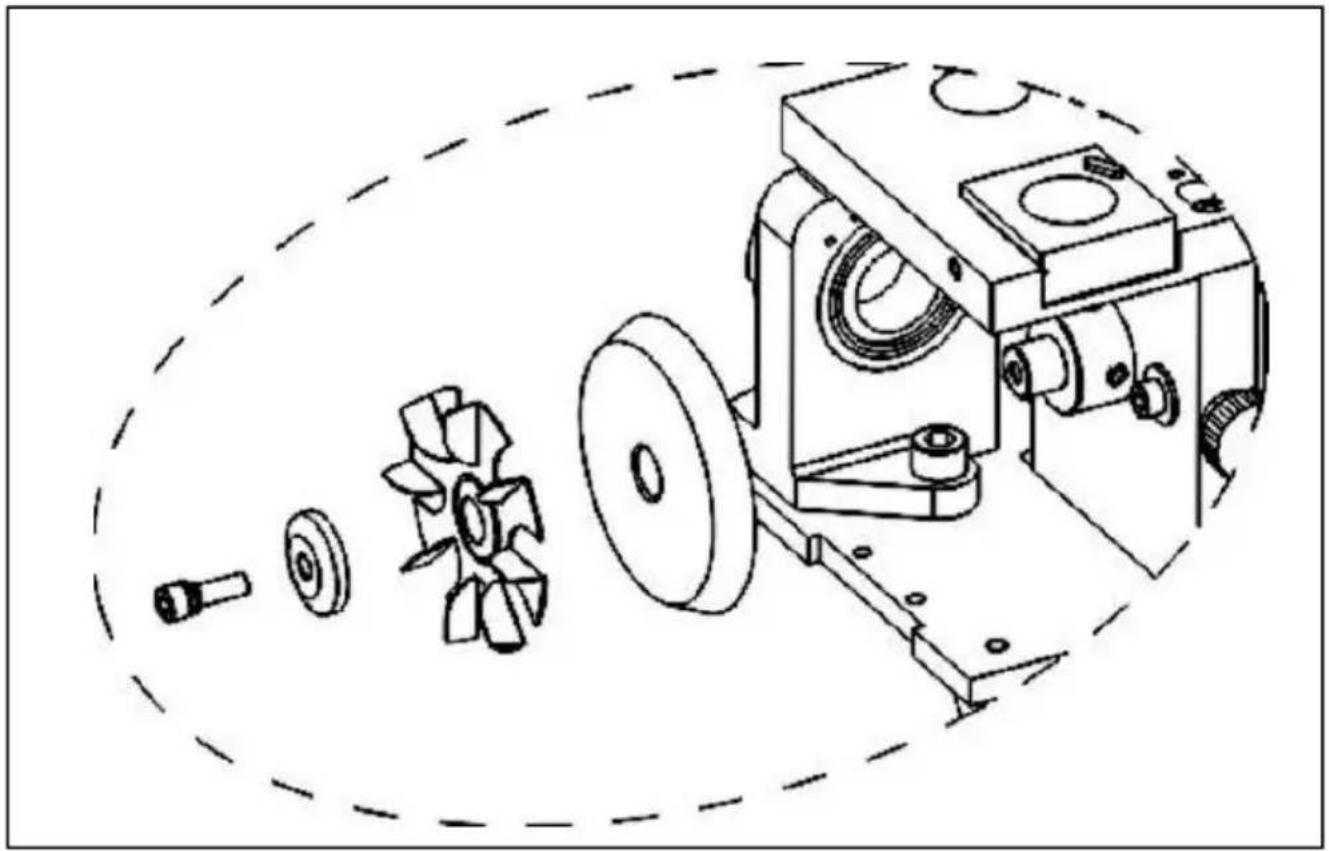
- Use the brush to clean the machine, then use dry cloth to clean surface.
- If you just used the machine, please wait 3 minutes after the temperature has fallen.
- Use the left hand to hold the wheel, then use the 4mm hex wrench to loosen the screw counterclockwise with the right hand.
- Take out the diamond grinding wheel from the machine.
- Replace the new grinding wheel.
- Put the wheel into the principal axis of the motor, and tighten the disc and the wheel cover to complete.
Notice: The motor's principal axis is very precise; if handled incorrectly, it may cause damage, thus affecting the grinding wheel position.
![graph LR A["Power supply"] --> B["Switch"] B --> C["Rectifier"] C --> D["Motor"] D --> E["M"] F["Grounding"] --> A G["+"] --> C H["-"] --> C](/content/2026/04/736030/images/465693f910335ed35aaf617f93a1bbcb2a5994048412d933eb68a181a8aeb287.jpg)
Address: Baoshanqu Shuangchenglu 803long 11hao 1602A-1609shi Shanghai
Imported to USA: Sanven Technology Ltd. Suite 250, 9166 Anaheim Place, Rancho Cucamonga, CA 91730
| UK | REP |
Pooledas Group Ltd
Unit 5 Albert Edward House, The Pavilion
Preston, United Kingdom
| EC | REP |
SHUNSHUN GmbH
Römeräcker 9 Z2021, 76351
Technical Support and E-Warranty Certificate www.vevor.com/support
VEVOR®
TOUGH TOOLS, HALF PRICE
| MODÈLE | Tension | MoteurPouvoir | AFFÛTAGEGAMME | INDIQUERANGLE | AFFÛTAGEROUE |
| MR-13A | Amérique du Nord:AC120V 60Hz | 120 W Φ3 ~ Φ13 mm | 95°~135° | CBN (pourHSS)×1 | |
| européenSyndicat:AC220-240V50 Hz | CBN (pourHSS)×1SD (pourCarbure)×1 | ||||
CLEANING AND MAINTENANCE
NEED HELP? CONTACT US!
D. Sharpening the
NEED HELP? CONTACT US!
CLEANING AND MAINTENANCE
NEED HELP? CONTACT US!
CLEANING AND MAINTENANCE
NEED HELP? CONTACT US!
D. Sharpen the lip relief angle.
CLEANING AND MAINTENANCE
NEED HELP? CONTACT US!
CLEANING AND MAINTENANCE
Unit 5 Albert Edward House, The Pavilions
- DRILL BITS SHARPENER
- VEVOR®
- NEED HELP? CONTACT US
- SAFETY WARNINGS AND PRECAUTIONS
- PLEASE READ ALL THE INSTRUCTIONS BEFORE USING YOUR MACHINE
- SAVE THESE INSTRUCTIONS
- MAIN APPLICATION AND CHARACTERISTICS
- OPERATIONS
- SETUP THE DRILL BIT TO THE ER COLLET CHUCK
- ALIGN DRILL BIT
- GRIND THE POINT ANGLE
- GRIND THE LIP RELIEF ANGLE
- CLEAN AND MAINTENANCE
- REPLACING THE WHEEL
- TOUGH TOOLS, HALF PRICE
- CLEANING AND MAINTENANCE
- SHARPENING THE
- SHARPEN THE LIP RELIEF ANGLE
Brand : Vevor
Model : MR-13A
Category : Sharpener