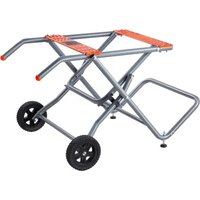
HS6805 - Saw Vevor - Free user manual and instructions
Find the device manual for free HS6805 Vevor in PDF.


| Product Type | Folding Stand for Table Saw |
| Brand | Vevor |
| Model | HS6805 |
| Dimensions (L x W x H) | 575 x 531 x 487 mm (approx.) |
| Weight | Approximately 15 kg |
| Material | Steel and plastic |
| Color | Black and red (as shown) |
| Maximum load capacity | Not specified |
| Saw compatibility | DEWALT DCS7485, DWE7485, DWE7491RS, VEVOR DCS7485T1, M1H-ZP7-254A-1, WTS210F and similar |
| Main functions | Folding stand, height-adjustable legs, transport wheels, safety lock |
| Folding and transport | Folding via release latch, integrated handles, wheels for rolling |
| Level adjustment | Adjustable feet B3/B4 for leveling |
| Assembly | Requires assembly per instructions, hardware included |
| Safety | Do not overload, do not use as ladder, disconnect tool before adjustment |
| Maintenance | Store in a dry, dark place between 5°C and 30°C |
| Cleaning | Wipe with a dry cloth |
| Spare parts | Contact Vevor support at www.vevor.com/support |
| Warranty | Electronic warranty certificate available on Vevor website |
| Repairability | Technical support via www.vevor.com/support |
| Regulatory information | Compliant with EU directive 2012/19/EC (WEEE) |
Frequently Asked Questions - HS6805 Vevor
User questions about HS6805 Vevor
0 question about this device. Answer the ones you know or ask your own.
Ask a new question about this device
Download the instructions for your Saw in PDF format for free! Find your manual HS6805 - Vevor and take your electronic device back in hand. On this page are published all the documents necessary for the use of your device. HS6805 by Vevor.
USER MANUAL HS6805 Vevor
Technical Support and E-Warranty Certificate
www.vevor.com/support
Table Saw Stand USER MANUAL
MODEL:HS6805
We continue to be committed to provide you tools with competitive price. "Save Half", "Half Price" or any other similar expressions used by us only represents an estimate of savings you might benefit from buying certain tools with us compared to the major top brands and does not necessarily mean to co all categories of tools offered by us. You are kindly reminded to verify carefully when you are placing an order with us if you are actually Saving Half in comparison with the top major brands.
MODEL:HS6805
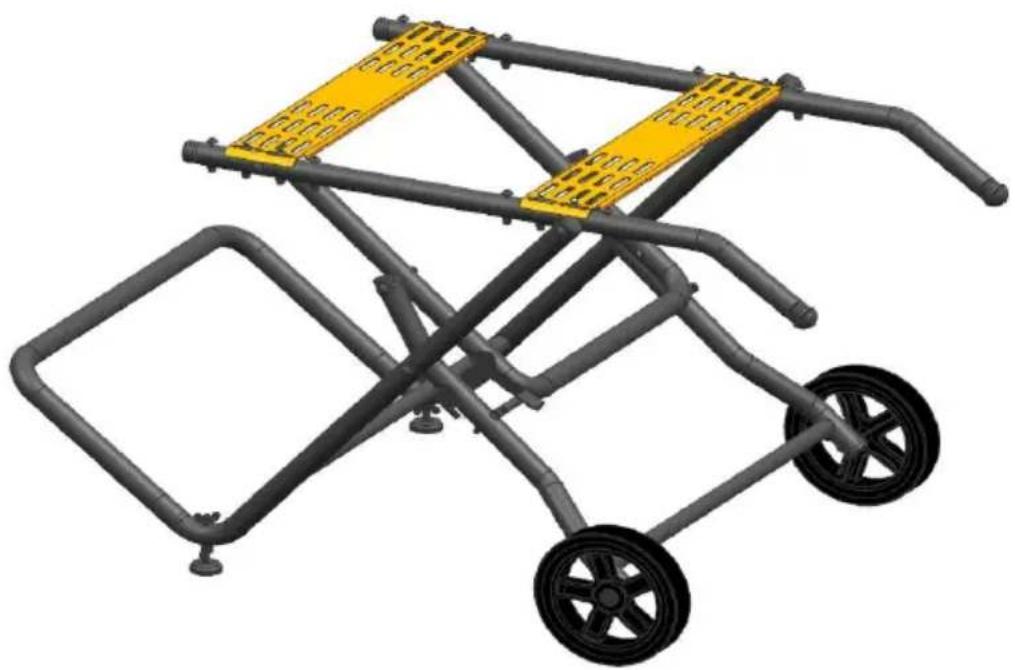
natural_image
3D model of a portable outdoor cart with black frame and yellow safety plate (no text or symbols)(The picture is for reference only, please refer to the actual obje
NEED HELP? CONTACT US!
Have product questions? Need technical support? Please feel fr contact us:
Technical Support and E-Warranty Certificate www.vevor.com/support
This is the original instruction, please read all manual instruction carefully before operating. VEVOR reserves a clear interpretation user manual. The appearance of the product shall be subject to product you received. Please forgive us that we won't inform you there are any technology or software updates on our product.
 | Warning-To reduce the risk of injury, user must read instructic manual carefully. |
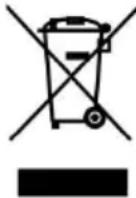 | This product is subject to the provision of European Directive 2012/19/EC. The symbol showing a wheelie bin crossed through indicates that the product requires separate refuse collection in European Union. This applies to the product and all accessori marked with this symbol. Products marked as such may not discarded with normal domestic waste, but must be taken to collection point for recycling electrical and electronic devices |
1. SAFETY INSTRUCTIONS
1.1 WARNING
Read all warnings, instructions, illustrations and specifications provided with folding stand and the tool to be mounted onto the stand. Failure follows the warnings and instructions may result in electric shock, fire serious injury.
Save all warnings and instructions for future reference.
1.2 WARNING
•The folding stand is intended for mounting DEWALT table saw DCS7DCS7485T1 DWE7485 and DWE7491RS VEVOR table saw
M1H-ZP7-254A-1 WTS210F and so on. Please refer to the power to owner manual to confirm compatibility.
- The support legs must have the adjustable legs fully assembled before mounting the tool.
- Assemble the folding stand as instructed before mounting the tool. Pr assembly is important to prevent the risk of a collapse of the stand.
- Do not modify the folding stand or use it for any purpose for which intended.
- Disconnect the tool from power source before assembling or making adjustments.
- Unintentional activation of the tool is the cause of many accidents.
• Always confirm the tool is mounted securely and is stable before u. Perform a dry run of the cutting operation just to make sure that no problems will occur when the cut is made. If the tool slips on the s can lead to loss of control and possible injury. - Before operating the tool, securely fasten the tool to the stand. The unit must be placed on a solid, level surface.
- Do not open or close the stand with tool mounted.
- Keep work area clean and well lit. Cluttered or dark areas invite ac
- Do not overload the stand and do not use it as a ladder or scaffold. Overloading or standing on the stand can lead to tipping over.
- Before operating or transporting, make sure that all fasteners are firm tightened.
Loose connections can lead to instability and inaccurate cutting.
Ensure that long and heavy work-pieces do not affect the balance of stand. Long and/or heavy work-pieces must be supported at the free
2. Layout and items supplied
2.1 Layout
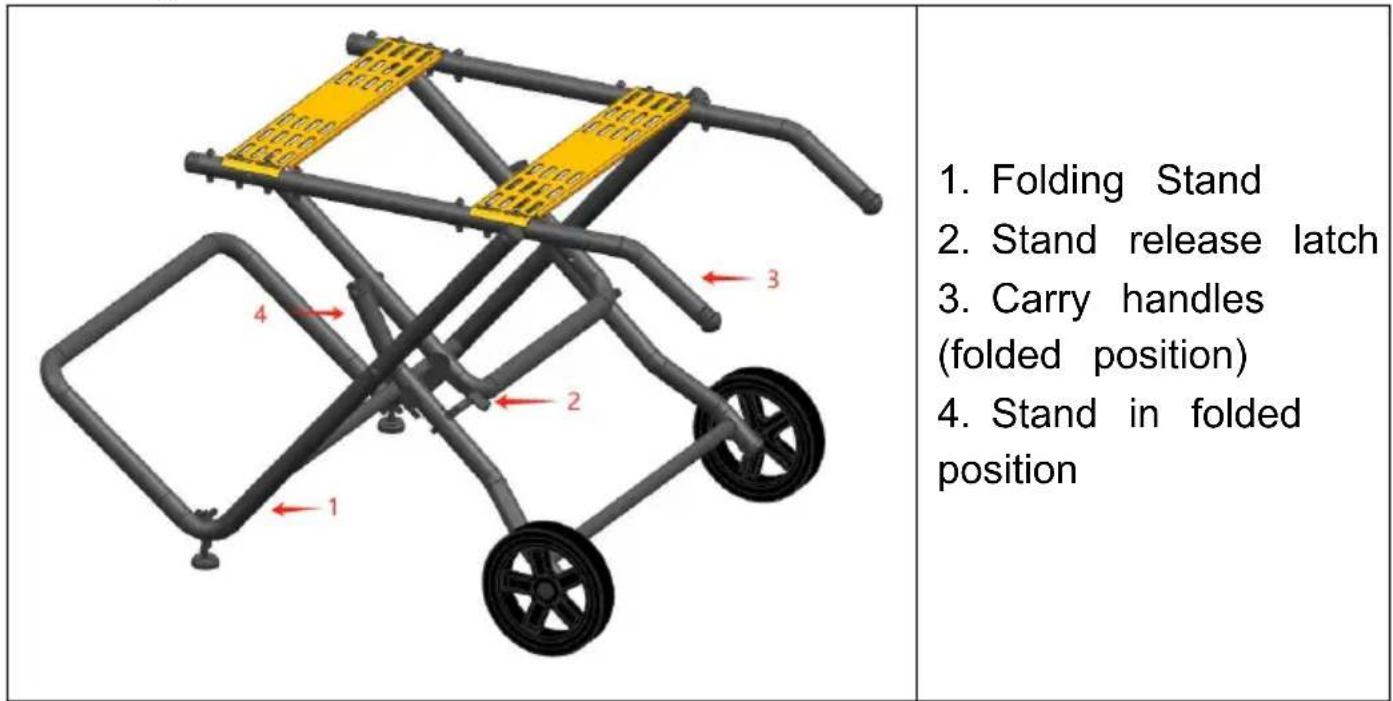
3. ASSEMBLY& ADJUSTMENTS
Assembly of folding stand
- Please open the package first and check whether the parts are complete.
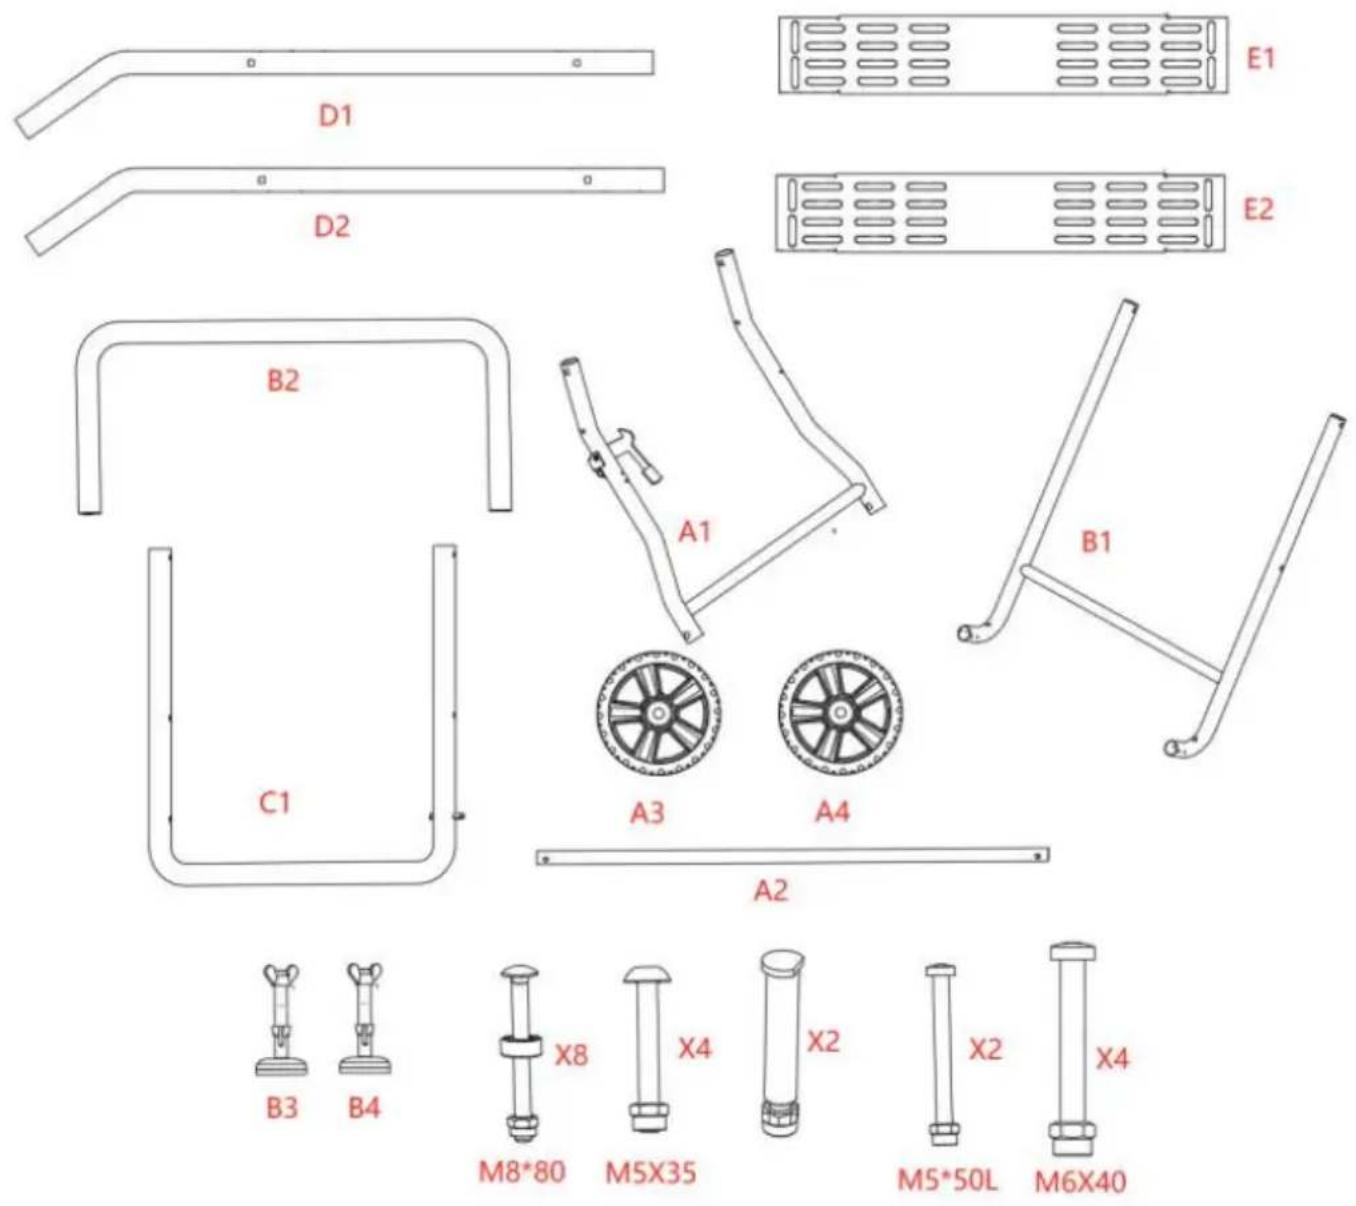
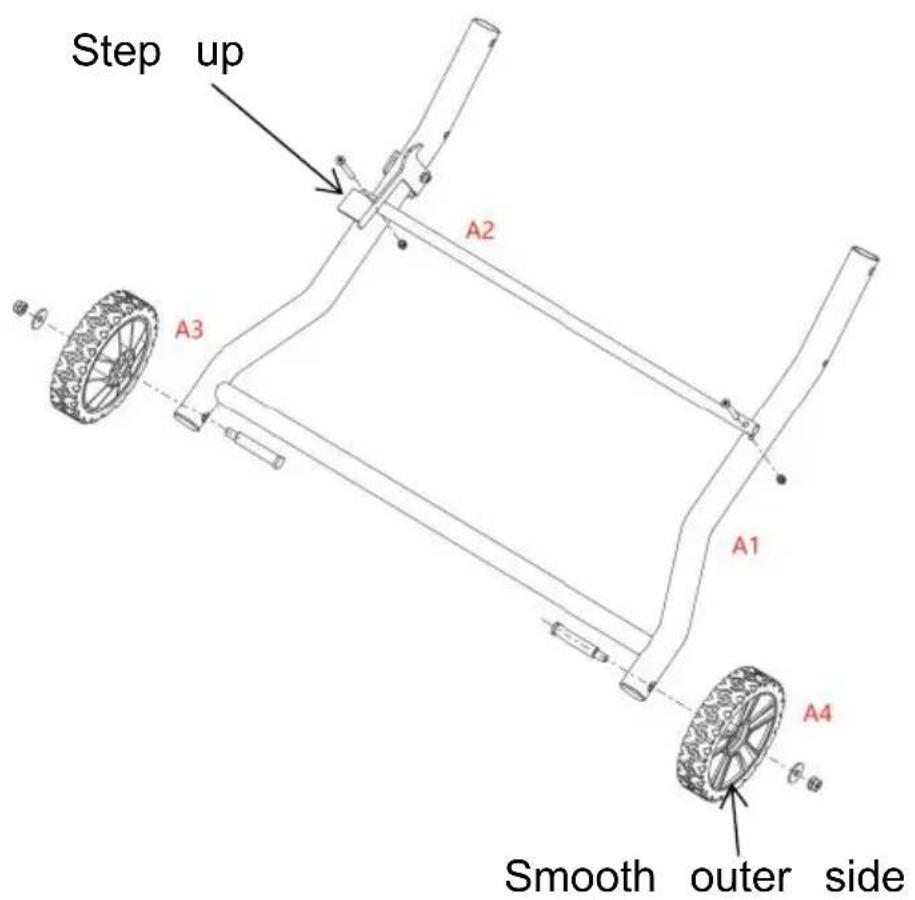
(Fig.1)
- Put part A1 flat as shown in the figure, take part A2, Align the A1 that need to be assembled with the holes of A2, pass the M4 * through the part hole and lock the nylon nut, and Assemble the other bolts in the same way.
- Take part A3 tire, take a shaft M8 * 82, Thread through the low of part A1 from the inside and then through the tire hole, install a t washer with a diameter of ∅ 22 * 1.5, tighten the M8 nylon nut, and loosen it back half a turn, Gently move the tire by hand to ensure that rotates freely. Assemble the A4 wheel in the same way
Please note that the smooth side of the tire is on the outside
Fig.1
(Fig. 2)
- Place part B1 flat as shown in Figure 2, align the steel pipes of B2 with the steel pipe holes at both ends of part B1, insert them a them with the small holes on the side. Take two M5 * 35 bolts and them through the outer face, then tighten the M5 nylon nut. Lock the bolt in the same way.
- Take one pre-installed B3 component, loosen the upper butterfly nut and unscrew the bolt, while keeping the lower butterfly nut in place. part B3 through the bottom hole of part B1 and lock another butterfly nut. Assemble B4 parts in the same way.
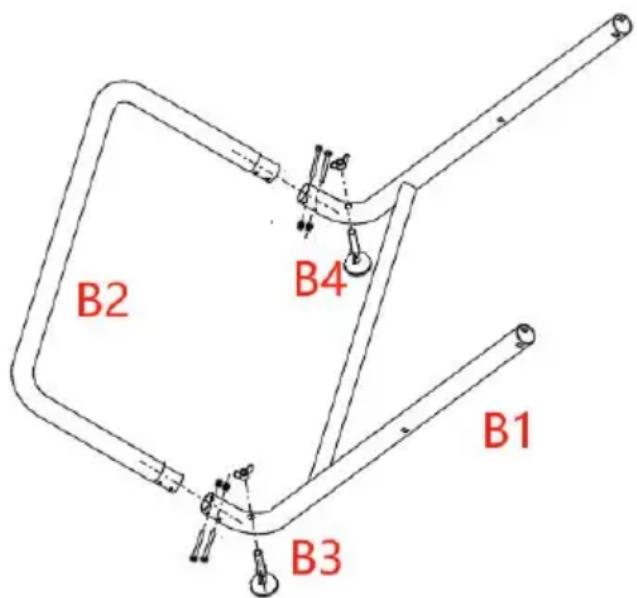
Fig.2
(Fig. 3)
-
Place the assembled part A flat, place the assembled part B flat the outside of part A. Align the middle side hole of part B with the hole on the upper end of part A, take a set of M8 * 80 square di first unscrew the pre-installed nylon nut, and remove the PP spacer s The M8 square diameter bolt passes through the outer side of the fi on the upper end of part A and is fitted with a PP spacer sleeve, passes through the middle hole of part C. The bottom of the M8 bo aligned with the square hole on the steel pipe, and the M8 nylon nu locked. The nylon nut is exposed by one tooth ring of the screw, ar bolt cannot be locked to avoid poor folding of the tripod. Assemble t on the other side using the same method.
-
Place part C in part A, and align the middle hole of part C with hole at the upper end of part A. Take a set of M8 * 80 square di first remove the pre-installed nylon nut, and remove the PP spacer sl The M8 square diameter bolt passes through the PP spacer from the hole of the upper end of part A on the sleeve and then through the hole of the part C. Align the bottom square of the M8 bolt with the hole on the steel pipe, lock the M8 nylon nut, and expose the nylon one tooth ring position standard with the screw. Do not lock the bolt avoid poor folding of the tripod. Assemble the bolt on the other side the same method.
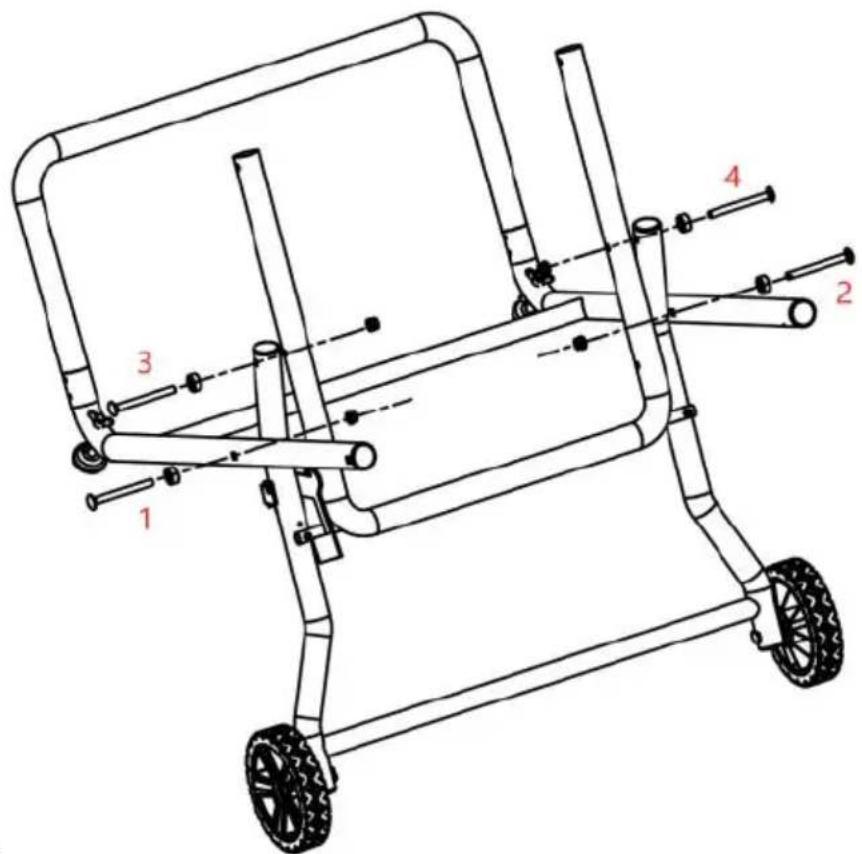
Fig.3
(Fig. 4 & Fig.5)
- Prepare two sets of M8 * 80 pre installed bolts, unscrew the nylon to remove the PP spacer sleeve, and take part D1 for backup. Grasp the bottom of part C and press it downwards to lock the locking pin into lock slot. Hold part C and pull it upwards to make parts A and B intersect. Take a prepared M8 * 80 screw and insert it into the PP through the upper hole of part B. Align the bottom square of the M8
with the square hole on the steel pipe. Insert the prepared hole near handle of part D1 into the bolt and lock it with an M8 nylon nut. E nylon nut by one tooth circle of the screw to avoid locking the bolt preventing the tripod from folding smoothly.
-
Take a prepared M8 * 80 screw and thread it through the distal part D1, add a PP spacer sleeve and thread it through the top hole C. Check that the bottom square of the M8 bolt aligns with the square on the steel pipe, lock the M8 nylon nut, and expose one tooth ring nylon nut with the screw. Do not lock the bolt to avoid folding the 1 smoothly. Repeat 1/2 of the two assembly methods to assemble part
-
Take part E1 and place it on the left and right sides of the far parts D1/D2. Align the four holes of part E1 with the holes of parts D2. Take one pre installed M6 * 40 bolt, unscrew the M6 nylon nut the bolt through the part from top to bottom, lock the M6 nylon nut, assemble the other three bolts using the same method. Repeat the a steps to assemble E2.
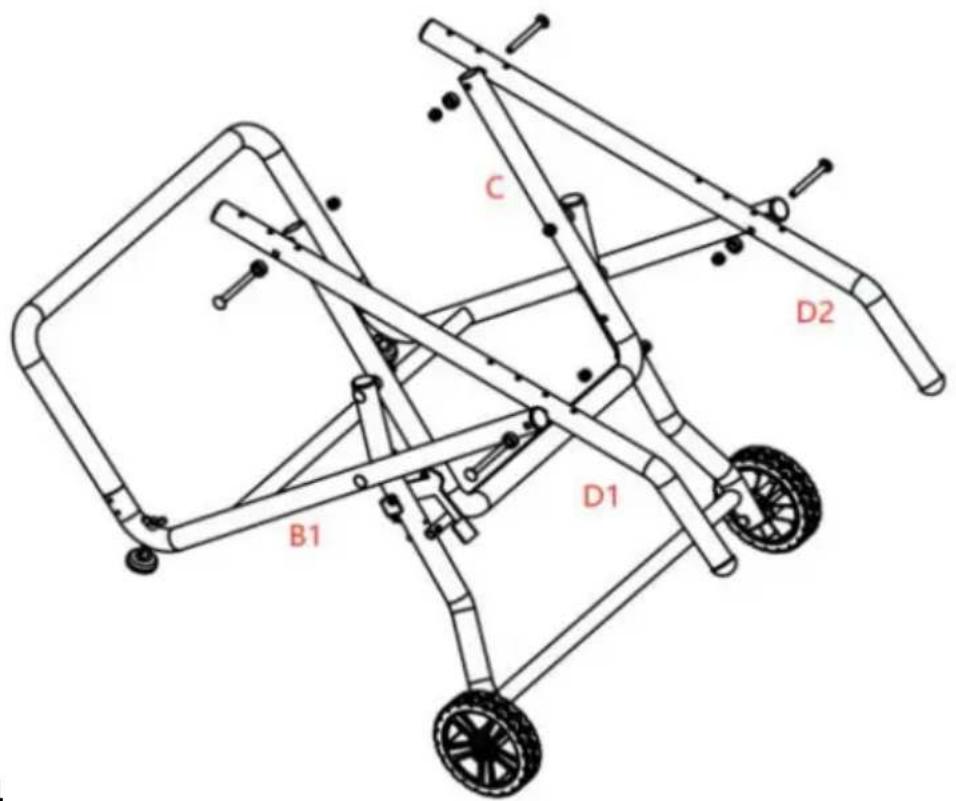
Fig.4
(Fig. 5)
Use a spirit level or tape measure to measure the horizontal height of points on parts E1 and E2. If there are any unevenness, adjust parts B3 and B4 up or down according to the actual height to remain level.
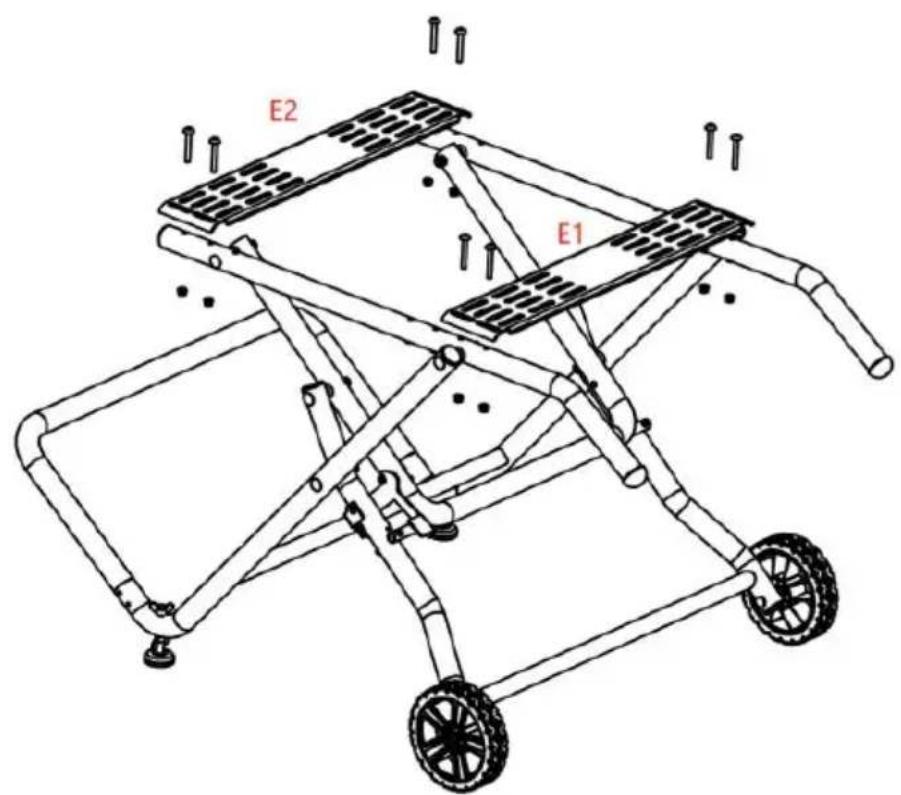
Fig.5
Mounting of the saw on folding stand
- Position the saw on top of the stand (choose which orientation be suits you). Use 4 screws and nylon hex. nuts to secure job site sav stand.
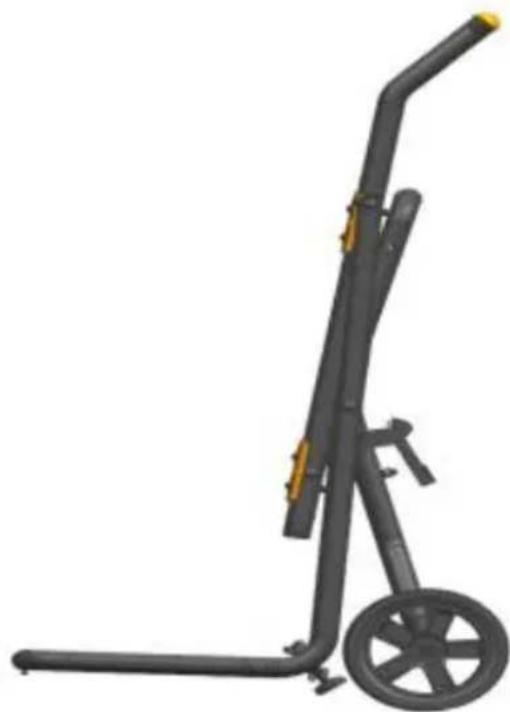
Accessory storage and folding/unfolding stand (Fig.6)
Note: Before folding stand, remove all work pieces from the table. Re and securely store all loose accessories such as the miter gauge, rip blade guard, and push stick. Lower saw blade below the table top.
Folding stand for storage and transportation purposes- (Fig.6)
Push the stand release latch (A) and at the same time, grasp the s handles (B) and lift them up and away from the saw body. Push the
saw until the release latch clicks and locks the stand. The stand and assembly can now be pivoted and rolled away.
4. Disposal and recycling
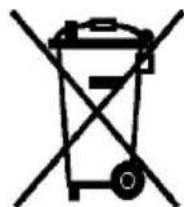
The equipment is supplied in packaging to prevent it from b damaged in transit. The raw materials in this packaging can reused or recycled. The equipment and its accessories are n of various types of material, such as metal and plastic. Never place defective equipment in your household refuse. The equipment should be taken to a suitable collection center for proper disposal. If not know the whereabouts of such a collection point, you should ask your local council office.
5. Storage
Store the equipment and accessories in a dark and dry place at abc freezing temperature. The ideal storage temperature is between 5 and 30^ . Store the electric tool in its original packaging.
natural_image
Black manual push cart with attached yellow components and wheels (no text or symbols visible)Fig.6
Dimensional Drawings
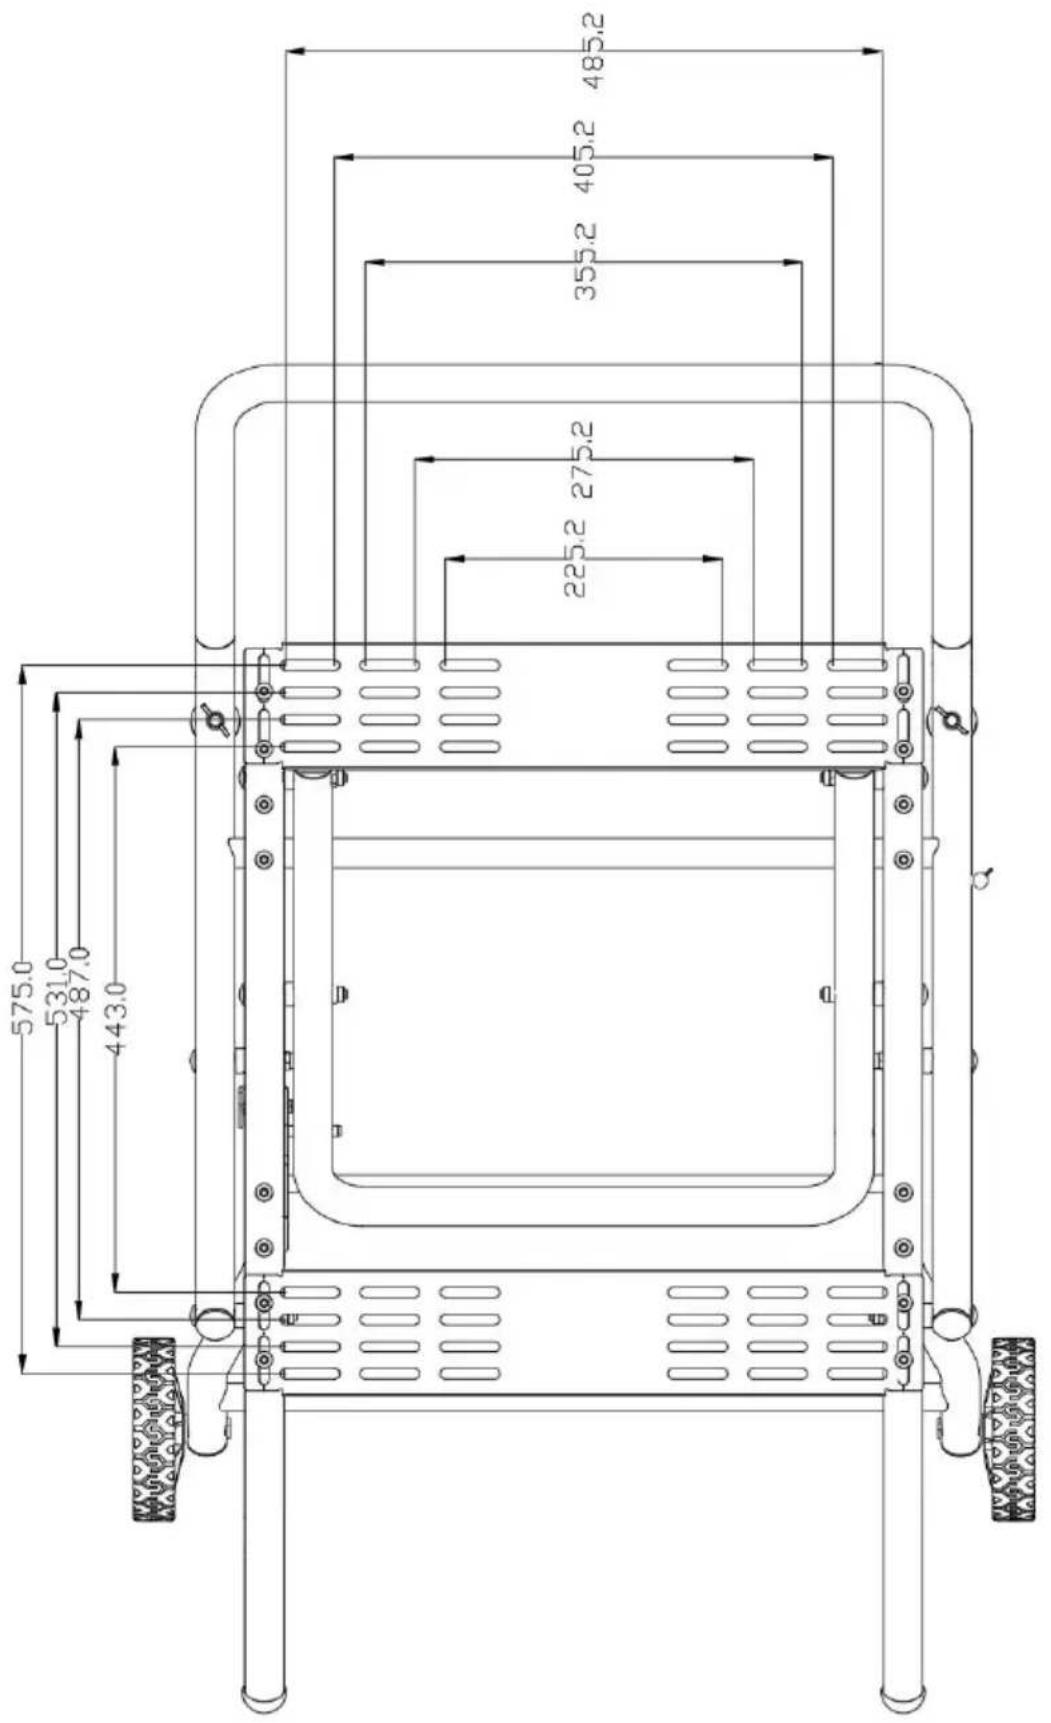
Manufacturer: Shanghaimuxinmuyeyouxiangongsi
Address: Shuangchenglu 803nong11hao1602A-1609shi, baoshanqu, shanghai 200000 CN.
Imported to AUS: SIHAO PTY LTD, 1 ROKEVA STREETEASTWOOD NS 2122 Australia
Imported to USA: Sanven Technology Ltd., Suite 250, 9166 Anaheim Pla Rancho Cucamonga, CA 91730
| EC | REP |
E-CrossStu GmbH
Mainzer Landstr.69, 60329 Frankfurt am Ma
| UK | REP |
YH CONSULTING LIMITED.
C/O YH Consulting Limited Office 147, Centurion H London Road, Staines-upon-Thames, Surrey, TW18 4
VEVOR®
TOUGH TOOLS, HALF PRICE
Technical Support and E-Warranty Certificate www.vevor.com/support
VEVOR®
TOUGH TOOLS, HALF PRICE
natural_image
3D model of a black and yellow wheeled cart with wheels, no text or symbols visiblenatural_image
Black manual push cart with yellow handle and wheels (no text or symbols visible)Fig.6
C/O YH Consulting Limited Bureau 147, Centurion House,
Route de Londres, Staines-upon-Thames, Surrey, TW18 4AX
VEVOR®
TOUGH TOOLS, HALF PRICE
www.vevor.com/support
natural_image
3D model of a black and yellow wheeled cart with wheels, no text or symbols visibleAbb.3
(Abb. 4 und Abb. 5)
natural_image
3D rendering of a black manual push cart with yellow handle and wheels (no text or symbols)Abb.6
Maßzeichnungen
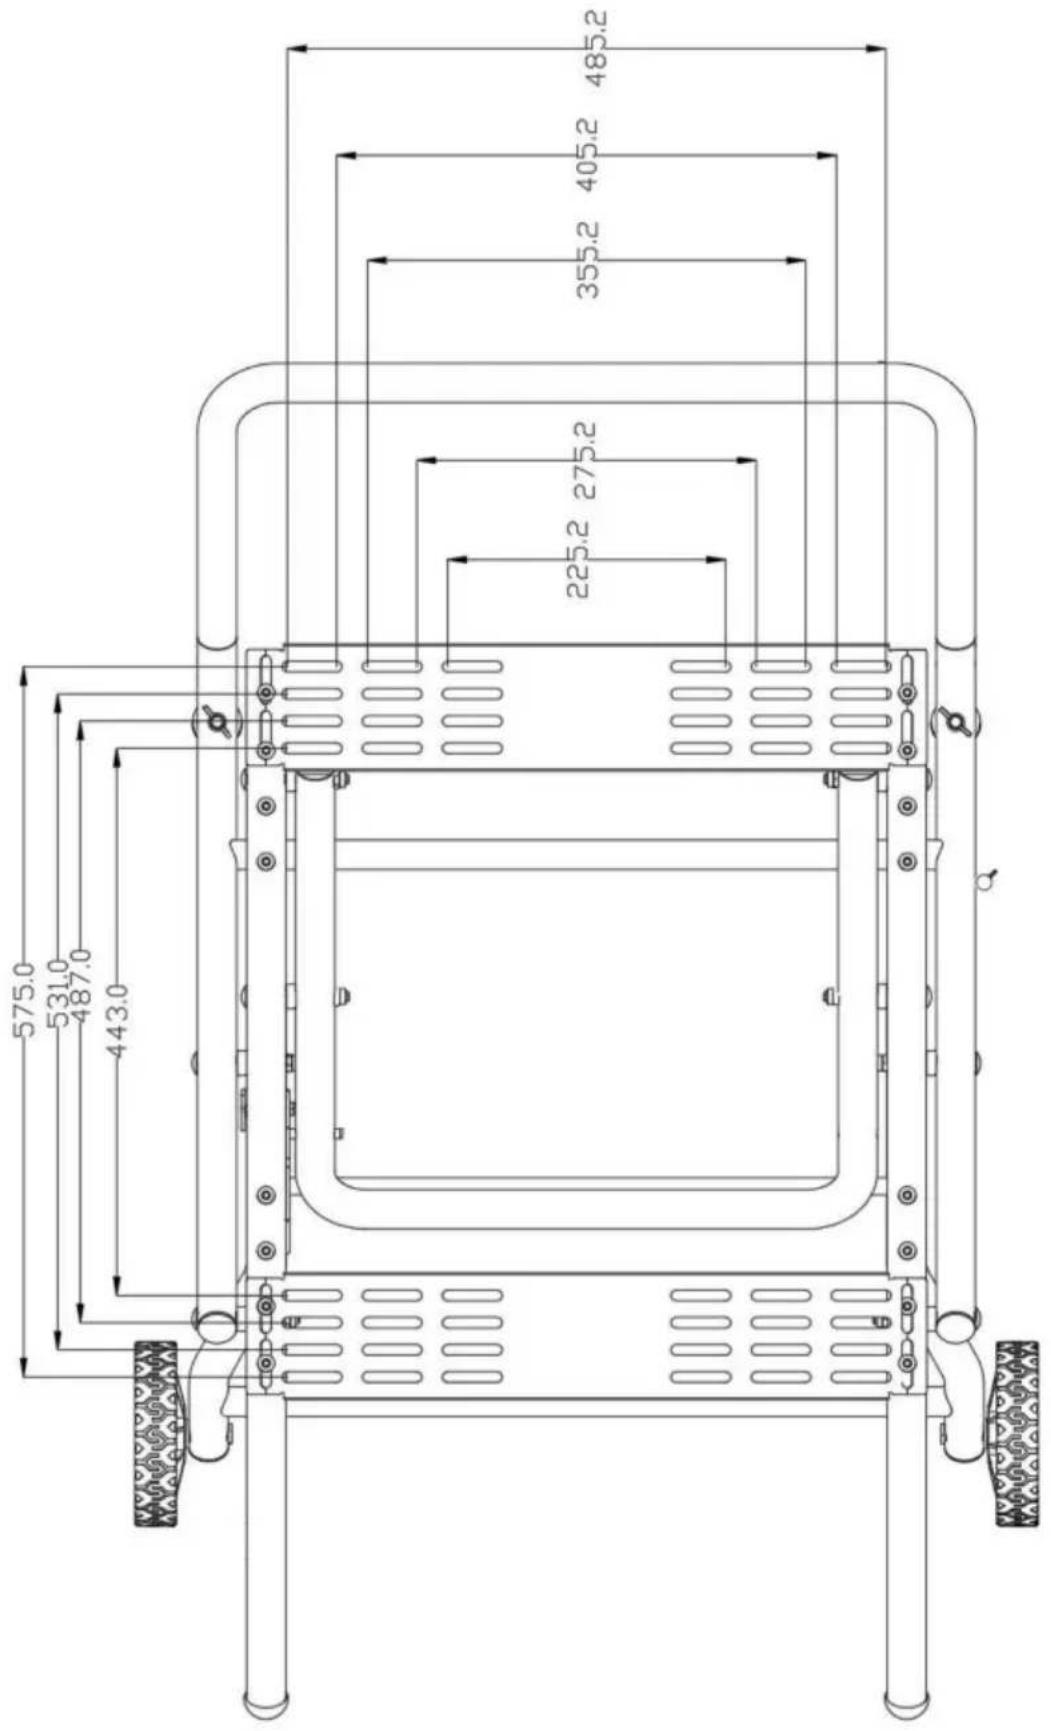
Hersteller: Shanghaimuxinmuyeyouxiangongsi
Adresse: Shuangchenglu 803nong11hao1602A-1609shi, baoshanqu, Shanghai 200000 CN.
Nach AUS importiert: SIHAO PTY LTD, 1 ROKEVA STREETEASTWOOD NSW 2122 Australien
Importiert in die USA: Sanven Technology Ltd., Suite 250, 9166 Anaheim Place, Rancho Cucamonga, CA 91730
| Vertreter der EG |
| UK REP |
E-CrossStu GmbH
Mainzer Landstr.69, 60329 Frankfurt am Main.
YH CONSULTING LIMITED.
C/O YH Consulting Limited Office 147, Centurion House, London Road, Staines-upon-Thames, Surrey, TW18 4AX
VEVOR®
TOUGH TOOLS, HALF PRICE
elettronica www.vevor.com/support
natural_image
3D model of a black and yellow wheeled cart with wheels, no text or symbols visiblenatural_image
3D model of a black manual push cart with yellow handle and wheels (no text or symbols)Figura 6
Importato in AUS: SIHAO PTY LTD, 1 ROKEVA STREETEASTWOOD NSW 2122 Australia
Importato negli USA: Sanven Technology Ltd., Suite 250, 9166 Anaheim Place, Rancho Cucamonga, CA 91730
natural_image
3D model of a black and yellow wheeled cart with wheels, no text or symbols visiblenatural_image
3D model of a black manual push cart with yellow handle and wheels (no text or symbols)Figura 6
Importado a Australia: SIHAO PTY LTD, 1 ROKEVA STREETEASTWOOD NSW 2122 Australia
Importado a EE. UU.: Sanven Technology Ltd., Suite 250, 9166 Anaheim Place, Rancho Cucamonga, CA 91730
E-CrossStu GmbH
C/O YH Consulting Limited Oficina 147, Centurion House,
Carretera de Londres, Staines-upon-Thames, Surrey, TW18 4AX
VEVOR®
TOUGH TOOLS, HALF PRICE
natural_image
3D model of a black and yellow wheeled cart with wheels, no text or symbols visiblenatural_image
3D rendering of a black manual push cart with yellow handle and wheels (no text or symbols)Ryc.6
Rysunki wymiarowe
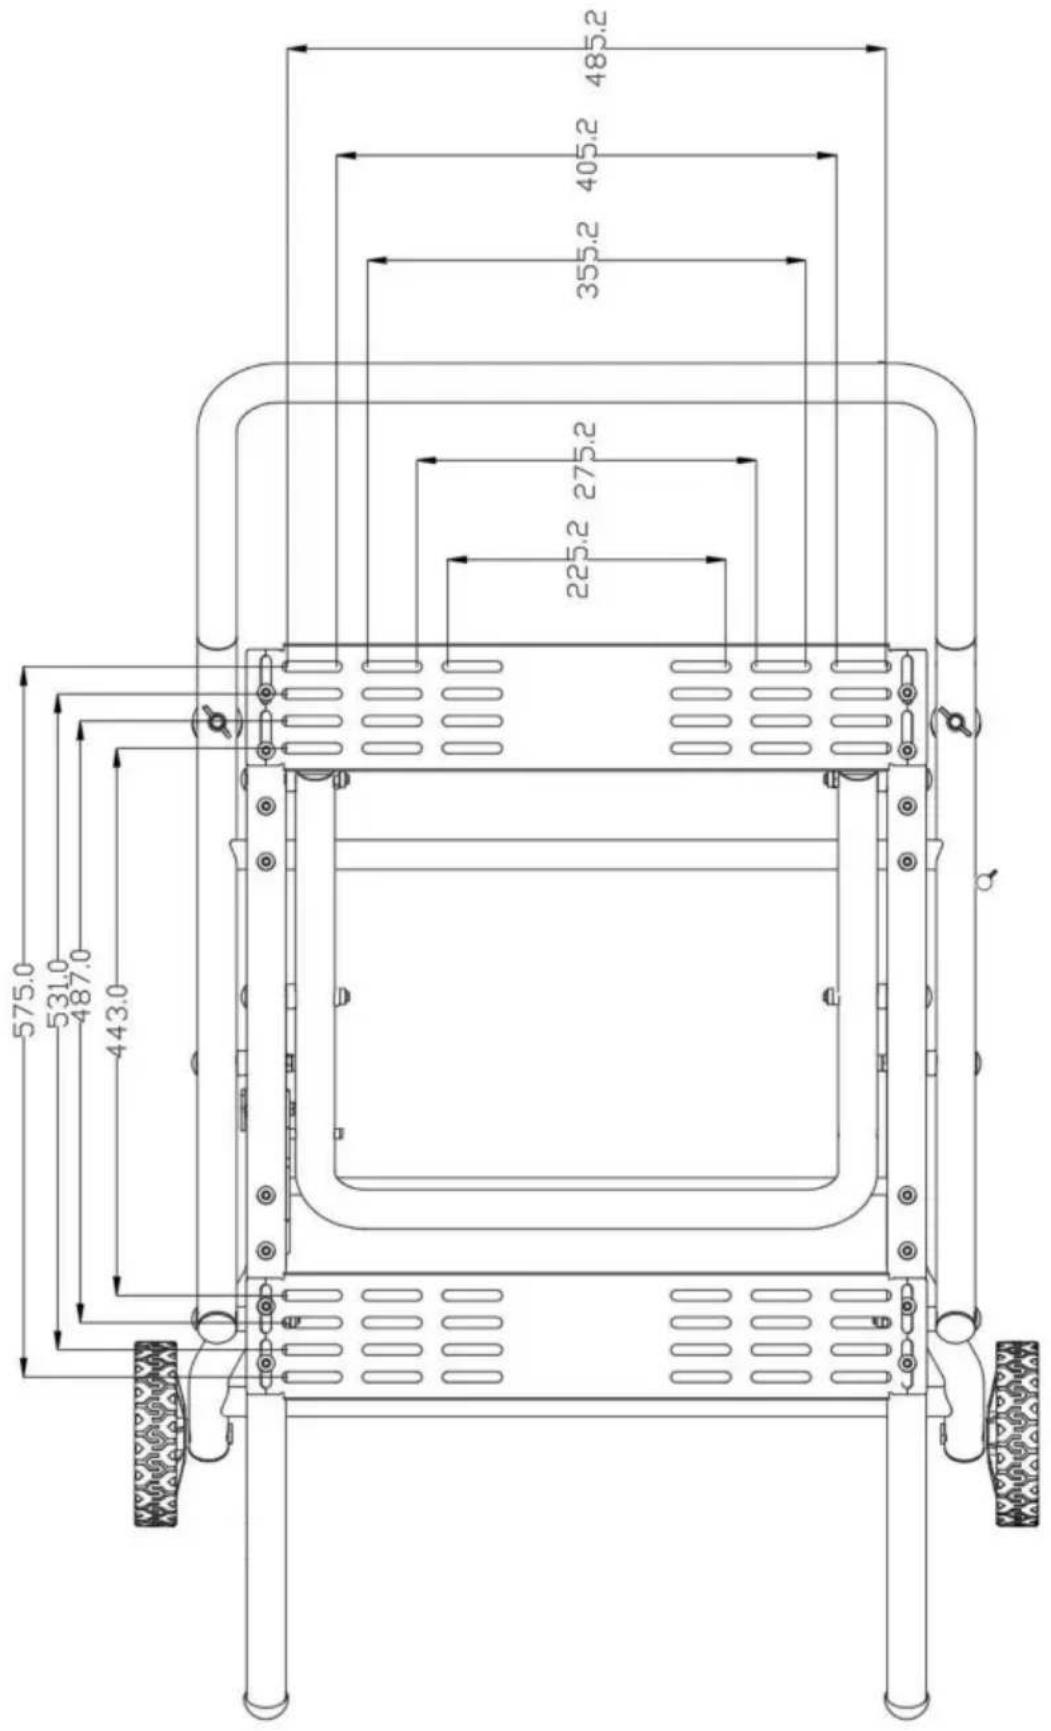
Producent: Shanghaimuxinmuyeyouxiangongsi
Adres: Shuangchenglu 803nong11hao1602A-1609shi, baoshanqu, szanghaj 200000 CN.
Importowane do AUS: SIHAO PTY LTD, 1 ROKEVA STREETEASTWOOD NSW 2122 Australia
Importowane do USA: Sanven Technology Ltd., Suite 250, 9166 Anaheim Place, Rancho Cucamonga, CA 91730
| Przedstaw ciel UE |
| REP WIELKIEJ BRYTANII |
E-CrossStu GmbH
Mainzer Landstr.69, 60329 Frankfurt nad Menem.
YH CONSULTING LIMITED.
C/O YH Consulting Limited Biuro 147, Centurion House, London Road, Staines-upon-Thames, Surrey, TW18 4AX
VEVOR®
TOUGH TOOLS, HALF PRICE
www.vevor.com/support
Tafelzaagstandaard
GEBRUIKERSHANDLEIDING
MODEL:HS6805
natural_image
3D model of a black and yellow wheeled cart with wheels, no text or symbols visibleHULP NODIG? NEEM CONTACT MET ONS OP!
Figuur 3
natural_image
3D rendering of a black manual push cart with yellow handle and wheels (no text or symbols)Afbeelding 6
Dimensionale tekeningen
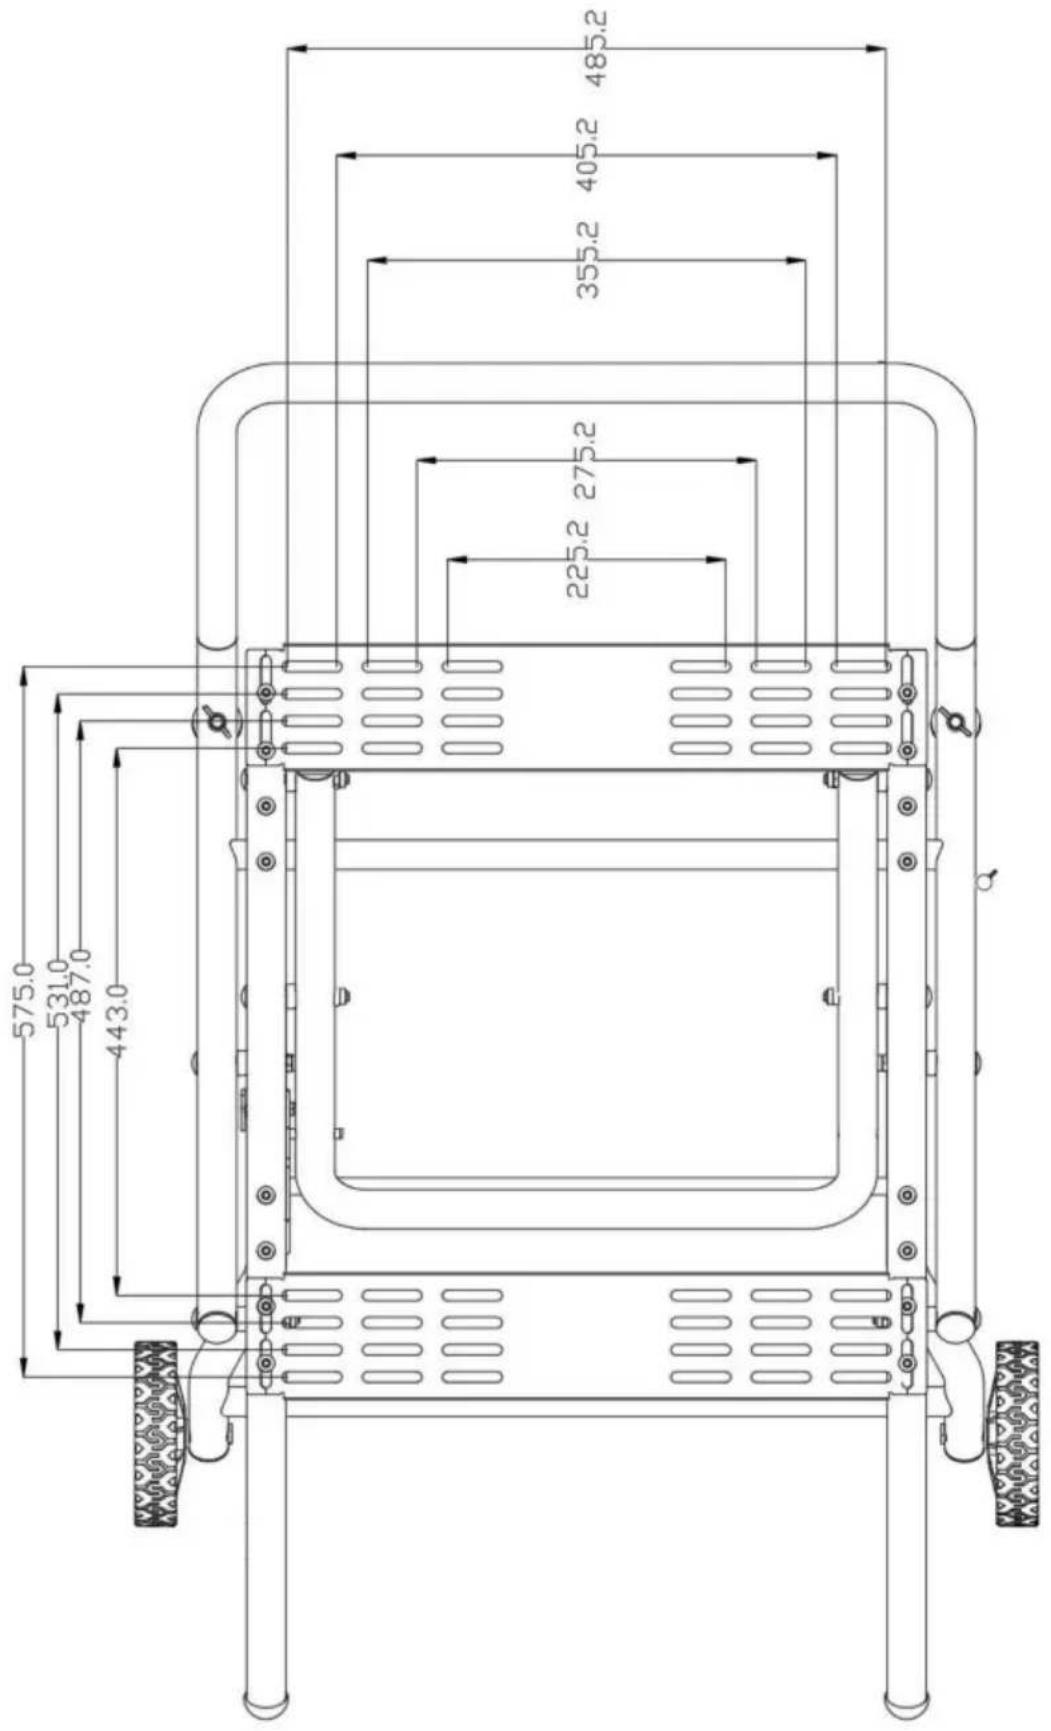
Fabrikant: Shanghaimuxinmuyeyouxiangongsi
Adres: Shuangchenglu 803nong11hao1602A-1609shi, baoshanqu, shanghai 200000 CN.
C/O YH Consulting Limited Kantoor 147, Centurion House, Londen Road, Staines-upon-Thames, Surrey, TW18 4AX
VEVOR®
TOUGH TOOLS, HALF PRICE
Technische ondersteuning en e- garantiecertificaat www.vevor.com/support
VEVOR®
TOUGH TOOLS, HALF PRICE
www.vevor.com/support
Bordssågstativ
ANVÄNDARMANUAL
MODELL: HS6805
natural_image
3D model of a black and yellow wheeled cart with wheels, no text or symbols visiblenatural_image
Black manual push cart with yellow handle and wheels (no text or symbols visible)Fig. 6
Måttritningar
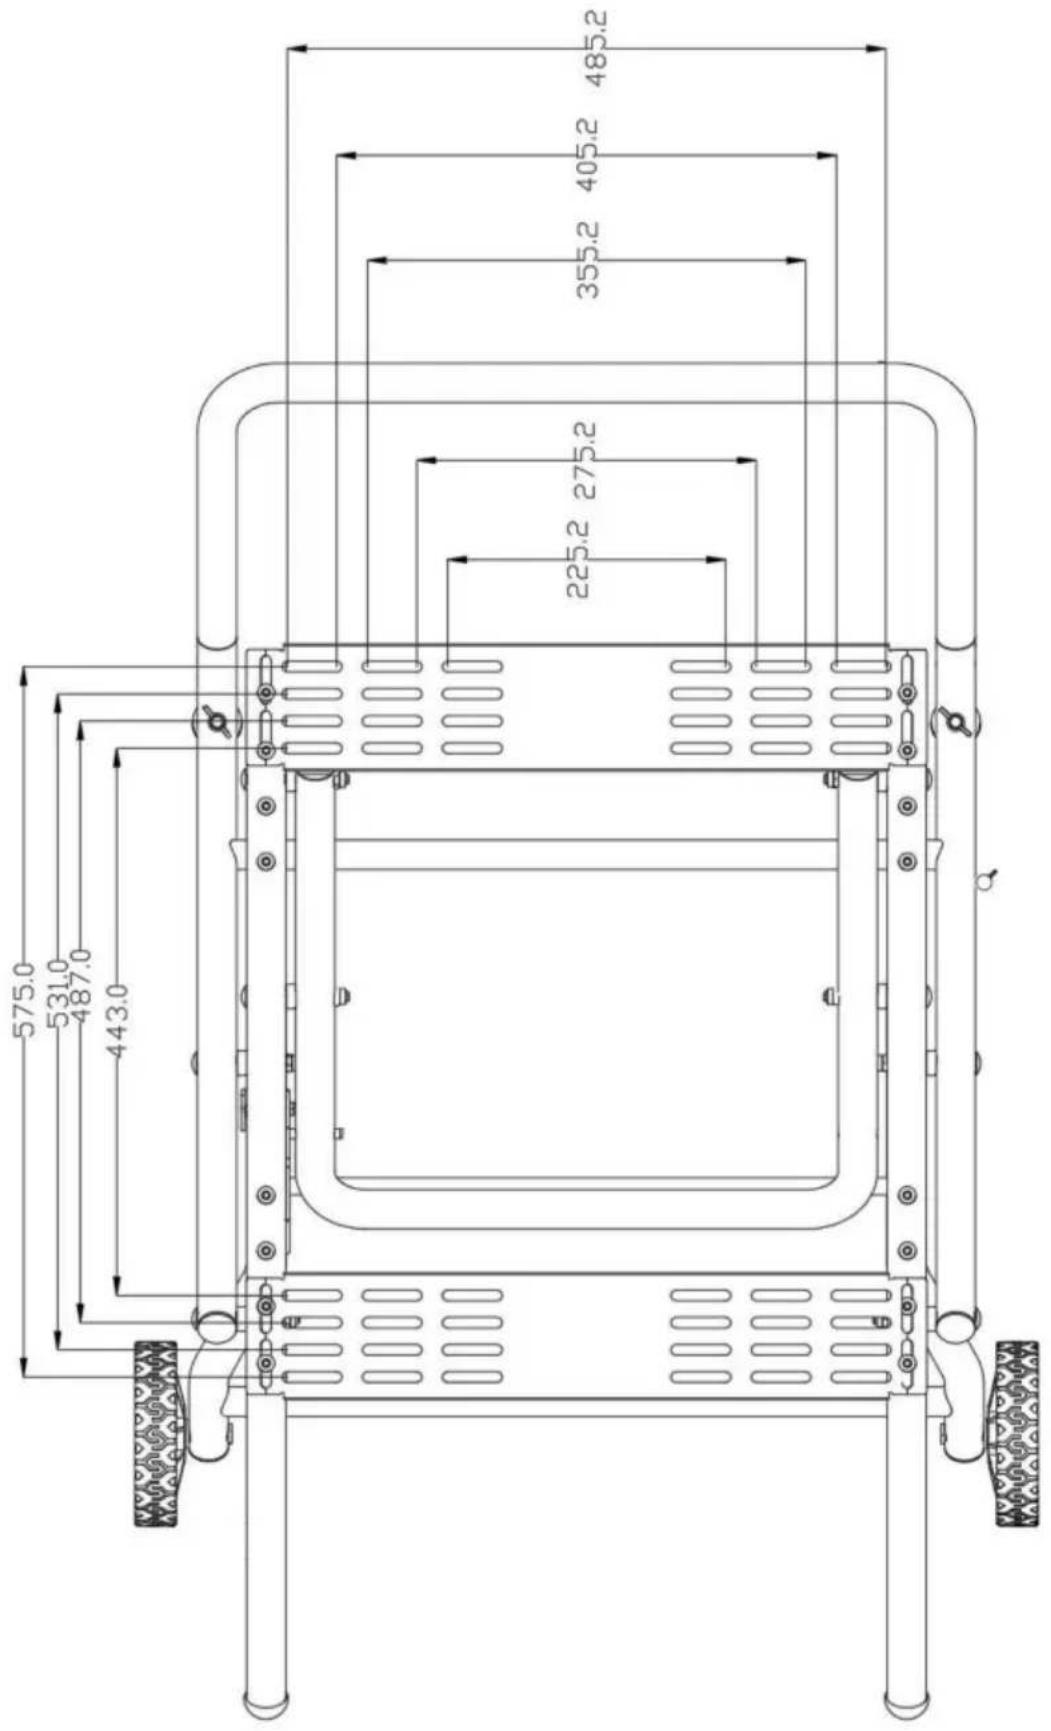
Tillverkare: Shanghaimuxinmuyeyouxiangongsi
Adress: Shuangchenglu 803nong11hao1602A-1609shi, baoshanqu, shanghai 200000 CN.
Importerad till AUS: SIHAO PTY LTD, 1 ROKEVA STREETEASTWOOD NSW 2122 Australien
Importerad till USA: Sanven Technology Ltd., Suite 250, 9166 Anaheim Place, Rancho Cucamonga, CA 91730
| EC | REP |
| UK | REP |
E-CrossStu GmbH
Mainzer Landstr.69, 60329 Frankfurt am Main.
YH CONSULTING LIMITED.
C/O YH Consulting Limited Office 147, Centurion House, London Road, Staines-upon-Thames, Surrey, TW18 4AX
VEVOR®
TOUGH TOOLS, HALF PRICE



- Table Saw Stand USER MANUAL
- NEED HELP? CONTACT US!
- SAFETY INSTRUCTIONS
- WARNING
- WARNING
- Layout and items supplied
- Layout
- ASSEMBLY& ADJUSTMENTS
- Assembly of folding stand
- (Fig.1)
- (Fig. 2)
- (Fig. 3)
- (Fig. 4 & Fig.5)
- Mounting of the saw on folding stand
- Accessory storage and folding/unfolding stand (Fig.6)
- Folding stand for storage and transportation purposes- (Fig.6)
- Disposal and recycling
- Storage
- Dimensional Drawings
- VEVOR®
- TOUGH TOOLS, HALF PRICE
- (Abb. 4 und Abb. 5)
- Maßzeichnungen
- Tafelzaagstandaard
- GEBRUIKERSHANDLEIDING
- MODEL:HS6805
- HULP NODIG? NEEM CONTACT MET ONS OP!
- Bordssågstativ
- ANVÄNDARMANUAL
- Måttritningar
Brand : Vevor
Model : HS6805
Category : Saw