H670TV7 - Paper cutter Vevor - Free user manual and instructions
Find the device manual for free H670TV7 Vevor in PDF.

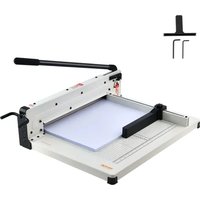
| Product Type | Electric Paper Cutter |
| Brand | Vevor |
| Model | H670TV7 |
| Maximum Cutting Length | 670 mm |
| Minimum Cutting Length | 30 mm |
| Cutting Thickness | 80 mm |
| Dimensions (L x W x H) | 1040 x 1430 x 1410 mm |
| Net Weight | 450 kg |
| Gross Weight | 484 kg |
| Power Supply | 220 V AC, 50/60 Hz, 2600 W |
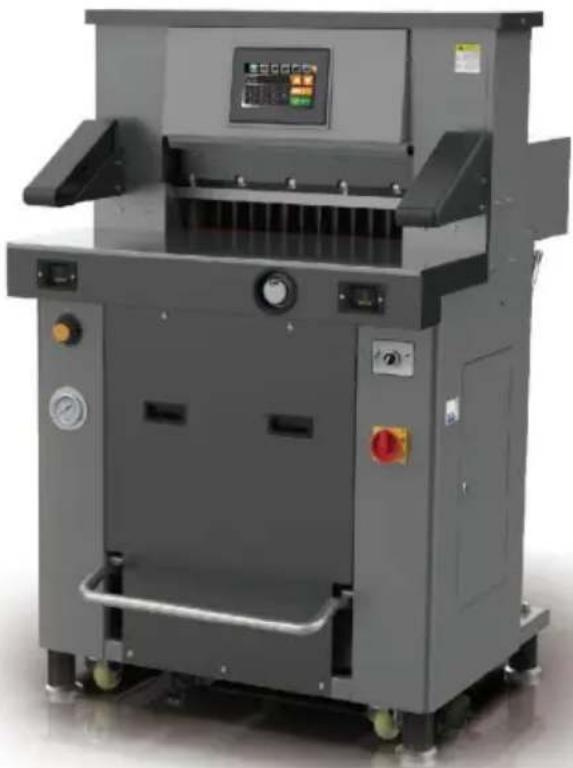
| Screen Type | NC / LCD Touch Screen |
| Cutting Modes | Manual, Bisection, Programming, Shortcut |
| Standard Pressure | 40 – 50 kg/cm² |
| Allowed Materials | Paper, books, soft leather |
| Safety | Double cutting button, foot pedal, blade guard, grounding |
| Maintenance | Monthly lubrication, regular cleaning |
| Included Accessories | Main motor, blade, cable, tools, certificate |
| Blade Life | 4 sides, 8 uses |
| Ambient Temperature | 10 – 30 °C |
| Ambient Humidity | 50 – 80 % |
Frequently Asked Questions - H670TV7 Vevor
User questions about H670TV7 Vevor
0 question about this device. Answer the ones you know or ask your own.
Ask a new question about this device
Download the instructions for your Paper cutter in PDF format for free! Find your manual H670TV7 - Vevor and take your electronic device back in hand. On this page are published all the documents necessary for the use of your device. H670TV7 by Vevor.
USER MANUAL H670TV7 Vevor
Technical Support and E-Warranty Certificate https://www.vevor.com/support
WATCH WINDER
USER MANUAL
MODEL NO.: H670TV7
We continue to be committed to provide you tools with competitive price. "Save Half", "Half Price" or any other similar expressions used by us only represent estimate of savings you might benefit from buying certain tools with us compared top brands and does not necessarily mean to cover all categories of tools offered are kindly reminded to verify carefully when you are placing an order with us actually saving half in comparison with the top major brands.
VEVOR®
TOUGH TOOLS, HALF PRICE
Electric Paper Cutte
MODEL NO.: H670TV7
natural_image
Industrial machine with control panel and control buttons (no visible text or symbols)NEED HELP? CONTACT US!
Have product questions? Need technical support? Please feel from contact us:
Technical Support and E-Warranty Certificate www.vevor.com/support
This is the original instruction, please read all manual instruction carefully before operating. VEVOR reserves a clear interpretation user manual. The appearance of the product shall be subject to product you received. Please forgive us that we won't inform you there are any technology or software updates on our product.

WARNING:
Please read this manual carefully before using the product. Failure do so may result in serious injury. SAVE THIS MANUAL

Warning: this kind machine is allowed to cut printed paper or books or soft leathers only. It is forbidden to cut any metal s or other hard objects do harm to the machine quality.

Forbid children to operate the machine

Keep hand from underneath the blade

Do not extract or transport the blade without protection
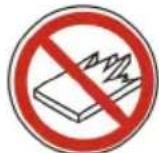
Do not cut hand or splintery materials
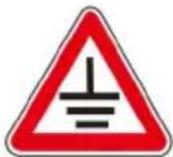
Must use socket with ground wire connected
Note:
In order to have more usage information of Numerical-controlled Paper Cutting Machine, you have to read this specification carefully first. This
help you improve your working efficiency, realize the machine'
sProperty,then the machine will have the best cutting effects,This will be good for the main tenance of the machine,and can prolong service of the maintenance of the machine,and can prolong service life of the machine.
Safety caution
1. Open the box and check
When you open the package of the machine, firstly you should check machine and relevant accessories. Please contact the seller or compare there is any damage or shortage.
●1 set of main engine ●1 instruction manual
●1 set of tools ●2 screws for tool removal ●1 Certificate
●1 blade and 1 power line ●1 warranty certificate
2. Machine installation and initial commissioning
Remove the wooden box, take out the accessories, and remove the screws on the base of the main engine. The hydraulic press needs to shoveled by a forklift.
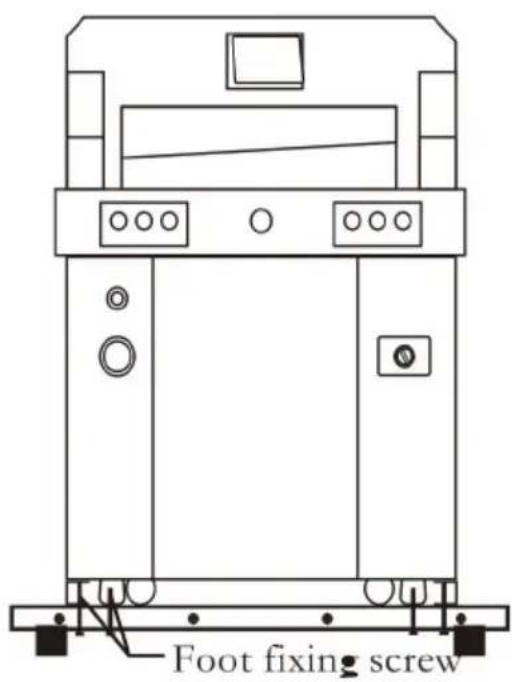
The location of the paper cutter should meet the following requirements:
- No vibration
- The ground shall be level and level, and the grade of concrete on the ground shall at least 300 mm, enough to carry the machine.
- It can avoid the operator's accidental injury caused by uneven ground.
- Keep a proper distance from buildings and ancillary equipment.
- It is recommended to adjust the levelness of the console with a level gauge.
Check the packing list for completeness and missing items; Check and clean all parts of the machine.
3. Usage environment
The machine must be placed in a clean working environment to avoid direct sunlight and air outlet; Environment temperature: 10 \~ 30 °C, It shall not exceed 32 °C; Ambient temperature: 50 \~ 80%;
Connect the ground wire correctly.
4. Hot tip
Remember that only one professional is allowed to operate this machine. When cutting, the button must be operated with both hands at the same time; Do not remove the safety cover;
When hands or foreign matters enter the cutting area, the power sup must be cut off first;
When replacing the blade, strictly follow the blade replacement instructions;
It is forbidden to modify the internal structure and circuit of the mach without permission.
TECHNICAL SPECIFICATIONS
| Model | H670TV7 | |
| Rating(s) | AC220V, 60Hz, 2600V | AC220V, 50Hz, 2600W |
| Max cutting length | 670mm | |
| Min cutting length | 30mm | |
| Cutting thickness | 80mm | |
| Product Dimensions (LxWxH) | 1040*1430*1410mm | |
| Packing Size (LxWxH) | 1535*1220*1600mm | |
| Net Weight (kg) | 450 | |
| Gross Weight (kg) | 484 | |
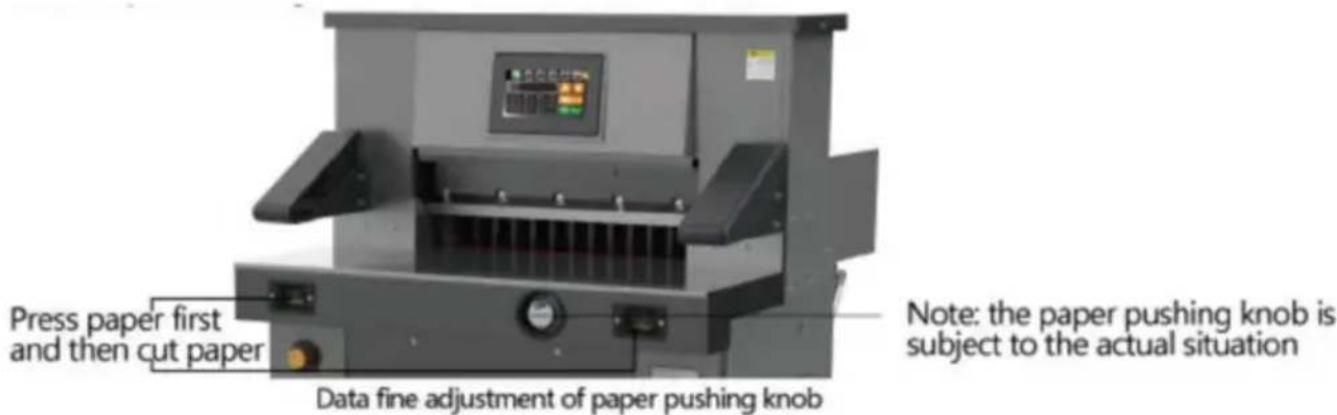
Parts description
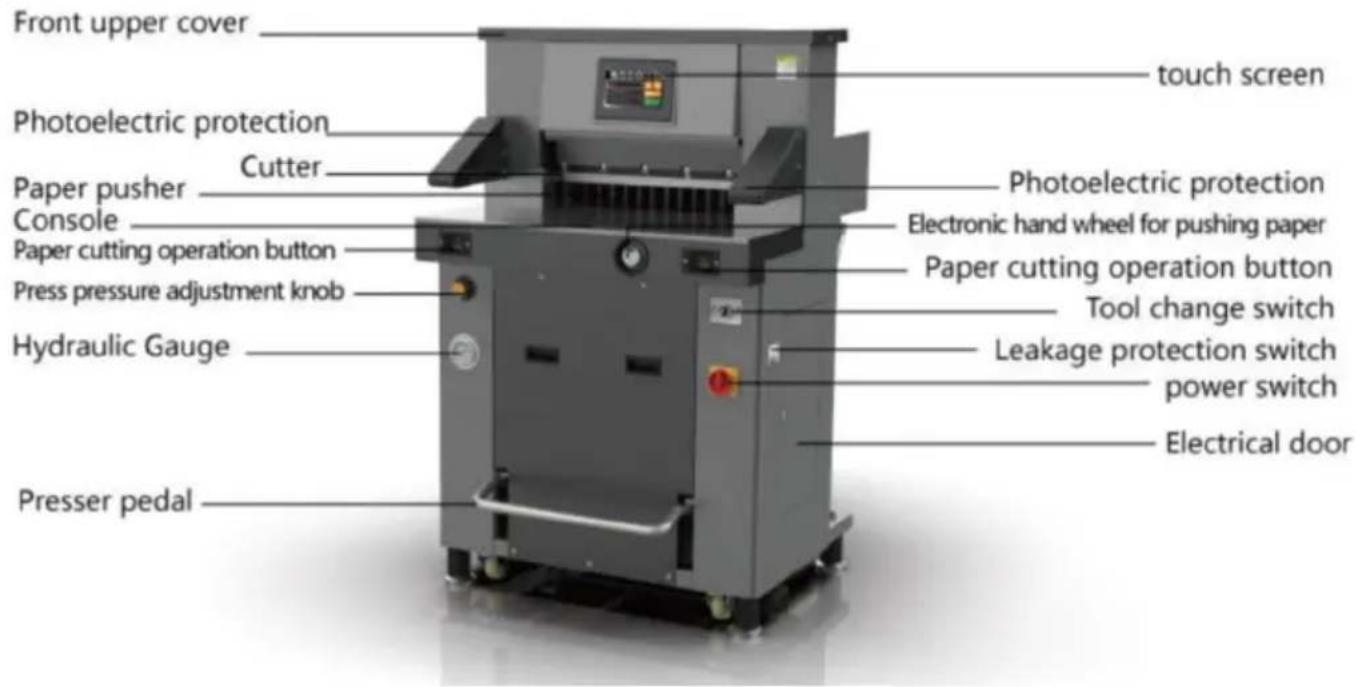
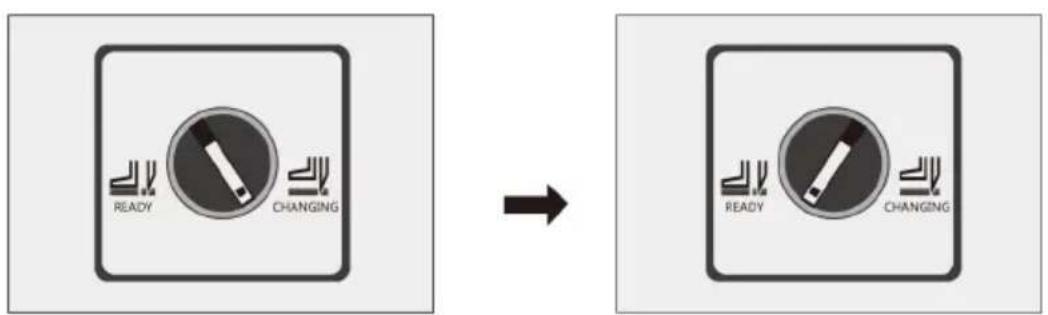
Operation panel
Operation diagram of paper cutter.
Turn on the power supply, turn on the power switch, turn the switch the display will be on, and the display will show the president's switch. When the knife light is on, the paper pusher automatically adjusts the which indicates that it has entered the normal startup state.
The correct way to operate the machine is to stand in front of the machine and face the paper cutter. The left hand controls the button on the left and the right hand controls the button on the right (you can step on the pedal switch for single pressure or single pressure before cutting), as shown in the figure.
natural_image
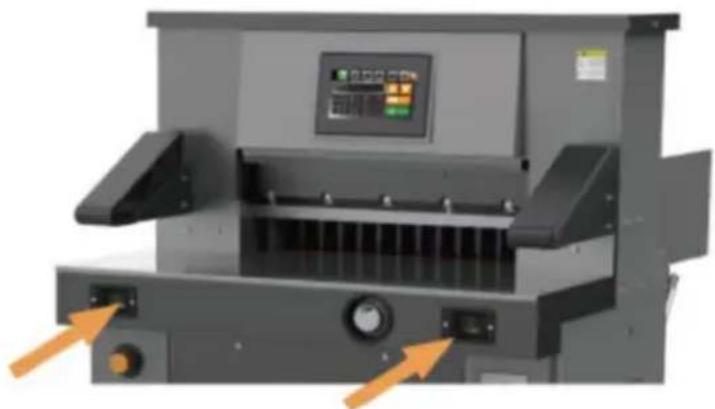
Industrial machine with control panel and orange arrows indicating ports (no visible text or symbols)Basic operation and adjustment
1. basic operation
- Power on
Before starting the machine, check whether there are other articles or machine, and clean them up;
Turn on the power supply;
Turn the electrical protection switch to the "on" position, turn on the switch, the NC screen / LCD screen will display, the position indicator will be on, and the paper pusher will be automatically calibrated, indicate that the power is normal.
natural_image
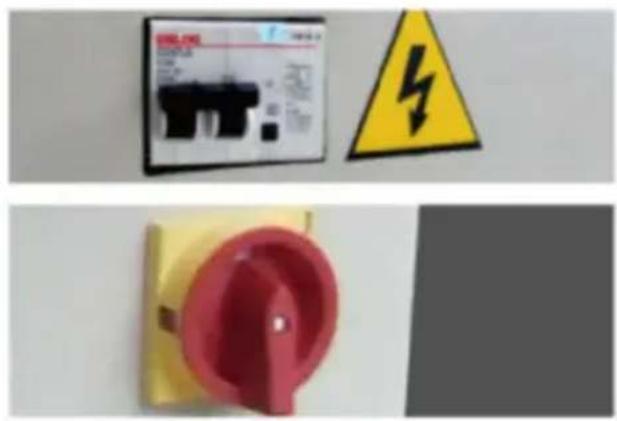
Three safety warning symbols: a digital display panel, a yellow triangular hazard symbol, and a red circular switch (no text or labels visible)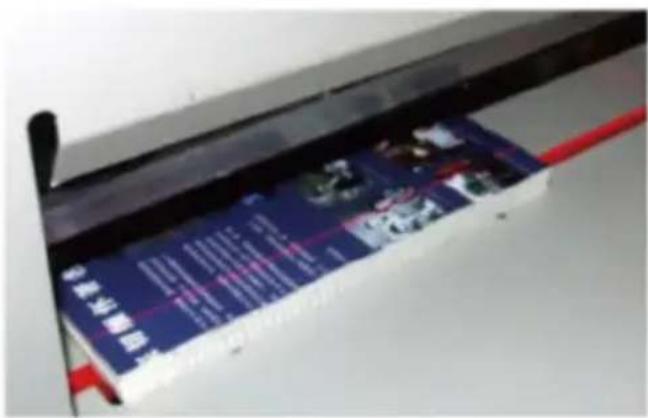
● Operation instructions of touch screen paper cutter
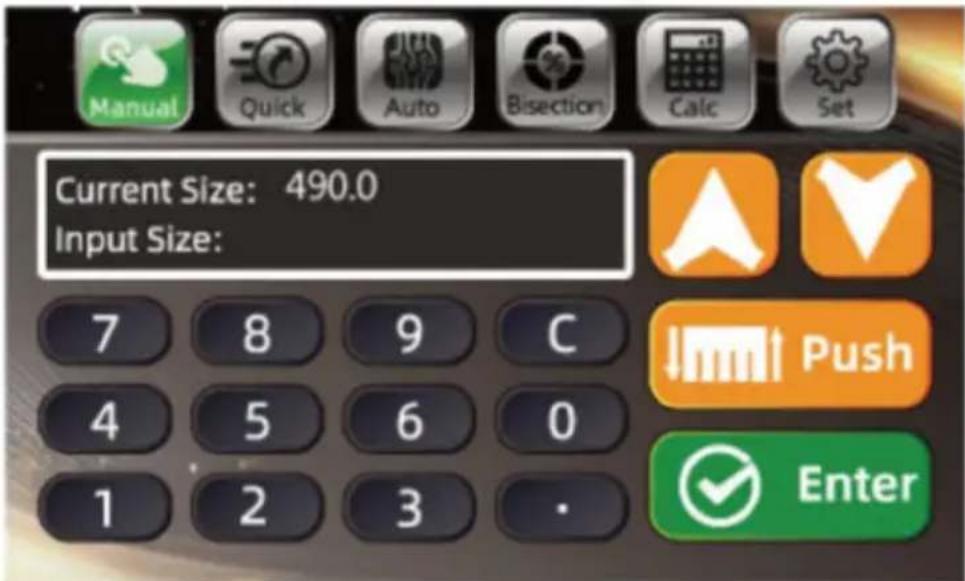
The program-controlled computer has three paper pushing modes. Now, 285mm is taken as an example to push paper respectively A. Manual mode
After startup, if the current mode is not in manual mode, click manual switch to manual mode, as shown in the figure. In manual mode, the two methods to input data. One is the paper pushing knob (not recommended, which is relatively slow and not recommended. The paper pushing knob is only used for data fine adjustment).
The second method is to directly click 480 to reverse select, press key, enter 285.0, OK, the paper pusher moves to the position of set size.
Use of electronic handwheel
Rotate the button clockwise, and the paper pusher moves in the direction of the arrow. and the paper pusher moves 0.1 mm per click. Press a the rotation button continuously. The pusher moves from slow to fast. When the button is rotated counterclockwise, the paper pusher moves the direction of the arrow, and the paper pusher moves 0.1 mm per Press and hold the rotation button continuously, and the pusher move from slow to fast.
Push in the cutting paper or book and place it on the left side to a with the ruler bar;
After confirming the size, you can cut the paper. Step on the foot s the presser starts to press the paper, press the cutting button with b hands, and start cutting after pressing the paper (you can also press cutting button directly with both hands without stepping on the foot sw
and the paper holder starts pressing the paper after pressing the paper. When there is any error, release the button, the knife and the press automatically return to their original position, and continue to press if is no error Live the cutting button to complete cutting;
After cutting, the paper pusher will push the book out (set the automatic push book cutting), a complete cutting process is completed. To continue other cutting, just repeat the above steps.
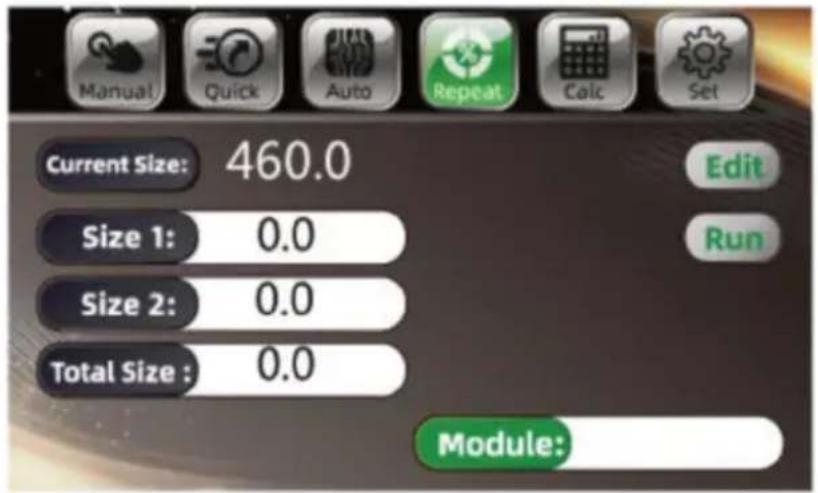
B. Segmentation mode
Click bisection to switch to bisection mode, click OK, the paper push automatically push to the first size. When you need to edit the size, the programming mode to enter the first group of programming mode, shown in the figure. To modify the data, click E-click bisection edit, switch to bisection editing, switch dialog box, modify data, and confirm to return.
Push in the cutting paper book and place it on the side to align with the ru bar;
Push in the cut paper or book and on the left to align with the ruler. After confirming the size, you can cut paper.
Step on the foot switch, the presser to press the paper, press the cutting
natural_image
Industrial machine with control panel and display screen (no visible text or symbols)button with both hands, and start cutting after pressing the paper (yo also press the cutting button directly with both hands without stepping the foot switch, and the paper holder will start pressing the paper af pressing the paper). When there is any error, release the button, the and the presser will return to their original position automatically, and
it again after confirmation Hold the cutting button to finish cutting the the first knife of 60.0 ~mm , and then continue to press the cutting ke the size of the second knife of 110.0 ~mm .
- Program control mode operation
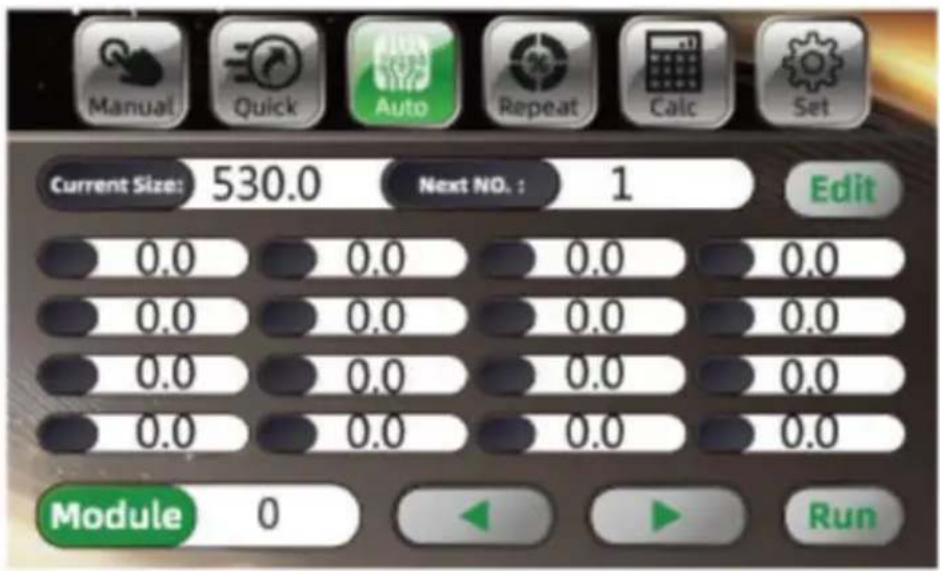
Click program control to switch to program control mode, as shown in figure above, you can see a lot of data list, click to turn page, click Edit to input cutting data, data input.
After entering, click Edit to save data again, and click change module switch data of different modules. After clicking ,the paper pusher will move to the corresponding size, push in and cut the paper or book, the paper or book on the left, which is close to the ruler.
After setting the size, push in the cutting paper or book, and arrange paper or book to the left, the edge is in line with the ruler.
After confirming the size, the paper can be cut. Step on the foot sw the paper presser starts to press the paper,press the cutting button w both hands respectively,press the paper to start cutting (or do not ste the foot switch,press the cutting button with both hands, and the paper holder starts to press the paper, and then starts cutting after pressing paper.If any error is found, release the button, the knife and presser return to their original position automatically, and continue to press an hold if there is no error.The cutting button is used to cut the size c knife of 60.0 mm, and then continue to press the cutting key to cut
second knife size of 110.0 mm. After cutting the first knife and the set knife, continue to press the cutting key to automatically return to the knife 60.0.
Cut and repeat until the cutting sequence is completed cut (it is inva push books by yourself in the bisection mode).
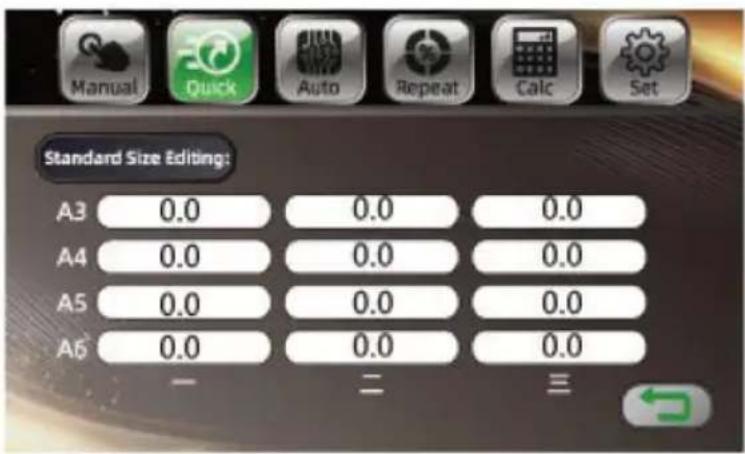
- Shortcut mode
Click shortcut to switch to shortcut mode. Several common standard sizes appear.Click the required size and the paper pusher will automatically push to the fi size, as shown in the figur
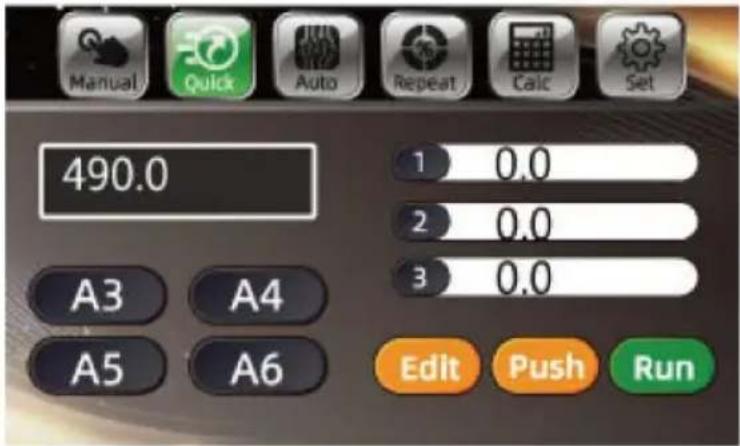
To edit the size, click Edit mode, click standard size (to enter the modification interface. After modification, click the return icon, as shown in the figure.
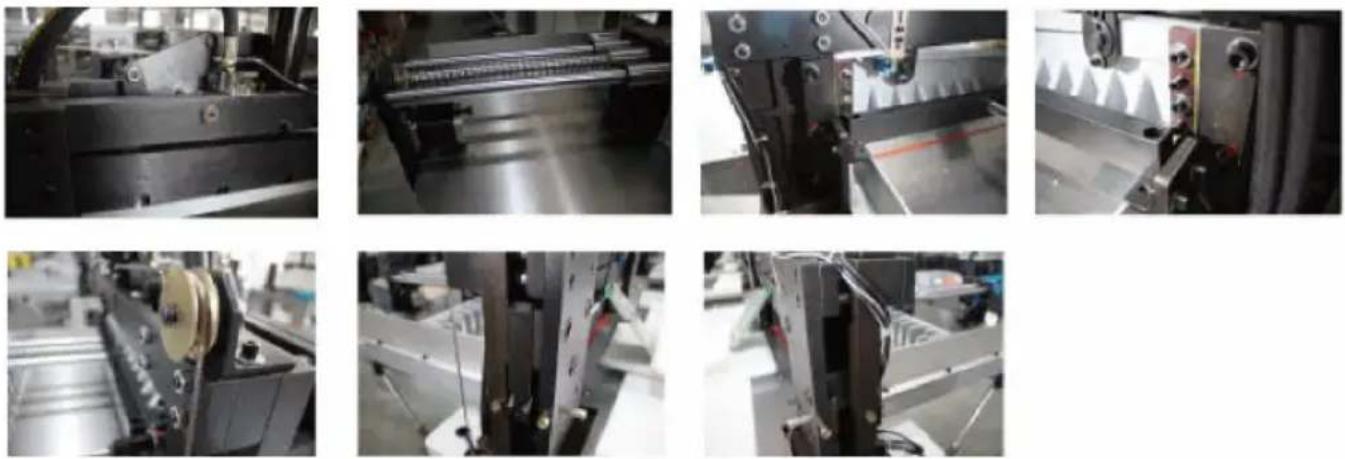
Basic adjustment
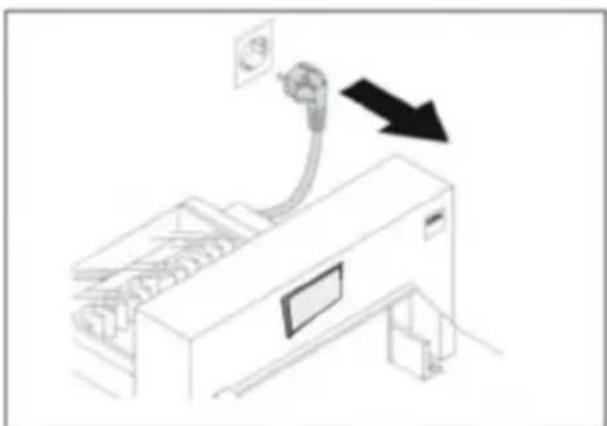
- Size proofreading and adjustment Cut off the power supply;
Remove the bottom plate of the machine and check whether there foreign matters stuck on the drivin screw rod;
natural_image
Line drawing of a printer with a paper outlet and cable, showing no text or symbolsCheck the stepper motor, remove the rear bottom plate, and change whether the synchronous motor and synchronous belt (hidden under the motor) are fixed normally;
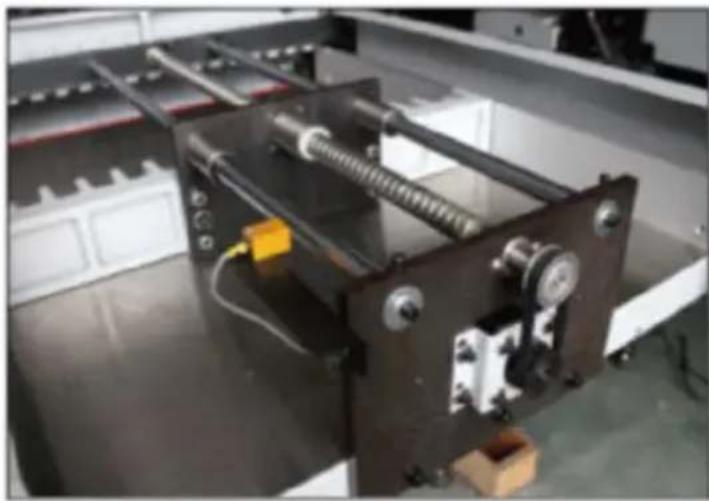
natural_image
Industrial machine with coiled spring and mounting base, no visible text or symbolsAdjust the limit support on the holder and adjust it before an after, until the size of the dis screen is in conformity with the size of the ruler, then lock the fixing screw.then lock the fixin screw.
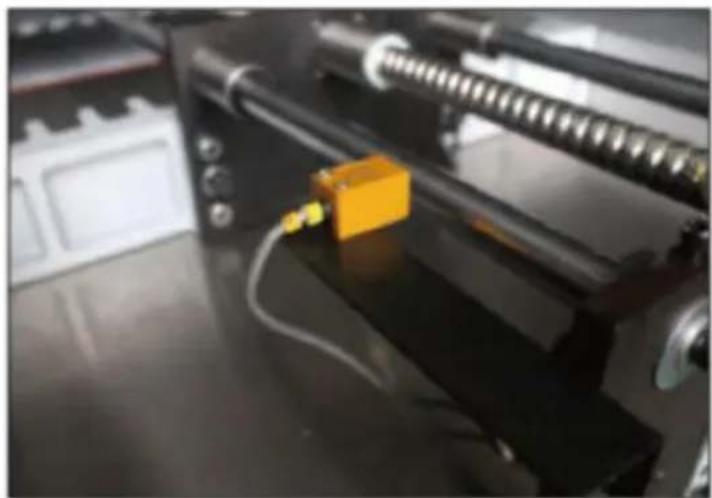
natural_image
Close-up of a 3D printer with a yellow component inserted, showing mechanical parts and wiring (no visible text or symbols)- Cutter depth adjustment
In the process of using, there are two adjustment methods when the bottom paper is continuously cut:
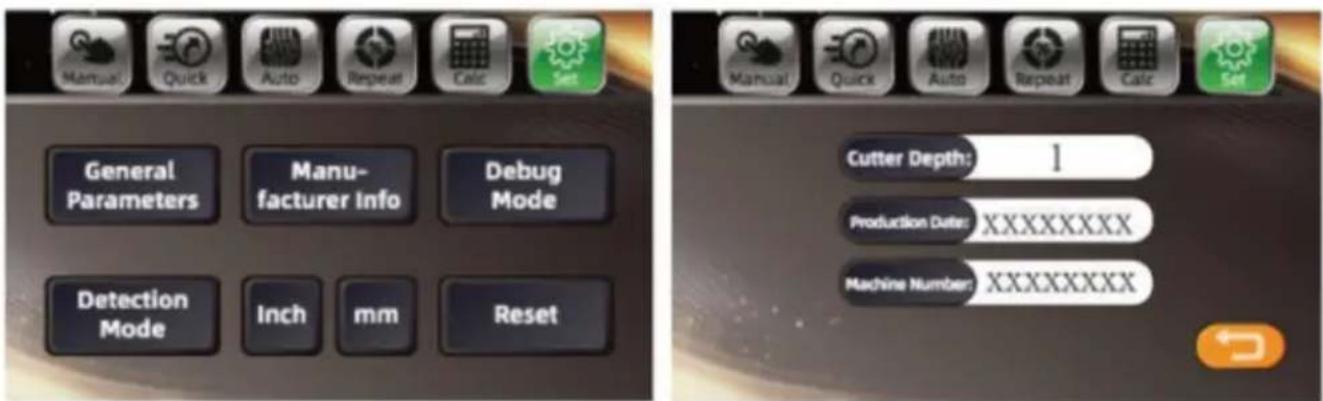
a. Through the control program adjustment of the display screen.
First, adjust the cutter depth fine adjustment device (adjust the depth of about 5mm) or change the cutting surface of the blade; click Set click the common parameters to modify according to the actual situation with the maximum modification value of 20.
It is completed by the top cutter screw on the tool holder.
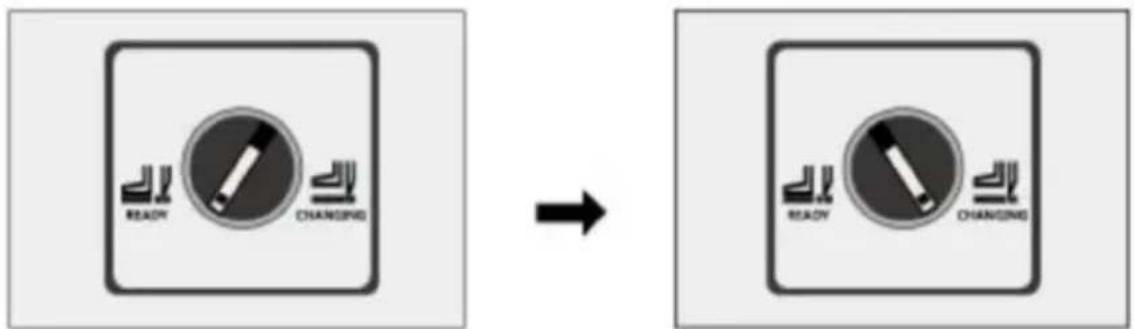
Change the tool switch, and rotate the tool change switch from the state to the tool change state, as shown in the figure.
If you can't cut off the next sheet of paper, you need to adjust the screw; generally, adjust it to 0.3-0.5 mm of the cutter insert pad. Try with a piece of paper. If the cutting is continuous, readjust according above steps.
Turn the tool change switch from tool change state to normal state.
- Stick adjustment
The blade has 4 sides, each s can be used twice and can be recycled for 8 times;
If the knife mark on the blade deep, it is necessary to adjust replace the blade;
The blade can be taken out w screw driver, and it should be smoothly installed into the cuttir
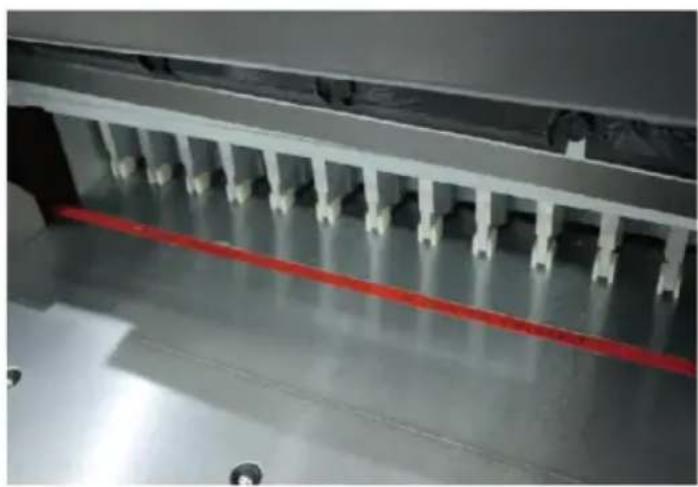
natural_image
Industrial machine with a red horizontal line and white panel connectors (no visible text or symbols)table when it is replaced;
The blade should be on the left.
- Pressure adjustment
Press the cutting button with both hands, and the pressure gauge will display the pressure when the presser drops to press the paper;
Standard pressure: 40kg / cm²
50kg / cm².
Turn the pressure adjustment knob to increase the clockwise pressure and decrease the counter clockwise pressure.
Press the cutting button again the presser presses the paper to display the new pressure.

natural_image
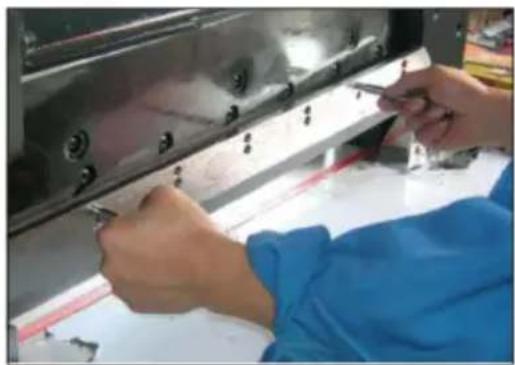
Close-up of a metallic industrial control panel with a pressure gauge and handle, no visible text or symbols- Blade replacement (please follow the steps carefully)
Turn the tool change switch from normal state to tool change state, shown in the figure.

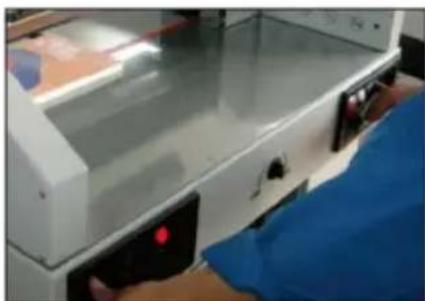
Press the cutting button with both hands, under the knife;
Loosen and remove the locking screw 1 with an opening on the tool
natural_image
Close-up of a white electronic device with a blue glove and red indicator light, partially covered by a person's hand (no visible text or symbols)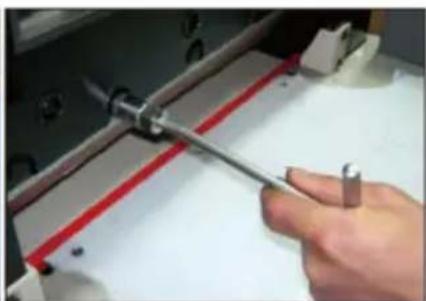
natural_image
Close-up of a hand using a tool to cut or adjust a red and white component on a white surface (no text or symbols visible)
Remove other locking screws on the tool holder, except for screw No. 2. Turn the tool change switch from the tool change state to the normal. On the tool, rotate the opening screw hole 1 of the two tool removal clockwise. If it is fixed and locked, remove other screws and No. 2 and pay attention to the blade falling;
Take out the blade by turning the two screw rods anticlockwise for h circle. Wrap the blade with gloves or cloth and put it into the cutter avoid scratches;
natural_image
Person in blue lab coat and white shirt working on a metal mechanical component with bolts (no visible text or symbols)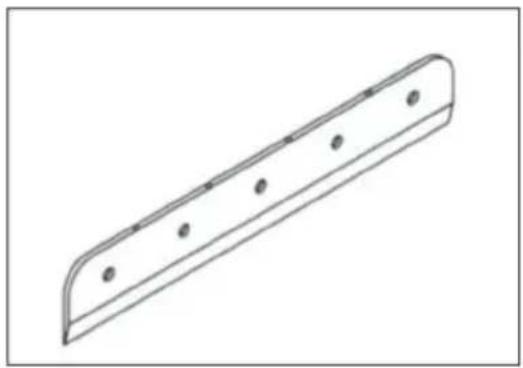
natural_image
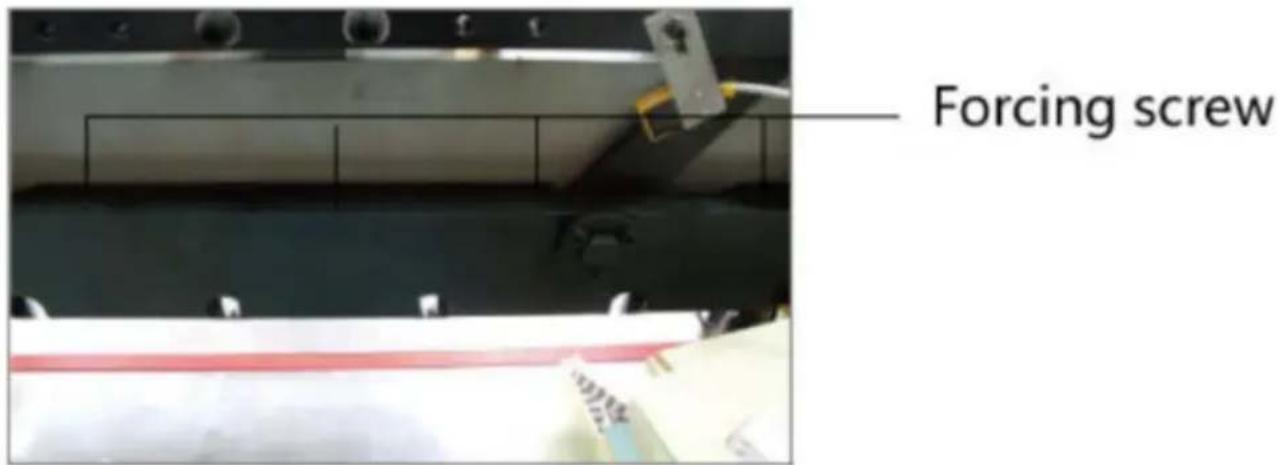
Technical line drawing of a mechanical part with evenly spaced holes (no text or symbols)Take out a new blade, pay attention to safety, the blade is facing o screw the two removal screws into the opening hole of the blade, in: blade on the tool holder, tighten and fix with screws in turn, and the according to the cutting depth adjustment method.
- Presser pressure adjustment
Due to different cutting materials, the pressure required is different.
Therefore, it is necessary to adjust according to the figure.
To adjust the presser pressure, first loosen locking screw 2 and turn the adjusting han adjust the pressure. Turn the pressure clock to increase and the pressure to decrease i
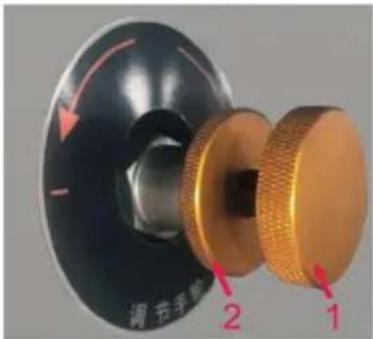
counter clockwise direction. The ideal pressure is 4MPa, and then loc screw.
Note: under the condition of not affecting the cutting performance, red the pressure of pressing paper as far as possible, which is beneficial service life and safety of the machine.
In general, the cutting pressure does not need to be adjusted. If the pressure exceeds the rated pressure, the machine is easy to be damaged or damaged, such as cutting paper should be grinded in time. (the n pressure is 8Mpa).
Lubrication and maintenance
1. Lubrication
The machine should open the cover every month, check the cleaning, fasten parts and lubricate the transmission parts once a month. Please be careful to avoid dripping lubricating oil on electrical circuits or electronic components when refueling; in order to avoid failure.
2. Maintenance
When working, it is forbidden to put non-cutting objects on the machine, so prevent hard objects from entering the knife and damaging the cutter. Bound b should avoid bringing staples into the cutting area so as not to damage the After the work is finished every day, wipe the machine, remove debris, and cut the power supply.
3. Attached drawings
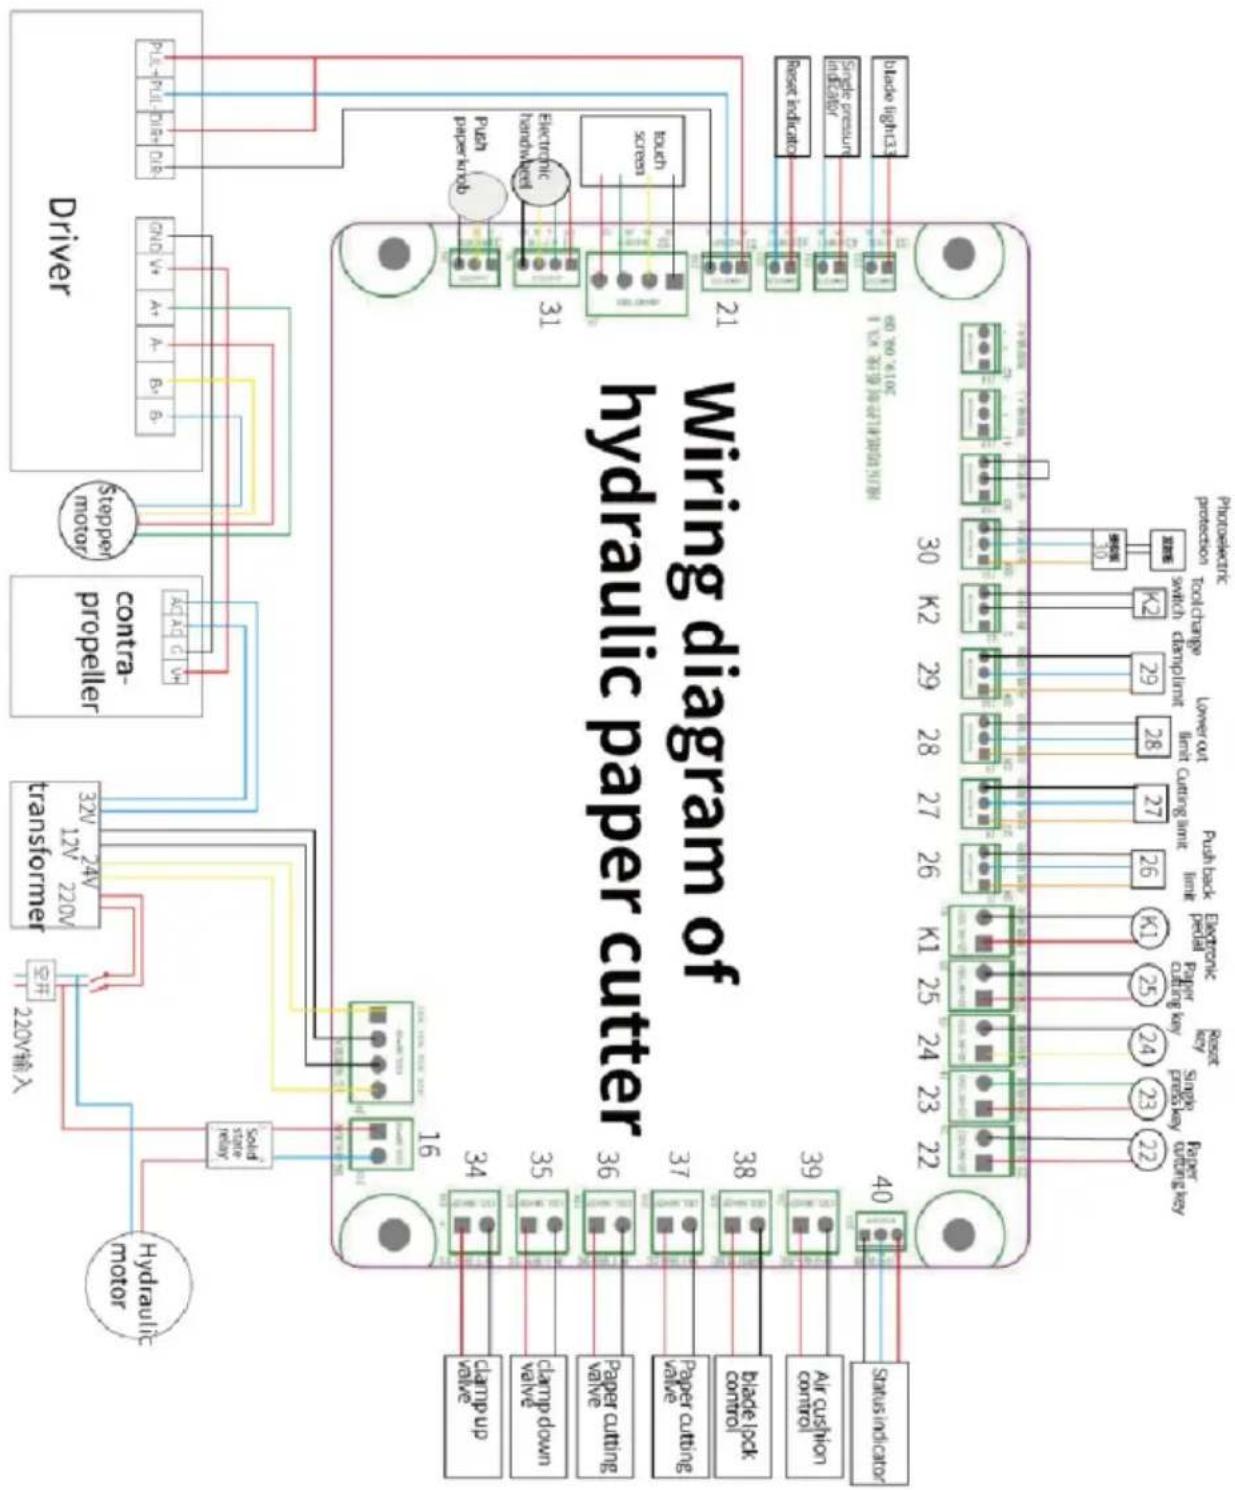
flowchart
Hydraulic paper cutter wiring diagram showing connections between motor, driver, and control panel with labeled components and terminal numbers.Common error and elimination
| fault | Phenomena | Exclusion method |
| No power display | The indicator light doesn't turn off | 1. Check the power socket2. Check whether the switch is in good condition3. The power cord is not good |
| Motor capacitance damage | Abnormal sound or pressure of motor | Replace the capacitor |
| Uneven cutting or large error | The cut paper i wide on one side and narrow on the other, or the size deviation is large | Shift the stop gauge, loosen the fastening screw, adjust the angle between the ruler and the pushing board with a ruler, an then fix the screw again |
| blade does not reset or works continuously up and down | Button invalid, continuous up and down | 1. Displacement or damage of home limit sensor2. Circuit board damaged |
| The window is no displayed, displayed disorderly or cannot be proofread | Power normal button invalid | Check the display board, electrical main board and electronic circuit |
| Part of the NC circuit is damaged | The paper pusher doesn't work | 1. Check the progress motor and driver2. Check whether the main board of the machine is normal |
| E-1 or foreign body in platform | The button is invalid and cannot be cut | 1. Check whether the safety photoelectricity is in good2. Check whether the main board of the machine is normal |
| Display E-2 and alarm | It can cut, but the cutter can't return to its position | 1. Check whether the upper line sensor of tool rest is in good condition2. Check whether the main board of the machine is normal |
| Display E-3 and alarm | It can cut, and the depth of thecutter cannot be adjusted | 1. Check whether the tool carrier lower limit sensor is ingood condition2. Check whether the main bo of the machine is normal |
| Display E-4 and alarm | Abnormal return of press frame | 1. Check whether the upper li sensor of presser is in good condition2. Check whether the main bo of the machine is normal |
| Display E-6 and alarm | It can cut, and the pusher cannot be limited or calibrated | 1. Check whether the back lin calibration sensor of the paper pusher is in good condition2. Check whether the main bo of the machine is normal |
Manufacturer: Shanghaimuxinmuyeyouxiangongsi
Address: Shuangchenglu 803nong11hao1602A-1609shi, baoshanqu, shanghai 200000 CN.
Imported to AUS: SIHAO PTY LTD. 1 ROKEVA STREETEASTWOOD NSW 2122 Australia
Imported to USA: Sanven Technology Ltd. Suite 250, 9166 Anaheim Place, Rancho Cucamonga, CA 91730
| EC | REP |
E-CrossStu GmbH
Mainzer Landstr.69, 60329 Frankfurt am Main
| UK | REP |
YH CONSULTING LIMITED.
C/O YH Consulting Limited Office 147, Centurion House, London Road, Staines-upon-Thames, Surrey TW18 4AX
VEVOR®
TOUGH TOOLS, HALF PRICE
Technical Support and E-Warranty Certificate www.vevor.com/support
VEVOR®
TOUGH TOOLS, HALF PRICE
natural_image
Industrial machine with control panel and control buttons (no visible text or symbols)Bedienfeld
natural_image
Industrial machine with control panel and orange arrows indicating ports (no visible text or symbols)
natural_image
Close-up of a red circular switch component mounted on a yellow base, against a plain white background (no text or symbols visible)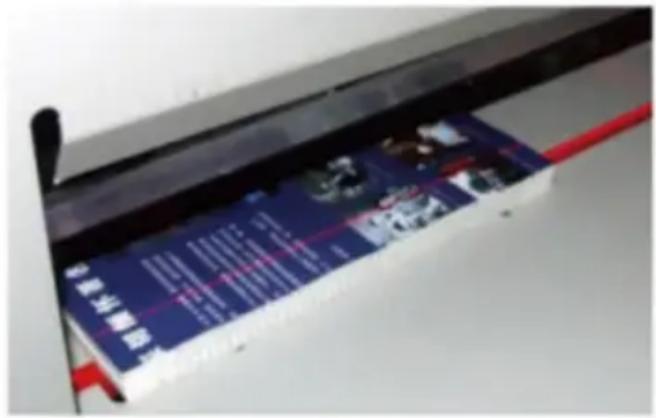
natural_image
3D rendering of a mechanical device with control panel and buttons (no visible text or symbols)natural_image
Line drawing of a printer with a cable and paper outlet, showing a black arrow pointing to the cable (no text or symbols present)natural_image
Industrial machine with coiled spring and mounting base, no visible text or symbolsnatural_image
Industrial machine with a red horizontal strip and white components, no visible text or symbolsnatural_image
Close-up of a metallic industrial control panel with a pressure gauge and circular dial (no visible text or symbols)natural_image
Close-up of a lab equipment with a gloved hand holding a blue object, no visible text or symbols
natural_image
Close-up of a hand using a tool to adjust or install a mechanical component, no visible text or symbols
natural_image
Close-up of hands installing or adjusting a metal bracket component (no visible text or symbols)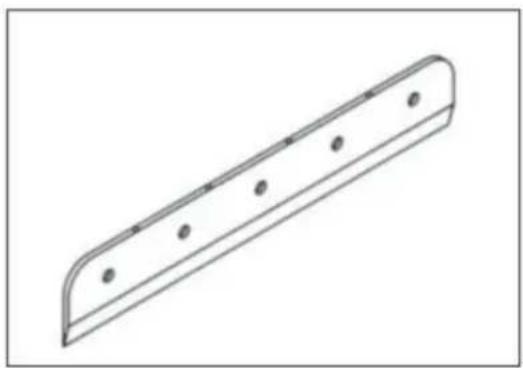
natural_image
Technical line drawing of a mechanical part with evenly spaced holes (no text or symbols)C/O YH Consulting Limited Office 147, Centurion
Haus, London Road, Staines-upon-Thames, Surrey,
TW18 4AX
VEVOR®
TOUGH TOOLS, HALF PRICE
www.vevor.com/support
VEVOR®
TOUGH TOOLS, HALF PRICE
natural_image
Industrial machine with control panel and control buttons (no visible text or symbols)POTRZEBUJESZ POMOCY? SKONTAKTUJ SIĘ Z NAMI!
Panel operacyjny
natural_image
Industrial machine with control panel and orange arrows indicating ports (no visible text or symbols)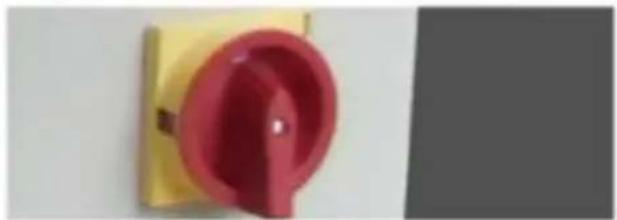
natural_image
Close-up of a red circular switch component mounted on a yellow base (no text or symbols visible)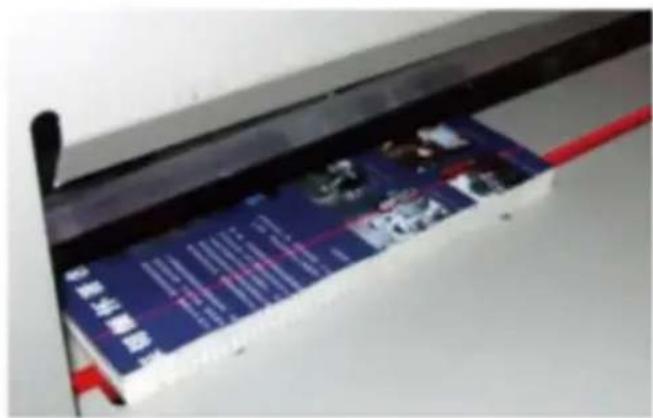
natural_image
Industrial machine with control panel and display screen (no visible text or symbols)natural_image
Line drawing of a printer with a cable and paper outlet, showing a black arrow pointing to the cable (no text or symbols present)natural_image
Industrial machine with coiled spring and mounting base, no visible text or symbolsnatural_image
Close-up of a 3D printer with a yellow component inserted, showing mechanical parts and wiring (no visible text or symbols)natural_image
Close-up of a mechanical device with a red horizontal line and white components, no visible text or symbols.natural_image
Close-up of a metallic industrial control panel with a pressure gauge and key inserted, no visible text or symbols.
natural_image
Close-up of a lab or laboratory equipment with a gloved hand holding a blue object, no visible text or symbols.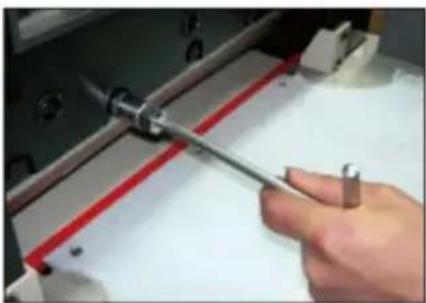
natural_image
Close-up of a hand using a tool to adjust or install a mechanical component, no visible text or symbols
natural_image
Close-up of hands installing or adjusting a metal bracket component (no visible text or symbols)
natural_image
Simple line drawing of a curved metal plate with evenly spaced circular holes (no text or symbols)C/O YH Consulting Limited Biuro 147, Centurion
Dom, London Road, Staines-upon-Thames, Surrey,
TW18 4AX
VEVOR®
TOUGH TOOLS, HALF PRICE
natural_image
Industrial machine with control panel and control buttons (no visible text or symbols)BESOIN D'AIDE? CONTACTEZ-NOUS!
Panneau de commande
natural_image
Industrial machine with control panel and orange arrows indicating ports (no visible text or symbols)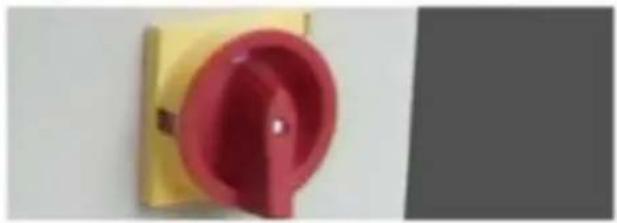
natural_image
Close-up of a red circular switch component mounted on a yellow base (no text or symbols visible)
natural_image
Industrial machine with control panel and display screen (no visible text or symbols)natural_image
Line drawing of a printer with a cable and paper outlet, showing a black arrow pointing to the cable (no text or symbols present)natural_image
Industrial machine with coiled spring and mounting base, no visible text or symbolsnatural_image
Close-up of a 3D printer with a yellow component inserted, showing mechanical parts and wiring (no visible text or symbols)natural_image
Close-up of a mechanical device with a red horizontal line and white components, no visible text or symbols.natural_image
Close-up of a metallic industrial control panel with a pressure gauge and key inserted, no visible text or symbols.natural_image
Close-up of a lab or laboratory equipment with a gloved hand holding a blue object, no visible text or symbols.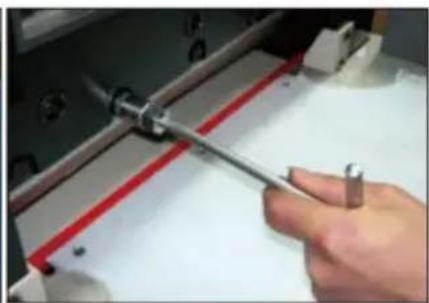
natural_image
Close-up of a hand using a tool to adjust or install a mechanical component, no visible text or symbols
natural_image
Close-up of hands installing or adjusting a metal bracket component (no visible text or symbols)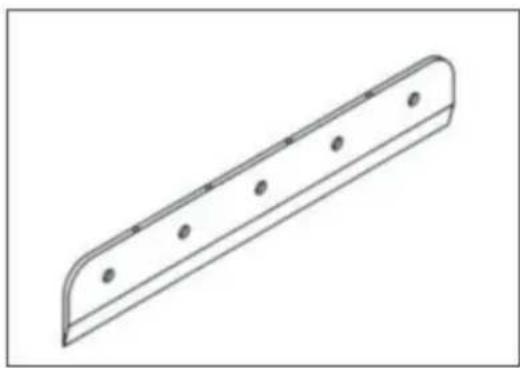
natural_image
Technical line drawing of a mechanical part with evenly spaced holes (no text or symbols)A/S YH Consulting Limited Bureau 147, Centurion
Maison, London Road, Staines-upon-Thames, Surrey,
TW18 4AX
VEVOR®
TOUGH TOOLS, HALF PRICE
natural_image
Industrial machine with control panel and control buttons (no visible text or symbols)HULP NODIG? NEEM CONTACT MET ONS OP!
Bedieningspaneel
natural_image
Industrial machine with control panel and orange arrows indicating ports (no visible text or symbols)natural_image
Three safety warning symbols: a digital display panel, a yellow triangular warning sign with a lightning bolt, and a red circular switch (no text or labels visible)
natural_image
Industrial machine with control panel and display screen (no visible text or symbols)natural_image
Line drawing of a printer with a cable and paper outlet, showing a black arrow pointing to the cable (no text or symbols present)natural_image
Industrial machine with coiled spring and mounting base, no visible text or symbolsnatural_image
Industrial machine with a red horizontal line and white components, no visible text or symbolsnatural_image
Close-up of a metallic industrial control panel with a pressure gauge and key inserted, no visible text or symbols.
natural_image
Close-up of a lab or laboratory equipment with a gloved hand holding a blue sample (no visible text or symbols)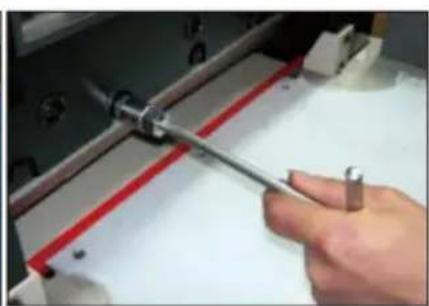
natural_image
Close-up of a hand using a tool to adjust or install a mechanical component (no visible text or symbols)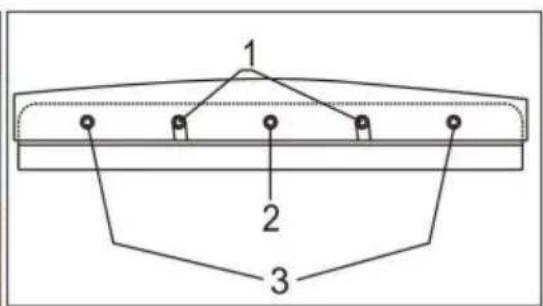
natural_image
Close-up of hands installing or adjusting a metal bracket component (no visible text or symbols)
natural_image
Technical line drawing of a mechanical part with evenly spaced holes (no text or symbols)C/O YH Consulting Limited Kantoor 147, Centurion Huis, London Road, Staines-upon-Thames, Surrey, TW18 4AX
VEVOR®
TOUGH TOOLS, HALF PRICE
Technische ondersteuning en e-garantiecertificaat www.vevor.com/support
VEVOR®
TOUGH TOOLS, HALF PRICE
natural_image
Industrial machine with control panel and control buttons (no visible text or symbols)BEHÖVER HJÄLP? KONTAKTA OSS!
Manöverpanel
Driftschema för pappersskärare.
natural_image
Industrial machine with control panel and orange arrows indicating ports (no visible text or symbols)natural_image
Three safety warning symbols: a digital display panel, a yellow triangular warning sign with a lightning bolt, and a red circular switch (no text or labels visible)
natural_image
3D rendering of a mechanical device with control panel and buttons (no visible text or symbols)natural_image
Line drawing of a printer with a cable and paper outlet, showing a black arrow pointing to the cable (no text or symbols present)natural_image
Industrial machine with coiled spring and mounting base, no visible text or symbolsnatural_image
Close-up of a 3D printer with a yellow component and coiled cable, no visible text or symbolsnatural_image
Close-up of a mechanical printer or printer with a red strip extending from its side (no visible text or symbols)natural_image
Close-up of a metallic industrial control panel with a pressure gauge and circular dial (no visible text or symbols)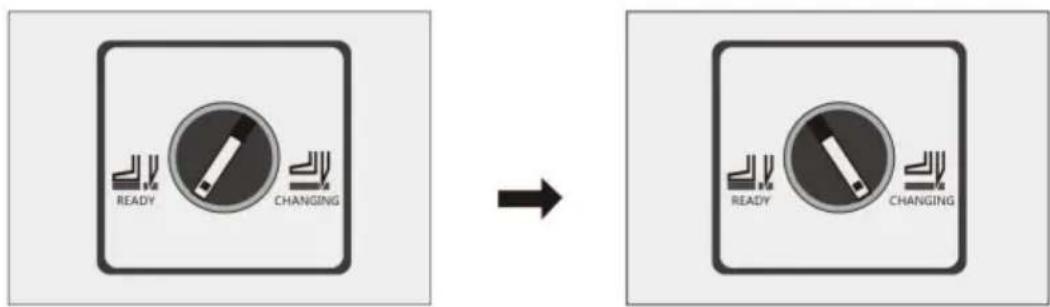
natural_image
Close-up of a lab equipment with a gloved hand holding a blue sample (no visible text or symbols)
natural_image
Close-up of a hand using a tool to adjust or install a mechanical component, no visible text or symbols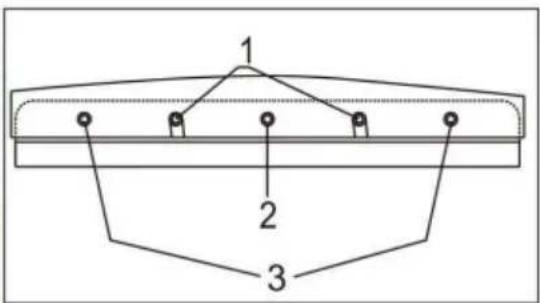
natural_image
Close-up of hands installing or adjusting a metal bracket component (no visible text or symbols)
natural_image
Technical line drawing of a mechanical part with evenly spaced holes (no text or symbols)flowchart
graph TD
    subgraph Motor
        A["Hydraulic motor"] --> B["Driver"]
        B --> C["Control"]
        C --> D["Stappen motor"]
        D --> E["Driver"]
    end

    subgraph Control
        F["30 K2 29 28 27 26 25 24 K1 23 K0 22 21 K1 20 K0 19 K0 18 K0 17 K0 16 K0 15 K0 14 K0 13 K0 12 K0 11 K0 10 K0 9 K0 8 K0 7 K0 6 K0 5 K0 4 K0 3 K0 2 K0 1 K0 0.5K<br>    end<br><br>    subgraph Wiring Diagram<br>        F --> G[Blade indicator"]
        G --> H["Air cushion control"]
        H --> I["Blade lock control"]
        I --> J["Paper cutting valve"]
        J --> K["Paper cutting valve"]
        K --> L["clamp down valve"]
        L --> M["clamp up valve"]
        M --> N["Cap pump valve"]
        N --> O["Cap pump valve"]
        O --> P["Cap pump valve"]
        P --> Q["Cap pump valve"]
        Q --> R["Cap pump valve"]
        R --> S["Cap pump valve"]
        S --> T["Cap pump valve"]
        T --> U["Cap pump valve"]
        U --> V["Cap pump valve"]
        V --> W["Cap pump valve"]
        W --> X["Cap pump valve"]
        X --> Y["Cap pump valve"]
        Y --> Z["Cap pump valve"]
        Z --> AA["Cap pump valve"]
        AA --> AB["Cap pump valve"]
        AB --> AC["Cap pump valve"]
        AC --> AD["Cap pump valve"]
        AD --> AE["Cap pump valve"]
        AE --> AF["Cap pump valve"]
        AF --> AG["Cap pump valve"]
        AG --> AH["Cap pump valve"]
        AH --> AI["Cap pump valve"]
        AI --> AJ["Cap pump valve"]
        AJ --> AK["Cap pump valve"]
        AK --> AL["Cap pump valve"]
        AL --> AM["Cap pump valve"]
        AM --> AN["Cap pump valve"]
        AN --> AO["Cap pump valve"]
        AO --> AP["Cap pump valve"]
        AP --> AQ["Cap pump valve"]
        AQ --> AR["Cap pump valve"]
        AR --> AS["Cap pump valve"]
        AS --> AT["Cap pump valve"]
        AT --> AU["Cap pump valve"]
        AU --> AV["Cap pump valve"]
        AV --> AW["Cap pump valve"]
        AW --> AX["Cap pump valve"]
        AX --> AY["Cap pump valve"]
        AY --> AZ["Cap pump valve"]
        AZ --> BA["Cap pump valve"]
        BA --> BB["Cap pump valve"]
        BB --> BC["Cap pump valve"]
        BC --> BD["Cap pump valve"]
        BD --> BE["Cap pump valve"]
        BE --> BF["Cap pump valve"]
        BF --> BG["Cap pump valve"]
        BG --> BH["Cap pump valve"]
        BH --> BI["Cap pump valve"]
        BI --> BJ["Cap pump valve"]
        BJ --> BK["Cap pump valve"]
        BK --> BL["Cap pump valve"]
        BL --> BM["Cap pump valve"]
        BM --> BN["Cap pump valve"]
        BN --> BO["Cap pump valve"]
        BO --> BP["Cap pump valve"]
        BP --> BQ["Cap pump valve"]
        BQ --> BR["Cap pump valve"]
        BR --> BS["Cap pump valve"]
        BS --> BT["Cap pump valve"]
        BT --> BU["Cap pump valve"]
        BU --> BV["Cap pump valve"]
        BV --> BW["Cap pump valve"]
        BW --> BX["Cap pump valve"]
        BX --> BY["Cap pump valve"]
        BY --> BZ["Cap pump valve"]
        BZ --> CA["Cap pump valve"]
        CA --> CB["Cap pump valve"]
        CB --> CC["Cap pump valve"]
        CC --> CD["Cap pump valve"]
        CD --> CE["Cap pump valve"]
        CE --> CF["Cap pump valve"]
        CF --> CG["Cap pump valve"]
        CG --> CH["Cap pump valve"]
        CH --> CI["Cap pump valve"]
        CI --> CJ["Cap pump valve"]
        CJ --> CK["Cap pump valve"]
    end

    style Motor fill:#f9f,stroke:#333
    style Driver fill:#ccf,stroke:#333
    style Wiring Diagram fill:#cfc,stroke:#333
    note right of A: Wiring diagram of hydraulic paper cutter
    note left of A: Wiring diagram of hydraulic paper cutter
    note right of B: Wiring diagram of hydraulic paper cutter
    note left of C:
    note right of D:
    note right of E:
    note right of F:
    note right of G:
    note right of H:
    note right of I:
    note right of J:
    note right of K:
    note right of L:
    note right of M:
    note right of N:
    note right of O:
    note right of P:
    note right of Q:
    note right of R:
    note right of S:
    note right of T:
    note right of U:
    note right of V:
    note right of W:
    note right of X:
    note right of Y:
    note right of Z:
    note right of AB:
    note right of AC:
    note right of AD:
    note right of AE:
    note right of AF:
    note right of AG:
    note right of AH:
    note right of AI:
    note right of AJ:
    note right of AK:
    note right of AL:
    note right of AM:
    note right of AN:
    note right of AO:
    note right of AP:
    note right of AQ:
    note right of AR:
    note right of AS:
    note right of AT:
    note right of AU:
    note right of AV:
    note right of AW:

    %% Legend
    %% Color coding
    %% Note values (e.g., 30, 29, 28, 27, 26, 25, 24, 23, 22, 21, 20, 19, 18, 17, 16, 15, 14, 13, 12, 11, 10, 9, 8, 7, 6, 5, 4, 3, 2, 1, 0.5K=5K=5K=5K=5K=5K=5K=5K=5K=5K=5K=5K=5K=5K=5K=5K=5K=5K=5K=5K=5K=5K=5K=5K=5K=5K=5K=5K=5K=5K=5K=5K=5K=5K=16
    end
C/O YH Consulting Limited Office 147, Centurion
House, London Road, Staines-upon-Thames, Surrey,
TW18 4AX
VEVOR®
TOUGH TOOLS, HALF PRICE
www.vevor.com/support
VEVOR®
TOUGH TOOLS, HALF PRICE
natural_image
Industrial machine with control panel and control buttons (no visible text or symbols)natural_image
Industrial machine with control panel and orange arrows indicating ports (no visible text or symbols)natural_image
Three safety warning symbols: a digital display panel, a yellow triangular hazard symbol, and a red circular switch (no text or labels visible)
natural_image
Industrial machine with control panel and display screen (no visible text or symbols)natural_image
Line drawing of a printer with a cable and paper outlet, showing a black arrow pointing to the cable (no text or symbols present)natural_image
Industrial machine with coiled spring and mounting base, no visible text or symbolsnatural_image
Close-up of a 3D printer with a yellow component inserted, showing mechanical parts and wiring (no visible text or symbols)natural_image
Industrial machine with a red horizontal strip and white components, no visible text or symbolsnatural_image
Close-up of a metallic industrial control panel with a pressure gauge and circular dial (no visible text or symbols)natural_image
Close-up of a lab equipment with a blue gloved hand and red laser indicator light (no visible text or symbols)
natural_image
Close-up of a hand using a tool to adjust or install a mechanical component, no visible text or symbols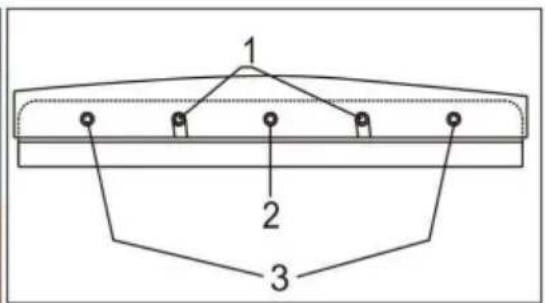
natural_image
Close-up of hands installing or adjusting a metal bracket component (no visible text or symbols)
natural_image
Simple line drawing of a curved metal plate with evenly spaced circular holes (no text or symbols)Casa, London Road, Staines-upon-Thames, Surrey,
TW18 4AX
VEVOR®
TOUGH TOOLS, HALF PRICE
natural_image
Industrial machine with control panel and control buttons (no visible text or symbols)Pannello operativo
natural_image
Industrial machine with control panel and orange arrows indicating ports (no visible text or symbols)natural_image
Three safety warning symbols: a digital display panel, a yellow triangular warning sign with a lightning bolt, and a red circular switch (no text or labels visible)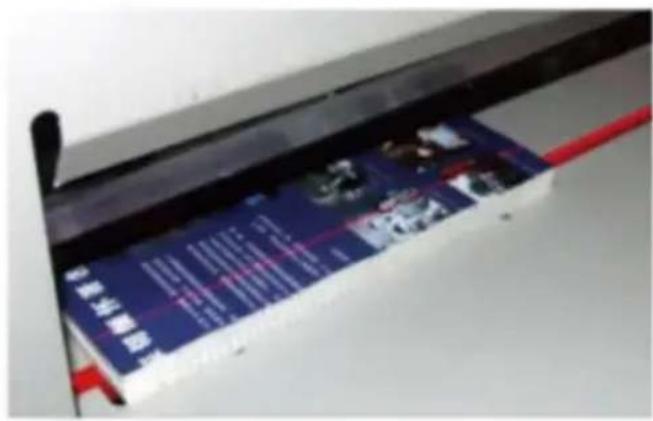
natural_image
Industrial machine with control panel and display screen (no visible text or symbols)natural_image
Line drawing of a printer with a paper feeding into a cable, showing a black arrow indicating direction (no text or symbols)natural_image
Industrial machine with coiled spring and mounting base, no visible text or symbolsnatural_image
Close-up of a 3D printer with a yellow component inserted, showing mechanical parts and wiring (no visible text or symbols)natural_image
Close-up of a mechanical device with a red horizontal line and multiple white components, no visible text or symbols.natural_image
Close-up of a metallic industrial control panel with a pressure gauge and a circular dial (no visible text or symbols)natural_image
Close-up of a lab equipment cabinet with blue gloves and red indicator lights (no visible text or symbols)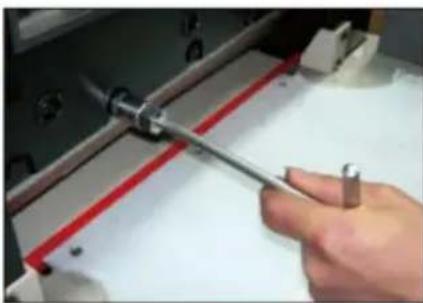
natural_image
Close-up of a hand using a wrench to adjust a mechanical component (no visible text or symbols)
natural_image
Close-up of hands installing or adjusting a metal bracket component (no visible text or symbols)
natural_image
Technical line drawing of a mechanical part with evenly spaced holes (no text or symbols)Importato in AUS: SIHAO PTY LTD. 1 ROKEVA STREETEASTWOOD NSW 2122 Australia
Importato negli USA: Sanven Technology Ltd. Suite 250, 9166 Anaheim Place, Rancho Cucamonga, CA 91730
C/O YH Consulting Limited Ufficio 147, Centurion
Casa, London Road, Staines-upon-Thames, Surrey,
Modello TW18 4AX
VEVOR®
TOUGH TOOLS, HALF PRICE