WJ-003 - Heating Vevor - Free user manual and instructions
Find the device manual for free WJ-003 Vevor in PDF.

| Brand | Vevor |
| Model | WJ-003 |
| Product type | Wooden sauna |
| Power | 2470 W |
| Voltage | AC 220-240 V |
| Frequency | 50 Hz |
| Material | Wooden frame |
| Adjustable temperature | 15 to 65 °C |
| Timer | 1 to 99 minutes |
| Controls | Electronic with LED screen |
| Main functions | Heating, LED light, FM radio, Bluetooth, MP3, oxygen ionizer |
| Lighting | Interior/exterior light, color LED |
| Connectivity | Bluetooth (name: BT301), USB, FM |
| Safety | Auto shut-off after 2 hours of continuous use, do not share outlet, avoid alcohol/drugs |
| Assembly | Requires at least 2 people |
| Included accessories | Cup holder, towel holder, magazine holder, oxygen ionizer |
| Maintenance | Clean with mild soap, sand if necessary |
| Warranty | 12 months on material and workmanship defects |
| Spare parts available | Heaters, fuses, bulbs, control panel |
| Country of manufacture | China |
Frequently Asked Questions - WJ-003 Vevor
User questions about WJ-003 Vevor
0 question about this device. Answer the ones you know or ask your own.
Ask a new question about this device
Download the instructions for your Heating in PDF format for free! Find your manual WJ-003 - Vevor and take your electronic device back in hand. On this page are published all the documents necessary for the use of your device. WJ-003 by Vevor.
USER MANUAL WJ-003 Vevor
Technical Support and E-Warranty Certificate www.vevor.com/support
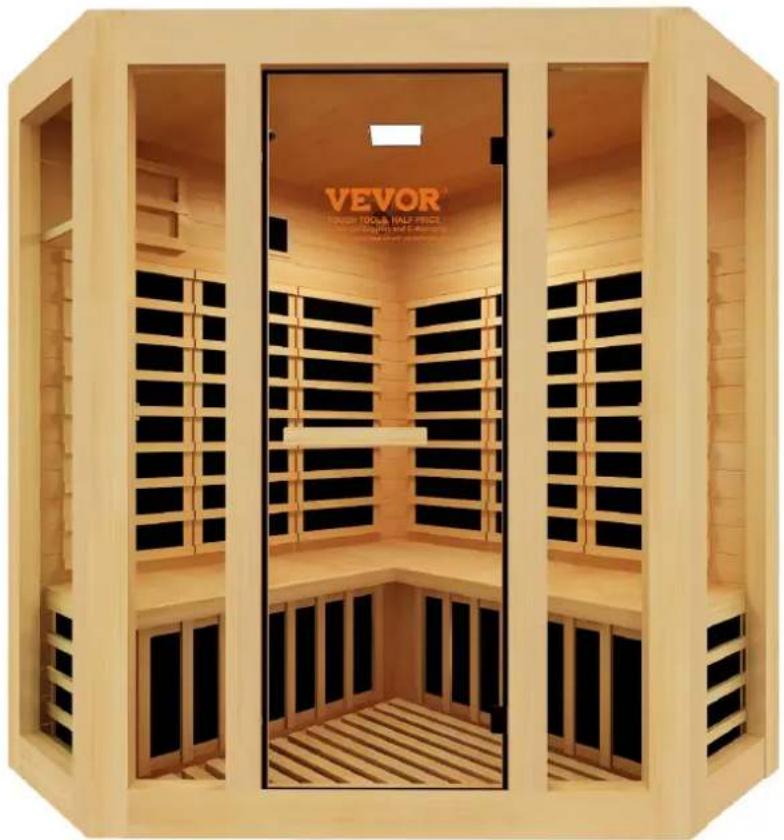
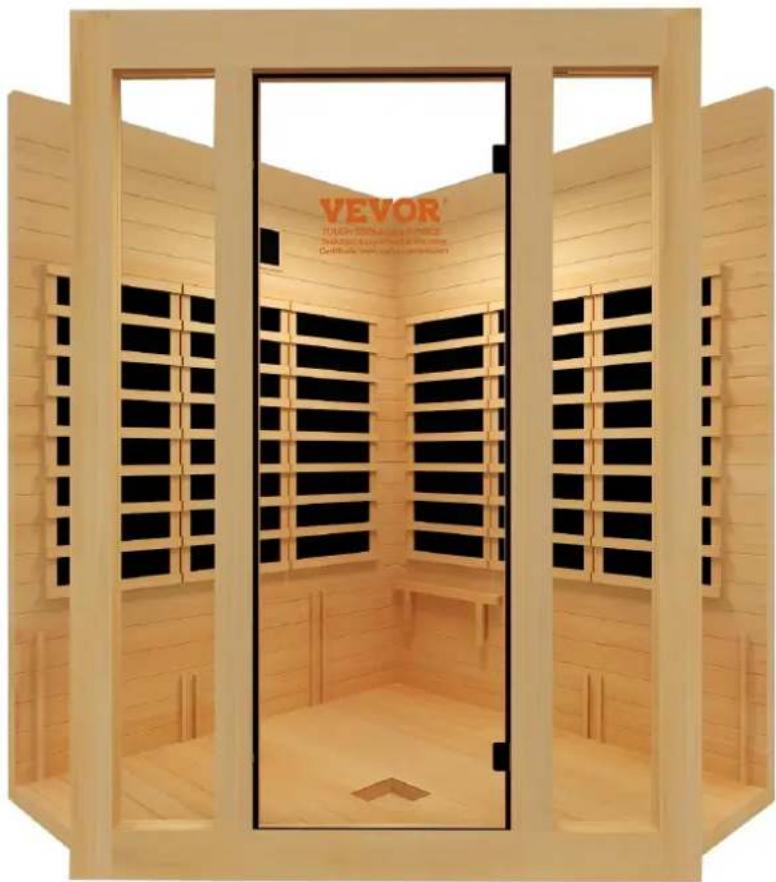
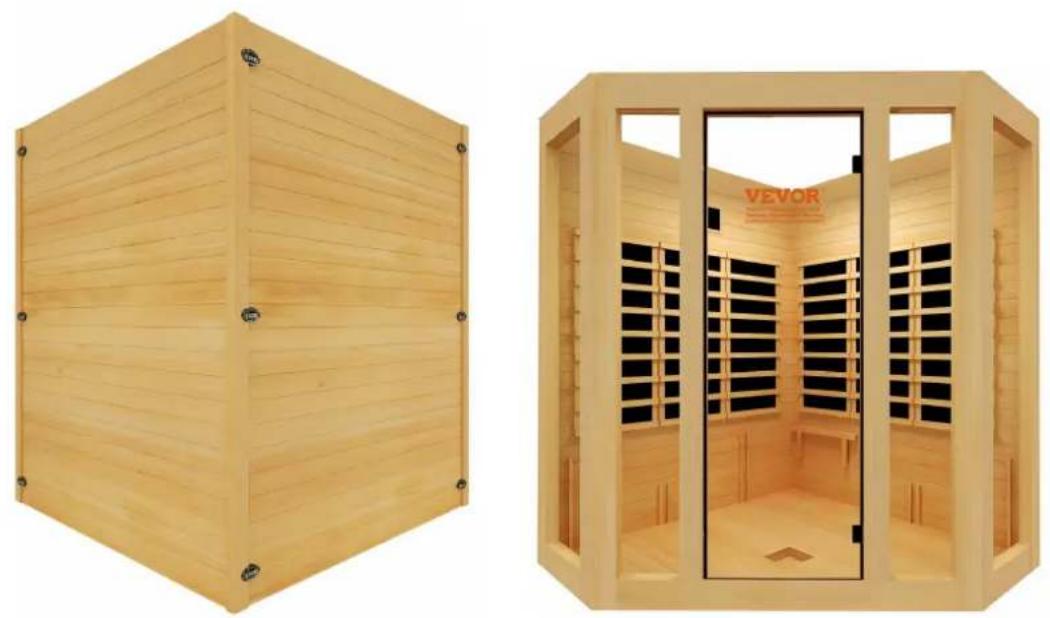
WOOD SAUNA
MODEL: WJ-003
We continue to be committed to provide you tools with competitive "Save Half", "Half Price" or any other similar expressions used by us represents an estimate of savings you might benefit from buying certain us compared to the major top brands and does not necessarily mean categories of tools offered by us. You are kindly reminded to verify when you are placing an order with us if you are actually saving comparison with the top major brands.
MODEL: WJ-003
NEED HELP? CONTACT US!
Have product questions? Need technical support? Please feel free to conta us:Technical Support and E-Warranty Certificate www.vevor.com/support
This is the original instruction, please read all manual instructions carefully before VEVOR reserves a clear interpretation of our user manual. The appearance of shall be subject to the product you received. Please forgive us that we won't again if there are any technology or software updates on our product.
1) CAUTION
1)Check all the circuitry and the plug connections carefully.
2)Install a voltage regulator if the power is unsuitable.
3)Do not share the outlet with other electrical appliances to avoid danger.
4)Do not use the sauna room if under the influence of alcohol, drugs, or medications.
5)Pregnant women or persons with poor health should consult their physicians before use.
6)Minors should be supervised in order to prevent injury.
7)Allow up to 30 minutes heat up time.
8) Do not use the room for drying clothes, bathing suits, etc.
9)Do not put animals in the room.
10)After 2 hours of continuous use, shut the sauna down for one hour.
| Part List | |||
| Code | Picture | Name | QTY. |
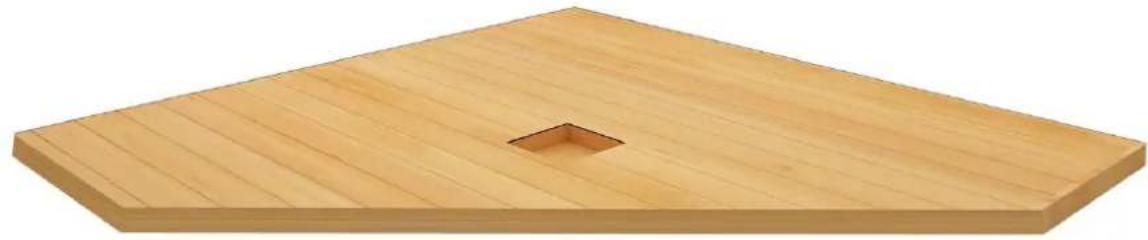
| 1 | Bottom | 1 | |
| 2 | Back panel 1 | 1 | |
| 3 | Back panel 2 | 1 | |
| 4 | Font panel | 1 | |
| 5 | Left panel | 1 | ||
| 6 | Right panel | 1 | ||
| 7 | Handler | 1 | ||
| 8 | Support under seat | 2 | ||
| 9 | Calf 1 | 1 | ||
| 10 | Calf 2 | 1 | ||
| 11 | Seat 1 | 1 |
| 12 | Seat 2 | 1 | |
| 13 | Roof | 1 | |
| 14 | Cover | 1 | |
| 15 | Bottom heater plate on the floc panel | 1 | |
| 16 | Cup holder | 2 | |
| 17 | Book holder | 1 | |
| 18 | Towel holder | 1 | |
| 19 | Oxygen bar | 1 | |
| 20 | Bench support | 1 | |
| 21 | Screws ST4*30mm | 42 | |
| 22 | Screws ST3*20mm | 2 | |
| 23 | Screws ST3.5*40mm | 4 | |
| 24 | Screws ST3*16mm | 26 | |
| 25 | Screws ST3*30mm | 30 | |
| 26 | Screws ST4*50mm | 15 | |
| 27 | Plastic plug for screw holes 8*13mm | 20 | |
| 28 | Dry paste for screw holes | 24 |
| Model | Power (W) | Voltage (V) | Frequency (Hz) | Plug Type |
| WJ-003 | 2470 | AC 220-240 | 50 | European Standard |
| 50 | Ausstandard | |||
| 60 | American Standard |
INSTALLATION PROCEDURE
CAUTION:
1)No plumbing or plumbing fixtures should be placed in the sauna.
2)Keep all liquids away from the heating panels.
3)Install sauna on a completely level surface.
4)Install sauna in an area that is dry.
5)Flammable objects and Corrosive chemical substances should be kept far away from the s
Each side panel has a white label to identify the side and direction. The panel with label should be placed on the left side according to the sauna (View from the outsid sauna). The same goes with the other panels.
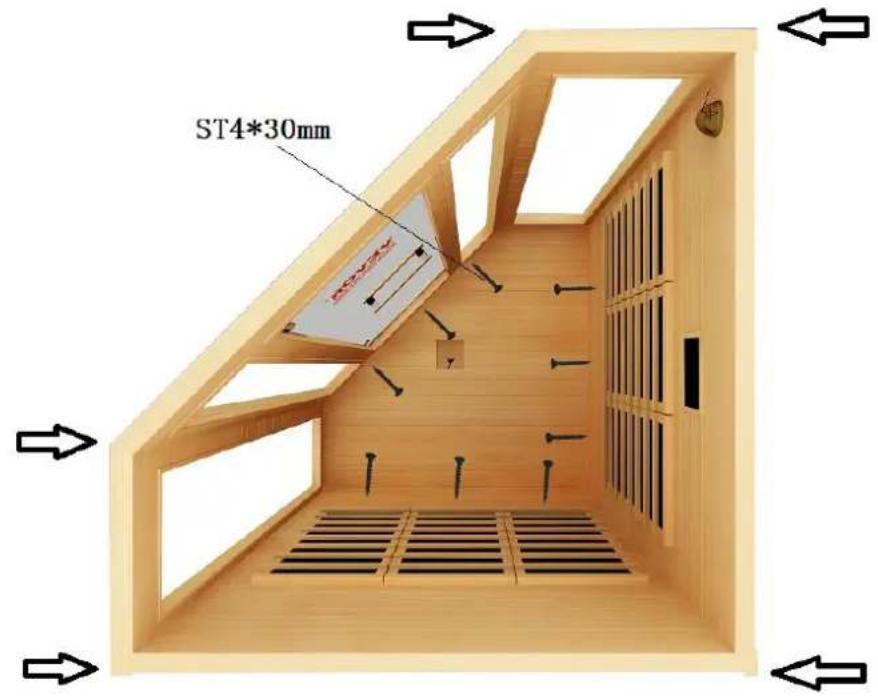
※ For Corner Style
(The following pictures are used for your reference. If your sauna has some differences from the please just follow the steps. Please read this direction carefully before use and keep it cautiously future. You should not try to install the sauna on your own as damage will easily occur. This sa
requires at least 2 adults to complete assembly. )
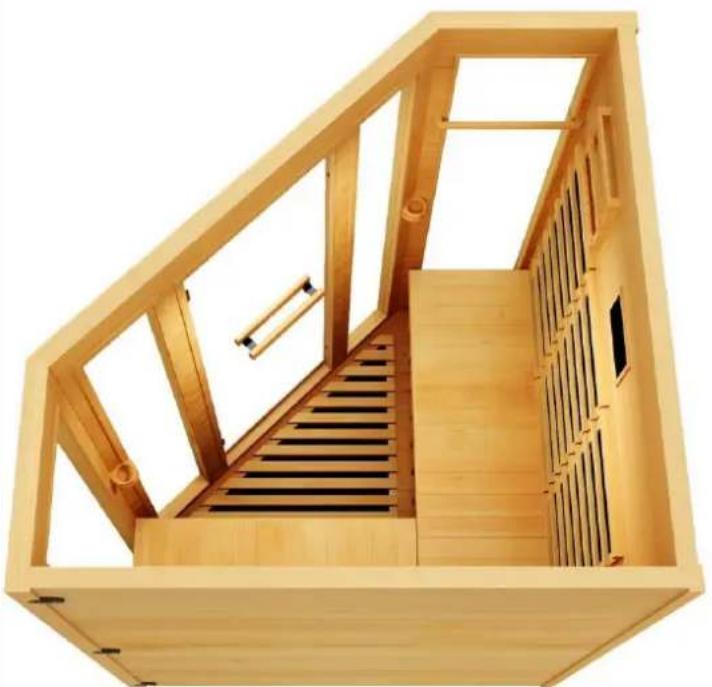
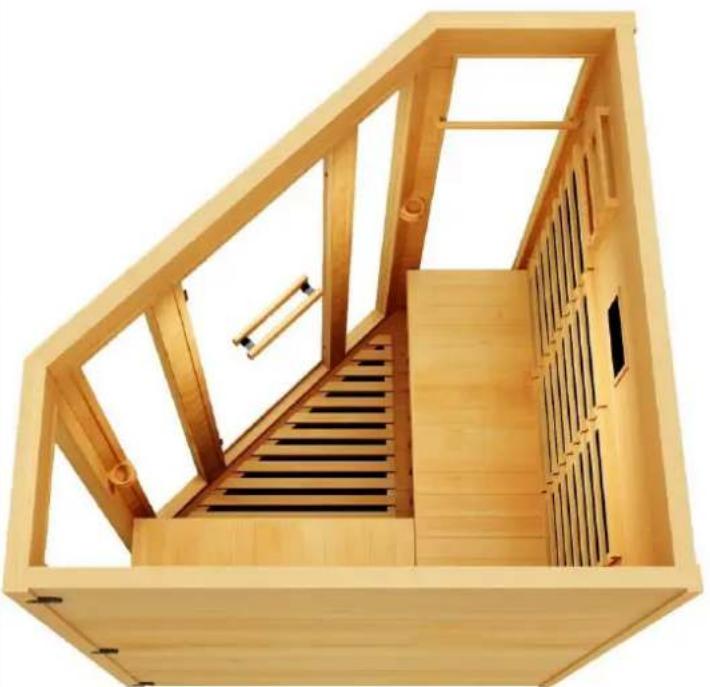
Product Size Drawing

1)Open sauna packages in a large area.
Place floor panels at the desired Horizontal the ground position.
2) Secure and align Back left panel on the Floor Panel vertically.(This step requires s to gently hold the panel.)
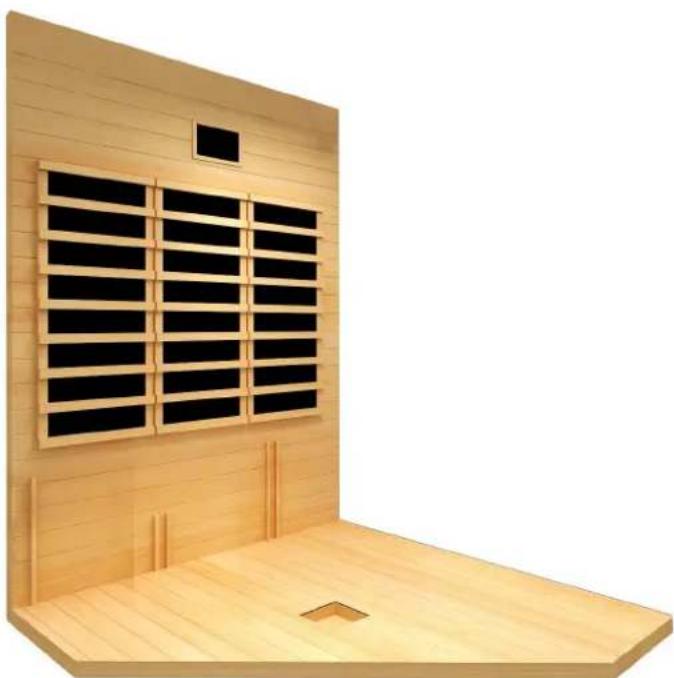
3) Secure and align Back right panel on the Floor Panel vertically and close the buccorner.
4) Secure and align front side panel on the Floor Panel vertically.(This step requires so to gently hold the panel.
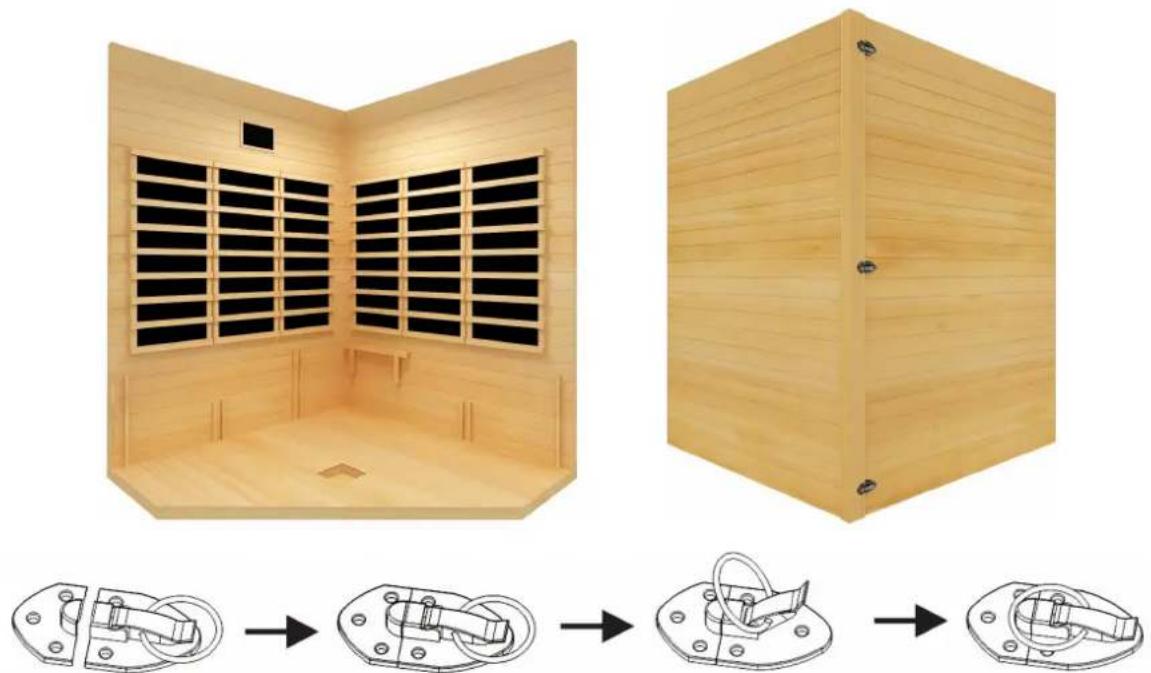
5) Secure and align Left and Right panel .Slide it down vertically between the front pa the back panel.

After making sure that the five corners are flush, fix the bottom with screws as show (ST4*30mm)
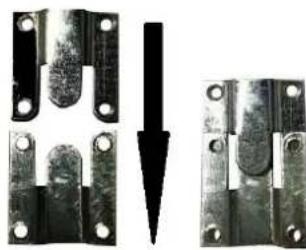
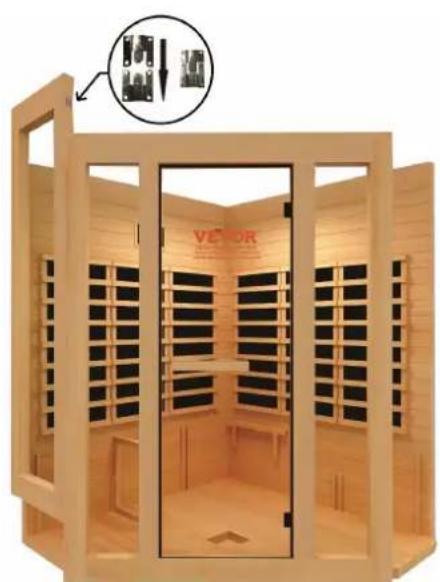
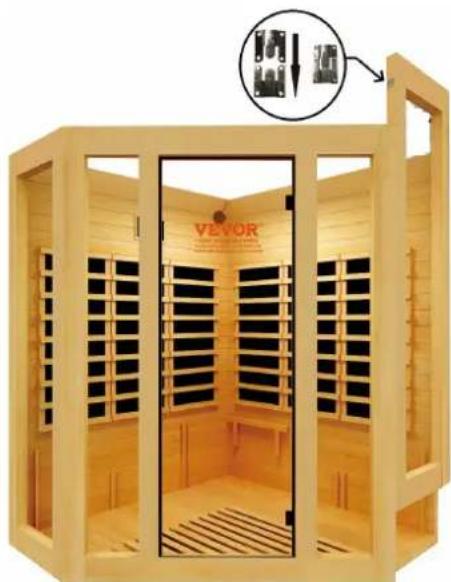
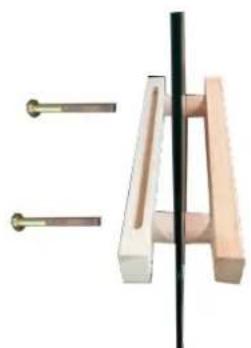
Install the handler .
You will get the following handle.
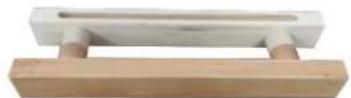
Step 1: Divide the handle into the picture below.
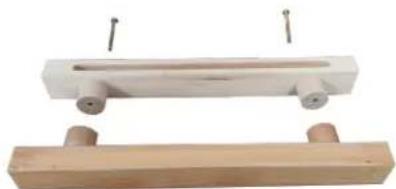
Step 2: Place the handles on the left and right sides of the glass and fasten them
6)Locate Shank panel between the two slips of left and back wall.
7)Locate support under seat (ST4*50mm) and glass baffle. Connect the terminals on the back panel.
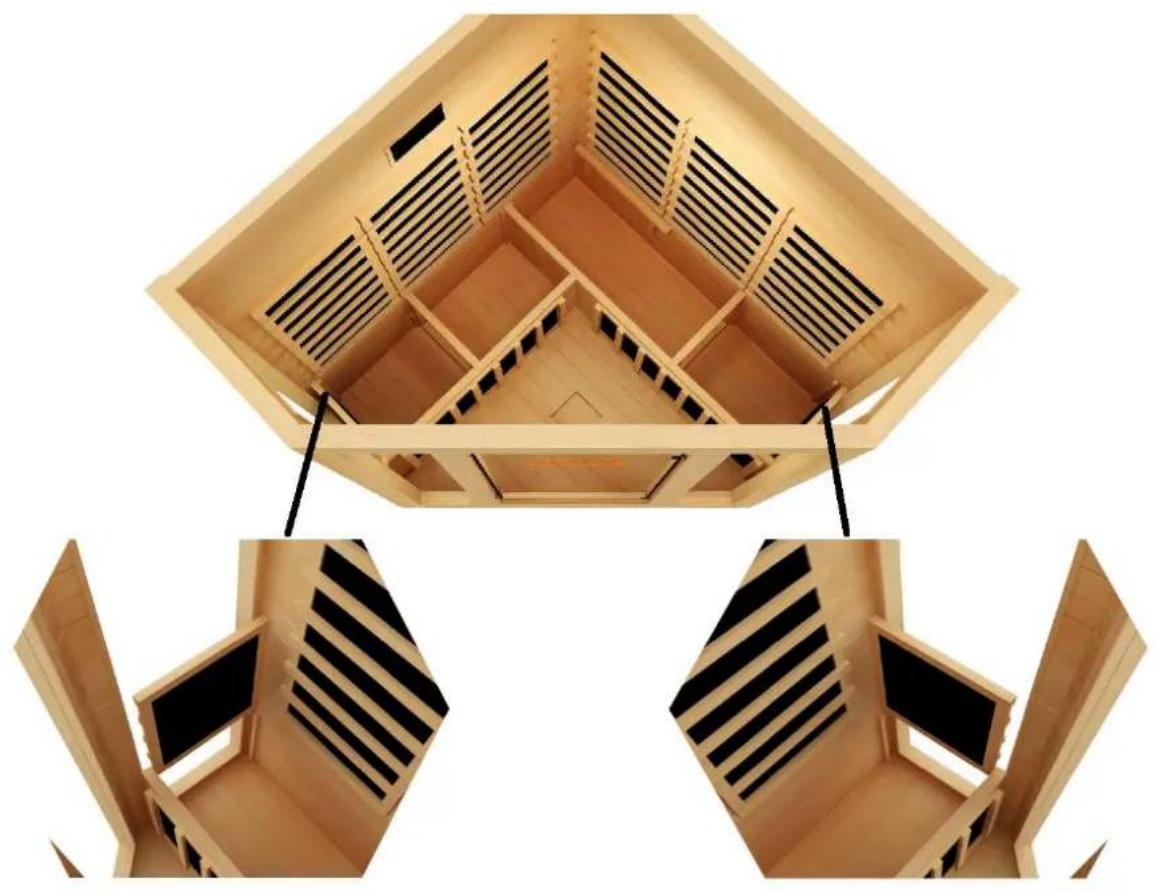
8)Locate Seat panel.
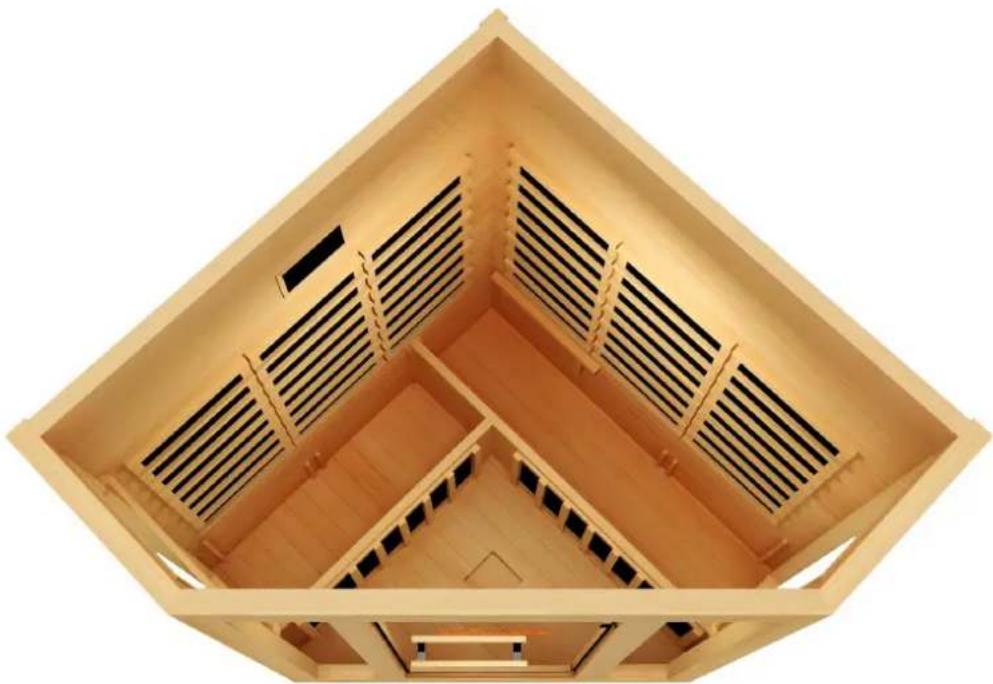
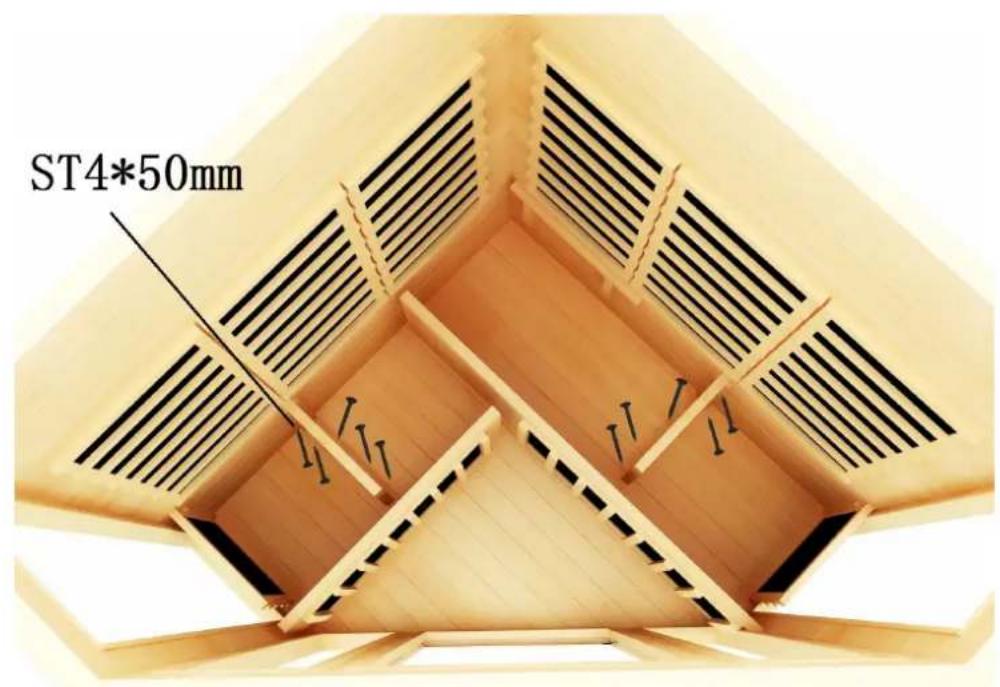
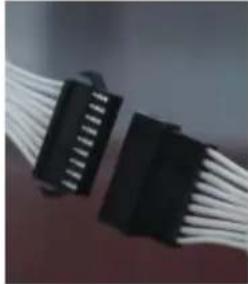
9 ) Raise Internal Top ceiling above the Panels and connect all plugs according to the number (1,2,3...).
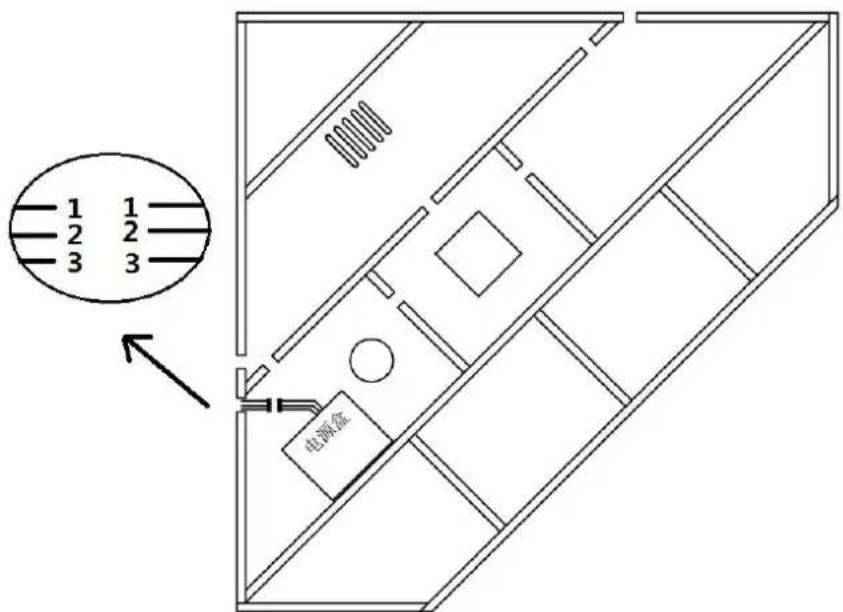
Connect the wires on the top. Please refer to the pictures below ( 3 steps).

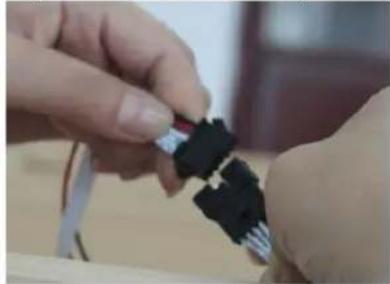
Fix the inner top with screws . (ST4*30mm)

10) Raise External Top Cover above the sauna. Pull the power wire out through the hole and fix the cover by a screw. (ST3*16mm)
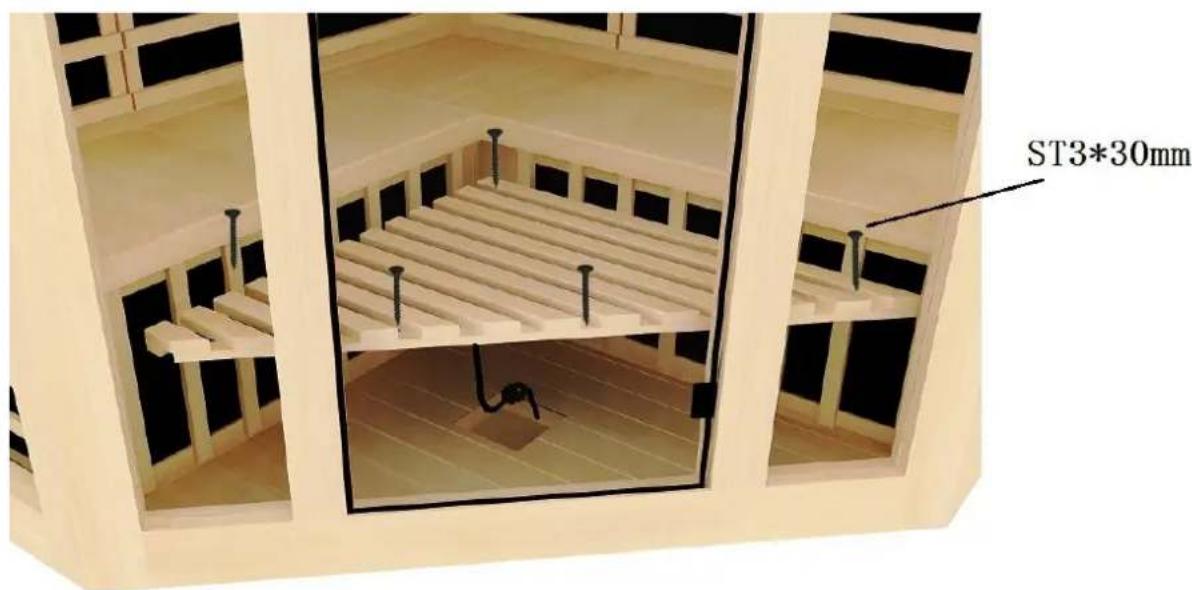
11) Install Bottom heater plate on the floor panel, connect the plug then fix the bottom heater plate with screws. (ST3*30mm)

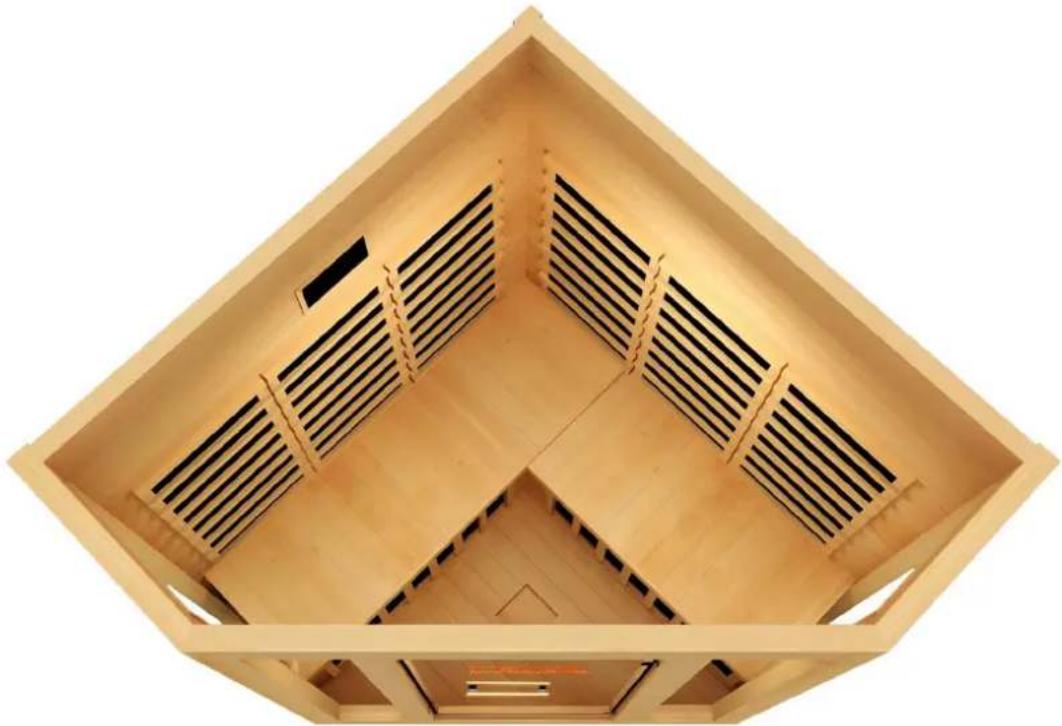
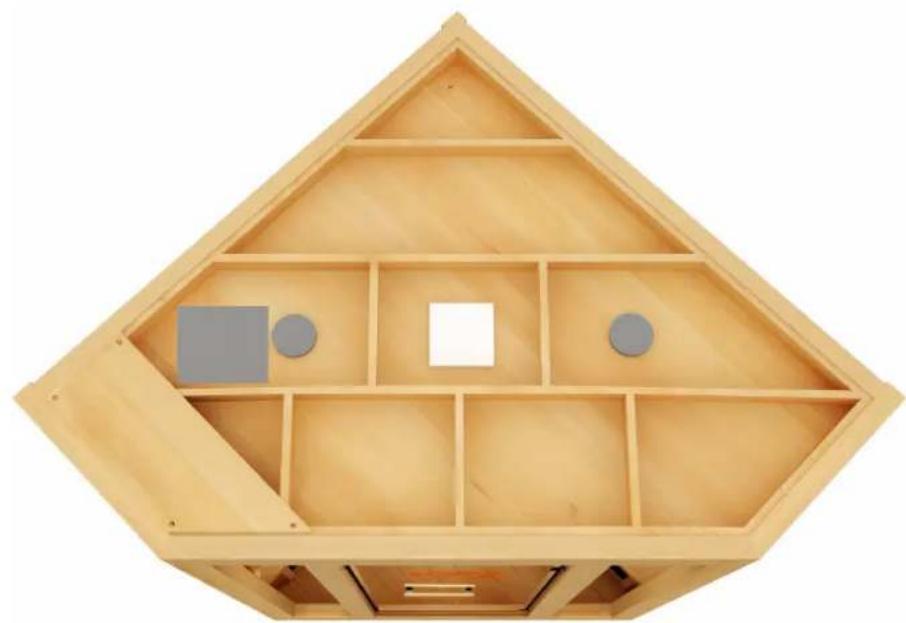
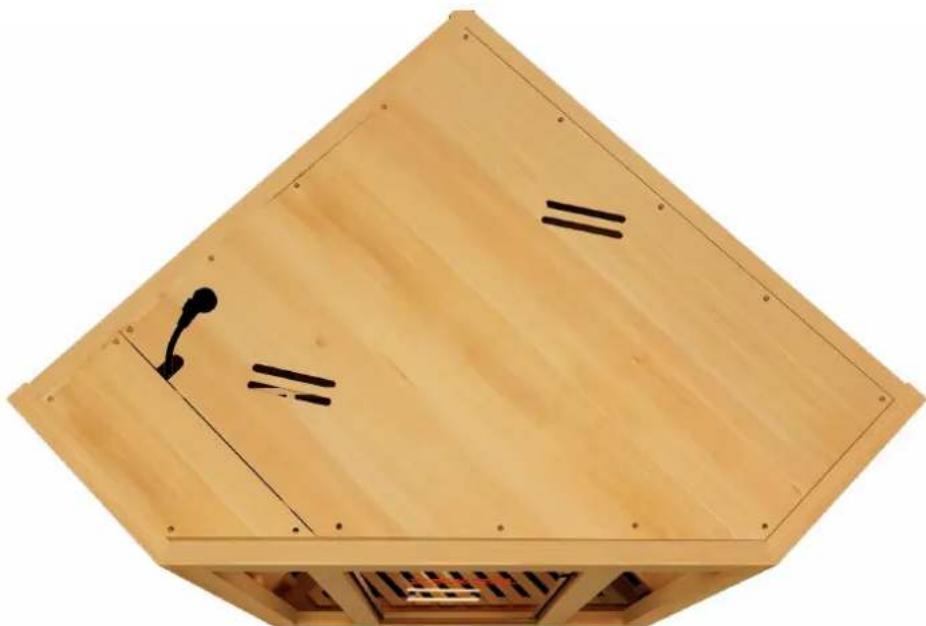
For Towel rack, cup holder, magazine holder, and oxygen ionizer installation
Although there are small pre-drilled holes for the placement of these items, the towel rack, magazine holder, and cup holder can be placed wherever you prefer as long as you do n the wood. If installing in a different location, it would be a good idea to pre-drill the holes tighten the screws. The oxygen ionizer should be installed in the upper left of the back pa there is a small wire that should be fed from the top panel. The following figure suggests installation position.
| Oxygen lonizer | Speaker | Color Light |
| Cup Holder | Towel rack | Magazine |
| ST3*30mm | ||
| ST3*30mm | ||
| ST3.5*40mm | ||
| ST3*20mm |

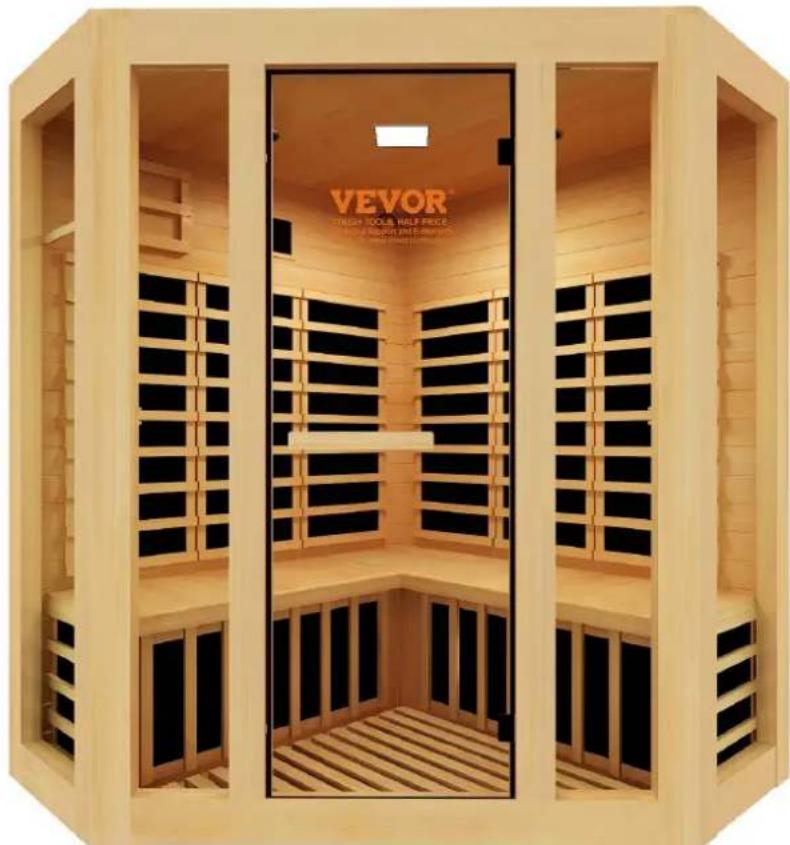
Whole Sauna
2. HOW TO USE INSTRUCTIONS
1) CAUTION
1) Check all the circuitry and the plug connections carefully.
2) Install a voltage regulator if the power is unsuitable.
3)Do not share the outlet with other electrical appliances to avoid danger.
4) Do not use the sauna room if under the influence of alcohol, drugs or medications.
5)Pregnant women or persons with poor health should consult their physicians before use.
6)Minors should be supervised in order to prevent injury.
7)Allow up to 30 minutes heat up time.
8)Do not use the room for dying clothes, bathing suits, etc.
9)Do not put animals in the room.
10)After 2 hours of continuous use, shut the sauna down for one hour.
2) USE ENVIRONMENT
1)Temperature: 15 65^ Time:1-99 minutes
2)Comparative humidity: ≤ 85%
3)Atmospheric pressure: 700hpa~1060hpa;
3) CHARACTERISTICS
(1) Wooden frame;
(2) Electronic controls and constant temperature automatically;
(3) Imported high-precise numerical transporter;
(4) Electronic keying;
(5) Radiate heaters;
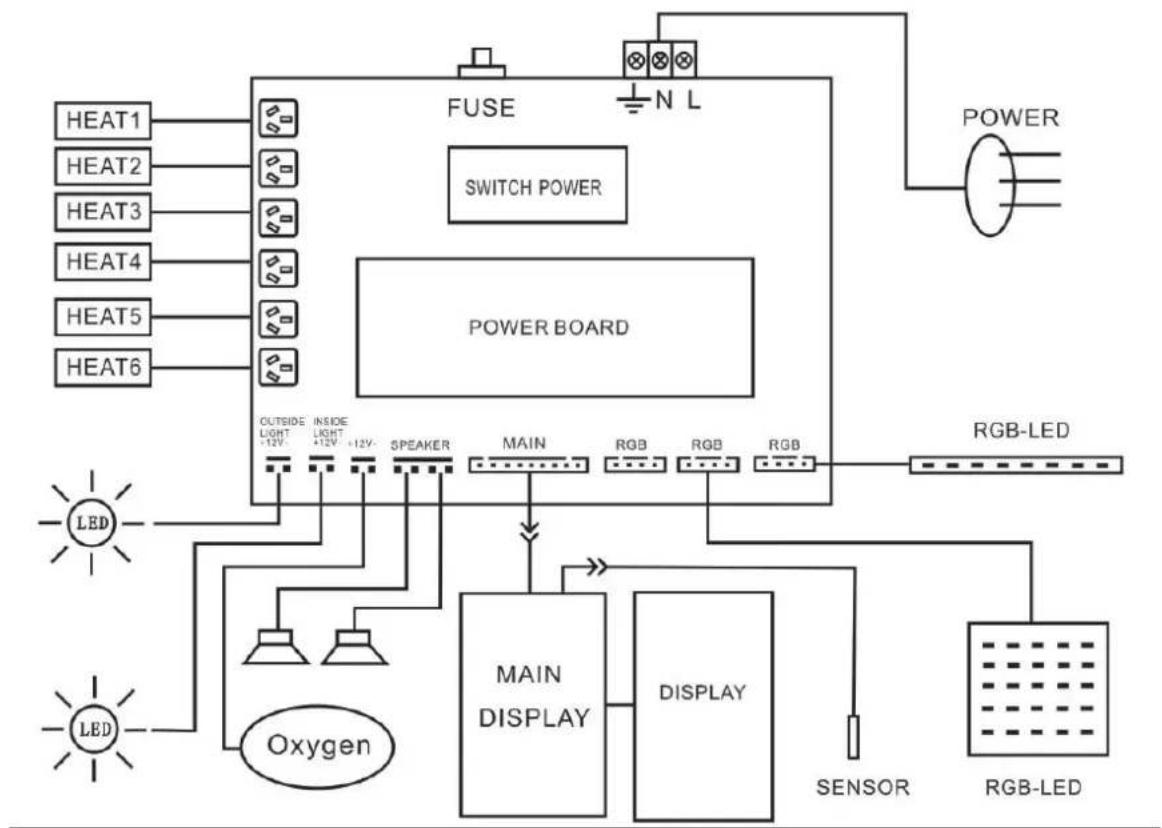
Warm tip: Before use, all the connection cables of the controller may be connected.
1.Display window:The left window displays the timing remaining time and volume.The right shows the temperature and FM frequency.
2."Light" key: light switch, press once: internal light on, external light off. Press again: inner light off, outer light on. Then press in turn for full on - full off.
3.Temperature "+" and "-" keys: Adjust the temperature, hold down the key to quickly change. FM status: Hold down for 5 seconds, automatically search the radio frequency and save. After 1 search is over, press once to select the next frequency.
4. LED color light key: press once on → Slow → Fast → White → Blue green → Blue → Red green → green → Off.
-
On/Off: Press the power on/off button once.
-
Press "Mp3" : Enter the BLUE USB function selection. Bluetooth device name: BT301.
-
Press "FM" to enter the FM radio status. Hold down the temperature "+" or "-" button for 5 seconds, automatically search the radio frequency and save. After the search, press the temperature "+" or "-" button to select the next frequency.
-
"D": In FM mode: press once to mute. Press again to restore the sound.
9.USB
10.Time "+" and "-" keys: Adjust the time, press and hold the key to change quickly. You can adjust the volume only when you enter the "FM" or "Mp3" mode and press the "+" or "-" keys.
11.2 LED indicators: Red Power indicator: The indicator is on immediately after it is powered on. Green heating indicator: On when heating is on, off when heating is off.
Note: Hold down the temperature "+" and "-" keys at the same time, Fahrenheit and Celsius temperature conversion.
5) TROUBLESHOOTING
I.The light bulb is out of order
| Possibility | Repairing Method | |
| 1 | The bulb fuse is burned up | Change a bulb. |
| 2 | The bulb and the socket are connected well. | Pull out the bulb and check the socket, change socket if necessary. Then plug it back in. |
| 3 | The fuse is burned up. | Change a fuse. On the top of ceiling. |
II.The control panel is out of order
| Possibility | Repairing Method | |
| 1 | The cable of control panel is no connected well. | Check the cable connection and fix it prop |
| 2 | The fuse is burned up. | Change a fuse. On the top of ceiling |
| 3 | The indicator light of power is on, led display | Most likely will need a new control pan |
III.The heaters are out of order
| Phenomenon | Possibility | Repairing Method |
| 1 One of heaters cannot heat. | 1)The heater is not connected properly | Check connection |
| 2)The heater needs replacement | Replace heater | |
| 2 All heaters can heat. | 1)The power plug is not connectepropently | Check power plug |
| 2)The heaters are not properly connected | Fix the connections | |
| 3)Relay malfunction | Change relay | |
| 4)Control panel malfunction | Change control panel |
CIRCUIT DIAGRAM
6) MAINTENANCE
I. The sauna room should be kept clean and odor free.
II.Damp towels should always be used on benches otherwise perspiration penetrates the soft III.Air out the room often by keeping the door and vents open when the room is not in use IV.Saunas that are in daily use should be washed down at least once a week to keep the air fresh.
V.Inspect benches regularly for required maintenance.
VI.To clean and remove perspiration stains, use soap or detergent in warm water, best app a scrub brush
VII.Badly soiled surfaces may require sanding Sand paper wrapped around a wooden block well.
7) WARRANTY
I. Please fill in the warranty card on the following page within 30 days to register your sau receive a full warranty.
We guarantee our sauna against defective material and/or workmanship for a period of 12 h from the purchase date. We warranty the replacement of heaters and any electronic compor associated with the sauna for the life of the sauna to its original purchaser. Variations in w texture, color, and normal wear are not covered by any warranty. We do not warranty the CD/DVD/LCD System as it carries its own manufacturer's warranty. The warranty is deemed the sauna has been misused, altered, or open to the elements of weather. Any deviation from instruction manual causing damage to sauna will not be under warranty. Our Saunas and a subsidiaries and/or associates shall not be held responsible for any misuse of the sauna by customer. Our Saunas shall not be liable for any damage and/or injury caused by customer of product. Customers shall use sauna at their own risk. Conditions are subject to change notice.
II.Any damages sustained to sauna set during transportation are not covered by this warrant. Claims for damage must be filed through transport/shipping Company. Any damage must be reported on the Bill of Lading through transport shipping company.
III.You're welcomed to give us suggestions.
DISCLAIMER
Our Saunas and its associates do not provide medical guidance. Consult a doctor for medical advice. All of the information contained in this manual is for information purely. We reserve the right to change, without notice, anything contained within the map. Our Saunas shall not be held responsible for printing variations. Color variations may Some models are shown with optional features.
Made In China
VEVOR®
TOUGH TOOLS, HALF PRICE
Technical Support and E-Warranty Certificate
www.vevor.com/support
VEVOR®
TOUGH TOOLS, HALF PRICE
Assistance technique et certificat de garantie electronique www.vevor.com/support
SAUNA EN BOIS
MODELE:WJ-003
| ST3*30mm | ||
| ST3*30mm | ||
| ST3.5*40mm | ||
| ST3*20mm |
Sauna entier

2. COMMENT UTILISER LES INSTRUCTIONS
1) ATTENTION
www.vevor.com/support
VEVOR®
TOUGH TOOLS, HALF PRICE
| ST3*30mm | ||
| ST3*30mm | ||
| ST3.5*40mm | ||
| ST3*20mm |

Ganzi Sauna

www.vevor.com/support
VEVOR®
TOUGH TOOLS, HALF PRICE
| ST3*30mm | ||
| ST3*30mm | ||
| ST3.5*40mm | ||
| ST3*20mm |

Sauna intera

2. COME USARE LE ISTRUZIONI
1) ATTENZIONE
www.vevor.com/support
VEVOR®
TOUGH TOOLS, HALF PRICE
Soporte的技术ico y certificate de garantia electrònica www.vevor.com/support
SAUNA DE MADERA
MODELO: WJ-003
Seguimos comprometidos a proportionarle herramrientas a precios competivos.
| ST3*30mm | ||
| ST3*30mm | ||
| ST3.5*40mm | ||
| ST3*20mm |

Sauna entera

2. INSTRUCCIONES DE CÓM O UTILIZAR
1) PRECAUCION
www.vevor.com/support
VEVOR®
TOUGH TOOLS, HALF PRICE
| ST3*30mm | ||
| ST3*30mm | ||
| ST3.5*40mm | ||
| ST3*20mm |

Caţa Sauna

2. JAK KORZYSTAC Z INSTRUKCJI
1) UWAGA
www.vevor.com/support
VEVOR®
TOUGH TOOLS, HALF PRICE
Technische ondersteuning en e-garantiecertificaat www.vevor.com/support
HOUT SAUNA
MODEL: WJ-003
| ST3*30mm | ||
| ST3*30mm | ||
| ST3.5*40mm | ||
| ST3*20mm |
Hele sauna

2. HOE DE INSTRUCTIES TE GEBRIKEN
1) LET OP
I. De gloeilamp is defect
www.vevor.com/support
VEVOR®
TOUGH TOOLS, HALF PRICE
www.vevor.com/support
| ST3*30mm | ||
| ST3*30mm | ||
| ST3.5*40mm | ||
| ST3*20mm |

Hel bastu

2. HUR MAN ANVÄNDER INSTRUKTIONER
1) WARNING
www.vevor.com/support