SC-11XD - Hot dog maker Vevor - Free user manual and instructions
Find the device manual for free SC-11XD Vevor in PDF.

| Brand | Vevor |
| Model | SC-11XD |
| Product Type | Electric hotdog machine with rotating rollers |
| Power Supply | 110 V ~ 60 Hz (North America) or 220-240 V ~ 50 Hz (Europe) |
| Power | 1650 W (110 V) / 2200 W (220-240 V) |
| Number of rollers | 11 (estimated from model) |
| Cooking Temperature Range | 120 °C - 160 °C (248 °F - 320 °F) |
| Temperature Control | Rotary thermostat with heating indicator light |
| Roller Material | Stainless steel (not specified, estimated) |
| Chassis Material | Steel with protective coating |
| Doors | Glass, with handles |
| Oil Drip Tray | Yes, removable for cleaning |
| Plug Type | American (110 V) or European (220 V) depending on version |
| Fuse | 20 A (110 V) / 10 A (220 V) |
| Usage | Indoor only |
| Grounding | Required - grounded plug |
| Roller Maintenance | Clean every 4 to 5 hours of cooking |
| Exterior Cleaning | Soft dry cloth - no abrasive cleaner |
| Included Assembly Parts | Screws, nuts, mica gaskets, nylon sleeves |
| Accessories | Protective film to remove before use |
| Warranty | Technical support and electronic warranty certificate |
Frequently Asked Questions - SC-11XD Vevor
User questions about SC-11XD Vevor
0 question about this device. Answer the ones you know or ask your own.
Ask a new question about this device
Download the instructions for your Hot dog maker in PDF format for free! Find your manual SC-11XD - Vevor and take your electronic device back in hand. On this page are published all the documents necessary for the use of your device. SC-11XD by Vevor.
USER MANUAL SC-11XD Vevor
Technical Support and E-Warranty Certificate www.vevor.com/support
ROLLING HOT-DOG GRILL
MODEL: SC-5XD / SC-7XD / SC-11XD
We continue to be committed to provide you tools with competitive price. "Save Half", "Half Price" or any other similar expressions used by us only represents an estimate of savings you might benefit from buying certain tools with us compared to the major top brands and does not necessarily mean to co all categories of tools offered by us. You are kindly reminded to verify carefully when you are placing an order with us if you are actually Saving Half in comparison with the top major brands.
VEVOR
TOUGH TOOLS, HALF PRICE
ROLLING HOT-DOG GRILI
MODEL: SC-5XD MODEL: SC-7XD


NEED HELP? CONTACT US!
Have product questions? Need technical support? Please feel free to contact us:
Technical Support and E-Warranty Certificate www.vevor.com/support
This is the original instruction, please read all manual instructions carefully before operating. VEVOR reserves a clear interpretation of o user manual. The appearance of the product shall be subject to the
product you received. Please forgive us that we won't inform you ag there are any technology or software updates on our product.
| Warning-To reduce the risk of injury, user must read instruct manual carefully. | |
| Indoor use only. | |
| Pay attention to high temperatures to prevent burns. | |
| CORRECT DISPOSAL This product is subject to the provision of European Directive 2012/19/EC. The symbol showing a wheele bin crossed throu indicates that the product requires separate refuse collection i European Union. This applies to the product and all accesso marked with this symbol. Products marked as such may not discarded with normal domestic waste, but must be taken to collection point for recycling electrical and electronic devices | |
| Compliance is a North America security certification. | |
| Compliance is a EC & UK security certification. |

WARM PROMPT:
A white protective film is attached to the surface of the fuselage protect the fuselage from scratches.Please tear it off before use.
SAFETY WARNINGS AND PRECAUTIONS
Thank you for using this product. In order to make sure that you can operam machine correctly, read this instruction carefully before operation and keep it properly for future reference. Please read the precautions and safety rules on page to ensure your safe use. This manual will outline safety warnings and precautions, operating, maintenance and cleaning. The warnings and instructions reviewed in this manual cannot cover all possible conditions and situations that may occur. Caution and common sense are not built into this product, since believe that the uses will comply with these codes. Before starting a training program or engaging in strenuous endurance activity on the device, please cc a doctor.
Please read ALL the instructions before using your machine.
- Make sure the voltage in your outlet is the same as the voltage indicated appliance's rating label.
- Do not let children and minors and pet get close to or touch the machir
- Do not touch the hot surface directly with your hands. Always use the hat knob for operation.
- To prevent electrical shock, do not immerse the cord or plug into water or liquids.
- Do not immerse the appliance in water or any other liquid.
- Unplug the machine from the outlet when not in use and before cleaning. the appliance before installing or removing parts and before cleaning.
- Cool down the HOT parts before operation and cleaning.
- Do not operate the device with damaged cord or plug, malfunction or with mechanical damage. Send it to your nearest authorized service centre for examination and repair (ONLY technicians should open up the unit).
- Using any accessories or attachments that are not provided or recommend by the manufacturer may cause injury.
- If the machine is not to be used for a long period of time, unplug it, or cover it and store it in a dry and safe place.
- Do not leave the power cord hanging over the edge of table or counter
come into contact with any hot surfaces.
- Do not place the unit on or near hot air, electric burners or heaters.
- Always switch off the power to the socket before plugging in or unplugging Hold the plug instead of pulling on the cord.
- Do not apply this unit to any other purposes than the indicated usage.
- KEEP IT OUT OF CHILDREN'S REACH. Never leave it unattended while use.
- DO NOT CLEAN IT WITH ANY ABRASIVE MATERIAL.
- Always check that this machine is plugged into a grounded outlet with the appropriate electrical supply. Ensure that the wall outlet being used is properly grounded. If not, you must install a grounded outlet. Have the work performed by a certified electrician who is properly qualified to meet local safety and el codes.
- Ensure that the power outlet, plug and cord being used are in good wo condition. Damaged components should be repaired by a certified electrician w is qualified to meet local safety and electrical codes. Even if your power cor functioning properly, keep it away from water and avoid letting it run over ca or heating devices.
- Avoid using it in the presence of flammable liquids, gases, dust or other explosive situations.
- Do not move the machine before cooling and during heating
- Do not operate the machine in an appliance garage or under a wall call Always unplug the unit from the electrical outlet when storing in an appliance garage. Otherwise, it would cause a risk of fire, especially if the machine to the garage wall or the door touches it as it closes.
- Type Y attachment: If the supply cord is damaged, it must be replaced manufacturer, its service agent or similarly qualified persons in order to avoid hazard.
- Children shall not play with the appliance. Cleaning and user maintenance shall not be made by children without supervision.
- Inspect before every use.
- DO NOT CLEAN IT WITH ANY ABRASIVE MATERIAL.
- Never leave it unattended while in use. Never leave the child unattended
- Pet urine and feces can damage the product, please keep away.
WARNING: This appliance is not intended for use by young or infirm persons unless supervised by a responsible person to ensure that they use the appliance safely. Young children should be supervised to ensure that they do not play with the product. Pets should stay away from the product.
PRODUCT PARAMETERS
| MODEL | Region | Voltage | Power | Plug Type | Fuse |
| SC-5XD | North America | AC110V 60Hz | 750W | American PLUC | 10A |
| Europe | AC220-240V 50Hz | 1000W | European PLUC | ||
| SC-7XD | North America | AC110V 60Hz | 1050W | American PLUC | 15A |
| Europe | AC220-240V 50Hz | 1400W | European PLUC | ||
| SC-11XD | North America | AC110V 60Hz | 1650W | American PLUC | 20A |
| Europe | AC220-240V 50Hz | 2200W | European PLUC |
Attention:
- The voltage used for this device must be the same as the power supply
- Users need to install it near the power switch and fuse.
- If the machine is not powered, remove the plug from the electrical o and check whether the fuse is blown.
- It is recommended that products use separate lines and sockets to avoid breaker or time delay fuse overload.

WARM PROMPT:
A white protective film is attached to the surface of the fuselage to protect the fuselage from scratches. Please tear it off before use.
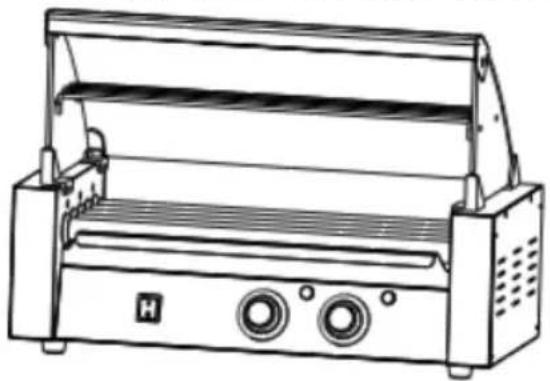
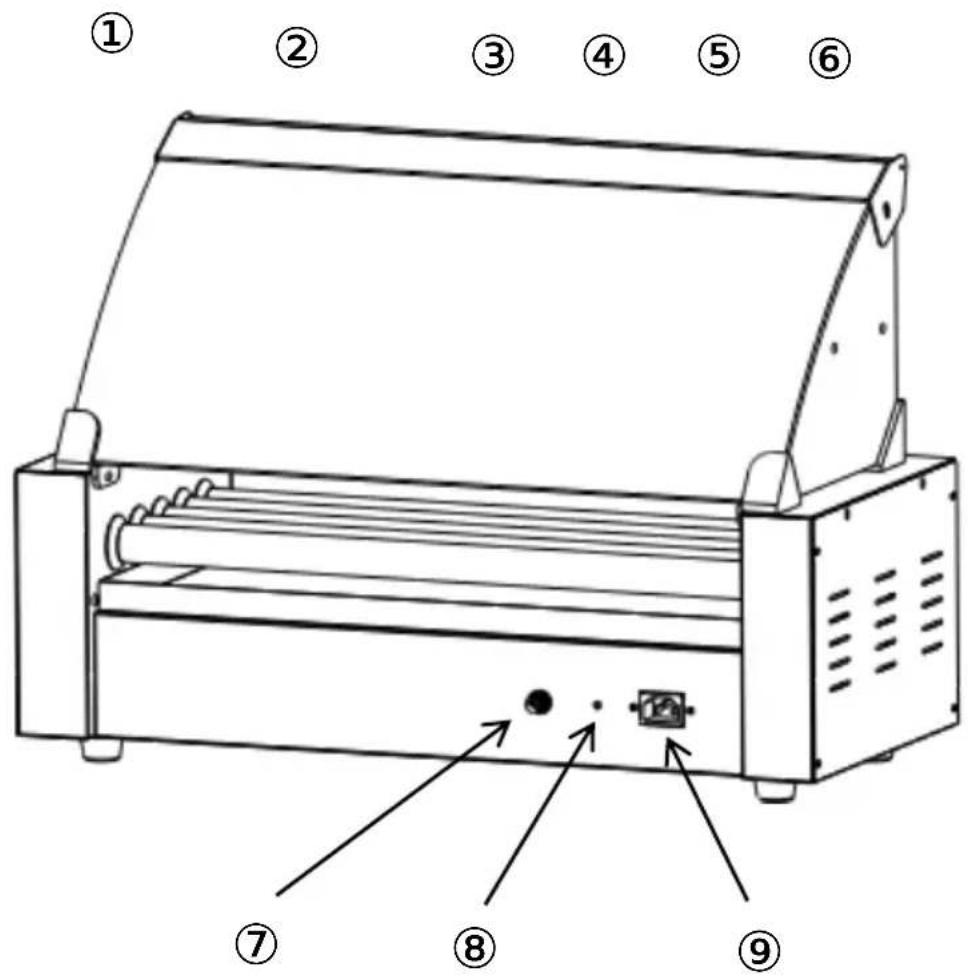
PRODUCT COMPONENTS
Note: The location of the core components of these three machines same!
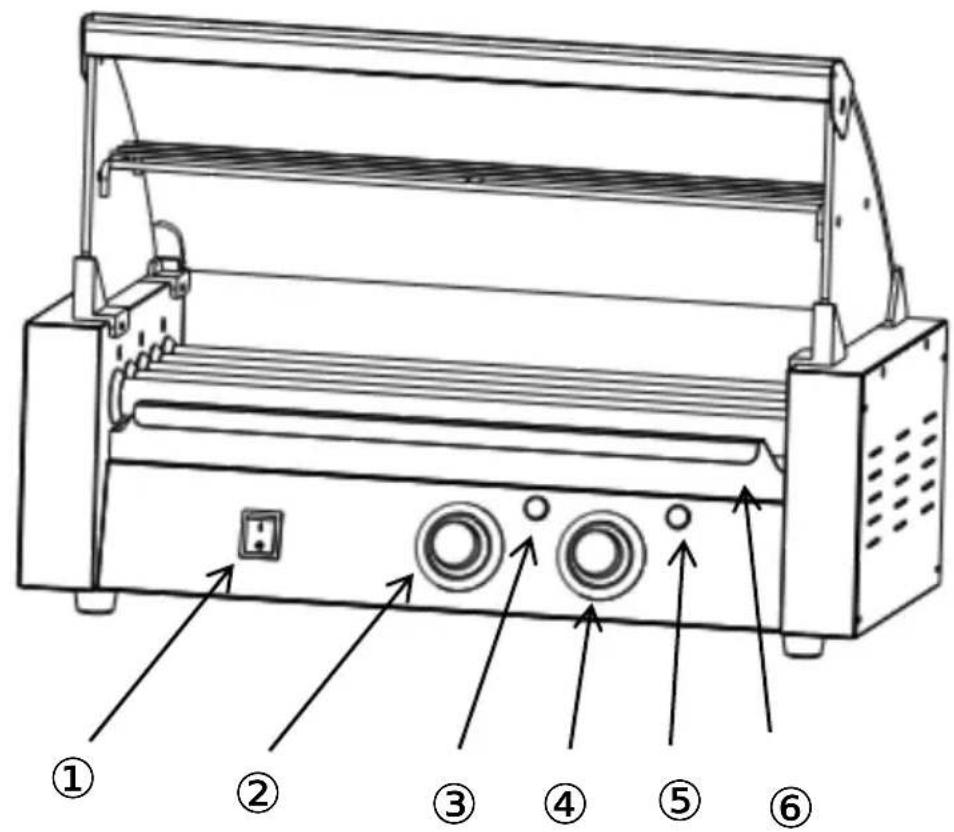
- Power Switch
2.Temperature Knob (Front) - Heat Light (Front)
4.Temperature Knob (Back) - Heat Light (Back)
- Pan
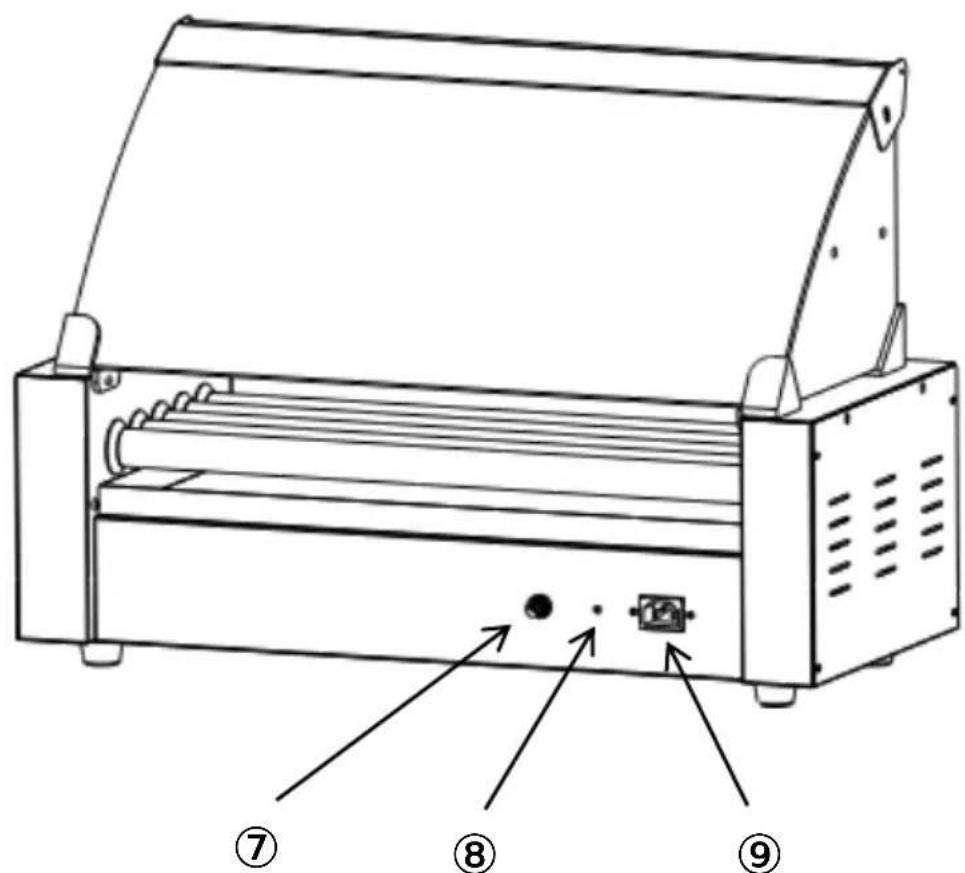
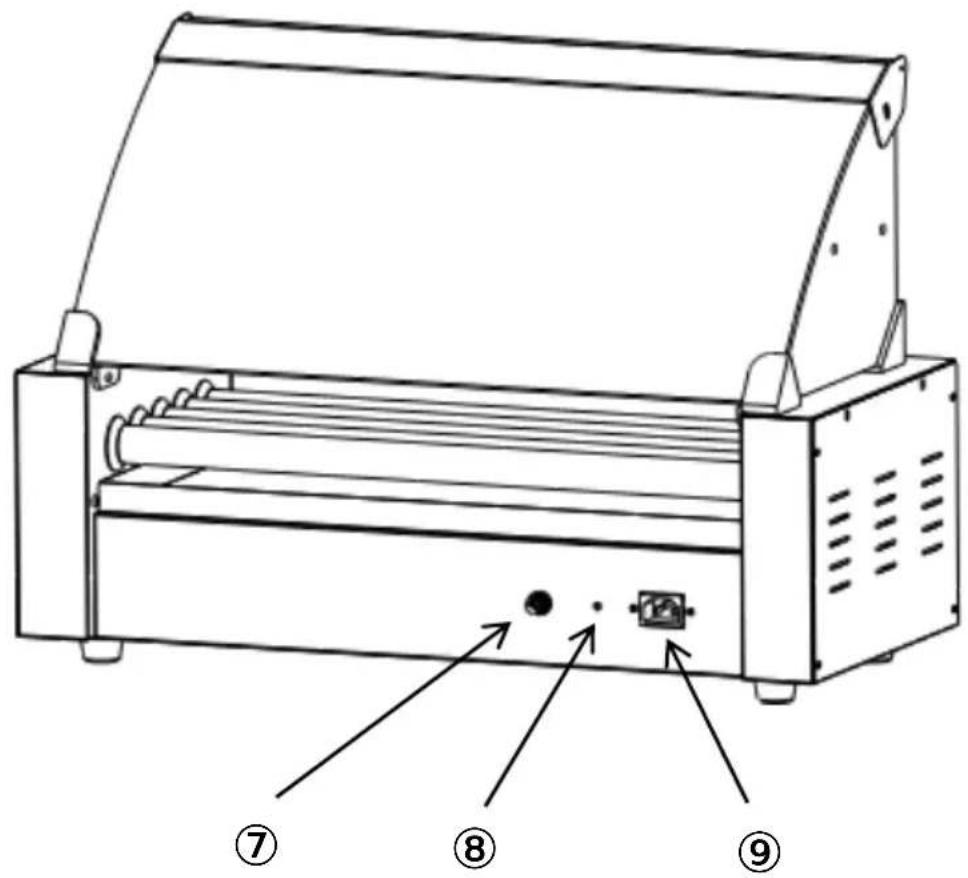
- Fuse
- Protective Earthing
- Power Socket
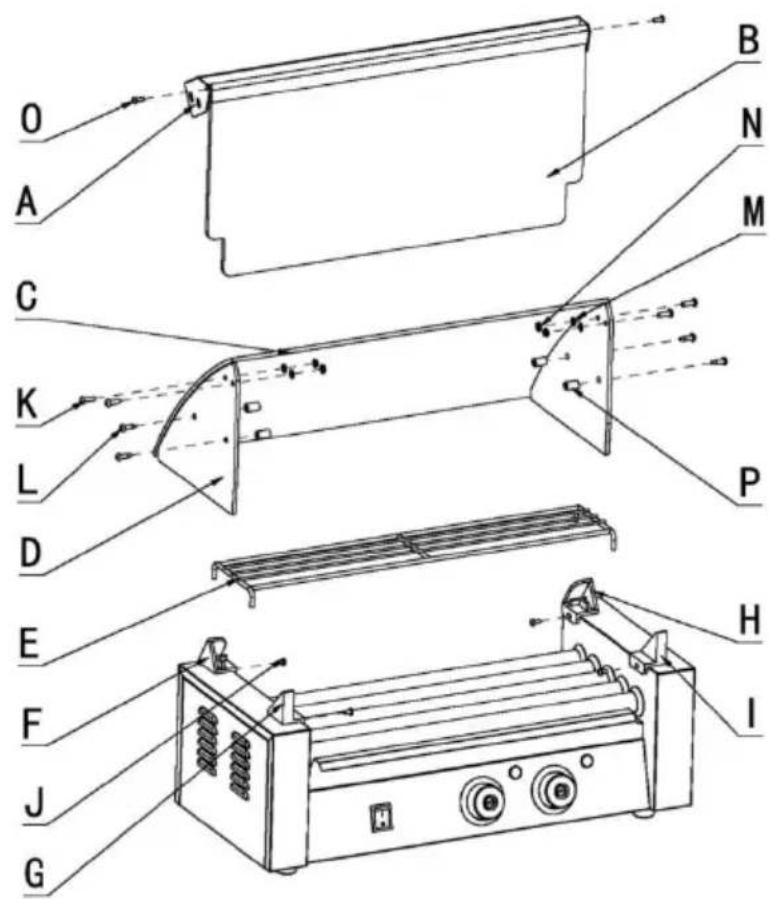
EXPLODED VIEW
Note: The location of the core components of these three machines same!

| NO. | Name | QTY | NO. | Name | QTY |
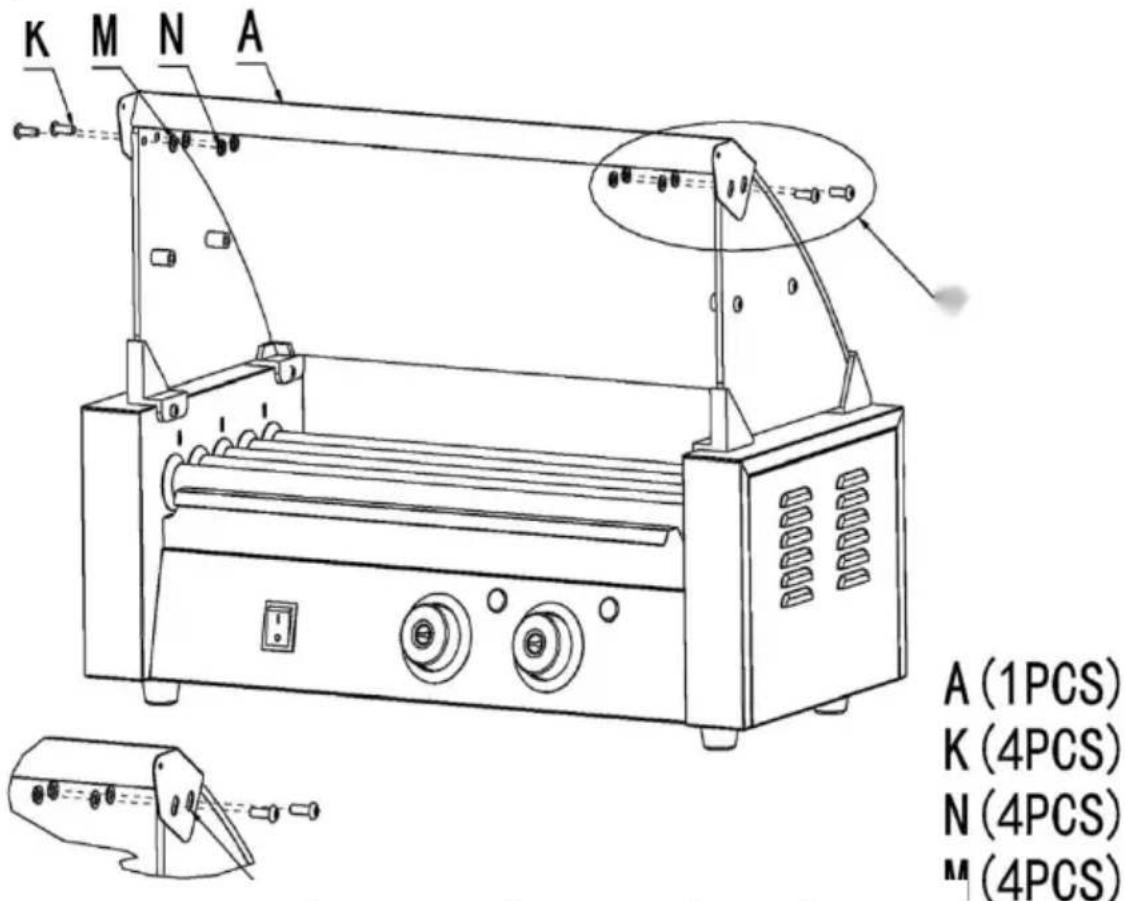
| A | Glass front fixed beam | 1 | I | Glass stand front (right) | 1 |
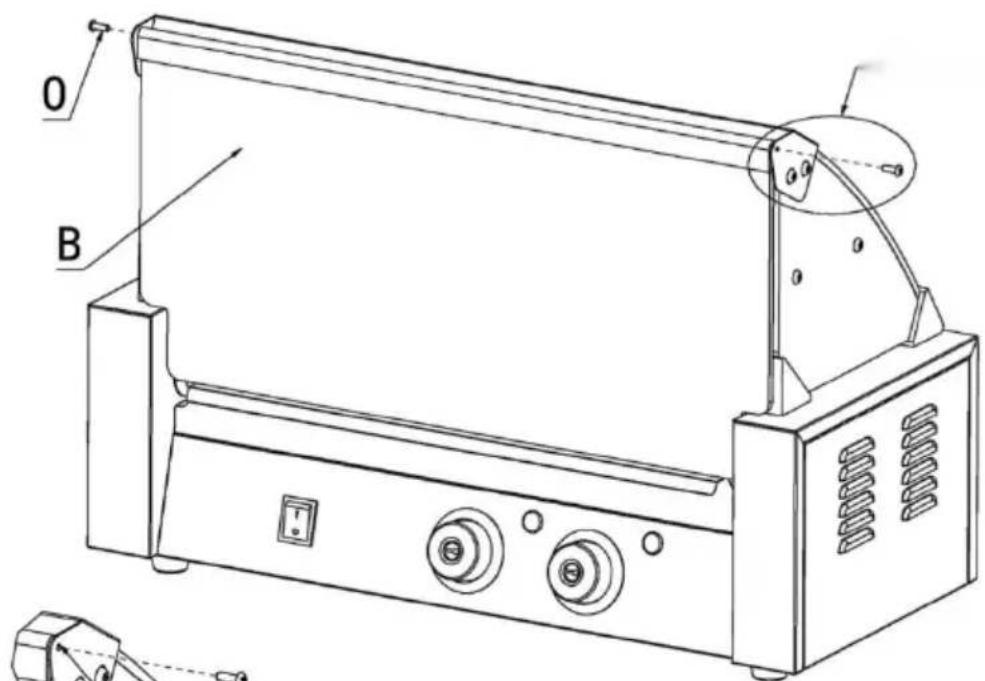
| B | Glass front door | 1 | J | Screws M4x8 | 4 |
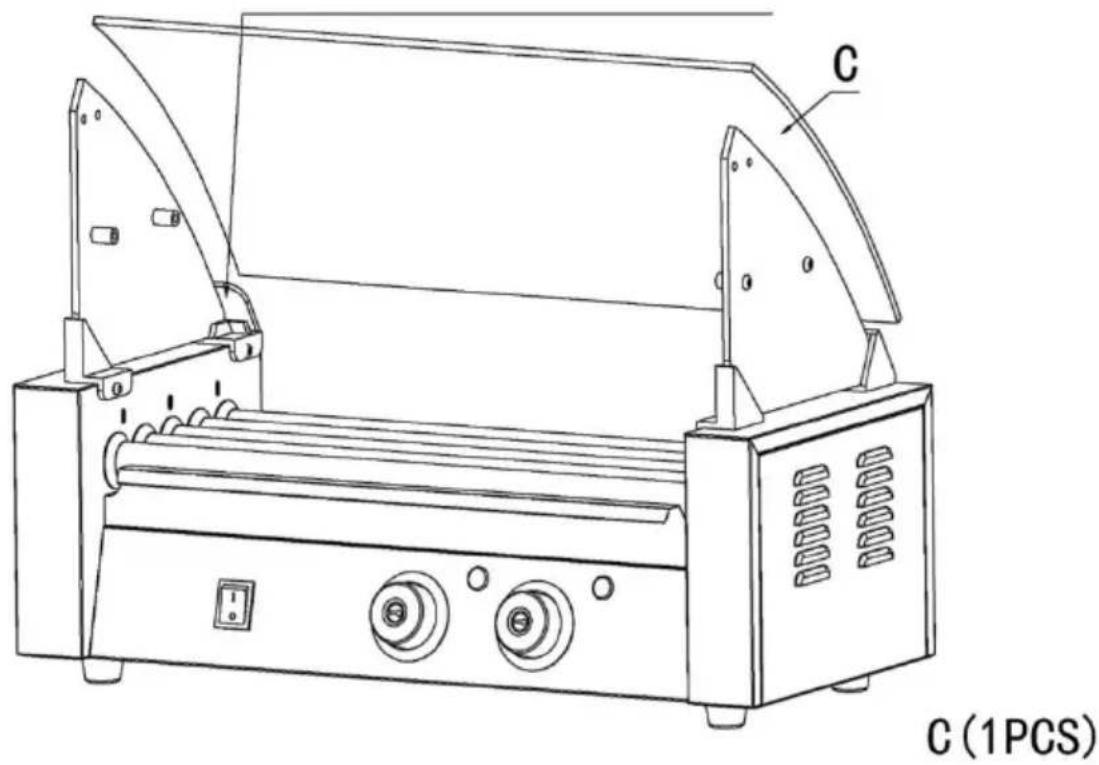
| C | Curved glass | 1 | K | Screws M5x14 | 4 |
| D | Side glass | 2 | L | Screws M6x14 | 4 |
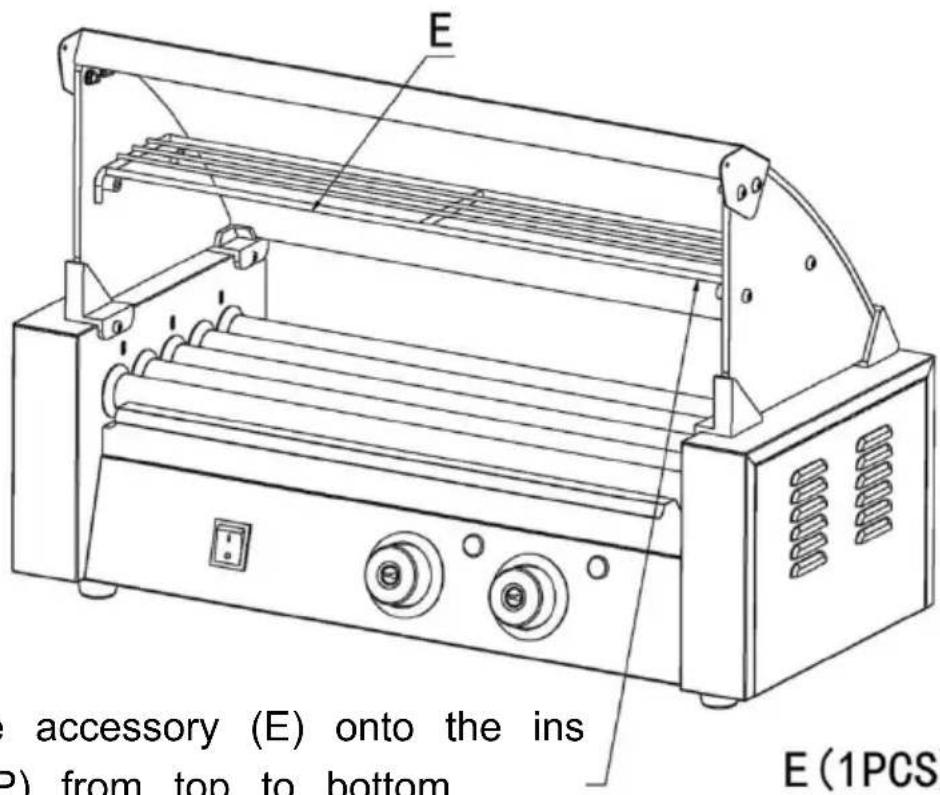
| E | Shelves | 1 | M | Nut M5 | 4 |
| F | Behind the glass stand (left) | 1 | N | Mica gasket | 4 |
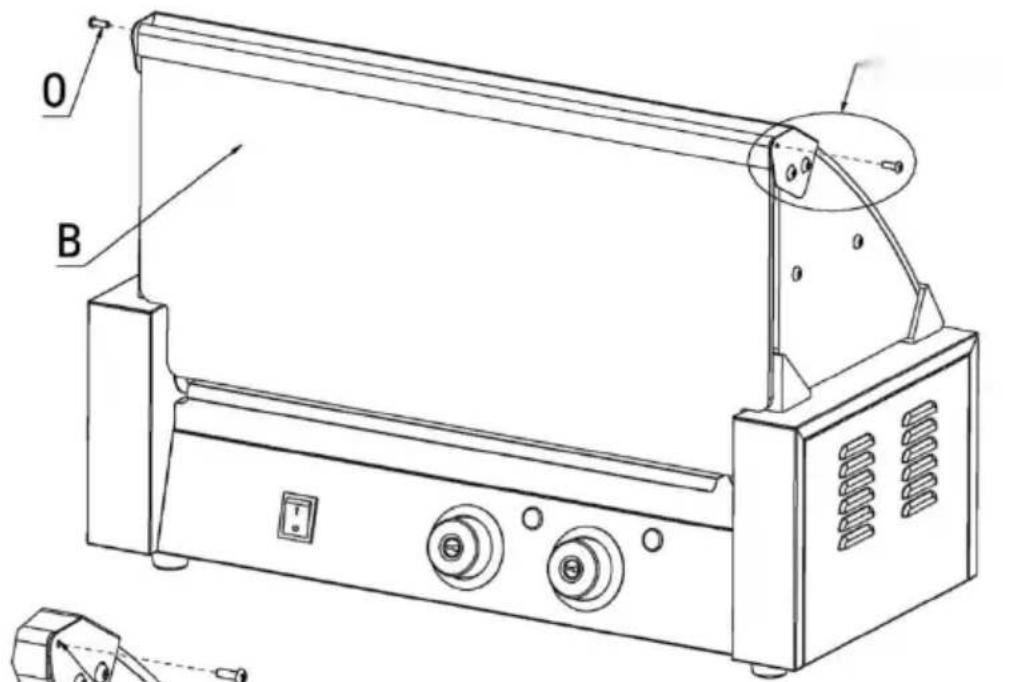
| G | Glass stand front (left) | 1 | O | Screws M4x12 | 2 |
| H | Behind the glass stand (right) | 1 | P | Nylon sleeve | 4 |
Note: the quantity of parts shown in the manual is the actual usage an unused parts are spare parts.
ASSEMBLY DRAWING
Note: The location of the core components of these three machines same!
Step1
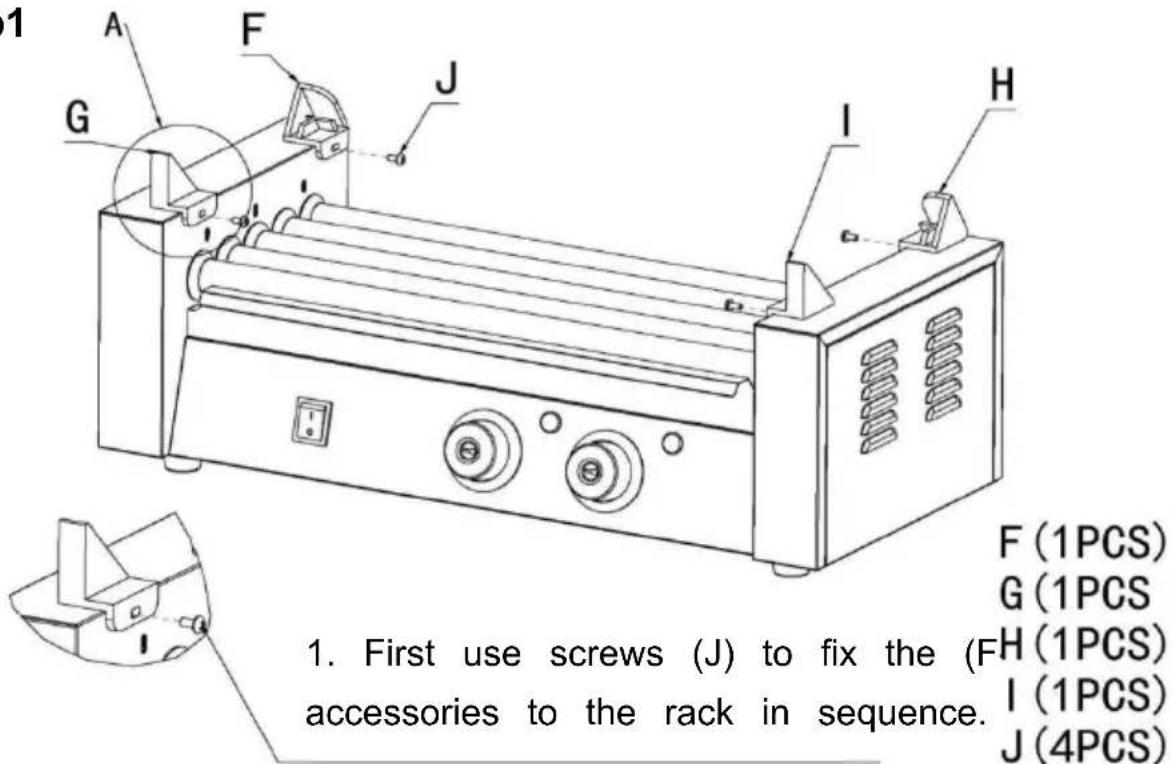
Note: Do not tighten the screws completely yet.
Step2

2.2 First put the left and right glass into the fasteners in sequence, and then tighten the fixing screws.
D(2PCS)
L (4PCS)
P(4PCS)
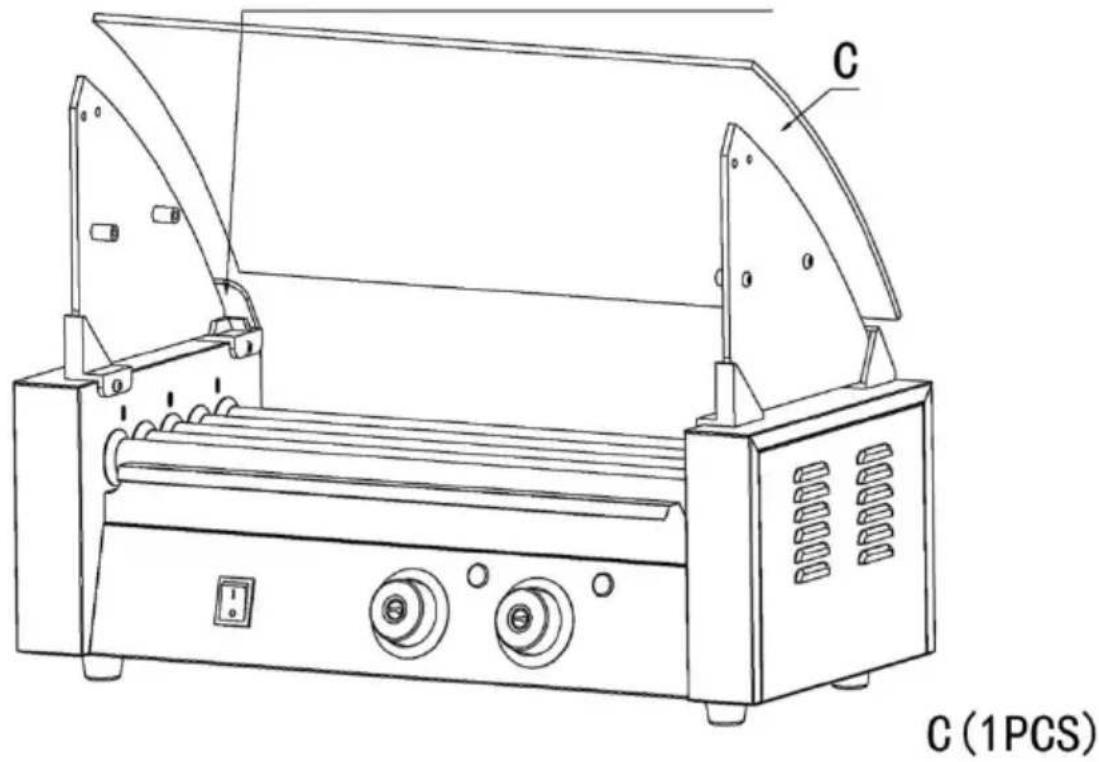
3.1 Place the accessory (C) into the slot of the glas

Step3
Step4

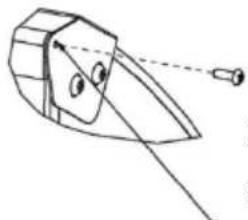
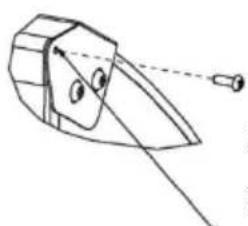
4 Use fasteners (K; N; M) to fix acces (A) to the reserved openings in the gla order and tighten them.
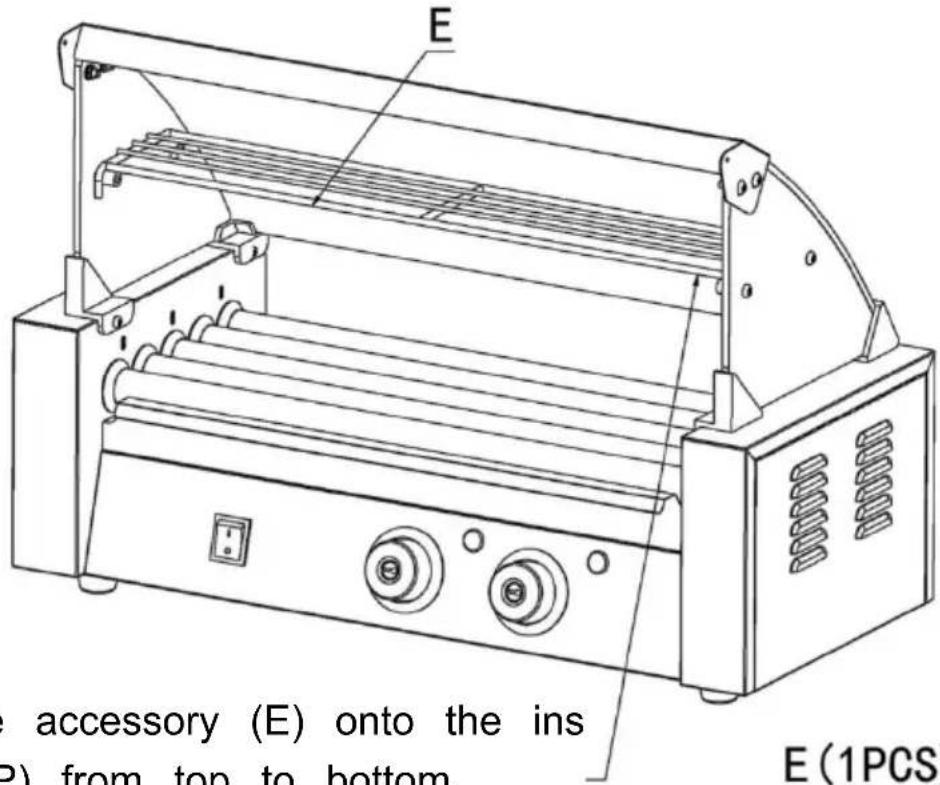
Step5

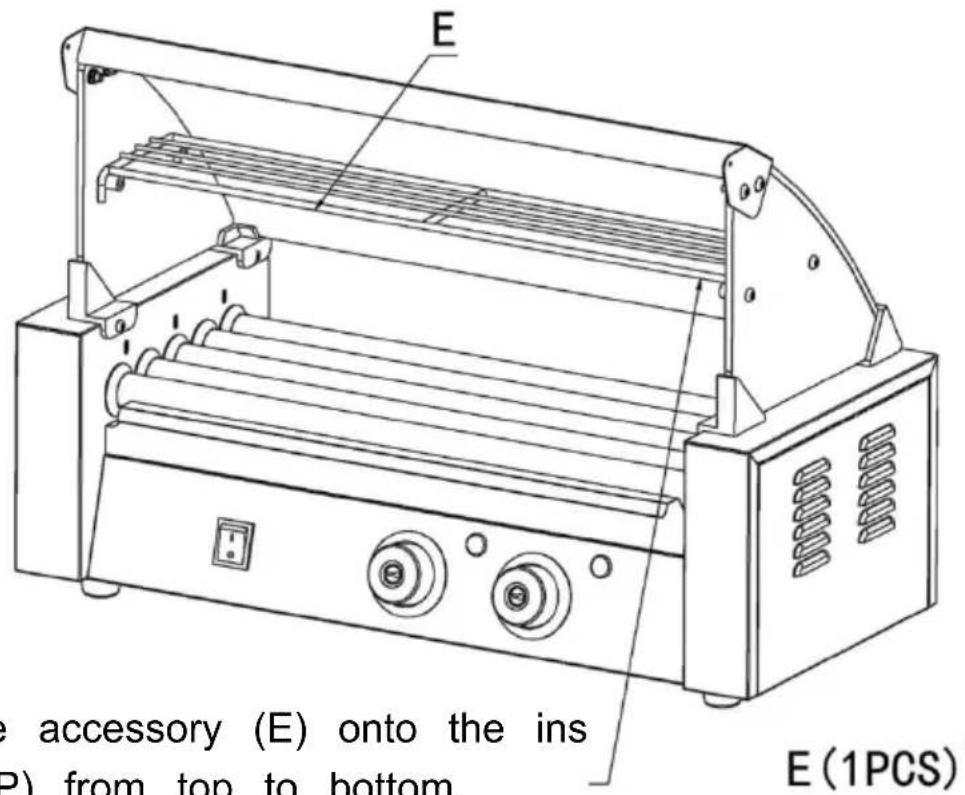
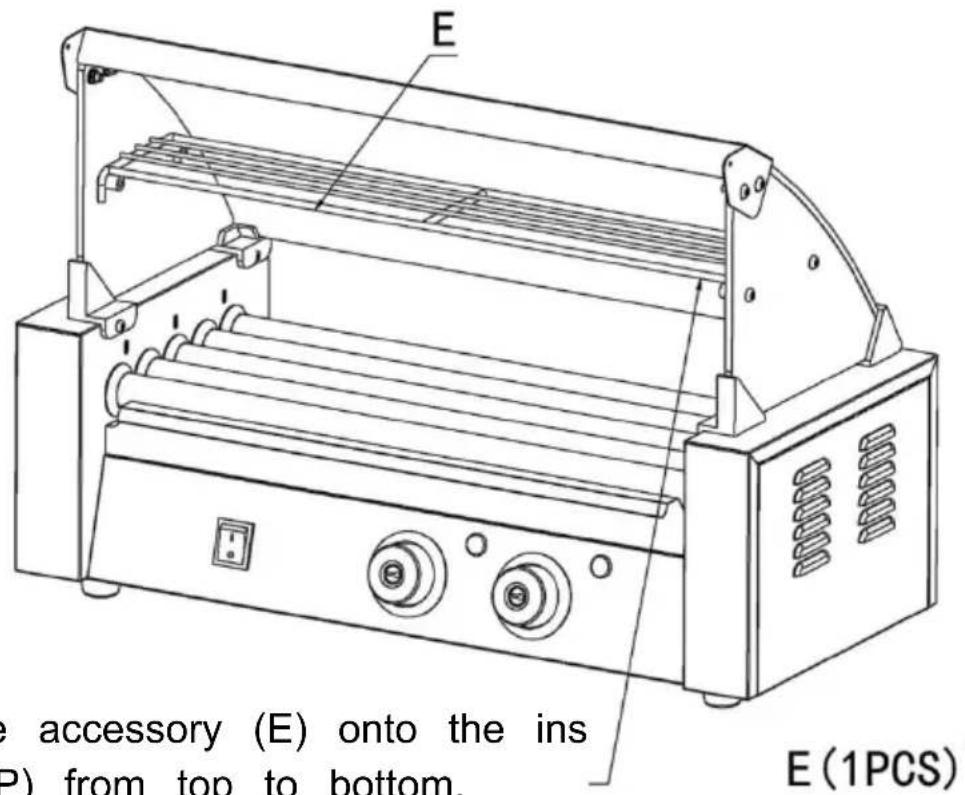
5 Place the accessory (E) onto the ins accessory (P) from top to bottom.
E(1PCS)
Step6

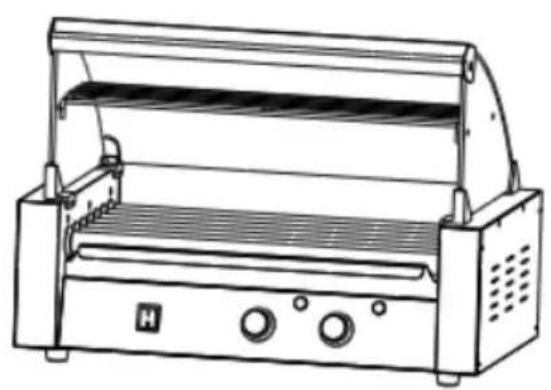
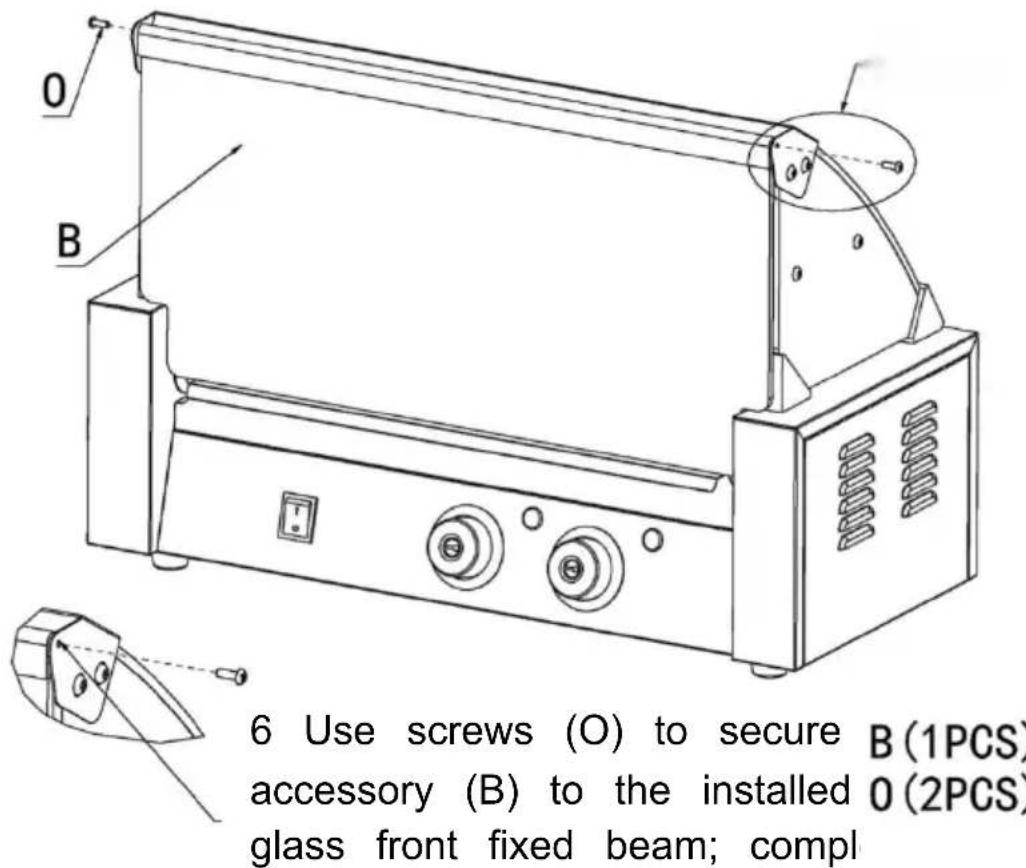
6 Use screws (O) to secure B(1PCS) accessory (B) to the installed 0 (2PCS) glass front fixed beam; compl installation.
OPERATING INSTRUCTIONS
Before using the appliance for the first time, peel off any promotional material packaging materials, and check that the product are clean and free of dust. necessary, wipe them over with a damp cloth. Spread over with an absorbent kitchen towel and wipe off any excess oil. When your appliance is heated first time, it may emit slight smoke or odor, which is normal for many appliances, and will not affect the safety of your appliance.
- Place the machine on a clean, dry, level surface near a plug base outlet
- Plug the cord into the machine power socket.
- Plug the cord into the wall outlet.
- How to test your machine: Turn on the power switch, the indicator light is turn on the motor switch, the rollers rotate. Turn the thermostat knob clockwise align the knob on the temperature scale with the red triangle on the panel, the heating indicator light is on, and the rollers start to heat. When the temperature reaches the set value, turn the knob clockwise to about 302^ ( 150^ ).
At this time, the heating indicator light will go off, which means the it has in the set temperature.
- Place the pre-prepared sausages parallelly in the middle of the two rollers the sausages will rotate in
opposite directions. Please do not place the sausages too close together, leave about 0.4 inch (10 mm) at the end of each roller.
Note:
- Every time you turn on the machine for the first time, you must first turn heating switch to preheat, and then turn on the rotary switch to prevent the oil from solidification.
- Opening of the bottom pan or both sides is not permitted, in case that y
eligible to do so. 3. Usually the baking temperature should be appropriate 24
F-320°F(120-160°C).
-
When heating, your hands are not allowed to touch the steel roller to press scalding.
-
When connecting or unplugging the plug, it should be disconnected from the total external power supply.
- Keep your hands dry when plugging the cord.
TIPS
- To save electricity and reduce the heating time, you can naturally defrost sausages or heat it by microwave oven before.
- Apply food oil to the left and right sides of the roller before use to increase smooth rolling of the roller.
Note: The pan under the rollers is used to catch drops of oil, it can also preheat the sausage, but it's not appropriate to put the grilled sausages into
CLEANING AND MAINTENANCE
- Once you have finished baking, remove the plug from the electrical outlet. Leave the machine to cool down completely before cleaning.
- The rollers should be cleaned every 4-5 hours of grilling.
- For the exterior, wipe with a soft, dry cloth. Never use an abrasive clean harsh pad. 3. Any other servicing should be provided by an Authorized Servi Representative.
Warning: Do not use liquid to rinse the product directly to avoid water damage to internal components.
STORAGE
- Always unplug the machine before storage.
- Always make sure the machine is cleaning cool and dry before string.
- Apply vegetable oil to the surface of the product to prevent rust.
Manufacturer: Shanghaiuxinmuyeyouxianggsi
Address: Shuangchenglu 803nong11hao1602A-1609shi, baoshanqu, shanghai 200000 CN.
Imported to AUS: SIHAO PTY LTD. 1 ROKEVA STREETEASTWOOD NSW 2122 Australia
Imported to USA: Sanven Technology Ltd. Suite 250, 9166 Anaheim Place, Rancho Cucamonga, CA 91730

YH CONSULTING LIMITED.
C/O YH Consulting Limited Office 147,
Centurion House, London Road,
Staines-upon-Thames, Surrey, TW18 4AX

E-CrossStu GmbH
Mainzer Landstr.69,
60329 Frankfurt am Main.
VEVOR®
TOUGH TOOLS, HALF PRICE
Technical Support and E-Warranty Certificate www.vevor.com/support
VEVOR®
TOUGH TOOLS, HALF PRICE
MODEL: SC-5XD / SC-7XD / SC-11XD
MODEL: SC-5XD MODEL: SC-7XD


POTRZEBUJE POMOCY? SKONTAKTUJ SIE Z NAMI!
SAFETY WARNINGS AND PRECAUTIONS
- Power Switch
2.Temperature Knob (Front) - Heat Light (Front)
4.Temperature Knob (Back) - Heat Light (Back)
- Pan
- Fuse
- Protective Earthing
- Power Socket

EXPLODED VIEW
2.2 First put the left and right glass into the fasteners in sequence, and then tighten the
Step3 cre 3.1 Place the accessory (C) into the slot of the glas

Step4

4 Use fasteners (K; N; M) to fix acces (A) to the reserved openings in the gla order and tighten them.

Step5
5 Place the accessory (E) onto the ins accessory (P) from top to bottom.
Step6

6 Use screws (O) to secure B(1PCS) accessory (B) to the installed 0 (2PCS) glass front fixed beam; compl
installation OPERATING INSTRUCTIONS
CLEANING AND MAINTENANCE
C/O YH Consulting Limited Office 147,
Centurion House, London Road,
Staines-upon-Thames, Surrey, TW18 4AX

E-CrossStu GmbH
Mainzer Landstr.69,
60329 Frankfurt am Main.
VEVOR
TOUGH TOOLS, HALF PRICE
www.vevor.com/support
VEVOR®
TOUGH TOOLS, HALF PRICE
MODELL: SC-5XD / SC-7XD / SC-11XD
SAFETY WARNINGS AND PRECAUTIONS
- Power Switch
2.Temperature Knob (Front) - Heat Light (Front)
4.Temperature Knob (Back) - Heat Light (Back)
- Pan
- Fuse
- Protective Earthing
- Power Socket

EXPLODED VIEW
2.2 First put the left and right glass into the fasteners in sequence, and then tighten the
Step3 cre 3.1 Place the accessory (C) into the slot of the glas

Step4

4 Use fasteners (K; N; M) to fix acces (A) to the reserved openings in the gla order and tighten them.

Step5
5 Place the accessory (E) onto the ins accessory (P) from top to bottom.
Step6


6 Use screws (O) to secure B(1PCS) accessory (B) to the installed 0 (2PCS) glass front fixed beam; compl
installation OPERATING INSTRUCTIONS
CLEANING AND MAINTENANCE
C/O YH Consulting Limited Office 147,
Centurion House, London Road,
Staines-upon-Thames, Surrey, TW18 4AX

E-CrossStu GmbH
Mainzer Landstr.69,
60329 Frankfurt am Main.
VEVOR®
TOUGH TOOLS, HALF PRICE
www.vevor.com/support
VEVOR®
TOUGH TOOLS, HALF PRICE
www.vevor.com/support
GRILL À HOT-DOG ROULANT
MODELE : SC-5XD/SC-7XD/SC-11XD
SAFETY WARNINGS AND PRECAUTIONS
- Power Switch
2.Temperature Knob (Front) - Heat Light (Front)
4.Temperature Knob (Back) - Heat Light (Back)
- Pan
- Fuse
- Protective Earthing
- Power Socket
EXPLODED VIEW
2.2 First put the left and right glass into the fasteners in sequence, and then tighten the fixing screws.
D(2PCS)
L (4PCS)
P(4PCS)
Step3 3.1 Place the accessory (C) into the slot of the glas
Step4
4 Use fasteners (K; N; M) to fix acces (A) to the reserved openings in the gla order and tighten them.
Step5
5 Place the accessory (E) onto the ins accessory (P) from top to bottom.
E(1PCS)
Step6
6 Use screws (O) to secure B(1PCS) accessory (B) to the installed 0 (2PCS) glass front fixed beam; compl installation.
OPERATING INSTRUCTIONS
CLEANING AND MAINTENANCE
C/O YH Consulting Limited Office 147, Centurion House, London Road,
Staines-upon-Thames, Surrey, TW18 4AX

E-CrossStu GmbH
Mainzer Landstr.69,
60329 Frankfurt am Main.
VEVOR
TOUGH TOOLS, HALF PRICE
Technique Assistance et certificat de garantie electronique www.vevor.com/support
VEVOR®
TOUGH TOOLS, HALF PRICE
Technisch Ondersteuning en e-garantiecertificaat www.vevor.com/support
MODELLEN: SC-5XD / SC-7XD / SC-11XD
MODEL: SC-5XD MODEL: SC-7XD


HULP NODIG? NEEM CONTACT MET ONS OPI!
SAFETY WARNINGS AND PRECAUTIONS
- Power Switch
2.Temperature Knob (Front) - Heat Light (Front)
4.Temperature Knob (Back) - Heat Light (Back)
- Pan
- Fuse
- Protective Earthing
- Power Socket

EXPLODED VIEW
2.2 First put the left and right glass into the fasteners in sequence, and then tighten the fixing screws.
D(2PCS)
L (4PCS)
P(4PCS)
3.1 Place the accessory (C) into the slot of the glas
Step3
Step4

4 Use fasteners (K; N; M) to fix acces (A) to the reserved openings in the gla order and tighten them.
Step5
5 Place the accessory (E) onto the ins accessory (P) from top to bottom.
E(1PCS)
Step6


6 Use screws (O) to secure B(1PCS) accessory (B) to the installed 0 (2PCS) glass front fixed beam; compl installation.
OPERATING INSTRUCTIONS
CLEANING AND MAINTENANCE
C/O YH Consulting Limited Office 147,
Centurion House, London Road,
Staines-upon-Thames, Surrey, TW18 4AX

E-CrossStu GmbH
Mainzer Landstr.69,
60329 Frankfurt am Main.
VEVOR®
TOUGH TOOLS, HALF PRICE
www.vevor.com/support
VEVOR®
TOUGH TOOLS, HALF PRICE
MODELL: SC-5XD / SC-7XD / SC-11XD
SAFETY WARNINGS AND PRECAUTIONS
- Power Switch
2.Temperature Knob (Front) - Heat Light (Front)
4.Temperature Knob (Back) - Heat Light (Back)
- Pan
- Fuse
- Protective Earthing
- Power Socket

EXPLODED VIEW
Obs: Placeringen av kärnkomponenterna i dessa tre maskiner ardensamma!
2.2 First put the left and right glass into the fasteners in sequence, and then tighten the
Step3 cre 3.1 Place the accessory (C) into the slot of the glas

Step4

4 Use fasteners (K; N; M) to fix acces (A) to the reserved openings in the gla order and tighten them.
Step5
5 Place the accessory (E) onto the ins accessory (P) from top to bottom. E(1PCS)
Step6
installation OPERATING INSTRUCTIONS
CLEANING AND MAINTENANCE
YH CONSULTING LIMITED.
C/O YH Consulting Limited Office 147,
Centurion House, London Road,
Staines-upon-Thames, Surrey, TW18 4AX
| EC | REP |
www.vevor.com/support
VEVOR®
TOUGH TOOLS, HALF PRICE
Tecnico Soporte y certificate de garantía electrónica www.vevor.com/support
PARRILLA RODANTE PARA PERRITOS CALIENTES
MODELO: SC-5XD / SC-7XD / SC-11XD
MODELO: SC-5XD MODELO: SC-7XD


SAFETY WARNINGS AND PRECAUTIONS
- Power Switch
2.Temperature Knob (Front) - Heat Light (Front)
4.Temperature Knob (Back) - Heat Light (Back)
- Pan
- Fuse
- Protective Earthing
- Power Socket

EXPLODED VIEW
2.2 First put the left and right glass into the fasteners in sequence, and then tighten the
Step3 cre 3.1 Place the accessory (C) into the slot of the glas

Step4

4 Use fasteners (K; N; M) to fix acces (A) to the reserved openings in the gla order and tighten them.
Step5
5 Place the accessory (E) onto the ins accessory (P) from top to bottom.
Step6

installation OPERATING INSTRUCTIONS
CLEANING AND MAINTENANCE
YH CONSULTING LIMITED.
C/O YH Consulting Limited Office 147,
Centurion House, London Road,
Staines-upon-Thames, Surrey, TW18 4AX

www.vevor.com/support
VEVOR®
TOUGH TOOLS, HALF PRICE
MODELLO: SC-5XD / SC-7XD / SC-11XD
SAFETY WARNINGS AND PRECAUTIONS
- Power Switch
2.Temperature Knob (Front) - Heat Light (Front)
4.Temperature Knob (Back) - Heat Light (Back)
- Pan
- Fuse
- Protective Earthing
- Power Socket
EXPLODED VIEW
2.2 First put the left and right glass into the fasteners in sequence, and then tighten the
Step3 cre 3.1 Place the accessory (C) into the slot of the glas

Step4

4 Use fasteners (K; N; M) to fix acces (A) to the reserved openings in the gla order and tighten them.

Step5
5 Place the accessory (E) onto the ins accessory (P) from top to bottom.
Step6


6 Use screws (O) to secure B(1PCS)
accessory (B) to the installed 0 (2PCS)
glass front fixed beam; compl
installation.
OPERATING INSTRUCTIONS
CLEANING AND MAINTENANCE
Importato in AUS: SIHAO PTY LTD. 1 ROKEVA STREETEASTWOOD NSW 2122 Australia
YH CONSULTING LIMITED.
C/O YH Consulting Limited Office 147,
Centurion House, London Road,
Staines-upon-Thames, Surrey, TW18 4AX