HD11 - Hot dog maker Vevor - Free user manual and instructions
Find the device manual for free HD11 Vevor in PDF.

| Product type | Rolling hot dog machine (hot dog grill) |
| Brand | Vevor |
| Model | HD11 |
| Supply voltage | 220-240 V ~ 50 Hz |
| Rated power | 2400 W |
| Plug type | European (Type E/F) |
| Number of rollers | 7 (estimated based on size) |
| Roller material | Stainless steel |
| Temperature range | 50-250 °C (warming drawer); cooking: 120-160 °C (248-320 °F) |
| Main functions | Cooking by rotating rollers, warming by warming drawer, preheating |
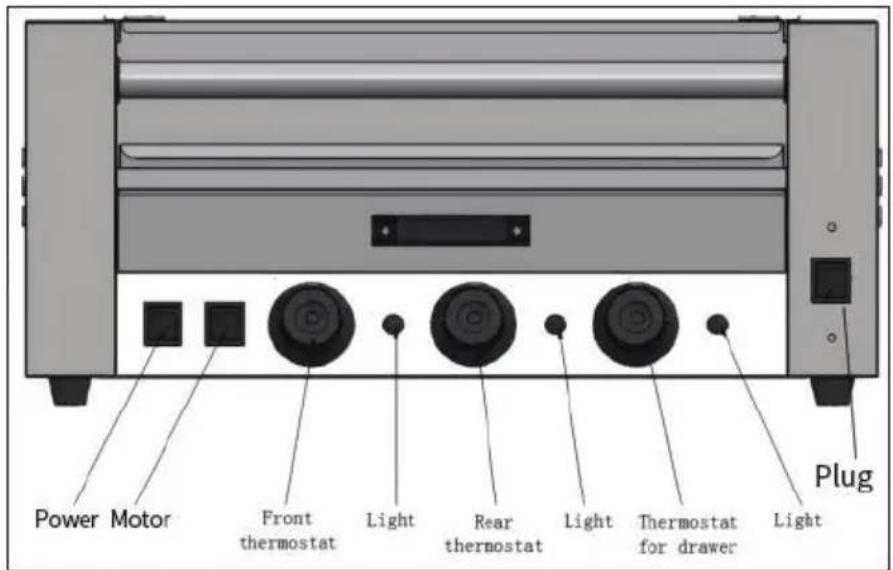
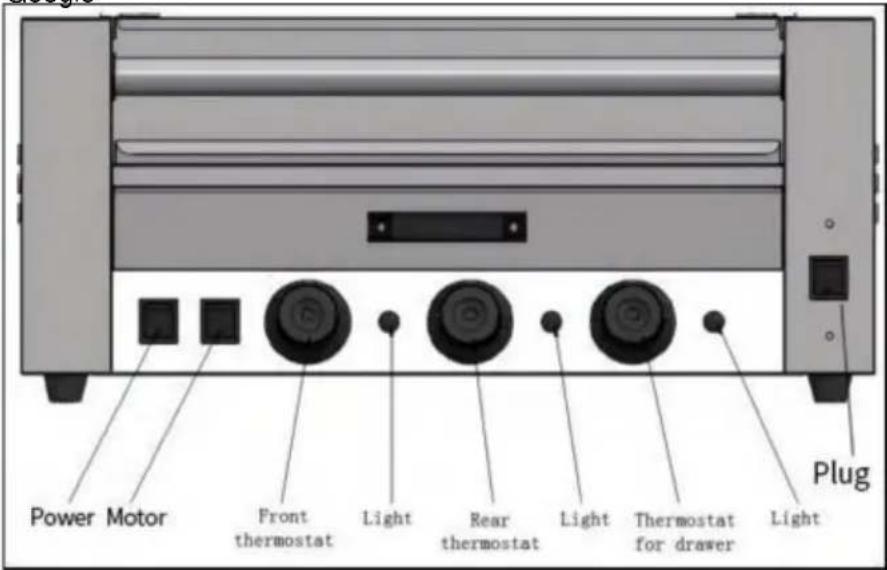
| Controls | Main switch, motor switch, rotary thermostat, indicator lights |
| Safety | Mandatory grounding, shutdown by unplugging, overload protection (fuse) |
| Maintenance and cleaning | Clean rollers every 4-5 h, wipe exterior with soft cloth, do not immerse |
| Spare parts and repairability | Repair by authorized technician only; type Y power cord |
| Storage | Unplug, cool down, apply anti-rust vegetable oil, dry storage |
| Compatibility | Indoor only, flat surface, near outlet |
| Package contents | Glass support, screws, nuts, bolts, drip tray |
| Weight | Not specified |
| Dimensions | Not specified |
Frequently Asked Questions - HD11 Vevor
User questions about HD11 Vevor
0 question about this device. Answer the ones you know or ask your own.
Ask a new question about this device
Download the instructions for your Hot dog maker in PDF format for free! Find your manual HD11 - Vevor and take your electronic device back in hand. On this page are published all the documents necessary for the use of your device. HD11 by Vevor.
USER MANUAL HD11 Vevor
TechnicalSupportandE-WarrantyCertificatewww.vevor.com/support
ROLLINGHOT-DOGGRILL
MODEL:ASQ-07HC/ASQ-011HC/HD11/A007
Wecontinuetobecommittedtoprovideyoutoolswithcompetitiveprice. "SaveHalf", "HalfPrice"oranyothersimilarexpressionsusedbyusonly represents an estimate of savings you might benefit from buying certain tools withuscomparedtothemajortopbrandsanddoesnotnecessarilymeantocover allcategoriesoftoolsofferedbyus. Youarekindlyremindedtoverifycarefully whenyouareplacinganorderwithusifyouareactuallySaving Halfincomparisonwiththetopmajorbrands.
MODEL:ASQ-07HC/A007MODEL:ASQ-011HC/HD11

natural_image
Illustration of a multi-gathered toaster with cooling fins and control buttons (no text or symbols)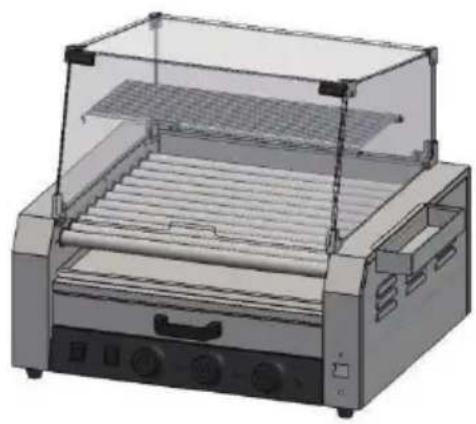
natural_image
Illustration of a portable food grater with cooling fins and side-mounted dish (no text or symbols visible)NEEDHELP?CONTACTUS!
Haveproductquestions?Needtechnicalsupport?Pleasefeelfreeto contactus:
TechnicalSupportandE-WarrantyCertificate
www.vevor.com/support
Thisistheoriginalinstruction, pleasereadallmanualinstructions carefullybeforeoperating.VEVORreservesaclearinterpretationofour usermanual.Theappearanceoftheproductshallbesubjecttothe productyoureceived.Pleaseforgiveusthatwewon'tinformyouagainif thereareanyte chnologyorsoftwareupdatesonourproduct.
 | Warning-Toreducetheriskofinjury,usermustreadinstructions manualcarefully. |
 | Indooruseonly. |
 | Payattentiontohightemperaturestoppreventburns. |
 | CORRECTDISPOSALThisproductissubjecttotheprovisionofEuropeanDirective 2012/19/EC.Thesymbolshowingawheeliebincrossedthrough indicatesthatheproductrequiresseparaterefusecollectioninthe EuropeanUnion.Thisappliestotheproductandallaccessories markedwiththissymbol.Productsmarkedassuchmaynotbediscardedwithnormaldomesticwaste,butmustbetakentoa collectionpointforrecyclingelectricalandelectronicdevices |
 | ComplianceisaEC&UKsecuritycertification. |
 | Themachine’sshellmustbegroundedtoensureitssecurity. |
SAFETYWARNINGSANDPRECAUTIONS
Thankyouforusingthisproduct.Inordertomakesurethatyoucanoperateth machinecorrectly,readthisinstructioncarefullybeforeoperationandkeepit properlyforfuturereference.Pleasereadtheprecautionsandsafetyrulesonthis pagetoensureyoursafeuse.Thismanualwilloutlinesafetywarningsand precautions,operating,maintenanceandcleaning.Thewarningsandinstructions reviewedinthismanualcannotcoverallpossibleconditionsandsituati onsthat
mayoccur.Cautionandcommonsensearenotbuiltintothisproduct,sincewe believethattheuseswillcomplywiththesecodes.Beforestartingatraining programorengaginginstrenuousenduranceactivityonthedevice,pleaseconsult adoctor.
PleasereadALLtheinstructionsbeforeusingyourmachine.
- Makesurethevoltageinyouroutletisthesameasthevoltageindicatedonthe appliance'sratinglabel.
- Donotletchildrenandminorsandpetgetclosetoortoucht hemachine.
- Donottouchthehotsurfacedirectlywithyourhands.Alwaysusethehandleorknobforoperation.
- Topreventelectricalshock, donotimmersethecordorplugintowaterorother liquids.
- Donotimmersetheapplianceinwateroranyotherliquid.
- Unplugthemachine from the outlet when not in use and before cleaning. Cool the appliance before installing or removing parts and before cleaning.
- CooldowntheHOTpartsbeforeoperationandcleaning.
- Dono toperatethedevicewithdamagedcordorplug,malfunctionorwithany mechanicaldamage.Sendittoyournearestauthorizedservicecentreforexaminationandrepair(ONLYtechnicianssshouldopenuptheunit).
- Using any accessories or attachment that are not provided or recommended by the manufacturer may cause injury.
- If them machine is not to be used for a long period of time, unplugit, clean and cover it and store it in adry and safe place.
- Donotleavethepowerco rdhangingovertheedgeoftableorcounterorletit comeintocontactwithanyhotsurfaces.
- Donotplacetheunitonornearhotair, electricburnersorheaters.
- Alwaysswitchoffthepowertothesocketbeforeplugginginorunplugging. Holdthepluginsteadofpullingonthecord.
- Donotapply this unit to any other purpose that indicated usage.
- KEEP IT OUT OF CHILDREN'S REACH. Never leave it unattended while in use.
16.DONOTCLEANITWITHANYABRASIVEMATERI AL. - Always check that this machine is plugged into a grounded outlet with the appropriate electrical supply. Ensure that the wall outlet being used improperly
grounded. If not, you must install agrounded outlet. Havethework performed only by acertified electrician who is properly qualified to meet locals safety and electrical codes.
- Ensure that the power outlet, plug and cord being used are good working condition. Damaged component should be repaired by certified electrician who is qualified to meet locals safety and electrical codes. Even if your power cord is functioning properly, keep it away from water and avoidle ttingitrunover carpets or heating devices.
- Avoid using it in the presence of flammable liquids, gases, dustorother explosivesituations.
- Donotmovethemachinebeforecoolingandduringheating
- Donotoperatethemachineinanappliancegarageorunderawallcabinet. Alwaysunplugtheunitfromtheelectricaloutletwhenstoringinanappliance garage. Otherwise, it would cause riskoffire, especially if themachinetouches thegaragewallorthedoortouch esitasitcloses.
- TypeYattachment: If the supply cord is damaged, it must be replaced by the manufacturer, its service agent or similarly qualified persons in order to avoid a hazard.
- Children shall not play with the appliance. Cleaning and user maintenance shall not be made by children without supervision.
- Inspectbeforeeveryuse.
25.DONOTCLEANITWITHANYABRASIVEMATERIAL. - Neverleaveitunattendedwhileinuse. Neverleavethechildunattended.
- Pe turine and fecescandamagetheproduct, please keep away.
WARNING: This appliance is not intended for use by young or infirm personsunlesssupervisedbyaresponsiblepersontoensurethattheycan usetheappliancesafely.Youngchildrenshouldbesupervisedtoensure thattheydonotplaywiththeproduct.Petsshouldstayawayfromthe product.
PRODUCTPARAMETERS
| MODELRegionVoltagePowerPlugType | ||||
| ASQ-07HC | North America | AC110-120V 60Hz | 1200W | AmericanPLUG |
| ASQ-011HC | North America | AC110-120V 60Hz | 1950W | AmericanPLUG |
| HD11 | Europe | AC220-240V 50Hz | 2400W | EuropeanPLUG |
| A007 | Europe | AC220-240V 50Hz | 1600W | EuropeanPLUG |
Attention:
- The voltage used forth this device must be the same as the powers supply voltage.
-
Usersneedtoinstallitnearthepowerswitchandfuse.
-
If the machine is not powered, removal the plug from the electrical outlet and check whether the fuse is blown.
-
It is recommended that products uses separate lines and socket to avoid circuit breaker or timedelayfuse overload.
-
“Equal potential mark” indicates those terminals that are connected to each othersothatallpa rtsoftheequipmentorsystemreachthesamepotential.This maynotnecessarilybeaconnectionposition,suchaslocalinterconnectionlines.Itisapplicableforallkindsofequipment.
PRODUCTCOMPONENTS
Note: The location of the core component sof these three emachines is the same!
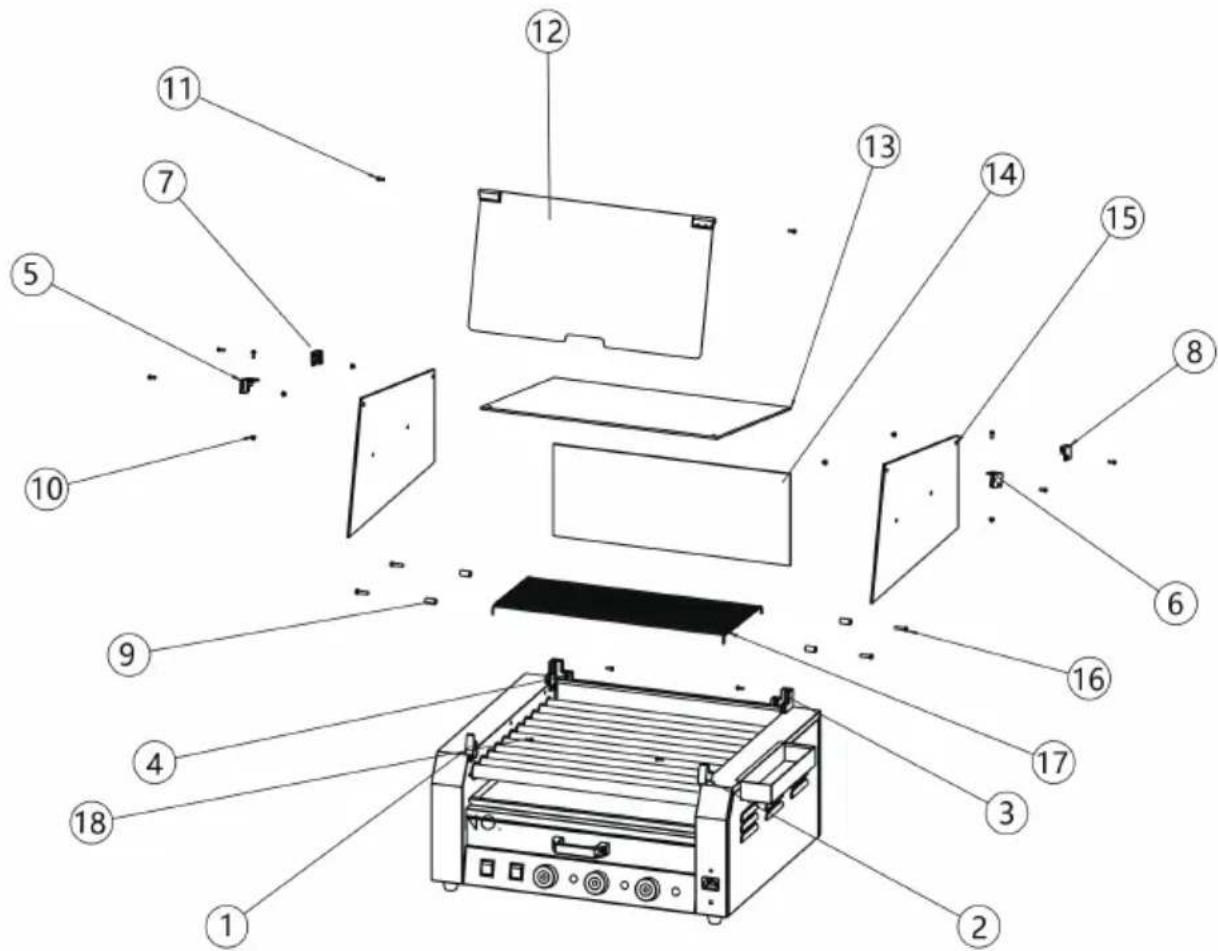
| NO. | Name | QTY | NO. | Name | QTY |
| 1 | Front the glass stand (left) | 1 | 2 | Front the glass stand (right) | 1 |
| 4 | Behind the glass stand (left) | 1 | 3 | Behind the glass stand (right) | 1 |
| 5 | Top front the glass stand (left) | 1 | 6 | Top front the glass stand (right) | 1 |
| 7 | Top behind the glass stand (left) | 1 | 8 | Top behind the glass stand (right) | 1 |
| 9 | Shelves support components | 4 | 13 | Top glass | 1 |
| 10 | M4 nut | 6 | 14 | Behind glass | 1 |
| 11 | Screws M4x12 | 8 | 15 | Side glass | 2 |
| 12 | PC door | 1 | 16 | Screws M5x20 | 4 |
| 18 | Screws M4x12 (under) | 4 | 17 | Shelves | 1 |
Note: the quantity of parts shown in the manual is the actual usage and the unused parts are spare parts.
ASSEMBLYDRAWING
Note: The location of the core component sof these three emachines is the same!
natural_image
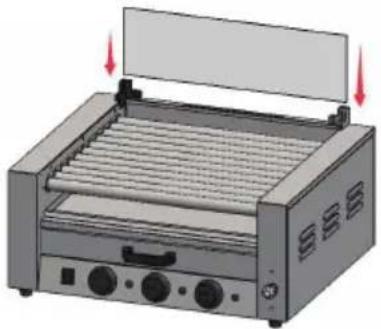
Illustration of a portable electric grill with heat exchanger and cooling fins (no text or symbols)- Asshowninthefigureabove, fix screwsNo.3and4intothefrontglass andinsertthem;
natural_image
Illustration of a portable grater with cooling fins and heat exchangers (no text or symbols)
natural_image
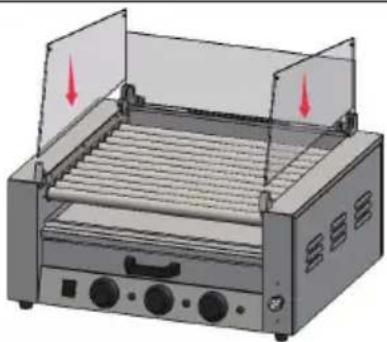
3D rendering of a portable grater with cooling fins and side-mounted dish (no text or symbols visible)- Insert No.7 and 8 into the front and side glass that have been installed and secure them with screws, as shown in the diagram.

natural_image
Illustration of a commercial toaster with cooling fins and ventilation grilles (no text or symbols)- PlaceNo. 1 and 2 on the side glass, and then insert the side glass into slot No. 3 and 4. Pre-tighten and fix No. 1 and 2 with screws, as shown in the diagram.
natural_image
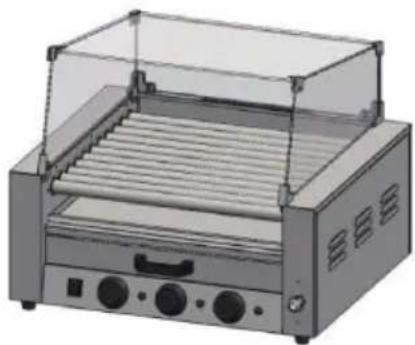
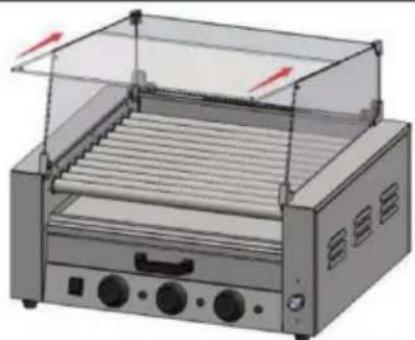
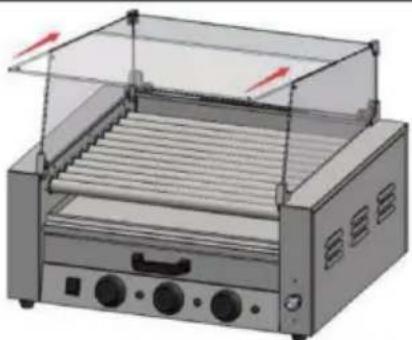
Illustration of a portable food grater with cooling fins and control buttons (no text or symbols)- Fix the glass on both sides and top, using screws and nuts to lock and secure No. 5 and 6. Please refer to the diagram for guidance.
natural_image
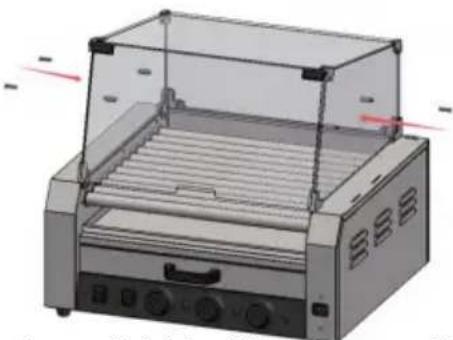
Illustration of a portable food grater with cooling fins and side-mounted dish (no text or symbols)- To install the door panels, use one screw each for No.5 and 6Please be careful not to over-tighten, as this may cause the door shaft to be unable to rotate, as shown in the diagram.
natural_image
3D rendering of a refrigerated toaster with cooling fins and ventilation slots (no text or symbols visible)- Install 4 shelves support components.

natural_image
Illustration of a multi-gathered food grater with a transparent dome cover (no text or symbols visible)- Install the shelves and side boxes properly.
OPERATINGINSTRUCTIONS
Beforeusingtheapplianceforthefirsttime, peeloffanypromotionalmaterialsand packagingmaterials,andcheckthattheproductarecleanandfreeofdust.If necessary,wipethemoverwithadampcloth.Spreadoverwithanabsorbent kitchen towel and wipe off any excess oil. When your appliance is heated for the first time, it may emit slight smoke or odor, which is normal for many heating appliances,andwillnotaffectthesafetyofyourappliance.
-
Placethmachineon aclean, dry, levelsurfacenearaplugbaseoutlet.
2.Plugthecordintothemachinepowersocket.
3.Plugthecordintothewalloutlet. -
Howtotestyourmachine: Turnonthepowerswitch, theindicatorlightison; turnonthemotorswitch, therollersrotate. Turnthethermostatknobclockwiseto aligntheknobonthetemperaturescalewiththeredtriangleonthe panel, theheatingindicatorlightison, andtherollersstarttoheat. Whenthe temperature reaches the set value, turn the knob clockwise to about 302^ F ( 150^ C).
Atthistime, the heating indicator light will go off, which mean the ith as reached the set temperature. - Placethepre-preparedsausagesparallellyinthemiddleofthetworollers, then thesausageswillrotateinoppositedirections. Pleasedonotplacethesausages tooclosetogether, leavingabout0.4inch(10mm)attheendofeachroller.
- This product also has awarming function. After setting the temperature for the warming drawer on the temperature controller (temperaturer range: 50-250°C), put the baked sausage into the warming drawer.
Note:
-
Everytimeyouturnonthemachineforthefirsttime,youmustfirstturnontheheatingswitchtopreheat,andthenturnontherotaryswitchtopreventthemotoroilfromsolidification.
-
Opening of the bottompanor both sides is not permitted, incasethat you are eligible to do so. 3. Usually the baking temperatures should be appropriate 248^ - 320^ (120-160°C).
-
When heating, your hands are not allowed to touch the steel rollertoprevent scalding.
-
When connecting or unplugging the plug, it should be disconnected from the totalexternalpowersupply.
-
Keep your hands dry when plugging the cord.
-
Whenthepresettemperatureisreached, the heating indicator light will turn off. If the temperature drops below the preset temperature, the heating indicator light will turn on and the heating process will start again. This cycle heating saves energy and ensure the quality of the barbecue.
-
Switch the front and rear temperature control switch hesto the "0" position when not in use for a long time. And them machines should be unplugged for safety reason
TIPS
- Tosaveelectricity and reduce the heating time, you can naturally defrost the sausages or heat it by microwave oven before.
- Apply food oil to the left and right sides of a theroller before usetoincrease the smoothing of a theroller.
- Before using the roller, add a small amount of edible vegetable oil and even it out to ensure uniform preheating.
Note: Thepanundertherollersisusedtocatchdropsofoil, itcanalsobeusedto preheatthesausage, butit'snotappropria tetoputthegrilledsausagesintoit.
CLEANINGANDMAINTENANCE
- Once you have finished baking, remove the plug from the electrical outlet. Leavethemachinetocooldown completely before cleaning.
- Therollers should be cleaned every 4-5 hour of grilling.
- Forthe exterior, wipewith asoft, drycloth. Never use an abrasive cleanser or harshpad. 3. Any others servicing should be provided by an Authorized Service Representative.
Warning: Donotuseliquidtorinsetheproductdirectlytoavoidwater damagetointernalcomponents.
STORAGE
- Alwaysunplugthemachinebeforestorage.
- Always makes sure the machine is cleaning coolant and dry before string.
- Apply vegetable oil to the surface of the product to prevent trust.
- If the device is not going to be used for an extended period, clean it thoroughly and store it in a well-ventilated warehouse with nocorrosive gases present.
Manufacturer:Shanghaimuxinmuyeyouxiangongsi
Address:Shuangchenglu803nong11hao1602A-1609shi,baoshanqu,shanghai200000CN.
ImportedtoAUS:SIHAOPTYLTD.1ROKEVASTREETEASTWOOD NSW2122Australia
ImportedtoUSA:SanvenTechnologyLtd.Suite250,9166Anaheim Place,RanchoCucamonga,CA91730
| REPU |
YHCONSULTINGLIMITED.
K/OYHConsultingLimitedOffice147,
CenturionHouse,LondonRoad,
Staines-upon-Thames, Surrey, TW184AX
| EC | REP |
E-CrossStuGmbH
MainzerLandstr.69,
60329FrankfurtamMain.
VEVOR®
TOUGH TOOLS, HALF PRICE
TechnicalSupportandE-WarrantyCertificate
www.vevor.com/support
VEVOR®
TOUGH TOOLS, HALF PRICE
natural_image
Illustration of a portable food grater with control panel and tray (no text or symbols)
natural_image
Illustration of a portable food grater with cooling fins and control knobs (no text or symbols)BESOIN D'AIDE? CONTACTEZ-NOUS!
PARAMÈTRES DU PRODUIT
Note: the quantity of parts shown in the manual is the actual usage and the unused parts are spare parts.

DESSIN D'ASSEMBLAGE
natural_image
Illustration of a portable electric grill with heat exchangers and a lid, showing no text or symbols.natural_image
Illustration of a portable electric stove with cooling fins and heat exchangers (no text or symbols)natural_image
Illustration of a portable electric grill with cooling fins and control knobs (no text or symbols)- Insert No.7 and 8 into the front and side glass that have been installed and secure them with screws, as shown in the diagram.

natural_image
Illustration of a portable food grater with cooling fins and control knobs (no text or symbols)- For the installation of the top glass, slide it down the plastic notch to NO. 7 and 8.

natural_image
Illustration of a portable food grater with cooling fins and control knobs (no text or symbols)natural_image
Illustration of a portable food grater with red indicator lights (no text or symbols)- Pour l'installation du verre supeneur, faites-le screw each for No 5 and 6 Please be glisser le long de l'encoche en plastique jusqu'au et 8. Careful not to over-tighten, as this may cause the door shaft to be unable to rotate, as shown in the diagram.
natural_image
3D rendering of a portable food grater with cooling fins and ventilation slots (no text or symbols visible)natural_image
Illustration of a portable food grater with lid and control panel (no text or symbols)A/S YH Consulting Limited Bureau 147,
Centurion House, London Road, Staines-
upon-Thames, Surrey, TW18 4AX
E-CrossStu GmbH
Mainzer Landstr.69,
natural_image
Illustration of a portable food grater with control panel and tray (no text or symbols)
natural_image
Illustration of a portable food grater with cooling fins and control knobs (no text or symbols)| NO. | Name | QTY | NO. | Name | QTY |
| NEIN.11 | NameFront the glass standVorne der (Glasständer) | Menge11 | No216 | NameFront the glassHister dem (right) | Menge11 |
| 42 | Behind the glass standVorne der (Glasständer) | 11 | 315 | Ständer (rechts) (links)Hister dem (right) | 11 |
| 53 | Top frokshthe glassRegaträger (left) | 14 | 613 | Ständer (rechts)stand (right)Schrauben M5x20 | 14 |
| 74 | Top behind the glass stand (left) | 16 | 814 | Top behind the glass stand (right) | 11 |
| 59 | Shelves supportOben vorne das GlasStandor (links) | 14 | 123 | Oben vorne das GlasTop glassStänder (rechts) | 11 |
| 610 | Schrauben M4x12 | 16 | 94 | Behind glassHinter Glas | 11 |
| 711 | Screw M4x12 | 8 | 105 | Side glassSetliches | 2 |
| 128 | PC doorTopglasScrews M4x12 | 11 | 1611 | Screw M5x20Glas Oben hinter Glas | 41 |
| 18 | (under) | 4 | 17 | Ständer (links)Shelves | 1 |
Unbenzte requsantity of parts shown in the manual is the actual usage and the unused parts are spare parts.

MONTAGEZEICHNUNG
natural_image
Illustration of a portable electric grill with heat exchangers and a lid, showing no text or symbols.natural_image
Illustration of a portable grater with cooling fins and ventilation slots (no text or symbols)natural_image
Illustration of a portable electric grill with cooling fins and control knobs (no text or symbols)- Insert No.7 and 8 into the front and side glass that have been installed and secure them with screws, as shown in the diagram.

natural_image
3D rendering of a portable food grater with cooling fins and ventilation slots (no text or symbols visible)- For the installation of the top glass, slide it down the plastic notch to NO. 7 and 8.

natural_image
Illustration of a portable food grater with cooling fins and control knobs (no text or symbols)
natural_image
Illustration of a portable toaster with cooling fans and heat exchanger (no text or symbols)natural_image
3D rendering of a portable food grater with cooling fins and ventilation slots (no text or symbols visible)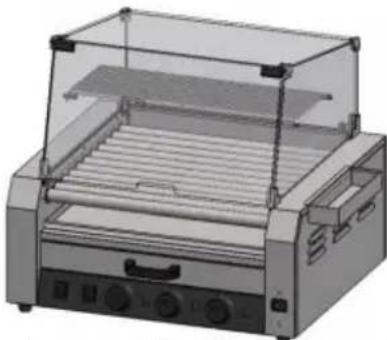
natural_image
Illustration of a portable food grater with lid and control panel (no text or symbols)C/O YH Consulting Limited Office 147, Centurion
House, London Road, Staines-upon-
Thames, Surrey, TW18 4AX
www.vevor.com/support
VEVOR®
TOUGH TOOLS, HALF PRICE
natural_image
Illustration of a portable food grater with control panel and tray (no text or symbols)
natural_image
Illustration of a portable food grater with cooling fins and control knobs (no text or symbols)natural_image
Illustration of a portable electric grill with heat exchanger and control panel (no text or symbols)natural_image
Illustration of a portable electric grill with heat exchangers and cooling fins (no text or symbols)natural_image
Illustration of a portable electric grill with cooling fins and control knobs (no text or symbols)- Insert No.7 and 8 into the front and side glass that have been installed and secure them with screws, as shown in the diagram.

natural_image
Illustration of a commercial toaster with cooling fins and ventilation slots (no text or symbols)- For the installation of the top glass, slide it down the plastic notch to NO. 7 and 8.

natural_image
Illustration of a portable food grater with cooling fins and control knobs (no text or symbols)natural_image
Illustration of a portable food grater with red indicator lights (no text or symbols)- To install the door panels, use one 4: Per l'installazione del vetro superiore, farlo screw each for No.5 and 6 Please be scorrere lungo la tacca di plastica fino al n. 7 e 8. Careful not to over-tighten, as this may cause the door shaft to be unable to rotate, as shown in the diagram.

natural_image
3D rendering of a portable food grater with cooling fins and ventilation slots (no text or symbols visible)natural_image
Illustration of a portable food grater with cooling unit and control panel (no text or symbols)Importato in AUS: SIHAO PTY LTD. 1 ROKEVA STREETEASTWOOD NSW 2122 Australia
Importato negli USA: Sanven Technology Ltd. Suite 250, 9166 Anaheim Place, Rancho Cucamonga, CA 91730

CONSULENZA YH LIMITATA.
C/O YH Consulting Limited Ufficio 147, Centurion
House, London Road, Staines-upon-
Thames, Surrey, TW18 4AX
elettronica www.vevor.com/support
VEVOR®
TOUGH TOOLS, HALF PRICE
natural_image
Illustration of a portable food grater with control panel and tray (no text or symbols)
natural_image
Illustration of a portable food grater with cooling fins and control knobs (no text or symbols)| NO. | Name | QTY | NO. | Name | QTY |
| 11 | NombreFront the glass standFrente al soporte de cristal(left) | CANTIDAD NÚM.11 | 216 | NombreFront the glassDetrás del cristalstand (right) | CANTIDAD11 |
| 42 | Behind the glass standFrente al soporte de cristal(left) | 11 | 315 | de pie (derecha)(izquierda)Detrás del cristalstand (right) | 11 |
| 53 | Top front the glassstand (left)Soporte de estantescomponentes | 14 | 613 | Top front the glassstand (right)Tornillos M5x20 | 14 |
| 47 | Top behind the glassstand (left)componentes | 61 | 814 | Top behind the glassstand (right)Estantes | 1 |
| 59 | Parte superior frontal del cristale parte(izquierda)Shelves supportcomponents | 14 | 1213 | Parte superior frontal del cristalTop glassde pie (derecha) | 1 |
| 610 | Tornillos M4x12M4nut | 126 | 914 | Dethind del cristal | 1 |
| 711 | Puerta de PCScrews M4x12 | 18 | 1015 | Siste glaste | 2 |
| 128 | PC doorVidrio superiorScrews M4x12 | 11 | 1611 | Arriba detrás del cristal | 41 |
| 18Nota: la | cantidad de piezas que se | 4muestra | 17en el manual | de pie (izquierda)Shelveses el uso real y la | 1 |
Las piezas no utilizadas son piezas de repuesto. Note: the quantity of parts shown in the manual is the actual usage and the unused parts are spare parts.

DIBUJO DE MONTAJE
natural_image
Illustration of a portable electric grill with heat exchangers and a lid, showing no text or symbols.natural_image
Illustration of a portable grater with cooling fins and ventilation slots (no text or symbols)natural_image
Illustration of a portable electric grill with cooling fins and control knobs (no text or symbols)- Insert No.7 and 8 into the front and side glass that have been installed and secure them with screws, as shown in the diagram.
natural_image
Illustration of a commercial grater with cooling fins and side fans (no text or symbols)- For the installation of the top glass, slide it down the plastic notch to NO. 7 and 8.

natural_image
Illustration of a portable food grater with cooling fins and control knobs (no text or symbols)
natural_image
Illustration of a portable food grater with red indicator lights (no text or symbols)- Fix the glass on both sides and top
-
Inserte los números 17 y 6 en la parte de antera using screws and nuts to lock and muidos laterales que se han instalado y secure No. 5 and 6. Please refer to the Asegurlos con tornillos, como se muestra en diagram for guidance. El diagrama.
-
To install the door panels, use one y4. Para la instalación del vidrio superior, deslicelo hacia abajo por la muesca de plástico hasta el N.° y 8. careful not to over-tighten, as this may cause the door shaft to be unable to rotate, as shown in the diagram.

natural_image
3D rendering of a portable food grater with cooling fins and ventilation slots (no text or symbols visible)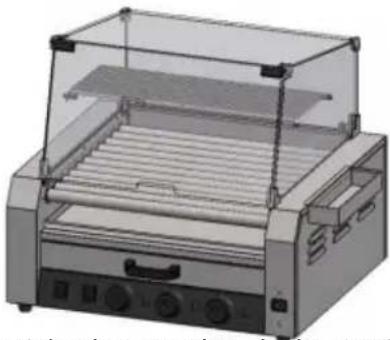
natural_image
Illustration of a portable food grater with a transparent hood and control panel (no text or symbols visible)Centurion House, London Road, Staines-
upon-Thames, Surrey, TW18 4AX
E-CrossStu GmbH
Mainzer Landstr.69,
natural_image
Illustration of a portable food grater with control panel and tray (no text or symbols)
natural_image
Illustration of a portable food grater with cooling fins and control knobs (no text or symbols)POTRZEBUJESZ POMOCY? SKONTAKTUJ SIĘ Z NAMI!
Note: the quantity of parts shown in the manual is the actual usage and the unused parts are spare parts.

RYSUNEK MONTAŻOWY
natural_image
Illustration of a portable electric grill with heat exchanger and control panel (no text or symbols)natural_image
Illustration of a portable electric stove with cooling fins and heat exchangers (no text or symbols)natural_image
Illustration of a portable grater with three side fans and control buttons (no text or symbols)- Insert No.7 and 8 into the front and side glass that have been installed and secure them with screws, as shown in the diagram.
natural_image
Illustration of a portable food grater with cooling fins and control knobs (no text or symbols)- For the installation of the top glass, slide it down the plastic notch to NO. 7 and 8.

natural_image
Illustration of a portable food grater with cooling fins and control knobs (no text or symbols)
natural_image
Illustration of a commercial toaster with red indicator lights and control knobs (no text or symbols)natural_image
3D rendering of a refrigerated toaster with cooling fins and ventilation ducts (no text or symbols visible)
natural_image
Illustration of a portable food grater with lid and control panel (no text or symbols)C/O YH Consulting Limited Biuro 147, Centurion
House, London Road, Staines-upon-
Thames, Surrey, TW18 4AX
| Przedstawiciel UE |
E-CrossStu GmbH
Mainzer Landstr.69,
60329 Frankfurt nad Menem.
VEVOR®
TOUGH TOOLS, HALF PRICE
natural_image
Illustration of a portable food grater with control panel and tray (no text or symbols)
natural_image
Illustration of a portable food grater with cooling fins and control knobs (no text or symbols)HULP NODIG? NEEM CONTACT MET ONS OP!
Note: the quantity of parts shown in the manual is the actual usage and the unused parts are spare parts.
MONTAGE TEKENING
natural_image
Illustration of a portable electric grill with heat exchangers and a lid, showing no text or symbols.natural_image
Illustration of a portable grater with cooling fins and ventilation slots (no text or symbols)natural_image
Illustration of a portable electric grill with cooling fins and control knobs (no text or symbols)- Insert No.7 and 8 into the front and side glass that have been installed and secure them with screws, as shown in the diagram.

natural_image
3D rendering of a portable food grater with cooling fins and ventilation slots (no text or symbols visible)- For the installation of the top glass, slide it down the plastic notch to NO. 7 and 8.

natural_image
Illustration of a portable food grater with cooling fins and control knobs (no text or symbols)natural_image
Illustration of a portable food grater with red indicator lights (no text or symbols)natural_image
3D rendering of a portable food grater with cooling fins and ventilation slots (no text or symbols visible)natural_image
Illustration of a refrigerated food grater with a transparent lid and control panel (no text or symbols)C/O YH Consulting Limited Kantoor 147,
Centurion House, London Road, Staines-
upon-Thames, Surrey, TW18 4AX
E-CrossStu GmbH
Mainzer Landstr.69,
60329 Frankfurt am Main.
VEVOR®
TOUGH TOOLS, HALF PRICE
garantiecertificaat www.vevor.com/support
VEVOR®
TOUGH TOOLS, HALF PRICE
natural_image
Illustration of a portable food grater with control panel and tray (no text or symbols)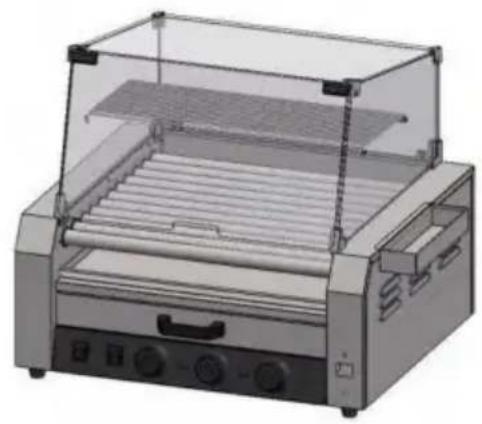
natural_image
Illustration of a portable food grater with cooling fins and control knobs (no text or symbols)BEHÖVER HJÄLP? KONTAKTA OSS!
November the quantity of parts is known in the manual is the actual usage and the unused parts are spare parts.

MONTERINGSRITNING
natural_image
Illustration of a portable electric grill with heat exchangers and a lid, showing no text or symbols.natural_image
Illustration of a portable grater with cooling fins and ventilation slots (no text or symbols)natural_image
Illustration of a portable electric grill with cooling fins and control knobs (no text or symbols)- Insert No.7 and 8 into the front and side glass that have been installed and secure them with screws, as shown in the diagram.

natural_image
Illustration of a commercial toaster with cooling fins and ventilation slots (no text or symbols)- For the installation of the top glass, slide it down the plastic notch to NO. 7 and 8.

natural_image
Illustration of a portable food grater with cooling fins and control knobs (no text or symbols)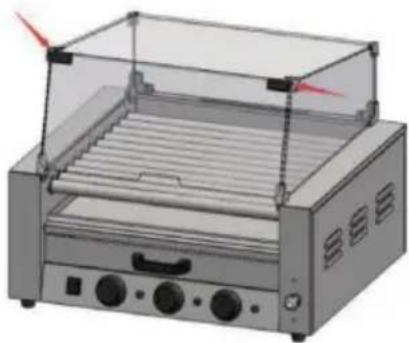
natural_image
Illustration of a portable food grater with red indicator lights (no text or symbols)-
Fix the glass on both sides and top, salt in fir 7 och 8 i fronten och sidoglas som har monterats och secure No. 5 and 6. Please refer to the fast dem med skruvar, som visas i diagram for guidance.
-
To install the door panels, use one 4: For installationen av det ovre glaset, skjut ner screw each for No.5 and 6Please be det I plastskaran till NO.7 och 8. careful not to over-tighten, as this may cause the door shaft to be unable to rotate, as shown in the diagram.
natural_image
3D rendering of a portable food grater with cooling fins and control knobs (no text or symbols visible)
natural_image
Illustration of a portable food grater with a transparent hood and control panel (no text or symbols visible)C/O YH Consulting Limited Office 147, Centurion
House, London Road, Staines-upon-
Thames, Surrey, TW18 4AX

E-CrossStu GmbH
Mainzer Landstr.69,
60329 Frankfurt am Main.
VEVOR®
TOUGH TOOLS, HALF PRICE
www.vevor.com/support