UV-401 - Manicure and pedicure set Vevor - Free user manual and instructions
Find the device manual for free UV-401 Vevor in PDF.

| Product Type | Manicure and Pedicure Set with Rechargeable Drill |
| Brand | Vevor |
| Model | UV-401 |
| Power Supply | Rechargeable lithium battery, input DC5V 2A |
| Charging Port | USB Type-C |
| Speed Range | 0 - 40,000 RPM, progressive adjustment |
| Rotation Direction | Forward (F) and Reverse (R) switchable |
| Main Functions | Grinding, polishing, cuticle care, manicure and pedicure |
| Safety | Overload protection, automatic stop in case of blockage, do not immerse in water |
| Maintenance | Clean with a soft, dry cloth; do not use abrasive materials |
| Regular Cleaning | At least once a month |
| Spare Parts | Interchangeable standard grinding heads (sold separately) |
| Included Accessories | Grinding pen, grinding head, USB cable (estimated) |
| Estimated Weight | Approx. 0.5 kg |
| Intended Use | Nail care at home and in professional salons |
| Warranty | Electronic warranty certificate via www.vevor.com/support |
| Certifications | CE, UKCA, FCC Part 15 |
| Important Warnings | Keep out of reach of children; do not disassemble; use only recommended accessories |
| Initial Charging Time | About 4 hours for first use |
| Overheat Protection | Automatic motor stop in case of overload; restart after shutdown |
Frequently Asked Questions - UV-401 Vevor
User questions about UV-401 Vevor
0 question about this device. Answer the ones you know or ask your own.
Ask a new question about this device
Download the instructions for your Manicure and pedicure set in PDF format for free! Find your manual UV-401 - Vevor and take your electronic device back in hand. On this page are published all the documents necessary for the use of your device. UV-401 by Vevor.
USER MANUAL UV-401 Vevor
Technical Support and E-Warranty Certificate www.vevor.com/support
RECHARGEABLE NAIL DRILL
MODEL: UV-401
We continue to be committed to provide you tools with competitive price. "Save Half", "Half Price" or any other similar expressions used by us only represent of savings you might benefit from buying certain tools with us compared to top brands and does not necessarily mean to cover all categories of tools offered are kindly reminded to verify carefully when you are placing an order with us actually saving half in comparison with the top major brands.
MODEL: UV-401
natural_image
Line drawing of a handheld electronic device with a cylindrical port and a digital display (no text or symbols)NEED HELP? CONTACT US!
Have product questions? Need technical support? Please feel fr contact us:
Technical Support and E-Warranty Certificate www.vevor.com/support
This is the original instruction, please read all manual instruction carefully before operating. VEVOR reserves a clear interpretation user manual. The appearance of the product shall be subject to product you received. Please forgive us that we won't inform you there are any technology or software updates on our product.
 | Warning-To reduce the risk of injury, user must read instr manual carefully. |
 | CORRECT DISPOSALThis product is subject to the provision of European Direct 2012/19/EC. The symbol showing a wheelie bin crossed th indicates that the product requires separate refuse collection the European Union. This applies to the product and all accessories marked with this symbol. Products marked as may not be discarded with normal domestic waste, but mutaken to a collection point for recycling electrical and elect devices |
 | To minimize hazards to health and the environment at the this product's life, laws dealing with Waste Electrical and Electronic Equipment (WEEE) and The Waste Battery Direct require you to dispose of this product at a suitable collect facility where it will be sent in order to remove the batter appropriate recycling.Please contact your local authorities for more details on recycling and safe disposal of these in yo |
| CE UK CA | Compliance is a EC & UK security certification. |
 | Move away from any potential source of ignition immediate battery leaks or emits an unusual odor. When you notice smell, heat, discoloration, deformation, or any other unusual situations in the process of using, charging, or storing batt you should immediately remove them from the device or c and stop using them. |
FCC INFORMATION
CAUTION: Changes or modifications not expressly approved by the party responsible for compliance could void the user's authority to operate the equipment!
This device complies with Part 15 of the FCC Rules. Operation is subject to following two conditions:
1) This product may cause harmful interference.
2) This product must accept any interference received, including interference that may cause undesired operation.
WARNING: Changes or modifications to this product not expressly approved by the party.responsible for compliance could void the user's authority to operate product.
Note: This product has been tested and found to comply with the limits for B digital device pursuant to Part 15 of the FCC Rules, These limits are des provide reasonable protection against harmful interference in a residential installation.
This product generates, uses and can radiate radio frequency energy, and if installed and used in accordance with the instructions, may cause harmful interference to radio communications. However, there is no guarantee that interference will not occur in a particular installation. If this product does cause harmful interference to radio or television reception, which can be determined by turning the product off and on, the user is encouraged to try to correct the interference by one or more of the following measures.
- Reorient or relocate the receiving antenna.
- Increase the distance between the product and receiver.
- Connect the product to an outlet on a circuit different from that to which receiver is connected.
- Consult the dealer or an experienced radio/TV technician for assistance.
The device has been evaluated to meet general RF exposure requirement. The device can be used in portable exposure condition without restriction.
IMPORTANT SAFEGUARDS
Thank you for using this product. In order to make sure that you can opera machine correctly, read this instruction carefully before operation and keep it properly for future reference. Please be sure to read the precautions and saf rules on this page to ensure your safe use.
This manual will outline safety warnings and precautions, operating, maintenance
and cleaning. The warnings and instructions reviewed in this manual cannot call all possible conditions and situations that may occur. Caution and common se are not built into this product, since we believe that the uses will comply wi codes. If you have any problems, please call us. Do not try to fix the prob yourself, or it will cause injury or property damage.
Please read ALL the instructions before using your machine.
- If the battery is low, please charge it in time.
- Do not let children, minors, and pets get close to or touch the machine.
- Do not immerse the appliance in water or any other liquid.
- Do not disassemble the product.
- Using any accessories or attachments that are not provided or recommend by the manufacturer may cause injury.
- Please start to use after the collect is fixed well.
- Do not leave the product hanging over the edge of table or counter or into contact with any hot surfaces.
- Do not place the product on or near hot air, electric burners or heaters.
- Do not apply this unit to any other purposes than the indicated usage.
- KEEP IT OUT OF CHILDREN'S REACH.
- DO NOT CLEAN IT WITH ANY ABRASIVE MATERIAL.
- Please clean it regularly, at least once a month.
- This appliance is not intended for use by persons (including children) with educed physical, sensory or mental capabilities, or lack of experience or knowledge, unless they have been given supervision or instruction concerning use of the appliance by a person responsible for their safe.
- When twist the lock chuck in using, the power of the main motor will be immediately to protect the machine. (The motor is easy to be damaged and of the motor will be reduced in this way, so please be cautious in operation).
- If the nail drill machine is re-started, the speed control dial need to be to the speed "0", and the power supply will be restarted.
- Please start to use after the collect is fixed well.
- Please stop the machine once any abnormal movement/noise is notic during operation.
-
Please adjust the speed gradually, not abruptly.
-
Please do not touch any rotating part when the machine is working.
- Please stop the machine at first to change the direction.
- Please do not place a cloth or anything else on the ventilation slides of controller, and keep the dust away from it.
- Please keep the plug out from the power supply after stop the machine.
BEFORE USING
- Before using the appliance for the first time, peel off any promotional and packaging materials and check that the product is clean and dust-free.
- Please dispose of all plastic bags carefully and keep them away from chi and pets.
- Check all components provided according to the list in this manual.
PRODUCT PARAMETERS
| Model | UV-401 |
| Charging port | Type-C |
| Power In put | DC5V 2A |
| Rotating speed | 0-40000RPM |
Note: Please use the correct power source voltage.
TIPS
- Product can go into service after 4 hours of charging. (When used for the time.)
- This device is equipped with a security protection system. Hand piece will working when the overload protection function is started to avoid overheat due improper operation. Just turn off the power and restart the machine for continue use.
- The slight burning smell from the handle motor is normal due to the head dissipation.
- When replacing the grinding head of the grinding handle, clean the dust at the socket before replacing it.
Prevent dust from entering the handle and causing noise.
- The internal parts of the handle are relatively precise, so be sure to hand with care to avoid bumps.
- If you need to use it with water during pre-processing, the water should exceed the grinding head to avoid the height of the grinding rod. At high spe water flows back into the handle, causing parts to rust. Correct operation car greatly extend the grinding time
The service life of the machine!
-
Please cut off the power before replacing the grinding head, and be sure insert the grinding head into the bottom of the chuck. If you do not insert the grinding head into the bottom of the chuck, the grinding head may easily fail due to vibration, which will bring risks.
-
Standard grinding heads should be used, and bent, deformed, or broken grinding heads must not be used.
-
In working condition, when the handle is not in use, the grinding head sh remain clamped.
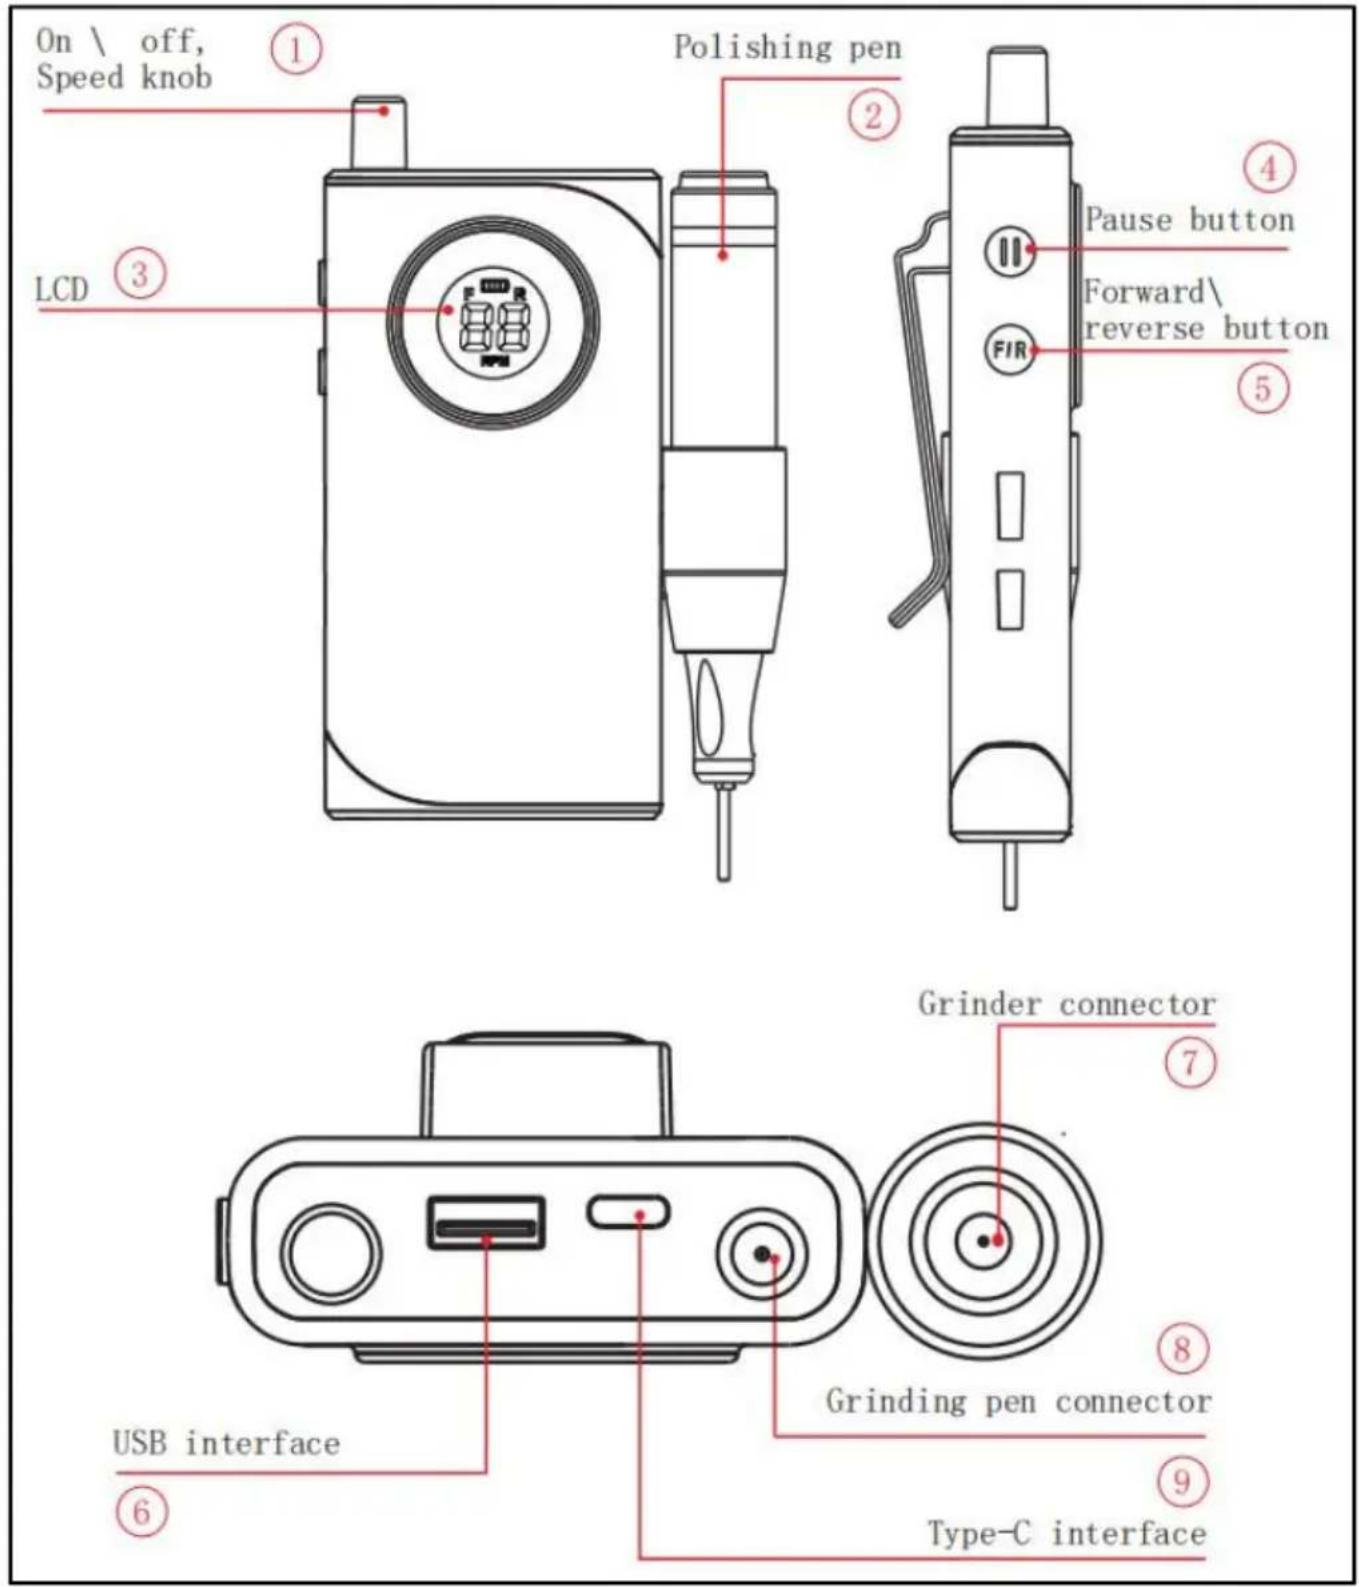
COMPOSITIONS
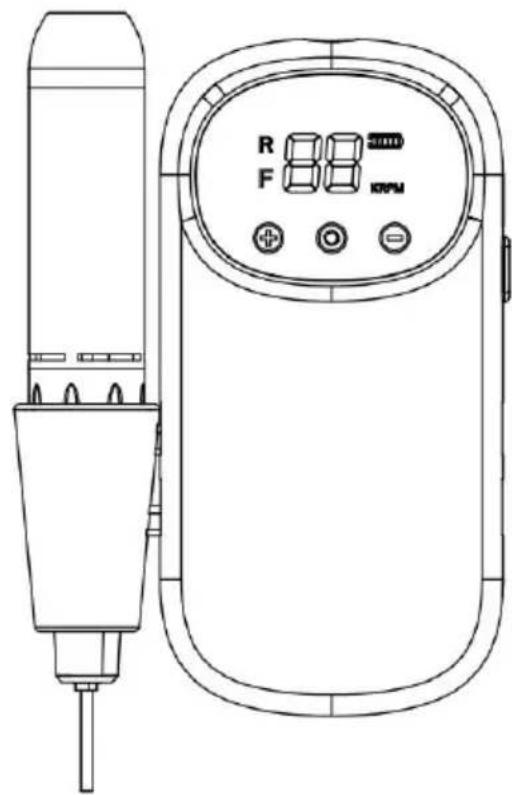
① Power on: Turn right to turn on, turn left to turn off.
Turn clockwise to increase the speed; twist counterclockwise to decrease the speed.
② Tighten the steering head of the grinding pen, place the grinding head a bottom and clamp it.
③ Speed display: 00-40RPM, representing 0-40000 rpm adjustment number.
④ Short press for one second to pause.
⑤ Forward and reverse rotation: Press the button "F" to rotate forward, and the button "R" again to return to reverse rotation.
⑥ USB charging port can provide mobile phone charging function and can be used simultaneously with the grinder.
⑦ Connect the polishing pen to the connection port of the host machine.
⑧ The connection port where the host computer connects to the polishing p
⑨ Type-C grinder charging port.
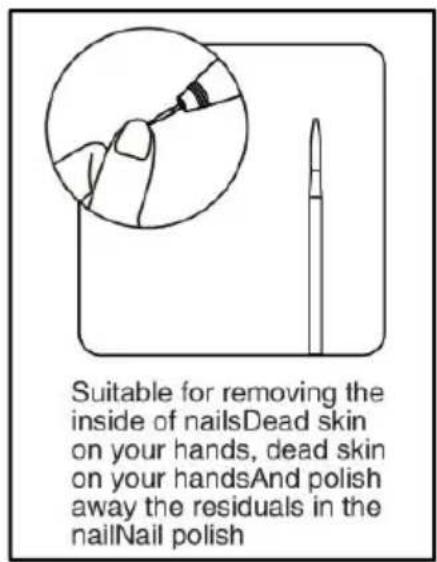
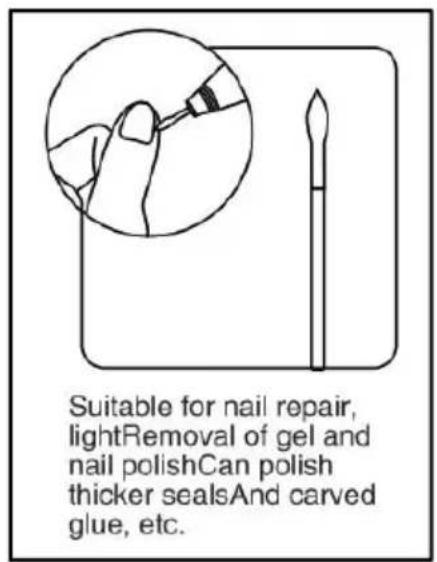
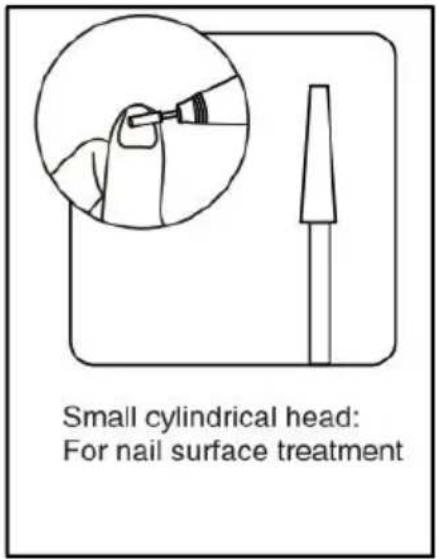
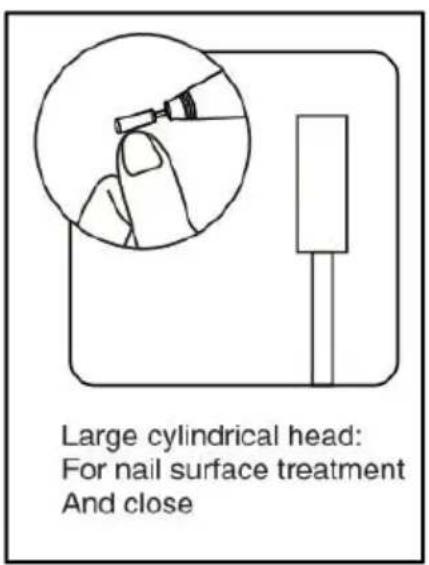
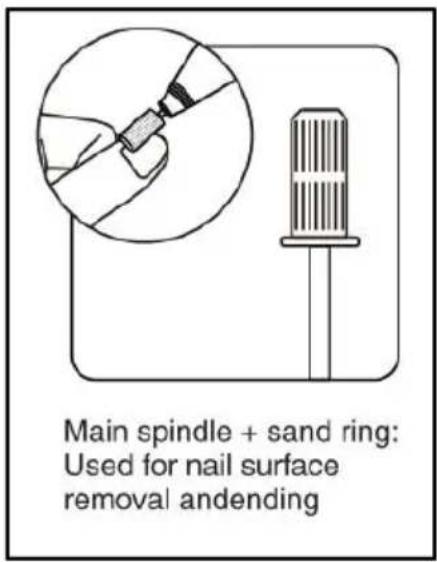
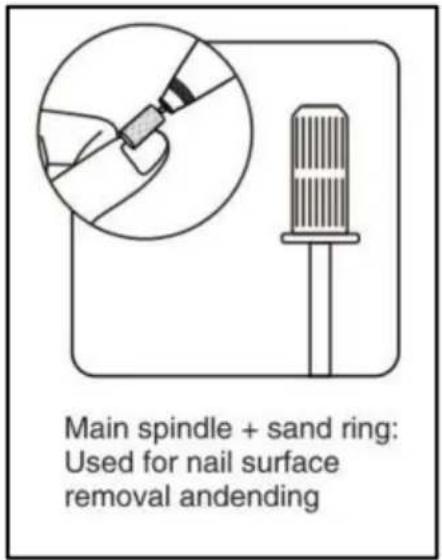
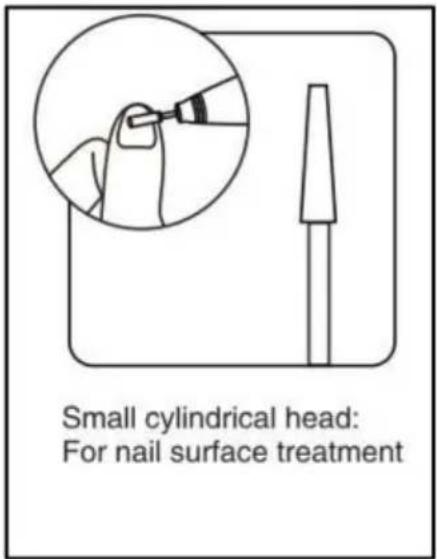
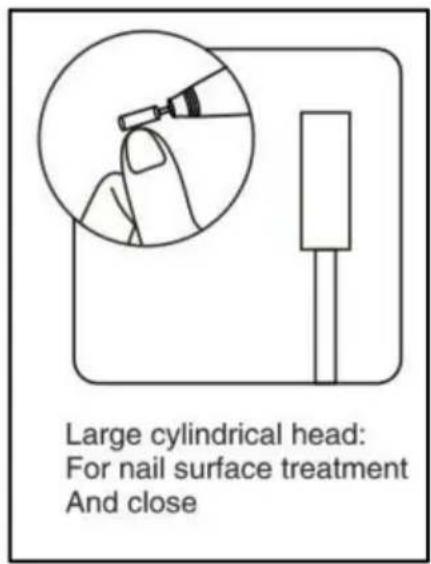
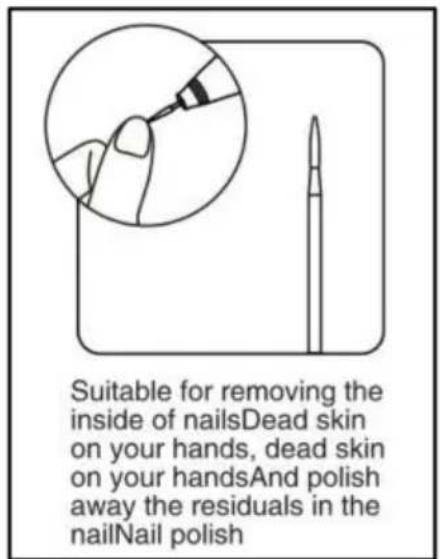
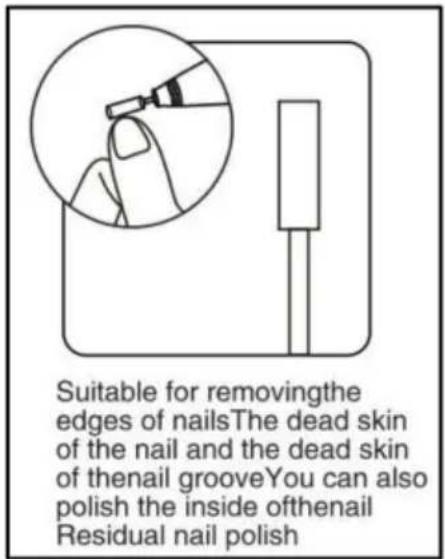
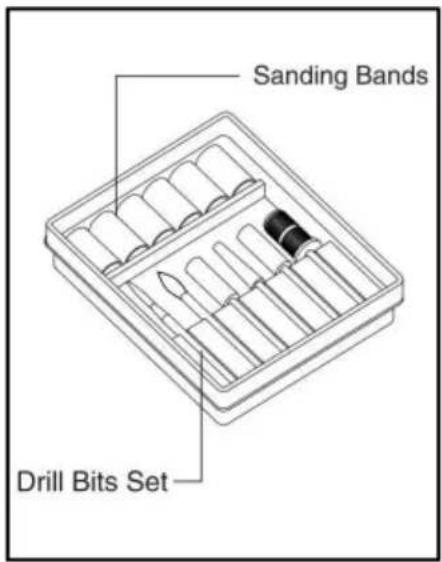
INTRODUCTION TO GRINDING HEAD
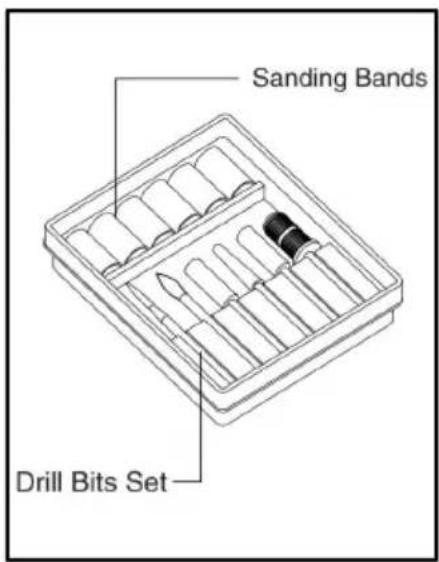
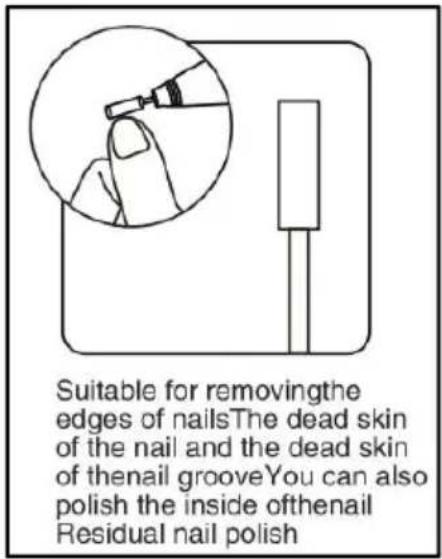

Note: When rotating the switch lock left and right, a grinding head or thimble be inserted, otherwise it will cause the rotation to be too tight, which is also Attention: Please note that there is a lock icon on the product and follow instructions.
CLEANING AND STORAGE
- If the machine is not to be used for a long period of time, Remove pov and cover it and store it in a dry and safe place.
- Wipe with a soft, dry cloth. Be sure to keep the product dry
- Please keep accessories and products together.
Manufacturer: Shanghaimuxinmuyeyouxiangongsi
Address: Shuangchenglu 803nong11hao1602A-1609shi, baoshanqu, shanghai 200000 CN.
Imported to AUS: SIHAO PTY LTD. 1 ROKEVA STREETEASTWOOD NSW 2122 Australia
Imported to USA: Sanven Technology Ltd. Suite 250, 9166 Anaheim Place, Rancho Cucamonga, CA 91730
| REPU |
YH CONSULTING LIMITED.
C/O YH Consulting Limited Office 147,
Centurion House, London Road,
Staines-upon-Thames, Surrey, TW18 4AX
| EC | REP |
E-CrossStu GmbH
Mainzer Landstr.69,
60329 Frankfurt am Main.
VEVOR®
TOUGH TOOLS, HALF PRICE
Technical Support and E-Warranty Certificate
www.vevor.com/support
VEVOR®
TOUGH TOOLS, HALF PRICE
natural_image
Line drawing of a handheld electronic device with a cylindrical component and a control panel (no text or symbols)BESOIN D'AIDE? CONTACTEZ-NOUS!
PARAMÈTRES DU PRODUIT
INTRODUCTION À LA TÊTE DE MEULAGE


FONCTIONNEMENT DE LA PIÈCE À MAIN
Lieu, Rancho Cucamonga, CA 91730

YH CONSULTING LIMITÉE.
C/O YH Consulting Limited Bureau 147,
Centurion House, London Road, Staines-
upon-Thames, Surrey, TW18 4AX

E-CrossStu GmbH
Mainzer Landstr.69,
natural_image
Line drawing of a handheld electronic device with a cylindrical component and a digital display panel (no text or symbols)BRAUCHEN SIE HILFE? KONTAKTIERE UNS!


HANDSTÜCKBETRIEB
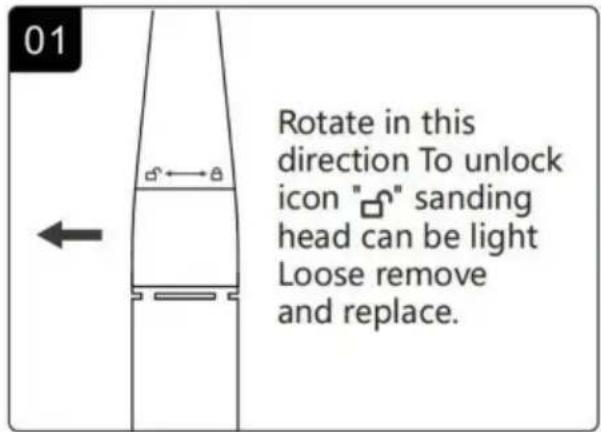
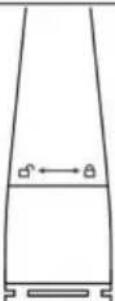
01


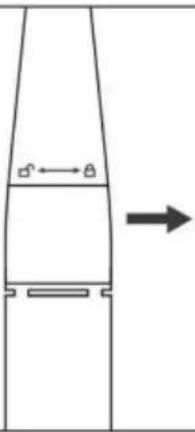
Rotate in this direction To unlock icon "☐" sanding head can be light Loose remove and replace.
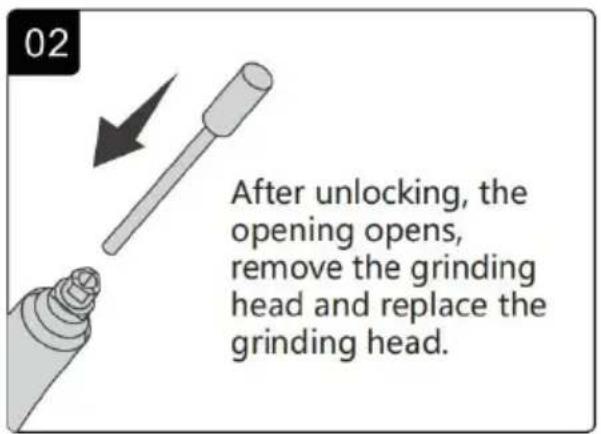
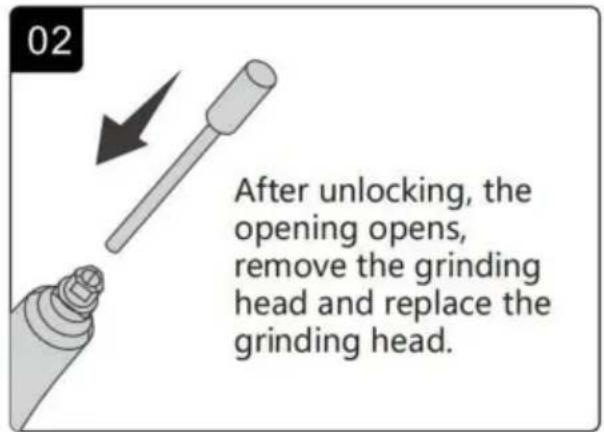
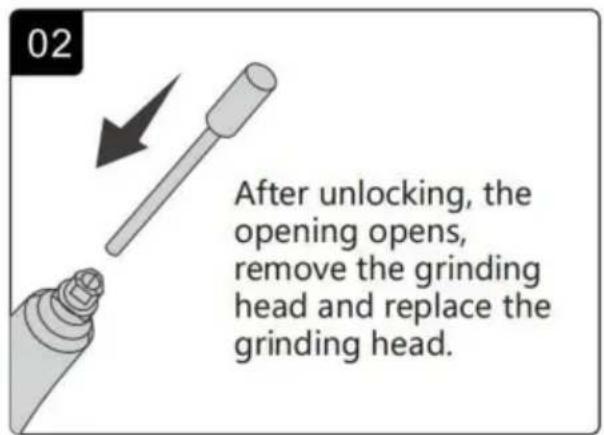
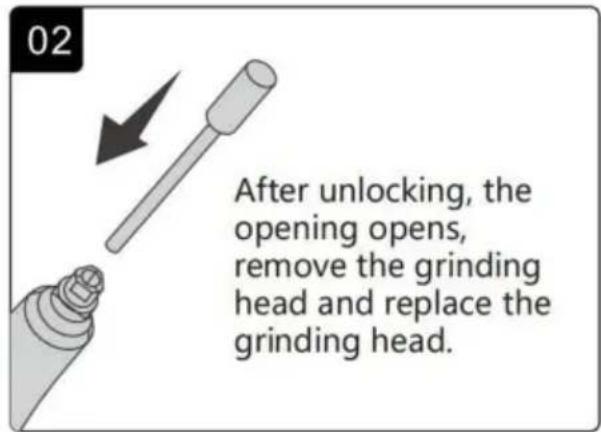
02

After unlocking, the opening opens, remove the grinding head and replace the grinding head.
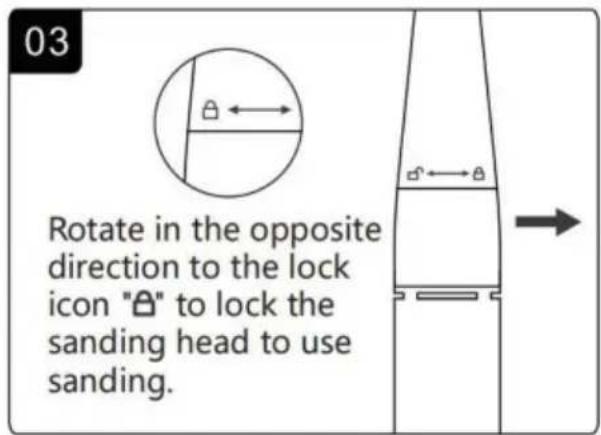
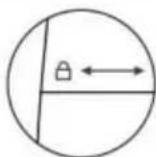
03

Rotate in the opposite direction to the lock icon "☐" to lock the sanding head to use sanding.
natural_image
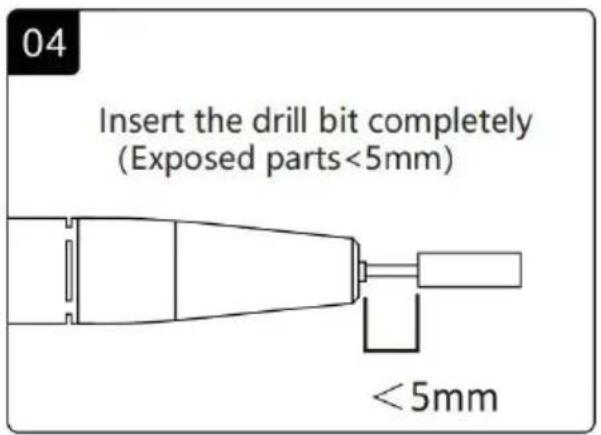
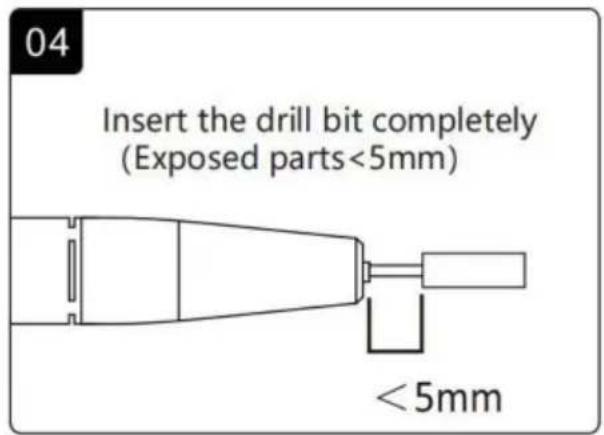
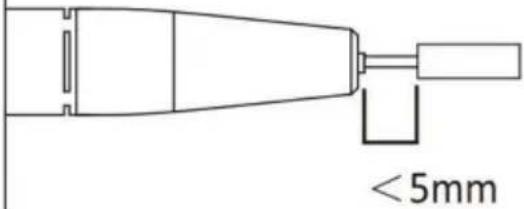
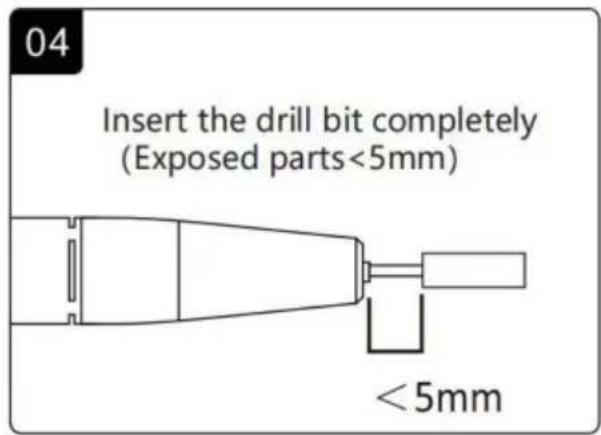
Pure diagram of a mechanical component with directional arrows, no text or symbols present04
Insert the drill bit completely (Exposed parts<5mm)
House, London Road, Staines-upon-
Thames, Surrey, TW18 4AX
E-CrossStu GmbH
Mainzer Landstr.69,
60329 Frankfurt am Main.
VEVOR®
TOUGH TOOLS, HALF PRICE
www.vevor.com/support
VEVOR®
TOUGH TOOLS, HALF PRICE
natural_image
Line drawing of a handheld electronic device with a cylindrical component and a control panel (no text or symbols)HO BISOGNO DI AIUTO? CONTATTACI!
INTRODUZIONE ALLA TESTA SMERIGLIATRICE


Importato in AUS: SIHAO PTY LTD. 1 ROKEVA STREETEASTWOOD NSW 2122Australia
C/O YH Consulting Limited Office 147,
Centurion House, London Road,
Staines-upon-Thames, Surrey, TW18 4AX
| REP.CE |
E-CrossStu GmbH
Mainzer Landstr.69,
elettronica www.vevor.com/support
VEVOR®
TOUGH TOOLS, HALF PRICE
natural_image
Line drawing of a handheld electronic device with a cylindrical component and a control panel (no text or symbols)


Centurion House, London Road,
Staines-upon-Thames, Surrey, TW18 4AX
E-CrossStu GmbH
Mainzer Landstr.69,
natural_image
Line drawing of a handheld electronic device with a cylindrical component and a control panel (no text or symbols)POTRZEBUJE POMOCY? SKONTAKTUJ SIĘ Z NAMI!
WPROWADZENIE DO GŁOWICY SZLIFIERSKIEJ


OBSŁUGA RĘCZNIKA


C/O YH Consulting Limited Office 147,
Centurion House, London Road,
Staines-upon-Thames, Surrey, TW18 4AX
| REPREZENT KE |
E-CrossStu GmbH
Mainzer Landstr.69,
60329 Frankfurt nad Menem.
VEVOR®
TOUGH TOOLS, HALF PRICE
www.vevor.com/support
VEVOR®
TOUGH TOOLS, HALF PRICE
Technische ondersteuning en e-garantiecertificaat www.vevor.com/support
OPLAADBARE NAGELBOOR
MODEL: UV-401
natural_image
Line drawing of a handheld electronic device with a cylindrical component and a control panel (no text or symbols)HULP NODIG? NEEM CONTACT MET ONS OP!
INLEIDING TOT SLIJPKOP


HANDSTUKBEDIENING


C/O YH Consulting Limited Office 147,
Centurion House, London Road,
Staines-upon-Thames, Surrey, TW18 4AX

E-CrossStu GmbH
Mainzer Landstr.69,
60329 Frankfurt am Main.
VEVOR®
TOUGH TOOLS, HALF PRICE
garantiecertificaat www.vevor.com/support
VEVOR®
TOUGH TOOLS, HALF PRICE
natural_image
Line drawing of a handheld electronic device with a cylindrical component and a digital display panel (no text or symbols)BEHÖVS HJÄLP? KONTAKTA OSS!
INTRODUKTION TILL SLIPHUVUD


HANDDELSFUNKTION
01

Rotate in this direction To unlock icon "☐" sanding head can be light Loose remove and replace.
02

After unlocking, the opening opens, remove the grinding head and replace the grinding head.
03
Rotate in the opposite direction to the lock icon "☐" to lock the sanding head to use sanding.

natural_image
Pure diagram of a mechanical component with directional arrows, no text or symbols present04
Insert the drill bit completely (Exposed parts<5mm)

C/O YH Consulting Limited Office 147,
Centurion House, London Road,
Staines-upon-Thames, Surrey, TW18 4AX
| EC | REP |
E-CrossStu GmbH
Mainzer Landstr.69,
60329 Frankfurt am Main.
VEVOR®
TOUGH TOOLS, HALF PRICE
www.vevor.com/support