
DryFy 60 Smart - Air purifier Klarstein - Free user manual and instructions
Find the device manual for free DryFy 60 Smart Klarstein in PDF.

| Product Type | Dehumidifier / Air Purifier |
| Brand | Klarstein |
| Model | DryFy 60 Smart |
| Dehumidification Capacity | 60 L/day |
| Tank Capacity | 8 L |
| Airflow Rate | 270 m³/h |
| Recommended Area | 45-65 m² |
| Power Supply | 220-240 V ~ 50 Hz |
| Refrigerant | R290 (flammable) |
| Operating Modes | Living Space (50% RH), Basement (45% RH), Continuous (55% RH), Free (35-80% RH) |
| Fan Speeds | High, Low |
| Timer | 0.5 to 24 hours |
| Wi-Fi Control | Yes, via Klarstein app |
| MIRAGE Display | Illuminated front panel (white models) |
| Filter | Washable, cleaning reminder every 250 hours |
| Drainage | Removable tank or continuous drainage (hose inner diameter 10 mm) |
| Safety | Auto shut-off when tank full, button lock, leak protection |
| Dimensions (W x D x H) | Approx. 40 x 30 x 60 cm (estimation) |
| Weight | Approx. 18 kg (estimation) |
| Included Accessories | Castors, handle, cable holder, accessories for continuous drainage (optional) |
Frequently Asked Questions - DryFy 60 Smart Klarstein
User questions about DryFy 60 Smart Klarstein
0 question about this device. Answer the ones you know or ask your own.
Ask a new question about this device
Download the instructions for your Air purifier in PDF format for free! Find your manual DryFy 60 Smart - Klarstein and take your electronic device back in hand. On this page are published all the documents necessary for the use of your device. DryFy 60 Smart by Klarstein.
USER MANUAL DryFy 60 Smart Klarstein
INHALTSVERZEICHNIS
3
natural_image
Line drawing of a portable air conditioner unit with ventilation grilles and attached cable (no text or symbols)natural_image
Symbol of a trash bin crossed with a diagonal line, no text or numbers presentBerlin Brands Group UK Limited
PO Box 42
272 Kensington High Street
London, W8 6ND
United Kingdom
Congratulations on your purchase. Please read the following instructions carefully and follow them to prevent potential damage. We accept no liability for damage caused by disregarding the instructions and improper use. Please scan the QR code to access the latest operating instructions and further information about the product.

CONTENTS
Safety Instructions 22
Instructions for Refrigerant R290 23
Device Overview 24
Installation 25
Control panel and button functions 26
Emptying and draining water 28
Cleaning and Care 31
Troubleshooting 32
Device Control by Smartphone 34
Disposal Considerations 36
Declaration of Conformity 36
TECHNICAL DATA
| Article number 10045546 10045547 | |
| Power supply 220-240 V ~ 50 Hz | |
| Dehumidification capacity 60 L/day | |
| Tank capacity 8 L | |
| Air flow 270 m3/h | |
| Suitable room size 45-65 m^2 |
SAFETY INSTRUCTIONS
- Place the unit on a level surface to reduce vibration and noise.
- Do not place the device in water or other liquids.
- To avoid accidents, never use the device if the cable or other connections are damaged.
- This device can be used by children from the age of 8 and by people with limited physical, sensory or mental abilities and/or a lack of experience and knowledge, provided that they have been instructed on the device by a person responsible for them, can use the device safely and the understand the risks associated with use.
- Unplug the power cord from the outlet when you have stopped the device and want to reset or clean it.
- Only use the voltage specified on the rating plate.
• This device is for indoor use only. - Only use the device for its intended purpose.
- Do not place any heavy objects on the device.
- After each use, empty the water tank to avoid overflowing when restarting the device.
- Do not tilt the device to one side, as this could cause the water in the water tank to get inside the device and damage it.
- Do not insert any foreign objects into the device as this could damage it.
- If the power cord is damaged, it must be replaced by the manufacturer, customer service or a similarly qualified person to avoid damage.
- Pull the power plug out of the mains socket if you will not be using the device for a long period of time.
- The power supply of the dehumidifier must comply with national safety regulations. Reliable grounding of the device must be ensured.
- Never place the device near heat sources (such as open flames, heaters, etc.).
- Do not turn the device on and off by plugging in or unplugging the power cord.
- Do not use sprays or other easily flammable substances near the device.
- Never scratch the surface of the device with sharp objects.
- Make sure that no water or oil gets inside the device.
- Never clean the device with water. Rub it with a soft, slightly damp cloth.
- Do not rub the device with chemical solutions such as benzene, gasoline, alcohol, etc. If the device is heavily soiled, wipe it with a neutral detergent.
- Do not tilt the device more than 45^ or turn it upside down.
INSTRUCTIONS FOR REFRIGERANT R290
Safety instructions
- The dehumidifier must be stored and transported in an upright position. Otherwise irreparable compressor damage may occur. Allow the unit to stand for at least 24 hours before operation.
- Before cleaning, switch off the appliance and disconnect it from the power supply.
- Please check that the product generates a constant flow of air! Please make sure that the air inlets and outlets are not blocked.
- Operate the appliance on a horizontal surface to prevent leaks.
- Every person working on a refrigerant circuit should have a valid certificate from an industry accredited assessment body. This ensures competence in the safe handling of refrigerants in accordance with an industry-recognised assessment specification.
- When the appliance no longer operates, dispose of it properly.
- Store the appliance in a well-ventilated place when not in use.
- Store the appliance in a place where no damage can occur to it.
- Repairs may only be carried out by the manufacturer or an authorised specialist company.
- Do not damage any of the components of the refrigerant circuit. Leaking refrigerant may not be noticed as it is odourless.
- Maintenance and repairs must be carried out under the supervision of specialists in the use of flammable refrigerants.
Information for areas with refrigerant pipes
- Keep pipework to a minimum.
- Take care not to damage the pipelines.
- Appliances with flammable refrigerants may only be installed in a well-ventilated room.
- Comply with national gas regulations.
- All mechanical connections must be freely accessible for maintenance purposes.
CAUTION
Fire hazard! This device contains the flammable refrigerant R290. If the refrigerant is leaking and exposed to an external ignition source, there may be a fire hazard.
DEVICE OVERVIEW
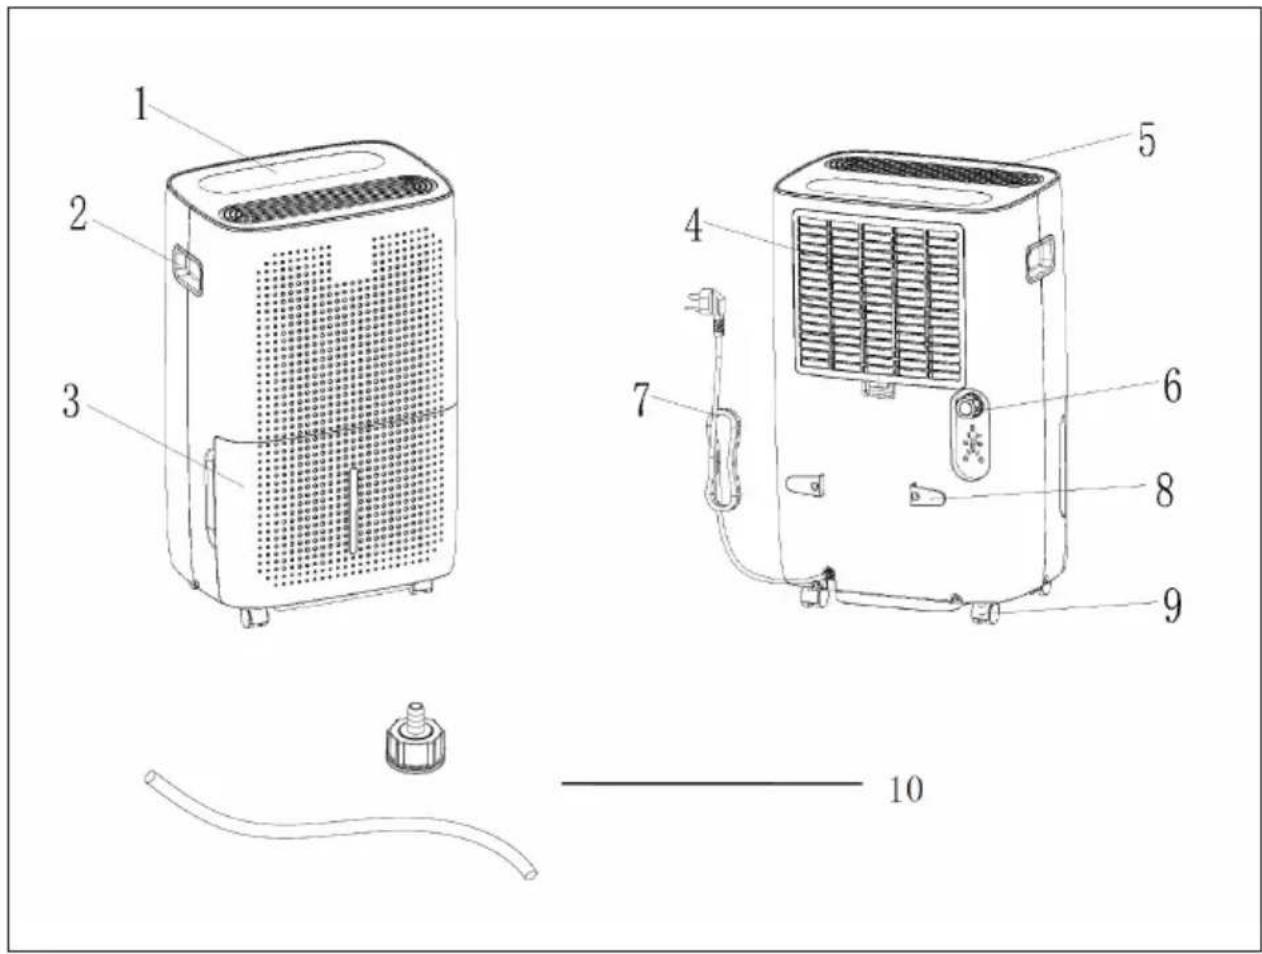
| 1 Top control panel 6 Water outlet | ||
| 2 Handle 7 Power cable | ||
| 3 Water tank 8 Cable suspension | ||
| 4 Intake grille and air filter 9 Rollers | ||
| 5 Air outlet 10 | Accessories for permanent drainage (optional) |
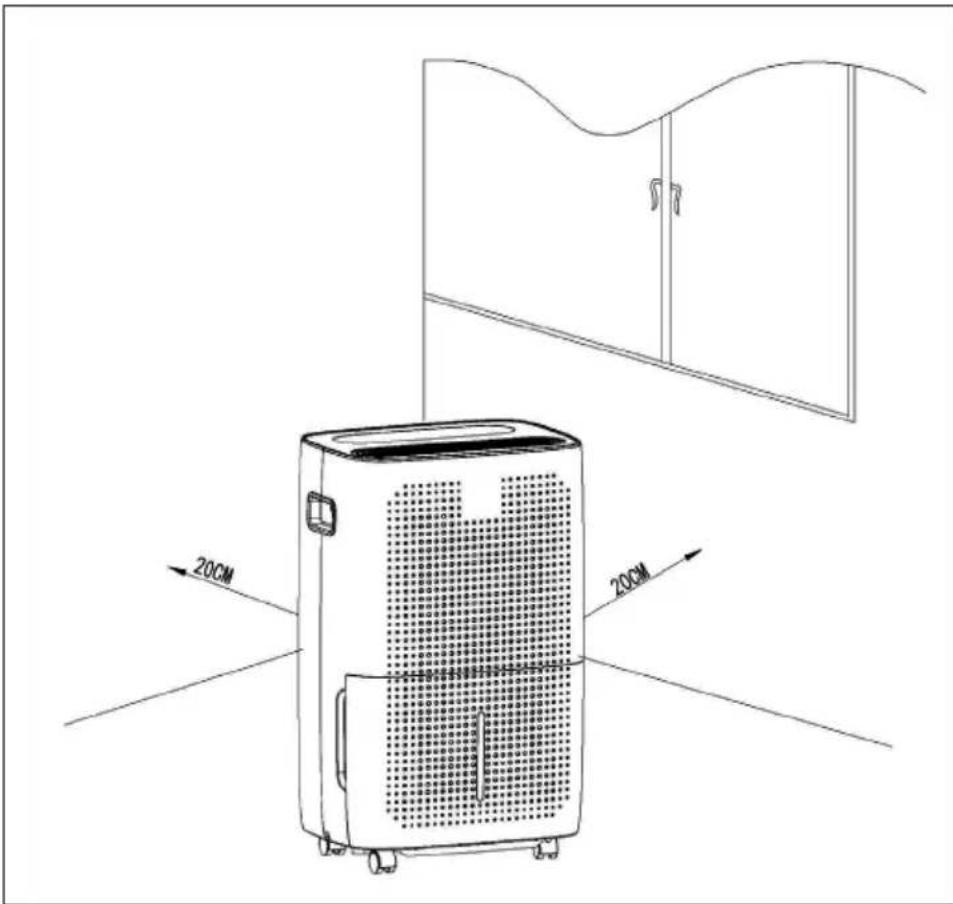
INSTALLATION
- When installing the device, make sure that there is a minimum clearance of 50 cm above and a minimum distance of 20 cm on all sides of the device (see figure below).
- If the device is very noisy during operation, it is recommended to install rubber pads or dampening rubber mats under the dehumidifier, as this will reduce the vibration and noise. Furthermore, the sinking of wooden and carpeted floors is reduced.
CONTROL PANEL AND BUTTON FUNCTIONS
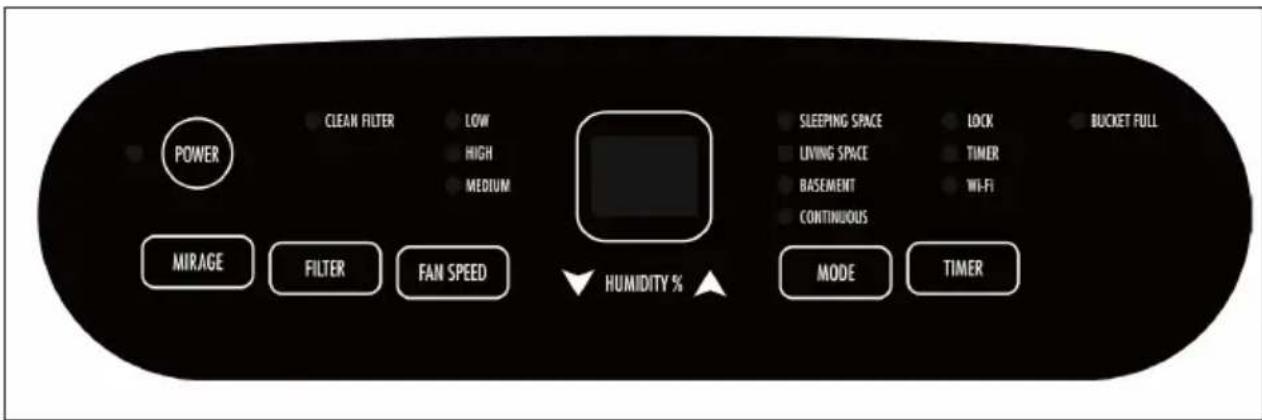
| 88 | Display |
| When the device is connected to the mains, the display shows the humidity in the room.When you set the humidity, the display will show the humidity you have selected.If you program the time for switching the device on and off, the display will show the time.If the humidity in the environment is below 20%, the display will show 20.If the humidity in the environment is above 90%, the display will show 90. | |
 | POWER (device on/off) |
| When the device is turned on, the light above the power button will turn on. The power button itself lights up for 3 seconds and then goes off again. Press the power button to start the device. The device defaults to free-run mode at 50% power and low wind speed. If there is a power failure, the device will work in the previously used mode with the previously used wind speed after turning it on again. If no mode is set, the next time the device is switched on, it will start again by default with 50% power and low wind speed. | |
 | FAN SPEED (wind speed) |
| Press the wind speed button to set the wind speeds to HIGH or LOW. The corresponding indicator light comes on. Press the arrow keys to enter free dehumidification mode. The humidity can now be set between 35-80%. Each time you press the button, the setting changes by 5% RH. | |
| MODE | MODE |
| Press MODE to change the set value of humidity as follows: LIVING SPACE 50% / BASEMENT 45% / CONINUOUS 55%. The corresponding indicator light will turn on. If you select CONTINUOUS, the display will show [CO]. | |
| TIMER | TIMER |
| Power off state: Press the timer key to activate the power on timer. The timer light turns on and the display initially shows [0.5]. Use the UP and DOWN keys to set the time. The time display remains on as long as the timer function is active. To cancel the timer function during runtime, press the timer key again.Power On: While the dehumidifier is running, press the Timer key to set the power off timer. The display will show [0.5]. Use the UP and DOWN keys to set the time.Time measurement range: The adjustable time ranges from 0.5 hours to 24 hours.Lock function: Press and hold the timer button for 3-5 seconds to activate the lock function. The lock light will illuminate and the other keys will become inactive. Press the timer key again for 3-5 seconds to cancel the lock function. After the lock light goes out, the other keys become active again. | |
| MIRAGE | MIRAGE (only available in white models |
| Press the MIRAGE key to activate the front panel display. Press the key again to deactivate the display on the front panel. The indication on the front panel display matches the indication on the upper display. | |
| FILTER | FILTER |
| After the dehumidifier has been running for 250 hours, the filter screen cleaning indicator light will illuminate, reminding you that the filter screen needs to be cleaned. Turn off the unit and clean the filter as described in the chapter CLEANING AND CARE. |
Note for activating the WiFi function (only for WiFi models):
Press the TIMER button and MODE button simultaneously for 3-5 seconds when the power is off to activate the WiFi function.
EMPTYING AND DRAINING WATER
When the drainage tank is full, the BUCKET FULL indicator light will illuminate, the operation will stop automatically and the buzzer will beep 15 times to alert the user that the drainage tank needs to be emptied.
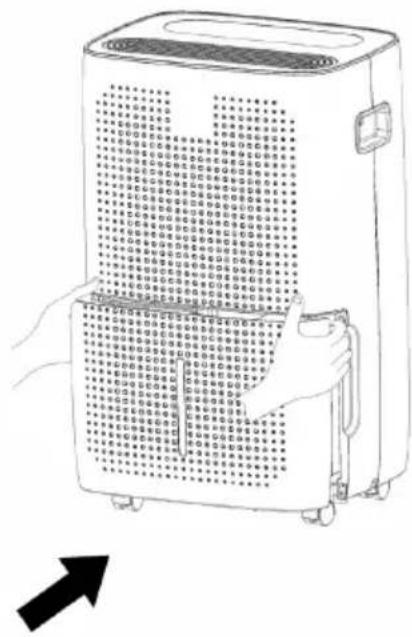
How to empty the drainage tank
| 1 | 2 |
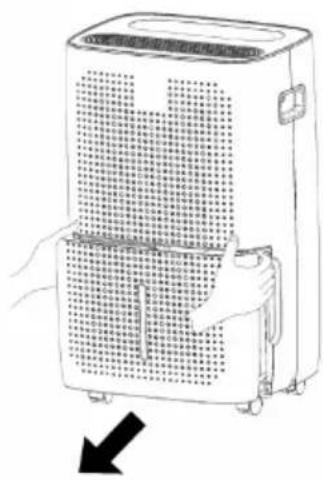 |  |
| Using both hands, gently press the sides of the tank and carefully pull it out. | Dispose of the collected water. |
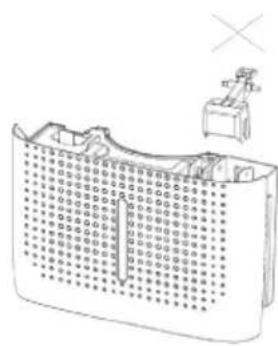
Please note:
- Do not remove the float from the water tank. Without the float, the water tank full sensor can no longer properly detect the water level and water may leak from the water tank.
- If the drainage tank is dirty, wash it with cold or lukewarm water. Do not use detergent, scouring pads, chemically treated dust cloths, gasoline, benzene, thinner or other solvents as they may scratch and damage the tank and cause water leakage.
natural_image
Illustration of a mechanical device above a grid-like structure (no text or symbols)3


When inserting, use both hands to firmly push the tank into place. If the tank is not positioned correctly, the water tank full detection sensor will be activated and the dehumidifier will not work.
Setting up a permanent water outlet
Screw the drain nozzle into the middle partition, and then connect the pipe (inner diameter 10 mm) to the drain nozzle.
The water in the waste water tank can now be permanently drained via the connection on the device.
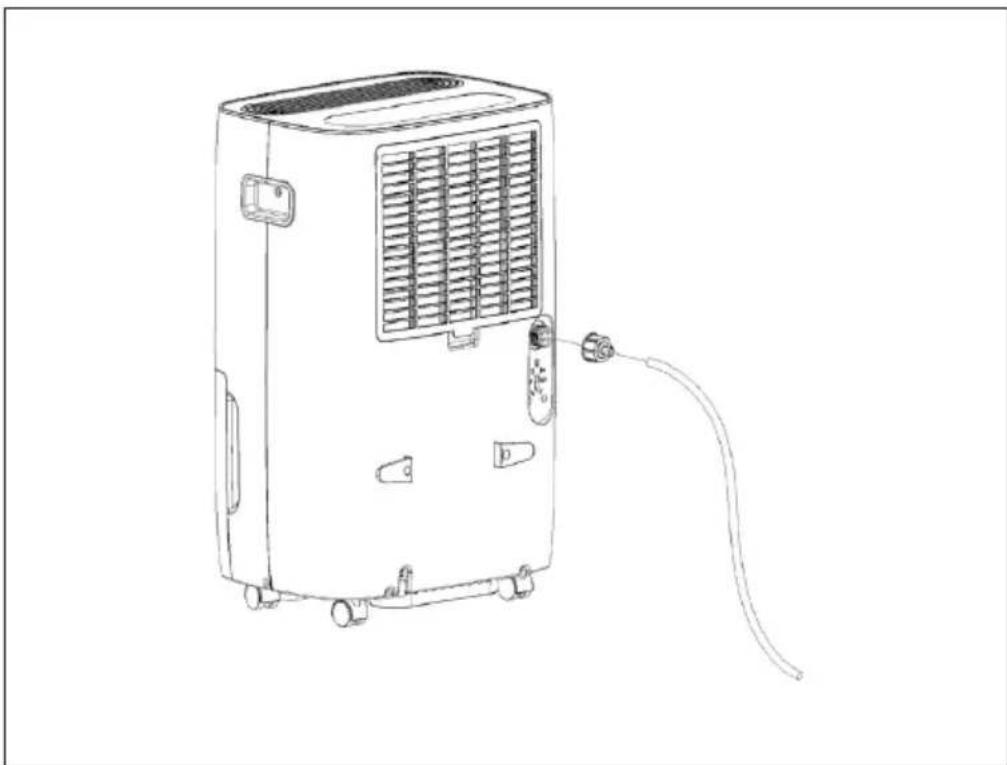
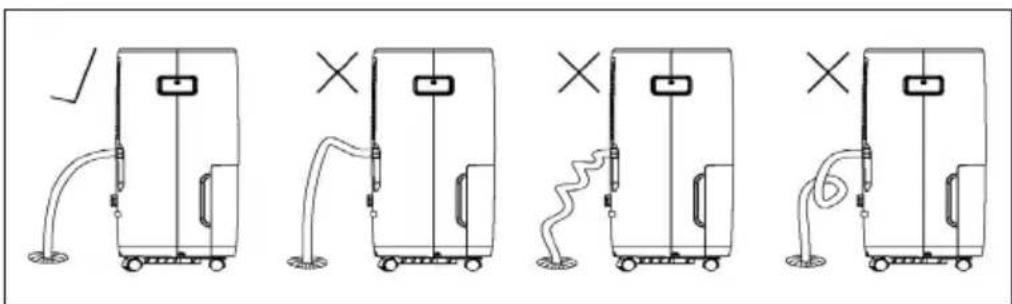
natural_image
Line drawing of a portable air conditioner unit with cooling fins and connected tubing (no text or symbols)The pipe must not be deformed or have a strong twist. The pipe must not be higher than the water outlet. The pipe must not be blocked. Do not use extension tubes or replace the hose with other hoses.
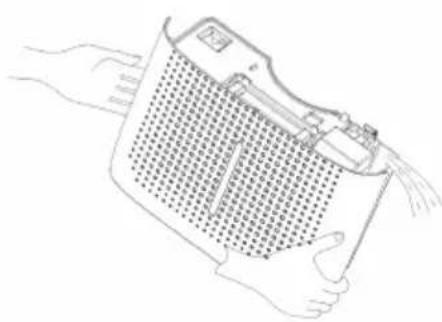
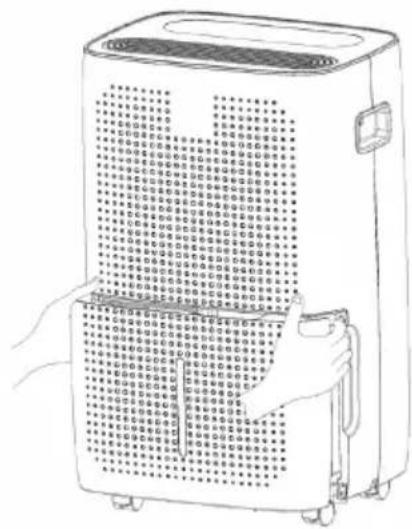
CLEANING AND CARE
| 1 | |
| First open the intake grille and then remove the filter. Wash the filter in warm water and let it air dry. | |
| 2 | 3 |
| Reattach the filter to the intake grille. Reinstall the intake grille. | |
Before storage
If you will not be using the device for a long period of time (more than a few weeks), follow the steps below.
- Disconnect the unit from the mains.
- Empty the water tank and dry it with a cloth.
- Clean the filter and let it dry completely in a shaded area.
- Put the filter back in place.
- Store the device in a dry and well-ventilated place. Make sure that the device is always upright.
TROUBLESHOOTING
| Problem Possible cause Solution approach | ||
| The appliance is not working. | The mains plug is not plugged into the socket. | Insert the mains plug into the socket. |
| The water tank may be full or installed incorrectly. | Drain the water from the water tank or insert it correctly. | |
| The room temperature is lower than 5 °C or higher than 32°C. | This is normal at these temperatures and is not a fault condition. | |
| Dehumidifying the room air is not effective. | The room temperature or humidity is too low. | In the dry season, the air dehumidification ability is reduced. |
| The air inlet or outlet is blocked. | Clean the air inlets and outlets. | |
| No air is blown out. The ventilation grille is blocked. | Clean the ventilation grille. | |
Error notifications
| Display Possible cause Solution | ||
| [E1] is displayed. Problem | with the air outlet temperature sensor. | Have the air outlet temperature sensor and associated circuit checked by a specialist company. |
| [E2] is displayed. Coil temperature | perature of the sensor is abnormal. | Have the temperature sensor of the coil and associated circuit checked by a specialist company. |
| [EH] is displayed. Humidity | sensor anomaly. | Have the humidity sensor and associated circuit checked by a specialist company. |
DEVICE CONTROL BY SMARTPHONE
If you integrate the device into your home WiFi, you can conveniently operate it via the associated Klarstein app. The app not only allows you to remotely control the device via your smartphone, but also gives you access to recipes and additional information.
Follow these steps to connect your smartphone to your Klarstein device:
- Download the Klarstein app first by scanning the QR code with your smartphone (see below), or download it directly from App Store or Google Play.
- Make sure your smartphone is connected to the same WiFi network that your Klarstein device is to be connected to.
- Open the Klarstein app.
- Sign in to your account. If you do not have an account, sign up in the Klarstein app.
- Follow the instructions from the app.
App Download
Use the scan function of your smartphone to scan the QR code and save the app on your smartphone.
Note: The app provides further information on how to use the app and help on how to connect to your device as soon as you open it for the first time.
| iOS Android | |
 |  |
Troubleshooting connection problems
If your Klarstein device cannot be found in the WLAN, check the following:
- The device is not plugged in. Make sure that your device is plugged into an electric socket.
- The device is not in pairing mode. Make sure that the WiFi indicator (LED) on the smart device control panel is blinking as described in the 'Reset WiFi settings' instruction of your smart device (instructions are usually available on device connection process).
- The WiFi access point does not operate on 2.4 GHz. Make sure that your access point operates on 2.4 GHz band and you have a separate SSID on 2.4 GHz band. If you are not sure about the operating band of your access point, please contact your internet provider company.
Important: please note that if your WiFi router is dual band - operating on both 2.4 GHz and 5 GHz band - you need to separate the SSIDs for each band and use the 2.4 GHz SSID for connection.
-
Firewall settings of your WiFi network; the firewall setting of your WiFi network may not allow the Klarstein app to configure the WiFi settings on your smart device. Please make sure that you are not using a public WiFi network, e.g. airports, dormitories, companies, etc.
-
Different credentials used in smartphone and the app. Make sure that the WiFi credentials entered in the Klarstein app are the same as the ones that your smartphone is connected to.
Following the above mentioned points, if your smart device still fails to connect to the app, please contact us via email for support: appsupport@go-bbg.com
DISPOSAL CONSIDERATIONS

natural_image
Symbol of a trash bin crossed with a diagonal line, no text or numbers presentIf there is a legal regulation for the disposal of electrical and electronic devices in your country, this symbol on the product or on the packaging indicates that this product must not be disposed of with household waste. Instead, it must be taken to a collection point for the recycling of electrical and electronic equipment. By disposing of it in accordance with the rules, you are protecting the environment and the health of your fellow human beings from negative consequences. For information about the recycling and disposal of this product, please contact your local authority or your household waste disposal service.
DECLARATION OF CONFORMITY

Manufacturer:
Chal-Tec GmbH, Wallstrasse 16, 10179 Berlin, Germany.
Importer for Great Britain:
Berlin Brands Group UK Limited
PO Box 42
272 Kensington High Street
London, W8 6ND
United Kingdom
Hereby, Chal-Tec GmbH declares that the radio equipment type DryFy 60 Smart is in compliance with Directive 2014/53/EU. The full text of the EU declaration of conformity is available at the following internet address: use.berlin/10045546
For Great Britain: Hereby, Chal-Tec GmbH declares that the radio equipment type DryFy 60 Smart is in compliance with the relevant statutory requirements. The full text of the declaration of conformity is available at the following internet address: use.berlin/10045546
Estimado cliente:
ÍNDICE
3

natural_image
Line drawing of a portable air conditioner unit with cooling fins and connected tubing (no text or symbols)LIMPIEZA Y CUIDADO
natural_image
Symbol of a trash bin crossed with a diagonal line, no text or numbers presentBerlin Brands Group UK Limited PO Box 42
272 Kensington High Street
London, W8 6ND
United Kingdom
Cher client, chère cliente,
SOMMAIRE
3


natural_image
Line drawing of a portable air conditioner unit with cooling fins and connected tubing (no text or symbols)NETTOYAGE ET ENTRETIEN
natural_image
Symbol of a trash bin crossed with a diagonal line, no text or numbers presentDÉCLARATION DE CONFORMITÉ

Fabricant :
Chal-Tec GmbH, Wallstraße 16, 10179 Berlin, Allemagne.
Berlin Brands Group UK Limited PO Box 42 272 Kensington High Street London, W8 6ND United Kingdom
INDICE
natural_image
Diagram of a battery cell with internal circuitry and external components (no text or symbols)3


natural_image
Line drawing of a portable air conditioner unit with cooling fins and connected tubing (no text or symbols)natural_image
Symbol of a trash bin crossed with a diagonal line, no text or numbers presentBerlin Brands Group UK Limited PO Box 42 272 Kensington High Street London, W8 6ND United Kingdom
bar
| Category | Value | |---|---| | Category 1 | 100 | | Category 2 | 100 | | Category 3 | 100 | | Category 4 | 100 | | Category 5 | 100 | | Category 6 | 100 | | Category 7 | 100 | | Category 8 | 100 | | Category 9 | 100 | | Category 10 | 100 | | Category 11 | 100 | | Category 12 | 100 | | Category 13 | 100 | | Category 14 | 100 | | Category 15 | 100 | | Category 16 | 100 | | Category 17 | 100 | | Category 18 | 100 | | Category 19 | 100 | | Category 20 | 100 | | Category 21 | 100 | | Category 22 | 100 | | Category 23 | 100 | | Category 24 | 100 | | Category 25 | 100 | | Category 26 | 100 | | Category 27 | 100 | | Category 28 | 100 | | Category 29 | 100 | | Category 30 | 100 | | Category 31 | 100 | | Category 32 | 100 | | Category 33 | 100 | | Category 34 | 100 | | Category 35 | 100 | | Category 36 | 100 | | Category 37 | 100 | | Category 38 | 100 | | Category 39 | 100 | | Category 40 | 100 | | Category 41 | 100 | | Category 42 | 100 | | Category 43 | 100 | | Category 44 | 100 | | Category 45 | 100 | | Category 46 | 100 | | Category 47 | 100 | | Category 48 | 100 | | Category 49 | 100 | | Category 50 | 100 | | Category 51 | 100 | | Category 52 | 100 | | Category 53 | 100 | | Category 54 | 100 | | Category 55 | 100 | | Category 56 | 100 | | Category 57 | 100 | | Category 58 | 100 | | Category 59 | 100 | | Category 60 | 100 | | Category 61 | 100 | | Category 62 | 100 | | Category 63 | 100 | | Category 64 | 100 | | Category 65 | 100 | | Category 66 | 100 | | Category 67 | 100 | | Category 68 | 100 | | Category 69 | 100 | | Category 70 | 100 | | Category 71 | 100 | | Category 72 | 100 | | Category 73 | 100 | | Category 74 | 100 | | Category 75 | 100 | | Category 76 | 100 | | Category 77 | 100 | | Category 78 | 100 | | Category 79 | 100 | | Category 80 | 100 | | Category 81 | 100 | | Category 82 | 100 | | Category 83 | 100 | | Category 84 | 100 | | Category 85 | 100 | | Category 86 | 100 | | Category 87 | 100 | | Category 88 | 100 | | Category 89 | 100 | | Category 90 | 100 | | Category 91 | 100 | | Category 92 | 100 | | Category 93 | 100 | | Category 94 | 100 | | Category 95 | 100 | | Category 96 | 100 | | Category 97 | 100 | | Category 98 | 100 | | Category 99 | 100 | | Total (Total) = [sum of bars] / [values] * (sum of bars + bars) * (sum of bars + bars) * (sum of bars + bars) * (sum of bars + bars) * (sum of bars + bars) * (sum of bars + bars) * (sum of bars + bars) * (sum of bars + bars) * (sum of bars + bars) * (sum of bars + bars) * (sum of bars + bars) * (sum of bars + bars) * (sum of bars + bars) * (sum in brackets) * (sum in brackets) * (sum in brackets) * (sum in brackets) * (sum in brackets) * (sum in brackets) * (sum in brackets) * (sum in brackets) * (sum in brackets) * (sum in brackets) * (sum in brackets) * (sum in brackets) * (sum in brackets) * (sum in brackets) * (sum in brackets) * (sum in brackets) * (sum in brackets) * (total).* (sum in brackets) * (sum in brackets) * (sum in brackets) * (sum in brackets) * (sum in brackets) * (sum in brackets) * (sum in brackets) * (sum in brackets) * (sum in brackets) * (sum in brackets) * (sum in brackets) * (sum in brackets) * (total).* (sum in brackets) * (sum in brackets) * (sum in brackets) * (sum in brackets)
KLARSTEIN

- INHALTSVERZEICHNIS
- CONTENTS
- SAFETY INSTRUCTIONS
- INSTRUCTIONS FOR REFRIGERANT R290
- Information for areas with refrigerant pipes
- CAUTION
- DEVICE OVERVIEW
- INSTALLATION
- CONTROL PANEL AND BUTTON FUNCTIONS
- Note for activating the WiFi function (only for WiFi models):
- EMPTYING AND DRAINING WATER
- Please note:
- 3
- Setting up a permanent water outlet
- CLEANING AND CARE
- Before storage
- TROUBLESHOOTING
- Error notifications
- DEVICE CONTROL BY SMARTPHONE
- App Download
- Troubleshooting connection problems
- DISPOSAL CONSIDERATIONS
- DECLARATION OF CONFORMITY
- Manufacturer:
- Importer for Great Britain:
- Estimado cliente:
- ÍNDICE
- LIMPIEZA Y CUIDADO
- SOMMAIRE
- NETTOYAGE ET ENTRETIEN
- DÉCLARATION DE CONFORMITÉ
- Fabricant :
- INDICE
- KLARSTEIN
Brand : Klarstein
Model : DryFy 60 Smart
Category : Air purifier