
DryFy Pro - Air purifier Klarstein - Free user manual and instructions
Find the device manual for free DryFy Pro Klarstein in PDF.

| Brand | Klarstein |
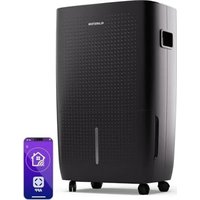
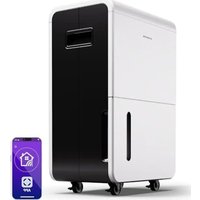
| Model | DryFy Pro |
| Product type | Air purifier / Dehumidifier |
| Power supply | 220-240 V ~ 50 Hz |
| Water tank capacity | 4 L |
| Refrigerant | R290 (flammable) |
| Operating temperature range | 5°C to 35°C |
| Operating modes | SMART, HIGH, LOW, FAN |
| Humidity setting | From 35% to (maximum value not specified), preset to 55% |
| Air quality indicator | LED lamp: red (≥80% RH), green (60-80% RH), blue (<60% RH) |
| Flap oscillation | Positions: 45°, 90°, Universal |
| Timer | Programmable auto start and stop (0-24 h) |
| Defrost function | Automatic at low temperature |
| Filter | Pre-filter + activated carbon filter |
| Filter cleaning | Every 2 weeks with warm water |
| Activated carbon filter replacement | Every 3 months |
| Permanent water drainage | Possible via PVC hose Ø10 mm (not included) |
| Recommended clearance | 15 cm around the appliance |
| Repairs | By manufacturer or authorized specialist only |
Frequently Asked Questions - DryFy Pro Klarstein
User questions about DryFy Pro Klarstein
0 question about this device. Answer the ones you know or ask your own.
Ask a new question about this device
Download the instructions for your Air purifier in PDF format for free! Find your manual DryFy Pro - Klarstein and take your electronic device back in hand. On this page are published all the documents necessary for the use of your device. DryFy Pro by Klarstein.
USER MANUAL DryFy Pro Klarstein
INHALTSVERZEICHNIS
BEDIENFELD UND TASTENFUNKTIONEN
Tastenfunktionen
natural_image
Illustration showing a hand holding a device next to three blank rectangular panels (no text or symbols)Wassertank leeren
natural_image
Line drawing of a hand using a tool to clean or adjust the interior wall of an air conditioner unit (no text or symbols visible)natural_image
Line drawings of three different air purifiers with a cable, shown from front, side, and top views (no text or symbols)Filterwechsel
natural_image
Line drawing of a hand opening a device with heat exchanger (no text or symbols)natural_image
Symbol of a trash bin crossed with a diagonal line, no text or labels presentBerlin Brands Group UK Limited
PO Box 42
272 Kensington High Street
London, W8 6ND
United Kingdom
Dear Customer,
Congratulations on purchasing this equipment. Please read this manual carefully and take care of the following hints to avoid damages. Any failure caused by ignoring the items and cautions mentioned in the instruction manual is not covered by our warranty and any liability. Scan the QR code to get access to the latest user manual and other information about the product.

CONTENT
Safety Instructions 18
Notes on Refrigerant R290 19
Product Description 20
Control Panel and Key Functions 20
Use and Operation 23
Care and Cleaning 25
Troubleshooting 26
Disposal Considerations 27
Manufacturer & Importer (UK) 27
TECHNICAL DATA
| Item number 10045549 | |
| Power supply 220-240 V ~ 50 Hz | |
| Water tank capacity 4 L |
SAFETY INSTRUCTIONS
- Leave the appliance to stand for at least two hours before power on, especially after transportation.
- Make sure that the voltage matching with the relevant data indicated on the rating label.
• The socket must be with grounding.
- Keep the appliance dry. Make sure no water on the top or the body. Do not unpin the plug when the appliance is working.
- If moving needed, please switch it off and unpin the plug. Allow a free space of 15 cm around air inlet of the appliance. Do not insert any object into the air inlet or outlet openings.
- Do not place the dehumidifier near a heating source (esp. a radiator) or indirect sunlight.
- Ensure that the appliance does not become hot.
- Empty the water tank regularly. (In extreme conditions the water tank may be full after a few hours operation.) Clean the air inlet filter if it becomes contaminated: the appliance is most effective when
- the filter is clean.
- Please do not expect the air dehumidifier to be effective when too many doors or windows are opened or when something in the room is producing a lot of humidity. The air dehumidifier will come into effect immediately. However, the reduction of humidity many hardly be measureable during the first few days.
- This appliance can be used by children aged from 8 years and above and persons with reduced physical, sensory or mental capabilities or lack of experience and knowledge if they have been given supervision or instruction concerning use of the appliance in a safe way and understand the hazards involved.
• Children shall not play with the appliance.
- Cleaning and user maintenance shall not be made by children without supervision.
NOTES ON REFRIGERANT R290
Warnings
- The air conditioning system must be kept and transported upright. Otherwise, irreparable compressor damage may occur. Leave the unit for at least 24 hours before putting it into operation.
- Switch off the device and disconnect it from the power supply before cleaning.
- Make sure that the product creates a steady stream of air. Ensure the air inlets and outlets are not blocked.
• To prevent leaks, operate this unit on a horizontal surface. - Any person performing work on a refrigerant circuit should have a current certificate from an industry-accredited assessment body. This ensures competence for the safe handling of refrigerants according to an industry-recognised assessment specification.
- If the device stops working, dispose of it properly.
- Store the device in a well-ventilated place when not in use.
- Store the device so that it is not damaged.
- Repairs may only be carried out by the manufacturer or an authorised specialist company.
- The cables connected to the device may contain potential ignition sources.
- Do not damage any components of the refrigerant circuit. Escaping refrigerant may not be noticed because it is odourless.
- Maintenance and repairs must be carried out under the supervision of specialists in the use of flammable refrigerants.
Information for rooms with refrigerant pipes
- Limit the piping to a minimum.
- Be careful not to damage the piping.
- Appliances with flammable refrigerants may only be installed in a well-ventilated room.
• Comply with national gas regulations. - All mechanical connections must be freely accessible for maintenance purposes.
CAUTION
Risk of fire! This device contains the flammable refrigerant R290. If the refrigerant escapes and is exposed to an external ignition source, there is a risk of fire.
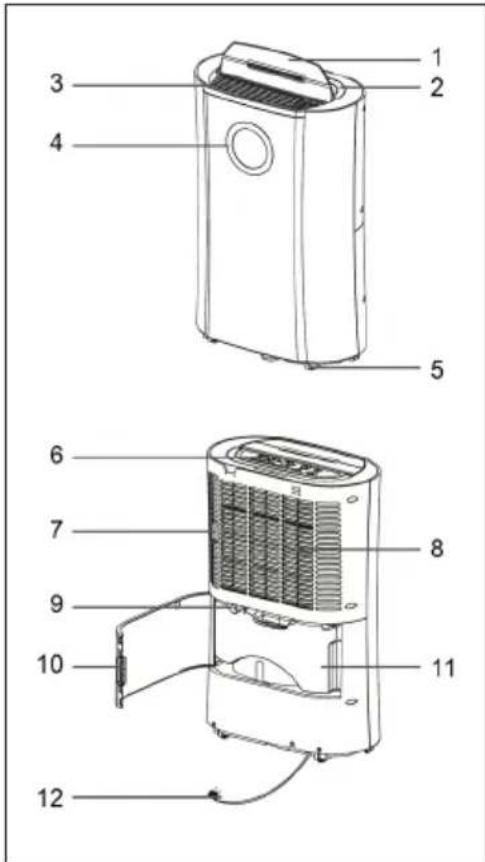
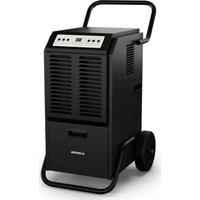
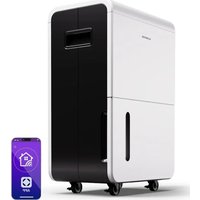
PRODUCT DESCRIPTION
1 Louvers
2 Handle
3 Air outlet
4 Lamp
5 Wheels
6 Control Panel
7 Prefilter / Activated Carbon Filter
8 Air inlet
9 Continuous drain port
10 Back cover
11 Water tank
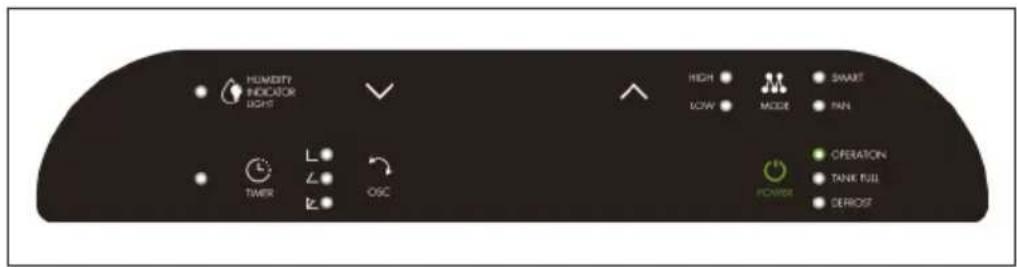
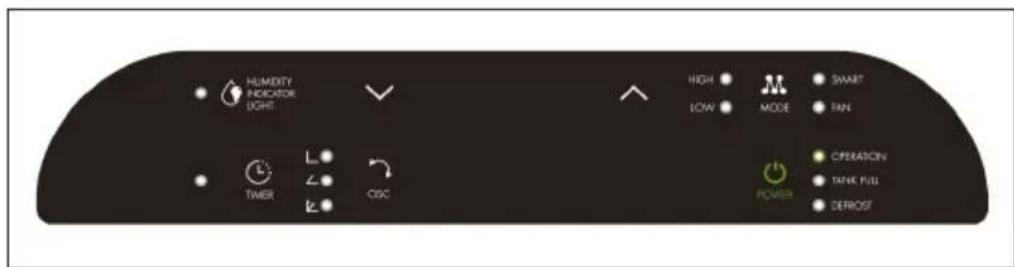
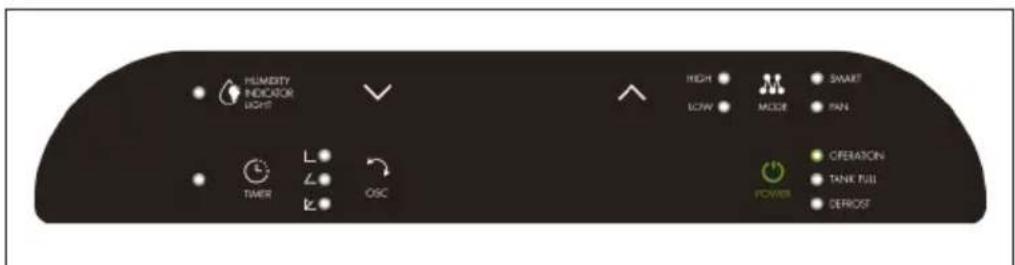
CONTROL PANEL AND KEY FUNCTIONS
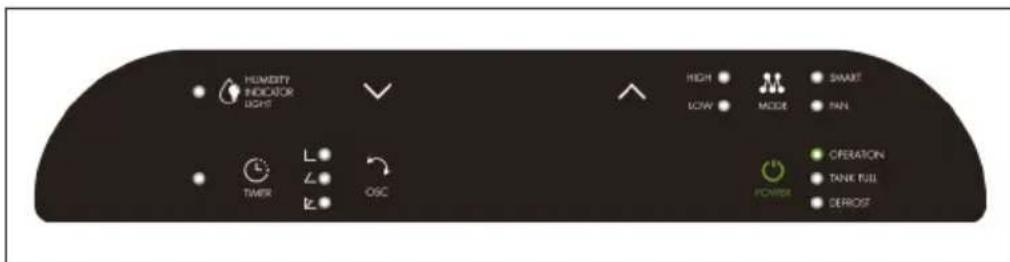
Key functions
 | POWER: Starts or Stops appliance. |
 | MODE: Select the functions of the unit for:SMART / HIGH / LOW / and FAN. The appliance will go. SMART function the first time it is switched on and remains in this mode until other type of programming is chosen. Depending on your relative humidity conditions, turn the fan speed switch to high or low. |
 | FAN (Ventilation Key): Press „MODE“ key to select „FAN“, and „FAN“ indicator light comes on. |
| (WDCZ) | Humidity Indicator LAMP: Start the appliance, the lamp will turn on automatically. The lamp color will change according to the humidity condition (with 100 seconds as interval between color changing)Red color means high humidity, RH≥80%Green color means comfortable, 80%>RH≥60%Blue color means dry, RH<60%Press "HUMIDITY" key, the lamp will be off or on. |
 | OSC. (oscillating function): The are three different directions, 45/90 degree and universal, the louvers will move or fixed asselected position. |
| (WHTT) | Humidity Setting: Press UP / DOWN key to select the desired relative humidity level, default relative humidity is 55%. Relative humidity 35% is selected, the compressor will not stop until water tank full. |

TIMER
TIMER (timer function): Press timer to program time and „TIMER“ light comes on while timer is programmed. Before programming make sure that the timer function has not been activated (the light must be off)! The following timer programs are available. Delayed power-on function (the appliance is in stand-by status) USE key „UP“ and „DOWN“ to set the time period (0\~24 hours) The appliance will start once time reaches setting value. Delayed power-off function (the appliances is in working stantus) The appliance will stop once time reach setting value.
Indicators

DEFROST

TANK FULL
DEFROST: The appliance will defrost automatically as programmed once the coil sensor detects temperature below some figure, and the defrosting indicator will light up at the same time. Once defrosting finishes, the appliance will recover to previous running mode.
TANK-FULL: If the water tank is full, the indicator light comes on and flash
USE AND OPERATION
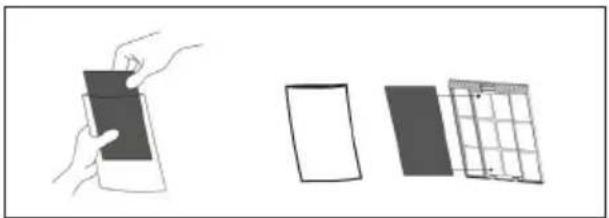
Carbon filter (deodor function)
Take out the carbon filter from bag and insert it on the filter. See picture below. Suggest to change the carbon filter every 3 months, it always keep the room fresh.
natural_image
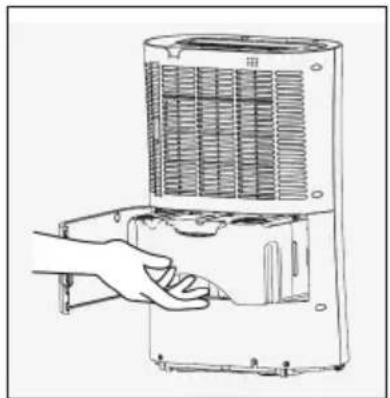
Illustration showing a hand holding a tablet and three separate panels (no text or symbols)Emptying the water tank
Empty the water tank regularly when full, the air dehumidifier turns off automatically and the tank full indicator is turned on
1 Open the front cover of your device.
2 Hold the water tank by its handle.
3 Pull it out carefully.
4 Empty the water tank.
5 Return the empty water tank to its position after wiping it off from any water residue.
natural_image
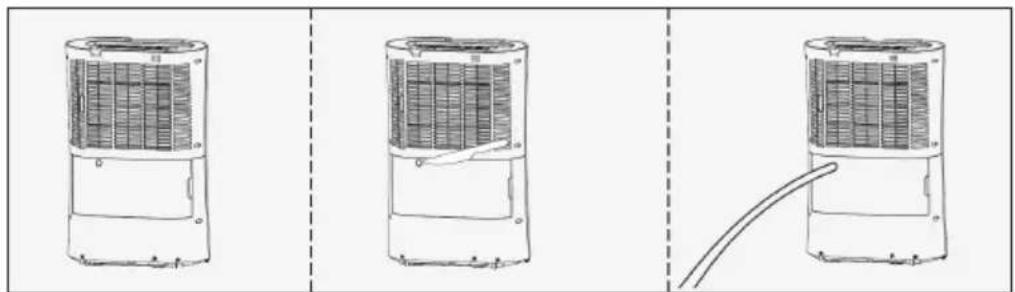
Line drawing of a hand using a handheld device to press or adjust the interior panel of an air conditioner unit (no text or symbols visible)Continuous drainage operation
Your device has a drainage port that allows you to have continuous drainage. Connect a 10mm diameter PVC pipe (optional - not provided in the package) with the drainage port located on back part of the unit, for continuous drainage purpose, as below figure. Ensuring the hose is directed downwards, allowing water to flow by gravity to an external drain. Ensure that the end of the hose is lower than the drain opening, otherwise the water will not drain and flooding may occur.
natural_image
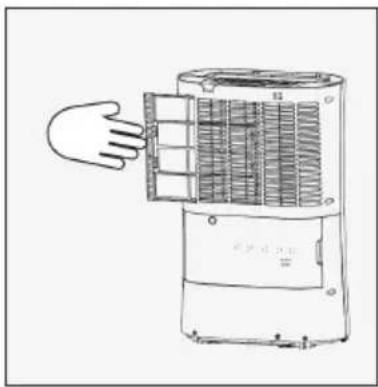
Line drawings of three different air purifiers with a cable, shown from front, side, and top views (no text or symbols)Replacement and maintenance of air filter
When used regularly, the filter may become clogged with dust and particles. Therefore the filter should be cleaned every one or two weeks. Follow these steps
1 Remove the filter by pulling it out carefully.
2 Clean the filter with a vacuum cleaner or with water. Tap the filter to remove excess water and let it dry completely. Once you make sure that your filter is completely dry, re-install it on your device. Do not wash your filter in the dishwasher and never use hair dryers or
natural_image
Line drawing of a hand opening a device with heat exchanger (no text or symbols)Genereral description
- The machine uses the temperature range of 5 \~35, please use the machine in this scope, (otherwise it will start the protection action, causing the machine automatically stop running.)
- At room temperature at 5 and the absolute temperature of the environment is very low. It is not necessary to use the machine.
- When the machine is running, it will produce a small portion of the heat, the room temperature will be a little higher, this is a normal phenomenon, please feel at ease.
- If the unit automatically stop running, please send the water in the water drained, and put back to the water tank, the machine will continue to operate.
- In order to ensure the normal operation, do not open the water tank float cover, or place any foreign body in the water tank.
When the machine can not start or unknown cause, please check with the following steps:
1 Ccheck whether the plug or the power cord is normal.
2 Above all is normally, just please re-start the machine after 10 minute.
3 If you are still unable to start, please contact the local dealer or the company's customer service department.
- Air inlet and outlet and the distance between the adjacent material to keep 15 cm above.
- After the machine is stopped, please restart in five minutes to make sure that the machine is used for longer service life.
- if the long time does not use the desiccant, please unplug the power plug.
• If the machine inlet frosting, automatically defrost.
CARE AND CLEANING
- Do not put the body in the soft, uneven ground, in order to avoid vibration or sound.
- Do not use any fine rod, hard object into the body, so as to avoid failure or danger.
- Clean the body, gently wipe with a damp cloth, do not splash water, to avoid damage to electrical insulation.
- Do not put heavy or water body above the vase, items.
- Please stay away from the fuselage. The heat source side heaters to avoid danger and waste electricity.
- Please close the doors and windows when used to achieve the effect of the desiccant.
- Please clean filter once every two weeks (not to use 40 degrees above the hot water or alcohol, gasoline, toluene and other dangerous flammable liquid).
• After filtering the net, please do not dry in the sun, so as not to deformation. - Around the body or out of the air outlet do not put items, to ensure that the effect of the desiccant air.
- Power failure or long-term nouse, please unplug the power cable plug, so as to avoid leakage, and fire.
- Before your moving the machine, pour out the water within the water tank.
- When not in use, please put in the position of ventilation, and unplug the power plug to avoid danger.
TROUBLESHOOTING
Errot codes
| Code Description | |
| E1 Room | temperature (ambient temperature) sensor for short circuit |
| E2 Room | temperature sensor open circuit |
| E3 Humidity | sensor short circuit |
| E4 Humidity | sensor open circuit |
| E5 Coil | sensor short circuit |
| E6 Coil | sensor open circuit |
Troubleshootig
| Problem Possible Cause and Suggested Solution | |
| The operation switch is “ON”, but the machine is not operation. | Is the water tank placed in the right position? |
| Is the power plug inserted right position? | |
| Is the fuse broken? | |
| Is the power off? | |
| The dehumidification amount is too low. | Is the front filter net dirty? |
| Is the interior temperature and the humidity too low? | |
| Is the air outlet and air inlet jammed? | |
| Long time operation can not reach the suitable humidity condition. | Does the door or window too widely open? |
| Is there any generated water evaporator? | |
| Is the interior space too big? | |
| When the machine is making huge noise. | Is the floor flat and hard? |
| Is the dehumidifier in the right position? | |
| The lamp is continuously on. | Is the temperature or humidify sensor is damaged or loosen? |
DISPOSAL CONSIDERATIONS

natural_image
Symbol of a trash bin crossed with a diagonal line, no text or labels presentIf there is a legal regulation for the disposal of electrical and electronic devices in your country, this symbol on the product or on the packaging indicates that this product must not be disposed of with household waste. Instead, it must be taken to a collection point for the recycling of electrical and electronic equipment. By disposing of it in accordance with the rules, you are protecting the environment and the health of your fellow human beings from negative consequences. For information about the recycling and disposal of this product, please contact your local authority or your household waste disposal service.
MANUFACTURER & IMPORTER (UK)
Manufacturer:
Chal-Tec GmbH, Wallstrasse 16, 10179 Berlin, Germany.
Importer for Great Britain:
Berlin Brands Group UK Limited
PO Box 42
272 Kensington High Street
London, W8 6ND
United Kingdom
Estimado cliente,
ÍNDICE
PANEL DE CONTROL Y TECLAS
Teclas de función
natural_image
Illustration showing a hand holding a small object, alongside three blank rectangular panels (no text or symbols)natural_image
Line drawing of a hand using a tool to adjust or install a wall-mounted air conditioner unit (no text or symbols visible)natural_image
Line drawings of three different air purifiers with a cable, shown from front, side, and top views (no text or symbols)Cambiar el filtro
natural_image
Line drawing of a hand opening a cylindrical device with heat exchanger (no text or symbols)natural_image
Symbol of a trash bin crossed with a diagonal line, no text or labels presentBerlin Brands Group UK Limited
PO Box 42
272 Kensington High Street
London, W8 6ND
United Kingdom
Chère cliente, cher client,
SOMMAIRE
PANNEAU DE COMMANDE ET TOUCHES DE FONCTION
Touches de fonction
natural_image
Illustration showing a hand holding a spray bottle, three blank panels, and a grid-patterned panel (no text or symbols)Vider le réservoir
natural_image
Line drawing of a hand operating a refrigerant air conditioner unit (no text or symbols visible)natural_image
Line drawings of three different air purifiers with a cable inserted, shown from top to side (no text or symbols)natural_image
Line drawing of a hand opening a device with heat exchanger (no text or symbols)natural_image
Symbol of a trash bin crossed with a diagonal line, no text or labels presentBerlin Brands Group UK Limited
PO Box 42
272 Kensington High Street
London, W8 6ND
United Kingdom
Gentile cliente,
INDICE
natural_image
Illustration showing a hand holding a device next to three blank panels (no text or symbols)natural_image
Line drawing of a hand using a tool to clean or adjust the interior wall of an air conditioner unit (no text or symbols visible)natural_image
Line drawings of three different air purifiers with a cable, shown from front, side, and top views (no text or symbols)natural_image
Line drawing of a hand opening a portable air conditioner unit (no text or symbols)natural_image
Symbol of a trash bin crossed with a diagonal line, no text or labels presentPRODUTTORE E IMPORTATORE (UK)
Produttore:
Chal-Tec GmbH, Wallstraße 16, 10179 Berlino, Germania.
Berlin Brands Group UK Limited
PO Box 42
272 Kensington High Street
London, W8 6ND
United Kingdom

KLARSTEIN

- INHALTSVERZEICHNIS
- BEDIENFELD UND TASTENFUNKTIONEN
- Tastenfunktionen
- Wassertank leeren
- Filterwechsel
- Dear Customer,
- CONTENT
- SAFETY INSTRUCTIONS
- NOTES ON REFRIGERANT R290
- Warnings
- Information for rooms with refrigerant pipes
- CAUTION
- PRODUCT DESCRIPTION
- CONTROL PANEL AND KEY FUNCTIONS
- Key functions
- Indicators
- USE AND OPERATION
- Carbon filter (deodor function)
- Emptying the water tank
- Continuous drainage operation
- Replacement and maintenance of air filter
- Genereral description
- CARE AND CLEANING
- TROUBLESHOOTING
- DISPOSAL CONSIDERATIONS
- MANUFACTURER & IMPORTER (UK)
- Manufacturer:
- Importer for Great Britain:
- Estimado cliente,
- ÍNDICE
- PANEL DE CONTROL Y TECLAS
- Teclas de función
- Cambiar el filtro
- SOMMAIRE
- PANNEAU DE COMMANDE ET TOUCHES DE FONCTION
- Touches de fonction
- Vider le réservoir
- Gentile cliente,
- INDICE
- PRODUTTORE E IMPORTATORE (UK)
- Produttore:
- KLARSTEIN
Brand : Klarstein
Model : DryFy Pro
Category : Air purifier