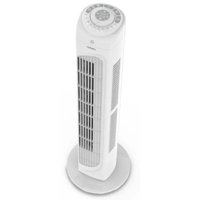
LIFE E10 SF - Fan MEDION - Free user manual and instructions
Find the device manual for free LIFE E10 SF MEDION in PDF.

| Product type | Pedestal fan |
| Brand | Medion |
| Model | LIFE E10 SF (MD 18795) |
| Dimensions (L x D x H) | 62 x 62 x 123 cm |
| Weight | 2.55 kg |
| Power supply | 220-240 V, 45 W |
| Protection class | II |
| Maximum air flow | 46.46 m³/min |
| Service value | 1.14 (m³/min)/W |
| Standby consumption | < 0.39 kWh |
| Noise level | 53.49 dB(A) |
| Main functions | 3 speeds, 3 modes (Normal, Natural, Sleep), timer up to 7h30, oscillation, adjustable tilt, remote control |
| Package contents | Fan, stand with screws, remote control with 2 AAA batteries, quick start guide |
| Care and cleaning | Unplug before cleaning. Clean with a slightly damp soft cloth. Do not immerse. Vacuum the grille. |
| Safety | Protective grille, do not insert objects, use only assembled, do not cover, do not use outdoors |
| Remote control batteries | 2 AAA LR03 micro batteries, 1.5 V |
| Warranty / After-sales service | Contact Medion France at 02 55 66 12 45 (Mon-Fri 9am-7pm). See manual for more info. |
Frequently Asked Questions - LIFE E10 SF MEDION
User questions about LIFE E10 SF MEDION
0 question about this device. Answer the ones you know or ask your own.
Ask a new question about this device
Download the instructions for your Fan in PDF format for free! Find your manual LIFE E10 SF - MEDION and take your electronic device back in hand. On this page are published all the documents necessary for the use of your device. LIFE E10 SF by MEDION.
USER MANUAL LIFE E10 SF MEDION
natural_image
White desktop fan with mesh grille and stand (no visible text or symbols)natural_image
Diagram of a mesh mesh device with a labeled component 'b' and a hand holding a tool (no text or symbols beyond label)natural_image
Diagram of a mesh net with a labeled component 'b' and a bolt, no readable text or symbols present.Fig. 6 - Insertion des piles
Cd = cadmium, Hg = mercure, Pb = plomb.
natural_image
Diagram of a mesh netting process with a labeled component 'b' (no text or symbols beyond label)Afb. 5 – Beschermroostervergrendeling
Cd = cadmium, Hg = kwikzilver, Pb = lood.
natural_image
Diagram of a mesh mesh structure with a labeled component 'b' and a small bolt, no readable text or symbols present.natural_image
Diagram of a mesh netting mechanism with a labeled component 'b' (no text or symbols beyond label)- Information about this user manual ....99
1.1. Explanation of symbols ...... 99 FR - Proper use 99
- Safety instructions 99
3.1. Product-specific hazards 101
3.2. Noise emissions 102ES
3.3. Handling batteries....102 - Package contents 17103
- Appliance overview 104
- Assembling the appliance .... 106
- Inserting batteries in the remote control 107
- Operating the fan.... 107
8.1. Timer 108
8.2. Setting the fan speed....108
8.3. Set the operating mode of the fan....108
8.4. Activate oscillation 109
8.5. Adjust inclination 109 - Cleaning the fan....109
- Troubleshooting 109
- Prolonged non-use and transport 110
- Technical specifications....110
- EU declaration of conformity....111
- Disposal....111
- Service information.... 112
- Legal Notice 113
EN
1. Information about this user manual

Thank you for choosing our product. We hope you enjoy using this appli-ance.
Read the safety instructions carefully before using the appliance for the first time. Note the warnings on the appliance and in the user manual.
Always keep the user manual close to hand. If you sell the appliance or give it away, please ensure that you also pass on this user manual. It is an essential component of the product.
1.1. Explanation of symbols
DANGER!
Warning: risk of fatal injury!
WARNING!
Warning: risk of possible fatal injury and/or serious irreversible injuries!

CAUTION!
Warning: risk of minor and/or moderate injuries!
WARNING!
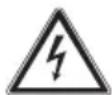
Warning: risk of electric shock!

WARNING!
Warning: risk of sharp edges!

NOTICE!
Follow these instructions to prevent damage to the appliance!

More detailed information about using the appliance!

Follow the instructions in the user manual!
DE

Symbol for protection class II
FR
NL
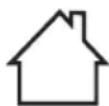
Indoor use
ES
IT
2. Proper use
This appliance is used to circulate air in closed, private indoor spaces.
Please note that we shall not be liable in cases of improper use:
▶ Do not modify the appliance without our prior consent. Use only auxiliary devices approved or supplied by us.
▶ Only use replacement parts or accessories that we have supplied or approved.
▶ Comply with all the information in this user manual, especially the safety instructions. Any other use is considered improper and can cause personal injury or property damage.
3. Safety instructions
- Keep the appliance and its accessories out of the reach of children.
■ This appliance can be used by children of 8 years and older, and by people with reduced physical, sensory or mental capacity, or with a lack of experience and/or knowledge, but only with proper supervision, or if they have been told how to use
EN
the appliance safely, and have understood the risks involved if they use it improperly.
■ Children must not be allowed to play with the appliance.
■ Cleaning and user maintenance must not be carried out by children.
■ Children do not recognise the dangers that can arise when handling electrical appliances. Please be particularly careful while using the appliance if there are children nearby.
■ Children younger than 8 must be kept away from the appliance and the power cord.
■ Only connect the appliance to a properly installed and easily accessible socket that is close to where you are using the appliance. The local mains voltage must match the voltage stated in the technical specifications for the appliance.
■ The power socket must be easily accessible so that you can unplug the appliance
from the mains quickly if necessary.
■ Unplug the appliance from the socket:
- when you are cleaning the appliance
- if you are no longer using the appliance
- when the appliance is un- attended
– during thunderstorms
■ Always hold the plug to pull it out and never pull the power cord.
■ Do not immerse the appliance in water or other liquids or hold it under running water because this could cause an electric shock.
■ Do not place the appliance near to sinks and do not expose it to water droplets or spray.
■ Use the appliance indoors only.
■ Do not use the appliance outdoors.
■ Do not allow the power cord to come into contact with hot objects or surfaces.
■ Do not use if the appliance if the appliance or the power cord is visibly damaged or
if the appliance has been dropped.
■ Check the appliance and the power cord for damage before using the appliance for the first time, and after each use.
■ Completely unwind the power cord.
■ Do not kink or crush the power cord.
■ Contact our customer service team without delay if the appliance has been damaged during transport.
■ Do not, under any circumstances, make any unauthorised modifications to the appliance or try to open a component and/or repair it yourself.
■ The power cord should only be repaired by an authorised repair workshop. Otherwise, contact the Medion Service Centre to avoid hazards.
■ Never touch the plug with damp or wet hands.
■ Do not expose the appliance to extreme conditions. Avoid:
– high humidity or wet conditions
- extremely high or low temperatures
- direct sunlight
- naked flames
■ Do not operate the appliance in potentially explosive atmospheres.
■ Ensure the power cord does not become a tripping hazard – do not use an extension cord.
■ Place the appliance on a stable, level surface.
■ Do not place the appliance on a wet surface.
- Never place the appliance on the edge of a table – it could tip over and fall.
3.1. Product-specific hazards
■ The fan may only be used when fully assembled!
■ Make sure that the guard grille is not dirty and is properly closed.
■ Do not put your fingers or other objects through the guard grille.
■ Make sure that no fabrics such as curtains or similar are hanging or lying near the appliance which could get caught in the appliance.
■ Do not operate the appliance on uneven surfaces or near steps. Avoid tipping the appliance (e.g. due to edges on the floor) during use.
■ Check all screw and plug connections at regular intervals!
■ Tighten up loose screws and correct the hold of the plug connections.
In the event of a thunderstorm, turn off the appliance and remove the mains plug from the socket.
■ Do not carry the appliance while it is in use.
■ Do not cover the appliance during operation.
■ Ensure the air intake and outlet are clear. Make sure that the air intake and outlet are free from dirt or loose objects.
3.2. Noise emissions
■ The sound pressure level of the fan is less than 54 dB(A).
3.3. Handling batt eries
The remote control is bat- tery-operated. Please note the following:
■ Avoid contact with battery acid. If battery acid comes into contact with skin, eyes or mucous membranes, rinse the affected areas with plenty of clean water and consult a doctor as soon as possible.
■ Keep new and used batteries out of the reach of children.
■ Stop using the remote control if you cannot close the battery compartment securely, and keep it well away from children.
■ Only replace batteries with those of the same or an equivalent type.
■ Never try to recharge non-rechargeable batteries. Risk of explosion!
■ Never expose the batteries to excessive heat (such as direct sunlight, fire or similar).
■ Store batteries in a cool, dry place. Strong direct heat can damage batteries. Do not expose the appliance to sources of intense heat.
■ Never short-circuit batteries.
■ Remove leaking batteries from the appliance imme-
diately. Clean the contacts before inserting new batteries. Battery acid can cause chemical burns!
□ Always remove flat batteries from the appliance.
If the appliance is not going to be used for long periods, remove the batteries.
Before inserting the batteries, check that the contacts in the appliance and on the batteries are clean and, if necessary, clean them.
□ Always use new batteries of the same type. Never use old and new batteries together.
Pay attention to the polarity (+/-) when inserting the batteries.
4. Package contents

DANGER!
Risk of choking and suffocation!
There is a risk of choking and suffocation due to swallowing or inhaling small parts or plastic wrap.
Keep packaging material such as plastic film or plastic bags away from children.
☐ Do not let children play with the packaging material.
Remove the product from the packaging and remove all packaging material.
▶ Please check the package contents to ensure that all items are included. If anything is missing, please contact us within 14 days of purchase.
The following items are supplied with your product:
• MEDION LIFE E10 SF (MD 18795) fan
- Lock nut
-
Base incl. 4 x fixing screws
-
Remote control incl. 2× micro batteries (type AAA LR03 1.5 V)
- Quick guide
5. Appliance overview

Fig. 1 - Part name
- Front guard grille
- Rotor lock nut
- Rotor
- Rear guard grille lock nut
- Rear guard grille
- Motor block
- Oscillating pin
- Drive shaft
- Joint with locking screw, adjust inclination angle
- Control panel
- Foot cuff
- Foot cap
- Foot bracket
- Connecting plate
- Foot bracket
- Height-adjustable stand
- Stand locking screw
- Motor block locking screw
flowchart
graph TD
    A["28"] --> B["14H"]
    C["27"] --> D["2H"]
    E["26"] --> F["1H"]
    G["25"] --> H["0.5H"]
    I["19"] --> J["3/2"]
    K["20"] --> L["+"]
    M["21"] --> N["/=2/2"]
    O["22"] --> P["+"]
    Q["23"] --> R["I"]
    S["24"] --> T["+/-"]
    U["+"] --> V["-"]
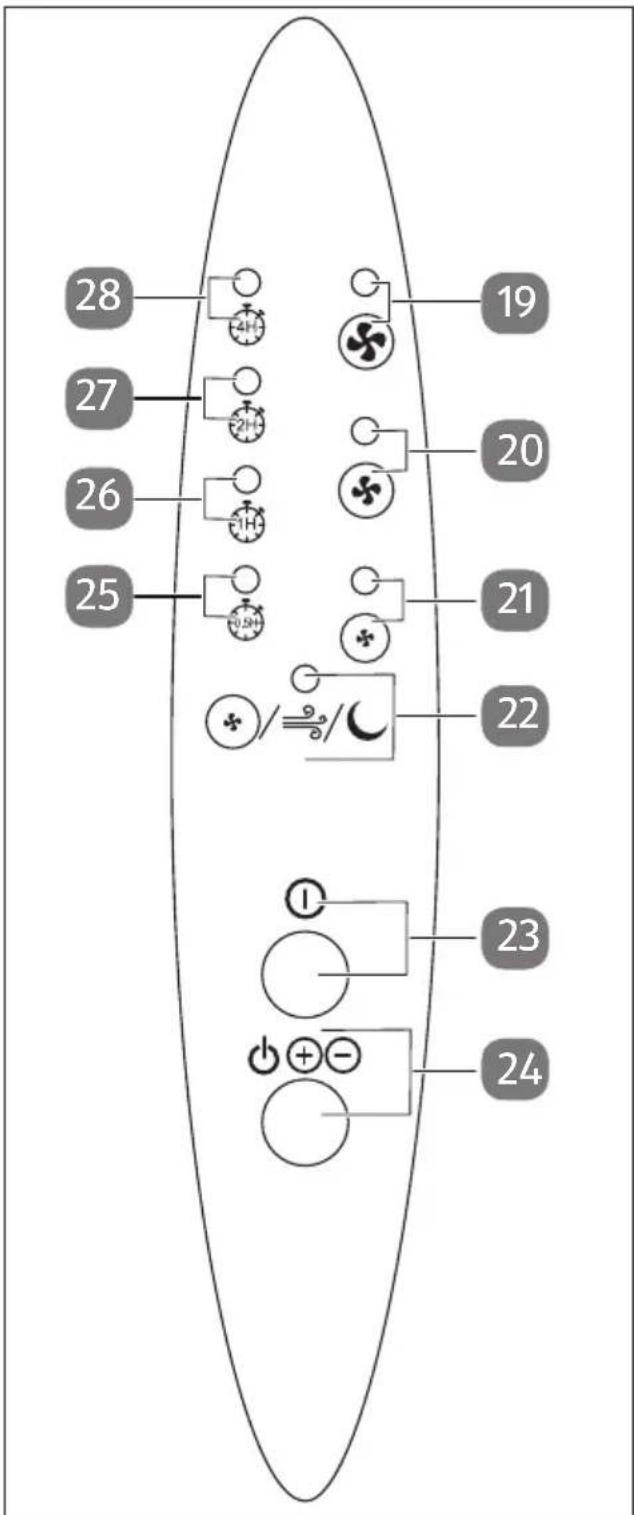
Fig. 2 - Control panel
- Fan indicator: maximum speed
- Fan indicator: medium speed
- Fan indicator: lowest speed
- Fan operating mode display: Normal, Natural, Sleep mode
- Switch off the fan
- Switch on the fan / choose fan speed
- Timer display 30 minutes
- Timer display 1 hour
- Timer display 2 hours
- Timer display 4 hours
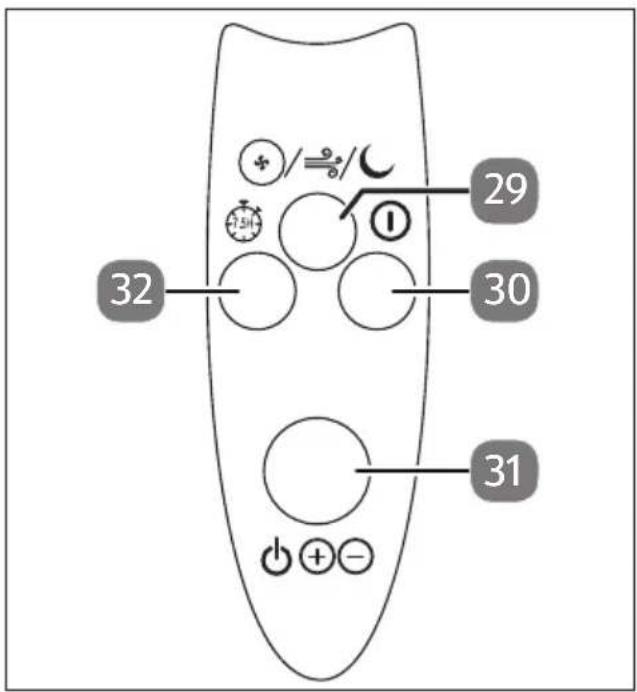
Fig. 3 - Remote control
- Set the operating mode of the fan
- Switch off the fan
- Switch on the fan / choose fan speed
- Set the timer
6. Assembling the appliance

NOTICE!
Possibility of damage to the appliance!
Without a fixed base, the fan may tilt and fall over.
■ Do not use the fan until it is fully assembled.
You need a Phillips screwdriver.
▶ Use a Phillips screwdriver to remove the four screws from the base struts (13) and (15).
Put the base struts together in a cross shape.
Place the caps on the ends of the base struts.
Place the height-adjustable stand (16) with the holes of the connecting plate (14) on the holes of the base and screw the stand to the base with the four screws.
▶ Turn the locking screw of the stand anticlockwise and slide the foot cuff (11) over the screws.
▶ Pull the stand out to the desired height and tighten the locking screw (17) clockwise.
Now insert the motor block onto the stand and tighten the locking screw (18) on the back of the motor block clockwise.
Place the rear guard grille (5) on the drive shaft (8) and secure it with the lock nut (4).
Place the rotor (3) on the drive shaft and fasten it by rotating the lock nut anticlockwise (2).
Remove the screw with the nut on the front guard grille with a small Phillips screwdriver.

Fig. 4 - Screwing guard grille
natural_image
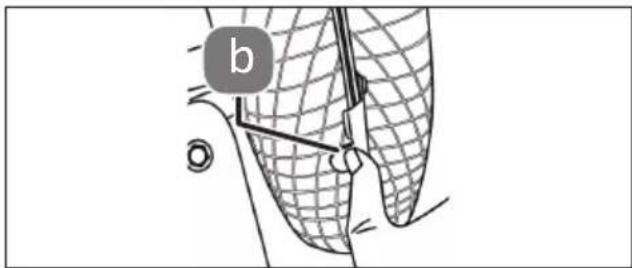
Diagram of a mesh fence with a labeled component 'b' and a bolt, no readable text or symbols present.Fig. 5 - Guard grille locking
Place the front guard grille on the edge of the rear guard grille. Make sure that the holes on both grilles are on top of each other and screw them together with the small screw with nut (a).
▶ Close the guard grilles by closing the guard grille locks (b).
7. Inserting batteries in the remote control
Two micro batteries (type AAA LR03 1.5 V) are used in the remote control.
Replace the batteries if the appliance fails to react to commands from the remote control properly. Then follow these steps:
Remove the flap from the battery compartment.
Remove the two batteries from the battery compartment.
▶ Dispose of the old batteries in accordance with legal requirements.
Insert two new micro batteries (type AAA LR03 1.5 V) into the battery compartment. Make sure that the battery polarity is correct.
▶ Close the battery compartment.
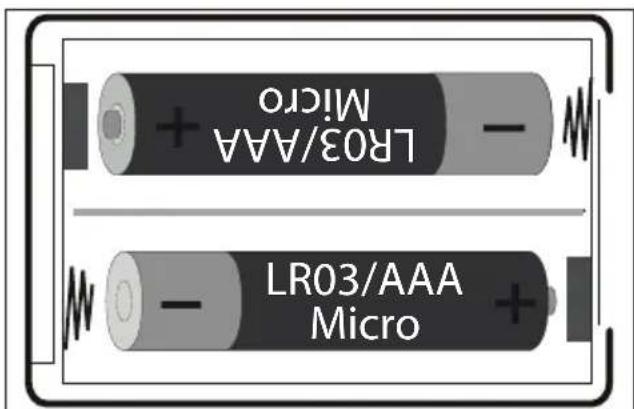
Fig. 6 - Inserting batteries
Risk of cuts due to rotating rotor blades.
■ Do not put your fingers or other objects through the guard grille.
▶ Plug the mains plug into the earthed socket.
▶ Press the ⏻⊕⊖ button on the appliance (24) or on the remote control (31) to switch on the fan.
If you press the Ⓘ button on the appliance (23) or on the remote control (30), you switch off the fan.
8.1. Timer
Press the button (32) on the remote control to set the timer function.
During operation of the appliance, press the button to activate the timer function. Each time you press the button you extend the time until the appliance is switched off by 30 minutes.

You can set a maximum of up to 7 hours and 30 minutes. The timer is then reset to 0.
The set duration is indicated by the operating lights (25-28) on the appliance.

In sleep mode, the indicator light goes out after one minute.
8.2. Sett ing the fan speed
▶ Press the ⏻⊕⊖ button on the appliance (24) or on the remote control (31) to set the fan speed.
| Button ⏻ ⊕⊖ | Fan speed |
| Press once Low | |
| Press twice Medium | |
| Press three times Quick |
8.3. Set the operating mode of the fan
The fan is set to 'Normal' by default.
Press the/≡/ button (29) on the remote control to select an operating mode.
| Normal: | The fan runs evenly. The⊕/÷/∪ operating light (22) lights up red. |
| Natural: | The fan runs at different speeds at regular intervals. The⊕/÷/∪ operating light lights up green. |
| Sleep mode: | The fan runs at the preset speed, see'8.2. Setting the fan speed' on page 108, and then slows down every 30 minutes until the lowest speed is reached. It then continues at the lowest speed. The⊕/÷/∪ operating light goes out after 30 minutes.If sleep mode starts at the lowest speed, the fan runs at the lowest speed for 5 seconds and then switches off for 5 seconds.The short interval does not bring the rotor to a complete standstill. |
8.4. Activate oscillation
▶ Press down the oscillation pin to activate the oscillation.
▶ Pull the oscillation pin up to stop the oscillation.
8.5. Adjust inclination
▶ Loosen the locking screw and adjust the desired inclination.
Now tighten the locking screw tightly again.
9. Cleaning the fan

WARNING!
Risk of electric shock!
There is a risk of electric shock due to live parts.
■ Do not immerse the appliance in water or other liquids or hold it under running water because this could cause an electric shock.
■ Unplug the mains plug from the socket before you start cleaning the appliance.
■ Make sure that no liquids enter the appliance.

NOTICE!
Damage to the appliance!
The improper use of cleaning agents on the fan may damage the surfaces.
■ Do not use acidic, abrasive or granular cleaners or those based on acetic acid, sodium bicarbonate or solvents. These may damage the appliance surfaces or the printing on it.
- Clean the housing only with a soft, slightly damp cloth, if necessary with some mild detergent.
▶ Gently remove dust deposits from the grille with a vacuum cleaner.
If the rotor is dirty, remove the guard grille and clean the rotor with a soft, damp cloth. Install the guard grille as described in '6. Assembling the appliance' on page 106.
10. Troubleshooting
| Problem Possible cause Solution | ||
| The appliance is not working. | The mains plug is not properly inserted. | ▸ Disconnect the mains plug and then plug it in again. |
| The earthed mains socket is faulty. | ▸ Check the earthed mains socket by connecting another appliance. | |
| The remote control is not working. | Are the batteries correctly inserted? | ▸ Insert the batteries correctly. |
| Are you more than 5 metres away from the fan? | ▸ Reduce your distance from the fan. | |
| Is the path between the remote control and the infrared sensor clear? | ▸ Remove any obstacles. | |
| Is the remote control pointed at the sensor? | ▸ Point the remote control correctly. | |
11. Prolonged non-use and transport
If you do not intend to use the appliance for a longer period of time, disconnect the mains plug from the socket and store the appliance in a dry, dust-free and frost-free environment where it is not exposed to direct sunlight.
To avoid damaging the product during transport, we recommend that you use the original packaging.
12. Technical specifications
| Model MEDION LIFE E10 SF (MD 18795) | |
| Power supply 220–240 V | |
| Output 45 W | |
| Protection class |  |
| Dimensions 62 x 62 x 123 cm | |
| Weight 2.55 kg | |
| Maximum air flow rate | 46.46 m^3/min |
| Performance metric* | 1.14 ( m^3/min )/W |
| Power consumption switched off | <0.39 kWh |
| Operating volume | 53.49 dB(A) |
13. EU declaration of conformity

The manufacturer hereby declares that this appliance complies with the fundamental requirements and the other relevant provisions of:
• EMC Directive 2014/30/EU
• Low Voltage Directive 2014/35/EU
• Ecodesign Directive 2009/125/EC (and Ecodesign Regulation 2019/1782)
• RoHS Directive 2011/65/EU
14. Disposal

PACKAGING
Your appliance has been packaged to protect it from damage in transit. The packaging is made of materials that can be recycled in an environmentally friendly manner.
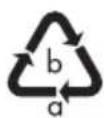
Observe the following packaging material label regarding waste separation with the abbreviations (a) and numbers (b):
1–7: plastics/20–22: paper and cardboard/80–98: composite materials.

(Only for France)
The "Triman" symbol tells the consumer that the product can be recycled, is covered by an extended system of manufacturer's responsibility and must be sorted by material type in France.
APPLIANCE
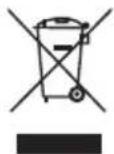
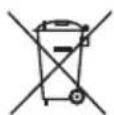
All old appliances marked with the symbol shown must not be disposed of in normal household waste.
In accordance with Directive 2012/19/EU, these appliances must be disposed of correctly at the end of their service life.
This involves separating the materials in the appliance for the purpose of recycling as well as minimising the environmental impact and negative effects on human health.
Take old appliances to a collection point for electrical scrap or a recycling centre.
Contact your local waste disposal company or your local authority for more information on this subject.
BATTERIES
Batteries that carry the symbol illustrated must not be disposed of in ordinary household waste.
In accordance with Regulation 2023/1542, batteries must be disposed of properly at the end of their service life.
They may contain toxic heavy metals and are subject to hazardous waste treatment.
The chemical symbols of the heavy metals are as follows:
Cd = cadmium, Hg = mercury, Pb = lead.
You are legally obliged to return old batteries and rechargeable batteries after use.
Therefore, please return used batteries and rechargeable batteries free of charge to a retailer or a municipal collection point.
Batteries and rechargeable batteries may contain substances that are harmful to human health and the environment. The negative effects can only be avoided if old batteries and rechargeable batteries are collected and recycled separately.
Take particular care when handling batteries and rechargeable batteries containing lithium, as there is an increased risk of fire if they are used incorrectly. Tape the poles to prevent an external short circuit.
Use batteries with a long service life or rechargeable batteries to reduce the generation of waste from old batteries.
Follow the storage instructions and avoid completely discharging and recharging the battery to extend its service life.
In addition, batteries or electrical and electronic devices with batteries or rechargeable batteries must not be left in public areas in order to avoid littering. Check options for reusing batteries instead of disposing of them, for example by repairing the battery.
15. Service information
Please contact our Customer Service team if your device ever stops working the way you want or expect it to. There are several ways for you to contact us:
- In our Service-Community, you can meet other users, as well as our staff, and you can exchange your experiences and pass on your knowledge there.
You will find our Service-Community at community.medion.com.
• Alternatively, use our contact form at www.medion.com/contact.
- You can also contact our Service team via our hotline or by post.
| Opening times Hotline number UK | |
| Mon – Fri: 08.00 – 20.00Sat – Sun: 10.00 – 16.00 | 1 0333 3213106 |
| Service address | |
| MEDION Electronics Ltd.120 Faraday Park, Faraday Road, DorcanSwindon SN3 5JF, WiltshireUnited Kingdom | |

You can download this and many other sets of operating instructions from our service portal at www.medionservice.com.
We have stopped providing printed copies of our warranty terms and conditions as part of our commitment to sustainability, but you can access the warranty terms and conditions on our service portal.
You can also scan the QR code on the side of the screen, to download the operating instructions onto your mobile device from the service portal.
16. Legal Notice
Copyright 2024
Date: 21. November 2024
All rights reserved.
These operating instructions are protected by copyright.
Mechanical, electronic and any other forms of reproduction are prohibited without the written permission of the manufacturer.
Copyright is owned by the company:
MEDION AG
Am Zehnthof 77
45307 Essen
Germany
Please note that you cannot use the address above for returns. Please always contact our Customer Service team first.
DE
FR
NL
ES
IT
EN
DE
FR
NL
ES
IT
EN