S30 - Vacuum Cleaner Narwal - Free user manual and instructions
Find the device manual for free S30 Narwal in PDF.

| Product type | Wet/dry vacuum (water and dust) |
| Brand | Narwal |
| Model | S30 |
| Dimensions (vacuum) | 247 × 273 × 116.3 mm |
| Weight (vacuum) | Approximately 4.17 kg (empty tank) |
| Rated power | 160 W |
| Rated voltage | 21.6 V (lithium battery) |
| Battery capacity | 4000 mAh |
| Clean water tank capacity | 790 ml |
| Waste water tank capacity | 720 ml |
| Self-cleaning base dimensions | 300 × 271 × 225 mm |
| Base weight | Approximately 0.5 kg |
| Adapter | Input 100-240 V~ 50/60 Hz, output 27 V=1.0 A |
| Cleaning modes | AI, suction, silent, wood floor, MAX boost |
| Self-cleaning and drying | Yes (self-cleaning + iron drying) |
| Smart dirt detection | Yes |
| Brush type | Antibacterial soft velvet roller |
| Filter | Washable filter 2.0 |
| Dust bag | Autonomous waste separation bag (optional) |
| Deodorizing module | Long-lasting integrated (replace every 1-3 months) |
| Recommended maintenance | Roller: replace every 9-12 months; Filter: replace every 3-6 months |
| Safety | Do not place horizontally; beware of heating plates |
| Included accessories | Spare roller, bag, filter, deodorizing module, cleaner, cleaning brush, adapter |
| Interface language | Switchable (button press) |
Frequently Asked Questions - S30 Narwal
User questions about S30 Narwal
0 question about this device. Answer the ones you know or ask your own.
Ask a new question about this device
Download the instructions for your Vacuum Cleaner in PDF format for free! Find your manual S30 - Narwal and take your electronic device back in hand. On this page are published all the documents necessary for the use of your device. S30 by Narwal.
USER MANUAL S30 Narwal
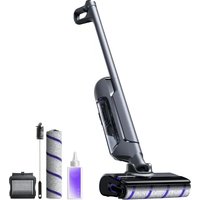
natural_image
White and black vacuum cleaner with blue scroll roller, isolated on white background (no text or symbols visible)Model / Modèle / Modelo aplicable: YJSC009
Dear users:
Thank you for purchasing Narwai products. To access comprehensive support from Narwai, you are recommended to read carefully the manual and illustrations before using the product. Please keep the manual property.
The manual may be updated from time to time based on product updates and user feedback. Please scan the QR code below to browse the official website and view the latest version.
In case of any problem in using the product, please contact Narwal after-sales customer service through the following ways:
Customer service email:
Enail ou service client
support@clotx@nawal.com(Italy)
support.js@global.narwal.com(Japan)
support.fr@global.narwal.com(France)
support i@glosa.narwa.com(South Korea)
support.cs@qlcisa.narwal.com(Spain)
*For other countries, please refer to the after-sales contact information provided by your local vendors
We wish you a pleasant experience!
Electronic version of the user manual
Regional Availability and Compatibility
Based on user experience consideration and relevant legal and compliant requirements, Narwal products normally sold by Narwal (and its authorized retailers) are only available for use and after sales service support in the country or region in which they were originally sold. If a product is shipped to any other countries or regions, you might not be able to use the Narwal App to bind the product or perform relevant operations. We recommend that you purchase the official version of the Narwal product from Narwal or its authorized retailers in order to obtain the best product use and services experience.
For avoidance of doubt, Narwal products sold by Narwal (and its authorized retailers) in the PRC are only available for use and after sales service support in the PRC (for this purpose, excluding Hong Kong, Macao and Taiwan).
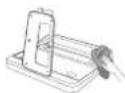
Product At A Glance
Component and Accessory List
Main parts
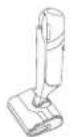
Main unit
(Included soft velvet roller brush module and filter 2.0)
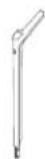
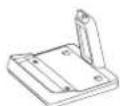
Handle Self-cleaning base
Accessories (subject to accessories in the packaging box)
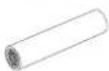
1. Soft velvet roller brush

2. Self-contained waste separation bag
- filter 2.04. Integrated deodorant module

5. Detergent 6. Cleaning brush
7. Adapter
1. 2. 3. 4, and 5 can be purchased on Narwal's official sales platforms.
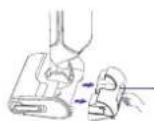
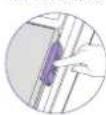
How to Assembly the Soft Velvet Roller Brush Module

- The soft velvet roller brush module can be split into two parts: the disinfection soft velvet roller brush and the roller brush handle
- To disassemble, pull the handle out from the side in the direction parallel to the roller brush
- Align the handle with the internal structure of the roller, and snap it in to assemble the soft velvet roller brush module
Main Parts
Wet Dry Vacuum
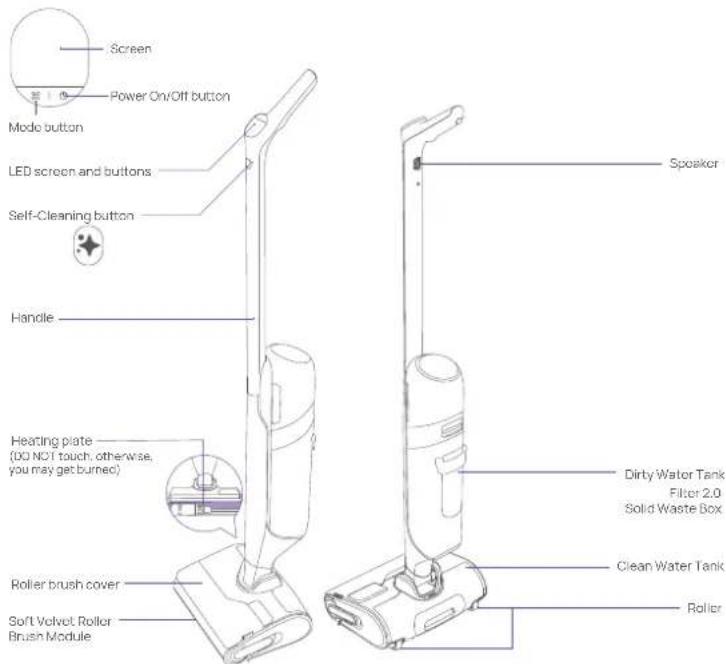
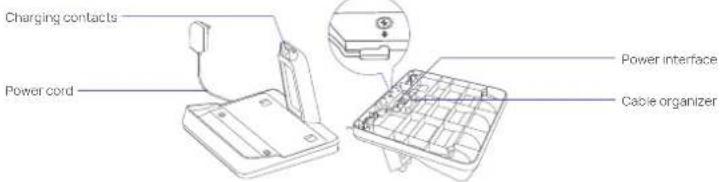
Self-cleaning base
How to Use
First-time Use
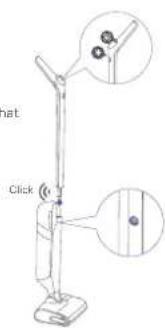
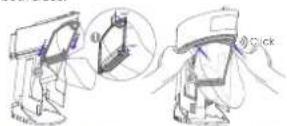
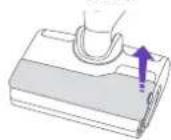
How to install the handle
Insert vertically; after hearing a "click," ensure that the handle is light and secure.
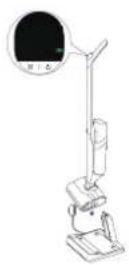
Language Switch Instructions
On the initial startup, a language switch reminder page will appear. Press the Mode button and Self-cleaning button simultaneously to change the system language.
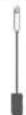
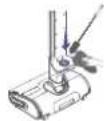
How to charge the product
After the self-cleaning base is connected to a power supply, put the vacuum mop on the base. When it rings ding-dong, the screen shows the charging animation, and charging starts.
How to fill the clean water tank
1. Take out the clean water tank
Pull out the clean water tank to take it out.
Clean water tank latch
2. Add clean water
Open the sealing cover and fill water from the tank opening.
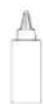
3. Add detergent
• To prevent excessive foaming, only add detergent when the clean water tank is loaded;
- Please use the detergent from Narwal, otherwise, the device may be damaged;
• Pour directly from the bottle into the cap which measures the recommended 6mL dose (for one full tank of clean water) and add it to the clean water tank.
Note: There detergent has a sealing film. Please unscrew the cap and remove it.


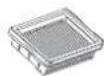
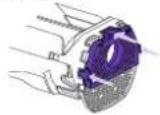
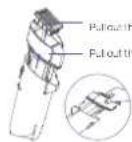
Installation of self-contained waste separation bag
In addition to the built-in solid waste box, a self-contained waste separation bag can be installed for easy disposal of solid waste.
-
Open the filter bag support plate and handle, pressing down at an angle exceeding 90°
-
Insert along the slide groove. 3. Snap the upper edges on both sides.
- Hold the handle when removing it along the slide groove.

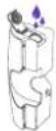
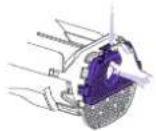
Installation of integrated deodorant module
- The release hole of the integrated deodorant module should face outward, matching the shape of the bottom of the solid waste box. Then press it in.
The three clips of the integrated deodorant module should snap into the corresponding notches at the bottom of the solid waste box for proper installation.
- Pinch the clip to slightly open it and remove the integrated deodorant module.
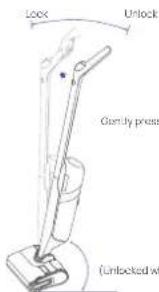
How to unlock and start the machine
Unlock and Start
Remove the washer from the self-cleaning base. Short press the Power On/Off button and then follow the voice prompts to slightly press and recline the lever to start cleaning. You can also recline the lever and then short press the Power On/Off button to use the washer.
Lock and pause when being upright
To pause the machine during cleaning, please short press the ○ Power On/Off button or pull the handle upright to lock it.
Note: When pausing/turning off the machine, the motor will keep running for a while to remove residual water.
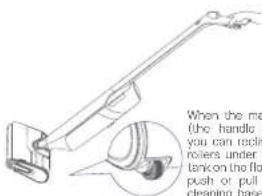
When the machine is locked (the handle being upright), you can recline it to set the roters under the clean water tank on the floor. Then you can push or pull it back to the cleaning base like handling a suitcase.
Instructions for Use
Button functions
*Note: When the vacuum mop is on the base and the screen is dark, you can press any button to wake up the screen.
| Button | Action | Function |
| Power On/Off button | When cleaning the floor | Short press: power on/pauseLong press for 2s: Power off |
| During self-cleaning or iron drying | Short press: end the current task | |
| Mode button | When cleaning the floor | Short press: switch the mode (All/Wooden Floor/Quiet/Suction) |
| During self-cleaning or charging with the screen on | Short press: start iron drying only | |
| During charging with the screen on | Press and hold for 2s: Switch volume (high/low/mute) | |
| Self-Cleaning button | During charging with the screen on | Short press: start self-cleaning and iron drying (iron drying will start after self-cleaning is completed)Press and hold for 2s: start self-cleaning only |
About the screen
| Al Mode | 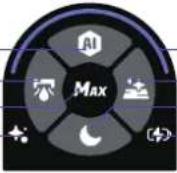 |
| Suction Mode | |
| MAX Enhancement | |
| Self-Cleaning and Iron Drying |
Icons
| Type | StatusIcon Description | |
| Cleaning mode | Steady white Al Mode | |
| Steady white Wooden Floor Cleaning | ||
| Steady white Quiet Mode | ||
| Steady white Suction Mode | ||
| MAX | Steady white MAX Enhancement | |
| Self-cleaning and Iron Drying | Steady white Self-cleaning and Iron Drying | |
| Faint White Self-cleaning and Iron Drying paused | ||
| Type | StatusIcon Description | |
| Charging Status and Battery Level | Steady Red Low (<10%) | |
| Steady Yellow Medium (10 | ||
| Steady Green Sufficient (50 | ||
| Dirt and Status Monitoring Loop | Steady Yellow Dirt detected | |
| Steady Orange High dirtiness level | ||
| Flickering Red Error | ||
| Steady Blue and Purple Cleaning underway | ||
| Breathing Blue and Purple Cleaning paused | ||
Floor Cleaning Description
Floor Cleaning DescriptionDescription
| AI Mode | Auto adaption to a variety of dirty surfaces powered by smart detection of floor dirt level and smart adjustment of suction power, water volume, and other indicators. |
| MAX Enhancement | Press and hold the Trigger Button to activate MAX Enhancement for the most powerful cleaning performance to tackle lots of stains or extremely stubborn stains. |
| Cleaning in low areas | When the angle between the handle and the floor is below 25°, the vacuum mop will automatically switch to the Low Areas Mode. As such areas are generally filled with lots of hairs, dust, and fluff, the machine will intelligently adjust the suction power to avoid dust floating around. Note. DO NOT lay the machine horizontally when not in use to prevent backflow of sewage and damage to the machine. |
| Suction Mode | Used for absorbing water on the floor, suitable for bathrooms and spilled liquids. |
| Quiet Mode | Suitable for relatively clean floors to deliver a noise-free experience and secure a longer battery life to clean more floors. |
| Wooden Floor Cleaning | Suitable for hardwood floors in living rooms, uses less water for quicker drying, and can remove dust, lint, and hair from bedroom floors. |
Cleaning and Maintenance
Suggested Maintenance Cycle
| Main Part | Part Suggested maintenance cycle | |
| Wet Dry Vacuum | Dirty water tank | Clean regularly on demand |
| Self-contained waste separation bag | Discard as necessary | |
| Filter 2.0 | Clean regularly as needed and replace every 3-6 months | |
| Integrated deodorant module | Replace every 1-3 months based on actual usage | |
| Roller brush cover | Clean regularly on demand | |
| Soft Velvet Roller Brush | Clean regularly as needed and replace every 9-12 months. The vacuum can intelligently detect the roller brush wearing and reminds the user to replace it timely | |
| Pipe | Clean regularly as needed | |
Maintenance Methods
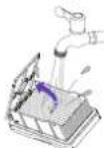
Dirty water tank module/Self-contained waste separation bag
- Remove the dirty water tank, filter, and solid waste box in order
Press the dirty water tank release button to remove the dirty water tank.
Pull out the list from the top of the sold was a box
Put out the waste box in the direction of the arrow.
- Discard the self-contained waste separation bag—pull the handle out along the slide groove
• Empty and rinse the dirty water tank
- If the self-contained waste separation bag is not installed, empty the solid waste box
- Rinse the solid waste box and the filter slot
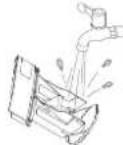
Filter 2.0
- Clean up the filter with clean water. You can open the filter cover. Shake dry the filter and then put it back into the machine for filter drying
You can open to clean
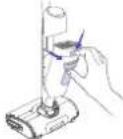
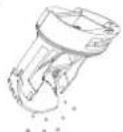
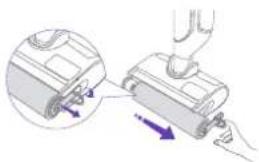
Soft Velvet Roller Brush
- Grab the tab on the right and pull it out gently, and then clean the roller brush
natural_image
Diagram showing a hand operating a device with a magnified inset of the component (no text or symbols visible)Vacuum mop and self-cleaning base
- To ensure optimal performance, you are recommended to maintain all parts regularly; - Before cleaning any part, please turn off the machine and unplug the power cord.
- Use a clean and dry cloth to scrub clean the machine and the base and prevent water ingress into electrical components.

Do not rinse with water
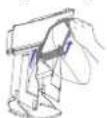
Roller brush cover
- Slightly press the roller brush release button to remove and rinse the roller brush cover
1 Push down to open t
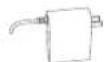
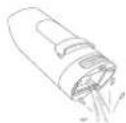
Pipe
- If the machine prompts a high dirt level when the floor is free from obvious dirt and several rounds of self-cleaning have been completed, the pipe may be dirty;
• The vacuum mop prompts that the pipe gets clogged (Use the cleaning brush to clean the pipe for the above two situations)
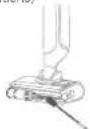
1. Clean the alt suction port.
DONOT irscit
2. Stick the brush inside to clean the interior of trape
Problem Analysis and Troubleshooting
FAQ
In case of any fault when the product is working (no action or fault prompt on the screen or via voice), please refer to the following table:
Description
Possible Causes and Solutions
| The vacuum voice prompts "Roller brush not in place" Check whether the roller brush is properly installed | |
| The vacuum voice prompts "Roller brush stuck. Please clean it" | Manually clean the pipe and roller brush |
| The vacuum voice prompts "Filter of the dirty water tank not in place. Please install it and check the dirty water tank" | Check whether the dirty water tank is installed properly |
| Description | Possible Causes and Solutions |
| The vacuum mop voice prompts "Dirty water tank full, Please empty it" and pauses | Rinse the dirty water tank and the filter |
| The vacuum mop voice prompts "Clean water tank short of water. Please refill it" and pauses | Fill water into the clean water tank or check whether the clean water tank is installed properly |
| The vacuum voice prompts "Pipe clogged. Please manually clean the pipe and the roller brush" during cleaning or self-cleaning | As a consistently high dirt level is detected, there may be residual dirt in the pipe. You are recommended to clean the pipe with the cleaning brush |
| The vacuum voice prompts "Uneven roller brush iron drying. Please check whether it is installed properly" | Check whether the roller brush is properly installed |
| There is residual water inside the vacuum after unboxing | Each vacuum will receive strict functional tests before delivery, and there may be a small amount of water remaining, which will not affect the vacuum |
| The floors got dirtier when the vacuum is working | There is too much dirt on the roller brush, so it is recommended that you put the vacuum back on the base for self-cleaning |
| The vacuum loses suction power after a period of time | There may be stubborn stains and waste residue affecting the normal performance of the washer. It is recommended that you remove and clean the roller brush cover, roller brush, pipe, and filter. |
| The roller brush suddenly stops rotating when the vacuum is working | The roller brush may be entangled with or the space between the roller brush and the cover is clogged with foreign objects, causing the roller brush to stop rotating. You can turn off the vacuum mop and remove the roller brush cover and the roller brush to clear the foreign objects. It is recommended to put away the data cables, plastic bags, and shoelaces on the floor before cleaning, to prevent them from entangling the roller brush and stopping its rotation, which may damage both the vacuum mop and items on the floor |
| The vacuum keeps warning that "Dirty water tank full. Please clean up the dirty water tank" when the dirty water tank is not full and the MAX water level is not yet reached | The solid waste box in the dirty water tank may be full of waste, or the vacuum mop may suck in easy foaming liquids (laundry detergent, detergent, urine, etc.). In this case, please clean the dirty water tank and the roller brush immediately, put them back, and then try again To prevent leakage due to inclining during cleaning. The vacuum mop would prompt a full dirty water tank when dirty water reaches any of the three lines below the MAX line. You should timely clean the dirty water tank |
Parameters Specifications
| Wet Dry Vacuum | Dimensions: 247*273*1163 mm | Battery: 4000mAh |
| Weight: ~4.17kg (empty water tank) | Clean water tank volume: 790ml | |
| Rated Input: 27V=1.0A | Dirty water tank volume: 720ml | |
| Rated Voltage: 21.6V= (lithium ion battery) | Rated Power: 160W | |
| Self-cleaning base | Dimensions: 300*271*225 mm | Rated Input: 27V=1.0A |
| Weight: ~0.6kg | Rated Output: 27V=1.0A | |
| Adapter | Rated Input: 100-240V~ 50/60Hz, 0.8A | |
| Rated Output: 27V=1.0A | ||
fr-ca
natural_image
Diagram showing a hand operating a vacuum cleaner with a close-up view of the component (no text or symbols present)natural_image
Technical line drawing of a device with a cable inserted, showing internal components and a magnified view (no text or symbols)natural_image
Diagram showing a device being inserted into a housing, with arrows indicating direction (no text or symbols present)Lavadora y base autolimpiante
Address/Adresse/Dirección:Room A2901, Yunzhongcheng, Building 1, Vanke Yuncheng VI, Dashi 2nd Road, Xili Community, Xili Street, Nanshan District, Shenzhen, Guangdong, China
Copyright © 2025 Yunjing Intelligence Innovation (Shenzhen) Co., Ltd. All Rights Reserved.
NARWAL is a trademark of Yunjing Intelligence Innovation (Shenzhen) Co., Ltd.