Supreme Elite TSA3240 - Pizza oven Teesa - Free user manual and instructions
Find the device manual for free Supreme Elite TSA3240 Teesa in PDF.

User questions about Supreme Elite TSA3240 Teesa
0 question about this device. Answer the ones you know or ask your own.
Ask a new question about this device
Download the instructions for your Pizza oven in PDF format for free! Find your manual Supreme Elite TSA3240 - Teesa and take your electronic device back in hand. On this page are published all the documents necessary for the use of your device. Supreme Elite TSA3240 by Teesa.
USER MANUAL Supreme Elite TSA3240 Teesa
text_image
Technical diagram of a microwave oven with numbered parts labeled for identification.| CS | DE | EN | FR | GR |
| Ovládecí panel | Bedienfeld | Control panel | Panneau de contrôle | Πινακας ελέγχου |
| Sklenėnė okno | Glasfenster | Glass window | Vitre | Γινάλινο παράθυρα |
| Dvoře | Tür | Door | Porte | Πόρτα |
| Vētrací otvory | Lüftungsschlitze | Ventilation slots | Trous de ventilation | Υποδοχές εξαερίομού |
| Držák | Handgriff | Handle | Paignée | Λαβή |
| Chiadící ventilátor | Kühlgebläse | Cooling fan | Ventilateur de refroldissement | Ανεμιστήρας |
| HU NL PL RO SK | ||||
| Vezérlópult | Bedieningspaneel Panel sterowania Panou de control Ovládací panel | |||
| Uveg ablak Glazen paneel Szkłana szyba Ferrostră de sticlă Sklenené okno | ||||
| Ajtő Deur Drzewi Usp Dvere | ||||
| Szellőzónyilások | Ventilatiegaten | Otwory wentylacyjne | Fante de ventilatie | Vetracle otvory |
| Fogantyú | Hendel | Uchwyt | Mäner | Rukovát |
| Hűtésventilátor | Kodiventilator | Wentylator chłodzący | Ventilator do rácire | Chladiaci ventilátor |
text_image
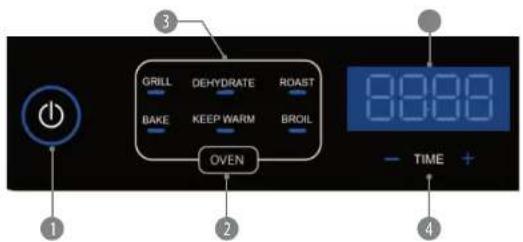
GRILL DEHYDRATE ROAST BAKE KEEP WARM BROIL OVEN TIME +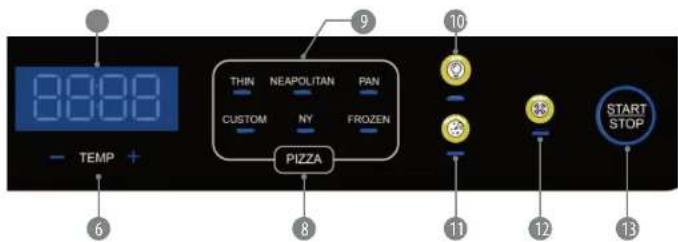
text_image
8000 TEMP + THIN NEAPOLITAN PAN CUSTOM NY FROZEN PIZZA 9 10 11 12 START STOP 13 6 8| CS DE EN FR GR | ||||
| Tlačitko ON/OFF Taste | EIN/AUS ON/OFF button | Bouton ON/OFF Koujuni ON/OFF | ||
| Tlačitko volby programu trouby | Taste zur Auswahl des Gar Programms | Cooking program selection button | Bouton de sélection du programme du four | Koujuni epiloyng proyopmuatos maayisipmuatos |
| Provozni programy trouby | Gar Programme Cooking programs | Programmies du four | Prayopdumputa maayisipking | |
| Tlačitka nastavení časováce | Tasten zur Zeitelnstellung | Time adjustment buttons | Boutons de réglage de la minuterie | Koujuni puðmuos úpas |
| Displej časováce Zeitanzeige Time display | Affichage de la minuterie | Evšení úpas | ||
| Tlačitka pro ovladání teploty | Tasten zur Temperatureinstellung | Temperature adjustment buttons | Boutons de contrôle de la température | Koujuni puðmuos čeprůpkuoloc |
| Zobrazení teploty Températuranzeige Temperature display | Affichage de la température | Evšení čeprůpkuoloc | ||
| Tlačitko volby programu pecení pizzy | Taste zur Auswahl des Pizzaprogramms | Pizza program selection button | Bouton de sélection du programme de cuisson de pizza | Koujuni epiloyng proyopmuatos nítroos |
| Programy na pečení pizzy | Pizzaprogramme Pizza | programs | Programmes de cuisson de pizzas | Prayopdumputa nítroos |
| Tlačitko zapnuti/ vypnuti vnitřního osvětleni | Taste Ofenlicht EIN/AUS | Oven light ON/OFF button | Bouton marche/amět de l'éclairage intérieur | Koujuni evérgyonoinçn/c onetevývonoinçn φούρνου |
| Tlačitko expertního rezimu | Taste Expertenmodus | Expert mode button | Bouton mode expert | Koujuni leistouprylac Expert |
| Tlačitko funkce koufení | Taste Raucherfunktion | Smoke function button | Bouton de fonction de fumage | Koujuni leistouprylac kainyou |
| Tlačitko START/STOP | Taste START/STOPP | START/STOP button | Bouton START/STOP | Koujuni START/STOP |
| HU | NL | PL RO SK | |||
| 1 | ON/OFF gomb | AAN/UIT knop | Przycisk ON/OFF | Buton ON/OFF | Tlacidlo ON/OFF |
| 2 | Sütóprogram választó gomb | Ovenprogramma selectieknop | Przycisk wyboru programu pracy plekarnika | Buton de selectare a programului de gātit | Tlacidlo volby programu rúry |
| 3 | Sütöműkoctető programok | Ovenprogramma's | Programy pracy plekarnika | Programe de gātit | Prevádzkové programy rúry |
| 4 | Időzítő beállító gombok | Knoppen voor het aanpassen van de timer | Przyciski regulacji timera | Butoane de reglare a timpului | Tlacidla nastavenia časovača |
| 5 | Időzítő kijelző | Timerweergave | Wyswietlacz timera | Afisare timp | Displej časovača |
| 6 | Hómérsekliet szabályozó gombok | Temperatuurregelkin oppen | Przyciski regulacji temperatury | Butoane de reglare a temperaturii | Tlacidla na ovladanie teploty |
| 7 | Hómérsekliet kijelzés | Temperatuurweergave | Wyswietlacz temperatury | Afisare temperatură | Zobrazenie teploty |
| 8 | Pizza sütési program választó gomb | Knop voor het selecteren van het pizzabakprogramma | Przycisk wyboru programu pieczenia pizzy | Buton de selectare a programului de pizza | Tlacidlo volby programu pećenia pizze |
| 9 | Pizzasültési programok | Pizza bakprogramma's | Programy pieczenia pizzy | Programe de pizza | Programy na pećenie pizze |
| 10 | Belső világítás be/ kilkapcsoló gomb | Aan/uit knop voor binnenverlichting | Przycisk włączania/wyłączania wewnętrznego oświetlenia | Buton ON/OFF pentru lumina cuptorului | Tlacidlo zapnutia/ vypnutia vnutorného osvetlenia |
| 11 | Szakértói mód gomb | Knop voor expertmodus | Przycisk trybu expert mode | Buton Mod expert | Tlacidlo expertného režimu |
| 12 | Dohányzás funkció gomb | Rookfunctieknop | Przycisk funkcji wędzenia | Buton functie de afumare | Tlacidlo funkcie fajcenia |
| 13 | START/STOP gomb | START/STOP knop | Przycisk START/STOP | Buton START/STOP | Tlacidlo START/STOP |
Thank you for purchasing TEESA appliance. Please read this operation instruction carefully before use, and keep it for future use. Distributor does not take responsibility for damages caused by inappropriate handling and use of the product.
SAFETY INSTRUCTIONS
In order to reduce the injuries or damages, follow basic safety precautions applied when using any electrical device, including the following:
- Read the entire instruction manual before you start installation and assembly and keep it for future reference.
- Before connecting the device to power supply socket, make sure the voltage indicated on the device corresponds to the voltage in the power supply socket.
- This appliance must not be supplied through an external switching device, such as a timer, or connected to a circuit that is regularly switched on and off by the utility. The device must be connected directly to the power outlet.
- Appliance for household use only.
- Clean and store this device in accordance to instructions listed in Cleaning and storage section.
- ALWAYS turn off the device and disconnect it from the mains supply:
- if it's not operating correctly
- if there's an uncommon voice when using
• before disassembling the device -
before cleaning
-
When you disconnect the power cord of the device, grasp and pull the plug, not the cord/cable.
-
This appliance may be used by children who are above 8 years old and by persons with reduced physical, sensory or mental capabilities, or lack of experience and knowledge, if they are supervised and guided by a person who is responsible for their safety in a cautious manner for all the safety precautions being understood and followed. Children should be supervised to ensure that they do not play with the appliance. Children should not perform cleaning and servicing of the device unsupervised.
-
Keep the device out of the reach of children.
-
Fixed power cable may only be replaced in an authorized service point.
-
Keep the device and its cord/cable away from heat, water, moisture, sharp edges and any other factor which may damage the appliance or its cord.
-
Make sure the power cord does not touch any hot or sharp elements.
-
Do not use the product for purposes different from displayed in this operating manual.
-
Do not place the appliance in water or any liquid; nor handle/use it with wet or moist hands.
-
Do not leave the appliance unattended when it's working.
-
DO NOT use this device if the cord or the plug is damaged, or the appliance is broken.
-
Do not attempt to repair this device yourself. Only authorized and qualified personnel may repair this device. Never disassemble this device.
-
Use only authorized accessories.
IMPORTANT
- Provide a safe distance of approximately 30 cm on both sides and top of the device as there are ventilation slots. Good ventilation is crucial for the proper operation of the device. Obstructing the airflow may lead to overheating and in consequence fire or product damage/personal injury.
- Do not place anything on the product unit to cover the top working fan.
- Never place the appliance on an uneven surface, sensitive table tops or close to walls and curtains. Never place it directly on another source of heat or on top of another electrical appliance.
- Do not place the appliance close to inflammable liquids or material.
- The appliance heats up to high temperature during use. Do not touch it with your hands. Always use gloves, handles and knobs provided.
- Do not place utensils or similar objects on the stone.
- Use utensils specifically designed for non-stick surfaces to avoid scratching. Never remove the food item with metal kitchen utensils.
- Do not twist or wrap the power cord around the appliance as this may cause the insulation to weaken and split, particularly in the location where it enters the unit.
- Only consumable food can be cooked in the product unit. Do not put large pieces of food or metal objects in the inner cavity in case of fire or danger.
- Do not use this appliance for deep-frying.
- When the product unit is working, do not open the door to move the cooking tray or other accessories to avoid burns caused by high temperature or high-temperature liquid.
24 25 Owner's manual
Owner's manual
reesa
BEFORE FIRST USE
- Remove all packaging material, promotional labels, and tape from the unit.
- Remove all accessories from the package and read this manual carefully. Please pay particular attention to operational instructions, warnings, and important safeguards to avoid any injury or property damage.
- Wash the accessories in warm soapy water (except the stone), then rinse and dry thoroughly.
POWER ON/OFF
- Plug in the device. It beeps and the ON/OFF button flashes (standby mode).
- Tap the ON/OFF button again to turn on the device. The control panel activates.
SELECTING THE PROGRAM
OVEN PROGRAMS
Tap the OVEN button to choose one of the oven programs. The below table contains all oven programs with its predefined temperature and time settings.
Notes:
- Temperature and time settings can be adjusted within the provided range (see the table below).
- You can use aluminum foil, baking paper and silicone bakeware up to maximum temperature of 190°C.
| PROGRAM | DEFAULT TEMPERATURE | ADJUSTABLE TEMPERATURE | DEFAULT TIME | ADJUSTABLE TIME | PREHEATING |
| GRILL | 300°C (570°F) | 80 - 300°C(180 - 600°F) | 2 min 1 - 15 | min Yes | |
| DEHYDRATE | 70°C (150°F) | 60 - 90°C(105 - 195°F) | 6 hours 1 - 12 | hours No | |
| ROAST | 350°C (700°F) | 80 - 350°C(180 - 700°F) | 8 min 1 - 20 | min Yes | |
| BAKE | 175°C (350°F) | 150 - 250°C(300 - 500°F) | 20 min | 1 - 120 min | Yes |
| KEEP WARM | 60°C (150°F) | 60 - 100°C(105 - 200°F) | 30 min | 1 - 120 min | No |
| BROIL | 200°C (500°F) | 200 - 300°C(400 - 600°F) | 10 min 5 - 20 | min No |
PIZZA PROGRAMS
Tap the PIZZA button to choose one of the pizza programs. The below table contains all pizza programs with its predefined temperature and time settings. Notes:
- Custom program is based on users' own time and temperature settings to best suit their preferences.
- Temperature and time settings can be adjusted within the provided range (see the table below).
- Do not add oil on the stone. Place the pizza directly on the untreated stone.
- The surface of the stone will darken and there may be some stains. It is normal and will not influence the cooking result.
- The stone gets very hot. Use the peel to take the pizza out of the oven.
- Do not cut pizza while it is still on the stone. This can damage the stone.
| PROGRAM | DESCRIPTION | DEFAULT TEMPERATURE | ADJUSTABLE TEMPERATURE | DEFAULT TIME | ADJUSTABLE TIME | PREHEATING |
| THIN | Thin, stretched pizza with a crispy crust | 310°C (590°F) | 80 - 400°C (180 - 750°F) | 4 min 1 | 10 min | Yes |
| NEAPOLITAN | A chewy, puffy crust that's spotted with crispy bubbles | 450°C (850°F) | 80 - 450°C (180 - 850°F) | 3 min 1 | 10 min | Yes |
| PAN | Baked in a deep dish or pan with a thick, chewy crust | 250°C (500°F) | 80 - 400°C (180 - 750°F) | 14 min | 1 - 20 min | Yes |
| CUSTOM | Set the time and temperature as your desired preference to make your own pizza | 200°C (380°F) | 80 - 350°C (180 - 700°F) | 10 min | 1 - 30 min | Yes |
| NEW YORK | Large, hand-tossed pizza with light browning and a foldable, chewy crust | 285°C (550°F) | 80 - 400°C (180 - 750°F) | 6 min 1 | 15 min | Yes |
| FROZEN | Turn your favorite packaged pie into a gooey masterpiece in minutes | 270°C (520°F) | 80 - 400°C (180 - 750°F) | 10 min | 1 - 20 min | Yes |
EN
ADJUSTING TIME
- Tap the TIME+ button to increase time. Tap the TIME- to decrease time. You can adjust the time in every program.
- With single tap time is increased/decreased with 1 minute. Tap and hold the TIME+/- buttons to enable fast time change with 5 minutes.
ADJUSTING TEMPERATURE
- Tap the TEMP+ button to increase temperature. Tap the TEMP− button to decrease temperature. You can adjust the temperature in every program.
- With single tap the temperature is increased/decreased with 5°C. Tap and hold the TEMP+/- buttons to enable fast temperature change with 10°C.
- Tap and hold the TEMP+/- buttons simultaneously to change the temperature unit (°C/°F).
PREHEATING
- After choosing the program, tap the START/STOP button to start preheating. "PRE" is displayed on the time display.
- If there is no need to preheat, tap and hold the OVEN or PIZZA button for about 3 seconds to cancel the preheating. "PRE" disappears from the display and the countdown at the set temperature and chosen program starts.
- Preheating time depends on set temperature. The higher the temperature, the longer the preheating time.
- When the cavity reaches set temperature, the device will beep 10 times what means that preheating is finished and "ADD FOOD" is displayed.
- Open the door and place food inside the cavity. Then tap the START/STOP button to start the cooking process.
Note: "ADD FOOD" prompt remains on the display for 10 minutes. If no operation is performed within that time (inserting food into the cavity and tapping the START/STOP button), the device will enter standby mode (the control panel goes off and the ON/OFF button flashes).
COOKING
- To adjust temperature or time during cooking, first tap the START/STOP button, then tap the TEMP+/- or TIME+/- buttons to set new values. Tap the ON/OFF button again to resume operation at new settings.
- Any adjustments made before preheating, during preheating or cooking refers to the cooking, not the preheating.
• To rechoose the program during preheating or cooking, first tap the START/STOP button, rechoose the program, then tap the START/STOP button again to resume operation.
• To pause/resume operation during preheating or cooking, tap the START/STOP button. - To stop operation before the countdown is finished, tap the ON/OFF button.
Once the cooking is finished, the device beeps 5 times, the temperature display shows "END" and afterwards the device enters standby mode.
SMOKE FUNCTION
| DEFAULT TEMPERATURE | ADJUSTABLE TEMPERATURE | DEFAULT TIME | ADJUSTABLE TIME | PREHEATING |
| 280°C (530°F) | - | 10 min | 1 - 15 min | No |
The device has been equipped with smoke function that allows to achieve natural wood flavor of your food.
To use that function follow the below instructions:
- First, place 15-20 g of wood chips alongside four edges of the baking tray ^4 as shown on the picture.
Note: For easy cleaning, you can put aluminum foil on the tray beforehand. It is not necessary though. - Place the rack* with food on the baking tray and insert inside the cavity, then close the door.
- Tap the SMOKE button. Smoke function doesn't include preheating so the process starts right away after tapping the SMOKE button. High temperature will make the wood chips smoke.
* The baking tray and the rack are sold separately on www.teesa.pl or www.rebelelectro.com.
COOLING FAN
The device has been equipped with a cooling fan. The fan works continuously during device's operation. It turns on automatically to maintain low temperature of the housing. When the cooking is finished, the fan continues to operate to cool down the housing. The higher temperature is set, the more time it takes for the fan to cool down the device. When the temperature of the housing drops to the safe level, the fan turns off automatically.
CAUTION Do not unplug the device before the fan has finished operation. Otherwise, the device may get damaged. It is forbidden to cover the ventilation slots on the top and on the sides of the device to avoid overheating.
PIZZA EXPERT MODE
Once selected the preset pizza program, tap the Expert mode button and the unit will enter into the pizza expert mode in which the device will operate in the selected program continuously for 30 minutes making lots of pizza. This mode is recommended for party usage.
Notes:
• Time and temperature adjustment is not available in pizza expert mode.
• This mode can be used only with pizza programs.
- To skip the preheating, tap and hold the PIZZA button for about 3 seconds.
CLEANING AND MAINTENANCE
• Always unplug the appliance from wall socket after use and before cleaning. Never clean the appliance while still connected to power mains.
- Allow the appliance to cool down completely before cleaning.
- Never immerse the appliance or its cord into water or other liquid.
- Clean the stone after each use.
- Do not let the stone get in contact with water or other liquids while still warm since the stone may crack. It is forbidden to place the stone in the washing machine!
- Scrape out any leftovers with a spatula or similar tool.
- Wipe off the stone with a moist cloth when the stone is completely cold.
• The stone is available for purchase online at www.teesa.pl or www.rebelelectro.com.
- When the housing is completely cold, wipe it off with a damp cloth. Do not use any corrosive cleaning agents.
ERRORS
| Error code Problem Solution | ||
| E1 | Top temperature sensor malfunction | Plug out the device, then plug it in and turn on. If the error still appears on the display, contact an authorized service point for repair. |
| E2 | Down temperature sensor malfunction | |
SPECIFICATION
Main features
6 pizza programs: thin crust, neapolitan, pan pizza, custom, new york, frozen 6 cooking programs: grill, dehydrate, roast, bake, keep warm, broll
Extra features: pizza expert mode, smoke function
Timer
Auto power off
LED display
Touch control panel
Two heating elements
Overheating protection
Oven interior light
Window on top for monitoring cooking progress
Heatproof handle
Antislip feet
Technical data
Cooking surface: ceramic stone
Stone dimensions: 33 x 33 x 10 cm
Temperature range: 60°C – 450°C
Material:
Door: stainless steel, double glass, plastic
Housing: iron with powder printing
Maximum power: 2200 W
Power supply: 220 \~ 240 V; 50/60 Hz
In set: stone, stone rack, pizza peel, user's manual
Physical parameters
Weight: 11,8 kg
Dimensions: 495 x 455 x 276 mm
Cord length: 80 cm

English
Correct Disposal of This Product
(Waste Electrical & Electronic Equipment)

(Applicable in the European Union and other European countries with separate collection systems) This marking shown on the product or its literature, indicates that it should not be disposed with other household wastes at the end of its working life. To prevent possible harm to the environment or human health from uncontrolled waste disposal, please separate this from other types of wastes and recycle it responsibly to promote the sustainable reuse of material resources. Household users should contact either the retailer where they purchased this product, or their local government office, for details of where and how they can take this item for environmentally safe recycling. Business users should contact their supplier and check the terms and conditions of the purchase contract. This product should not be mixed with other commercial wastes for disposal.
Made in China for Lechpol Electronics Leszek Sp.k., ul. Ganwolinska 1, 08-400 Miętne, serwis@lechpol.pl
Once the cooking is finished, the device beeps 5 times, the temperature display shows "END" and afterwards the device enters standby mode.
FUNCTIA DE AFUMARE
| TEMP. IMPLICITÄ | TEMP. REGLABILÄ | TIMP IMPLICIT | TIMP REGLABIL | PREÎNCÄLZIRE |
| 280°C (530°F) - | 10 min 1 - 15 min Nu | |||