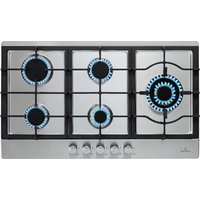
Ignito Chef Edition - Cooker Klarstein - Free user manual and instructions
Find the device manual for free Ignito Chef Edition Klarstein in PDF.


User questions about Ignito Chef Edition Klarstein
0 question about this device. Answer the ones you know or ask your own.
Ask a new question about this device
Download the instructions for your Cooker in PDF format for free! Find your manual Ignito Chef Edition - Klarstein and take your electronic device back in hand. On this page are published all the documents necessary for the use of your device. Ignito Chef Edition by Klarstein.
USER MANUAL Ignito Chef Edition Klarstein
text_image
COOKINGCO COOKINGCO KINGCOOKING KINGCOOKING COOKINGCO KINGCOOKING KINGCOOKING KINGCOOKINGKLARSTEIN
www.klarstein.com

area
| Category | Value | | -------- | ----- | | 1 | 100 | | 2 | 100 | | 3 | 100 | | 4 | 100 | | 5 | 100 | | 6 | 100 | | 7 | 100 | | 8 | 100 | | 9 | 100 | | 10 | 100 | | 11 | 100 | | 12 | 100 | | 13 | 100 | | 14 | 100 | | 15 | 100 | | 16 | 100 | | 17 | 100 | | 18 | 100 | | 19 | 100 | | 20 | 100 | | 21 | 100 | | 22 | 100 | | 23 | 100 | | 24 | 100 | | 25 | 100 | | 26 | 100 | | 27 | 100 | | 28 | 100 | | 29 | 100 | | 30 | 100 | | 31 | 100 | | 32 | 100 | | 33 | 100 | | 34 | 100 | | 35 | 100 | | 36 | 100 | | 37 | 100 | | 38 | 100 | | 39 | 100 | | 40 | 100 | | 41 | 100 | | 42 | 100 | | 43 | 100 | | 44 | 100 | | 45 | 100 | | 46 | 100 | | 47 | 100 | | 48 | 100 | | 49 | 100 | | 50 | 100 | | 51 | 100 | | 52 | 100 | | 53 | 100 | | 54 | 100 | | 55 | 100 | | 56 | 100 | | 57 | 100 | | 58 | 100 | | 59 | 100 | | 60 | 100 | | 61 | 100 | | 62 | 100 | | 63 | 100 | | 64 | 100 | | 65 | 100 | | 66 | 100 | | 67 | 100 | | 68 | 100 | | 69 | 100 | | 70 | 100 | | 71 | 100 | | 72 | 100 | | 73 | 100 | | 74 | 100 | | 75 | 100 | | 76 | 100 | | 77 | 100 | | 78 | 100 | | 79 | 100 | | 80 | 100 | | Note: The actual values are not provided in the code. I have used the label 'Value' as a placeholder for the value detection. You would need to run the code to get the actual values from the code list. Please note that the actual values would be the result of this example. You would need to run the code to get the actual values from the code list. You would need to run the code to get the actual values from the code list. You would need to run the code to get the actual values from the code list. You would need to run the code to get the actual values from the code list. You would need to run the code to get the actual values from the code list. You would need to run the code to get the actual values from the code list. You would need to run the code to get the actual values from you would need to run the code.text_image
QR code image containing encoded data, no visible human-readable textINHALT
Technische Daten 3
natural_image
Simple diagram with a circle, star, and curved arrows (no text or symbols)natural_image
Five circular diagrams showing directional arrows and geometric shapes, no text or symbols presenttext_image
Exploded view diagram of a mechanical assembly with numbered parts for identificationtext_image
25 mm (MIN.) 45 mmnatural_image
Pure electrical circuit lines without any symbols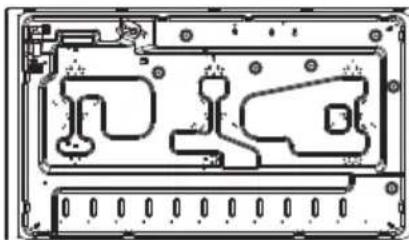
natural_image
Technical line drawing of an electronic device casing with internal components (no text or symbols)Boden10040146
natural_image
Top-down schematic of an electronic device casing with internal components and connectors (no text or symbols)Boden10040147
natural_image
Simple line drawing of a hand holding a pen above a ruler, with a black X mark on the ruler (no text or symbols)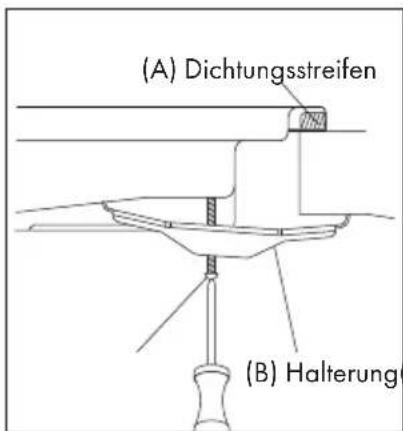
EU-PRODUKTDATENBLATT
natural_image
Symbol of a trash bin crossed with a diagonal line, no text or labels presentBerlin Brands Group UK Limited
PO Box 42
272 Kensington High Street
London, W8 6ND
United Kingdom
Dear Customer,
Congratulations on purchasing this equipment. Please read this manual carefully and take care of the following hints to avoid damages. Any failure caused by ignoring the items and cautions mentioned in the instruction manual are not covered by our warranty and any liability. Scan the QR code to get access to the latest user manual and other information about the product.
text_image
QR code image containing encoded data, no visible human-readable textCONTENTS
Technical Data 25
Safety Instructions 26
Disassembly 28
Description of the Appliance 29
How to Use the Appliance 29
Safety and Energy Saving Advice 31
Disassembly 32
Cleaning and Care 33
Installation 35
Troubleshooting 40
EU Product Data Sheet 42
Disposal Considerations 43
Manufacturer & Importer (UK) 43
TECHNICAL DATA
| Item number 100401 | 46, 10040147, 10045673, 10045673 |
| Power supply 220-24 | 40 V 50–60 Hz |
SAFETY INSTRUCTIONS
Please take the time to read this instruction manual before installing or using the appliance. This instruction booklet must be kept with the appliance for any future reference. If the appliance is sold or transferred to another person, ensure the booklet is passed on to the new user.
- This appliance shall be installed in accordance with regulations in force and only used in a well ventilated space.
- Prior to installation, ensure that the gas and electrical supply complies with the type stated on the rating plate.
- Where this appliance is installed in marine craft or in caravans, it should not be used as a space heater.
- The gas pipe and electrical cable must be installed in such a way that they do not touch any parts or the appliance.
- This appliance should be installed by a qualified technician or installer.
- The adjustment conditions for this appliance are stated on the label or data plate.
- Remove all packaging before using the appliance.
- After unpacking the appliance, make sure the product is not damaged and that the connection cord is in perfect condition. Otherwise, contact the dealer before installing the appliance.
- The adjacent furniture and all materials used in the installation must be able to withstand a minimum temperature of 85 °C above the ambient temperature of the
• room it is located in, whilst in use. - In the event of burner flames being accidentally extinguished, turn off the burner control and do not attempt to re-ignite the burner for at least one minute.
- The use of a gas cooking appliance results in the production of heat and moisture in the room in which it is installed. Ensure that the kitchen is well ventilated: keep natural ventilation holes open or install a mechanical ventilation device (mechanical extractor hood).
- Prolonged intensive use of the appliance may call for additional ventilation, for example opening of a window, or more effective ventilation, for example increasing he level of mechanical ventilation where present.
- Do not allow children to play near or with the appliance.
• The appliance gets hot when it is in use.
• Children should be kept away until it has cooled.
• This appliance is designed to be operated by adults.
• Children can also injure themselves by pulling pans or pots off the appliance. - This appliance is not intended for use by children or other persons whose physical, sensory or mental capabilities or lack of experience and knowledge prevents them from using the appliance safety without supervision or instruction by a responsible person to ensure that they can use the appliance safety.
- Only use the appliance for preparing food.
- Do not modify this appliance. Burner panel is not designed to operate from an external timer or separate remote control system.
- The use of a gas cooking appliance results in the production of heat and moisture in the room in which it is installed. Ensure that the kitchen is well ventilated: keep natural ventilation holes open or install a mechanical ventilation device (mechanical
extractor hood).
- Do not use this appliance if it comes in contact with water. Do not operate this appliance with wet hands.
- The heating and cooking surfaces of the appliance become hot when they are in use, take all due precautions.
- Do not use large cloths, tea towels or similar as the ends could touch the flames and catch fire.
- Never leave the appliance unattended when cooking.
- Unstable or misshapen pans should not be used on the appliance as they can cause an accident by tipping or spillage.
- Do not use or store flammable materials in the storage drawer near this appliance.
- Perishable food, plastic items and aerosols may be affected by heat and should not stored above or below the appliance.
- Do not spray aerosols in the vicinity of this appliance while it is in operaiton.
- Ensure the control knobs are in the '●' position when not in use.
- This appliance is intended for domestic cooking only. It is not designed for commercial or industrial purposes.
- Prolonged intensive use of the appliance may call for additional ventilation, for example opening of a window, or increasing the level of mechanical ventilation where present.
- Use heat-resistant pot holders or gloves when handling hot pots and pans.
- Do not let pot holders come near open flames when lifting cookware.
- Take care not to let pot holders or gloves get damp or wet, as this causes heat to transfer through the material quicker with the risk of burning yourself.
- Only ever use the burners after placing pots and pans on them. Do not heat up any empty pots or pans.
- Never use plastic or aluminium foil dishes on the appliance.
- When using other electrical appliances, ensure the cable does not come into contact with the appliance surfaces of the cooking appliance.
- If you have any mechanical parts eg. an artificial heart in your body, consult a doctor before using the appliance.
- Do not use a tea towel or similar materials in place of a pot holder. Such cloths can catch fire on a hot burner.
- When using glass cookware, make sure it is designed for top plate cooking. If the surface is made of glass-cracked, switch off the appliance to avoid defeat electrocution.
- To minimise the possibility of burns, ignition of flammable materials and spillage, turn cookware handles toward the side or center of the top plate without extending over adjacent burners.
• Always turn burner controls off before removing cookware. - Carefully watch foods being fried at a high flame setting.
• Always heat fat slowly and watch as it heats. - Foods for frying should be as dry as possible. Frost on frozen foods or moisture on fresh foods can cause hot fat to bubble up and over the sides of the pan.
- Never try to move a pan of hot fat, especially a deep fat fryer. Wait until the fat is completely cool.
DISASSEMBLY
Note: Installation/assembly and disassembly of the unit must only be carried out by qualified personnel.
Before dismantling, any gas in the unit must be vented. Proceed as follows:
- Close all supply valves, but do not disconnect the gas cooker from the line yet.
- Now light all the burners. The remaining gas contained in the appliance burns off in a short time.
- After that, the appliance's pipes are free of gas and the gas cooker can be disconnected from the connections.
Important notes on dismantling the unit
- The disassembly is the same as the installation / assembly in the reverse order of the steps.
- Have a second person help you during disassembly to avoid injury.
- Ensure sufficient ventilation of the working area during disassembly.
- There are no motors or accumulators in this gas hob. Observe the section "Disposal Considerations".
DESCRIPTION OF THE APPLIANCE
Accessories
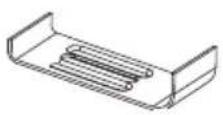
Bracket (4)
Sponge (4)

Screw (4)

Injector (5)
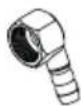
Gas-pipe bend (1)
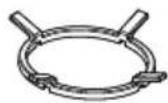
Cast iron rack (1)
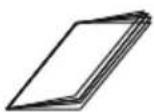
Instruction Manual (1)
HOW TO USE THE APPLIANCE
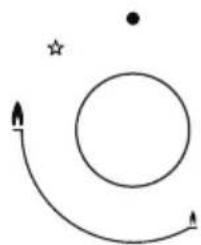
The following symbols will appear on the control panel, next to each control handle.

Black circle: gas off

Large flame: maximum setting

Small flame: minimum setting
natural_image
Simple diagram with a circle, star, and curved arrows (no text or symbols)The minimum setting is at the end of the anti-clockwise rotation of the control handle. All operation positions must be selected between the maximum and minimum position. The symbol on the control panel, next to the control handle will indicate which burner it operates.
Automatic ignition with flame failure safety device
- The appliance is fitted with a flame failure safety device on each burner, which is designed to stop the flow of gas to the burner head in the event of the flame going out.
natural_image
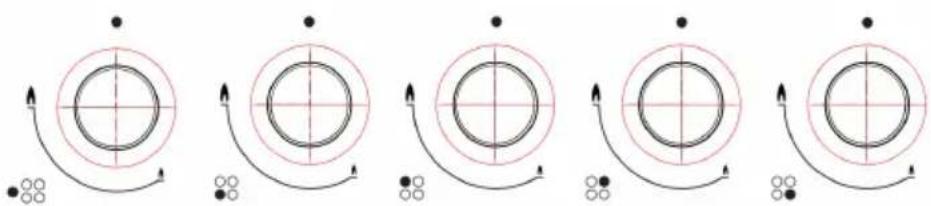
Five circular diagrams showing rotational motion with arrows and dots, no text or symbols presentTo ignite a burner
- Press in the control knob of the burner that you wish to light and turn it anticlockwise to the maximum position.
- If you keep the control knob depressed, the automatic ignition for the burner will operate.
- You should hold down the control knob for 15 seconds after the flame on the burner has lit. If after 15s the burner has not lit, stop operating the device and open the compartment door and/or wait at least 1 min before attempting a further ignition of the burner.
• After this 15-second interval, to regulate the flame you should continue turning the control knob anti-clockwise until the flame is at a suitable level.
• The operating position MUST be at a position between the maximum and - minimum position.
- To switch the burner off, turn the control knob fully clockwise to the gas off position.
• In case of power failure, the burners can be lit by carefully using a match.

Warning: Danger of fire or explosion
If gas seems to leak, take the actions as follow:
- Do not turn on the light.
- Do not switch on/off any electrical appliance and do not touch any electric plug.
-
Do not use a telephone.
-
Stop using the product and close the middle valve.
-
Open the window to ventilate.
-
Contact our service centre by using a phone outside.
SAFETY AND ENERGY SAVING ADVICE
The diameter of the bottom of the pan should correspond to that of the burner.
| BURNERS | PANS | |
| min. max. | ||
| Triple-Crown 200 mm | 240 mm | |
| Rapid 200 mm 240 mm | ||
| Semi-Rapid 160 mm | 160 mm | |
| Auxiliary 120 mm 180 mm | ||
| NO YES | |
| Do not use small diameter cookware on large burners. The flame should never come up the sides of the cookware. | Always use cookware that is suitable for each burner, to avoid wasting gas and discolouring the cookware. |
| Avoid cooking without a lid or with the lid half off -as this wastes energy | Place a lid on the cookware: |
| Do not use a pan with a convex or concave bottom. | Only use pots,saucepans and frying pans with a thick,flat bottom. |
| Do not place cookware on one side of a burner, as it could tip over. | Always place the cookware right over the burners,not to one side. |
| Do not use cookware with a large diameter on the burners near the controls,which when placed on the middle of the burner may touch the controls or be so close to them that they increase the temperature in this area and may cause damage. | |
| Never place cookware directly on top of the burner. | Place the cookware on top of the trivet. |
| Do not place anything,eg.flame tamer,asbestos mat,between pan and pan support as serious damage to the appliance may result. | |
| Do not use excessive weight and do not hit the cooktop with heavy objects. | Handle cookware carefully when they are on the burner. |
It is not recommended to use roasting pans, frying pans or grill stonesheated simultaneously on several burners because the resulting heatbuild-up may damage the appliance.
Do not touch the top plate and trivet whilst in use for a certain period after use. As soon as a liquid starts boiling, turn down the flame so that it will barely keep the liquid simmering.
DISASSEMBLY
Note: Installation/assembly and disassembly of the unit must only be carried out by qualified personnel.
Before dismantling, any gas in the unit must be vented. Proceed as follows:
- Close all supply valves, but do not disconnect the gas cooker from the line yet.
- Now light all the burners. The remaining gas contained in the appliance burns off in a short time.
- After that, the appliance's pipes are free of gas and the gas cooker can be disconnected from the connections.
Important notes on dismantling the unit
- The disassembly is the same as the installation / assembly in the reverse order of the steps.
• Have a second person help you during disassembly to avoid injury. - Ensure sufficient ventilation of the working area during disassembly.
- There are no motors or accumulators in this gas hob. Observe the section "Notes on disposal".
CLEANING AND CARE
- Cleaning operations must only be carried out when the appliance is completely cool.
- The appliance should be disconnected from your mains supply before commencing any cleaning process.
- Clean the appliance regularly, preferably after each use.
- Abrasive cleaners or sharp objects will damage the appliance surface; you should clean it using water and a little washing up liquid.
| Usable Unusable | |
| Soft Cloth Nylon Brush | |
| Neutral Detergent Edible Oil | |
| Abrasive | |
| Metal Brush | |
| Acidic/Alkali Detergent | |
| Thinner/Benzene |
Pan support, control handles
• Take off the pan support
- Clean these and the control handles with a damp cloth, washing up liquid and warm water. For stubborn soiling, soak beforehand.
• Dry everything with a clean soft cloth.
Top plate
- Regularly wipe over the top plate using a soft cloth well wrung-out in warm water to which a little washing up liquid has been added.
• Dry the top plate thoroughly after cleaning. - Thoroughly remove salty foods or liquids from the hob as soon as possible to avoid the risk of corrosion.
- Stainless steel parts of the appliance may become discoloured over time. This is normal because of the high temperatures. Each time the appliance is used these parts should be cleaned with a product that is suitable for stainless steel.
Burners
- Remove the burner lids and Flame Spreaders by pulling them upwards and away from the top plate.
- Soak them in hot water and a little detergent or washing up liqui.
-
After cleaning and washing them, wipe and dry them carefully. Make sure that the flame holes are clean and completely dry.
-
Wipe the fixed parts of the burner cup with a damp cloth and dry afterwards.
• Gently wipe the ignition device and flame supervision device with a well wrung-out cloth and wipe dry with a clean cloth. - Before placing the burners back on the top plate, make sure that the injector is not blocked.
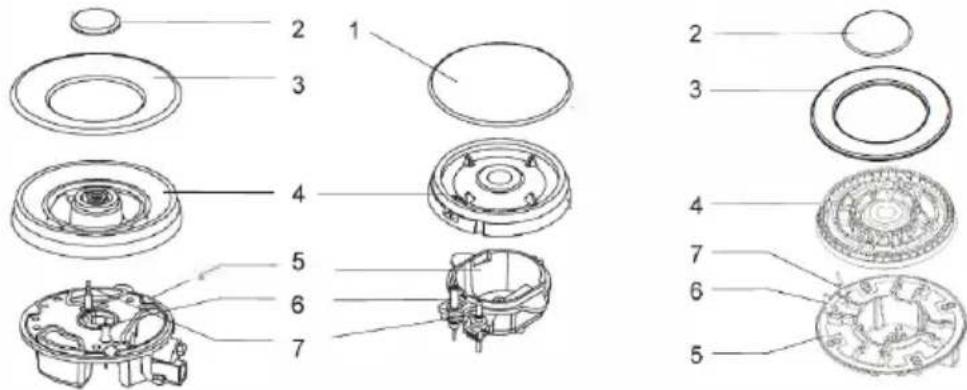
Re-assemble the Auxiliary, Semi-Rapid, Rapid and Triple-Crown burners as follows
text_image
Exploded view diagram of a mechanical assembly with numbered parts for identification- Place the flame spreader (4) on to the burner cup (5) so that the ignition device and the flame supervision device extend through their respective holes in the flame spreader. The flame spreader must click into place correctly.
- Position the burner lid (1,2,3) onto the flame spreader (4) so that the retaining pins fit into their respective recesses.

Warning: Danger of fire
Do not mix up the top and bottom.
The locating pins must fit exactly into the notches.
INSTALLATION
Safety instructions for installation
- Do not modify this appliance.
- This appliance must be installed by an authorised technician or installer.
- Prior to installation, ensure that the local distribution conditions (nature of the gas and gas pressure) and the adjustment of the appliance are compatible.
- The adjustment conditions for this appliance are stated on the label (or data plate).
- This appliance is not connected to a combustion products evacuation installation regulations. Particular attention should be given to the relevant requirements regarding ventilaton.
- Before installing, turn off the gas and electricity supply to the appliance.
- All appliances containing any electrical components must be earthed.
- Ensure that the gas pipe and electrical cable are installed in such a way that they do not touch any parts of the appliance which may become hot.
Gas pipe or connector shouldn't be bent or blocked by any other appliances.
- Check the dimensions of the appliance as well as the dimensions of the gap to be cut in the kitchen unit.
- The panels located above the work surface, directly next to the appliance, must be made of non-flammable material. Both the stratified surfacing and the glue used to secure it should be heat resistant, to prevent deterioration.
- Turn on appliance tap and light each burners.
- Check for a clear blue flame without yellow tipping.
• If burners shows any abnormalities check the following :
- Burner lid on correctly
- Flame spreader positioned correctly
- Burner vertically aligned with injector nipple
- A full operational test and a test for possible leakages must be carried out by the fitter after installation.
- The flexible hose shall be fitted in such a way that it cannot come into contact with a moveable part of the housing unit and does not pass through any space susceptible of becoming congested.device. It should be installed and connected in accordance with current.
- Grease cranes produced at the factory to meet the requirement of all life hob.
Positioning
text_image
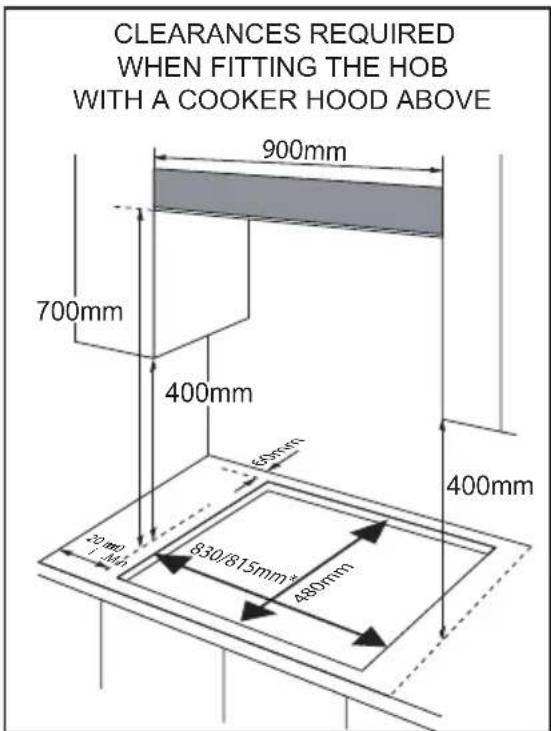
CLEARANCES REQUIRED WHEN FITTING THE HOB WITH A COOKER HOOD ABOVE 900mm 700mm 400mm 650mm 400mm 20mm 1.4m 830/815mm 480mm* 10040146 - 830 mm × 480 mm 10040147 - 815 mm × 490 mm
- The edges of the hob must be a minimum distance of mm from a side or rear wall.
- 700 mm between the highest point of the hob surface (including the burners) and the underside of any horizontal surface directly above it.
- 400 mm between the hob surfaces, providing that the underside of the horizontal surface is in line with the outer edge of the hob. If the underside of the horizontal surface is lower than 400 mm, then it must be at least 50 mm away from the outer edges of the hob.
- 50 mm clearance around the appliance and between the hob surface and any combustible materials.
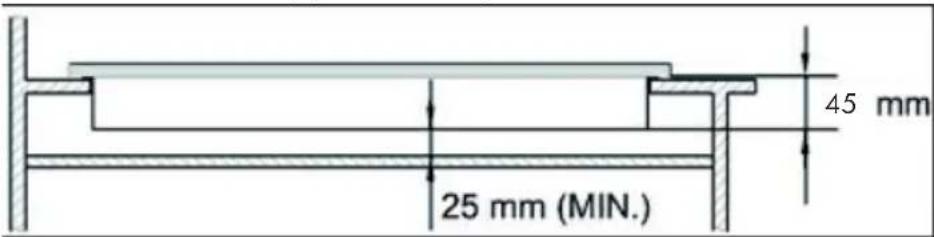
- You must have a gap of at least 25 mm and at most 74 mm between the underneath of the appliance and any surface that is below it.
text_image
45 mm 25 mm (MIN.)- This appliance is to be built into a kitchen unit or 600mm worktop, providing the following minimum distances are allowed. An oven must have forced ventilation to
install a hob above it.
-
Check the dimensions of the oven in the installation manual.
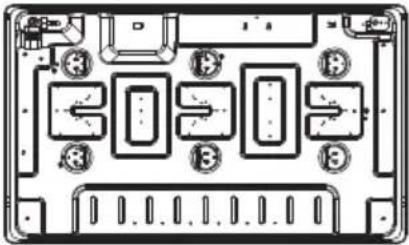
• The cut out size must obey the indication. -
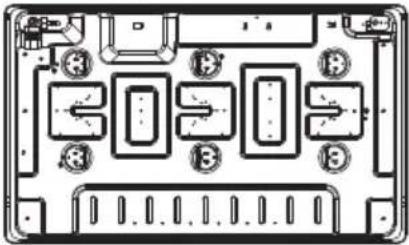
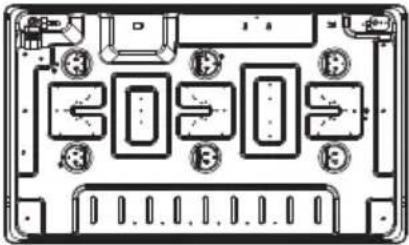
Remove the pan supports, the burner lid and flame spreader and carefully turn the appliance upside down and place it on a cushioned mat.
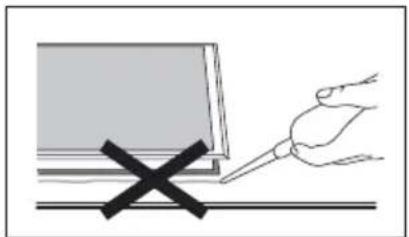
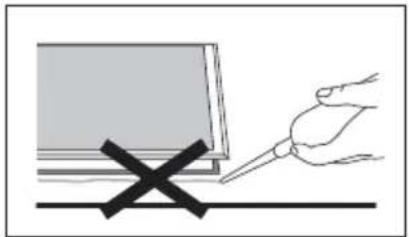
Take care that the Ignition devices and flame supervision devices are not damaged in this operation. - Apply the sponge provided around the edge of the appliance.
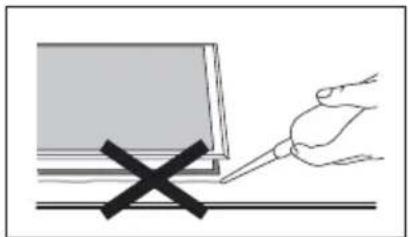
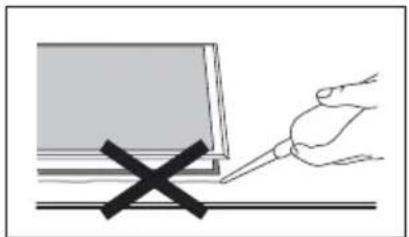
- Do not leave a gap in the sealing agent or overlap the thickness.
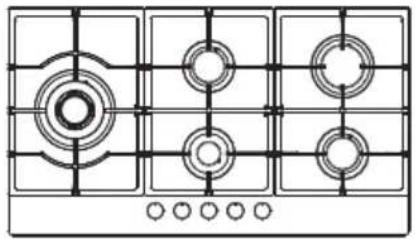
natural_image
Pure technical diagram of a gas stove with six circular components and grid lines (no text or symbols)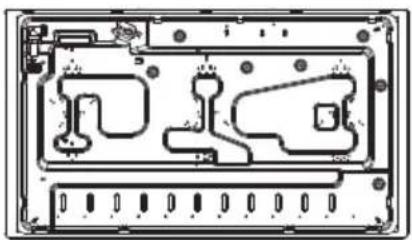
natural_image
Pure electrical circuit lines without any symbolsBottom10040146
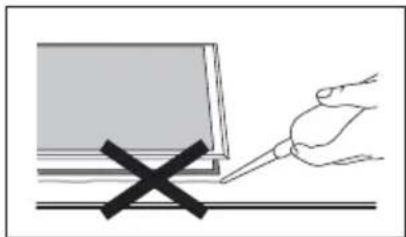
Do not use a silicon sealant to seal the appliance against the aperture This will make it difficult to remove the appliance from the aperture in future, particularly if it needs to be serviced. Do not use a silicon sealant to seal the appliance against the aperture.
-
Place the bracket (B) over the holes that match the size of the screws. There are one set of screw holes in each corner of the hob (H) Slightly tighten a screw (C) through the bracket (B) so that the bracket is attached to the hob, but so that you can still adjust the position.
-
Carefully turn the hob back over and then gently lower it into the aperture hole that you have cut out.
-
On the underneath of the hob, adjust the brackets into a position that is suitable for your worktop. Then fully tighten the screws (C) to secure the hob into position.
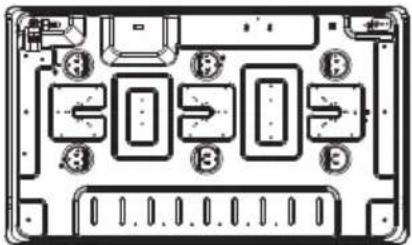
natural_image
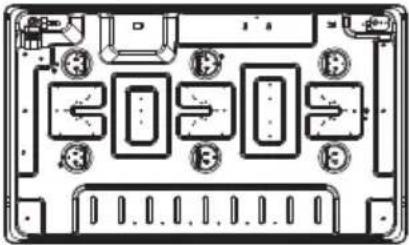
Technical diagram of an electronic component with labeled ports and slots (no readable text or symbols)Bottom10040147
natural_image
Simple line drawing of a hand holding a pen above a screen, with a black X mark on the base (no text or symbols)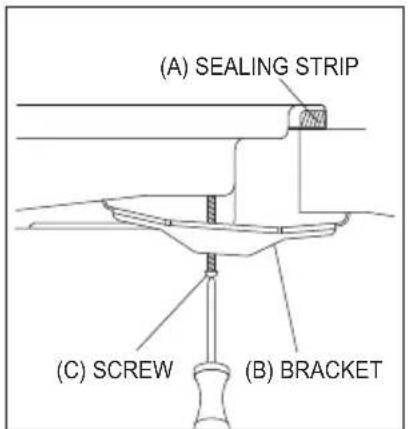
text_image
(A) SEALING STRIP (C) SCREW (B) BRACKETGas connection
This appliance must be installed and connected in accordance with installation regulations in force in the country in which the appliance is to be used.
This appliance is supplied to run on LPG and natural gas. Conversion for use on LPG and natural gases must only be undertaken by a qualified person.
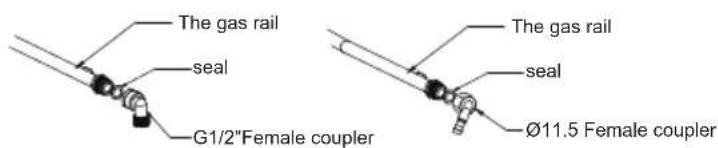
Gas supply replacement and installation guidelines:
LPG > NG NG > LPG
text_image
The gas rail seal G1/2"Female coupler The gas rail seal Ø11.5 Female couplerIt is the law that all gas appliances are installed by competent persons in accordance with the current edition of the Gas Safety Installation and Use Regulations.
It is in your interest and that of safety to ensure compliance with the law.
Gas adjustment
- Take precautions on the operations and adjustments to be carried out when converting from one gas to another.
- All work must be carried out by a qualified technician.
• Before you begin, turn off the gas and electricity supply to the appliance.
1 Change the injector of the burners
text_image
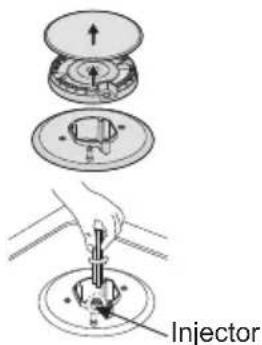
InjectorRemove the pan support, Burner lid and Flame spreader. Unscrew the injector using a 7mm box spanner and replace it with the stipulated injector for new gas supply. Carefully reassemble the all components. After injectors are replaced, it is advisable to strongly tighten the injector in place.
2 Adjustment of minimum level of the flame
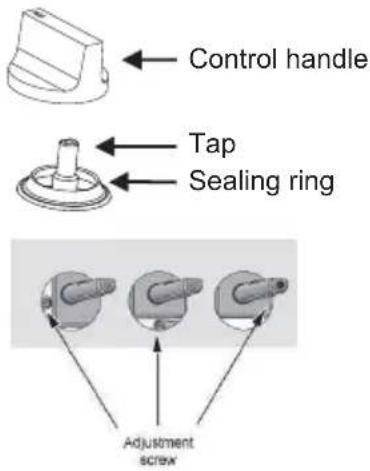
text_image
Control handle Tap Sealing ring Adjustment screw- Turn the taps down to minimum.
-
Remove the knob from the tap and place a small bladed screwdriver in the centre of the tap shaft.
-
The correct adjustment is obtained when the flame has a length of about 3 - 4 mm.
-
For butane / propane gas, the adjusting screw must Make sure that the flame does not go out by quickly turning from maximum flow to minimum flow. If it does then remove the control knob and make further adjustments to the gas flow, testing it again once the adjustment has been made.
-
Repeat this process for each one of the gas taps.
- Do not dismantle the tap shafe: in the event of a malfunction, change the whole tap.
- Before placing the burners back on the top place, make sure that the injector is not blocked. carried out after gas conversion. (such as soap water or gas in the event of a malfunction, change the whole tap.
- A full operational test and a test for possible leakages must be detector) Do not dismantle the tap shafe:
- After completing conversion a qualified technician or installer has to mark "V" on the right gas category to match with the setting in rating plate. Remove the previous setting "V" mark.
TROUBLESHOOTING
Repairs should be performed by a licensed technician only. Improper repair may result in considerable danger to you and others. However, some minor problems can be resolved as follows.
If problem is not solved, please contact customer care centre.
| Problem Probable cause Solution | ||
| Not ignited | No Spark. Check the electricity supply. | |
| The gas supply is closed. Assemble the lid correctly. | ||
| The burner lid is badly assembled. | Open the gas supply completely. | |
| Badly ignited | The gas supply is not completely open. | Open the gas supply completely. |
| The burner lid is badly assembled.. | Assemble the lid correctly. | |
| The ignition plug is contaminated with alien substance. | Wipe alien substance with a dry cloth. | |
| The burners are wet. Dry the burners lids carefully. | ||
| The holes in the flame spreader are clogged.. | Clean the flame spreader. | |
| Noise made when combusted and ignited | The burner lid is badly assembled. | Assemble the burner lid correctly.. |
| Flame goes out when in use. | The flame supervision device is contaminated with alien substance. | Clean the flame supervision device. |
| Product being cooked has boiled over and extinguished the flame. | Turn off burner knob.Wait one minute and reignite zone. | |
| A strong draught may have blown the flame out. | Please turn off zone and check cooking area for draught such as open windows.Wait one minute and reignite zone. | |
| Yellow Flame | The holes in the flame spreader are clogged. | Clean the flame spreader. |
| Unstable Flame | The burner lid is badly assembled. | Assemble the burner lid correctly. |
| Gas Smell Gas leakage | Stop using the product and close the middle valve.Open the window to ventilate. Contact our service centre by using a phone outside. | |
Gas specifications for model 10040146, 10040147, 10045673, 10045673
| Gas type & pressure | Heat input and orifice size marked (mm) | |||
| Wok burner Rapid burner Semi-rapid Auxiliary rapid | ||||
| 3.6 kW (262 g/h) 3.0 kW (218 g/h) 1.75 kW (127 g/h) 1.0 (73 g/h) | ||||
| G30 50 mbar 0.85 0.78 0.60 0.46 | ||||
| G20 20 mbar | 1.41 | 1.30 | 1.00 | 0.78 |
EU PRODUCT DATA SHEET
This document serves to demonstrate conformity with Regulation (EU) No 66/2014.
Specifications according to EN 30-2-1:2015
The energy efficiency of gas burners in a domestic hob is calculated as follows:
$$ E E _ {\text { g a r b e r }} = \frac {E _ {\text { t h e c o n t i c }}}{E _ {\text { g a r b e r }}} \times 1 0 0 $$
| Symbol Burner Value Unit | ||||
| Model identification | 10040146, 10040147, 10045673, 10045673 | |||
| Type of hob | Gas Hob | |||
| Number of gas burner | --- 5 -- | |||
| Energy efficiency per gas burner | EE_gas burner | Wok burner 54.4Rapid burner 58.4Semi-rapid burner 58.4Auxiliary burner 60.0 | % | |
| Energy efficiency per gas hob | EE_gas hob | 57.8 % | ||
DISPOSAL CONSIDERATIONS
natural_image
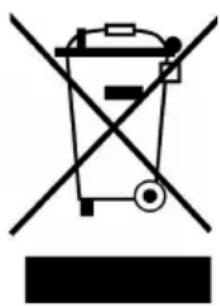
Symbol of a trash bin crossed with a diagonal line, no text or labels presentIf there is a legal regulation for the disposal of electrical and electronic devices in your country, this symbol on the product or on the packaging indicates that this product must not be disposed of with household waste. Instead, it must be taken to a collection point for the recycling of electrical and electronic equipment. By disposing of it in accordance with the rules, you are protecting the environment and the health of your fellow human beings from negative consequences. For information about the recycling and disposal of this product, please contact your local authority or your household waste disposal service.
MANUFACTURER & IMPORTER (UK)
Manufacturer:
Chal-Tec GmbH, Wallstrasse 16, 10179 Berlin, Germany.
Importer for Great Britain:
Berlin Brands Group UK Limited
PO Box 42
272 Kensington High Street
London, W8 6ND
United Kingdom
Cher client, chère cliente,
text_image
QR code image containing encoded data, no visible human-readable textSOMMAIRE
Fiche technique 45
natural_image
Simple diagram with a circle, star, and curved arrows (no text or symbols)flowchart
graph TD
    A["Start"] --> B{Circular Ring}
    B --> C["Arrow to Right"]
    B --> D["Arrow to Left"]
    B --> E["Arrow to Center"]
    B --> F["Arrow to Right"]
    B --> G["Arrow to Left"]
    B --> H["Arrow to Center"]
    B --> I["Arrow to Right"]
Allumer le brûleur
text_image
Exploded view diagram of a mechanical assembly with numbered parts for identification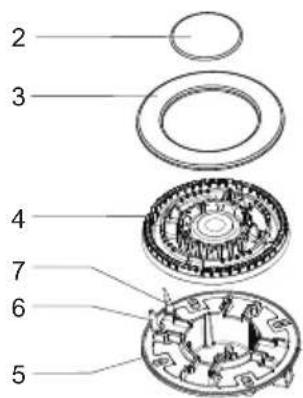
text_image
Exploded view diagram of a mechanical assembly with numbered parts for identificationtext_image
25 mm (MIN.) 45 mmnatural_image
Pure technical diagram of a mechanical component grid with no text, numbers, or symbols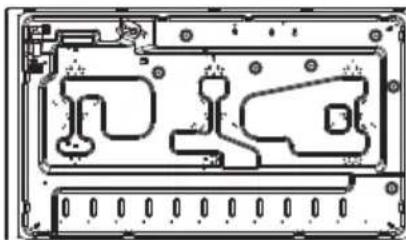
natural_image
Technical line drawing of an electronic device casing with internal components (no text or symbols)Plancher 10040146
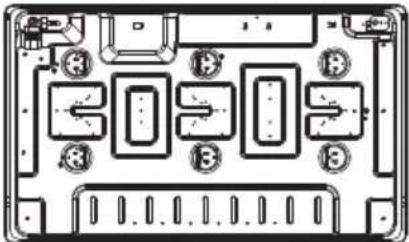
natural_image
Top-down schematic of a device layout with labeled components (no readable text or symbols)Étage 10040147
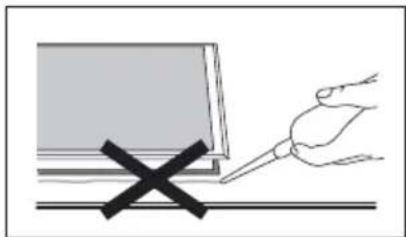
natural_image
Simple line drawing of a hand holding a pen above a laptop, with a black X mark on the left (no text or symbols)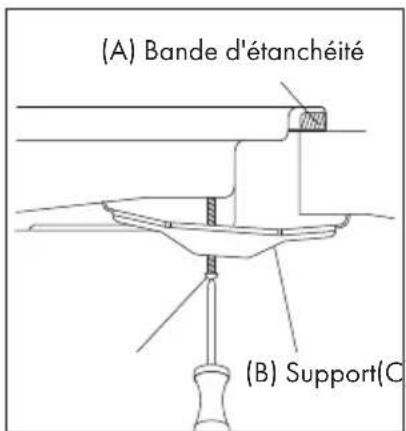
text_image
(A) Bande d'étanchéité (B) Support(C)Raccordement au gaz
FICHE DE DONNÉES PRODUIT UE
natural_image
Symbol of a trash bin crossed with a diagonal line, no text or labels presentBerlin Brands Group UK Limited
PO Box 42
272 Kensington High Street
London, W8 6ND
United Kingdom
Estimado cliente:
text_image
QR code image containing encoded data, no visible human-readable textCONTENIDO
Datos técnicos 65
natural_image
Simple diagram with a circle, star, and curved arrows (no text or symbols)text_image
Exploded view diagram of a mechanical assembly with numbered parts for identificationtext_image
25 mm (MIN.) 45 mmnatural_image
Pure technical diagram of a mechanical component grid with no text, numbers, or symbols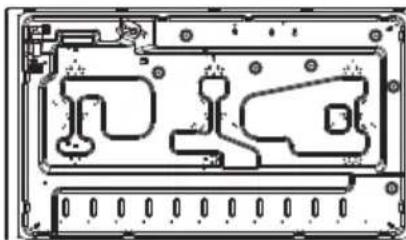
natural_image
Technical line drawing of an electronic device casing with internal components (no text or symbols)Suelo10040146
natural_image
Top-down schematic of an electronic device casing with internal components and connectors (no text or symbols)Suelo10040147
natural_image
Simple line drawing of a hand holding a pen above a laptop, with a black X mark on the left (no text or symbols)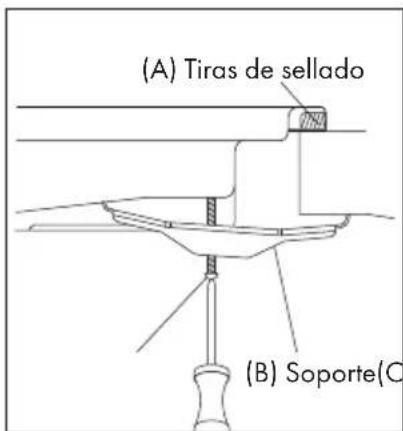
text_image
(A) Tiras de sellado (B) Soporte(C)Tornillo
Conexión de gas
natural_image
Symbol of a trash bin crossed with a diagonal line, no text or numbers presentBerlin Brands Group UK Limited
PO Box 42
272 Kensington High Street
London, W8 6ND
United Kingdom
Gentile cliente,
text_image
QR code image containing encoded data, no visible human-readable textINDICE
Dati tecnici 85
natural_image
Simple diagram with a circle, star, and curved arrows (no text or symbols)text_image
Exploded view diagram of a mechanical assembly with numbered parts for identificationtext_image
25 mm (MIN.) 45 mmnatural_image
Pure electrical circuit lines without any symbols
natural_image
Technical line drawing of an electronic device casing with internal components (no text or symbols)Fondo10040146
natural_image
Top-down schematic of an electronic device casing with internal components and connectors (no text or symbols)Fondo10040147
natural_image
Simple line drawing of a hand holding a pen above a ruler, with a black X mark on the ruler (no text or symbols)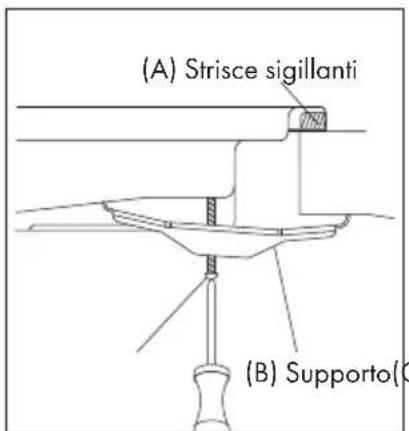
text_image
(A) Strisce sigillanti (B) Supporto(0)C) Vite
natural_image
Symbol of a trash bin crossed with a diagonal line, no text or labels presentPRODUTTORE E IMPORTATORE (UK)
Produttore:
Chal-Tec GmbH, Wallstraße 16, 10179 Berlino, Germania.
Berlin Brands Group UK Limited
PO Box 42
272 Kensington High Street
London, W8 6ND
United Kingdom
Bästa kund,
text_image
QR code image containing encoded data, no visible human-readable textINNEHÅLL
Tekniska data 105
natural_image
Simple diagram with a circle, star, and curved arrows (no text or symbols)natural_image
Six identical diagrams showing circular components with arrows indicating rotation, no text or symbols presenttext_image
25 mm (MIN.) 45 mmnatural_image
Pure electrical circuit lines without any symbols
natural_image
Technical line drawing of an electronic device casing with internal components (no text or symbols)Boden10040146
natural_image
Top-down schematic of an electronic device casing with internal components and connectors (no text or symbols)Boden10040147
natural_image
Simple line drawing of a hand holding a pen above a ruler, with a black X mark on the ruler (no text or symbols)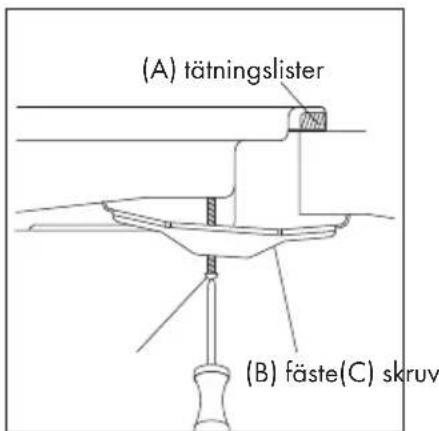
EU-PRODUKTINFORMATIONSBLAD
natural_image
Symbol of a trash bin crossed with a diagonal line, no text or numbers presentBerlin Brands Group UK Limited
PO Box 42
272 Kensington High Street
London, W8 6ND
United Kingdom