PKG15A-SET - Speaker IBIZA SOUND - Free user manual and instructions
Find the device manual for free PKG15A-SET IBIZA SOUND in PDF.

| Brand | IBIZA SOUND |
| Model | PKG15A-SET |
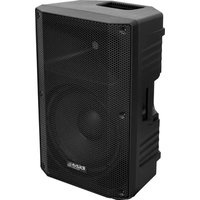
| Product type | 2-way portable active speaker with LED lighting |
| RMS power | 250 W |
| Maximum power | 500 W |
| Woofer | 15" / 38 cm, 40 oz magnet |
| Tweeter | 1" / 25 mm titanium diaphragm, 5.4 oz magnet |
| Impedance | 8 ohms |
| Voice coil | 2" KSV |
| Frequency response | 50 Hz - 18 kHz (-10 dB) |
| Sensitivity | 94 dB (±2 dB) |
| Weight | 16 kg |
| Power supply | 115-230 V~ 50/60 Hz |
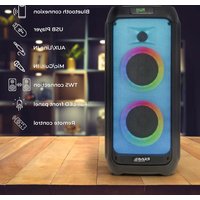
| Functions | MP3 player, Bluetooth, FM tuner, USB, SD, AUX, microphone, guitar |
| Inputs | Microphone (6.35 mm), Guitar, AUX, USB, SD |
| Outputs | Line (L+R) RCA, General RCA, 8 ohm speaker |
| LED lighting | Yes, On/Off switch |
| Remote control | Yes, infrared, CR2032 battery |
| Safety instructions | Indoor use only, do not expose to water, unplug before cleaning |
| Maintenance | Unplug before cleaning, use a dry cloth, do not block ventilation openings |
Frequently Asked Questions - PKG15A-SET IBIZA SOUND
User questions about PKG15A-SET IBIZA SOUND
0 question about this device. Answer the ones you know or ask your own.
Ask a new question about this device
Download the instructions for your Speaker in PDF format for free! Find your manual PKG15A-SET - IBIZA SOUND and take your electronic device back in hand. On this page are published all the documents necessary for the use of your device. PKG15A-SET by IBIZA SOUND.
USER MANUAL PKG15A-SET IBIZA SOUND
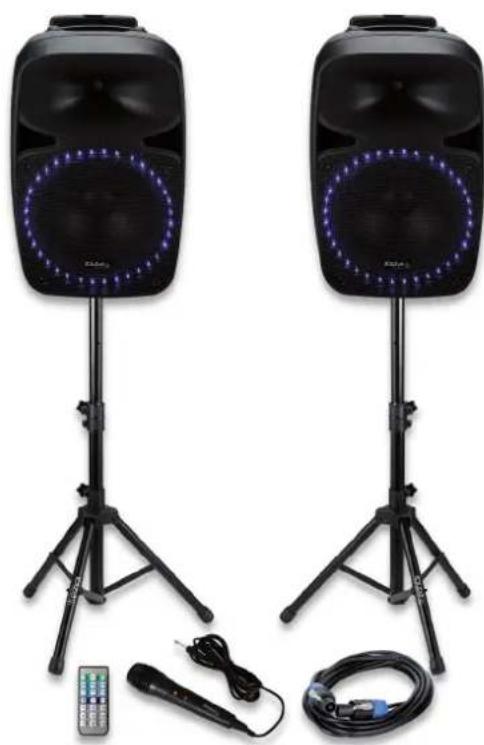
SOUND SET WITH FM TUNER, USB/SD PLAYER + BLUETOOTH
SYSTEME DE SONORISATION AVEC TUNER FM, LECTEUR USB/SD + BLUETOOTH
REF:
PKG12A-SET / PKG15A-SET
12"/30CM - 2 X 400W / 15"/38CM - 2 X 500W
CODE:
15-2425 / 15-2426
natural_image
Two black electronic speakers with LED-lit headsets and tripods, connected to a remote control and cable (no text or symbols visible)MANUAL
SOUND SET WITH FM TUNER, USB/SD PLAYER + BLUETOOTH
INSTRUCTION MANUAL
EXPLANATION OF SIGNS
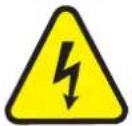
The triangle containing a lightning symbol is used to indicate whenever your health is at risk (due to electrocution, for example).
An exclamation mark in a triangle indicates particular risks in handling or operating the appliance.

CAUTION DO NOT OPEN THE HOUSING SHOCK HAZARD
CE Accordance with the requirements of CE standard
The product is for indoor use only
This marking indicates that this product should not be disposed with other household wastes throughout the EU. To prevent possible harm to the environment or human health from uncontrolled waste disposal, recycle it responsibly to promote the sustainable reuse of material resources. To return your used device, please use the return and collection systems or contact the retailer where the product was purchased. They can take this product for environmental safe recycling.
IMPORTANT SAFETY INSTRUCTIONS AND DANGER WARNINGS
- Please read the manual carefully and keep it for future reference.
- All safety instructions and warnings must be adhered to. They are part of the manual and must be kept with the manual.
- Any guarantee claims are rendered invalid if damage occurs due to non-observance of these operating instructions. We assume no liability for any consequent damage.
• We assume no liability for personal injury or damage to property caused by incorrect handling or non-observance of the safety instructions. Any guarantee claims expire in such cases. - Unauthorized conversions and/or modifications of the appliance are not permitted for safety and licensing reasons (CE).
• The appliance belongs to protection class I and must only be plugged into an earthed mains outlet. - The appliance is approved for operation in dry, closed rooms only 📋. Do not operate the device nearby water, such as in bathrooms or nearby swimming pools.
• The appliance may not be exposed to extreme temperatures ( < +5^ / > +35^ ) in operation.
• The appliance may not be subjected to strong vibrations or heavy mechanical strain.
• The appliance may not be exposed to excessive moisture (due to dripping or sprayed water, for example). - Do not place any recipients filled with liquids, such as glasses or vases, on top of or directly next to the appliance. They could fall over, causing water to enter the appliance. Never pour out liquids above the appliance. Do not place any small objects, such as coins or paper clips, on the appliance since they could fall inside the appliance. You run a high risk of causing a fire or life-threatening electrocution! If any liquid or objects enter the appliance nevertheless, pull the mains plug out of the socket immediately and contact a specialist.
• Always pull the mains plug out of the mains socket:
Before cleaning the appliance
If there is a thunderstorm
If you will not be using the appliance for a long period of time (>1 week)
• Do not leave the appliance unattended while operating it. - Never place the appliance on an unstable or movable surface. Persons could be injured or the appliance
damaged by it falling down.
- When using a rack, make sure it is in a stable position and is transported securely. Installation on uneven, slanted surfaces or stopping the rack abruptly during transport can result in the rack overturning or appliances falling from or out of the rack and injuring people.
• Live components can be exposed by opening covers or removing components (unless this can be done without tools). Contact points can also be live. If the appliance has to be opened in order to calibrate, service, repair or replace components or assemblies, all of its poles must be disconnected from all sources of voltage first. If the appliance has to be kept open and under voltage during maintenance or repairs, this work may only be carried out by a specialist who is familiar with the risks involved and the relevant regulations. - Do not place any naked flames such as those of burning candles on or next to the appliance.
- Do not place the appliance on soft surfaces such as carpets or beds. Do not cover the air vents of the appliance. Do not obstruct the air circulation with objects such as magazines, table cloths or curtains. This prevents the dissipation of heat from the appliance and can result in overheating.
- Only use the appliance in a moderate climate, not in tropical environments.
- All persons involved in operating, installing and servicing the appliance and putting it into service must be trained and qualified accordingly and observe these operating instructions.
• Defective mains cables may only be replaced by specialists. Danger of shock hazard!
DISCONNECTION FROM THE MAINS
- Where the MAINS plug or an appliance couples is used as the disconnect device, the disconnect device shall remain readily accessible.
- If a switch is used to disconnect the device, the switch and its function must be clearly identified and remain easily accessible.
FEATURES
- 2-Way 12" or 15" portable Disco speakers with LED illumination
- MP3 player
- LCD display
- SD card slot
- USB connection
• FM radio/Bluetooth
• Equalizer (Bass & treble level control)
• High efficiency woofer
• 1" titanium driver
• Supports 16Gb USB/SD drives
INSTALLATION
Plug one end of the supplied SPEAKON lead into the SPEAKER OUT socket of the active box and the other end to the SPEAKER IN socket of the passive box.
STAND MOUNTING
Observe the following precautions:
- The stand must be placed on a flat, level, and stable surface.
- Route cables so that performers, crew, and audience will not trip over them and pull the speaker over.
- Remove the speaker from the stand before moving the stand or adjusting its height.
• Before moving the box, remove all connected cables. - Do not use the speaker's handles for suspended installation. Doing so can result in damage and injury.
- Be sure to fully extend the legs of tripod type stands.
- Position the stand so that the legs do not present a trip hazard.
- Do not attempt to place more than one speaker on a stand.
OPERATION
- Prior to switching the unit on, turn the volume down to minimum.
-
Connect your audio source to the appropriate input socket.
-
Connect the unit to the mains supply.
- Switch on the audio source first, followed by the active speaker.
- Set the volume with the applicable control.
- Adjust the bass & treble.
CONTROLS AND CONNECTIONS
- LCD screen
- MP3 controls
• MODE: USB/SD/BT/FM selector
- Play/Pause
• SCAN: Keep pressed to start an automatic search for radio stations in FM mode
FOL: Hold down for 3 seconds to enter the folder option function mode (press the ◀/▶ song button to choose the folder)
• Repeat one / Repeat all / Random
•: Previous song. Hold down for fast rewind.
▶: Next song. Hold down for fast forward.
In FM mode: Short press to tune to the next or previous station
Keep pressed to search lower/higher stations manually
- USB input
- SD card input
- IR remote control receiver
- MIC level control
- Echo control
- Treble control for high frequencies
- Bass control for low frequencies
- Master Volume control
- MP3 level control
- Guitar level control
- 6.35mm microphone input
- Guitar line input
- AUX input
- RCA (R+L) line outputs
- RCA mix output
- Speaker output 8 ohms
- LED light switch (ON/OFF)
- Main power switch
- Fused IEC mains inlet
REMOTE CONTROL
Please operate the remote control within a distance of 6m and 30° between the remote and the appliance. Aim the remote at the sensor. Remove all obstacles between the remote and the sensor.
The remote control might not work properly if the sensor is exposed to strong sunshine.
If the remote control doesn't work properly, please check the batteries.
INSTALLING THE BATTERIES IN THE REMOTE CONTROL
- Place the remote face down on a flat surface.
- Push the compartment cover into the direction of the arrow.
- Slide the battery compartment open.
- Remove the old battery and install the new one (CR2032) with the plus (+) symbol facing up.
• Gently slide the battery compartment closed. It locks automatically.
RECOMMENDATIONS FOR BATTERIES

This symbol indicates that used batteries should not be disposed of with household waste but deposed correctly in accordance with your local regulations..
Batteries shall not be exposed to excessive heat such as sunshine, fire or the like.
When the internal batteries are not to be used, remove them to avoid damage caused by battery leakage or corrosion.
ATTENTION: Danger of explosion if battery is incorrectly placed. Only replace by the same or equivalent type.
WARNING :Do not swallow the battery. Danger of chemical burns.Keep new and old batteries out of the reach of children.
If the battery compartment doesn't close properly, stop using the product and keep it out of the reach of children.
If you are in doubt whether the batteries have been swallowed or introduced into any other part of the body, contact immediately a doctor.

buttons: Press to browse downwards or upwards through the folders
MODE: Press to cycle through the various input sources: BT/USB/SD/FM
Previous song in USB/SD/BT mode. Keep pressed for fast rewind
In FM mode: Short press to tune to the previous station. Keep pressed to search lower stations manually.
▶ Next song in USB/SD/BT mode. Keep pressed for fast forward
In FM mode: Short press to tune to the next station. Keep pressed to search higher stations manually.
▶ II Play/Pause
VOL- / VOL +: Press to lower/increase the volume
EQ: Press to cycle through the preset music styles
-- button: If you want to select a song on your USB or SD drive whose number has 2 digits, press this button first and then press the digits of the song number. E.g. to select song no. 37, press "--" + "3" + "7"
--- button: If you want to select a song on your USB or SD drive whose number has 3 digits, press this button first and then press the digits of the song number. E.g. to select song no. 237, press "---" + "2" + "3" + "7"
Number buttons: Select directly a song by putting in its number
CONNECTION OF THE MICROPHONE
Connect the microphone to the MIC IN socket and switch it on.
Note: If you are playing music from any other input, connecting the microphone will not mute the sound output.
USB/SD OPERATION
- Insert a USB stick or an SD card
- Select "USB" or "SD" mode by pressing the MODE button until USB or SD is displayed
- Select song via the remote control or the previous song/next song buttons on the MP3 control panel
BLUETOOTH
- Select "BT" mode by pressing the MODE button on the MP3 control panel or on the remote control
• Activate the Bluetooth function on your mobile phone - Select "BLUETOOTH" among the found devices
- If a password is required, type "0000"
- Select the song and play by using the controls on your mobile phone
FM TUNER OPERATION
- Select FM mode via the MODE button on the remote control or the MP3 control panel
- Press the SCAN button for 3 seconds and the unit will start searching through all available channels and stop when it finds a station.
- Select the channel via the PREVIOUS or NEXT button on the MP3 control panel or via the remote control
FUSE REPLACEMENT
Disconnect the power cord before replacing a fuse. Always replace with the same type of fuse.
SPECIFICATIONS
| Model PKG12A-SET PKG15A-SET | ||
| Woofer 12" / 30cm 15" / 38cm | ||
| RMS/max. power 200/400W 250/500W | ||
| Magnet 30oz 40oz | ||
| Tweeter 1"/25 mm Titanium diaphragm driver | ||
| Magnet 5.4oz | ||
| Impedance 8 ohm | ||
| Voice Coil 1.5" KSV 2" KSV | ||
| Frequency response | 65Hz-18kHz (-10dB) | 50Hz-18KHz (-10dB) |
| Sensitivity | 92dB (+/-2dB) | 94dB (+/-2dB) |
| BT frequency band 2402-2480MHz | ||
| Max. RF emission | 1.92dBm | |
| Voltage | 115-230V~ 50/60Hz | |
| Weight | 11.5kg | 16kg |
SYSTEME DE SONORISATION AVEC TUNER FM, LECTEUR USB/SD + BLUETOOTH
MANUEL D'UTILISATION
EXPLICATION DES SYMBOLES

ATTENTION NE PAS OUVRIR LE BOITIER RISQUE DE CHOC ELECTRIQUE
REPLACEMENT DU FUSIBLE
CONTROLS AND CONNECTIONS
- LCD display
- MP3 controles
MODE: USB/SD/BT/FM keuze schakelaar
Play/pauze
- Display LCD
- Controles MP3:
• MODO: Selector USB/SD/BT/FM
- Ecran LCD
- Control Mp3:
VAŽNE UPUTE O SIGURNOSTI I OPASNOSTI UPOZORENJA
- Molimo pažljivo pročitajte priručnik i sačuvajte ga za buduću upotrebu.
- Moraju se poštivati sve sigurnosne upute i upozorenja. Oni su dio priručnika i moraju se čuvati uz priručnik.
Svi jamstveni zahtjevi postaju nevaljani ako nastane šteta zbog nepoštivanja ovih operativnih uputa. Ne preuzimamo odgovornost za bilo kakvu posljedičnu štetu. - Ne preuzimamo odgovornost za osobne ozljede ili materijalnu štetu nastalu nepravilnim rukovanjem ili nepridržavanjem sigurnosnih uputa. Bilo koji zahtjev za jamstvom istječe u takvim slučajevima.
- Neovlaštene preinake i / ili preinake uređaja nisu dopuštene iz sigurnosnih razloga i razloga licenciranja (CE).

PKG12A-SET PKG15A-SET

Imported from China by LOTRONIC S.A.
Avenue Zénobe Gramme 9
B-1480 Saintes


www.ibiza-light.com
© Copyright LOTRONIC 2019