
IK2002 - Ice machine Eldom - Free user manual and instructions
Find the device manual for free IK2002 Eldom in PDF.

| Product type | Ice machine |
| Brand | Eldom |
| Model | IK2002 |
| Production capacity | 9 ice cubes per cycle |
| Water tank | With MIN and MAX markings |
| Ice basket | With infrared full level sensor |
| Ice cube size selection | Yes (small/large) |
| Indicator lights | Size, fill, operation, water shortage |
| Self-cleaning program | Yes, 30-minute cycle |
| Drainage system | Silicone plug |
| Refrigerant | R600a |
| Safety | Automatic shutdown if basket full or water shortage |
| Maximum ambient temperature | 32 °C |
| Waiting time before restart | 3 minutes |
| Recommended water | Cold non-carbonated drinking water, preferably spring water |
| Cleaning | Water and vinegar solution; basket and scoop washable with mild detergent |
| Removable parts | Ice basket, scoop |
Frequently Asked Questions - IK2002 Eldom
User questions about IK2002 Eldom
0 question about this device. Answer the ones you know or ask your own.
Ask a new question about this device
Download the instructions for your Ice machine in PDF format for free! Find your manual IK2002 - Eldom and take your electronic device back in hand. On this page are published all the documents necessary for the use of your device. IK2002 by Eldom.
USER MANUAL IK2002 Eldom
natural_image
Line drawing of a rectangular appliance with a lid and ventilation grille (no text or symbols)
/EN/ The disposal of used electrical and electronic equipment (applies to European Union countries and other European countries with separate waste-collection systems).
This symbol on the product or its packaging indicates that it should not be classified as household waste. It should be handed over to an appropriate company dealing with the collection and recycling of electrical and electronic equipment. The correct disposal of the product will prevent potential negative consequences for the environment and human health resulting from hazardous substances present in the product. Electrical devices must be handed over to restrict their re-use and further treatment. If the device contains batteries, remove them, and hand them over to a storage point separately. DO NOT THROW EQUIPMENT INTO THE MUNICIPAL WASTE BIN. Material recycling helps to preserve natural resources. For detailed information on how to recycle this product, please contact your local authority, the recycling company, or the shop where you bought it.
I
IV
V
WSKAZÓWKI BEZPIECZEŃSTWA
UWAGA: RYZYKO POŻARU
- Before installation and operation, please read the operating instructions and warnings on the unit carefully. This manual contains the correct principles for the installation and operation of the appliance, failure to observe which can void the warranty.
- This device is intended for home use only, as described in this manual. Do not use the device for purposes other than those specified in these operating instructions. If the appliance is not used for its intended purpose, the warranty can be void.
- The device should not be operated by persons who are not familiar with it, and who haven't made themselves familiar with the operating instructions. In particular, this applies to children.
- This appliance may be used by children of at least 8 years of age, and by persons with reduced physical and mental abilities, and persons with no experience or knowledge of the equipment, if supervised or instructed on its safe use so that the risks associated with it are understandable. Children should not play with the appliance. Unattended children should not be allowed to carry out cleaning and maintenance on the appliance.
- The installation of the appliance does not require special knowledge, and can be carried out by the user alone, in accordance with the guidelines and diagrams in these operating instructions. Improper installation can result in water leakage, electric shock, and irreparable damage to the unit. Eldom Sp. z o.o. shall not be
liable for any potential losses due to improper use of the appliance.
- The unit must be installed in accordance with the national regulations for electrical installations. Before connecting to the mains, make sure that the mains current (voltage) parameters correspond to those specified on the device. The mains plug of the device should be fully plugged into the mains socket. Do not use extension cords or splitters to connect the mains cable of the device. Please remove the plug from the mains socket if the device is not used for an extended period of time. If the unit has not been used for a long time, check that the air inlets and outlets are not blocked before restarting the unit.
- Keep the device at least 50 cm away from flammable materials (e.g. alcohol, etc.), and pressurised containers (e.g. aerosols).
- The mains cable and the mains plug of the appliance are used for the eventual disconnection of the appliance from the mains power supply, and must therefore be easily accessible at all times.
- Switch off the appliance and disconnect it from the mains power supply during a storm. If the operation of the appliance is affected by lightning or electromagnetic radiation, turn off the unit and disconnect it from the mains power supply. The device may be switched on after a few minutes.
- Do not put hands or any objects into the air outlets while the unit is in operation.
-
Before cleaning, repair, maintenance, or inspection, turn off the appliance and disconnect it from the mains power supply.
-
Clean the device with a soft, dry cloth. If the housing of the unit is badly soiled, you can use a cloth soaked in a household cleaner. Do not wipe or clean the appliance with chemical solvents such as gasoline and alcohol
- Place and use the unit away from any splashes of water or oil.
- If, during the operation of the device, the user notices any irregularities, such as a strange smell or sound, smoke, steam, fire, heating of the casing or mains plug, fuse failure, or malfunction of other devices, turn off the device immediately, disconnect it from the mains power supply, and contact an authorised service centre immediately.
- Do not use if the power cord is damaged, or if the unit has been dropped or otherwise damaged. The repair of the device should be entrusted to an authorised service centre; information on which can be found on the warranty card and on the website www.eldom.eu.
- All modernisations or use of spare parts or appliance elements other than the original ones are prohibited, and they can cause hazard to the safety of use.
- Under the risk of voiding the warranty, the user may not carry out on their own any repairs, modifications, or disassembly of the device's casing.
- There are no user-serviceable parts inside the unit.
- All modernizations or use of spare parts or appliance elements other than the original ones are prohibited and they cause hazard to the safety of use.
- Clean the device with a dry and soft cloth. If the appliance casing is heavily soiled, use a cloth soaked in a household cleaner.
NOTE


Appliance is filled with flammable gas R600a
Before using the appliance, read the mannual.
Before installing the appliance, read the installation manual.
Any repairs you need, contact the nearest authorized Service Centre and strictly follow manufacturer's instruction only.

Caution, risk of fire
Information on equipment with R600a gas coolant
- Please read all warnings carefully.
- Do not use tools other than those recommended by the manufacturer during defrosting and cleaning.
- The device shall be kept clear of fixed sources of ignition (e.g. open flames, operating gas, or electrical appliances).
- Do not allow puncturing to the housing, do not burn the device.
• Gases used as a coolant can be odourless.
- The unit must be installed, used, and stored in a room larger than 4 m ^2 .
• R600a is a gaseous coolant which meets EU environmental directives.
- Do not allow puncturing to any part of the cooling circuit.
- If the appliance is installed, used, or stored, in a room without ventilation, measures shall be taken to prevent the accumulation of leaked coolant and the risk of fire or explosion due to the ignition of the coolant caused by an electric heater, stove, or other source of ignition.
- Store the device in a way which prevents mechanical damage.
- The persons operating or modifying the cooling circuit must have the appropriate authority from an accredited organisation to ensure the professional handling of the coolant, which must be confirmed by reputable industry organisations.
- All repairs must be carried out in accordance with the manufacturer's instructions. Maintenance and repairs requiring the employment of experts in other fields should be carried out under the supervision of a person authorised to use flammable coolants
OVERVIEW
- Control panel
- Lid
- Nozzles
- Sensor
- Water tank
- Ice container
- Housing
- Ventilation openings
- Drain plug
- Ice shovel
TECHNICAL DATA
Power supply: 220-240 V \~ 50 Hz
Power: 100 W
Capacity: 12 kg of ice/24 h;
9 cubes/6-10 min.
Water tank: 1.3 l
Ice container: 700 g
Refrigerant type: R600a/16 g
Climatic class: SN/N/ST
Control panel
A Ice size indicator
B Ice full indicator
C Operation indicator
D Water shortage indicator
E On/Off button
F Ice size selection buton
INTENDED USE
The appliance is designed for making ice cubes from drinking water. The unit is capable of making 9 ice cubes at a time.
CAUTION! The appliance inclination angle during transport should not exceed 45^ . Do not rotate the ice machine upside down. This can lead to damage to the compressor and the sealed system.
● APPLIANCE PREPARATION
CAUTION! Before first use, it is recommended to wait 2 hours after positioning the ice machine. It is also advisable to leave the front lid open for at least 2 hours.
- Before commencing operation of the appliance, make sure that the appliance, plug and power cord are operational and that all the packaging parts have been removed.
- All the parts that will have contact with food must be cleaned thoroughly before the first use. (see section: Cleaning and Maintenance).
- The appliance must be placed vertically on a flat surface in a dry and spacious area. Leave at least 15 cm of free space around the applianceto ensure proper ventilation.
CAUTION! Do not install the ice machine near an oven, heater or other heat sources.
- Before connecting the appliance to the mains supply, check that the mains current parameters (voltage) comply with the parameters indicated on the appliance.
- If the appliance has not been used for a long time, before restarting it, check that the air inlets and outlets are not clogged.
CAUTION! Only COLD DRINKING WATER without additives may be used in the ice machine; spring water is recommended. For hygienic reasons, replace the water in the tank every 24 hours. To avoid fungi and bacteria growth, leave the appliance's lid open after use.
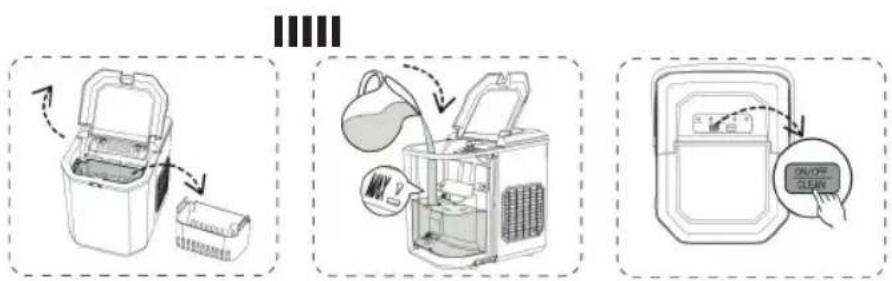
USE
- Ensure that the appliance is disconnected from the power supply.
- Open the lid (2) and remove the ice container (6) – Fig. 2.
- Fill the water tank (5) with water. Ensure that the water level is between the "MIN" and "MAX" indicators – Fig. 3.
- Replace the ice container (6) in its position.
CAUTION! The water must not come into contact with the ice container (6).
- Connect the appliance to a power supply in accordance with the parameters specified in the manual – the "C" indicator on the control panel (1) will flash.
- To turn on the appliance, press the "E" button on the control panel (1) – Fig. 4. The "C" indicator on the control panel will light up steadily.
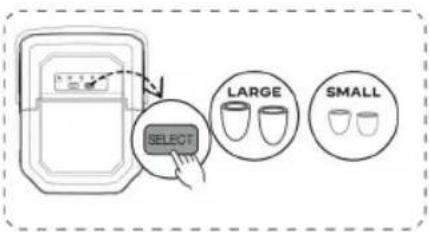
- Use the "F" button to select the size of the ice cubes – one of the "A" indicators will light up – Fig. 5.
- The appliance will start operating.
- To turn off the appliance, press the "E" button again.
CAUTION! If there is enough water in the tank (5) and during two cycles the appliance will not pump it to the ice-making container (6) (the appliance will not start making ice), move the appliance slightly forward. Then place a container underneath it, next remove the silicone plug (9) at the bottom of the container (5) and allow some of the water to drain.
CAUTION! For the first three cycles, ice cubes can be small and irregular.
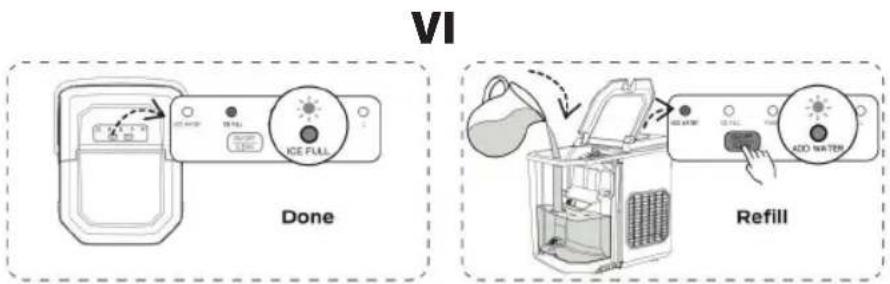
No water
- When the indicator lamp "D" lights up and an audible signal can be heard simultaneously, this means that the water level is too low for a full ice-making cycle.
- In this case, remove and empty the tank (6), then add water, put the container (6) back and press button "E" to restart the appliance.
Emptying the ice container
- The appliance has a sensor (4) that indicates the ice container (6) is full.
- When indicator "B" lights up, and an audible signal can be heard simultaneously, this
means that the ice storage container (6) is full.
- In this case, remove and empty the container (6), then put the container (6) back and press button "E" to restart the unit.
Caution! When the ice container (6) is full, immediately remove the ice. Do not overfill the ice container. (6).
TIPS
- If the appliance will be used after a long time, the water pump may not pump a sufficient amount of water due to an air lock. In this case, the “no water” indicator “” is activated. To fix the problem, press button “D” again, and then the ice machine will come back to regular operation.
- Always use fresh water before ice-making after installation or after a long period of downtime.
- If the compressor stops for any reason, such as a shortage of water, too much ice, power failure, etc., do not start the unit immediately, but wait 3 minutes and then restart it.
- In the event of a power failure due to the power cord being disconnected or the poweroff button being pressed during the ice-making cycle, small pieces of ice may form and settle in the automatic scoop attached to the container (8), causing a jam. In this case, disconnect the unit from the mains supply and remove the ice cubes by gently pushing the scoop backwards. Then connect the ice machine to the mains supply and restart.
• CLEANING AND MAINTENANCE
- Before cleaning, turn off the appliance and disconnect it from the power supply.
- Remove and empty the ice basket (6).
- Empty the water reservoir (5) – to do this, slightly pull the appliance forward, place a container underneath, remove the silicone plug (9) located at the bottom of the reservoir (5), and allow the water to drain out.
- Clean the internal walls of the appliance, the nozzles (3), the ice basket (6), and the scoop (10) after each use.
- Use a diluted solution of water and vinegar to clean the internal components and the external housing. Rinse thoroughly with water before using again.
- The ice basket (6) and scoop (10) can be washed with a mild detergent and rinsed thoroughly.
- DO NOT use any chemicals such as acids, gasoline, or oil for cleaning.
- During each cleaning, check that the ventilation openings (8) on the appliance housing (7) are not blocked.
- Do not use mechanical devices or other means to accelerate the defrosting process.
SELF-CLEANING PROGRAM
- Connect the appliance to a power source.
- Remove the ice basket (6).
- Fill the water reservoir up to the "MAX" level.
-
Press and hold the power button "E" for at least 3 seconds to start the self-cleaning program.
-
The cleaning cycle lasts 30 minutes; during this cycle, the indicators "B" and "D" will flash alternately.
- After the cleaning cycle is complete, empty the water from the internal reservoir using the drain located at the bottom of the appliance.
CAUTION: DO NOT USE ANY DESCALING AGENTS – THIS MAY DAMAGE THE DEVICE.
TROUBLESHOOTING
| Problem Possible Causes Solution | ||
| Unsatisfactory ice shape or quality 1. | Ice is blocking the infrared sensor.2. Infrared sensors are malfunctioning. | Empty the ice basket.Clean the infrared sensors or press and hold the SELECT button for 5 seconds to force the ice-making cycle approximately 10 times. Contact customer service if the infrared sensors still do not work. |
| Ice cubes clumping together 1. The ice-making process is taking too long.The water temperature is too low.Evaporator deformation. | 1. Stop the ice-making process, wait for the ice to melt, restart the appliance, and try again.Fill the appliance with water at a temperature between 8^ and 25^ .3. Contact customer service. | |
| The appliance is not making ice 1. The ambient or water temperature is too high.Internal system damage. | 1. Keep the ambient temperature below 32^ and fill the appliance with cold water.Contact customer service. |
SICHERHEITSHINWEISE
ATTENTION : RISQUE D'INCENDIE
ATTENTION : RISQUE D'INCENDIE