MILLA M300 - Mincer Eldom - Free user manual and instructions
Find the device manual for free MILLA M300 Eldom in PDF.

User questions about MILLA M300 Eldom
0 question about this device. Answer the ones you know or ask your own.
Ask a new question about this device
Download the instructions for your Mincer in PDF format for free! Find your manual MILLA M300 - Eldom and take your electronic device back in hand. On this page are published all the documents necessary for the use of your device. MILLA M300 by Eldom.
USER MANUAL MILLA M300 Eldom
natural_image
White electrician meat market maker with stainless steel handle and control buttons (no visible text or symbols)/EN/ The disposal of used electrical and electronic equipment (applies to European Union countries and other European countries with separate waste-collection systems).
This symbol on the product or its packaging indicates that it should not be classified as household waste. It should be handed over to an appropriate company dealing with the collection and recycling of electrical and electronic equipment. The correct disposal of the product will prevent potential negative consequences for the environment and human health resulting from hazardous substances present in the product. Electrical devices must be handed over to restrict their re-use and further treatment. If the device contains batteries, remove them, and hand them over to a storage point separately. DO NOT THROW EQUIPMENT INTO THE MUNICIPAL WASTE BIN. Material recycling helps to preserve natural resources. For detailed information on how to recycle this product, please contact your local authority, the recycling company, or the shop where you bought it.
natural_image
Technical line drawings of four different mechanical components or parts, including a cylindrical bin and a flanged housing (no text or symbols present)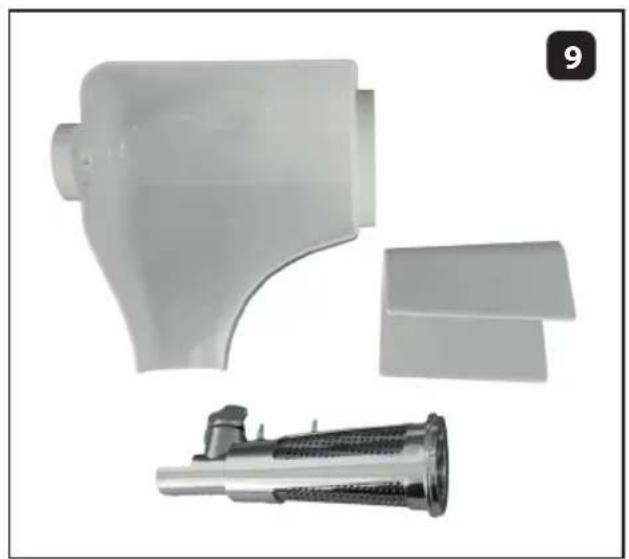
natural_image
Product photo of a white plastic mechanical component with a metallic threaded end and two separate views (no text or symbols visible)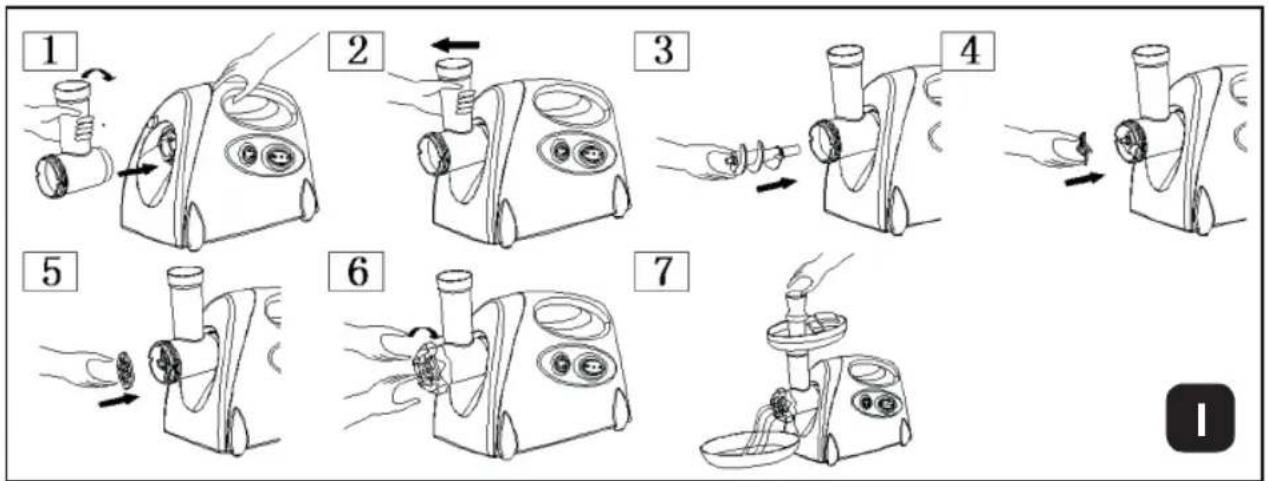
flowchart
graph TD
    A["1: Raw Material Input"] --> B["2: Bagasse"]
    B --> C["3: Bagasse"]
    C --> D["4: Washer"]
    D --> E["5: Bagasse with Paper"]
    E --> F["6: Washer with Paper"]
    F --> G["7: Washer with Paper"]
text_image
1 2 II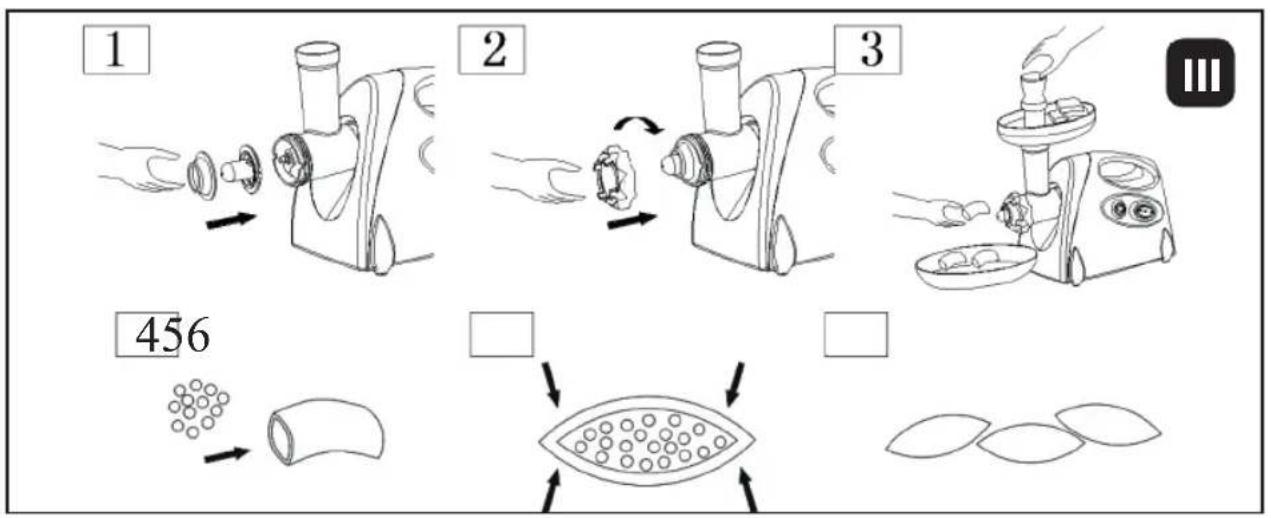
flowchart
graph TD
    A["1: Hand mixing bowl"] --> B["2: Stabilization with plastic bag"]
    B --> C["3: Process with steaming machine"]
    C --> D["456: Packaging with porous material"]
    D --> E["Final packaging with granular texture"]
text_image
1 2 3 IV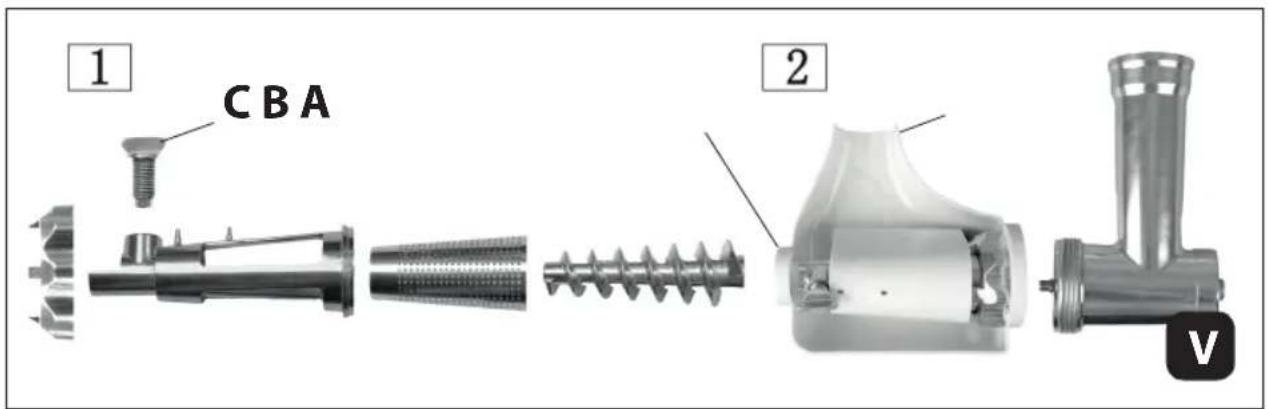
text_image
1 CBA 2 VWSKAZÓWKI BEZPIECZEŃSTWA
Before first use, please thoroughly read the entire manual.
It is recommended to keep this instructions manual for future reference.
- The power cord must be connected to a socket with specifications that match those provided in the manual.
- Do not immerse the cord or the device in water.
- The device is not intended to be operated with an external timer or separate remote-control system.
- Do not use outdoors.
- Before turning on the device, ensure all its components are properly assembled. Do not operate the device without the end cover installed.
- Do not use the device to crush ice, bones, or other hard products, or to grind nuts, coffee, or dried legumes.
- Do not leave the device unattended while in use.
- Turn off the device before disconnecting it from the power supply and before assembling or disassembling accessories.
- Always disconnect the device from the power supply after use.
- This equipment may be used by children aged 8 years and above and by persons with reduced physical, sensory, or mental capabilities, or lack of experience and knowledge, provided they are supervised or instructed on the safe use of the equipment and understand the associated risks. Children should not play with the
equipment. Cleaning and user maintenance should not be carried out by children without supervision.
-
Do not touch the device with wet hands.
-
Disconnect the device from the power supply before cleaning.
-
Do not use the device if any part is damaged.
-
Do not exceed the recommended continuous operating time of the device.
-
Do not carry or move the device while it is in operation.
-
Do not insert fingers or tools into the feeding tube while the device is in operation—use the pusher provided.
-
Do not use the device if the power cord is damaged, if the device has been dropped, or if it has been otherwise damaged. Repairs should be carried out by an authorized service center; refer to the warranty card and www.eldom.eu for more information. Any modifications or use of non-original spare parts or accessories are prohibited and may compromise safety.
-
The device should only be used with the originally supplied accessories.
-
Eldom Sp. z o. o. is not liable for any damage resulting from improper use of the device.
WARNING: Improper use of the appliance may cause injury.
WARNING: Plastic bag can be dangerous, to avoid danger of suffocation keep this bag away from babies and children.

Only intended for household use.
EN
MEAT GRINDER 5-in-1 M300
DESCRIPTION
-
Pusher
-
Grinding chamber
-
Auger
-
Screens or grinder plates
-
Locking ring or nut
-
Blade
-
Sausage attachment
-
Slicing set or shredding set
-
Juicing set
-
Kebbe attachment
-
Lock button
-
Grinding chamber socket
-
Safety button
-
Power switch
-
Body or housing
-
Feeding tube
-
Tray
TECHNICAL DATA
• power: 300 W
• MBP: 800 W
• mains voltage: 220-240 V\~ 50-60 Hz
• maximum time of continuous operation: 30 min.
• break before continuation of operation: 15 min.
INTENDED USE
The M300 Grinder is a versatile kitchen appliance that allows you to grind meat, slice vegetables, extract juices, prepare homemade sausages, and shape kebbe. With its various attachments, it is the perfect solution for those who value fresh, homemade meals and multifunctionality in the kitchen.
HOW TO USE
Before the first use:
- Read thoroughly this guidebook.
• Make sure that all elements are free of damages. - Wash the elements that come into contact with food.
OPERATION
- Place the body (15) on a flat, hard, and stable surface.
- Ensure that the appliance is unplugged from the mains and the power switch (14) is set to the "0" position.
- Select one of the device's functions.
• Before starting, make sure all parts are correctly assembled. - Set the switch (13) to the "ON" position, then set the power switch (14) to the "ON" position.
WARNING: The device WILL NOT TURN ON unless both switches (13 and 14) are in the POSITION—either "ON" or "R".
WARNING: Never insert fingers or any objects into the feeding tube (16).
• If the auger (3) gets jammed, set both switches (13 and 14) to the "R" position for 3 to 5 seconds.
• After processing all the products, turn off the appliance and wait until it stops completely.
• After finishing, unplug the appliance from the mains.
GRINDING (Fig. 1)
- Place the following in the grinding chamber (2) in order: the auger (3), the blade (6), one of the screens (4), and screw on the locking ring (5).
- Then, mount the entire assembly into the body (15). Check if the chamber (2) is locked.
- Place the tray (17) on the feeding tube (16).
- Insert the pusher (1) into the feeding tube (16).
- Place a bowl under the outlet of the grinding chamber (2).
- Cut the meat into strips approximately 10 cm long and 2 cm thick. Remove bones, cartilage, and tendons.
- Connect the appliance to a power supply that matches the specifications provided above and start it using the switches (13 and 14) – "ON" position.
- Place the meat on the tray (17) and gently push it into the feeding tube (16) using the pusher (1).
- For certain dishes, the meat needs to be ground twice.
WARNING: DO NOT GRIND FROZEN MEAT!
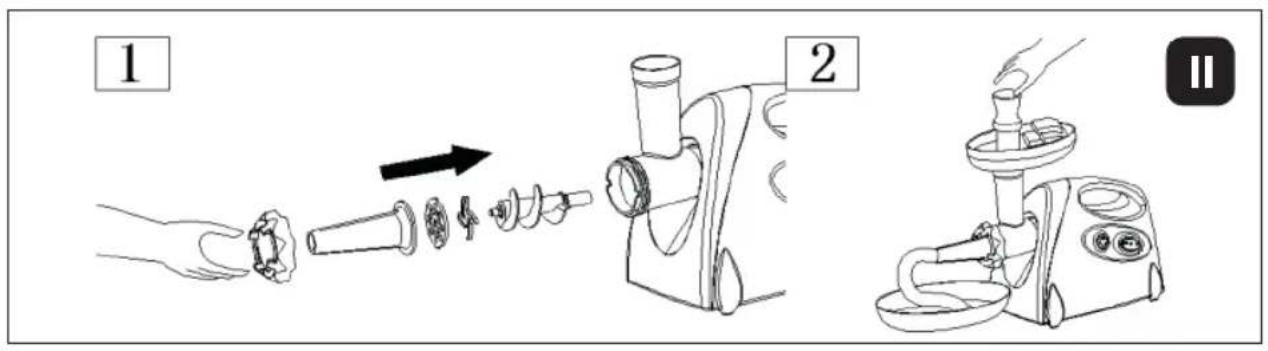
THE BUTCHER'S SET (FOR SAUSAGES) (Fig. 2)
- Place the following in the grinding chamber (2) in order: the auger (3), the blade (6), one of the screens (4), and the sausage attachment (7), then screw on the locking ring (5).
- Then, mount the entire assembly into the body (15).
-
Check if the chamber (2) is locked.
-
Place the tray (17) on the feeding tube (16).
- Insert the pusher (1) into the feeding tube (16).
• Soak the sausage casing in lukewarm water (approx. 10 min.). - Place the filling mixture on the tray (17) and gently push it into the feeding tube (16) using the pusher (1).
- Pull the damp casing over the sausage attachment (7).
- Connect the appliance to a power supply that matches the specifications provided above and start it using the switches (13 and 14) – "ON" position.
• Fill the sausage casing, forming segments as desired.
WARNING: The filling mixture should not be too runny.
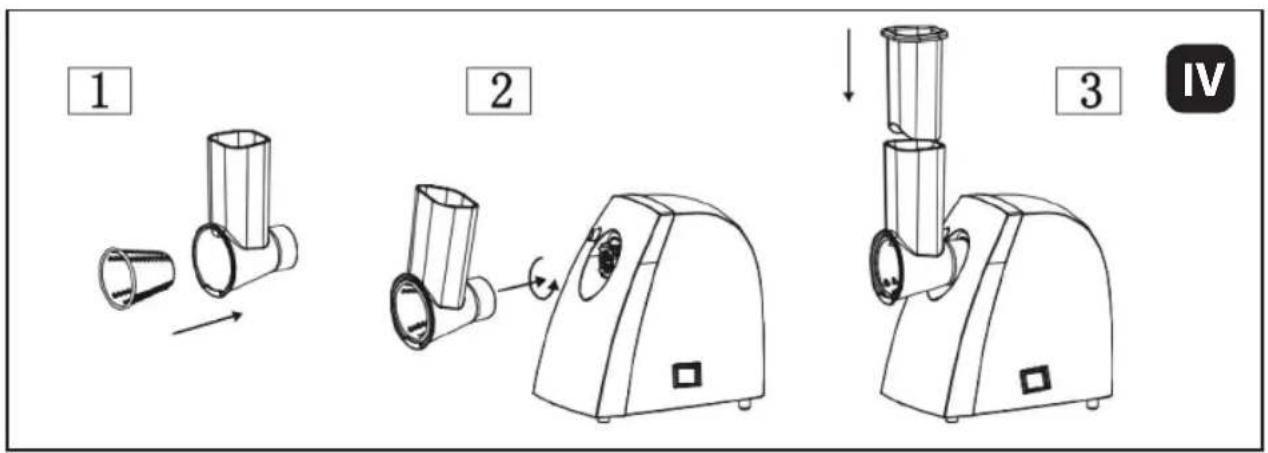
KEBBE SET (Fig. 3)
Kebbe is a traditional Middle Eastern dish, made primarily from lamb and bulgur wheat.
- Place the following in the grinding chamber (2) in order: the auger (3) and the kebbe attachment components (10), then screw on the locking ring (5).
- Then, mount the entire assembly into the body (15).
- Check if the chamber (2) is locked.
- Place the tray (17) on the feeding tube (16).
- Insert the pusher (1) into the feeding tube (16).
- Place the kebbe mixture on the tray (17) and gently push it into the feeding tube (16) using the pusher (1).
- Connect the appliance to a power supply that matches the specifications provided above and start it using the switches (13 and 14) – "ON" position.
- Shape the kebbe as desired.
SLICER (Fig. 4)
• Install one of the discs (C) in the slicer.
- Mount the entire assembly into the body (15).
- Check if the slicer (B) is locked. Insert the pusher (A) into the feeding tube.
- Place a bowl under the outlet of the slicer (B).
- Connect the appliance to a power supply that matches the specifications provided above and start it using the switches (13 and 14) – "ON" position.
- Feed the prepared ingredients into the feeding tube in batches and use the pusher (A) to guide them down to the rotating disc (C).
JUICER (Fig. 5)
cer is designed for extracting juice from s
oft vegetables (e.g., tomatoes) and soft fruits (e.g., apples).
WARNING: The juice from the juicer will not be clear.
• Install the juicing set (9) and connect it to the grinding chamber (2).
- Mount the entire assembly into the body (15).
- Check if the chamber (5) is locked.
- Place the tray (17) on the feeding tube (16).
- Insert the pusher (1) into the feeding tube (16).
• Place containers under the juice outlet (A) and pulp outlet (B).
• Cut the products into pieces that fit the size of the feeding tube opening (16).
- Place the prepared products on the tray (17) and gently push them into the feeding tube (16) using the pusher (1).
- Connect the appliance to a power supply that matches the specifications provided above and start it using the switches (13 and 14) – "ON" position.
- The amount of juice produced and its consistency can be adjusted using the screw (C).
CLEANING AND MAINTENANCE
Disconnect the power supply when the unit is not in use or before cleaning it. Clean the device right after its use. Before cleaning, dismantle the parts of the appliance. Wash them in warm water with washing liquid, use a brush, rinse under running water and wipe dry. Put a thin layer of edible oil on the grinding plates and the knife to protect them against rust. Do not use abrasive agents, cleaning powders, acetone, alcohol, etc., for cleaning. Do not immerse the body in water and do not rinse it under running water. Clean the body of the appliance with a damp cloth. The device cannot be immersed in water or washed in a dishwasher.
The knife is an utility tool and should be replaced regularly.
The knife is not covered by guarantee.
WARRANTY
• this appliance is designed for domestic use only.
- it cannot be used for professional purposes or for other than the intended use.
- improper use will nullify the guarantee.
_
| _
一
1

text_image
eldomKARTA GWARANCYJNA
WAŻNA Z DOWODEM ZAKUPU
MASZYNKA DO MIĘSA M300