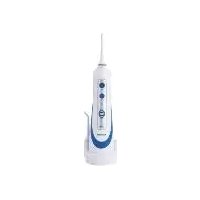
NMD 3.7 B2 - Oral irrigator NEVADENT - Free user manual and instructions
Find the device manual for free NMD 3.7 B2 NEVADENT in PDF.

| Product type | Oral irrigator (water flosser) |
| Brand | Nevadent |
| Model | NMD 3.7 B2 |
| Power supply | 100-240 V ~ 50/60 Hz, Li-ion battery 3.7 V 800 mAh (2.96 Wh) |
| Power | 1.4 W |
| Charging time (first charge) | 14 to 16 hours |
| Protection rating (base station) | IPX7 (protected against temporary immersion) |
| Protection rating (handle) | IPX4 (protected against water splashes) |
| Reservoir capacity | Not specified (estimated ~150 ml) |
| Number of nozzle tips included | 2 (with color indicator rings) |
| Jet intensity settings | 3: soft (soft), normal (normal), strong (jet) |
| Functions | Interdental cleaning, gum massage |
| Use | Household only, for humans |
| Recommended water temperature | Cold or warm, max 40 °C |
| Care and cleaning | Rinse tips after each use; clean reservoir periodically; wipe station with a damp cloth |
| Safety | Do not immerse station; disconnect before cleaning; do not use if damaged |
| Spare parts and accessories | Nozzle tips available at shop.hoyerhandel.com (replacement recommended every 12 months) |
| Warranty | 3 years (HOYER Handel GmbH) |
| Ambient conditions | 10 °C to 40 °C, relative humidity 40-85% |
Frequently Asked Questions - NMD 3.7 B2 NEVADENT
User questions about NMD 3.7 B2 NEVADENT
0 question about this device. Answer the ones you know or ask your own.
Ask a new question about this device
Download the instructions for your Oral irrigator in PDF format for free! Find your manual NMD 3.7 B2 - NEVADENT and take your electronic device back in hand. On this page are published all the documents necessary for the use of your device. NMD 3.7 B2 by NEVADENT.
USER MANUAL NMD 3.7 B2 NEVADENT
- Overview 17
- Intended purpose 17
- Safety information 18
- Items supplied 20
- Battery charger 20
- Charging the battery 20
7.Nozzle attachments 21 - Operation 21
8.1 Filling the water tank 21
8.2 Setting the water jet intensity 22
8.3 Before initial use 22
8.4 Using the dental water jet 22
8.5 After every use 23
-
Cleaning / Hygiene requirements 23
-
Storage 24
- Disposal 24
12.Troubleshooting 25 - Ordering accessories 25
- Technical specifications 26
15.Warranty of the HOYER Handel GmbH 26
1. Overview
9 n o r m a l LED: setting: normal water jet
1 Nozzle
2 Nozzle attachment (replaceable)
3 Marking ring
4 Holder (for nozzle attachment)
5 Release button (for nozzle attachment)
6 On off switch
7 mode Select water jet intensity
8 j e t LED: setting: strong water jet
10 soft LED: setting: soft water jet
11 charge Charging indicator light
12 Dental water jet
13 Holders (for storing the nozzle attachments)
14 Peg of the battery charger
15 Battery charger
16 Holes for wall mounting (on the back)
17 Mains power cable and mains plug
18 Filling opening
19 Water tank
20 Suction hose (in the water tank)
(2 rawlplugs and 2 screws without image)
Thank you for your trust!
Congratulations on the purchase of your new dental water jet.
For a safe handling of the device and in order to get to know the entire scope of features:
- Thoroughly read these user instructions prior to initial use.
- Above all, observe the safety information!
The device should only be used as described in these user instructions. -
Keep these user instructions for reference.
-
If you pass the device on to someone else, please include this copy of the user instructions. The user instructions are a part of the product.
We hope you enjoy using your new dental water jet!
2. Intended purpose
The dental water jet is intended to be used exclusively for cleaning teeth and oral hygiene.
The device is designed for private, domestic use. This device must not be used for commercial purposes.
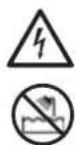
DANGER! Risk of electric shock
The battery charger is connected to the mains voltage, and must therefore not be used in the shower, in the bath, or over wash basins filled with water.
The installation of a residual current device with a nominal trip current not exceeding 30mA in the building wiring offers additional protection. Contact a skilled electrician in this regard.
Do not start using the device if the device, the battery charger or the mains power cable shows visible damage, or if the device has previously been dropped.
The mains power cable of this device cannot be replaced. If the cable should become damaged, the device itself must be disposed of.
- Only connect the mains plug to a properly installed and easily accessible wall socket whose voltage corresponds to the specifications on the rating plate. The wall socket must continue to be easily accessible after the device is plugged in.
- Ensure that the mains power cable cannot be caught or crushed, and that it cannot be damaged by sharp edges or hot points.
To fully disconnect the battery charger from the mains power supply, pull out the mains plug.
- When removing the mains plug from the wall socket, always pull the plug and never the cable.
- Disconnect the mains plug from the wall socket.
... if there is a fault,
... when you are not using the device,
... before you clean the device and
... during thunderstorms.
To avoid any risk, do not make modifications to the device. Repairs must be
carried out by a specialist workshop or the Service Centre.
- When using an extension cable, this must correspond to the applicable safety regulations.

DANGER from battery
Do not expose the device to direct sunshine or heat. The ambient temperature should not be lower than 0^ or higher than +40^ .
Charge the hand unit of the dental water jet only with the original battery charger.
Protect the battery against mechanical damages. Fire hazard!
Should the electrolyte solution leak out of the battery, avoid contact with eyes, mucous membranes and skin. Rinse immediately with plenty of clean water and consult a doctor. The electrolyte solution can cause irritation.
The device is provided with a lithium ion battery.
- The battery cannot be removed!
- This device must not be opened!
- The device with the installed battery must be disposed of properly.
WARNING! Risk of material damage
- If you wish to attach the battery charger to the wall, check what fixing material is suitable. If in doubt, have the assembly performed by an expert.
- Before drilling, check that there are no water pipes or power cables in the wall at the relevant point.
The battery charger is fitted with non-slip silicon feet. As furniture is coated with a variety of different varnishes and acrylics, and treated with different cleaning agents, it cannot be completely ruled out that components are contained in some of these substances that could damage and soften the plastic feet. If necessary,

place a non-slip mat under the battery charger.
- Never place the device on hot surfaces (e.g. hot plates) or near heat sources or open fire.
Do not use any astringent or abrasive cleaning agents.
CAUTION
In the first few days of use of a dental water jet, some users may experience slight gum bleeding. If the bleeding lasts longer than 14 days, a dentist should be consulted.
- If you suffer from severe periodontitis, have injuries or ulcers in the oral mucosa or have had dental surgery during the last two months, please consult a dentist before using the dental water jet.
5. Battery charger
The battery charger 15 can either be placed on a surface or attached to a wall.
- Insert the mains power cable 17 through one of the 3 recesses in the housing of the battery charger 15.
Wall mounting
NOTES:
- Please note the rawlplug size when selecting the drill.
If your wall material requires it, replace the fixing material supplied with a suitable one.
Figure A: mount the battery charger 15 to a wall according to the holes 16 on the back as shown in the il- lustration.
4. Items supplied
1 dental water jet 12
2 nozzle attachments 2
1 battery charger 15
2 rawplugs, diameter 5 mm screws 3 × 25 ~mm
1 copy of the user instructions
- Remove all packing material.
- Check whether all accessories are present and undamaged.
6. Charging the battery
NOTES:
Fully charge the battery before using it for the first time. This takes 14 - 16 hours.
- Place the dental water jet 12 on the peg 14 of the battery charger 15 after use. This ensures that the dental water jet 12 always works at full power. The battery is not damaged by regular charging.
- Plug the mains plug 17 of the battery charger 15 into a suitable wall socket. The wall socket must continue to be easily accessible after the device is plugged in.
- Place the switched-off dental water jet 12 on the peg 14 of the battery charger 15. The charging indicator light charge 11 is lit in red throughout the entire charging process. When the optimal charging
state has been reached, the charging indicator light charge 11 is lit green.
Battery signals: charging indicator light charge 11
Dental water jet 12 on battery charger 15: charging indicator light charge 11 is lit green: the battery is fully charged.
- Dental water jet 12 on battery charger 15: charging indicator light charge 11 is lit red: the battery is being charged.
- Dental water jet 12 switches itself off: charging indicator light charge 11 flashes red. Charge the battery.
- The battery becomes weak during use: charging indicator light charge 11 flashes red. Charge the battery.
7. Nozzle attachments
The items supplied include 2 nozzle attachments 2.
The various marking rings 3 allow you to assign the nozzle attachments 2 to different family members.
The nozzle attachments 2 can be inserted into the holders 13 of the battery charger 15 for storage.
Attaching/ removing the nozzle attachment
Take a nozzle attachment 2 and insert it from above into the holder 4 of the dental water jet 12 so that it clicks into place.
- To remove it, hold down the release button 5 and carefully pull the nozzle attachment 2 upwards.
NOTE: it is advisable to replace the nozzle attachments 2 every 12 months (see "Ordering accessories" on page 25).
8. Operation
CAUTION:
In the first few days of use of a dental water jet, some users may experience slight gum bleeding. If the bleeding lasts longer than 14 days, a dentist should be consulted. Please also note the remarks on the water jet intensity (see "Setting the water jet intensity" on page 22).
- If you suffer from severe periodontitis, have injuries or ulcers in the oral mucosa or have had dental surgery during the last two months, please consult a dentist before using the dental water jet.
8.1 Filling the water tank
You can fill the water tank with water without removing it from the device.
WARNING! Risk of material damage!
-
Use only clean tap water without additives to fill the water tank. Additives (such as mouthwashes) or other liquids can damage the device.
The water should have a pleasant temperature. Do not use water that is hotter than 40^ . -
Hold the switched-off dental water jet 12 horizontally.
- Figure B: open the cover over the filling opening 18.
- Fill the water tank 19 through the filling opening 18.
- Close the cover over the filling opening 18.

8.2 Setting the water jet intensity
You can set three different water jet intensities on the dental water jet:
| LED Jet intensity | |
| soft | soft water jet: at the beginning, for sensitive gums, for gentle gum massage |
| normal | normal water jet |
| jet | strong water jet: for advanced users, strong gums, intensive cleaning of the spaces between the teeth |
NOTE: if you have not used a dental water jet before, please start on the soft setting so that your gums can get used to the water jet. At a later time you can increase the water jet intensity to normal and jet. The pressure should always remain pleasant.
Press the mode 7 button repeatedly until the desired LED 10, 9 or 8 is lit.
8.3 Before initial use
- Rinse the nozzle attachments 2 under running water.
- Clean the water tank 19 and the dental water jet 12 (see "Cleaning / Hygiene requirements" on page 23).
- Fill the water tank 19 with clean tap water (see "Filling the water tank" on page 21).
- Insert a nozzle attachment 2 into the holder 4 so that it clicks into place.
- Point the nozzle 1 at a washbasin and switch the dental water jet 12 on with the on/off switch 6.
- Let the dental water jet 12 run until the water tank 19 is empty in order to rinse through the pipes inside. The dental water jet is now ready for use.
8.4 Using the dental water jet
- Take the dental water jet 12 off the battery charger 15.
- Insert a nozzle attachment 2 into the holder 4 if necessary so that it clicks into place.
- Fill the water tank 19 with fresh tap water.
-
To set the water jet intensity, press the mode 7 button repeatedly until the desired LED is lit:
-
LED soft 10: soft water jet
- LED normal 9: normal water jet
-
LED jet 8: strong water jet
-
Insert the nozzle 1 into your slightly open mouth and lean over a washbasin so that water and rinsed-out food particles can flow out.
- Switch on the dental water jet 12 with the on/off switch
- To start the cleaning process, direct the water jet at the spaces between your teeth and the edges of the teeth.
Figure C: hold the nozzle 1 in such a way that the water jet can flush the food residues away from your gums.
- Move the nozzle 1 slowly from one space between two teeth to the next. Use this method to clean all of the external and internal surfaces.
- To massage your gums, direct the water jet at your gums.
- When no more water is coming out of the nozzle 1, the water tank 19 is empty. Switch off the dental water jet 12 and replenish the water tank. When the device is switched on again, the device will automatically start on the last selected water jet setting.
- To switch off the dental water jet 12, press the on/off switch 品 6.Do not take the nozzle 1 out of your mouth un
til the dental water jet has been switched off.
8.5 After every use
- Open the cover over the filling opening 18, pour out the remaining water from the water tank 19 and close the cover again.
- Switch on the dental water jet 12 for a few seconds with the on/off switch 6 to remove any remaining water from the pipes inside the dental water jet.
- Hold down the release button 5 and gently pull the nozzle attachment 2 upwards.
- Rinse the nozzle attachment 2 under running water and insert it into a holder 13.
- Place the dental water jet 12 on the battery charger 15.
NOTE: it is advisable to replace the nozzle attachments 2 every 12 months (see "Ordering accessories" on page 25).
9. Cleaning / Hygiene requirements

DANGER! Risk of electric shock!
Before cleaning the battery charger 15, pull the mains plug 17 out from the mains socket.
Do not immerse the dental water jet 12 and/or the battery charger 15 in water!
The battery charger 15 must be completely dry before you reconnect it to the wall socket.
Nozzle attachments
- Hold down the release button 5 and gently pull the nozzle attachment 2 upwards.
- Rinse the nozzle attachment 2 under running water and insert it into a holder 13.
Water tank
Clean the water tank 19 once a week or before you are not going to use the device for more than one week.
- Figure D: push the water tank 19 downwards off the dental water jet 12.
- Rinse the water tank 19 thoroughly both inside and out with warm water.
- Dry the water tank 19 on the outside and pour out the remaining water.
NOTE: if you are not going to use the dental water jet 12 for more than one week, allow the water tank 19 to dry completely before you put it back into the dental water jet.
- Push the water tank 19 from below into the dental water jet 12. Make sure that the suction hose 20 is located in the water tank 19,


- the water tank 19 is positioned in the recesses on both sides and
- the water tank 19 is firmly in place so that the seal provides a tight fit.
Dental water jet and battery charger
- Rinse off the dental water jet 12 and rub it dry.
- Wipe the battery charger 15 with a damp cloth if necessary, and rub it dry.
10. Storage
- Remove any excess water from the device and let all of the parts dry completely before you store them away.
- Disconnect the device from the mains and store it in a dry location.
11. Disposal

DANGER from the battery!
The device contains a lithium-ion battery.
- The battery cannot be removed!
- This device must not be opened!
- The device with the installed battery must be disposed of properly.
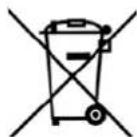
Li-ions
The lithium-ion battery used for this device may not be treated as household waste. The battery must be disposed of properly, together with the device. Contact local waste disposal points for this.
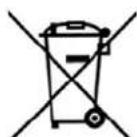
This product is subject to the provisions of European Directive 2012/19/EC.
The symbol showing a whee- ie bin crossed through indicates that the product requires separate refuse col
13/14
lection in the European Union. This applies to the product and all accessories marked with this symbol. t Products identified with this symbol may not be discarded with normal household waste, but must be taken to a collection point for recycling electric and electronic appliances. Recycling helps to reduce the consumption of raw materials and protect the environment.
Packaging
When disposing of the packaging, make sure you comply with the environmental regulations applicable in your country.

12. Troubleshooting
If your device fails to function as required, please try this checklist first. Perhaps there is only a minor problem, and you can solve it yourself.

DANGER! Risk of electric shock!
Do not attempt to repair the device yourself under any circumstances.
| Fault | Possible causes / A- tion |
| The device can- not be switched on. | • Is the battery empty? |
| Charging indi-cator light charge 11 is not lit. | • Is the battery charg- er 15 connected to the mains? |
13. Ordering accessories
Accessories for the dental water jet NMD 3.7 B2 can be reordered.
Order online shop.hoyerhandel.com

- Scan the QR code with your smartphone/ tablet.
- With the QR code you will access a website where you can submit your re-order.
14. Technical specifications
| Model: NMD 3.7 B2 |
| Mains voltage: 100-240 V ~ 50/ 60 Hz |
| Protection class: II ☐ |
| Power rating: 1.4 W |
| Battery: 1x3.7 V (DC voltage) Li-lon 800 mAh 2.96 Wh |
| Charging time (first charging): 14-16 hours |
| Protection class of battery charger: IPX7 (protected against the ef- fects of temporary immer- sion) |
| Protection class of hand unit: IPX4 (protected against water splashes) |
| LEDs: RG 0 |
| Ambient condi- tions: 10 °C to 40 °C Relative humidity 40 to 85 % |
Technical Symbols
| Double insulation | |
| GS | Certified Safety. Devices must comply with the generally acknowledged rules of technology and the German Product Safety Act (Produktssicherheitsgesetz - ProdSG). |
| CE | With the CE marking, HOYER Handel GmbH declares the con-formity with EU guidelines. |
Subject to technical modifications.
15. Warranty of the HOYER Handel GmbH
Dear Customer, your device is provided with a 3 year warranty starting with the purchase date. In the event of product defects, you are entitled to statutory rights against the vendor. These statutory rights are not restricted by our warranty presented in the following.
Warranty conditions
The warranty period starts with the purchase date. Please keep the original purchase receipt in a safe place. This document is required to verify the purchase. If within three years from the purchase date of this product a material or factory defect occurs, the product will be repaired or replaced by us - at our discretion - free of charge to you. This warranty implies that within the period of three years the defective device and the purchase receipt are presented, including a brief written description of the defect and the time it occurred. If the defect is covered by our warranty, the repaired or a new product will be returned to you. No new warranty period starts with a repair or replacement of the product.
Warranty period and statutory claims for defects
The warranty period is not extended when the warranty has been claimed. This also applies to replaced and repaired parts. Any damages and defects already existing at the time of purchase must be reported immediately upon unpacking. Repairs arising after the expiration of the warranty period are subject to a charge.
Warranty coverage
The device was produced carefully according to strict quality guidelines and tested diligently prior to delivery. The warranty applies to material or factory defects.
Excluded from the warranty are wear parts subject to normal wear and damages to fragile parts, e.g. switches, batteries, lamps or other parts manufactured from glass.
This warranty expires if the product is damaged, not used as intended or not serviced. For the proper operation of the product, all instructions listed in the operating instructions must be observed carefully. Any form of use and handling that is advised against in the operating instructions or warned against must always be avoided.
The product is only intended for private and not for commercial use. In the case of incorrect and improper treatment, use of force and interventions not performed by our authorised Service Centre, the warranty shall cease.
Handling in case of a warranty claim
In order to ensure prompt processing of your matter, please observe the following notes:
Please keep the article number IAN:291789 and the purchase receipt as a purchase verification for all inquiries.
- The article number can be found on the rating plate, an engraving, the title page of your instructions (in the bottom left), or as a label on the rear or underside of the device.
- If faulty operation or other defects occur, first contact the Service Centre listed in the following by telephone or email.
- Then, you are able to send a product reported as defective free of charge to the service address specified to you, including the purchase receipt and the information on the defect and when it occurred.

Please visit www.lidl-service.com to download this and many other manuals, product videos and software.

Service Centre
GB Service Great Britain Tel.:08715000720 (20.10/Min.) E-Mail: hoyer@lidl.co.uk
IE Service Ireland
Tel.: 1890 930 034
(0,08 EUR/ Min., (peak))
(0,06 EUR/ Min., (off peak))
E-Mail: hoyer@lidl.ie
MT Service Malta Tel.:80062230 E-Mail: hoyer@lidl.com
CY Service Cyprus Tel.:80094409 E-Mail: hoyer@lidl.com.cy
IAN:291789

Supplier
Please note that the following address is no service address. First contact the aforementioned Service Centre.
Encomenda online shop.hoyerhandel.com