LUCA 28835 - Coffee machine UNOLD - Free user manual and instructions
Find the device manual for free LUCA 28835 UNOLD in PDF.

User questions about LUCA 28835 UNOLD
0 question about this device. Answer the ones you know or ask your own.
Ask a new question about this device
Download the instructions for your Coffee machine in PDF format for free! Find your manual LUCA 28835 - UNOLD and take your electronic device back in hand. On this page are published all the documents necessary for the use of your device. LUCA 28835 by UNOLD.
USER MANUAL LUCA 28835 UNOLD
natural_image
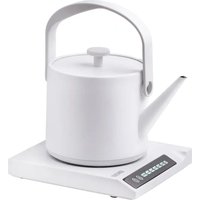
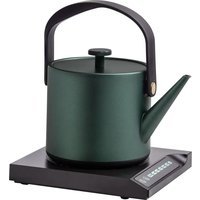
Modern black and silver UNOLD coffee maker with glass cup and coffee cup (no visible text or symbols)Bedienungsanleitung
Instructions for use Model 28835
Technical data....27
Explanation of symbols....27
For your safety....27
Explanation of the buttons....30
Explanation of the display ....31
Before first use....31
Rinsing the appliance ....33
Operation....34
Setting the coffee and hot water quantity ....36
Setting the grind coarseness....37
Setting the mode....37
Cleaning and maintenance ....39
Descaling....41
Draining the water lines....42
Troubleshooting....42
Guarantee Conditions....44
Waste Disposal/Environmental Protection ....44
Service 26
text_image
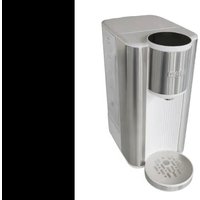
Exploded view diagram of a device's internal components with numbered parts for identificationDE Ab Seite 6
1 Drip tray
2 Drip grid
3 Coffee grounds container
4 Coffee spout
5 Control panel
6 Bean container
7 Bean container lid
8 Water tank
9 Residual water tray
10 Cover
11 Brew assembly
12 Cleaning brush
13 Power cable
F Page 45
natural_image
Line drawing of a network interface component with an attached cable (no text or symbols)text_image
Diagram illustrating three steps of a device packaging or cleaning process: opening, pressing down, and removing a black X-shaped component.natural_image
Three-step diagram showing a printer, a tray with seeds being poured into a container, and a keyboard with a downward arrow (no text or symbols)Kaffee zubereiten
natural_image
Two line drawings of a coffee maker with a cup and lid, showing the process (no text or symbols)natural_image
Diagram of a mechanical device with two rotating gears and a handle, enclosed in a rectangular frame (no text or symbols)MODUS EINSTELLEN
natural_image
Technical line drawing of a mechanical device with a side panel and an arrow indicating direction (no text or symbols)natural_image
Technical line drawing of a mechanical component with two views, one showing internal components and the other a flanged base (no text or symbols)
natural_image
Illustration showing two hand positions: top shows a close-up of a device with a tool, bottom shows a close-up of a device with arrows pointing to the interior (no text or symbols)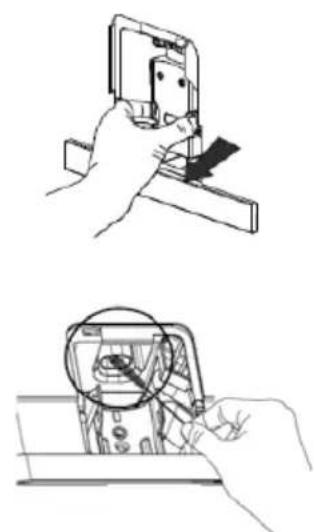
natural_image
Two-step line drawings showing hands using a handheld device to inspect or inspect a component, with no visible text or symbols.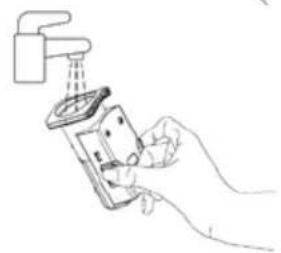
natural_image
Line drawing of a hand using a handheld device to clean or install a wall-mounted device (no text or symbols present)ENTKALKEN
Power: 1,235–1,470 W, 220–240 V\~, 50/60 Hz
Bean container: 160 g coffee beans
Water tank: 1.2 litres
Dimensions: approx. 18 x 40 x 31.4 cm (WxHxD)
Power cable: approx. 100 cm
Weight: approx. 8.2 kg
Material: Plastic
Pump pressure: 19 bar
Features: Pre-brew function, height-adjustable coffee spout with integrated light, hot water function, removable brew assembly, 5 selectable grind coarseness settings, sound pressure level <70 dB(A)
Accessories: Instruction manual, cleaning brush
Features, technology, colours, and design are subject to change without notice; errors excepted.
EXPLANATION OF SYMBOLS

This symbol denotes a possible hazard which could cause injury or damage to the appliance.
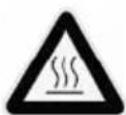
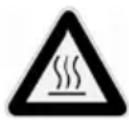
This symbol indicates a potential burning hazard. Please be especially careful at all times here.
FOR YOUR SAFETY
Please read this instruction manual carefully and keep it for future reference.
Persons in household
-
This appliance can be used by children aged 8 or above or by individuals with reduced physical, sensory or mental capabilities or a lack of experience and knowledge, if they are supervised or have been instructed in the safe use of the appliance and understand the hazards involved.
-
Children must not be allowed to play with the appliance.
- Children from the age of 8 may be permitted to clean or maintain the appliance, provided they are supervised.
- Keep the appliance and its power cable out of the reach of children under the age of 8.
- The appliance is designed for household and similar use, e.g.
■ kitchenettes in offices, shops or other workplaces,
- farms,
■ kitchenettes for guests in hotels, motels, hostels,
■ bed and breakfast accommodations or holiday homes.
Electrical safety tips
- Connect the appliance to an alternating current source as specified on the type plate.
- Do not connect the appliance to an external timer or remotely controlled power system.
- Never immerse the appliance or the cable in water or another liquid.
-
Never touch the appliance or the cable with wet hands.
-
Always unwind the power cord completely.
-
When unplugging the appliance, always pull on the plug itself and never on the power cable.
- Only use the appliance indoors.
- The ideal ambient temperature for trouble-free operation of the appliance is between +10 °C and +40 °C.
- For safety reasons, never place the appliance on hot surfaces, a metal tray or a wet surface.
- Do not place the appliance or the power cable close to open flames.
- Disconnect the plug in the following cases:
■ Before filling the water tank
■ Before removing or inserting any components of the appliance
■ If the appliance is not functioning properly
■ Before cleaning and maintenance
■ After using the appliance
-
Never leave the appliance unattended while it is connected to the power socket.
-
Regularly check the appliance, the power cable and the plug for wear and damage. If the power cable or other parts are damaged, return the appliance or the base to our Customer Service department for inspection and repair. Unauthorised repairs can result in serious hazards for the user and will void the warranty.
- If the power cable of this appliance is damaged, it must be replaced by the manufacturer or his customer service department or someone with similar qualifications, to prevent hazards.
Information on magnets
- The appliance contains magnets. Keep cards with magnetic strips (e.g. debit and credit cards), magnetic storage media and other sensitive objects away from the appliance. They could be damaged or their function could be impaired.
Information on how to handle the appliance safely
- Do not use the appliance for any other purpose than the intended use.
- Use the appliance only after the drip tray and coffee grounds container have been correctly inserted.
- Always use the automatic coffee maker on an uncluttered, level and heat-resistant surface.
- The appliance is not intended for installation in cabinets.
- Do not allow the power cable to hang over the edge of the worktop, as this could result in accidents, for example if pulled on by small children.
- Route the power cable safely so that it cannot be pulled on or tripped over.
- Make sure that all users, especially children, are aware of the danger of injury from emerging steam or hot splashing water – danger of burns!
- Never fill the water tank past the 1.2 litre mark.
- To prevent damage, do not operate the appliance with accessories from another manufacturer or brand.
- Use the grinder only for roasted coffee beans. Never put ground coffee, raw coffee beans, or mixtures with raw coffee, caramelised coffee beans, or other foods or objects in the grinder.
-
Set the grind coarseness only when the grinder is running.
-
Fill the water tank with cold tap water or drinking water only. Hot water, carbonised water, or other liquids can damage the appliance.
- Empty the water tank if the appliance will not be used for an extended period.
- Do not use the hot water function without interruption for more than one full water tank.
- Let the appliance cool down before cleaning and maintenance.
Hot water can cause scalding. Therefore, always handle the appliance with caution.

Never open the appliance housing. Risk of injury from electric shock!
The manufacturer will not be liable in the event of incorrect assembly, improper or incorrect use or if repairs are carried out by unauthorized third parties.
EXPLANATION OF THE BUTTONS
Note: The buttons are visible only when the appliance is switched on.
 | ON/OFF button |
 | Espresso – a small coffee brewed quickly under high pressure |
 | Lungo – espresso brewed with more water; more intensive, with a somewhat more bitter flavour |
 | Americano – espresso diluted with hot water; mild flavour, similar to filter coffee |
 | Favourite – with this button, you can program your own coffee speciality |
 | Hot water – for brewing tea or pre-warming coffee cups |
EXPLANATION OF THE DISPLAY
 | Flashes if the water tank has to be filled or is not correctly inserted |
 | Add beans |
 | Lights up continuously: Grounds container is full Flashes: Residual water tray / grounds container is missing |
 | Lights up continuously: Brew assembly is missing or is not correctly inserted Flashes: Lid is open or not correctly closed |
 | Lights up continuously: Descaling is necessary Flashes: Descaling process is active |
 | Water line rinsing is active |
BEFORE FIRST USE
- Remove all packaging and transport safety devices. Keep the packaging material away from children. Choke hazard! Dispose of the packaging materials according to the relevant local waste disposal regulations. We recommend to keep the packaging for safe storage of the appliance when it is not in use for a longer period of time.
- Inspect the appliance for damage. If there is visible damage, do not operate the appliance; instead, contact our Customer Service department.
| 3. Choose a safe and sturdy surface with an easily accessible electrical outlet and sufficient space to maintain a minimum distance to the sides of the appliance. | 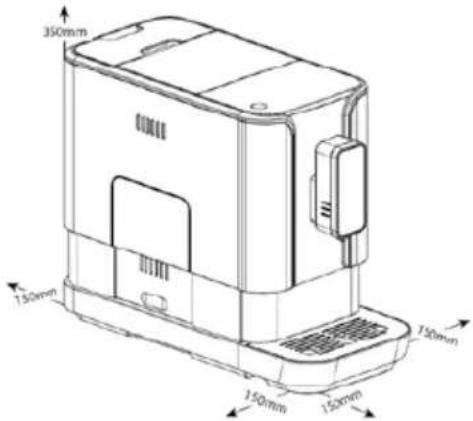 |
| 4. Slide the drip tray into the appliance, as shown in the illustration. The drip tray is held securely in place by magnets. | 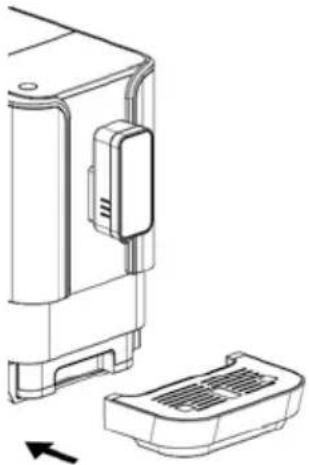 |
| 5. Remove the water tank by pulling upward, then fill it with fresh, cold tap water, as described in “Filling the water tank”. Reinsert the water tank into the appliance. | 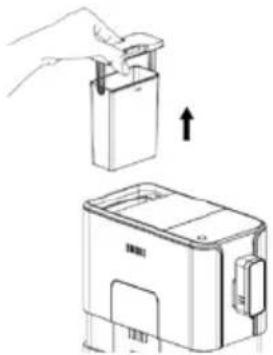 |
| 6. Fill the bean container with coffee beans as described in “Filling the bean container” and place the lid on the bean container. | |
- Unwind the power cable and connect the end of the cable with the socket on the back of the appliance. Then plug the appliance into an electrical outlet with suitable mains voltage in accordance with the type plate. Then press the ON/OFF button.

natural_image
Technical line drawing of a device with an attached cable and internal connector (no text or symbols)- Rinse the water lines in the appliance as described in “Rinsing the appliance”. The appliance is now ready to use.
RINSING THE APPLIANCE
WARNING: When rinsing, hot water flows from the coffee spout into the drip tray. To prevent scalding, avoid contact with splashing water.
- You can carry out a manual rinsing cycle to clean the coffee spout after use or if the appliance has not been used for an extended period.
- Press and hold the ON/OFF button and the "Hot water" button simultaneously.
- The hot water button flashes. The coffee spout then dispenses a small amount of water, which is used for rinsing.
- After rinsing, the appliance returns to standby mode.
OPERATION
Hot water can cause scalding. Therefore, always handle the appliance with caution.
Filling the water tank

Never fill the water tank with warm, hot, or bubbling water, or with other liquids that could damage the water tank and the appliance.
To prevent the water tank from overflowing, remove the water tank for filling and do not pour water directly into the appliance.
- If the symbol flashes, the water tank is empty and must be filled.
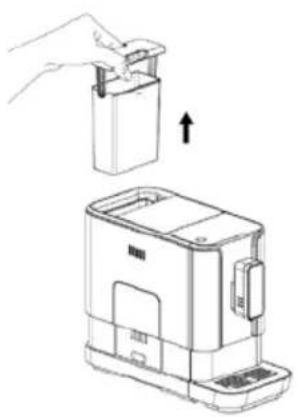
- Lift the water tank by using the lid as a handle.
- Rinse the water tank with fresh water. Then fill the water tank to the maximum level and reinsert it into the appliance; the water spout must point the right. Push the water tank down until it is correctly seated in the housing. Make sure that the water tank is inserted completely.
natural_image
Line drawing of a hand placing a small rectangular object into a device, with an arrow indicating the process (no text or symbols present)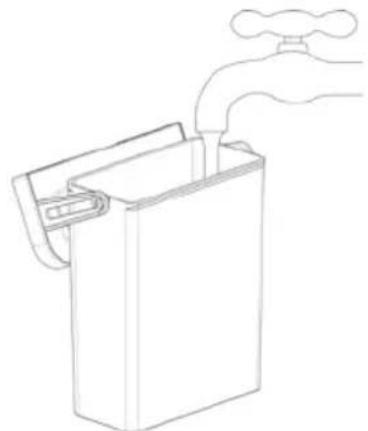
natural_image
Line drawing of a hand washing a water tap into a rectangular container (no text or symbols)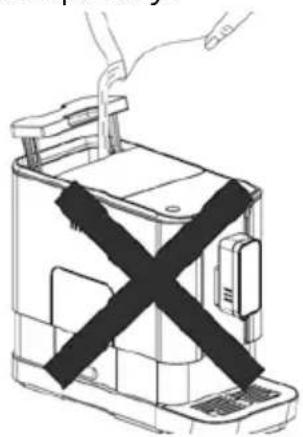
natural_image
Line drawing of a device with a black X-shaped band, no text or symbols presentFilling the bean container
- Fill the coffee bean container with coffee beans only. Ground coffee, instant coffee, caramelised coffee beans, raw coffee, or other objects can damage the appliance.
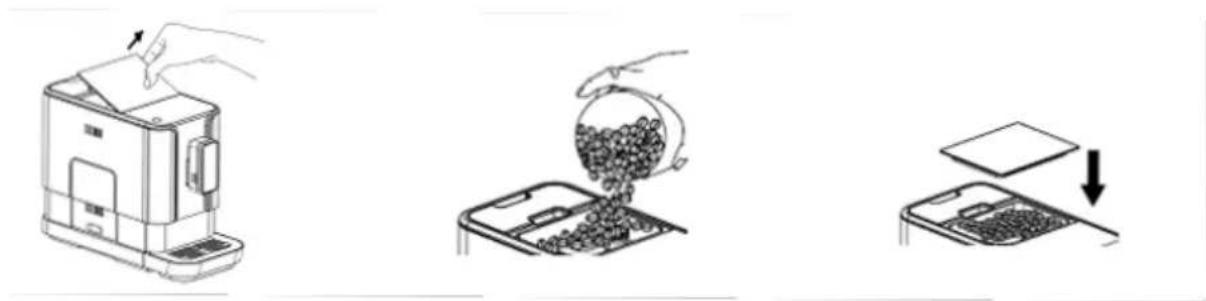
- Remove the lid of the bean container.
- Fill the bean container with coffee beans. The coffee bean container has a maximum capacity of 160 ~g . We recommend filling the container only with the amount of coffee beans you will grind in one day. This ensures that the coffee beans stay fresh.
- Put the lid back on the container.
natural_image
Three-step diagram showing a kitchen machine, a tray with granular material being poured into it, and a keyboard with a downward arrow (no text or symbols)Brewing coffee
- Make sure that the drip tray is inserted and the water tank is filled with water.
- Press the ON/OFF button to switch the appliance on.
- The appliance carries out automatic rinsing for a small cup of water. If rinsing is not desired, you can prevent it by pressing the "Hot water" button. The appliance is now in standby mode.
- Place a cup on the drip grate under the coffee spout and adjust the height of the spout to the cup. The drip tray can also be removed for a large cup:

natural_image
Two line drawings of a coffee maker with a cup and side panel, showing mechanical components and a drop in the base (no text or symbols)- Now select the desired program by pressing one of the buttons Espresso, Lungo or Americano.
- The display for the selected type of brew and the light under the coffee spout light up, indicating that the appliance is brewing a cup of coffee. You can stop dispensing coffee at any time by pressing the button again.
- When the appliance is in standby mode again, the brewing process is finished.
- Note: You can adapt the Espresso and Lungo programs as described in "Adapting the coffee and water quantity".
Favourite button
- The Favourite button allows you to brew coffee to your individual taste. Proceed as follows:
- Place a cup under the coffee spout.
- Press and hold the Favourite button for 2 seconds. The Espresso, Lungo and Americano buttons flash. Now press one of the buttons to select the desired brew type.
- The corresponding beverage is dispensed. Press and hold the button again to continue the process, and release the button to stop dispensing. You will hear two beeps, and the quantity is saved.
- How to use the Favourite button:
- Place a cup under the coffee spout.
- Press the Favourite button. The saved favourite beverage is dispensed.
Preparing hot water
- Place a cup under the coffee spout.
- Press the “Hot water” button. The button lights up, indicating that the appliance is heating water.
- Preparation of the hot water stops automatically. If you wish to interrupt the heating of water during operation, press the “Hot water” button again.
Switching the appliance on and off
- Press the ON/OFF button to switch the appliance on or off.
- The appliance is additionally equipped with an automatic shut-off function. The shut-off time varies depending on the mode being used. For more information, see “Setting the mode”.
SETTING THE COFFEE AND HOT WATER QUANTITY
- The appliance can save your desired quantity of Espresso, Lungo, Americano and hot water.
- When you brew your coffee or dispense hot water, keep the selected button pressed. The appliance continues brewing the coffee or heating the water.
- When the coffee or hot water quantity reaches the desired quantity, release the button. Two beeps indicate that the beverage quantity has been saved.
SETTING THE GRIND COARSENESS

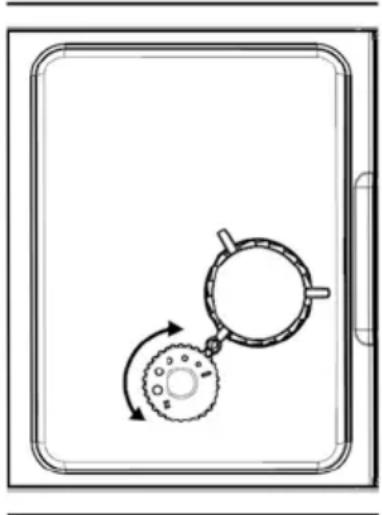
Important: To prevent damage to the grinder, the grind coarseness may be set only when the grinder is running.
Tip: Set the grind coarseness in small increments and first test the new setting before making further adjustments.
- While the grinder is grinding coffee beans, you can set the grind coarseness by turning the knob in the bean container. The dots on the knob show the grind coarseness.
natural_image
Diagram of a mechanical device with two rotating components, one with a curved arrow indicating rotation (no text or symbols)SETTING THE MODE
- The appliance has three different settings: standard setting, energy-saving mode, and quick mode. In energy-saving mode, the appliance uses less energy. In quick mode, the appliance brews the coffee faster than with the standard setting.
| Quick mode Standard Energy saving mode | |||
| Coffee spout light Yes Yes No | |||
| Pre-brewing* No Yes Yes | |||
| Automatic shut-off time | 30 min. 20 min | 10 min. | |
| Save cup size Yes Yes Yes | |||
*Note: The pre-brew function moistens the ground beans in the brew assembly with a small amount of water before full extraction. This causes the coffee grounds to expand and generates higher pressure in the brew assembly, allowing extraction of all oils and the full aroma from the ground beans.
- Proceed as follows to select this mode:
- If the appliance is in standby mode, press and hold the ON/OFF button for 5 seconds.
- The ON/OFF button flashes. The display shows the following for the different settings:
| “Hot water” button | “Espresso” button | “Lungo” button | |
| Energy saving mode | Lights up Flashes | Flashes | |
| Quick mode Flashes | Lights up Flashes | ||
| Standard Flashes | Flashes Lights up |
- Press the “Hot water” button for energy-saving mode, the Espresso button for quick mode, and the Lungo button for the standard setting. Two beeps indicate that the mode has been selected.
- To leave the setting unchanged, press the ON/OFF button again or wait 5 seconds until the appliance returns to standby mode.
CLEANING AND MAINTENANCE
Daily cleaning and maintenance of the appliance are very important to ensure a long service life.

Always switch off the appliance and disconnect the mains plug from the socket before dismantling it. Do not use abrasive cleaners, steel wool, metal objects, hot cleaning agents or disinfectants, as these can cause damage.
-
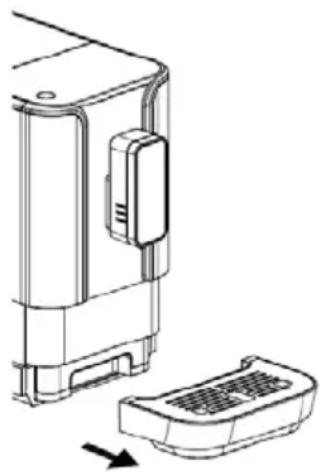
Remove the drip tray. Pour out the water and rinse the tray thoroughly with clean water. Then dry all parts well and reinsert the drip tray.
-
Now remove the residual water container with the grounds container.
-
Empty both parts and rinse with fresh water. Dry the parts and reinsert them in the appliance.
natural_image
Technical line drawing of a device component with a base and side view, showing no text or symbols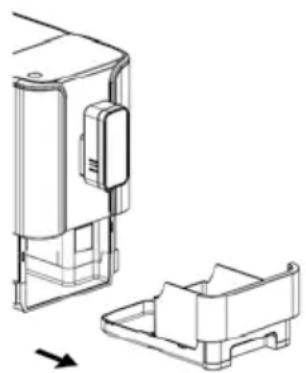
natural_image
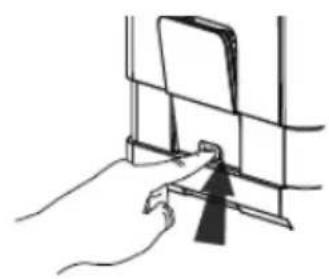
Technical line drawing of a mechanical component with two views, one showing internal structure and the other showing a flanged housing (no text or symbols)- Push down on the lower part of the lid and pull to remove it from the appliance. Press and hold the orange buttons to the left and right of the brew assembly and pull the brew assembly straight out of the appliance.
- Clean the brew assembly under flowing water and then allow it to dry thoroughly.
- Use the cleaning brush to remove any remaining ground coffee in the brew assembly compartment.
- Now push the brew assembly back into the compartment applying slight force, however without pressing the two orange buttons. The brew assembly must audibly click into position.
- Re-insert the cover.
natural_image
Line drawing of a hand holding a device with a black arrow pointing to a screen (no text or symbols)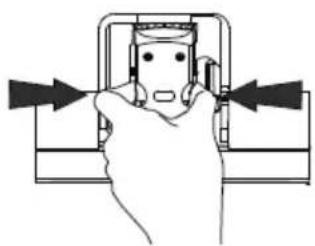
natural_image
Diagram of a hand pressing a button on a mechanical component with directional arrows (no text or symbols)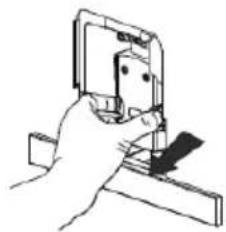
natural_image
Hand holding a small electronic component with a ruler, no visible text or symbols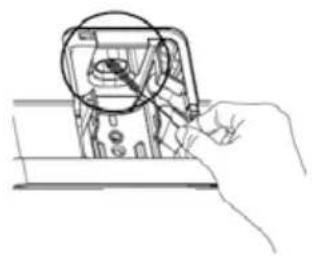
natural_image
Line drawing of a hand holding a device with a magnified inset showing internal components (no text or symbols)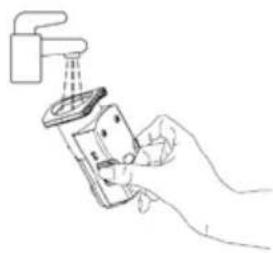
natural_image
Line drawing of a hand using a showerhead to clean or install a shower (no text or symbols)DESCALING

WARNING: Danger from hot water. Keep skin and extremities away from hot water.
- Always descale the machine as soon as the descaling symbol lights up. This will prolong the life of your appliance. If you wait too long before descaling, it is possible that the descaling agent will no longer have the desired effect.
- Note: The descaling programme takes approx. 30 minutes and cannot be interrupted. If it is inadvertently interrupted by a power outage, for example, it has to be carried out the next time the appliance is switched on before it can be used again.
- Fill the water tank to the marking with the descaling agent.
- Put the descaling agent in the water tank according to the instructions on the package.

IMPORTANT: Do not use vinegar or other cleaning agents for descaling of the appliance. The cleaning agent could damage the appliance. Use only special descaling agents for fully automatic coffee makers
- Place a sufficiently large container under the coffee spout.
- In standby mode, press and hold the ON/OFF button and the Espresso button for 5 seconds, then release the buttons. Two beeps sound and the Espresso button flashes.
- Press the Espresso button to confirm the descaling process.
- The descaling symbol flashes, indicating that the appliance is being descaled.
- When there is no more water in the water tank, the Espresso button flashes. Remove the remaining solution from the water tank and rinse the tank with normal tap water. Then fill the water tank as usual. When the tank is filled with water, the display goes blank. Then the appliance resumes the descaling process.
- When descaling is finished, the appliance automatically shuts off.
DRAINING THE WATER LINES
- Before extended non-use, transport, or repair of the appliance, we recommend to clean the appliance thoroughly and then to drain the water lines, as described below:
- In standby mode, press and hold the ON/OFF and Lungo buttons simultaneously for 5 seconds.
- The water line draining symbol flashes:
- Remove the water tank from the appliance; the water line draining symbol lights up continuously, indicating that the system is being drained. You can press the ON/OFF button before removing the water tank to return to standby mode.
- When draining is finished, the appliance automatically shuts off.
- IMPORTANT: After draining, press the “Hot water” button until water emerges from the spout the next time the appliance is used.
TROUBLESHOOTING
| Problem Cause Remedy | ||
| The appliance does not operate | Power plug not plugged in | Plug the appliance into an electrical outlet |
| No reaction to pushed button | Electromagnetic disturbance | Switch the appliance off and then on again |
| Dirty display | Clean display with cloth | |
| The coffee is not hot enough | The cups are not pre-warmed | Pre-warm the cups |
| The brew assembly is too cold | Rinse the appliance three times before brewing coffee | |
| No coffee emerges from the coffee spout | Water lines drained Press | the “Hot water” button until water flows |
| The first cup of coffee is of poor quality | During the first grinding cycle, the brewing unit was filled with an insufficient quantity of coffee. | Discard this coffee and brew coffee again |
| The coffee has no crema T | The coffee beans are too old | Use only fresh coffee beans for fully automatic coffee makers |
| The appliance takes a very long to time to heat | Limescale build-up in the appliance | Descale the appliance |
| The empty water tank symbol does not appear, although the tank is empty | Water in the area of the water tank | Dry the area around the water tank |
| The residual water tray is full of water | The coffee grind is too fine | Use a coarser grind |
| The coffee comes out of the appliance too slowly | ||
| The symbol for missing coffee beans flashes, although there are still coffee beans in the container | Clogging due to ground coffee residue inside | Clean the brew assembly compartment with the cleaning brush |
GUARANTEE CONDITIONS
We grant a warranty of 24 months for this UNOLD brand appliance - 12 months for commercial use - from the date of purchase, covering damage that is demonstrably due to factory defects when used as intended. Within the warranty period, we will remedy material and manufacturing defects at our discretion by repair or exchange. Our warranty services apply exclusively to appliances sold in Germany and Austria. For other countries, please contact the responsible importer. Please send appliances for which you seek removal of defects, together with a copy of the machine-generated proof of purchase that shows the date of purchase along with a description of the fault, to our customer service department using suitable packaging. On our website https://unold.de/pages/rucksendungen, you can print out a return slip (only for return shipments from Germany and Austria). All types of damage attributable to wear and tear, improper handling and non-compliance with the maintenance and care instructions are excluded from the warranty. The warranty claim is void if repairs or interventions on the appliance are carried out by a third party. This manufacturer's warranty does not limit your statutory rights or your claims against the seller or dealer under the purchase contract in accordance with the provisions of the German Civil Code (BGB). Your statutory rights as a consumer, in particular your rights to warranty and the statutory claims for defects in accordance with Sections 437 et seqq. BGB, remain unaffected. UNOLD AG, Mannheimer Straße 4, D-68766 Hockenheim
WASTE DISPOSAL / ENVIRONMENTAL PROTECTION
Our appliances are produced on a highquality level for a long lifetime. Regular maintenance and expert repairs by our after-sales service can extend the useful life of the appliance. If an appliance is defective and repair is not possible, we ask you to follow the following instructions for disposal. Do not dispose this appliance together with your standard household waste. There is a legal requirement to dispose of waste electrical and electronic equipment (WEEE) as well as batteries and accumulators separately from household waste. You can recognise this waste equipment by the crossed-out wheeled bin symbol (WEEE symbol). Please bring this product to an approved collection point for recycling of electric and electronic products. By separate collection and disposal of waste products you help to protect natural resources and ensure, that the product is disposed in an adequate way to protect health and environment.

The instruction booklet is also available for download: www.unold.de
NOTICE D'UTILISATION MODÈLE 28835
CARACTÉRISTIQUES TECHNIQUES
Puissance : 1 235–1 470 W, 220–240 V\~, 50/60 Hz
text_image
350mm 150mm 150mm 150mmnatural_image
Technical line drawing of a device housing with a side panel and an arrow indicating direction (no text or symbols)natural_image
Illustration of a hand holding a small device with an arrow indicating upward motion (no text or symbols)natural_image
Technical line drawing of a device with an attached cable and internal connector (no text or symbols)natural_image
Line drawing of a hand holding a small device next to a separate device with a handle, showing no text or symbols.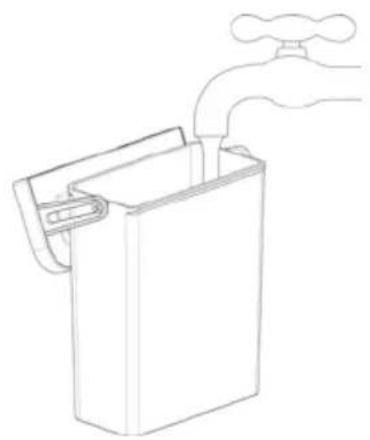
natural_image
Line drawing of a hand pouring liquid into a rectangular container (no text or symbols)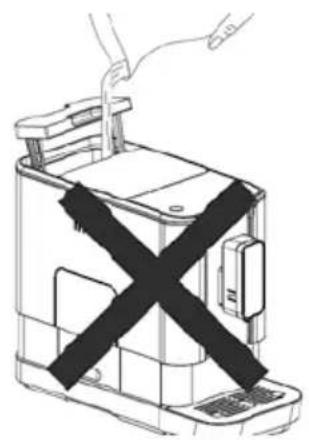
natural_image
Diagram of a device with a black X-shaped barrier, no text or symbols presentnatural_image
Line drawing of a hand inserting paper into a device (no text or symbols)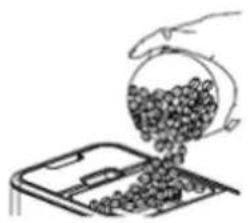
natural_image
Hand pouring granular material into a tray (no text or symbols visible)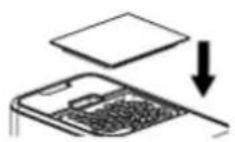
Préparer du café
natural_image
Line drawing of a modern coffee maker with a cup on the front (no text or symbols)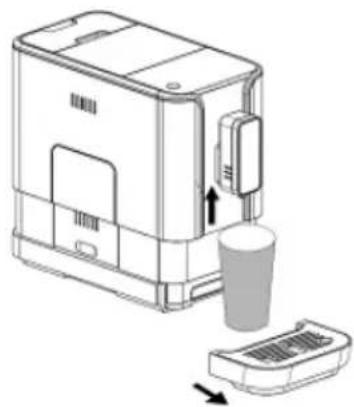
natural_image
Line drawing of a device with a cup and a tray, showing an open lid (no text or symbols)natural_image
Diagram of a mechanical device with rotating components and directional arrows (no text or symbols)RÉGLER LE MODE
natural_image
Technical line drawing of a device component with an arrow indicating assembly or transformation (no text or symbols present)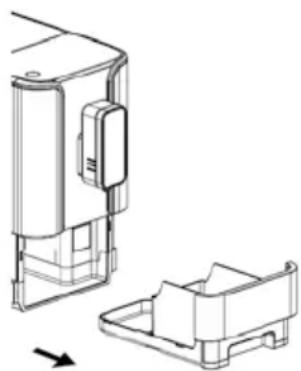
natural_image
Technical line drawing of a mechanical component with an arrow indicating direction (no text or symbols)natural_image
Illustration of a hand holding a tool interacting with a device (no text or symbols visible)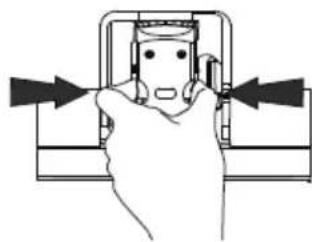
natural_image
Hand holding a mechanical component with arrows indicating direction (no text or symbols)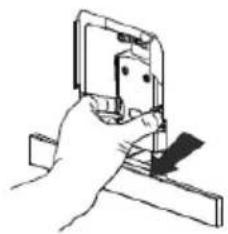
natural_image
Hand holding a small electronic device with a bracket (no visible text or symbols)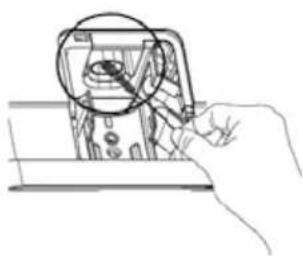
natural_image
Hand holding a device with a magnified inset showing internal components (no text or symbols visible)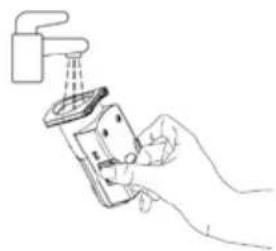
natural_image
Line drawing of a hand using a handheld device to lift a faucet (no text or symbols)DÉTARTRAGE

CONDITIONS DE GARANTIE
text_image
350mm 150mm 150mm 150mmnatural_image
Technical line drawing of a device housing and casing with an arrow indicating direction (no text or symbols)natural_image
Diagram showing a hand placing a small device into a larger device with an arrow indicating motion (no text or symbols present)natural_image
Technical line drawing of a device with an attached cable and internal connector (no text or symbols)natural_image
Line drawing of a hand holding a small device next to a second photo of a toaster (no text or symbols)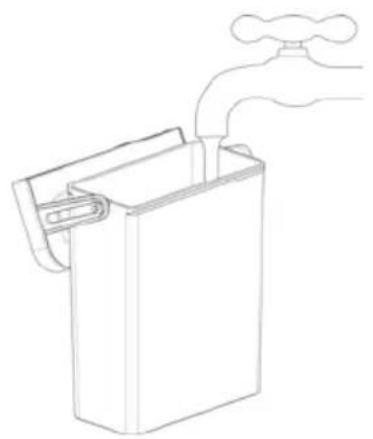
natural_image
Line drawing of a hand washing a water tap into a rectangular container (no text or symbols)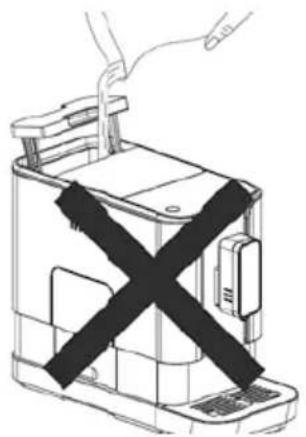
natural_image
Line drawing of a device with a black X symbol crossed out, no text or symbols presentBonenreservoir vullen
natural_image
Line drawing of a kitchen appliance with a hand inserting paper into it (no text or symbols)
natural_image
Hand pouring coins into a container (no text or symbols visible)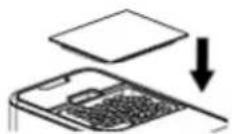
Koffie bereiden
natural_image
Line drawing of a modern coffee maker with a cup on the side (no text or symbols)
natural_image
Line drawing of a coffee maker with a cup and lid, showing mechanical components (no text or symbols)natural_image
Diagram of a mechanical device with two rotating components, one with a curved arrow indicating rotation (no text or symbols)MODUS INSTELLEN
text_image
Technical diagram showing five steps of electrical switch installation, including wire connection, circuit breakers, and water level inspection.ONTKALKEN
text_image
350mm 150mm 150mm 150mmnatural_image
Technical line drawing of a device housing and vent, showing internal components and a separate component (no text or symbols)natural_image
Illustration of a hand holding a device next to a device with an arrow indicating rotation (no text or symbols)natural_image
Line drawing of a device with an attached cable and internal connector (no text or symbols)natural_image
Line drawing of a hand inserting a small device into a device, showing the process with an arrow indicating rotation (no text or symbols present)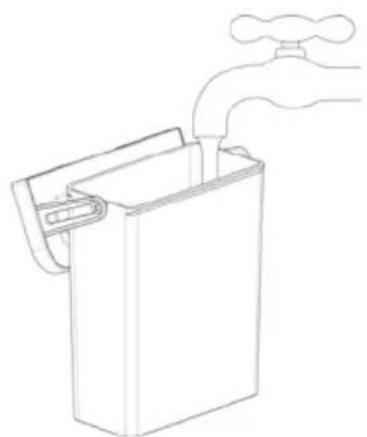
natural_image
Line drawing of a hand pouring liquid into a rectangular container (no text or symbols)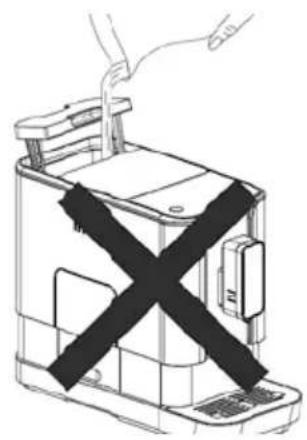
natural_image
Line drawing of a device with a black X-shaped band, no text or symbols presentnatural_image
Line drawing of a hand inserting paper into a device (no text or symbols)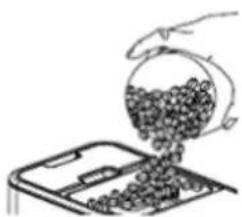
natural_image
Hand pouring granular material into a tray (no text or symbols visible)
Przygotowanie kawy
natural_image
Line drawing of a modern coffee maker with a cup on the front tray (no text or symbols)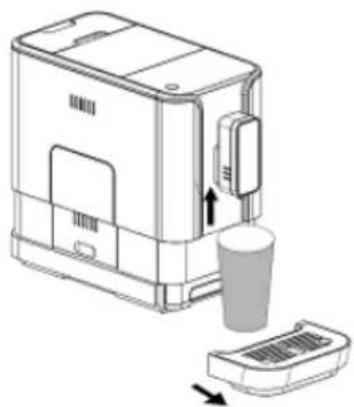
natural_image
Line drawing of a device with a cup and base, showing a step-down view (no text or symbols)natural_image
Diagram of a mechanical device with two rotating components, one with a curved arrow indicating rotation (no text or symbols)USTAWIENIE TRYBU
natural_image
Line drawing of a hand holding a small object near a window (no text or symbols)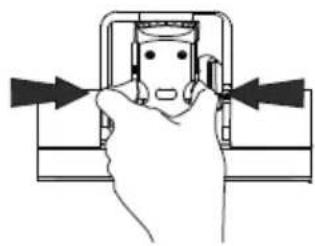
natural_image
Diagram of a hand pressing a component with arrows indicating direction (no text or symbols)
natural_image
Hand holding a mechanical clamp or bracket with a small component inserted (no text or symbols visible)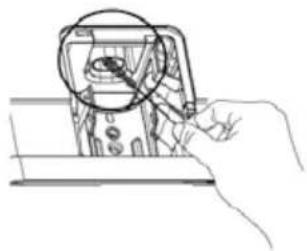
natural_image
Line drawing of a hand holding a device with a magnified circular detail (no text or symbols)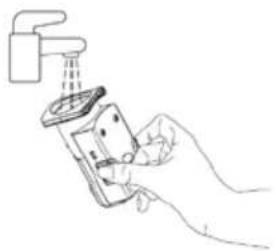
natural_image
Line drawing of a hand using a handheld device to clean or install a surface (no text or symbols)USUWANIE KAMIENIA
| Additional Information for User Manual: | ||
| Technical information on the operating Low Power Modes pursuant to EU Regulation 2023/826 | ||
| Mode | POWER CONSUMPTION(WATT) | PERIOD(MINUTES)* |
| OFF mode 0.0W 20min | ||
| * The period after which the equipment reaches automatically standby mode, off mode or networked standby in minutes and rounded to the nearest minute. | ||
Aus dem Hause
UNOLD®
Impressum: