
DOP4756W - Oven DE DIETRICH - Free user manual and instructions
Find the device manual for free DOP4756W DE DIETRICH in PDF.

| Brand | De Dietrich |
| Model | DOP4756W |
| Product type | Built-in oven |
| Dimensions (W x H x D) | 595 x 596 x 550 mm (approx.) |
| Weight | Approx. 35 kg |
| Power supply | 220-240 V~, 50/60 Hz, 16 A |
| Maximum power | Approx. 3.5 kW |
| Control type | Rotary knob with digital display |
| Number of cooking functions | More than 10 (Convection, Traditional, Grill, Air Fry, Dehydration, Defrost, Dough proofing, Keep warm, ECO, etc.) |
| Automatic modes | AI Sensor, Low temperature, World recipes |
| Capacity | Approx. 73 L |
| Shelf levels | 6 heights |
| Included accessories | Safety grid, drip tray 45 mm, baking tray 8 mm, multi-purpose tray 20 mm, flavor grids, perforated tray, sliding rails |
| Self-cleaning | Pyrolysis (3 cycles: Auto, Express, 2h) |
| Interior lighting | Halogen lamp 25 W (G9, 300°C) |
| Connectivity | Wi-Fi 2.4 GHz, De Dietrich Smart Control app |
| Safety | Key lock, auto-stop, door locked during pyrolysis |
| Manufacturing | France (label Origine France Garantie) |
| Repairability index | Not specified, but spare parts available (lamp, seals, etc.) |
Frequently Asked Questions - DOP4756W DE DIETRICH
User questions about DOP4756W DE DIETRICH
0 question about this device. Answer the ones you know or ask your own.
Ask a new question about this device
Download the instructions for your Oven in PDF format for free! Find your manual DOP4756W - DE DIETRICH and take your electronic device back in hand. On this page are published all the documents necessary for the use of your device. DOP4756W by DE DIETRICH.
USER MANUAL DOP4756W DE DIETRICH
1 INSTALLATION ....6
natural_image
Diagram of a kitchen appliance with a grater and a black arrow indicating direction (no text or symbols)natural_image
3D CAD model of a rectangular tray or enclosure with internal compartments and a black arrow indicating direction (no text or symbols)natural_image
Close-up of a gray rectangular baking tray with a black arrow pointing to it, next to a curved surface (no text or symbols)• 3 PRÉSENTATION DU FOUR
LES ACCESSOIRES (SELON MODÈLE)
natural_image
3D rendering of a gray tray with a black arrow pointing to the bottom area (no text or symbols)natural_image
Diagram of a kitchen appliance with a grater and rack, showing a black arrow pointing to the grille (no text or symbols present)natural_image
3D rendering of a rectangular metal tray with perforated surface and a small protrusion at the bottom (no text or symbols)• 3 PRÉSENTATION DU FOUR
SYSTÈME DE RAILS COULISSANTS
natural_image
Diagram of a microwave oven with airflow arrows indicating internal flow (no text or symbols)
natural_image
Mechanical assembly diagram showing a lever mechanism with arrows indicating motion direction (no text or symbols present)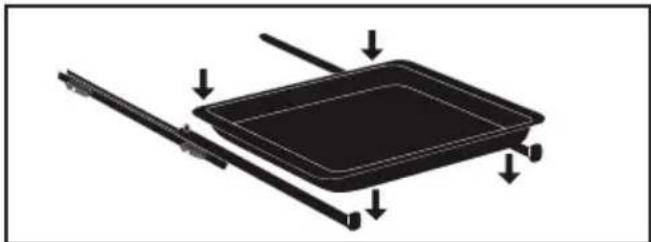
natural_image
Diagram of a rectangular tray with arrows indicating direction or movement, no text or symbols present
natural_image
Mechanical assembly diagram showing a lever mechanism with directional arrows and a magnified inset view (no text or symbols)
natural_image
3D rendering of a perforated metal tray with a small handle at the bottom (no text or symbols)TABLEAU INDICATIF AIR FRY
natural_image
Illustration of a hand inserting a rack into a device (no text or symbols visible)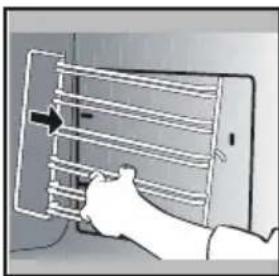
natural_image
Illustration of a hand inserting a rack into a device (no text or symbols visible)NETTOYAGE DES VITRES DE PORTE

Mise en garde
natural_image
Illustration of a hand inserting a small electronic component into a device, with no visible text or symbols.natural_image
Illustration of a hand opening a refrigerator with a tray and door, showing internal compartments (no text or symbols)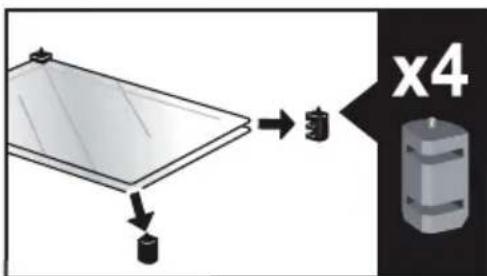
.9 ENTRETIEN
natural_image
Diagram showing a mechanical component with arrows indicating motion or force, and an inset magnified view of a stepped mechanism (no text or symbols present)
natural_image
Diagram of a laptop interior showing the open screen and internal components, with an inset close-up highlighting a cable or cable attachment (no text or symbols present)natural_image
Mechanical component diagram showing a pulley and rotating arrow (no text or symbols)RELATIONS CONSOMMATEURS FRANCE
natural_image
Illustration of a kitchen appliance inside a container, with a clock icon and page number 4 (no text or symbols on the appliance itself)
DEAR CUSTOMER,
You have just purchased a De Dietrich product. This choice reflects your high standards and taste for the French way of life.
Resulting from over 300 years' know-how, the De Dietrich creations embody the fusion between design, authenticity and technology at the service of culinary arts. Our appliances are manufactured using noble materials and offer an irreproachable quality of finish.
We are certain this high-quality product will enable cooking enthusiasts to express all their talents.
The De Dietrich Customer Service Department is at your disposal for all your questions and suggestions to always better meet your expectations.
We are honoured to be your new partner in the kitchen and thank you for your trust.
With its factories based in France, in Orléans and Vendôme, De Dietrich cultivates

a constant search for excellence, perpetuating exceptional know-how in the design of perfectly finished products. Many of our electrical appliances are certified by the "Origine France Garantie" label, an acknowledgement which certifies they are manufactured in France.
This label both ensures the quality and durability of our appliances, as well as their traceability, thus offering a clear and objective
indication of their provenance.
www.de-dietrich.com
De Dietrich
CRÉATEUR D'ÉMOTIONS DEPUIS 1684
IMPORTANT SAFETY ADVICE AND PRECAUTIONS ....4
1 INSTALLATION ....6
Choice of location and fitting....6
Electrical connection....7
2 CARE FOR THE ENVIRONMENT ....7
3 DESCRIPTION OF THE OVEN....8
The controls and display....9
Locking the controls....9
Accessories (depending on model)....10
Sliding rail system....12
Installing and removing the sliding rails 12
4 FIRST USE AND SETTINGS....13
Using the oven for the first time ....13
Settings menu (depending on model)....13
Connectivity 15
Connectivity: questions and answers....15
5 MANUAL COOKING MODE....17
Start a cooking programme ....19
6 COOKING TIPS....20
Air FRY FUNCTION....20
Drying function 21
7 AUTOMATIC COOKING MODE....22
Presentation of the automatic mode 22
Presentation of dish categories....23
Starting an automatic cooking programme....31
Immediate cooking....31
8 OTHER FUNCTIONS....32
Cooking end options (according to the type of cooking)....32
Favourites ....33
Timer function ....33
9 CARE....34
Cleaning and maintenance ....34
Removing and refitting the "sensor" plate 35
Pyrolytic self-cleaning 36
Replacing the oven lamp. 38
10 TROUBLESHOOTING AND SOLUTIONS....39
11 SUITABILITY TEST ....41
IMPORTANT SAFETY INSTRUCTIONS - READ CAREFULLY AND KEEP FOR FUTURE USE.
This user guide is available for download on the brand's website.
Once you receive the appliance, unpack it or have it unpacked immediately. Give it an overall inspection. Make a note of any reservations on the delivery slip and keep a copy.

Important
This appliance may be used by children aged 8 years and older, and by persons with impaired physical, sensory or mental capacities, or without experience or knowledge, if they are supervised or have received prior instructions on how to use the appliance safely and have understood the risks involved.
— Children must not play with the appliance. The appliance should not be cleaned or maintained by unsupervised children.
— Children should be supervised to prevent them from playing with the appliance.

WARNING:
— The appliance and its accessible parts become hot during use. Be careful
not to touch the heating elements inside the oven. Children under
8 years old must be kept away from the hob unless they are supervised at all times.
— This appliance is designed to cook with the door closed.
— Before pyrolytic cleaning of your oven, remove all accessories and any thick deposits.
— During cleaning, the surfaces may become warmer than under normal conditions of use.
It is advisable to keep children away from the appliance.
— Do not use a steam cleaner.
— Do not use abrasive cleaners or hard metal scrapers to clean the oven's glass door; they could scratch the surface and cause the glass to.

WARNING:
Make sure the appliance is disconnected from the power before replacing the lamp in order to avoid the risk of electric shock. Change the lamp only when the appliance has cooled down. To unscrew the view port and the light, use a rubber glove, which will make disassembly easier.

It must be possible to disconnect the appliance from the power supply by fitting a switch on the fixed wiring system in accordance with installation rules.
— the power cable is damaged, it should be replaced by the manufacturer, its after-sales service department or by a similarly qualified person in order to avoid danger.
— This appliance may be installed either under a worktop or in a column as shown in the installation diagram.
— Centre the oven in the cabinet so as to ensure a minimum gap of 10mm between the appliance and the surrounding unit. The material of the unit supporting the appliance must be heat-resistant (or covered with a heat-resistant material). For greater stability, attach the oven to the unit with
2 screws through the holes provided on the side panels.
— The appliance must not be installed behind a decorative door to prevent overheating.
— This appliance is designed to be used for domestic and similar applications such as kitchen areas for the staff of shops, offices and other professional premises; farms; use by clients of hotels, motels and other residential type establishments; guest house type environments.
— The oven must be turned off when cleaning inside the oven.
Do not modify the characteristics of this appliance; doing so could be dangerous.
Do not use your oven as a larder or to store any items after use.
• 1 INSTALLATION
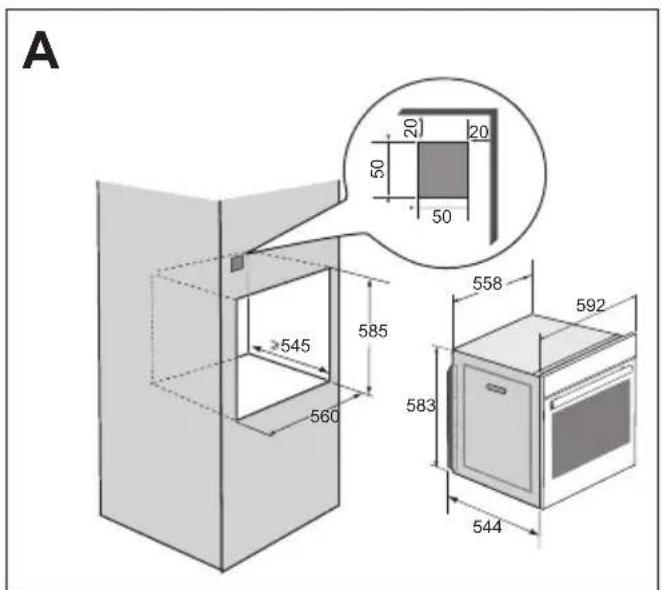
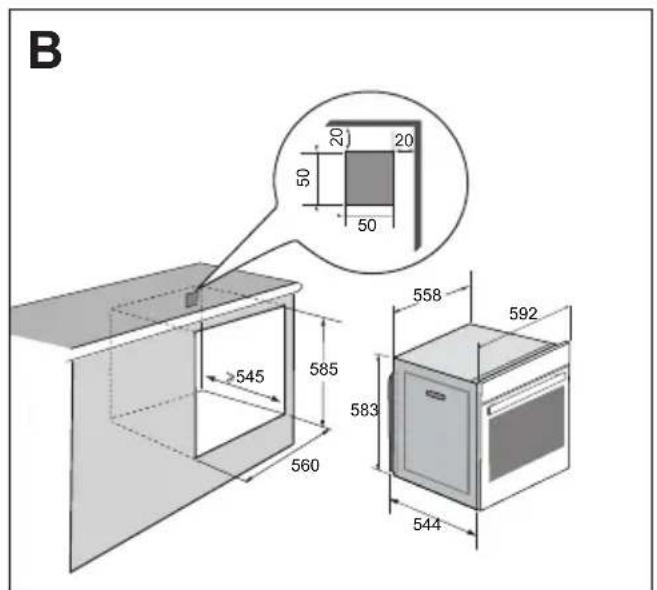
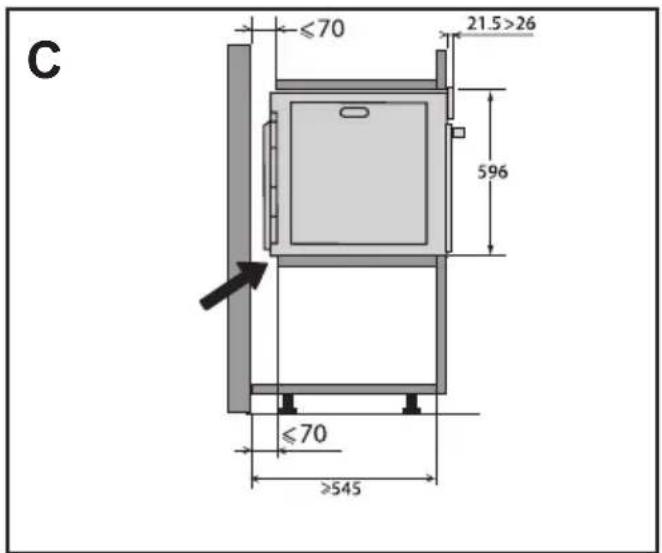
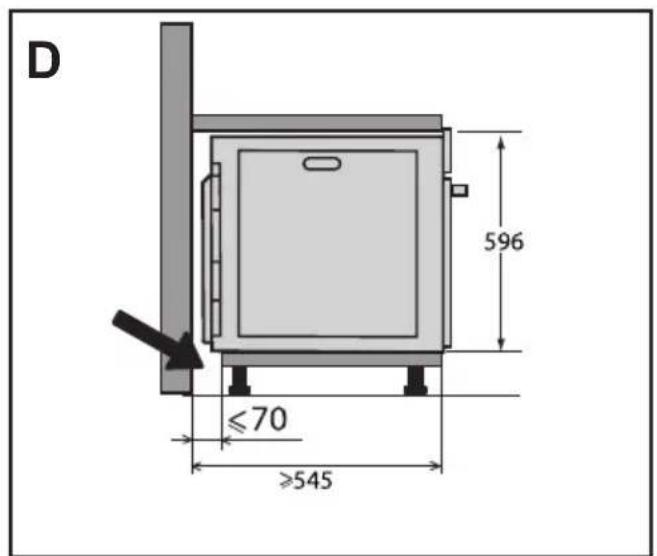
CHOICE OF LOCATION AND FITTING
The diagrams show the dimensions of a cabinet that will be able to hold your oven. This appliance may be installed either in a column (A) or under a worktop (B). If the cabinet is open, its opening at the back must be 70 mm maximum (C and D). Install the oven in the cabinet. To do this, remove the rubber stops and pre-drill a 2-mm diameter hole in the wall of the cabinet to avoid splitting the wood. Attach the oven with the two screws.
Re-position the rubber stops.
If the furniture is closed at the back, make a 50 x 50 mm opening through which to route the electrical cable.
• 1 INSTALLATION
ELECTRICAL CONNECTIONS
The oven is supplied with a standardised power cable with 3 conductors of 1.5mm ^2 (1 live + 1 neutral + earth) which must be connected to the 220\~240 Volt grid by means of an all-pole cut-off device in compliance with the installation rules.
The safety wire (green-yellow) is connected to the appliance's terminal and must be connected to the installation's earth. The fuse in your set-up must be 16 amperes.
We cannot be held responsible for any accident or incident resulting from non-existent, defective or incorrect earthing or non-compliant connection.
Your appliance is designed to work as is, at a frequency of 50Hz or 60Hz, without you having to do anything.

Important: If the electrical installation of your home requires a modification to connect the appliance, call a qualified electrician. If the oven malfunctions in any way, unplug it or remove the fuse for the oven's connection line.
• 2 ENVIRONMENT
CARING FOR THE ENVIRONMENT
The packaging material of this appliance is recyclable. Please recycle it and help protect the environment by depositing it in municipal containers provided for this purpose.
Your appliance also contains many recyclable materials. It is therefore marked with this logo to indicate that used appliances should not be mixed with other waste.
Recycling of appliances organised by your manufacturer is carried out under the best conditions, in accordance with the
European regulation on waste disposal of electronic and electrical equipment.
Contact your local authority or retailer for information on used appliance collection points close to your home. We thank you for your help in protecting the environment.
• 3 DESCRIPTION OF THE OVEN
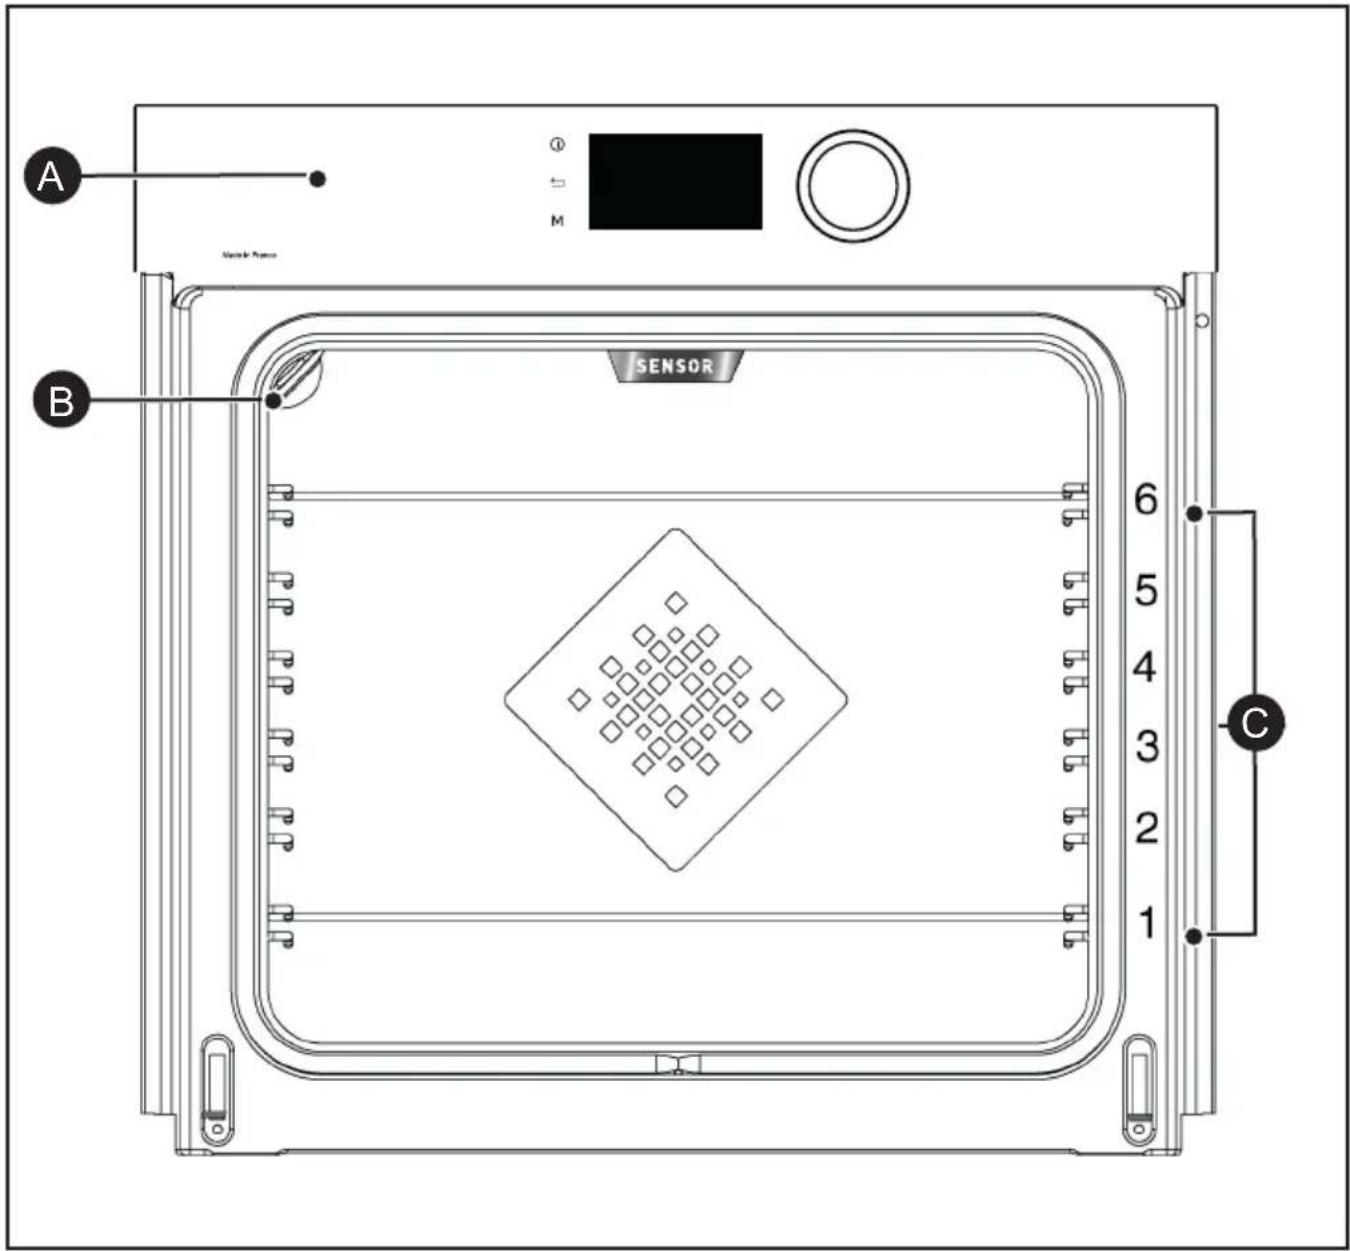
A Control panel
B Light
C Shelf runners (6 heights available)
• 3 DESCRIPTION OF THE OVEN
THE CONTROLS AND DISPLAY
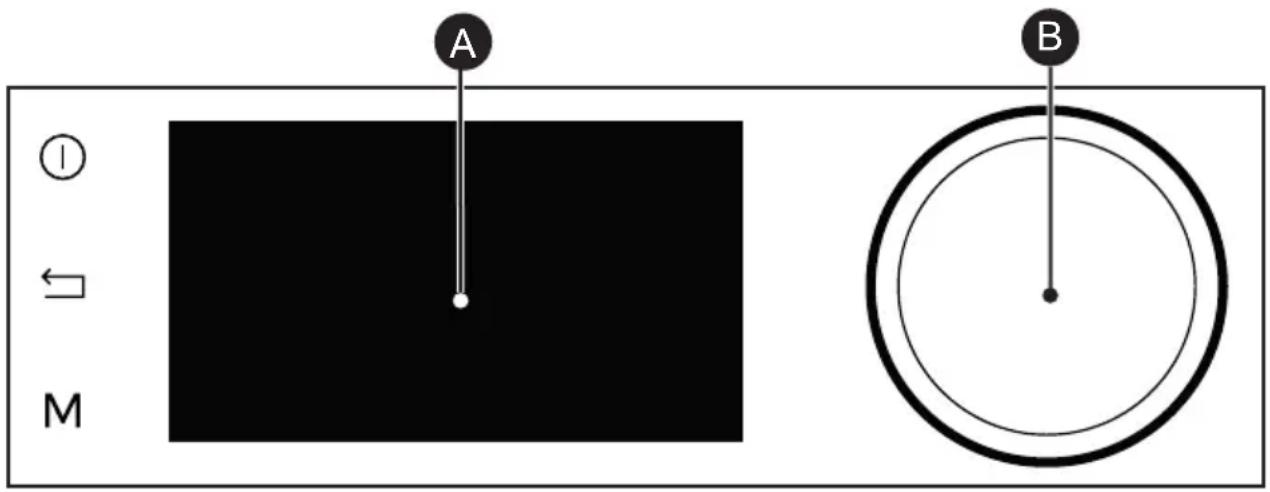

Oven stop key (press and hold)

Display

Back key

Rotating knob with central button (cannot be removed):

MANUAL Mode direct access key
- Choose programmes, increase or reduce values by turning it. - Validate each action by pressing the centre.
LOCKING THE CONTROLS
Press the and M keys at the same time until the symbol aears on the screen.
Control locking is accessible during cooking or when the oven has stopped.
NOTE: only the stop key Ⓞ remains active.
To unlock the keypad, press the back and M keys at the same time until the padlock symbol disappears from the screen.
• 3 DESCRIPTION OF THE OVEN
ACCESSORIES (DEPENDING ON MODEL)
- Anti-tip safety rack. The rack can be used to support all dishes and moulds containing food for cooking or browning. It can be used for barbecues (to be placed directly on the grill). Position the anti-tip stop towards the back of the oven.
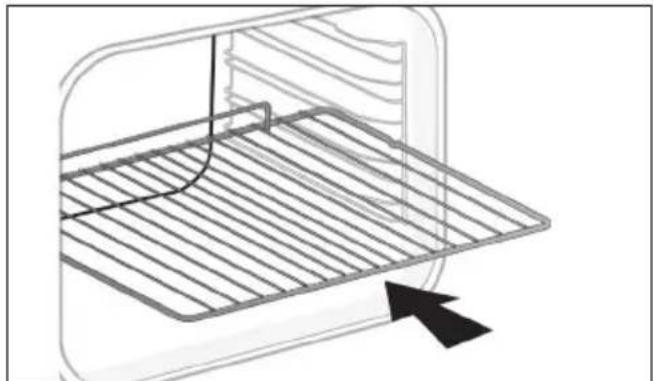
natural_image
Diagram of a kitchen appliance with a grater and a black arrow pointing to the interior (no text or symbols)- 45 mm multi-purpose tray. To be inserted into the supports under the rack, with the handle towards the oven door. It collects juice and fat from grilling, and can be used half-filled with water as a double-boiler.
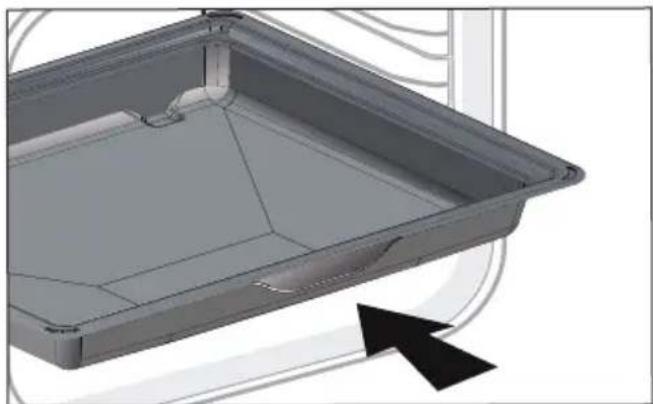
natural_image
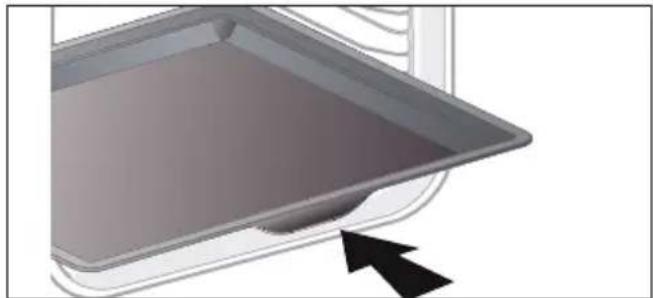
3D CAD model of a rectangular tray or container with internal compartments and a black arrow pointing to the bottom-right corner (no text or symbols)- 8 mm Pastry Sheet. Inserted into the supports or placed on the telescopic rails. This sheet is ideal to bake pastries and baked goods such as biscuits, cookies, meringues, croissants, etc. Its front slope enables you to easily place your preparations.

natural_image
Close-up of a gray rectangular baking tray with a black arrow pointing to it, next to a curved surface (no text or symbols)• 3 DESCRIPTION OF THE OVEN
ACCESSORIES (DEPENDING ON MODEL)
- 20 mm multi-purpose drip tray. When inserted in the shelf runners under the grill with the handle towards the oven door, it is ideal for baking cookies, shortbread and cupcakes. Its tilted surface makes it practical and easy to use. Can also be inserted into the supports under the rack to collect juice and fat from grilling.
natural_image
3D rendering of a gray tray with a black arrow pointing to the bottom portion (no text or symbols)- "Flavour" racks. These half "flavour" grills are used separately, but only when placed in one of the dishes or drip tray with the anti-tip handle towards the back of the oven. By using just one grill, it is easy to moisten your food with the cooking juices collected in the dish.

natural_image
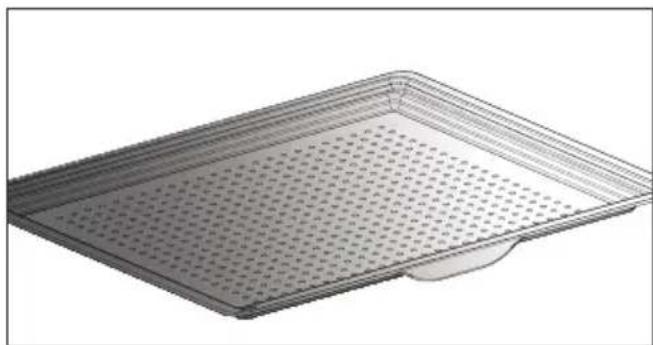
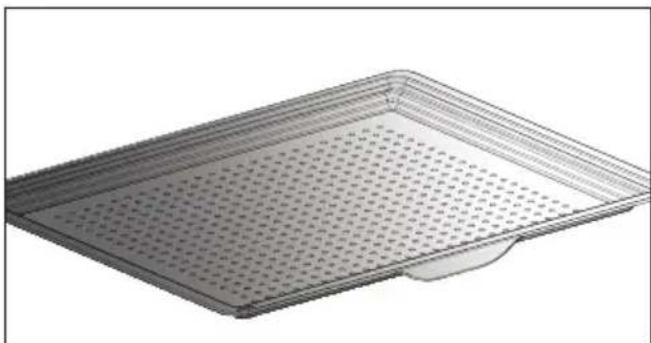
3D diagram of a kitchen appliance with a grater and ventilation grille (no text or symbols)- Perforated tray. When inserted in the supports with the handle towards the oven door, This tray is designed for the AIR FRY cooking mode and is also suitable to cook pizzas and pastries, as well as for drying food.
natural_image
3D rendering of a perforated metal tray with a small base (no text or symbols)• 3 DESCRIPTION OF THE OVEN
SLIDING RAIL SYSTEM
The new sliding rail system makes food more practical and easier to handle as the trays can be effortlessly pulled for simpler handling. The trays can be completely removed, providing full access. Their stability ensures that food can be handled safely, reducing the risk of burns. This means that you can take food out of the oven far more easily.
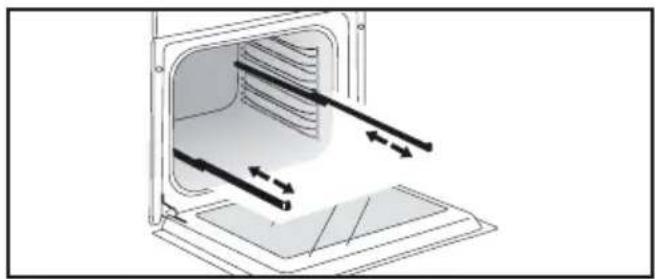
INSTALLING AND REMOVING THE SLIDING RAILS
After removing the 2 shelf runners, choose the height (2 to 5) at which you want to fit your rails. Snap the left rail against the left shelf runner by applying enough pressure to the front and back of the rail so that the 2 tabs on the side of the rail slot into the shelf runner. Do the same for the right-hand rail.
NOTE: the telescopic sliding part of the rail must unfold towards the front of the oven, with the stop Ⓐ opposite you.
Insert your 2 shelf runners and then put your tray on the 2 rails. The system is now ready to use.
To remove the rails, remove the shelf runners again.
Slightly prise apart the bottom of the tabs fixed on each rail to release them from the shelf runner. Pull the rail towards you.
natural_image
Diagram of a microwave oven with airflow arrows indicating internal flow (no text or symbols)
natural_image
Mechanical assembly diagram showing a lever mechanism with labeled component A (no text or symbols beyond label)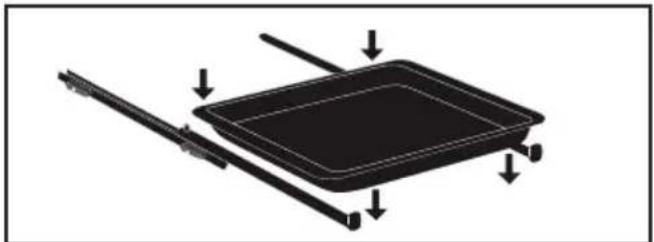
natural_image
Diagram of a rectangular device with arrows indicating force or movement, no text or symbols present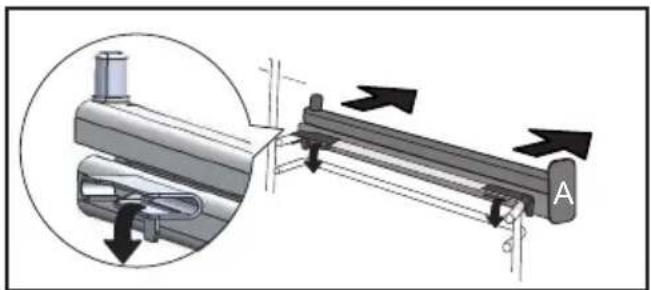
natural_image
Mechanical assembly diagram showing a lever mechanism with directional arrows and a magnified inset view (no text or symbols)The accessories may warp with the effect of heat, but this will not alter their function. They will return to their original shape once cooled.
USING THE OVEN FOR THE FIRST TIME
- Select the language
The first time you use your oven or after a power cut, turn the knob to select your language and press to confirm your choice.
Before using your oven for the first time, heat it at maximum temperature while empty for approximately 30 minutes. Make sure that the room is sufficiently ventilated.
- Set the time
Adjust the hours and minutes by turning the knob, then press to confirm.
Your oven displays the time.
SETTINGS MENU (DEPENDING ON MODEL)
In the general menu, select the "SET-TINGS" function by turning the control knob and confirm. Different settings are proposed.
Select the setting you want by turning the control knob then confirm.
Then set your parameters and confirm them.
- Pyrolysis indicator
Activate or deactivate the pyrolysis indicator. When it is activated, the oven uses its technology and sensors to recommend the right time to conduct a pyrolysis cleaning cycle. In this case, the symbol displays on the screen. You will be able to chose between an Auto, 2h or Express pyrolysis if the residual heat in your oven allows it.
- Time
Modify the time; validate then modify the minutes and validate again. If you oven is connected the time updates automatically. You can also put your display on standby:
- Sleep mode
ON position: the display switches off after 90s.
OFF position: the brightness diminishes after 90s.
- Connectivity
See connectivity chapter on p.15
Activate your oven's connectivity. Select "ON" and confirm.
Download the Mobile application “De Dietrich Smart Control” onto your smartphone and follow the instructions.
- Sound
Your oven emits sounds when you use the keys. To keep these sounds, select ON, otherwise select OFF to deactivate them and confirm.
- Brightness
Select the desired brightness level.
- Lamp management
Two setting options are proposed: Position ON, the light stays on throughout cooking (except in ECO mode). AUTO position, the oven light turns off after a period of time when cooking. Choose your position and confirm.
• 4 FIRST USE AND SETTINGS
SETTINGS MENU
- Language
Choose your language and confirm.
- DEMO mode
By default, the oven is configured in normal heating mode.
If it is activated in DEMO mode (ON position), the mode for presenting products in stores, your oven will not warm up.
- Diagnostic
Access the Diagnostic menu if a problem occurs.
If you contact the After-Sales Service, you will be asked to provide the codes displayed in the diagnostic.
The “Reinitialise” option lets you reset your oven to factory settings.
CONNECTIVITY
Your oven may be connected at any moment via your Wi-Fi router using the "De Dietrich Smart Control" mobile application which must be installed on your smartphone for you to benefit from the connectivity function.
With this application, you will be able to control your oven remotely via the “De Dietrich Smart Control” application.
You will also be informed through notification messages, of events linked to your oven as if you were next to it. No need to be at home to start, preheat or change your oven's programme. To benefit from these functionalities, let the application guide you to connect your oven.
For more information, consult www.dedietrich-electromenager.com
CONNECTIVITY: QUESTIONS AND ANSWERS
| Questions Troubleshooting and Solutions | ||
| I cannot connect my product | The product's connectivity operates with 2.4 Ghz Wifi, make sure your router is configured with 2.4Ghz Wifi.Try to enter the wifi network parameters again via the applicationIf the oven still cannot connect to your wifi router, the signal may be too weak. Try to move the router closer or install a wifi repeater. | |
| I cannot finalise the creation of my account | The oven can only be controlled by a single account. Use the same account (email address) for your household. | |
| Where can I find the application? | For Android telephones:De Dietrich Smart Control | For IOS telephones:De Dietrich Smart Control II |
| Can I control several appliances with the application? | The application enables you to control different De Dietrich brand connected electrical appliances. | |

Tip: In order to maintain your appliance up to date, you need to connect your product at least once a month.
CONNECTIVITY: QUESTIONS AND ANSWERS
| Questions | Troubleshooting and Solutions |
| I am moving or changing my Wifi network param-eters | - Pair the product again.1- Reset the product by going into the Settings menu of the oven then Connectivity, and Reset: (see Settings menu).2- Smartphone application, see Menu, then Product Management, andReconnect the product. |
| I am selling my product* | - From the application menu, go into "Product management" then "delete my product".- If you have a single product, you can delete your customer account via the application by going into My Account and delete account |
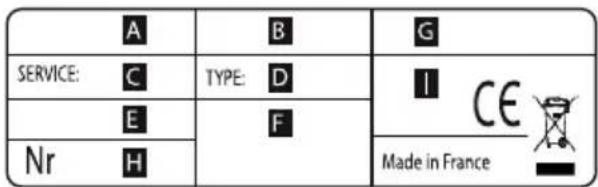
| I cannot find the QR code for the product | - To establish the connection with your oven, the application will ask you to scan its QR code or enter its serial number. This information is on the nameplate, such as shown below, visible when you open the oven door.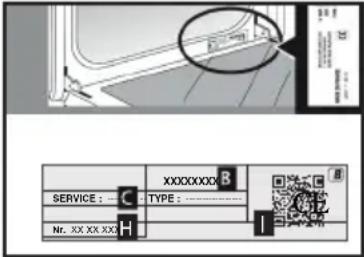 B: Commercial referenceC: Service referenceH: Serial numberI: QR Code B: Commercial referenceC: Service referenceH: Serial numberI: QR Code |
Compliance declaration
We, Brandt France, declare the appliance equipped with the Smart Control function complies with directive 2014/53/EU. The full EU declaration of compliance is available on the following website: www.dedietrich-electromenager.com 2.4 Ghz frequency band: Max power: 100mW (20 dbm) Brandt France may not be held liable:
In the event of any data transmission loss, delay or error outside of its control, if this data was not transferred to it for whatever reason, or if the data it receives is illegible or cannot be processed; should the user be unable to access or use the application and associated services for whatever reason, or if the connexion should be suspended or interrupted. Moreover, Brandt France cannot be held liable for any misuse of the terminal and/or incident linked to the use of the terminal when using the application. Brandt France may in no case be held liable for any damage of any kind caused to your terminal and any data stored on it, nor any consequences that may stem from this.
* As a safety measure, each electric appliance can only be connected to a single user account. In the event of a change of user of the appliance (the appliance is sold, for example), the first user must delete his/her user account from his/her mobile application. The new user must ensure the former account was deleted before he/she can create his/her own account by going through the same installation and registration steps as described in this manual. However, a same user account can be used on several smartphones or tablets. In the event of a change of user of the appliance (the appliance is sold, for example), the first user must delete his/her user account from his/her mobile or tablet application.

Note:
Display standby (see settings menu): After 90 seconds without any action by the user, the display brightness decreases to limit power consumption. The Wifi connexion is still maintained.

Tip
If Wifi is activated, you can use the DeDietrich Smart Control function. In standby with the Wifi connexion maintained, the appliance uses 2W maximum.
• 5 MANUAL COOKING MODE
This mode lets you set the cooking parameters yourself: temperature, cooking type, cooking time. During your navigation, you can directly access this menu by pressing the "M" key.

Pre-heat your oven empty before cooking.
| Position Recommended T°C mini - maxi | Use | ||
 | Combined heat | 205°C35°C - 230°C | Recommended for meat, fish, vegetables, preferably in an earthenware dish. |
 | Fan oven* | 180°C35°C - 250°C | Recommended for keeping white meat, fish and vegetables moist. For cooking multiple items on up to three levels. |
 | Traditional | 200°C35°C - 275°C | Recommended for meat, fish, vegetables, preferably in an earthenware dish. |
 | ECO* | 200°C35°C - 275°C | This setting saves energy while maintaining the quality of the cooking. In this setting, pre-heating is not required. |
 | Ventilated grill | 200°C100°C - 250°C | Roasts and poultry are juicy and crisp all over. Slide the drip tray on to the bot-tom shelf support. Recommended for all spit-roasted poultry or meat, for sealing and thoroughly cooking a leg or a rib of beef. To retain the moist texture of fish steaks. |
 | Bottom heat ventilated | 180°C75°C - 250°C | Recommended for meat, fish, vegetables, preferably in an earthenware dish. |
*Cooking mode as per standard EN 60350-1: 2016 to demonstrate compliance with requirements of the energy label of European regulation UE/65/2014.

Never place tin foil directly in contact with the oven floor as the build up of: may damage the enamel.

Advice on how to save energy
Avoid opening the door during cooking to avoid heat escaping from the oven.
• 5 MANUAL COOKING MODE
| Position Recommended | Use | ||
| T°C mini - maxi | |||
 | Variable grill | 41 - 4 | Recommended for grilling cutlets, sausages, toasting bread and prawns placed on the grill. Cooking controlled by the upper element. The grill covers the entire shelf surface. |
 | Keep warm | 60°C35°C - 100°C | Recommended for letting dough rise for bread, brioche, kügelhopf. |
 | Air Fry | 200°C180°C - 220°C | Ideal for tasty and healthy cooking, this programme associated with the use of the perforated tray enables you to cook and brown your vegetables, chips, breaded food and tempuras in your over without (or with very little) fat. |
 | Defrost | 35°C30°C - 50°C | Ideal for delicate dishes (fruit tarts, custard pies, etc.). Meat, rolls, etc. are defrosted at 50°C (meat should be placed under the grill with a dish underneath to catch the drips). |
 | Doughproofing | 40°C | Programme recommended for all types of dough to rise, such as bread, brioche, pizza, kouglof, etc. Place your dish directly onto the bottom of the oven. |
 | Drying | 80°C35°C - 80°C | Sequence to dehydrate certain food items such as fruits, vegetables, roots, seasoning plants and herbs. Refer to the specific drying table on p 18. |
START A COOKING PROGRAMME
IMMEDIATE COOKING
When you have selected and validated your cooking function, example: Ventilated floor, press the knob to confirm, preheating starts; a beep informs you the oven has reached the set temperature. You can now place your dish in the oven at the recommended shelf height.
NB: Some settings can be modified before starting cooking
(temperature, cooking time and delayed start) see following chapters.
CHANGING THE TEMPERATURE
Based on the type of cooking you already selected, the oven will recommend the ideal cooking temperature.
This can be adjusted as follows: Select temperature and confirm.
Turn the control knob to change the temperature then confirm your choice.
COOKING TIME
You can enter the cooking time for your dish by selecting time, then turn the control knob to set your cooking time and confirm.
SETTING THE COOKING END TIME
(delayed start)
When you set the cooking time, the end of cooking time automatically adjusts. You can change the end of cooking time if you want to delay the programme start.
- Select cooking end time and confirm.
Once you have set the cooking end time, confirm. The cooking end time remains displayed.
NB: You may start cooking without selecting a duration or end time.
In this case, when you feel that you have cooked your dish for long enough, stop cooking (see the "Stopping cooking in progress" chapter).
STOPPING COOKING IN PROGRESS
To stop a cooking programme in progress, press the control knob.
Select "STOP".
Confirm by selecting "YES" then validate or select "NO" and validate to continue cooking.
• 6 COOKING TIPS
AIR FRY FUNCTION
Place your food directly onto the perforated tray by spreading the items out without overlapping, select the Air Fry cooking mode and set the temperature between 180^ C and 220^ C. Insert the perforated tray at level 5 and the drip tray at level 3 to catch any cooking residues.
natural_image
3D rendering of a perforated metal tray with a small handle at the bottom (no text or symbols)AIR FRY INDICATIVE TABLE
at 200°C preheating to be considered except *
| Duration Weight | |
| Chicken wings 25 min 500 g | |
| Fresh chips 30 min 700 g | |
| Frozen chips 30 min 700 g | |
| Fresh diced vegetables (courgettes / aubergines / peppers) | 30 min* 500 g |
| Chicken nuggets 10 min 250 g | |
| Breaded fish 15 min 250g / 2 | portions |

DRYING FUNCTION
Drying is one of the oldest methods of preserving food. The aim is to remove all or some of the water in the food to preserve foodstuffs and prevent the development of microbes. Drying preserves the nutritional qualities of food (minerals, proteins and other vitamins). It allows food to be stored in optimal conditions thanks to their reduced size and makes food easy to use once re-hydrated.
Only use fresh food.

Only use fresh food.
Wash the food carefully, drain and wipe. Cover the grill in parchment paper and distribute the cut food evenly on top.
Use shelf level 1 (if you have several grill pans, put them on levels 1 and 3).
Turn the moist food over several times during drying. The values provided in the table may vary depending on the type of food to dehydrate, its maturity, its thickness and its humidity rate.
GUIDE TABLE TO DEHYDRATE YOUR FOOD
| Fruits, vegetables and herbs Temperature Time in hours | Accessories | |
| Fruits with seeds (3 mm thick slices, 200 g per grill pan) | 80°C 5-9 1 or 2 grill pans | |
| Fruits with stones (plums) 80°C 8-10 1 or 2 grill pans | ||
| Root vegetables (carrots, parsnips) grated, blanched | 80°C 5-8 1 or 2 grill pans | |
| Sliced mushrooms 60°C 8 | 1 or 2 grill pans | |
| Tomato, mango, orange, banana | 60°C 8 | 1 or 2 grill pans |
| Sliced red beetroot | 60°C 6 | 1 or 2 grill pans |
| Herbs | 60°C 6 | 1 or 2 grill pans |
• 7 AUTOMATIC COOKING MODE
PRESENTATION OF THE AUTOMATIC MODE
In the AUTO mode, you will find many varied recipes sorted into categories, which you can cook in different ways. The oven AI will offer you automatically a preselected automatic cooking mode or alternatives to be selected from the navigation interface.
AI SENSOR
This mode will completely simplify cooking for you because the oven will automatically calculate all the cooking parameters (temperature, cooking time, cooking mode) based on the selected dish thanks to its electronic sensors located in the oven that constantly measure the moisture level and temperature variations.
Cooking must ABSOLUTELY begin in a cool oven.
LOW TEMPERATURE
For a recipe managed completely by the oven using a specific electronic programme.
This cooking mode makes meat fibres tender thanks to slow cooking at low temperature. Cooking quality is optimal.
Cooking must ABSOLUTELY begin in a cool oven.
Cooking at low temperature requires food to be extremely fresh. For poultry, it is important to rinse the outside and inside with cold water and to dry with absorbent paper before cooking.
AI
This mode selects for you the suitable cooking parameters based on the food to be prepared. For some types of food, some additional parameters must be entered (weight, size, etc.)
• 7 AUTOMATIC COOKING MODE
PRESENTATION OF DISH CATEGORIES
In the general menu, select the "AUTO" function by turning the control knob and confirm. Different dish categories are available to you:
- Meat, Fish, Dishes, Bread & Doughs, Desserts, World Recipes. Select the setting you want by turning the control knob then confirm.

Tip
Before inserting your dish, for all cooking programmes, the oven indicates which shelf level to place your dish on
| MEAT AI SENSOR AI | LOW TEMPERATURE | |
| MEAT TERRINE | O | |
| SHOULDER OF LAMB | O | |
| DE-BONED LEG OF LAMB O | O | |
| LEG OF LAMB ON THE BONE O | O | |
| VEAL RIBS | O | |
| VEAL ROAST | O | O |
| PORK SHANK | O | |
| PORK LOIN | O | |
| FILET MIGNON | O | O |
| PORK ROAST O O O | ||
| BEEF ROAST O O O | ||
| Poultry O O O | ||
| DUCK | O | |
| DUCK BREAST | O | |
| TURKEY LEG | O | |
| TURKEY | O | |
| GOOSE | O |
RECOMMENDATIONS FOR THE AI SENSOR MODE
De-boned leg of lamb(2 cooking modes):
1.4 kg to 1.8kg
Well done de-boned leg of lamb
Pink de-boned leg of lamb
Select a leg that is round and plump rather than long and lean. Place the leg in the drip tray.
Let sit after cooking.
Leg of lamb on the bone(2 cooking modes):
2 kg to 2.8kg
Well done leg of lamb on the bone Pink leg of lamb on the bone
Select a leg that is round and plump rather than long and lean. Place the leg in the drip tray.
Let sit after cooking.
Roast pork
700 g to 1.4kg
Loin, fillet
Place the roast on the grill using the grill + drip tray assembly. At the end of cooking, allow the meat to sit for 7 to 10 minutes before carving. Add salt when cooking is finished.
Roast beef (3 cooking modes):
(800 g to 1.6 kg) Rare beef
Medium beef
Well done beef
Trim away as much fat as possible: it causes smoke.
Place the roast in the drip tray.
Once cooked, allow the meat to sit for 7 to 10 minutes before carving.
Chicken
Chickens from 1.4 kg to 2.5 kg
Duck, guinea fowl
Place the chicken on the rack of the rack + drip tray assembly.
Pierce the skin of poultry to avoid splattering.
• 7 AUTOMATIC COOKING MODE
PRESENTATION OF DISH CATEGORIES
| FISH AI SENSOR AI | LOW TEMPERATURE | |
| TROUT O O O | ||
| SALMON O O O | ||
| LARGE FISH O O O | ||
| SMALL FISH O O O | ||
| SEA BASS O O O | ||
| LOBSTER | O | |
| FISH TERRINE | O |
RECOMMENDATIONS FOR THE AI SENSOR MODE
Fish
400 g to 1kg
Whole fish (bream, hake, trout, mackerel, fish roasts). Not suitable for flat fish.
Only use this function with whole fish.
Use the multi-purpose tray.
PRESENTATION OF DISH CATEGORIES
| TYPE OF FOOD AI SENSOR AI | LOW TEMPERATURE | |
| STUFFED VEGETABLES O O | ||
| VEGETABLE GRATIN | O | |
| STUFFED TOMATOES O O | ||
| LASAGNE | O | |
| MEAT PIE | O | |
| SAVOURY TART O O | ||
| CHEESE TART O O | ||
| QUICHE O O | ||
| PIZZA O O | ||
| POTATO GRATIN | O | O |
| MOUSSAKA | O | |
| SOUFFLÉ O O |
RECOMMENDATIONS FOR THE AI SENSOR MODE
Pizza
300 g to 1.2kg
Store-bought pizza - fresh dough
Ready-to-use pizza dough
• "Home-made" pizza dough
Place it on the grill for a crispy crust (you can place a sheet of parchment paper between the grid and the pizza to protect the oven from cheese drippings).
Savoury tart
Fresh quiches
Frozen quiches
Use a non-stick aluminium mould:
the crust will be crispy on the bottom.
Remove the tray from frozen quiches before placing them on the grid.
Stuffed vegetables
Stuffed tomatoes, stuffed peppers
Fish pie.
Properly adjust the dimensions of the dish to the quantity of food to be cooked to avoid juices spilling over.
• 7 AUTOMATIC COOKING MODE
PRESENTATION OF DISH CATEGORIES
| TYPE OF FOOD AI SENSOR AI | LOW TEMPERATURE | |
| BRIOCHE | O | |
| BAGUETTES | O | |
| BREAD | O | |
| SHORTCRUST PASTRY | O | |
| PUFF PASTRY | O |
PRESENTATION OF DISH CATEGORIES
| DESSERTS AI SENSOR AI | LOW TEMPERATURE | ||
| YOGHURT | O | ||
| RUM BABA | O | ||
| KOUGLOF | O | ||
| BASQUE CAKE | O | ||
| GALETTE DES ROIS | O | ||
| FAR BRETON | O | ||
| KOUIGN AMANN | O | ||
| CLAFOUTIS | O | ||
| CHOCOLATE FONDANT | O | ||
| SPONGE CAKE | O | ||
| APPLE CAKE O O | |||
| POUND CAKE O O | |||
| LOAF CAKE O O | |||
| CHOCOLATE CAKE O O | |||
| YOGHURT CAKE O O | |||
| TATIN TART | O | ||
| FRUIT CRUMBLE | O | ||
| FRUIT PIE O O | |||
| BISCUITS/COOKIES O O | |||
| CUPCAKES | O | ||
| MADELEINES | O | ||
| FINANCIERS | O | ||
| MACARONS | O | ||
| CANNELES | O | ||
| CHOUX PASTRY | O | ||
| MERINGUES | O | ||
| CRÈME BRÛLÉES | O | ||
| CRÈME CARAMEL | O |
• 7 AUTOMATIC COOKING MODE
Select the “WORLD RECIPES” mode to discover dishes from around the world through all our recipes. Simply select the recipe and its weight, and the oven will select the most suitable parameters.
Find the “World Recipes” mode on the DE DIETRICH SMART CONTROL application to follow these step-by-step recipes specially designed for your oven.
| WORLD RECIPES SWEET | COUNTRY |
| Babka Poland | |
| Baklava Turkey | |
| Brioche Switzerland | |
| Chokladfarn Sweden | |
| Chrik Algeria | |
| Papaya flan Madagascar | |
| Jablecznik Poland | |
| Kanelbullar Sweden | |
| Kapflern Germany | |
| Orange blossom kourabies Greece | |
| Malva pudding South Africa | |
| Marzipan Buchteln Germany | |
| Miguelitos Spain | |
| Panettone Italy | |
| Pastéis de nata Portugal | |
| Pudding Great Britain | |
| Robinson | France Martinique |
| Rocher coco | Congo |
| Scones | Great Britain |
| Stollen | Germany |
| Tarta de Santiago | Spain |
| Torta della nonna | Italy |

Tip
You can also select world recipes per country
• 7 AUTOMATIC COOKING MODE
| WORLD RECIPES SAVOURY | COUNTRY |
| Bacalhau Portugal | |
| Baeckeffe France | |
| Börek Turkey | |
| Canneloni Italy | |
| Carbonade Belgium | |
| Empanadas de carne Argentina | |
| Fabada asturiana Spain | |
| Moroccan-style leg of lamb Morocco | |
| Karaage Japan | |
| Salmon koulibiac Russia | |
| Lacquered salmon fillets Japan | |
| Chicken curry India | |
| Chicken tandoori India | |
| Tikka massala chicken India | |
| Sausage rougail | France Reunion Island |
| Vegetable tian | France |
• 7 AUTOMATIC COOKING MODE
STARTING AN AUTOMATIC COOKING PROGRAMME
The “AUTO” function selects for you the suitable cooking parameters based on the food to be prepared.
IMMEDIATE COOKING
Select the "AUTO" mode when you are in the general menu then confirm.
The oven suggests several categories of dishes (Meat, Fish, Dishes, Bread & Doughs, Desserts, World Recipes):
Your oven offers the AI sensor cooking mode in priority so there are no settings for you to adjust. Simply press 'Start cooking'. The shelf height displays, insert your dish and confirm.

Do not open the oven door during AI sensor cooking programme.
Depending on the dish selected or the oven status (already preheated), the AI mode suggests a default weight which you will need to adjust if necessary before confirming. The oven automatically calculates the cooking time and temperature parameters. The shelf height displays, insert your dish and confirm.
- The oven beeps and turns off when the cooking time is finished; your screen then indicates that the dish is ready.

For certain AI recipes, the oven is be preheated before you place dish in it.
You may open your oven to baste your dish at any time during cooking.
COOKING END OPTIONS (ACCORDING TO THE TYPE OF COOKING)
Once cooked in both the manual and Auto mode, the oven offers three options to adjust to the expected result: CRISP, KEEP WARM and ADD 5 MIN.
CRISP
You can brown a dish once cooked with the "Crisp" function.
Select a cooking function, add the temperature and set a cooking time. Then select the "Crisp" function and confirm by pressing the control knob.
Cooking starts. A symbol displays at the bottom right of the screen and the grill will automatically switch on during the 5 last minutes of your cooking time.

Note:
The ‘CRISP’ option may be configured at the start of cooking, during cooking or at the end of the set cooking time.
ADD 5 MIN (only in manual mode) You can select the "ADD 5 MIN" option at the end of your cooking with a set time. By activating "ADD 5 MIN", the oven will use the same cooking mode and temperature settings for 5 more minutes. You may press this again if necessary.
KEEP WARM
Once cooked, you can select the “KEEP WARM” option, which enables you to leave your dish in the oven without overcooking it. The oven temperature will adjust to an eating temperature until you are ready.

FAVOURITES
AVAILABLE FOR THE MANUAL AND AUTO MODES
The "Favourites" function lets you save 3 manual cooking modes and 3 auto cooking modes that you make frequently.
During a manual or auto cooking programme, press the control knob and turn it to “Add to favourites”. To save it, press to confirm.
Your cooking is then memorised as "FAVORI MANUAL 1".
Confirm again to start cooking.
NB: If the 3 favourites are already used up, any new memorisation will replace the favourite you selected.
TIMER FUNCTION
This function can only be used when the oven is off.
- Select the "TIMER" function by turning the control knob and confirm.
To cancel, return to the minute minder menu and set to 00:00.
If you press the control knob during the countdown you will stop the minute minder.
00:00 is displayed on the screen.
Set the minute minder by turning the knob and then press to confirm. The timer starts.
Once the time has lapsed, there is a sound signal. To stop it, press any key.
Note: You can modify or cancel the minute minder at any time.
. 9 CARE
CLEANING AND MAINTENANCE:
EXTERNAL SURFACE
Use a window washing product applied to a soft cloth. Do not use abrasive creams or scouring sponges.
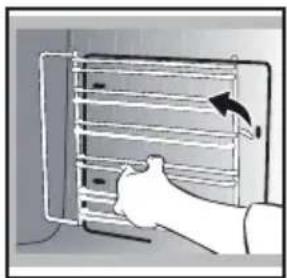
REMOVING THE SHELF RUNNERS
Side liners with shelf runners:
Lift the front part of the shelf runner upwards. Press the entire shelf runner and release the front hook from its housing. Then, gently pull the whole of the shelf runner towards you to release the rear hooks from their housing. Pull out the two shelf supports.
natural_image
Illustration of a hand inserting a rack into a device (no text or symbols visible)
natural_image
Illustration of a hand inserting a rack into a device (no text or symbols visible)CLEANING THE OVEN DOOR GLASS PANELS

Warning
Do not use scouring products, abrasive sponges or metal scrapers to clean the glass oven door as this could scratch the surface and cause the glass to shatter.
Before doing this, remove any excess grease on the inside panel with a soft cloth and washing up liquid.
To clean the different inside glass panels, disassemble them as follows:
Open the door fully and block it with one of the plastic wedges provided in your appliance's plastic pouch.
natural_image
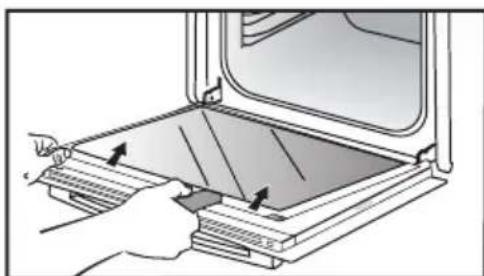
Illustration of a hand inserting a component into a device, with no visible text or symbolsRemove the first clipped glass panel: Using the other wedge (or a screwdriver), press into the slots Ⓐ to unclip the glass.
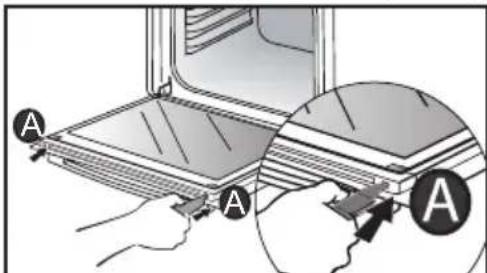
Remove the glass panel. The door consists of two additional glass panels, with a black rubber spacer at each corner.
natural_image
Illustration of a hand placing a tray with arrows into an open oven (no text or symbols)
. 9 CARE
If necessary, remove them to clean them.
Do not soak the glass panels in water. Rinse with clean water and dry off with a lint-free cloth.
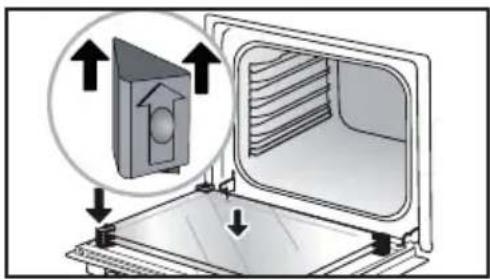
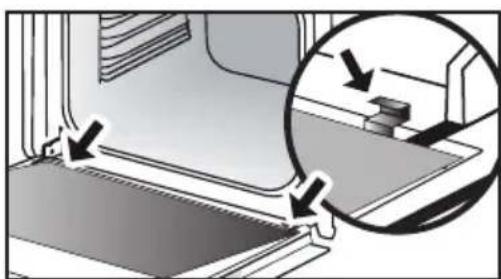
After cleaning, reposition the four rubber stops with the arrows upwards and reposition all of the glass panels.
Insert the last panel into the metal stops, then clip it in, with the side with "PYROLYTIC" facing you and legible.
natural_image
Diagram showing a mechanical component with arrows indicating motion or force direction, no text or symbols present
natural_image
Diagram of a printer or printer with an open lid and a magnified view showing internal structure (no text or symbols)Remove the plastic wedge.
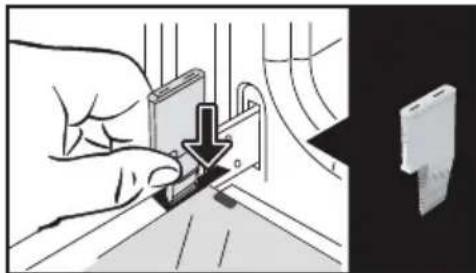
REMOVING AND REFITTING THE "SENSOR" PLATE
You can remove the “SENSOR” plate which informs your of the presence of a humidity sensor linked to the AI SENSOR mode. To clean it, use the plastic wedge provided to remove the door.
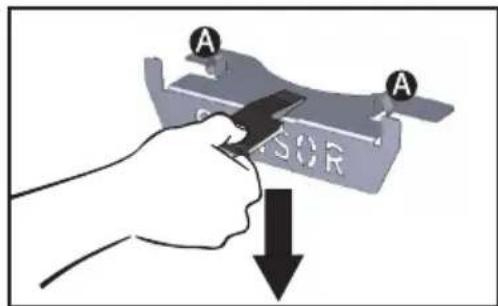
Removal:
Slide the wedge between the "SENSOR" plate and the top of the oven and push down to unclip it.
Refitting: Grab the “SENSOR” plate and firmly insert the notchesA into the corresponding housings at the top.
PYROLYTIC SELF-CLEANING

Remove the accessories and supports from the oven before beginning pyrolysis cleaning. Before starting a pyrolysis cleaning cycle, make sure that any accessories that are not pyrolysis safe have been removed from the oven (sliding rails, chrome-plated racks) as well as any cookware.
This oven is equipped with a pyrolytic self-cleaning function: Pyrolysis is a cycle during which the oven cavity is heated to a very high temperature in order to eliminate soiling from splattering and spills. Before starting pyrolysis cleaning, remove any large overspills, if any. Remove the excess grease on the door using a damp sponge. As a safety measure, cleaning only occurs after the door locks automatically; it is impossible to unlock the door.
Three pyrolysis cycles are proposed. The durations are pre-selected and cannot be modified:
PERFORM A SELF-CLEANING CYCLE

Pyro Auto: between 1h30 and
2h15 for an energy-saving cleaning cycle.

Pyro Express: This function, which is also accessible once cooking is finished, uses the heat built up during a previous cooking cycle to quickly and automatically clean the inside of the oven: it cleans a mildly dirty cavity in less than an hour.
If the heat inside your oven is sufficient: this pyrolysis takes as little as 59 min, and up to 1h30.

Pyro 2H: in 2h for more in-depth cleaning of the inside of the oven.
IMMEDIATE SELF CLEANING
Select the "CLEANING" function when you are in the general menu then confirm.
- Select the most suitable self cleaning cycle, for example PYRO AUTO, and confirm.
The pyrolysis cycle begins. The time starts to count down immediately it is set.
During pyrolysis, the symbol displays in the programmer to indicate that the door is locked.
After the pyrolysis, a cooling phase occurs during which your oven remains unavailable.

When the oven is cool, use a damp cloth to remove the white ashes. The oven is clean and once again ready for the cooking application of your choice.
SELF CLEANING WITH DELAYED START
Follow the instructions described in the previous section.
Select the cooking end time.
Set the pyrolysis end time you want with the control knob and confirm.
After a few seconds, the oven
goes into standby and the start of pyrolysis is delayed so that it finishes at the set time.
When the pyrolysis is complete, switch your oven off by pressing the ⏻key.
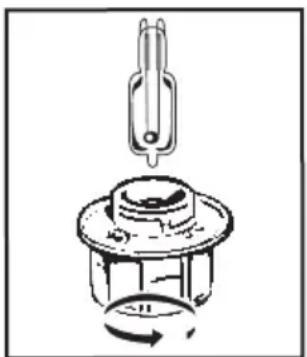
REPLACING THE LIGHT BULB

Warning: Make sure the appliance is disconnected from the power supply before replacing the bulb in order to avoid the risk of electric shock. Change the lamp only when the appliance has cooled down.
Bulb details: 25 W, 220-240 V\~, 300°C, G9.
natural_image
Mechanical component diagram showing a pin and rotating knob (no text or symbols)You can replace the bulb yourself.
Unscrew the view port and remove the bulb (use a rubber glove, which will make it easier
to remove). Insert the new bulb and replace the view port.
This product contains a light source with energy rating G.
• 10 TROUBLESHOOTING AND SOLUTIONS
| Questions | Troubleshooting and Solutions |
| "AS" is displayed (Auto Stop sys-tem). | This function stops heating the oven if you forget to switch it off. Turn your oven to STOP. |
| Default code starting with "F". | Your oven has detected a problem. Stop the oven for 30 minutes. If the fault is still there, cut off the power supply for at least one minute. If the fault persists, contact the After Sales Service. |
| The oven is not heating. | Check that the oven is correctly con- nected and that your installation's fuse is not out of service. Check that the oven is not set to "DEMO" mode (see settings menu). |
| The oven light is not working. | Replace the bulb or the fuse. Check that the oven is correctly connected. See chapter on replacing the light bulb. |
| The cooling fan continues to operate after the oven stops. | This is normal. It can work for up to one hour after cooking to cool down the oven. If it continues beyond this, contact the After Sales Service. |
COOKING TIPS FOR THE MANUAL MODE
| TYPE OF FOOD | *  | **  |  |  |  |  | Cooking time in minutes | |||||||
| [10/19] | LEVEL | [12/27] | LEVEL | [31/20] | LEVEL | [37/26] | LEVEL | [10/27] | LEVEL | [4/24] | LEVEL | |||
| MEAT | Roast pork (1 kg) 200 2 | 190 2 | 60 | |||||||||||
| Roast veal (1 kg) 200 2 | 190 2 | 60-70 | ||||||||||||
| Roast beef 240 2 | 200 2 | 30-40 | ||||||||||||
| Lamb (leg, shoulder 2.5 kg) 2 | 20 2 220 | 2 | 200 2 | 210 2 | 60 | |||||||||
| Poultry (1kg) 200 3 220 3 | 210 3 | 185 3 | 60 | |||||||||||
| Chicken thighs | 220 3 | 210 3 | 20-30 | |||||||||||
| Pork/veal chops | 210 3 | 20-30 | ||||||||||||
| Beef ribs (1 kg) | 210 3 | 210 3 | 20-30 | |||||||||||
| Mutton ribs | 210 3 | 20-30 | ||||||||||||
| FISH | Grilled fish | 275 4 | 15-20 | |||||||||||
| Cooked fish (bream) | 200 3 | 190 3 | 30-35 | |||||||||||
| Fish papillotte | 220 3 | 200 3 | 15-20 | |||||||||||
| VEGETABLES | Gratins (precooked ingredients) | 275 2 | 30 | |||||||||||
| Potato gratins | 200 3 | 180 3 | 45 | |||||||||||
| Lasagne | 200 3 | 180 3 | 45 | |||||||||||
| Stuffed tomatoes 170 3 | 170 3 | 30 | ||||||||||||
| PASTRIES AND CAKES | Sponge cake - Génoise | 180 3 | 180 4 | 35 | ||||||||||
| Swiss roll | 220 3 | 180 2 | 190 3 | 5-10 | ||||||||||
| Brioche | 180 3 | 200 3 | 180 3 | 180 3 | 35-45 | |||||||||
| Brownies | 180 2 | 180 2 | 20-25 | |||||||||||
| Cake - Pound cake | 180 3 | 180 3 | 180 3 | 45-50 | ||||||||||
| Clafoutis | 200 3 | 190 3 | 30-35 | |||||||||||
| Cookies - Shortbread | 175 3 | 170 3 | 15-20 | |||||||||||
| Kugelhopf | 180 2 | 40-45 | ||||||||||||
| Meringues | 100 4 | 100 4 | 100 4 | 60-70 | ||||||||||
| Madeleines | 220 3 | 210 3 | 5-10 | |||||||||||
| Choux pastry | 200 3 | 180 3 | 200 3 | 30-40 | ||||||||||
| Individual puff pastry | 220 3 | 200 3 | 5-10 | |||||||||||
| Savarin cake 180 3 | 175 3 | 180 3 | 30-35 | |||||||||||
| Shortcrust pastry tart 200 1 | 200 1 | 30-40 | ||||||||||||
| Thin puff pastry tart | 215 1 | 200 1 | 20-25 | |||||||||||
| VARIOUS | Terrine pâté | 200 2 | 190 2 | 80-100 | ||||||||||
| Pizza | 240 1 | 15-18 | ||||||||||||
| Quiche | 190 1 | 180 1 | 190 1 | 35-40 | ||||||||||
| Soufflé | 180 2 | 50 | ||||||||||||
| Pie | 200 2 | 190 2 | 40-45 | |||||||||||
| Bread | 220 2 | 220 2 | 30-40 | |||||||||||
| Toasted bread | 275 | 4-5 | 2-3 | |||||||||||
Note: Before putting them in the oven, all meats must be kept at room temperature for at least one hour.
* Depending on model
FUNCTIONAL SUITABILITY TESTS IN ACCORDANCE WITH IEC/EN 60350 STANDARD
| FOOD | COOKING MODE | LEVEL AC | CESSORIES °C Min. TIME | PREHEATING | |
| Short-bread (8.4.1) |  | 5 | 45-mm pan | 150 30-40 yes | |
| Short-bread (8.4.1) |  | 5 | 45-mm pan | 150 25-35 yes | |
| Short-bread (8.4.1) |  | 2+ 5 | 45 mm pan + wire rack | 150 25-45 yes | |
| Short-bread (8.4.1) |  | 3 | 45-mm pan | 175 25-35 yes | |
| Short-bread (8.4.1) |  | 2+ 5 | 45 mm pan + wire rack | 160 30-40 yes | |
| Small cakes |  | 5 | 45-mm pan | 170 25-35 yes | |
| Small cakes |  | 5 | 45-mm pan | 170 25-35 yes | |
| Small cakes |  | 2+ 5 | 45 mm pan + wire rack | 170 20-40 yes | |
| Small cakes |  | 3 | 45-mm pan | 170 25-35 yes | |
| Small cakes |  | 2+ 5 | 45 mm pan + wire rack | 170 25-35 yes | |
| Fat-free sponge cake (8.5.1) |  | 4 | wire rack | 150 30-40 yes | |
| Fat-free sponge cake (8.5.1) |  | 4 | wire rack | 150 30-40 yes | |
| Fat-free sponge cake (8.5.1) |  | 2+ 5 | 45 mm pan + wire rack | 150 30-40 yes | |
| Fat-free sponge cake (8.5.1) |  | 3 | wire rack | 150 30-40 yes | |
| Fat-free sponge cake (8.5.1) |  | 2+ 5 | 45 mm pan + wire rack | 150 30-40 yes | |
 | |||||
| Apple pie (8.5.2) |  | 1 | wire rack | 170 90-120 yes | |
| Apple pie (8.5.2) |  | 1 | wire rack | 170 90-120 yes | |
| Apple pie (8.5.2) |  | 3 | wire rack | 180 90-120 yes | |
| Browned surface (9.2.2) |  | 5 | wire rack | 275 3-6 yes |
* Depending on model
NOTE: When cooking on 2 levels, dishes can be removed at different times.
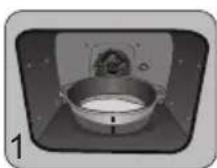
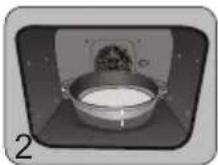
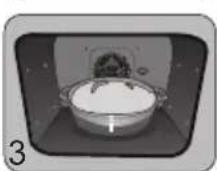
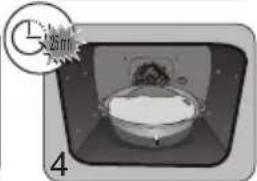
Recipe with yeast (depending on model)
Ingredients:
- Flour 2 kg - Water 1240 ml - Salt 40 g - 4 packs of dried baker's yeast Mix the dough with an electric mixer and proof it in the oven.
Method: For yeast-based pastry recipes. Place the dough in a heat-resistant dish, remove the shelf-runner supports and place the dish on the oven floor.
Pre-heat the oven to 40--50°C with the circulating heat function for five minutes. Stop the oven and allow the dough to rise for 25-30 minutes thanks to the residual heat.
natural_image
Illustration of a bowl with a lid and a small inset showing a clock (no text or symbols)Domestic Electric Oven - Product Fiche As per the Commission Delegated Regulation (EU) N° 65/204
| Trade Mark | DE DIETRICH |
| Commercial code | DOP4756* |
| Energy Efficiency Index (EEI cavity) | 81,4 |
| Energy Efficiency Class | A+ |
| Energy consumption per cycle in conventional mode | 0,70kWh |
| Energy consumption per cycle in fan-forced convection mode | 1,10kWh |
| Number of cavities | 1 |
| Heat source(s) per cavity | Electric |
| Volume of the cavity | 73l |
| European Union eco-label |

VÁŽENÁ ZÁKAZNICE, VÁŽENÝ ZÁKAZNÍKU
natural_image
Diagram of a kitchen appliance with a grater and a black arrow indicating direction (no text or symbols)natural_image
3D CAD model of a rectangular tray or enclosure with internal compartments and a black arrow indicating direction (no text or symbols)natural_image
Close-up of a gray rectangular baking tray with a black arrow pointing to it, next to a curved surface (no text or symbols). 3 POPIS TROUBY
PŘÍSLUŠENSTVÍ (PODLE MODELU)
natural_image
3D rendering of a rectangular tray with a black arrow pointing to the bottom portion (no text or symbols)natural_image
3D diagram of a kitchen appliance with a grater and ventilation grille (no text or symbols)natural_image
3D rendering of a perforated metal tray with a small indentation on the side (no text or symbols). 3 POPIS TROUBY
SYSTÉM POSUVNÝCH LIŠT
natural_image
Diagram of a microwave oven with airflow arrows indicating internal flow (no text or symbols)
natural_image
Mechanical assembly diagram showing a lever mechanism with labeled component A (no text or symbols present)
natural_image
Diagram of a rectangular tray with arrows indicating direction or movement, no text or symbols present
natural_image
Mechanical assembly diagram showing a lever mechanism with directional arrows and a magnified inset view (no text or symbols)
natural_image
3D rendering of a perforated metal tray with a small handle at the bottom (no text or symbols)ORIENTAČNÍ TABULKA AIR FRY
natural_image
Illustration of a hand inserting a rack into a device (no text or symbols visible)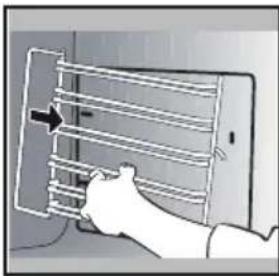
natural_image
Illustration of a hand holding a smartphone with a grid-like device on the screen (no text or symbols visible)ČIŠTĚNÍ SKLA DVEŘÍ

Upozornění
natural_image
Illustration of a hand inserting a small electronic component into a device, with no visible text or symbols.natural_image
Illustration of a hand inserting a tray into a microwave oven (no text or symbols visible)
. 9 ÚDRŽBA
natural_image
Diagram showing a mechanical component with arrows indicating motion or force, and an inset magnified view of a stepped mechanism (no text or symbols present)
natural_image
Diagram of a printer or printer with an open lid and internal structure, showing a magnified view of the printer's internal components (no text or symbols present)natural_image
Mechanical component diagram showing a pulley and rotating knob (no text or symbols)1 INSTALLATION ....6
6 GODE RÅD FOR TILBEREDNING....20
TILBEH∅R (IF∅LGE MODELLEN)
natural_image
Diagram of a kitchen appliance with a grater and a black arrow pointing to the interior (no text or symbols)natural_image
3D CAD model of a rectangular tray or container with internal compartments and a black arrow pointing to the bottom-right corner (no text or symbols)natural_image
Close-up of a gray rectangular baking tray with a black arrow pointing to it, next to a curved surface (no text or symbols)• 3 PRÆSENTATION AF OVNEN
TILBEH∅R (IF∅LGE MODELLEN)
natural_image
3D rendering of a gray tray with a black arrow pointing to the bottom portion (no text or symbols)natural_image
3D diagram of a kitchen appliance with a grater and ventilation grille (no text or symbols)natural_image
3D rendering of a perforated metal tray with a small indentation on the side (no text or symbols)• 3 PRÆSENTATION AF OVNEN
SYSTEM MED GLIDESKINNER
natural_image
Diagram of a microwave oven with airflow arrows indicating internal flow (no text or symbols)
natural_image
Mechanical assembly diagram showing a lever mechanism with labeled component A (no text or symbols beyond label)
natural_image
Diagram of a rectangular tray with arrows indicating direction or movement, no text or symbols present
natural_image
Mechanical assembly diagram showing a lever mechanism with directional arrows and a magnified inset view (no text or symbols)
natural_image
3D rendering of a perforated metal tray with a small handle at the bottom (no text or symbols)VEJLEDENDE TABEL FOR AIR FRY
natural_image
Two-panel illustration showing a person inserting a rack into a device, with arrows indicating the motion (no text or symbols present)RENG∅RING AF LÅGENS GLASRUDER

Pas på
natural_image
Illustration of a hand inserting a device into a wall, with a magnified view of the device on the right (no text or symbols present). 9 VEDLIGEHOLDELSE
natural_image
Diagram showing a mechanical assembly with an inset magnified view of a stepped component (no text or symbols present)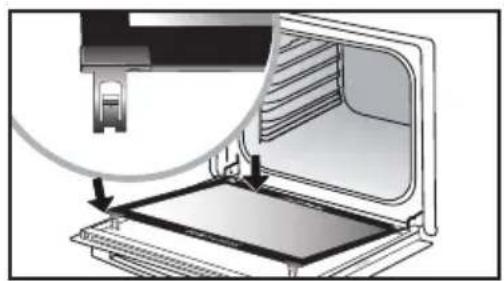
natural_image
Diagram of a device with an open panel and a magnified inset showing a mechanical component (no text or symbols)Tag plastkilen ud.
AFTAGNING OG ISÄETNING AF "SENSOR"-PLADEN
natural_image
Mechanical component diagram showing a pulley and rotating knob (no text or symbols)GODE RÅD FOR TILBEREDNING I MANUEL FUNKTION
| RETTER | * | ** |  | |  |  | Tilbered-ningstidi minutter | |||||||
| [PTSH] | NIVEAU | [266H] | NIVEAU | [AKES] | NIVEAU | [TAAT] | NIVEAU | [03A7] | NIVEAU | [SPOT] | NIVEAU | |||
| KOD | Svinesteg (1 kg) 200 2 | 190 2 | 60 | |||||||||||
| Kalvesteg (1 kg) 200 2 | 190 2 | 60-70 | ||||||||||||
| Oksesteg 240 2 | 200 2 | 30-40 | ||||||||||||
| Lam (kølle, bov 2,5 kg) 220 2 | 220 2 | 200 2 | 210 2 | 60 | ||||||||||
| Fjerkræ (1 kg) 200 3 220 3 | 210 3 | 185 3 | 60 | |||||||||||
| Kyllingelår | 220 3 | 210 3 | 20-30 | |||||||||||
| Svine/kalvekoteletter | 210 3 | 20-30 | ||||||||||||
| Oksekoteletter (1 kg) | 210 3 | 210 3 | 20-30 | |||||||||||
| Fårekoteletter | 210 3 | 20-30 | ||||||||||||
| FISK | Grillet fisk | 275 4 | 15-20 | |||||||||||
| Kogt fisk (havrude/brasen) 200 3 | 190 3 | 30-35 | ||||||||||||
| Indpakket fisk 220 3 | 200 3 | 15-20 | ||||||||||||
| GRONSAGER | Gratiner (tilberedte mad-varer) | 275 2 | 30 | |||||||||||
| Kartoffelgratin 200 3 | 180 3 | 45 | ||||||||||||
| Lasagner | 200 3 | 180 3 | 45 | |||||||||||
| Farserede tomater | 170 3 | 170 3 | 30 | |||||||||||
| KAGER | Sukkerbrødskage - Sand-kage | 180 3 | 180 4 | 35 | ||||||||||
| Rullede småkager | 220 3 | 180 2 | 190 3 | 5-10 | ||||||||||
| Brioche | 180 3 | 200 3 | 180 3 | 180 3 | 35-45 | |||||||||
| Brownies 180 2 | 180 2 | 20-25 | ||||||||||||
| Cake - Pund-til-pund | 180 3 | 180 3 | 180 3 | 45-50 | ||||||||||
| Clafoutis | 200 3 | 190 3 | 30-35 | |||||||||||
| Cookies - tørkager | 175 3 | 170 3 | 15-20 | |||||||||||
| Kugelhopf | 180 2 | 40-45 | ||||||||||||
| Marengs | 100 4 | 100 4 | 100 4 | 60-70 | ||||||||||
| Madeleinekager | 220 3 | 210 3 | 5-10 | |||||||||||
| Vandbakkelser | 200 3 | 180 3 | 200 3 | 30-40 | ||||||||||
| Petit fours af butterdej | 220 3 | 200 3 | 5-10 | |||||||||||
| Savarinkage | 180 3 | 175 3 | 180 3 | 30-35 | ||||||||||
| Mørdej | 200 1 | 200 1 | 30-40 | |||||||||||
| Butterdej til tærte | 215 1 | 200 1 | 20-25 | |||||||||||
| DIVERSE | Postej | 200 2 | 190 2 | 80-100 | ||||||||||
| Pizza | 240 1 | 15-18 | ||||||||||||
| Quiche | 190 1 | 180 1 | 190 1 | 35-40 | ||||||||||
| Soufflé | 180 2 | 50 | ||||||||||||
| Pie | 200 2 | 190 2 | 40-45 | |||||||||||
| Brød | 220 2 | 220 2 | 30-40 | |||||||||||
| Ristet brød | 275 | 4-5 | 2-3 | |||||||||||
1 INSTALLATION ....6
ZUBEHÖR (JE NACH MODELL)
natural_image
Diagram of a kitchen appliance with a grater and a black arrow indicating direction (no text or symbols)natural_image
3D CAD model of a rectangular tray or enclosure with internal compartments and mounting holes, shown with an arrow indicating direction (no text or symbols present)natural_image
Close-up of a gray rectangular baking tray with a black arrow pointing to it, next to a curved surface (no text or symbols)ZUBEHÖR (JE NACH MODELL)
natural_image
3D rendering of a gray tray with a black arrow pointing to the bottom portion (no text or symbols)
natural_image
3D diagram of a kitchen appliance with a mesh tray and an arrow pointing to it (no text or symbols)
natural_image
3D rendering of a rectangular metal tray with perforated surface and a small indentation at the bottom (no text or symbols)natural_image
Diagram of a microwave oven with airflow arrows indicating internal flow (no text or symbols)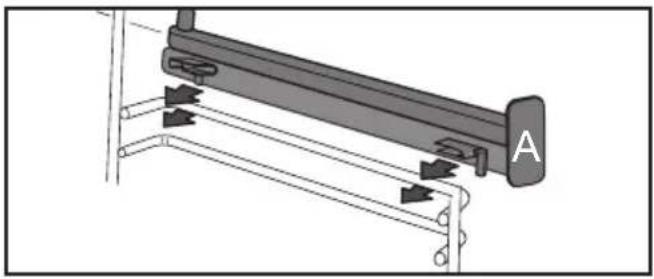
natural_image
Mechanical assembly diagram showing a lever mechanism with labeled component A (no text or symbols beyond label)
natural_image
Diagram of a rectangular tray with arrows indicating direction or movement, no text or symbols present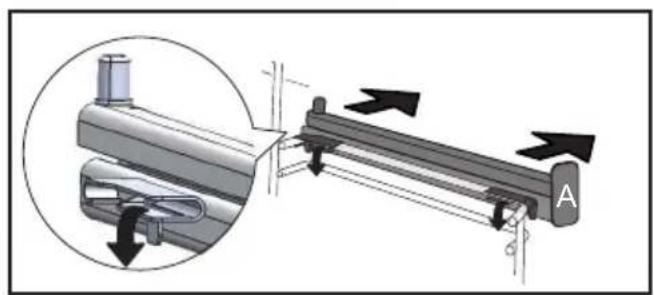
natural_image
Mechanical assembly diagram showing a lever mechanism with directional arrows and a magnified inset view (no text or symbols)natural_image
3D rendering of a perforated metal tray with a small handle at the bottom (no text or symbols)TABELLE MIT RICHTWERTEN FÜR AIR FRY
natural_image
Illustration of a hand inserting a rack into a device (no text or symbols visible)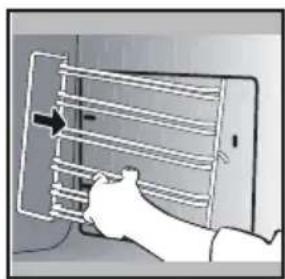
natural_image
Illustration of a hand holding a smartphone with a grid of horizontal bars and an arrow pointing to it (no text or symbols present)natural_image
Illustration of a hand inserting a device into a panel, with a magnified view of the device (no text or symbols present)natural_image
Illustration of a hand placing a slide into a refrigerator with arrows indicating motion (no text or symbols)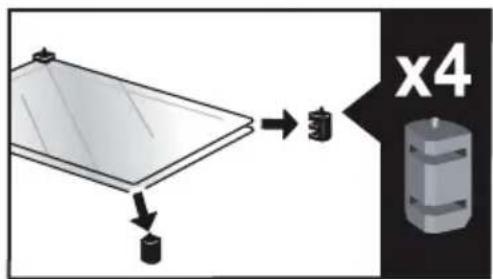
. 9 PFLEGE
natural_image
Diagram showing a mechanical component with arrows indicating motion or force, and an inset magnified view of a stepped structure (no text or symbols present)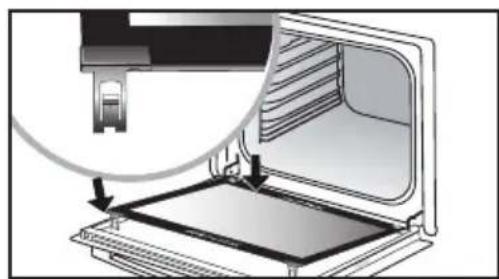
natural_image
Diagram of a device with an open lid and a magnified inset showing internal structure (no text or symbols)Ausbau:
natural_image
Mechanical component diagram showing a lever and rotating knob (no text or symbols)natural_image
Diagram of a kitchen appliance with a grater and a black arrow pointing to the interior (no text or symbols)natural_image
3D CAD model of a rectangular tray or enclosure with internal compartments and a black arrow indicating direction (no text or symbols)natural_image
Close-up of a gray rectangular baking tray with a black arrow pointing to it, next to a curved surface (no text or symbols)natural_image
Close-up of a gray tray with a black arrow pointing to the bottom portion (no text or symbols visible)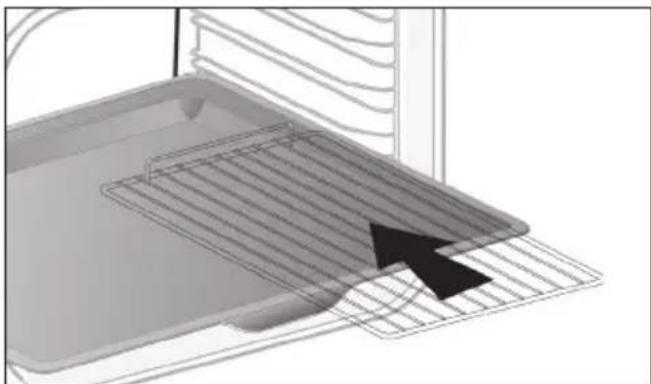
natural_image
3D diagram of a kitchen appliance with a grater and ventilation grille (no text or symbols)
natural_image
3D rendering of a perforated metal tray with a small base (no text or symbols)natural_image
Diagram of a microwave oven with airflow arrows indicating internal flow (no text or symbols)
natural_image
Mechanical assembly diagram showing a lever mechanism with labeled component A (no text or symbols beyond label)
natural_image
Diagram of a rectangular tray with arrows indicating direction or movement, no text or symbols present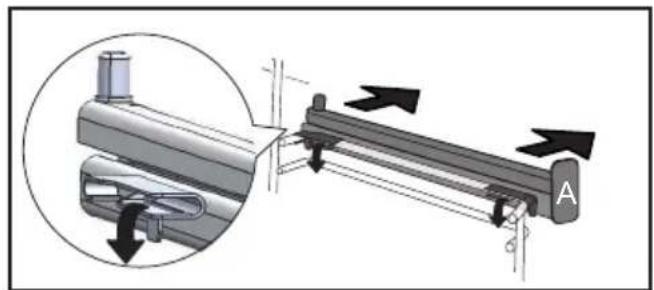
natural_image
Mechanical assembly diagram showing a lever mechanism with directional arrows and a magnified inset view (no text or symbols)
natural_image
3D rendering of a perforated metal tray with a small handle at the bottom (no text or symbols)TABLA INDICATIVA DE AIR FRY
natural_image
Two-panel illustration showing a person inserting a rack into a device, with arrows indicating the motion (no text or symbols present)natural_image
Illustration of a hand using a tool to adjust or install a component, with no visible text or symbols.natural_image
Illustration of a hand inserting a tray into a device with arrows indicating direction (no text or symbols)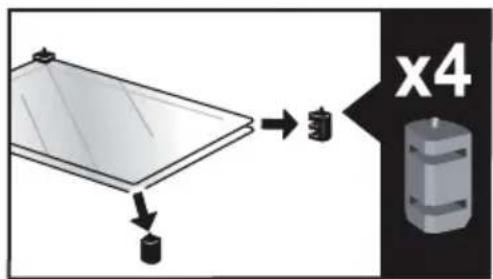
. 9 MANTENIMIENTO
natural_image
Diagram showing a mechanical component with arrows indicating motion or force, and an inset magnified view of a stepped mechanism (no text or symbols present)
natural_image
Diagram of a laptop with an open screen and a magnified inset showing the cable being inserted (no text or symbols present)natural_image
Mechanical component diagram showing a pulley and rotating shaft assembly (no text or symbols)natural_image
Diagram of a kitchen appliance with a grater and a black arrow indicating direction (no text or symbols)natural_image
3D CAD model of a rectangular tray or enclosure with internal compartments and mounting holes, shown with an arrow indicating direction (no text or symbols present)natural_image
Close-up of a gray rectangular baking tray with a black arrow pointing to it, no text or symbols visible.natural_image
Close-up of a gray tray with a black arrow pointing to the bottom portion (no text or symbols visible)
natural_image
3D diagram of a kitchen appliance with a mesh tray and a black arrow pointing to a component (no text or symbols)
natural_image
3D rendering of a perforated metal tray with a small protrusion at the bottom (no text or symbols)natural_image
Diagram of a microwave oven with airflow arrows indicating internal flow (no text or symbols)
natural_image
Mechanical assembly diagram showing a lever mechanism with arrows indicating motion direction (no text or symbols present)
natural_image
Diagram of a rectangular tray with arrows indicating direction or movement, no text or symbols present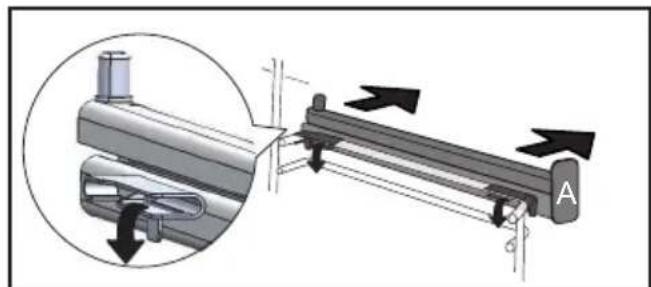
natural_image
Mechanical assembly diagram showing a lever mechanism with directional arrows and a magnified inset view (no text or symbols)natural_image
3D rendering of a perforated metal tray with a small outlet (no text or symbols)natural_image
Two-panel illustration showing a person interacting with a device panel, one with an arrow indicating rotation (no text or symbols)natural_image
Illustration of a hand using a tool to adjust or install a component, with no visible text or symbols.natural_image
Illustration of a hand opening a door with a tray and handle, showing internal components (no text or symbols)
.9 ΣΥΝΤΗΡΗΣΗ
natural_image
Diagram showing a mechanical component with arrows indicating motion or force direction, no text or symbols present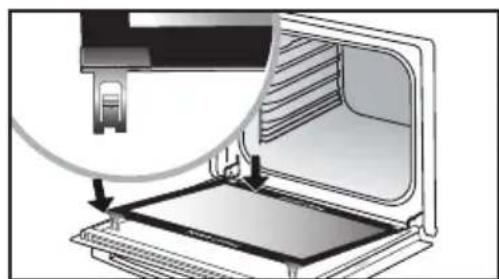
natural_image
Diagram of a laptop with an open screen and a magnified inset showing the internal structure (no text or symbols)natural_image
Mechanical component diagram showing a lever and rotating arrow (no text or symbols)natural_image
Illustration of a kitchen sink with a clock icon and partial view (no text or symbols)
HYVÄ ASIAKAS
5 MANUAALINEN KYPSENNYSTILA....17
natural_image
Diagram of a kitchen appliance with a grater and a black arrow indicating direction (no text or symbols)natural_image
3D CAD model of a rectangular tray or enclosure with internal compartments and a black arrow indicating direction (no text or symbols)natural_image
Close-up of a gray rectangular baking tray with a black arrow pointing to it, next to a curved surface (no text or symbols). 3 UUNIN YLEISKUVAUS
LISÄVARUSTEET (MALLIKOHTAISET)
natural_image
3D rendering of a gray tray with a black arrow pointing to the bottom portion (no text or symbols)natural_image
3D diagram of a kitchen appliance with a grater and ventilation grille (no text or symbols)natural_image
3D rendering of a rectangular metal tray with perforated surface and a small indentation at the bottom (no text or symbols). 3 UUNIN YLEISKUVAUS
LIUKUKISKOJÄRJESTELMÄ
natural_image
Diagram of an oven with airflow arrows indicating internal flow (no text or symbols)
natural_image
Mechanical assembly diagram showing a lever mechanism with arrows indicating motion direction (no text or symbols present)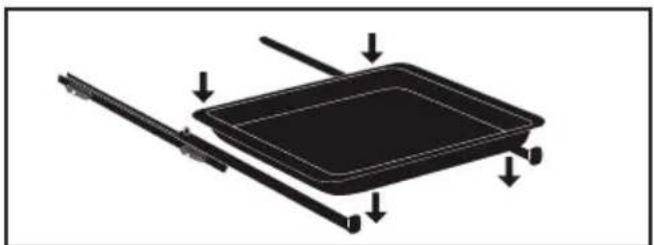
natural_image
Diagram of a rectangular tray with arrows indicating direction, no text or symbols present
natural_image
Mechanical assembly diagram showing a lever mechanism with directional arrows and a magnified inset view (no text or symbols)• 5 MANUAALINEN KYPSENNYSTILA
• 5 MANUAALINEN KYPSENNYSTILA
KYPSENNYKSEN KESTOAIKA
KYPSENNYKSEN PÄÄTTYMISEN SÄÄTÖ
natural_image
3D rendering of a perforated metal tray with a small handle at the bottom (no text or symbols)VIITTEELLINEN AIR FRY -TAULUKKO
Pitsa, "talon" taikina
SAATAVILLA MANUAALISESSA JA AUTOMAATTISESSA TILASSA
natural_image
Illustration of a hand inserting a rack into a device (no text or symbols visible)
natural_image
Illustration of a hand inserting a rack into a device (no text or symbols visible)LUUKUN LASIEN PUHDISTAMINEN

Varoitus
natural_image
Illustration of a hand using a tool to adjust or install a component, with no visible text or symbols.natural_image
Illustration of a hand opening a refrigerator with a tray and drawer (no text or symbols)
. 9 _HUOLTOTOIMET
natural_image
Diagram showing a mechanical component with arrows indicating motion or force direction, no text or symbols present
natural_image
Diagram of a printer's internal structure showing a slot and paper tray (no text or symbols)Irrota muovikiila.
"SENSOR"-LEVYN IRROTTAMINEN JA ASENTAMINEN
natural_image
Mechanical component diagram showing a pulley and rotating arrow (no text or symbols)MANUAALISEN TILAN KYPSENNYSVINKKI
| RUOKALAJIT | |  | | | | | Kypsen- nys- alka minuu- telissa | |||||||
| (RV72) | TASO | (RG71) | TASO | (ZA43) | TASO | (4F46) | TASO | (3F43) | TASO | (4F47) | TASO | |||
| LIHARUAT | Porsaanpaisti (1 kg) 200 2 | 190 2 | 60 | |||||||||||
| Vasikanpaisti (1 kg) 200 2 | 190 2 | 60–70 | ||||||||||||
| Naudanpaisti 240 2 | 200 2 | 30–40 | ||||||||||||
| Lammas (reisi, lapa 2,5 kg) 220 2 220 2 | 200 2 | 210 2 | 60 | |||||||||||
| Linnunliha (1 kg) 200 3 220 3 | 210 3 | 185 3 | 60 | |||||||||||
| Kanankoivet | 220 3 | 210 3 | 20–30 | |||||||||||
| Porsaan- tai vasikankyljykset | 210 3 | 20–30 | ||||||||||||
| Naudankyljykset (1 kg) | 210 3 | 210 3 | 20–30 | |||||||||||
| Lampaankyljykset | 210 3 | 20–30 | ||||||||||||
| KALA | Grillattu kala | 275 4 | 15–20 | |||||||||||
| Keitetty kala (hammasahven) | 200 3 | 190 3 | 30–35 | |||||||||||
| Kala en papillote | 220 3 | 200 3 | 15–20 | |||||||||||
| VIHANNEK-SET | Gratiinit | 275 2 | 30 | |||||||||||
| Perunagratiini | 200 3 | 180 3 | 45 | |||||||||||
| Lasagne | 200 3 | 180 3 | 45 | |||||||||||
| Täytetyt tomaatit 170 3 | 170 3 | 30 | ||||||||||||
| LEIVONNAISET | Savoiardi- ja Génoisekeksit | 180 3 | 180 4 | 35 | ||||||||||
| Kääretorttu | 220 3 | 180 2 | 190 3 | 5–10 | ||||||||||
| Briossi | 180 3 | 200 3 | 180 3 | 180 3 | 35–45 | |||||||||
| Pikkuleivät | 180 2 | 180 2 | 20–25 | |||||||||||
| Kakut - kuivakakut | 180 3 | 180 3 | 180 3 | 45–50 | ||||||||||
| Hedelmäpiiras | 200 3 | 190 3 | 30–35 | |||||||||||
| Keksit - Pikkuleivät | 175 3 | 170 3 | 15–20 | |||||||||||
| Kugelhopf | 180 2 | 40–45 | ||||||||||||
| Marengit | 100 4 | 100 4 | 100 4 | 60–70 | ||||||||||
| Madeleine-leivokset | 220 3 | 210 3 | 5–10 | |||||||||||
| Tuulihatut | 200 3 | 180 3 | 200 3 | 30–40 | ||||||||||
| Petit fours -leivokset | 220 3 | 200 3 | 5–10 | |||||||||||
| Savariini | 180 3 | 175 3 | 180 3 | 30–35 | ||||||||||
| Murotaikinaleivät | 200 1 | 200 1 | 30–40 | |||||||||||
| Hedelmäpiirakat | 215 1 | 200 1 | 20–25 | |||||||||||
| SEKALASET | Lihamureke | 200 2 | 190 2 | 60–100 | ||||||||||
| Pitsa | 240 1 | 15–18 | ||||||||||||
| Piiraat | 190 1 | 180 1 | 190 1 | 35–40 | ||||||||||
| Kohokkaat | 180 2 | 50 | ||||||||||||
| Piirakat | 200 2 | 190 2 | 40–45 | |||||||||||
| Leipä | 220 2 | 220 2 | 30–40 | |||||||||||
| Paahdettu leipä | 275 | 4–5 | 2–3 | |||||||||||
natural_image
Diagram of a kitchen appliance with a grater and a black arrow indicating direction (no text or symbols)natural_image
3D CAD model of a rectangular tray with internal channels and a black arrow indicating direction (no text or symbols)natural_image
Close-up of a gray tray with a black arrow pointing to it, no text or symbols visible• 3 A SÜTÖ BEMUTATÁSA
TARTOZÉKOK (MODELLTÓL FÜGGÖEN)
natural_image
3D rendering of a tray with an arrow pointing to the bottom section (no text or symbols)natural_image
3D diagram of a kitchen appliance with a mesh tray and an arrow pointing to it (no text or symbols)natural_image
3D rendering of a rectangular metal tray with perforated surface and a small indentation at the bottom (no text or symbols)• 3 A SÜTÖ BEMUTATÁSA
CSÚSZÓSÍN-RENDSZER
natural_image
Diagram of an oven with airflow arrows indicating internal flow (no text or symbols)
natural_image
Mechanical assembly diagram showing a lever mechanism with arrows indicating motion direction (no text or symbols present)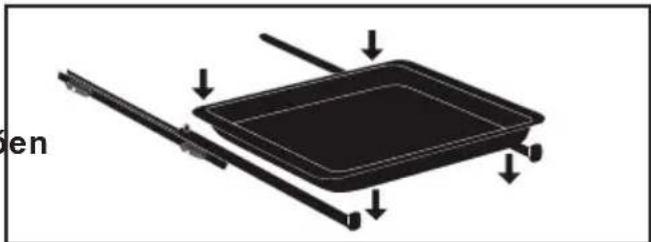
natural_image
Diagram of a rectangular device with arrows indicating movement or force, no text or symbols present
natural_image
Mechanical assembly diagram showing a lever mechanism with directional arrows and a magnified inset view (no text or symbols)natural_image
3D rendering of a perforated metal tray with a small handle at the bottom (no text or symbols visible)AIR FRY TÁJÉKOZTATÓ JELLEGÜ TÁBLÁZAT
JAVASLATOK AZ AI SENSOR MÓDHOZ
JAVASLATOK AZ AI SENSOR MÓDHOZ
Hal
400 gr - 1 kg
JAVASLATOK AZ AI SENSOR MÓDHOZ
Pizza
300 g - 1,2 kg
natural_image
Illustration of a hand inserting a rack into a device (no text or symbols visible)
natural_image
Illustration of a hand inserting a grid into a tablet device (no text or symbols visible)natural_image
Illustration of a hand inserting a device into a wall, with a magnified view of the device on the right (no text or symbols present)natural_image
Illustration of a hand opening a microwave oven with a tray and lid (no text or symbols)
. 9 KARBANTARTÁS
natural_image
Diagram showing a mechanical component with arrows indicating motion or force, and an inset magnified view of a stepped component (no text or symbols present)
natural_image
Diagram of a laptop computer with an open screen and cable, showing internal components (no text or symbols)natural_image
Mechanical component diagram showing a pulley and rotating shaft (no text or symbols)natural_image
Diagram of a kitchen appliance with a grater and a black arrow indicating direction (no text or symbols)natural_image
3D CAD model of a rectangular tray or enclosure with internal compartments and a black arrow indicating direction (no text or symbols)natural_image
Close-up of a gray rectangular baking tray with a black arrow pointing to it, next to a curved surface (no text or symbols)natural_image
3D rendering of a gray tray with a black arrow pointing to the bottom area (no text or symbols)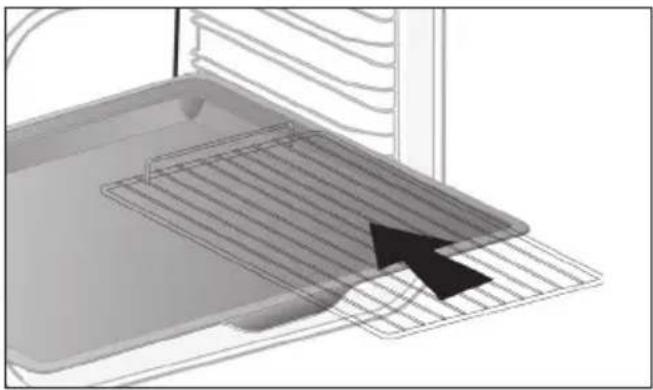
natural_image
Diagram of a kitchen appliance with a grater and rack, showing a black arrow pointing to the grille (no text or symbols present)
natural_image
3D rendering of a rectangular metal tray with perforated surface and a small protrusion at the bottom (no text or symbols)natural_image
Diagram of a microwave oven with airflow arrows indicating internal flow (no text or symbols)
natural_image
Mechanical assembly diagram showing a lever mechanism with labeled component A (no text or symbols beyond label)
natural_image
Diagram of a rectangular tray with arrows indicating direction or movement, no text or symbols present
natural_image
Mechanical assembly diagram showing a lever mechanism with directional arrows and a magnified inset view (no text or symbols)natural_image
3D rendering of a perforated metal tray with a small handle at the bottom (no text or symbols)TABELLA INDICATIVA AIR FRY
Sullo schermo compare 0m00s.
natural_image
Hand inserting a rack into a device (no text or symbols visible)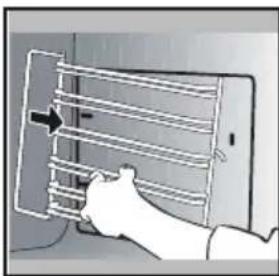
natural_image
Illustration of a hand holding a smartphone with a grid of horizontal bars, no text or symbols presentPULIZIA DEI VETRI DELLA PORTA

Avvertenza:
natural_image
Illustration of a hand using a tool to adjust or install a component, with no visible text or symbols.natural_image
Illustration of a hand opening a microwave oven with a tray and lid (no text or symbols)
. 9 MANUTENZIONE
natural_image
Diagram showing a mechanical component with arrows indicating motion or force direction, no text or symbols present
natural_image
Diagram of a device being processed into a tray, showing internal structure and a magnified view (no text or symbols)Smontaggio:
natural_image
Mechanical component diagram showing a pulley and rotating shaft (no text or symbols)8 ANDERE FUNCTIONS....32
11 BEKWAAMHEIDSPROEF ....41
VEILIGHEID EN BELANGRIJKE VOORZORGS-MAATREGELEN
BELANGRIJKE VEILIGHEIDSINSTRUCTIES. LEES ZE AANDACHTIG EN BEWAAR ZE VOOR TOEKOMSTIG GEBRUIK.
natural_image
Diagram of a kitchen appliance with a grater and a black arrow pointing to the interior (no text or symbols)natural_image
3D CAD model of a rectangular tray or container with internal compartments and a black arrow pointing to the bottom-right corner (no text or symbols)natural_image
Close-up of a gray rectangular baking tray with a black arrow pointing to it, next to a curved surface (no text or symbols)• 3 VOORSTELLING VAN DE OVEN
DE ACCESSOIRES (AFHANKELIJK VAN HET MODEL)
natural_image
3D rendering of a gray tray with a black arrow pointing to the bottom portion (no text or symbols)
natural_image
3D diagram of a kitchen appliance with a grater and ventilation grille (no text or symbols)
natural_image
3D rendering of a perforated metal tray with a small base (no text or symbols)• 3 VOORSTELLING VAN DE OVEN
SYSTEEM VAN SCHUIFRAILS
natural_image
Diagram of a microwave oven with airflow arrows indicating internal flow (no text or symbols)
natural_image
Mechanical assembly diagram showing a lever mechanism with labeled component A (no text or symbols present)
natural_image
Diagram of a rectangular tray with arrows indicating direction or movement, no text or symbols present
natural_image
Mechanical assembly diagram showing a lever mechanism with directional arrows and a magnified inset view (no text or symbols)
natural_image
3D rendering of a rectangular metal tray with perforated surface (no text or symbols)INDICATIEVE TABEL AIR FRY
natural_image
Illustration of a hand inserting a rack into a device (no text or symbols visible)
natural_image
Illustration of a hand holding a smartphone with a grid-like panel and an arrow pointing to it (no text or symbols present)REINIGING VAN DE RUITEN VAN DE DEUR

Waarschuwing
natural_image
Illustration of a hand inserting a device into a wall, with a magnifying glass highlighting the component (no text or symbols present)natural_image
Illustration of a hand opening a refrigerator with a tray and door, showing internal compartments (no text or symbols)
. 9 ONDERHOUD
natural_image
Diagram showing a mechanical component with arrows indicating motion or force, and an inset magnified view of a stepped platform (no text or symbols present)
natural_image
Diagram of a laptop computer with an open screen and a magnified view showing the cable attachment (no text or symbols present)Demontage:
natural_image
Mechanical component diagram showing a pin with a handle and rotating arrow (no text or symbols)natural_image
Illustration of a bowl with a lid and a magnified inset showing a circular symbol (no text or symbols present)
KJÆRE KUNDE,
5 MANUELL MODUS....17
Starte en tilberedning....19
6 RÅD OG ANBEFALINGER....20
Air fry 20
Tørking 21
7 AUTOMATISK MODUS....22
natural_image
Diagram of a kitchen appliance with a grater and a black arrow indicating direction (no text or symbols)natural_image
3D CAD model of a rectangular tray or enclosure with internal compartments and a black arrow indicating direction (no text or symbols)natural_image
Close-up of a gray rectangular baking tray with a black arrow pointing to it, next to a curved surface (no text or symbols)• 3 PRESENTASJON AV OVNEN
TILBEH∅R (AVHENGIG AV MODELL)
natural_image
3D rendering of a gray tray with a black arrow pointing to the bottom portion (no text or symbols)natural_image
3D diagram of a kitchen appliance with a grater and ventilation grille (no text or symbols)natural_image
3D rendering of a perforated metal tray with a small indentation on the side (no text or symbols)• 3 PRESENTASJON AV OVNEN
GLIDESKINNER
natural_image
Diagram of an oven with airflow arrows indicating internal flow (no text or symbols)
natural_image
Mechanical assembly diagram showing a lever mechanism with labeled component A (no text or symbols beyond label)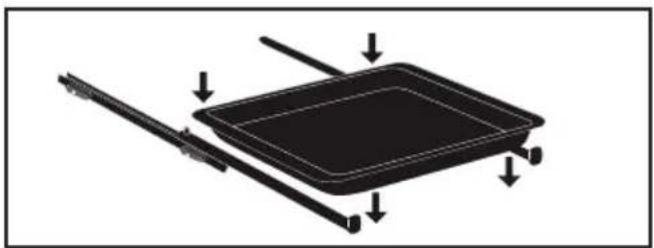
natural_image
Diagram of a rectangular tray with arrows indicating direction or movement, no text or symbols present
natural_image
Mechanical assembly diagram showing a lever mechanism with directional arrows and a magnified inset view (no text or symbols)natural_image
3D rendering of a perforated metal tray with a small handle at the bottom (no text or symbols)VEILEDENDE TABELL FOR AIR FRY
FINNES I MODUSENE MANUELL OG AUTO
natural_image
Two-panel illustration showing a person inserting a rack into a device, with arrows indicating the motion (no text or symbols present)RENGJ∅RING AV GLASSRUTENE PÅ D∅REN

Advarsel
natural_image
Illustration of a hand using a tool to adjust or install a component, with no visible text or symbols.Døren består av to ekstra glassruter med et svart avstandsstykke i gummi i hvert hjørne.
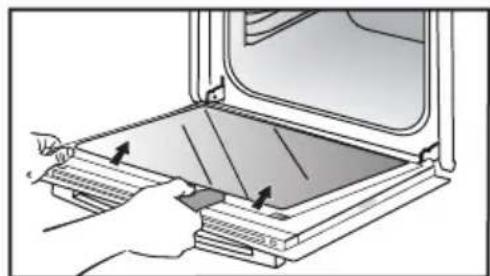
natural_image
Illustration of a hand opening a microwave oven with a tray and lid (no text or symbols)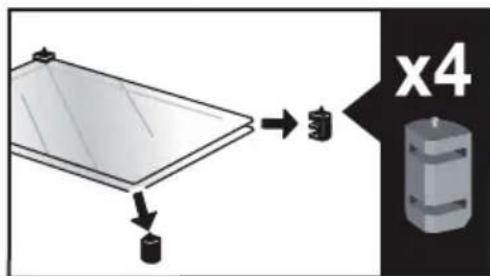
. 9 VEDLIKEHOLD
natural_image
Diagram showing a mechanical component with arrows indicating motion or force direction, no text or symbols present
natural_image
Diagram of a computer monitor with an open screen and a magnified view showing the internal structure (no text or symbols)Fjern plastkilen.
MONTERE OG DEMONTERE SENSORPLATEN
natural_image
Mechanical component diagram showing a pulley and rotating knob (no text or symbols)STEKERÅD I MANUELL MODUS
| RETTER | * | ** | | | | | Varighet i minutter | |||||||
| °C | RILLE | °C | RILLE | °C | RILLE | °C | RILLE | °C | RILLE | °C | RILLE | |||
| KJ∅TT | Svinestek (1 kg) 200 2 | 190 2 | 60 | |||||||||||
| Kalvestek (1 kg) 200 2 | 190 2 | 60-70 | ||||||||||||
| Oksestek 240 2 | 200 2 | 30-40 | ||||||||||||
| Lam (lår, skulder 2,5 kg) 220 2 | 220 2 | 200 2 | 210 2 | 60 | ||||||||||
| Fjærkre (1 kg) 200 3 | 220 3 | 210 3 | 185 3 | 60 | ||||||||||
| Kyllinglår | 220 3 | 210 3 | 20-30 | |||||||||||
| Svine-/kalvekoteletter | 210 3 | 20-30 | ||||||||||||
| Oksekoteletter (1 kg) | 210 3 | 210 3 | 20-30 | |||||||||||
| Fårekoteletter | 210 3 | 20-30 | ||||||||||||
| FISK | Grillet fisk | 275 4 | 15-20 | |||||||||||
| Fiskerett 200 3 | 190 3 | 30-35 | ||||||||||||
| Foliedampet fisk | 220 3 | 200 3 | 15-20 | |||||||||||
| GR∅NNSA-KER | Grateng (kokte grønnsaker) | 275 2 | 30 | |||||||||||
| Fløtegratinerte poteter | 200 3 | 180 3 | 45 | |||||||||||
| Lasagne | 200 3 | 180 3 | 45 | |||||||||||
| Fylte tomater | 170 3 | 170 3 | 30 | |||||||||||
| BAKVERK | Bløtkakebunn | 180 3 | 180 4 | 35 | ||||||||||
| Rullekake | 220 3 | 180 2 | 190 3 | 5-10 | ||||||||||
| Boller | 180 3 | 200 3 | 180 3 | 180 3 | 35-45 | |||||||||
| Brownies | 180 2 | 180 2 | 20-25 | |||||||||||
| Formkake | 180 3 | 180 3 | 180 3 | 45-50 | ||||||||||
| Bærpai | 200 3 | 190 3 | 30-35 | |||||||||||
| Småkaker | 175 3 | 170 3 | 15-20 | |||||||||||
| Marmorkake | 180 2 | 40-45 | ||||||||||||
| Marengs | 100 4 | 100 4 | 100 4 | 60-70 | ||||||||||
| Muffins | 220 3 | 210 3 | 5-10 | |||||||||||
| Vannbakkelis | 200 3 | 180 3 | 200 3 | 30-40 | ||||||||||
| Små former med butterdeig 2 | 200 3 | 200 3 | 5-10 | |||||||||||
| Formkake med gjærdeig | 180 3 | 175 3 | 180 3 | 30-35 | ||||||||||
| Terte med mørdeig | 200 1 | 200 1 | 30-40 | |||||||||||
| Terte med butterdeig | 215 1 | 200 1 | 20-25 | |||||||||||
| DIVERSE | Terrin | 200 2 | 190 2 | 80-100 | ||||||||||
| Pizza | 240 1 | 15-18 | ||||||||||||
| Quiche | 190 1 | 180 1 | 190 1 | 35-40 | ||||||||||
| Sufflé | 180 2 | 50 | ||||||||||||
| Pai | 200 2 | 190 2 | 40-45 | |||||||||||
| Brød | 220 2 | 220 2 | 30-40 | |||||||||||
| Ristet brød | 275 | 4-5 | 2-3 | |||||||||||
System szyn uchylnych....12
WYBÓR MIEJSCA INSTALACJI I WBUDOWANIA
natural_image
Diagram of a kitchen appliance with a grater and a black arrow indicating direction (no text or symbols)
natural_image
3D CAD model of a rectangular tray or enclosure with internal compartments and a black arrow indicating direction (no text or symbols)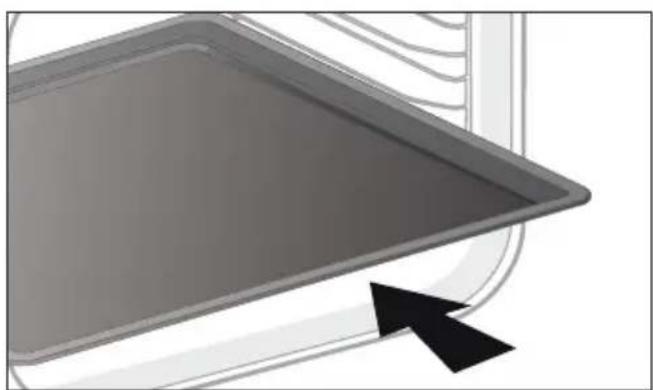
natural_image
Close-up of a gray rectangular baking tray with a black arrow pointing to it, next to a curved surface (no text or symbols)• 3 PREZENTACJA PIEKARNIKA
AKCESORIA (W ZALEŻNOŚCI OD MODELU)
natural_image
3D rendering of a gray tray with a black arrow pointing to the bottom portion (no text or symbols)
natural_image
3D diagram of a kitchen appliance with a grater and ventilation grille (no text or symbols)
natural_image
3D rendering of a perforated metal tray with a small base (no text or symbols)• 3 PREZENTACJA PIEKARNIKA
natural_image
Diagram of a microwave oven with airflow arrows indicating internal flow (no text or symbols)
natural_image
Mechanical assembly diagram showing a lever mechanism with labeled component A (no text or symbols present)
natural_image
Diagram of a rectangular tray with arrows indicating direction or movement, no text or symbols present
natural_image
Mechanical assembly diagram showing a lever mechanism with directional arrows and a magnified inset view (no text or symbols)
natural_image
3D rendering of a perforated metal tray with a flat base (no text or symbols)TABELA INFORMACYJNA AIR FRY
natural_image
Hand holding a rack-mounted device with a curved arrow indicating rotation (no text or symbols visible)
natural_image
Illustration of a hand holding a tablet with a grid and arrow indicating direction (no text or symbols)CZYSZCZENIE SZYBY DRZWICZEK

Ostrzeżenie
natural_image
Illustration of a hand using a tool to adjust or install a component, with no visible text or symbols.natural_image
Illustration of a hand inserting a tray into a microwave oven (no text or symbols visible)
. 9 KONSERWACJA
natural_image
Diagram showing a mechanical component with an inset magnified view of a stepped mechanism (no text or symbols)
natural_image
Diagram of a computer oven with an open tray and a close-up view of the lid (no text or symbols)natural_image
Mechanical component diagram showing a pin and rotating arrow (no text or symbols)natural_image
Diagram of a kitchen appliance with a grater and a black arrow indicating direction (no text or symbols)natural_image
3D CAD model of a rectangular tray or enclosure with internal compartments and a black arrow indicating direction (no text or symbols)natural_image
Close-up of a gray rectangular baking tray with a black arrow pointing to it, next to a curved surface (no text or symbols)natural_image
3D rendering of a rectangular tray with a black arrow pointing to the bottom section (no text or symbols)
natural_image
3D diagram of a kitchen appliance with a grater and ventilation grille (no text or symbols)
natural_image
3D rendering of a rectangular metal tray with perforated surface and a small protrusion at the bottom (no text or symbols)natural_image
Diagram of an oven with airflow arrows indicating internal flow (no text or symbols)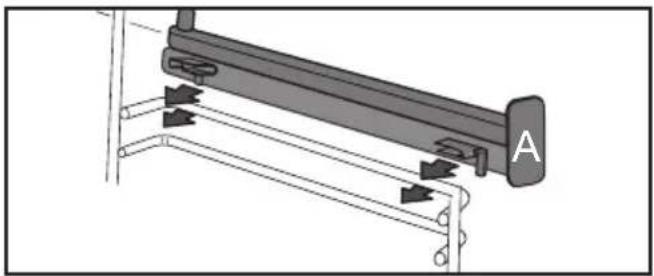
natural_image
Mechanical assembly diagram showing a lever mechanism with arrows indicating motion direction (no text or symbols present)
natural_image
Diagram of a rectangular tray with arrows indicating direction or movement, no text or symbols present
natural_image
Mechanical assembly diagram showing a lever mechanism with directional arrows and a magnified inset view (no text or symbols)CONETIVIDADE: PERGUNTAS E RESPOSTAS
CONETIVIDADE: PERGUNTAS E RESPOSTAS
natural_image
3D rendering of a perforated metal tray with a small handle at the bottom (no text or symbols)TABELA INDICATIVA AIR FRY
natural_image
Illustration of a hand inserting a rack into a device (no text or symbols visible)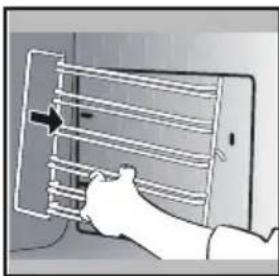
natural_image
Illustration of a hand holding a tablet with a grid and directional arrow (no text or symbols)LIMPEZA DOS VIDROS DA PORTA

Advertência
natural_image
Illustration of a hand inserting a device into a wall, with a magnified view of the device on the right (no text or symbols present)natural_image
Illustration of a hand opening a refrigerator with a tray and door, showing internal compartments (no text or symbols)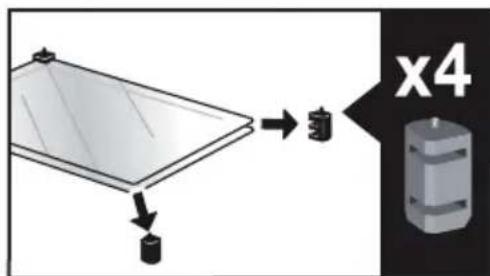
. 9 CONSERVAÇÃO
natural_image
Diagram showing a mechanical assembly with arrows indicating motion or force direction (no text or symbols present)
natural_image
Diagram of a computer monitor with an open screen and a magnified view showing the internal structure (no text or symbols)natural_image
Mechanical component diagram showing a pin with a handle and rotating arrow (no text or symbols)natural_image
Illustration of a bowl with a flower inside, enclosed in a rounded rectangle (no text or symbols)
flowchart
graph TD
    A[" "] --> B["RU"]
    C[" "] --> D[" "]
    E[" "] --> F[" "]
    G[" "] --> H[" "]
    I[" "] --> J[" "]
    K[" "] --> L[" "]
natural_image
Diagram of a kitchen appliance with a grater and a black arrow indicating direction (no text or symbols)natural_image
3D CAD model of a rectangular tray or enclosure with internal compartments and a black arrow indicating direction (no text or symbols)natural_image
Close-up of a gray rectangular baking tray with a black arrow pointing to it, next to a curved surface (no text or symbols)natural_image
3D rendering of a gray tray with a black arrow pointing to the bottom portion (no text or symbols)natural_image
Diagram of a kitchen appliance with a grater and ventilation grille (no text or symbols)natural_image
3D rendering of a rectangular metal tray with perforated surface (no text or symbols)natural_image
Diagram of a microwave oven with airflow arrows indicating internal flow (no text or symbols)
natural_image
Mechanical assembly diagram showing a lever mechanism with arrows indicating motion direction (no text or symbols present)
natural_image
Diagram of a rectangular tray with arrows indicating direction or movement, no text or symbols present
natural_image
Mechanical assembly diagram showing a lever mechanism with directional arrows and a magnified inset view (no text or symbols)natural_image
3D rendering of a perforated metal tray with a small handle at the bottom (no text or symbols)natural_image
Illustration of a hand inserting a rack into a device (no text or symbols visible)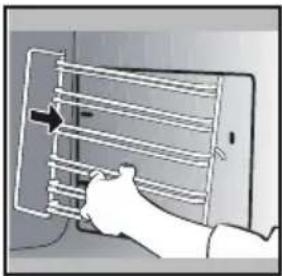
natural_image
Illustration of a hand holding a smartphone with a rack and a vertical arrow pointing to the screen (no text or symbols present)natural_image
Illustration of a hand inserting a device into a panel, with a magnified view of the next panel showing a smartphone (no text or symbols present)natural_image
Illustration of a hand pressing down on a tray with arrows indicating direction (no text or symbols)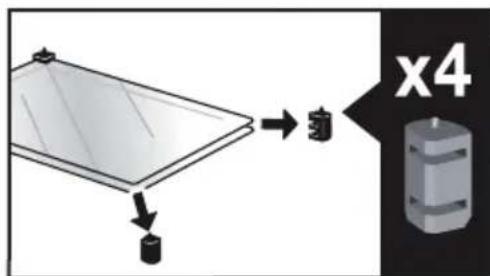
. 9 уход
natural_image
Diagram showing a mechanical component with arrows indicating motion or force direction, no text or symbols present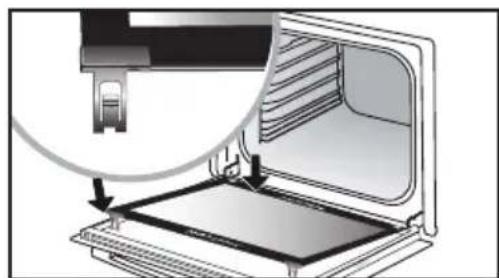
natural_image
Diagram of a laptop interior showing the open screen and a close-up of its screen (no text or symbols visible)natural_image
Mechanical component diagram showing a lever and rotating knob (no text or symbols)natural_image
Simple grayscale illustration of a bowl with a lid, no text or symbols present
natural_image
Illustration of a kitchen sink with a clock icon and page number 4 (no text or symbols on the main subject)
VÁŽENÁ ZÁKAZNÍČKA, VÁŽENÝ ZÁKAZNÍK,
natural_image
Diagram of a kitchen appliance with a grater and a black arrow indicating direction (no text or symbols)natural_image
3D CAD model of a rectangular tray or enclosure with internal compartments and a black arrow indicating direction (no text or symbols)natural_image
Close-up of a gray rectangular baking tray with a black arrow pointing to it, next to a curved surface (no text or symbols)• 3 PREDSTAVENIE RÚRY
PRÍSLUŠENSTVO (V ZÁVISLOSTI OD MODELU)
natural_image
3D rendering of a rectangular tray with a black arrow pointing to the bottom section (no text or symbols)natural_image
3D diagram of a kitchen appliance with a mesh tray and an arrow pointing to it (no text or symbols)natural_image
3D rendering of a rectangular metal tray with perforated surface and a small protrusion at the bottom (no text or symbols)• 3 PREDSTAVENIE RÚRY
SYSTÉM POSUVNÝCH KOL'AJNIČIEK
natural_image
Diagram of an oven with airflow arrows indicating internal flow (no text or symbols)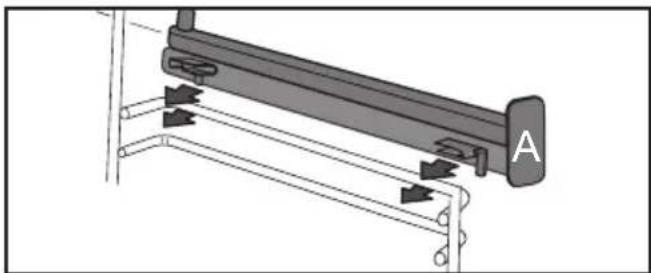
natural_image
Mechanical assembly diagram showing a lever mechanism with arrows indicating motion direction (no text or symbols present)
natural_image
Diagram of a rectangular tray with arrows indicating direction or movement, no text or symbols present
natural_image
Mechanical assembly diagram showing a lever mechanism with directional arrows and a magnified inset view (no text or symbols)natural_image
3D rendering of a perforated metal tray with a small handle at the bottom (no text or symbols)ORIENTAČNÁ TABUL'KA AIR FRY
natural_image
Illustration of a hand inserting a rack into a device (no text or symbols visible)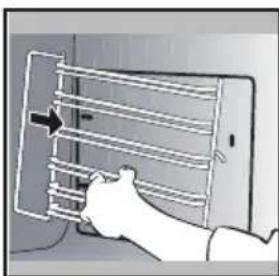
natural_image
Illustration of a hand holding a smartphone with a grid and cable, no text or symbols presentČISTENIE SKLA DVIEROK

Upozornenie
natural_image
Illustration of a hand inserting a small electronic component into a device, with no visible text or symbols.natural_image
Illustration of a hand pressing down on a tray with arrows indicating direction (no text or symbols)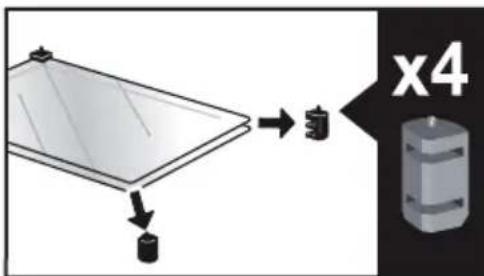
. 9 ÚDRŽBA
natural_image
Diagram showing a mechanical component with arrows indicating motion or force, and an inset magnified view of a stepped mechanism (no text or symbols present)
natural_image
Diagram of a printer's internal structure showing paper feeding into a tray, with an inset close-up highlighting the component (no text or symbols present)natural_image
Mechanical component diagram showing a pin with a handle and rotating arrow (no text or symbols)1 INSTALLATION ....6
VAL AV PLACERING OCH INBYGGNAD
natural_image
Diagram of a kitchen appliance with a grater and a black arrow indicating direction (no text or symbols)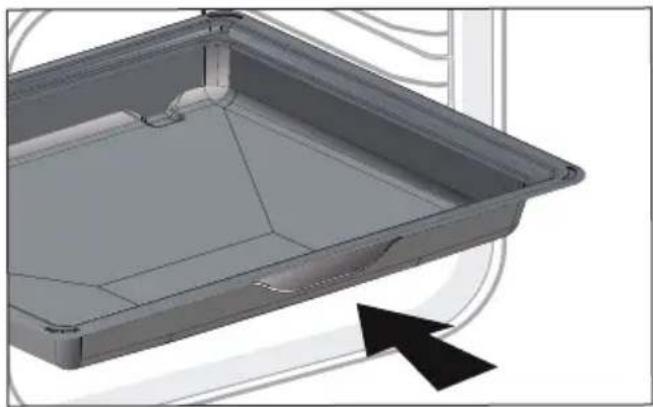
natural_image
3D CAD model of a rectangular tray or enclosure with internal compartments and a black arrow indicating direction (no text or symbols)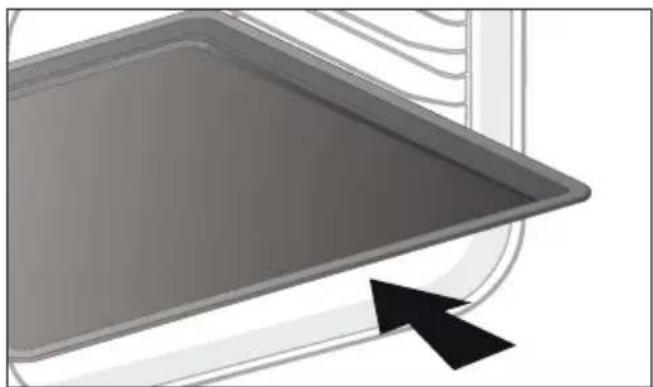
natural_image
Close-up of a gray rectangular baking tray with a black arrow pointing to it, next to a curved surface (no text or symbols)• 3 PRÉSENTATION AV UGNEN
natural_image
3D rendering of a gray tray with a black arrow pointing to the bottom area (no text or symbols)natural_image
3D diagram of a kitchen appliance with a mesh tray and an arrow pointing to it (no text or symbols)natural_image
3D rendering of a perforated metal tray with a small base (no text or symbols)• 3 PRÉSENTATION AV UGNEN
SYSTEM MED GLIDSKENOR
natural_image
Diagram of a microwave oven with airflow arrows indicating internal flow (no text or symbols)
natural_image
Mechanical assembly diagram showing a lever mechanism with labeled component A (no text or symbols beyond label)
natural_image
Diagram of a rectangular tray with arrows indicating direction or movement, no text or symbols present
natural_image
Mechanical assembly diagram showing a lever mechanism with directional arrows and a magnified inset view (no text or symbols)natural_image
3D rendering of a perforated metal tray with a small handle at the bottom (no text or symbols)INDIKATIV TABELL FÖR AIR FRY
degen blir krispig undertill.
FINNS FÖR MANUELLT OCH AUTO-LÄGE
natural_image
Illustration of a hand inserting a rack into a device (no text or symbols visible)
natural_image
Illustration of a hand inserting a grid into a smartphone (no text or symbols visible)RENGÖRA GLASET I UGNSLUCKAN

Varning
natural_image
Illustration of a hand using a tool to adjust or install a component, with no visible text or symbols.natural_image
Illustration of a hand pressing down on a tray with arrows indicating direction (no text or symbols)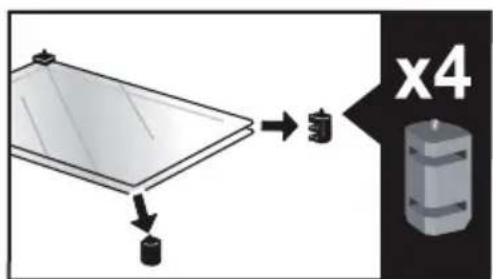
. 9 SERVICE
natural_image
Diagram showing a mechanical component with arrows indicating motion or force, and a magnified inset highlighting a step-like feature (no text or symbols present)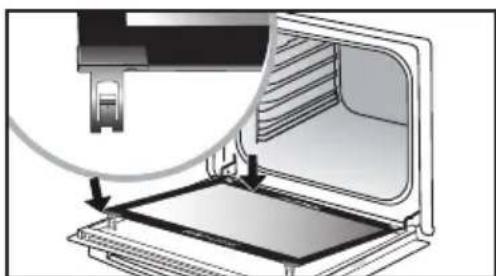
natural_image
Diagram of a printer or printer with an open base and a magnified view showing internal structure (no text or symbols)Ta bort plastkilen.
DEMONTERA OCH MONTERA TILLBAKA GIVARPLATTAN
SJÄLVRENGÖRING MED PYROLYS

SJÄLVRENGÖRING MED FÖRDRÖJD START
natural_image
Mechanical component diagram showing a lever and rotating knob (no text or symbols)natural_image
Diagram of a kitchen appliance with a grater and a black arrow pointing to the interior (no text or symbols)natural_image
3D CAD model of a rectangular tray or container with internal compartments and a black arrow pointing to the bottom-right corner (no text or symbols)natural_image
Close-up of a gray rectangular baking tray with a black arrow pointing to it, next to a curved surface (no text or symbols)natural_image
3D rendering of a gray tray with a black arrow pointing to the bottom portion (no text or symbols)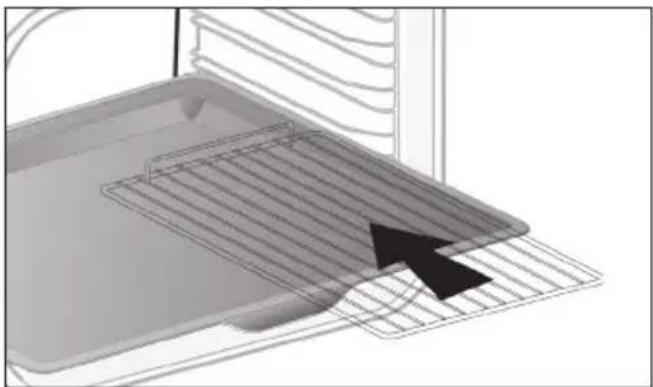
natural_image
3D diagram of a kitchen appliance with a grater and ventilation grille (no text or symbols)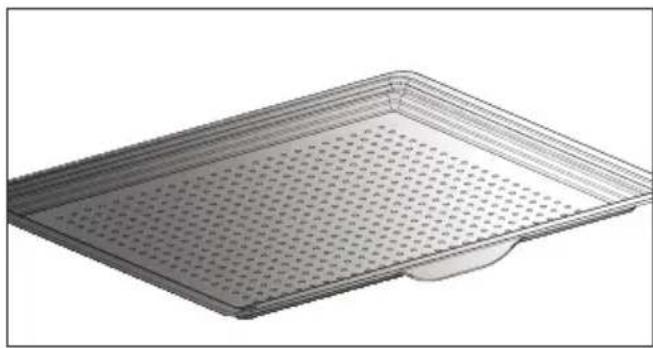
natural_image
3D rendering of a rectangular metal tray with perforated surface and a small protrusion at the bottom (no text or symbols)natural_image
Diagram of a microwave oven with airflow arrows indicating internal flow (no text or symbols)
natural_image
Mechanical assembly diagram showing a lever mechanism with arrows indicating motion direction (no text or symbols present)
natural_image
Diagram of a rectangular tray with arrows indicating direction or movement, no text or symbols present
natural_image
Mechanical assembly diagram showing a lever mechanism with directional arrows and a magnified inset view (no text or symbols)
natural_image
3D rendering of a perforated metal tray with a small handle at the bottom (no text or symbols)natural_image
Illustration of a hand inserting a rack into a device (no text or symbols visible)
natural_image
Illustration of a hand holding a device with a grid-like structure, no text or symbols visiblenatural_image
Illustration of a hand using a tool to adjust or install a component, with no visible text or symbols.natural_image
Illustration of a hand opening a microwave oven with a tray and lid (no text or symbols)
. 9 догляд
natural_image
Diagram showing a mechanical component with arrows indicating motion or force, and an inset magnified view of a stepped structure (no text or symbols present)
natural_image
Diagram of a printer or printer with an open lid and a magnified view showing the internal structure (no text or symbols)Зняття
natural_image
Mechanical component diagram showing a pulley and rotating shaft (no text or symbols)natural_image
Illustration of a bowl with a small object inside, enclosed in a rounded square frame (no text or symbols)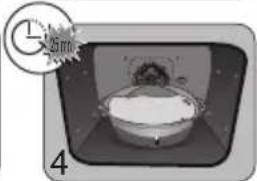
natural_image
Illustration of a cartoon character inside a rounded rectangular frame, with a clock icon and number 4 nearby (no readable text or symbols)
natural_image
Diagram of a kitchen appliance with a grater and a black arrow indicating direction (no text or symbols)natural_image
3D CAD model of a rectangular tray or container with internal compartments and mounting holes, shown with an arrow indicating direction (no text or symbols present)natural_image
Close-up of a gray tray with a black arrow pointing to it, next to a curved surface (no text or symbols)natural_image
3D rendering of a gray rectangular tray with a black arrow pointing to the bottom portion (no text or symbols)natural_image
3D diagram of a kitchen appliance with a mesh tray and a black arrow pointing to a component (no text or symbols)natural_image
3D rendering of a perforated metal tray with a small protrusion at the bottom (no text or symbols).הכלההוּרָהוּרָהוּרָהוּרָהוּרָהוּרָהוּרָהוּרָהוּרָהוּרָהוּרָהוּרָהוּרָהוּרָהוּרָה
| הכלהה-הכלהה-הכלהה-הכלהה-הכלהה-הכלהה-הכלהה-הכלהה-הכלהה-הכלהה-הכלהה-הכלהה-הכלהה-הכלהה-הכלהה-הכלהה-הכלהה-הכלהה-הכלהה-הכלהה-הכלהה -הכלהה -הכלהה -הכchia 1-(הכchia 2-(הכchia 2-(הכchia 2-(הכchia 2-(הכchia 2-(הכchia 2-(הכchia 2-(הכchia 2-(הכchia 2-(הכchia 2-(הכchia 2-(הכchia 2-(הכchia 2-(הכchia 2-(הכchia 2-(הכchia 2-(הכchia 2-(הכeria 2-(הכeria 2-(הכeria 2-(הכeria 2-(הכeria 2-(הכeria 2-(הכeria 2-(הכeria 2-(הכeria 2-(הכeria 2-(הכeria 2-(הכeria 2-(הכeria 2-(הכeria 2-(הכeria 2-(הכeria 2-(הכeria 2-( |
הכלהה
הכלהה NE UER 2014/53/UE Smart Control, BRANDT FRANCE-1
(20 dbm) 100mW אַרְבָרִי אַרְבָרִי:GHz 2.4 אַרְבָרִי אַרְבָרִי os www.dedietrich-electromenager.com:
natural_image
3D rendering of a perforated metal tray with a small handle at the bottom (no text or symbols).הכלההוּרָהוּרָהוּרָהוּרָהוּרָהוּרָהוּרָהוּרָהוּרָהוּרָהוּרָהוּרָהוּרָהוּרָהוּרָה
הַרְשׁ
λ"7 2,5-7 λ"7 1,4 1
UP TINX
00 0-7 1-7 1-7 1-7 1-7 1-7 1-7
natural_image
Illustration of a hand using a tool to adjust or install a component, with no visible text or symbols.natural_image
Illustration of a hand pressing down on a tray with arrows indicating direction (no text or symbols)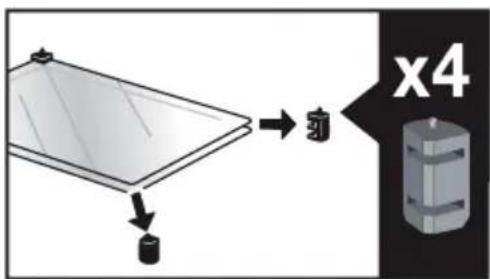
natural_image
Illustration of a hand inserting a rack into a device (no text or symbols visible)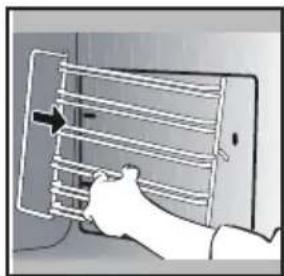
natural_image
Illustration of a hand holding a smartphone with a grid of horizontal lines and an arrow pointing to the screen (no text or symbols present)תַלְרָה בְּרָה
תָרְשָׁ

natural_image
Diagram showing a mechanical component with arrows indicating motion or force, and an inset magnified view of a stepped mechanism (no text or symbols present)