
ED2 - Food Dehydrator Essentiel B - Free user manual and instructions
Find the device manual for free ED2 Essentiel B in PDF.

| Product type | Food dehydrator |
| Brand | Essentiel B |
| Model | ED2 |
| Rated voltage | 220-240 V~ |
| Rated frequency | 50-60 Hz |
| Rated power | 350 W |
| Temperature range | 40 to 70 °C (adjustable in 5 °C increments) |
| Timer | 1 to 48 hours (in 1-hour increments) |
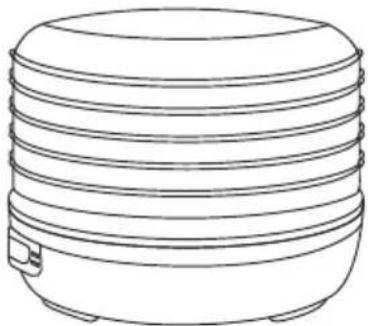
| Number of trays | 6 (5 intermediate + 1 top) |
| Diameter of a tray | 32 cm |
| Display screen | LCD |
| Main functions | Dehydration by vertical hot air flow, time and temperature adjustment, pause, premature stop |
| Temperature unit display | °C or °F (selectable) |
| Tray material | Dishwasher safe |
| Maintenance and cleaning | Trays and lid dishwasher safe; base clean with a damp cloth |
| Safety | Automatic shut-off, overheat protection, non-slip feet |
| Power supply | Removable power cord (not specified) |
| Intended use | Private domestic, non-professional |
| Package contents | 1 base, 5 intermediate trays, 1 top tray, 1 manual |
| Warranty | Warranty valid from date of purchase (not covered: improper installation, incorrect use, normal wear) |
Frequently Asked Questions - ED2 Essentiel B
User questions about ED2 Essentiel B
0 question about this device. Answer the ones you know or ask your own.
Ask a new question about this device
Download the instructions for your Food Dehydrator in PDF format for free! Find your manual ED2 - Essentiel B and take your electronic device back in hand. On this page are published all the documents necessary for the use of your device. ED2 by Essentiel B.
USER MANUAL ED2 Essentiel B
natural_image
Modern kitchen steamer with digital display showing 5.5°C, no visible text or symbols on the device itself.Notice d'utilisation / User guide / Instrucciones de uso / Bedienungsanleitung / Gebruiksaanwijzing
| FR EN ES | DE NL | ||||
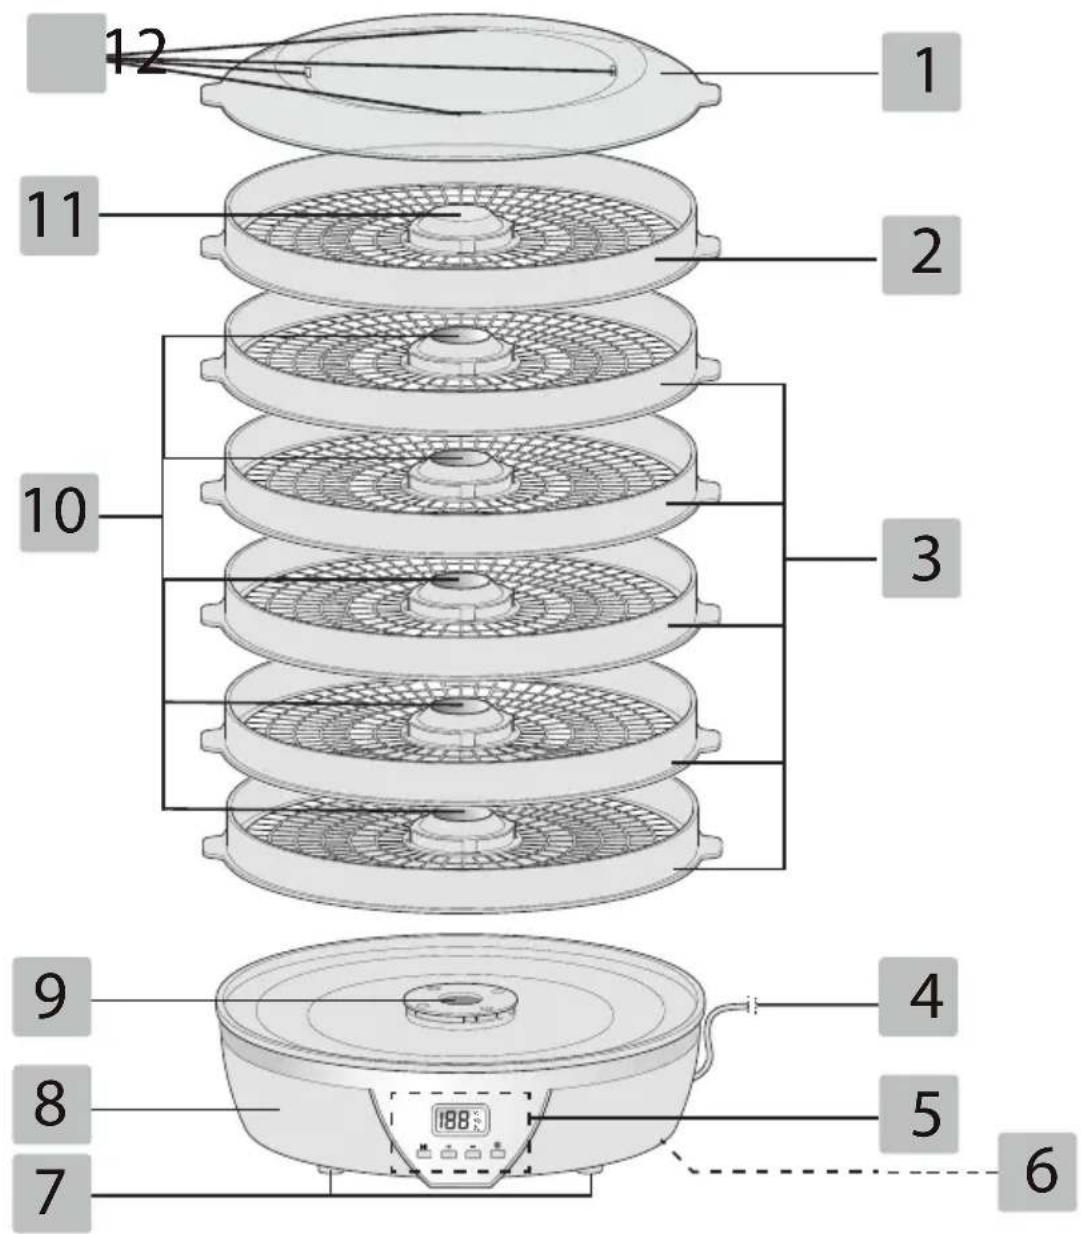
| 1 | Couvercle Lid Tapa | Deckel | Deksel | ||
| 2 | Plateau supérieur x1 | Top tray x1 | Bandeja superior x1 | Obere Ablage x1 | Bovenste plaat x1 |
| 3 | Plateaux intermédiaires x 5 | Intermediate trays x5 | Bandejas intermedias x 5 | Zwischenabla-gen x 5 | Tussenplaten x 5 |
| 4 | Cordon d'alimentation | Power cord | Cable de alimentación | Stromkabel | Voedings-snoer |
| 5 | Panneau de commande | Control panel | Panel de control | Bedienfeld | Bedie-ningspaneel |
| 6 | Fentes d'aération | Air vents | Rejillas de ventilación | Belüf-tungsschlitze | Verluch-tingssleuven |
| 7 | Pieds Feet Pies Füße | Voeten | |||
| 8 | Base Base Base Sockel | Basis | |||
| 9 | Ventilateur Fan | Ventilador | Ventilator | Ventilator | |
| 10 | Ouvertures centrales | Central openings | Aperturas centrales | Öffnungen in der Mitte | Centrale openingen |
| 11 | Bouchon du plateau supérieur | Cap of the top tray | Tapón de la bandeja superior | Ver-schlusskappe der oberen Ablage | Knop van de bovenste plaat |
| 12 | Évents | Vents | Orificios de ventilación | Lüftungsöffnungen | Openingen |
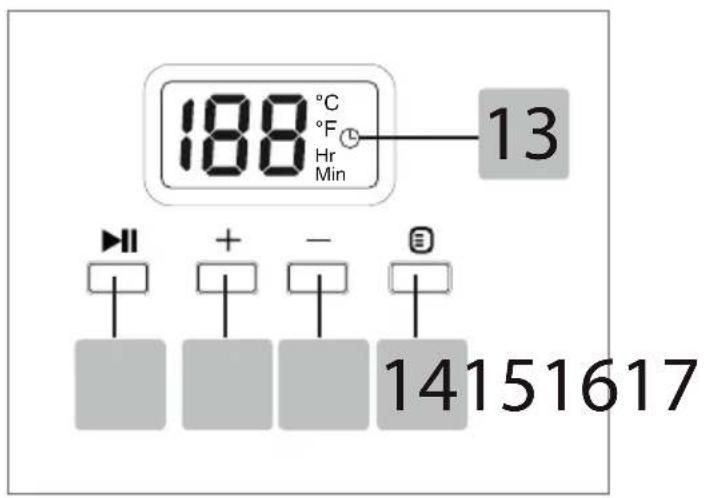
| Panneau de commande | Control panel | Panel de control | Bedienfeld | Bedie-ningspaneel | |
| 13 | Écran | Screen | Pantalla | Display | Scherm |
| 14 | Bouton de réglage | Adjustment knob | Botón de ajuste | Einstelltaste | Instelknop |
| 15 | Bouton - | - Button | Botón - Taste - | Knop - | |
| 16 | Bouton + | + Button | Botón + | Taste + | Knop + |
| 17 | Bouton marche/arrêt | On/off switch | Botón de encendido/apagado | Ein-/Ausschal-ter | Aan/uit-knop |
utilisation prévue
1 x plateau supérieur portant la mention "PLACER AU DESSUS / PLACE ON TOP"
1 x couvercle
natural_image
Line drawing of a multi-tiered cylindrical container or storage unit (no text or symbols)REMARQUES :
natural_image
Illustration of household appliances including a cloth and fan with decorative elements (no text or symbols)
natural_image
Diagram showing a cylindrical container being lifted by a wire and connected to an open box (no text or symbols present)rangement
- This food dehydrator is designed to dry food, such as fruits, vegetables, mushrooms and meat. This process preserves food without chemical additives, while preserving the vitamins.
- This appliance is intended for household use only; it is not suitable for professional use.
• This dehydrator is not intended for heating or cooking food.
technical features
| Item reference ED2 | |
| Rated voltage 220-240 V~ | |
| Rated frequency 50-60Hz | |
| Rated power 350W | |
| Temperature range 40 to 70°C | |
| Setting the temperature 5°C increment | |
| Timer 1 to 48 hours | |
| Diameter of a tray 32 cm | |
| Number of trays 6 | |
| Screen LCD |
Package contents
1 x base
5 x intermediate trays
1 x top tray marked "PLACER AU DESSUS / PLACE ON TOP"
1 x lid
1 x user manual

getting started
- Unpack the dehydrator.
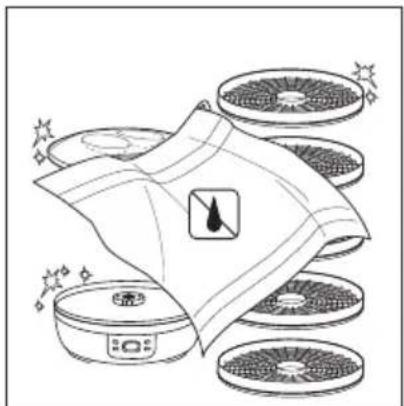
- Clean the parts that will come into contact with food. Read the detailed instructions on how to clean the surfaces that come in contact with food. Refer to the section on CLEANING AND MAINTENANCE.
- Check that the voltage of your mains power supply matches the voltage indicated on the nameplate of the appliance.
assembly and dehydration instructions
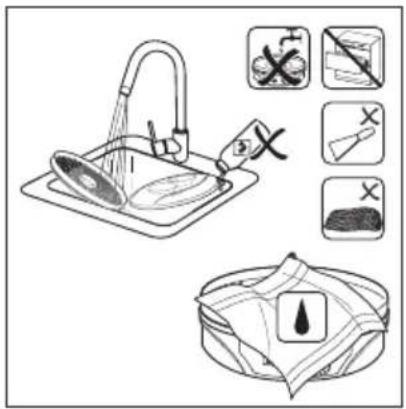
WARNING: do not connect the appliance to the power supply before assembling it.
-
Check that the appliance is switched off.
-
Put the base of the appliance on a flat, secure, stable and dry surface, e.g. on the worktop of your kitchen, and make sure that there is a gap of 30 ~cm all the way around the appliance. The non-slip rubber feet maintain the stability of the appliance.
-
Prepare the food to be dehydrated according to the type of food by following the instructions. Refer to the PREPARATION AND TREATMENT sections.
-
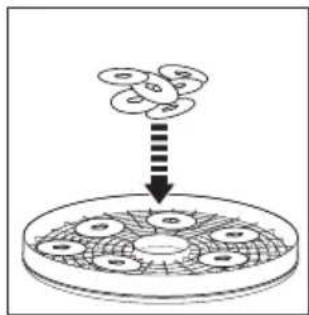
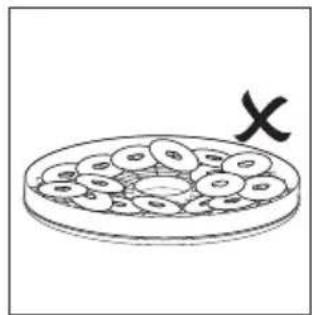
Take the number of intermediate trays you need as well as the top tray marked "PLACER AU DESSUS / PLACE ON TOP". Arrange the food on the trays-and set them aside. Never stack food or
natural_image
Illustration of a plate with circular objects and a black 'X' symbol (no text or labels)overload the trays. Make sure that the pieces of food do not touch each other.
- Stack the intermediate trays (as many as you want) in the base of the appliance. Regardless of the number of intermediate trays, you should always insert the tray marked "PLACER AU DESSUS / PLACE ON TOP" last (above all the others). Then, cover this tray with the lid.
natural_image
Line drawing of a multi-tiered cylindrical container or storage unit (no text or symbols)NOTES:
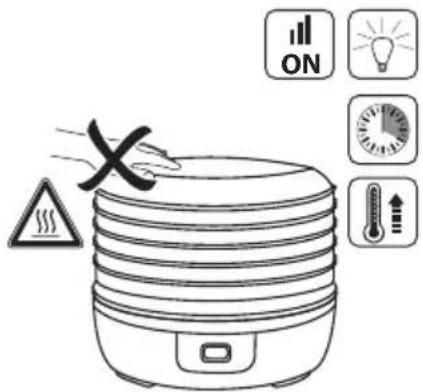
- do not block the vents in the lid. Do not cover the lid!
- When filling the trays, keep in mind that the tray marked "PLACER AU DESSUS / PLACE ON TOP" will be stacked last (above all the others).
-
Plug the power cord into a suitable outlet.
-
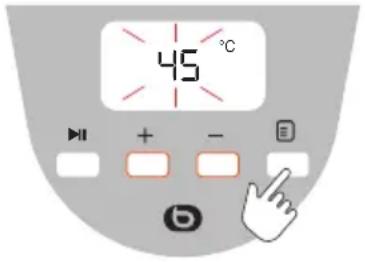
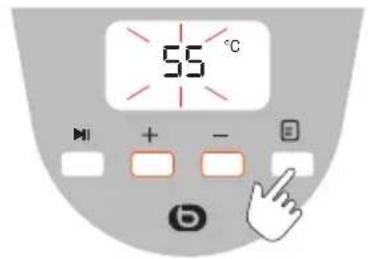
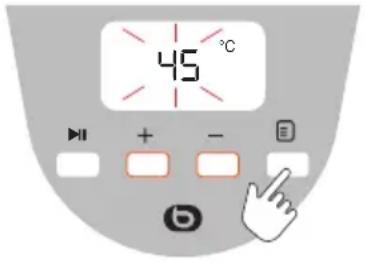
After plugging in the appliance, the message "00 Hr" flashes on the screen. Adjust the dehydration time by 1-hour increments (1-48 hours) using the + and- buttons.

- Then press the ☐ button once to set the temperature: "55°C" flashes on the screen. Adjust the required temperature by 5° increments (from 40 to 70°C or from 100 to 160°F) using the + and-buttons.

NOTES:
- to change the temperature unit, press and hold ☐. You can choose between degrees Celsius (°C) and degrees Fahrenheit (°F).
- to find out the recommended settings according to the type of food, refer to the chapters on food processing.
-
After setting the time and temperature, press the ▶ button to turn on the appliance. The fan begins to run and the appliance heats up. The display screen alternates between indicating the time remaining according to the chosen program and the temperature selected, as well as the Ⓛ symbol.
-
Before the automatic shut-down, a series of beeps are emitted to indicate the end of the program. At the end of the countdown, the appliance switches off automatically, the fan stops and the screen displays "00" continuously.
NOTE: do not touch the trays! Hot surfaces!
- Unplug the power cord and let the appliance cool down before cleaning it. Refer to the section on CLEANING AND MAINTENANCE.
If you want to change the temperature or time setting during the dehydration process:
- Briefly press the button, and the remaining time will flash on the display.
- While the time is flashing on the screen, press the + and - buttons to change the timer setting.

E Z
- Briefly press the ☐ button again, and the set temperature will flash on the display.
- While the temperature is flashing on the screen, press the + and - buttons to change the temperature setting.
- After about 2 seconds, the values are saved and appear permanently on the display.
PAUSING THE DEHYDRATION PROCESS
If you want to temporarily stop the appliance from operating, e.g. to check whether the food is sufficiently dehydrated:
- Briefly press the ▶ button to pause the appliance. The fan stops. You will see the message "PA" displayed on the screen.
- Press the ▶ button again to restart the appliance.

If you want to shut down the appliance completely before the time is up:
- Press and hold the ▶ button until the fan stops and "00" is displayed on the screen.

how it works
- To dry the food, the appliance uses fresh air which it extracts through the vents at the base of the appliance.
- The air is heated and flows over the trays from bottom to top. This is why it is advisable not to overload your appliance or cover it.
- The flow of warm, dry air creates a gentle drying process.
helpful tips for best results
- Wash and clean the dehydrator before use, if you have not used it for an extended period.
- All the fruits, vegetables, nuts, herbs and flowers must be washed before preparation and pretreatment.
- Do not put pieces of food on top of each other. The air must be able to flow freely. Keep the food well spaced-out on the dehydrating trays.
- Check the level of dehydration every 2 hours until the food is crispy, pliable or soft depending on the type of product. Cut the food in half and check if it is dry inside. If the food is still moist, extend the dehydration process.
- For best results, rotate the trays halfway through the dehydration process. For example, move the bottom tray up because the food on the bottom trays will dehydrate faster than the top ones. However, the top tray cannot be moved and must remain at the top of the appliance.
- Dry the food at a suitable temperature. Refer to the instructions in the food drying guide to correctly prepare the temperature and dehydrating time of the food.
NOTE: drying food at higher temperatures can make it hard. While the food may be dry on the outside, the inside may still be moist. - Leave the food to cool before checking the level of dryness.
NOTE: the times and procedures described in this instruction manual are given as a rough guide. The dehydration time can vary greatly depending on the type of food used, its size and quality, the amount of food on the trays and your personal preferences. By experimenting and taking notes on the type of food, the weight of the food before and after dehydration, the total dehydration time and the end results, you will get the result you want!
food choices for best results
- Choose high-quality food for dehydration.
- Pre-treat some food with lemon juice to prevent discolouration.
- Choose barely ripe fruits, as they naturally contain a high sugar content and yield better results.
- Do not dehydrate fruits that are not ripe; the results can be unpredictable and they often taste bland and bitter.
- The vegetables should be fresh and crisp.
- Blanch vegetables before dehydrating them. Blanching destroys the enzymes that spoil vegetables, preventing them from going brown and developing a bad taste.
-
Also do not dehydrate overripe fruits and vegetables with spoiled parts.
-
Cut off all the damaged or spoiled parts of fruits and vegetables before dehydrating.
- Meat, poultry and fish should be fresh and lean. Always use lean meats. Remove as much fat as possible before dehydrating.
- Choose pieces of food of a similar size and shape so that they dehydrate evenly.
NOTE: the preparation, dehydration time and method of preservation will have a significant influence on the quality and taste of the food. Follow the preparation, dehydration and storage instructions given in this manual for superior quality better-tasting dried foods.
WARNING: if you suspect food contamination, do not attempt to use the dehydrator. Throw away the food instead.
fruit preparation and treatment
Preparation
- Wash and examine the fruit, removing any damaged or overripe parts.
- Peel the fruit as needed. Peeling is optional with other fruits, e.g. dried pear skins tend to be grainy and peach skins are a little fluffy.
- Some fruits turn brown when exposed to air (apples, apricots, peaches and pears). By following the tips below, you can pre-treat these fruits to slow down the browning effect and prevent the loss of vitamins A and C. To pre-treat them, the cut pieces should be dipped in a preservative solution until you have enough fruit to dry.
Pretreatment
It is not always necessary to pre-treat food in order to dry it; however, pre-treatment can improve the appearance of the food, increase shelf life and even preserve the nutritional value. Experiment with treated and untreated food to find out what works best. Bear in mind that the quality of the final product depends on the food being properly preserved, whether it is treated or not.
- Given their high vitamin C content, lemon and lime juices are natural alternatives to other pretreatments for reducing browning. Cut the fruit into slices and drop them straight into the juice. Take the slices out after about 2 minutes and place them on the trays.
- The fruits can also be dipped in honey, lime or orange juice, or sprinkled with coconut to give them an exotic flavour.
- For fruits cut and treated with lemon or lime juice, mix 1 part of lemon juice for 4 parts of water.
Treatment
NOTE: before preparing the food, wash it thoroughly. Make sure the utensils and racks are clean.
| Fruit Preparation | Dehydration temperature | Dehydration time in hours (for reference only) | Test to check for dehydration | |
| Pineapple Slices (about 8 mm thick) 70°C | 10-12 Easily pliable | |||
| Apples Slices (about 8 mm thick)Quarters (about 15 mm thick) | 70°C 8-10 | Easily pliable | ||
| Apricots Peeled fruit halves 70°C 10-12 Pliable | ||||
| Bananas Skinless pieces 70°C 8-10 Crispy | ||||
| Pears Slices (about 3 mm thick) 70°C 8-10 Pliable | ||||
| Halves | 70°C 14-18 Pliable | |||
| Raspberries | Whole | 70°C 8-10 | Hard | |
| Figs | Fruit halves | 70°C 8-10 | Dry | |
| Cherries | Whole, pitless | 70°C 10-12 | Dry | |
| Plums | Peeled fruit halves 70°C | 10-12 Pliable | ||
| Grape | Peeled fruit halves 70°C | 12-14 Easily pliable | ||
vegetable preparation and treatment
Vegetables are low in acid and contain less sugar than fruit. Vegetables require more attention. Some vegetables keep better when frozen rather than dried. Take care when choosing the vegetables.
Preparation
- Only choose the best quality vegetables for drying.
- Wash them thoroughly just before dehydrating them to remove dirt and bacteria.
- Most vegetables need to be peeled, trimmed, chopped or grated before being dried. For more details, refer to the table below.
Pretreatment
Blanch vegetables before drying them. Blanching destroys the enzymes that can produce unusual flavours during storage and result in poor texture and rehydration.
NOTE: Steam blanching is more effective than water blanching because it retains more flavour and vitamins. Vegetables can also be microwaved.
Steam blanching
Using a steamer, bring 5 to 7cm of water to boil in the lower section. Arrange the prepared vegetables in the upper section of the steamer, and steam them until piping hot, but not cooked enough to eat (usually 2 to 3 minutes, and no more than 5 minutes). Stir to ensure that all the vegetables are evenly blanched. Quickly transfer the steamed vegetables directly to the drying trays.
Water blanching
Take a large saucepan and fill it half-full with water. Bring to the boil. Place the food directly in boiling water and cover it. Remove it after 2 to 3 minutes. Quickly transfer the vegetables to the drying trays.
Microwave blanching
Microwave ovens can easily be used to blanch fresh vegetables. Prepare the vegetables in the same way as for steam blanching. Place the vegetables in a microwave-safe dish with a small amount of water (refer to your microwave's cooking chart). Cook for 1/4 to 1/3 of the time indicated in the table, giving the food a stir after half the blanching time. Microwave-blanched vegetables will be more colourful than steam-blanched vegetables. Quickly transfer the blanched vegetables straight to the drying trays.
Treatment
| Vegetables | Preparation | Dehydration temperature | Dehydration time in hours (for reference only) | Test to check for dehydration |
| Beans Whole 70°C 6-8 Crumbly | ||||
| Peas Without the pods 50°C 6-8 Hard | ||||
| Cucumbers Unpeeled slices (about 10 mm thick) | 50°C 6-8 Hard | |||
| Carrots Unpeeled slices (about 8 mm thick) | 70°C 6-8 Hard | |||
| Leeks Sections (6-8 cm long) 70°C 6-10 Crumbly | ||||
| Peppers Strips (6-8 cm long) 60°C 6-8 | Pliable | |||
| Mushrooms | Sliced or whole, if the mushrooms are small | 50°C 4-6 Hard | ||
| Celery | Unpeeled slices (about 8 mm thick) | 70°C 6-10 | Hard | |
| Tomatoes | Halves | 70°C | 12-14 Pliable | |
| Slices (about 6 mm thick) 70°C 7-10 | Hard | |||
| Courgettes | Unpeeled slices (about 8 mm thick) | 60°C 6-8 Hard | ||
meat, fish and poultry preparation
Marinate the meat before dehydrating it to preserve its natural taste and make it more tender. Be sure to marinate the meat for at least 3 hours.
NOTE: the longer you marinate the meat, the better it will taste.
Salt should be added to marinades because it helps to remove water from the meat so that it dehydrates more effectively. Always use lean meats. Meats with a high fat content do not dry out properly.
Meat
Prepare the meat by cutting it into small pieces and placing the pieces in the appliance for the recommended time or until all the moisture has gone.
Meat and fish should be dried on your dehydrator's highest temperature setting. These temperatures also help keep the bacteria and other putrefying micro-organisms, that are present in meat and fish, to a minimum during the early stages of drying.
Poultry
Before starting the drying process, the poultry must be prepared either by boiling it or by frying it.
Fish
Boil or cook the fish before starting the dehydration process (cook for approx. 15 minutes at 200^ C or until the fish can be easily divided up).
Walnuts
To dry walnuts, they must first be shelled and rinsed with hot water. Dry them and spread them out on the trays. Most walnuts take about 20 to 30 hours to dehydrate, and dehydration must continue until they are crisp.
Leave them to cool down after rehydrating them. Walnuts, that will not be eaten within a few days, should be frozen to keep them fresh. Allow them to thaw before eating them.
Treatment
| Food Preparation Dehydration | temperature | Dehydration time in hours (for reference only) | |
| Meat Thin | slices 60°C 10-12 | ||
| Fish Thin | slices 60°C 10-12 | ||
herb and flower preparation
To dry herbs and flowers, they must first be rinsed and patted dry. Remove any dead, soft or discoloured parts, while leaving the stem intact. Spread the herbs or flowers on a tray and let them dehydrate for about 2 to 7 hours, depending on their type and size. Once drying is complete, remove the tray and allow to cool. Remove the leaves or buds from the stem and separate them. Crush them if you want.
For best results, pick the flowers after the morning dew has dried in the sunlight and before the cool evening mist has settled on the petals. Be careful of flowers that have been sprayed with insecticides or other harmful chemicals; do not use them under any circumstances. If you are dehydrating flowers at the same time as herbs, place the flowers on the lower trays and the herbs on the upper trays so that any debris from the flowers doesn't fall on the herbs.
Treatment
| Herbs Preparation Dehydration | temperature | Dehydration time in hours (for reference only) | |
| Basil, oregano, parsley, chives, tarragon, etc. | Whole stems 40°C | 2-4 | |
food preservation
NOTE: food needs to be properly preserved in order to maintain its quality. Food should be at room temperature before storing.
Packing
In order to properly store dehydrated foods, the dried food must be carefully wrapped.
- Pack dried food in plastic freezer bags, while removing as much air as possible from inside. Vacuum packing is ideal for storing dried food.
- Store the plastic bags in an airtight glass, metal or plastic container. When food is stored in rigid containers without first being placed in freezer bags, the dried food is exposed to air, which has a damaging effect. Vacuum packing significantly extends the shelf life of your dried food.
Storage conditions
Dehydrated food must be stored correctly in order to preserve the quality and taste of the product.
- Make sure all dried food is kept in a dark, cool place; the cooler the conditions, the longer the optimum quality of the food will be preserved.
- For every 8^ drop in temperature, the shelf life increases 2-3 times.
- If you have the space, store your dried food in a fridge or freezer. Otherwise, find the coolest place in your home to store your dried food.
- Bear in mind that light also causes the quality and nutritional value to deteriorate. Therefore, keep dried food in an opaque or dark coloured container.
- Store food in a sealed bag or dark container.
Shelf life
Fruits are naturally high in sugar and acid; they dry well and keep longer than vegetables. When properly packed and stored at or below room temperature (21°C or less), most fruits retain a high quality and nutritional value for one year. Most vegetables are best when eaten within six months.
FRUITS AND VEGETABLES STORED OVER THE RECOMMENDED TIME MAY NOT BE AS NUTRITIOUS OR AS TASTY, BUT THEY WILL NOT SPOIL AS LONG AS THE PACKING REMAINS INTACT.
rehydrating food
Food, that has been dehydrated, can be rehydrated in water. There are three ways of doing this:
- Fruits and vegetables can be soaked in water for 2 to 6 hours. Make sure they are kept refrigerated during this process. Do not soak them at room temperature, as harmful bacteria may develop.
- They can be immersed in boiling water for 5 to 10 minutes until they have reached the required consistency.
- You can also rehydrate fruits and vegetables by cooking them. Do not add seasoning, salt or sugar during this process. Adding salt or sugar during rehydration can change the taste of the food. As a rule of thumb, put 1 cup of fruit to simmer in 2 cups of water.
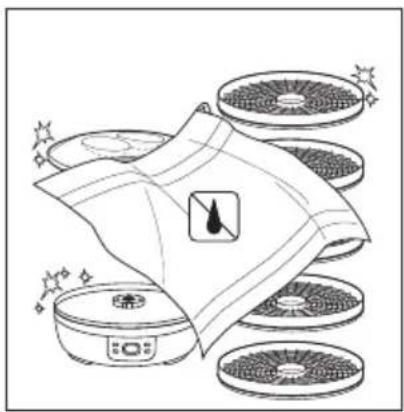
cleaning and maintenance
BEFORE CLEANING,

ALWAYS UNPLUG THE APPLIANCE TO AVOID ANY RISK OF AN ELECTRIC SHOCK

AND LET IT COOL DOWN COMPLETELY TO AVOID ANY RISK OF BURNS.
CLEAN THE APPLIANCE BEFORE USING IT FOR THE FIRST TIME.
-
Clean the lid and the trays with a neutral detergent using a sponge or a soft brush. Rinse all the parts thoroughly with clear water and dry them with a dry, soft cloth. The lid and trays are also dishwasher-safe.
-
Clean the base with a damp cloth, and dry it completely.
-
Never clean the appliance with strong chemicals, or alkaline or abrasive products, as they can damage the surface.
-
Never submerge the appliance or its power cord in water or any other liquid to clean it. Make sure that the electrical parts do not get damp or wet.
-
The appliance can only be used again after all the accessories have completely dried.
natural_image
Illustration of a cloth cover with decorative patterns and a small inset image (no text or symbols)
natural_image
Simple line drawing of a cylindrical container being lifted by an air vent into a box (no text or symbols)storage
-
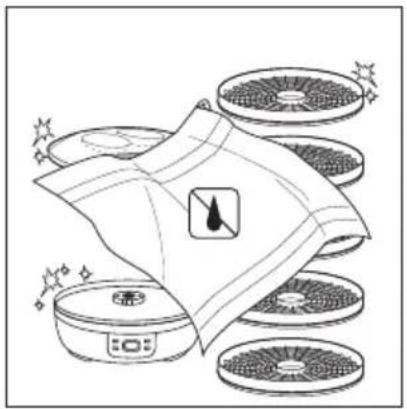
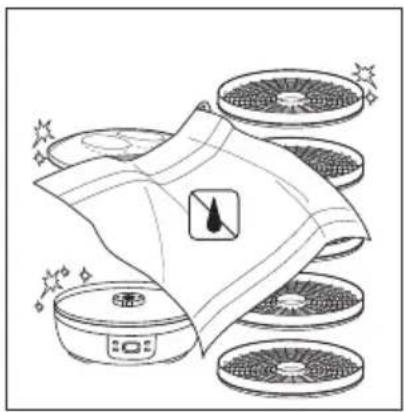
Before storing the appliance, clean it thoroughly along with its accessories. Allow all the parts to dry completely.
-
Store the appliance in a cool, dry place away from moisture. Keep the appliance out of the reach of children.
-
Do not place heavy loads on the appliance, as this could damage it
troubleshooting
In the event of a malfunction, here is a list of suggested solutions. Do not attempt to repair the appliance yourself.
| Problem Cause Solution | ||
| The appliance is not working. | ·The installation has a connection problem.·You have not set a running time. | ·Check that the appliance is properly plugged in.·Check that the outlet is working.·Set a running time between 1 and 48 hours. |
| The appliance has automatically shut down and won't restart. | ·The appliance has overheated. | ·The appliance is equipped with an overheat protection system. In case of overheating, the appliance will shut down. Leave the appliance to cool down. |
| The food is sticking to the trays. | ·After the first hour, turn the food over.·Before placing the food on the trays, spray or lightly coat the trays with vegetable oil. | |
| Mould is appearing on the dehydrated food. | ·The food has not been allowed to properly cool before storage.·The food is not completely dry.·The storage container is not airtight.·The pieces of food are not uniform in size, resulting in uneven drying.·The food was dried at too high a temperature.·The exterior is dry and hard, while the interior is still damp. | ·Check how dry the pieces of food are.·Cut the pieces of food and check how dry they are inside.·Leave the food to cool before storing. |
| There is dampness in the storage container. | ·The food was not left to cool down properly before it was stored.·The food has not dried completely. | ·Check how dry the pieces of food are.·Cut the pieces of food and check how dry they are inside. |
| The fruits or vegetables are discoloured or have brown spots. | ·The food has not dried completely.·The food was dried at too high a temperature.·The food is too dry. | ·Pre-treat the cut fruit with lemon or lime juice and water (1 part lemon to 4 parts water). |
E Z
uso previsto
natural_image
Diagram showing a container with multiple circular objects and a downward arrow, no text or symbols present.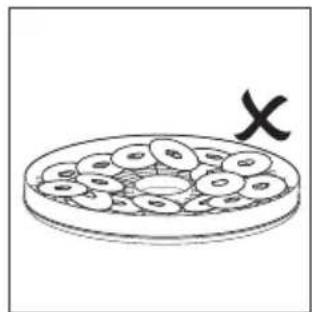
natural_image
Illustration of a plate with multiple circular objects and a black 'X' symbol (no text or labels)natural_image
Line drawing of a multi-tiered cylindrical container or storage unit (no text or symbols)OBSERVACIONES:
natural_image
Illustration of household appliances including a microwave oven, fan with a warning symbol, and decorative items (no text or labels)
natural_image
Simple line drawing of a cylindrical container being lifted by an open box, with no text or symbols present.almacenamiento

natural_image
Illustration of a plate with circular objects and a black 'X' symbol (no text or labels)natural_image
Line drawing of a cylindrical object with horizontal ridges and a small protrusion at the bottom (no text or symbols)HINWEISE:
HINWEISE:
Funktionsweise
natural_image
Illustration of cleaning tools including a cloth cover and circular components with star patterns (no text or symbols)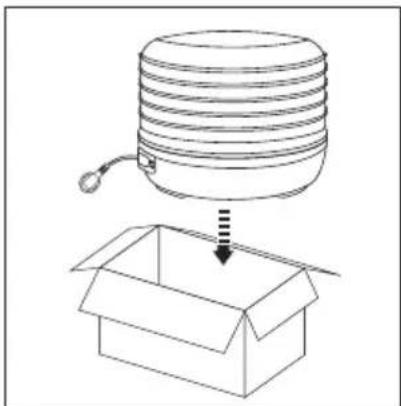
natural_image
Simple line drawing of a cylindrical container being inserted into an open box, with no text or symbols present.Verstauen
natural_image
Line drawing of a multi-tiered cylindrical container or storage unit (no text or symbols)OPMERKINGEN:
ONDERBREKING VAN HET DROOGPROCES
ANNULATIE VAN HET DROOGPROCES
werkingsprincipe
natural_image
Illustration of a cloth cover with decorative patterns and scattered circular objects (no text or symbols)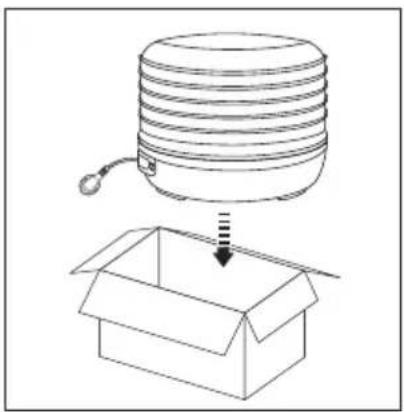
natural_image
Simple line drawing of a cylindrical device above an open box, with no text or symbols present.opberging
All information, designs, drawings and pictures in this document are the property of SOURCING & CREATION. SOURCING & CREATION reserves all rights to its brands, designs and information. Any copy and reproduction through any means shall be deemed and considered as counterfeiting.
Protection of the environment
This symbol attached to the product means that it is an appliance whose disposal is subject to the directive on waste from electrical and electronic equipment (WEEE). This appliance may not in any way be treated as household waste and must be subject to a specific type of removal for this type of waste. Recycling and recovery systems are available in your area (waste removal) and by distributors. By taking your appliance at its end of life to a recycling facility, you will contribute to environmental conservation and prevent any harm to your health.
\* Tested in our laboratories
Warranty valid from the date of purchase (receipt as proof of purchase). This warranty does not cover defects or damage caused by improper set up, incorrect use, or normal wear and tear of this product.
Customer Relations Department /