
EASV2 - Vacuum packaging machines Essentiel B - Free user manual and instructions
Find the device manual for free EASV2 Essentiel B in PDF.

| Product type | Vacuum packaging machine |
| Brand | Essentiel B |
| Model | EASV2 |
| Power | 130 W |
| Power supply | 220-240 V~, 50 Hz |
| Maximum vacuum | 0.8 bar |
| Pump capacity | 15 L/min |
| Dimensions (closed) | 40 x 19 x 9 cm (L x W x H) |
| Weight | 2.145 kg |
| Lid material | Stainless steel |
| Main functions | Automatic vacuum and sealing, food type selection (fragile/normal, liquid/solid), marinade function (10 min), external suction via hose for accessories |
| Suction speeds | 2 speeds: normal and fragile |
| Integrated cutter | Cutting bar for roll |
| Box contents | Machine, 22 cm x 3 m roll, 28 cm x 3 m roll, suction hose, vacuum stopper, user manual |
| Cleaning | Exterior: soft damp cloth without detergent; interior: paper towel; accessories: soapy water; do not immerse |
| Safety | Unplug before cleaning, allow 20 s cooling between seals, do not immerse |
| Use with accessories | Hose for airtight containers and stopper for glass bottles |
| Available accessories | Rolls, bags, airtight containers, stoppers, hoses (at retailer store) |
| Warranty | From purchase date (receipt) |
| Recycling | Device subject to WEEE regulations, to be disposed of at a waste disposal center or at the store |
Frequently Asked Questions - EASV2 Essentiel B
User questions about EASV2 Essentiel B
0 question about this device. Answer the ones you know or ask your own.
Ask a new question about this device
Download the instructions for your Vacuum packaging machines in PDF format for free! Find your manual EASV2 - Essentiel B and take your electronic device back in hand. On this page are published all the documents necessary for the use of your device. EASV2 by Essentiel B.
USER MANUAL EASV2 Essentiel B
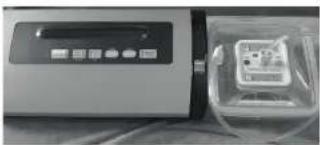
natural_image
Exterior view of a silver and black electronic device with control buttons (no visible text or symbols)Notice d'utilisation / User guide / Instrucciones de uso / Bedienungsanleitung / Gebruiksaanwijzing
FR EN ES DE NL
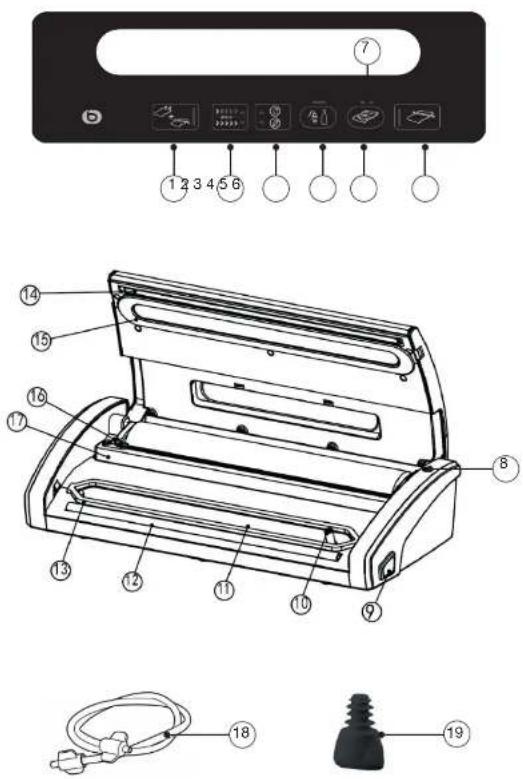
| 1 | Vide d'air & soudure / Annulation | Vacuum pack & seal / Cancel | Vacio de aire y soldadura/ Cancelación | Vakuum & Versiegelung/ Abbruch | Vacuum trekken & sealen / Opheffing |
| 2 | Selection de la vitesse en fonction du type c'aliment | Select a speed by food type | Selección de la velocidad en función del tipo de alimento | Auswahl der Geschwindigkeit ja nach Lebensmittelt | Keuze van de snelheid afnankelijk van het type voedingswaren |
| 3 | Selection du type c'aliment : Liquide ou Solide | Sselect the food type: Liquid or Solid | Selección del tipo de alimento: Líquido o Sólido | Auswahl der Lebensmittelt: Flüssigkeit oder Feste Lebensmittel | Keuze van het type voedingswaren: Vloelbaar of Vast |
| 4 | Mise sous vide d'une boutelle ou d'une botte hermétique | Vacuum pack a bottle or airtight container | Puesta al vacio de una botella o de una caja hermetica | Vakuumieren einer Flasche oder einer Dose | Vacuüm trekken van een flies of een hermetisch gesloten doos |
| 5 | Marinade Marinate | Marinada Marinade | Marinade | ||
| 6 | Soudure manuelle | Manual seal Soldar | Laura manual | Manuelles Versiegeln | Manusel sealen |
| 7 | Témoins lumineux | Indicator lights | Indicadores luminosos | Kontrolleuchten | Signaillampies |
| 8 | Embouts de raccordement | Connectors | Boquillas de conexión | Anschlussslutzen | Aansluitingen |
| 9 | Boutons de céverrouillage (x2) | Release buttons (x2) | Botones de desbloquen (x2) | Entriegelungstasten (x 2) | Ontgrendelingsknappen (x2) |
| 10 | Embouts de récupération de l'air sortant | Outfeed air collection nozzles | Boquillas de recuperación del aire saliente | Stützen zur Rückleitung der austretenden Luft | Uiteinden om de uitgaande lucht op te vangen |
| 11 | Chambre de mise sous vide | Vacuum chamber | Camara de puesta al vacio | Vakuumkammer | Vacuümkamer |
| 12 | Barre de soudure | Heat strip | Barra de soldadura | Schweitlleiste | Seistrook |
| 13 | Joint d'étanchéité inférieur | Bottom seal | Junta de estanqueidad inferior | Unterer Dichtungsring | Onderste atlichting |
| 14 | Ruban de soudure | Heat strip tape | Tira de soldadura | Siegelband | Seallint |
| 15 | Joint d'étanchéité supérieur | Top seal | Junta de estanqueidad superior | Oberer Dichtungsring | Bovenste ardichting |
| 16 | Bouton poussoir de découpe | Cut button | Pulsador de corte | Schnitt-Drucktaste | Drukknop voor snijden |
| 17 | Barre de maintien du sac | Bag retaining bar | Barra de sujeción de la bolsa | Haltestange Beutel | Lat om de zak op zijn plaats te houden |
| 18 | Tuyau d'aspiration | Suction hose | Tubo de aspiración | Saugschlauch | Zügslang |
| 19 | Bouchon spécial de mise sous vide pour bouteilles | Special vacuum stopper for bottles | Tapán especial de puesta al vacio para boletlas | Spezialverschluss für das Vakuumversiegeln von Flaschen | Speziale knop voor het vacuum trekken van flessen |
natural_image
Technical line drawing of a mechanical component with internal channels and directional arrows (no text or symbols)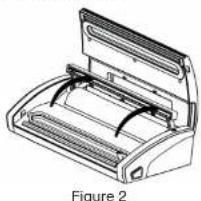
natural_image
Technical line drawing of a device with internal components and labeled as Figure 2 (no text or symbols on the diagram itself)Figure 1
natural_image
Technical line drawing of a mechanical component with internal channels and directional arrows, labeled Figure 1 (no text or symbols on the diagram itself)Figure 1

natural_image
Line drawing of a printer or scanner device with paper and scroll (no text or symbols)Figure 10
natural_image
Close-up of a portable electronic device with control buttons and a transparent plastic container (no visible text or symbols)Figure 14
Figure 15
natural_image
Exterior view of a laboratory instrument with digital display and connected tubing (no visible text or symbols)natural_image
Close-up of a hand pressing a button on a device panel, with no visible text or symbols.Figure 16
natural_image
Exterior view of a modern office building (no signage)Figure 14
natural_image
Exterior view of a medical device with control panel and internal component (no visible text or symbols)Figure 17
natural_image
Technical line drawing of a device with a coiled spring and mounting bracket (no text or symbols)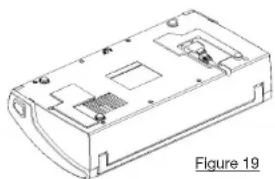
natural_image
Technical line drawing of a 3D electronic device casing with internal components (no text or symbols)guide de dépannage
Thank you for purchasing an Essentiel brand product. We pay special attention to the RELIABILITY, EASE OF USE and DESIGN of our products. We hope that you will be completely satisfied with this vacuum sealer.
your product
Contents of the box
• 1 vacuum sealer
• 1 22 cm x 3 m roll
• 1 28 cm x 3 m roll
- 1 suction hose for accessories (bottle, airtight container and compatible bags)
• 1 vacuum stopper
- 1 user guide
Technical features
• Power: 130 W
• Voltage: 220-240 V\~ 50 Hz
• Auto vacuum and seal
- Select the food type for an ideal suction speed
- Two suction speeds, including one for delicate food
• Stainless steel lid
• Maximum vacuum: 0.8 bar
• 15 L per minute piston pump capacity
• Dimensions (device closed) (L x D x H): 40 cm x 19 cm x 9 cm
• Weight: 2.145 kg
intended use
- This appliance is designed only for vacuum packing and sealing compatible vacuum seal bags. You can use the provided vacuum seal rolls with this appliance (cut to the appropriate size). The suction hose is used to create a vacuum inside suitable airtight containers (not included) and glass bottles using a special vacuum stopper (1 stopper is included with the device).
- You can purchase vacuum seal rolls, individual bags, airtight containers and compatible stoppers from your retail store (at the after-sales service counter).
- This appliance is used to keep food fresh up to 5 times longer than traditional preservation methods.
- You can buy more food less often and prepare meals in advance for your family or guests, for picnics, hikes and more.
- It can be used as a great solution for portion control during a diet.
- You can use this appliance to pack any type of food into desired portions, including meat, fish, vegetables and more, for storage in the fridge or freezer.
- It prevents freezer burn.
- Pack dry foods such as peanuts, cereals, etc. so they keep longer.
- Preparing marinades takes minutes instead of hours.
- Keep opened glass bottles fresh for longer by vacuum packing them.
- Re-seal food in its original packaging (e.g. bag of crisps, etc.) using the button.
- You can use this vacuum sealer to safeguard other non-food items such as important documents, photos, jewellery, books, etc. or hardware such as screws and nails, medication, plasters, etc.
before initial use
- Remove the appliance from its packaging. Also remove all cushioning and paper. Check to make sure no pieces of the packaging remain inside the appliance.
- Wipe the appliance's exterior and interior surfaces with a soft damp cloth (do not use detergent).
- Wash your hands thoroughly before handling food and vacuum packing.
use
Making a bag using a vacuum seal roll
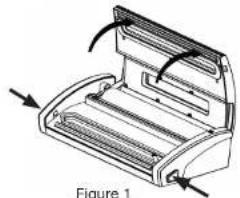
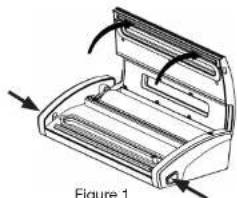
- Open the lid by pressing the 2 release buttons on either side of the appliance (Figure 1).
- Lift the cutting bar and set it to its rear position (Figure 2).
natural_image
Technical line drawing of a mechanical component with internal channels and arrows indicating motion (no text or symbols)
natural_image
Technical line drawing of a mechanical device with internal components, labeled as Figure 2 (no text or symbols on the diagram itself)-
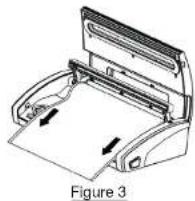
Place the roll in its storage compartment. Unroll the roll to the desired length for the food you intend to pack (Figure 3). Remember to leave about 8 cm clear for the vacuum packing.
-
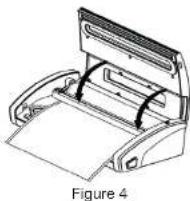
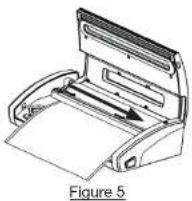
Lower the cutting bar (Figure 4) and slide the cut button from left to right (Figure 5).
- Place the end of the bag on the heat strip, allowing the bag to protrude slightly into the vacuum chamber (Figure 6).
- Close the lid (Figure 7). Press firmly on the left and right sides of the lid to make sure it locks (each side should make an audible click when it locks).
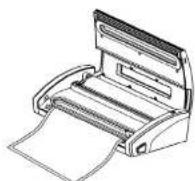
Figure 6

Figure 7
- Press the button (Figure 8). The bag is sealed once the light on this button turns off. Press the 2 release buttons (Figure 9) to open the lid and remove the bag. You can now vacuum seal the bag with the food.
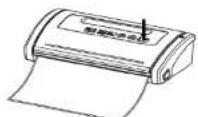
Figure 8
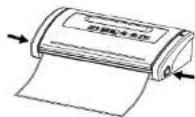
Figure 9
Vacuum packing using vacuum seal bags
- Open the lid by pressing the 2 release buttons on either side of the appliance (Figure 1).
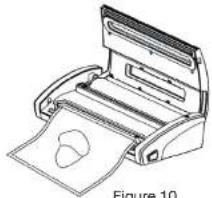
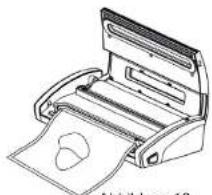
- Insert the food into the bag, leaving a gap of at least 8 centimetres between the contents and the open end of the bag. Place the end of the bag on the heat strip, allowing the bag to protrude slightly into the vacuum chamber (Figure 10).
natural_image
Technical line drawing of a mechanical component with internal channels and arrows indicating motion (no text or symbols)Figure 1
natural_image
Line drawing of a mechanical device with paper feed and cover, labeled as Figure 10 (no text or symbols on the diagram itself)Figure 10
Make sure both sides of the bag are inside the vacuum chamber.
- Close the lid. Press firmly on the left and right sides of the lid to make sure it locks (each side should make an audible click when it locks) (Figure 11).
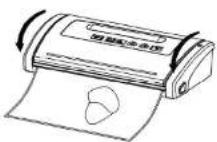
Figure 11
- Choose the type of food ("Delicate" or "Normal") by pressing button (1) and whether it is a "Liquid" or "Solid" by pressing button (2) (see Figure 12 below). The "Normal" and "Solid" modes are selected by default. "Delicate" foods include more sensitive foods like fruits that should not be excessively compressed when vacuum packed. "Normal" foods are those that tolerate being highly compressed when vacuum packing, such as: meat, fish, dry fruit, etc. The light for the food type tums on.
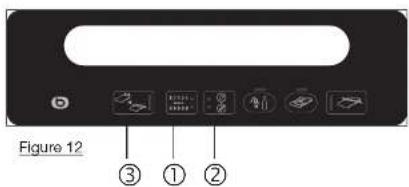
- Press the button (3 Figure 12). The air in the back is sucked into the vacuum chamber and the bag is sealed. The light on the button will go out during the process and turn on again when the vacuum packing is finished (after a few seconds).
- Press the 2 release buttons (Figure 13) and remove the bag.
Wipe off any excess liquid or food residue remaining on the bag. Place the bag in the fridge or freezer (refer to the "Useful Operating Tips" section).
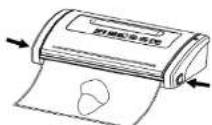
Figure 13
- Be aware that vacuum packing does not replace refrigeration or freezing. All perishable food that needs refrigeration must always be refrigerated after being vacuum packed.
- Wait at least 20 seconds between seams to allow the unit to cool down properly.
- To open a vacuum-sealed bag, use a pair of scissors to cut along just under the sealed seam. The bags are microwave safe.
Vacuum packing using the accessory hose and/or stopper
Compatible airtight vacuum pack containers are not included with this appliance, but you can purchase them from your retail store's after-sales service counter. Replacement accessory hoses and vacuum stoppers are also available from your retail store.
Preparation
- Clean the accessory hose fitted with its 2 end pieces as well as the airtight container and its lid using a soft sponge and hot water with washing-up liquid added. Rinse with fresh water and dry carefully using a soft cloth. The container and the hose must be completely clean and dry. Next, place the food you wish to vacuum seal in the airtight container, leaving a 2-3 cm gap between the contents and the lid.
Vacuum packing
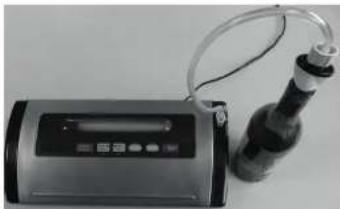
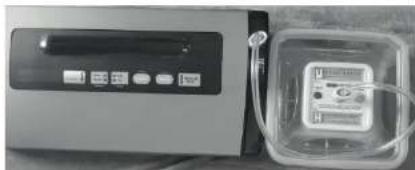
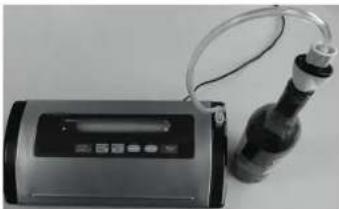
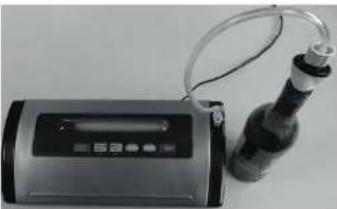
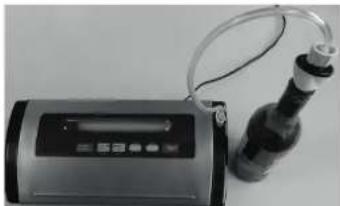
- Connect one end of the accessory hose to the connector located on the right-hand side of the appliance and the other end to the specially-designed lid of the airtight container (not included) (Figure 14).
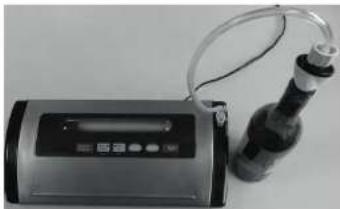
Or: - Connect the vacuum stopper to one end of the hose. Next, connect the free end of the hose to the connector on the right-hand side of the appliance and use the vacuum stopper to plug the glass bottle you intend to vacuum seal (Figure 15).
natural_image
Exterior view of a portable electronic device with control panel and adjacent plastic housing (no visible text or symbols)Figure 14
Figure 15
natural_image
Exterior view of a laboratory instrument with digital display and tubing (no visible text or symbols)- Make sure to properly close the container's lid.
- For airtight containers with a button that has a "sealed" setting, set the button to the "sealed" position.
- "Normal" mode is selected by default. You can choose a slower or faster speed by pressing the button. The light for the selected speed turns on. "Delicate" represents a slower speed and "Normal" a faster speed.
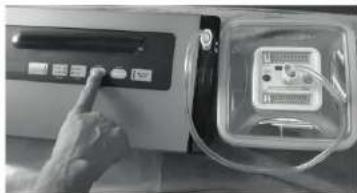
- Press the button to begin removing air (Figure 16). The light on the button turns on and the motor starts to run.
- Once air in the container has been removed, the appliance automatically stops and the light on the button turns off.
natural_image
Close-up of a hand pressing a button on a medical device (no visible text or symbols)Figure 16
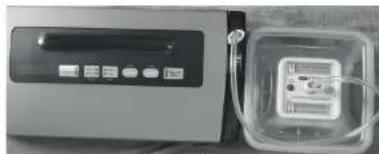
- Once the vacuum packing process is complete, set the button on the top of the airtight container to the "closed" position (sealed). You can then remove the hose. The airtight container is ready for storage.
- Note: At any time, you can press the "Vacuum pack & seal/Cancel" button to stop the process.
Marinating

- Your vacuum sealer has a "marinate" function, which takes about 10 minutes. The process is faster because vacuum packing opens the pores in the food, making it absorb flavours more quickly. Marinating is an hours-long process without a vacuum sealer.
- The motor keeps air out for several minutes then releases it and allows the food to rest briefly. The process repeats twice in a row, marinating the food faster.
Marinating with a vacuum bag
- You can use the "Marinate" function with vacuum bags. For this, refer to the section "Vacuum packing using vacuum seal bags". At step 5, press the button. Let the appliance run. The process takes about 10 minutes.
Marinating with an airtight container (not included)
- Fill your airtight container with your marinade, making sure to leave a 2-3 cm gap between the contents and the lid.
- Connect one end of the accessory hose to the connector located on the right-hand side of the appliance and the other end to the specially-designed lid of the airtight container (Figure 14).
natural_image
Exterior view of a modern office building (no signage)Figure 14
- Make sure the container's lid is closed securely and that the hose is properly connected to the airlight container. For airlight containers with a button that has a "sealed" setting, set the button to the "sealed" position.
- "Normal" mode is selected by default. You can choose a slower or faster speed by pressing the button. The light for the selected speed turns on. "Delicate" represents a slower speed and "Normal" a faster speed.
-
Press the button. The light on the button blinks during the process, which takes about 10 minutes.
-
The process is finished once the light on this button turns off. Set the button on the top of the airtight container to the "closed" position (sealed). You can then remove the hose (Figure 17). The airtight container is ready for storage.
natural_image
Exterior view of a medical device with control panel and internal component (no visible text or symbols)Figure 17
Food storage time guide*
| Storage Food Temperature | Normal storage time | Vacuum packed storage time | ||
| In the fridge | Raw meat | Between 0°C 4-6 days 10-14 days and 4°C | 2-3 days 8-9 | days |
| Fresh fish/ seafood | 1-3 days 4-5 | days | ||
| Cooked meat 4-6 days 10-14 days and 4°C | ||||
| Vegetables 3-5 days 7-10 days | ||||
| Fruit 5-7 days 14-20 days | ||||
| Eggs 10-15 days 30-50 days | ||||
| In the freezer | Meat | > -1 year | 3-5 months > | 1 year |
| Fish 3-5 months | ||||
| Seafood | 3-5 months > | 1 year | ||
| At room temperature | Bread | About 20°C | 1-2 days 6-8 | days |
| Biscuits | 4-6 months > | 1 year | ||
| Rice/flour | 3-5 months > | 1 year | ||
| Peanuts and other nuts | 3-6 months > | 1 year | ||
| Tea | 5-6 months > | 1 year | ||
| Medical supplies | 3-6 months > | 1 year | ||
* This table is provided for information purposes. You should take into account different factors, including the initial quality of the food, transport and storage conditions, etc.
useful operating tips
- To avoid possible food poisoning, do not reuse bags after packaging raw meat, raw fish or fatty foods. Do not reuse bags that have been microwaved or simmered.
• Always wait for hot food to cool to room temperature before you vacuum pack them. - You can vacuum pack wine, non-carbonated liquids and oils using the specially-designed stopper. Use glass bottles only. Do not use plastic bottles. Vacuum packing carbonated or sparkling liquids will cause them to go flat (since the gas is being removed).
- Avoid vacuum packing soft cheeses, mushrooms, onions and garlic (due to the risk of anaerobic bacteria).
- Some vegetables such as broccoli, cauliflower, cabbage and Brussels sprouts give off an odour when stored. Vegetables should be blanched before vacuum packing.
- For liquid food (soup, sauce, etc.): we recommend you freeze it first and avoid overfilling the bags. Empty and clean the vacuum chamber after each use if needed.
- Before vacuum packing soft fruits, berries, bread and other baked goods, freeze them for 1 to 2 hours until they harden.
- For coffee or other powdered foods, to stop the pump from sucking up particles, place a paper coffee filter or paper towel at the top of the bag before sealing it. You can also put the food in its original packaging inside the vacuum bag.
- Beef may darken in colour after vacuum packing due to the absence of oxygen: this is not a sign that it has spoiled.
- To avoid wrinkles on the seam when vacuum packing bulky foods, hold the bag with both hands and gently stretch it out to keep it flat until the pump starts. Repeat the process if you are unsure whether the bag is sealed properly or if you find creases after vacuum packing.
- When thawing and reheating vacuum-packed food, always thaw in the refrigerator or microwave, not at room temperature. You can lay the food in a pan of hot water (75°C). If you want to use the microwave to reheat food, cut off a corner of the bag and place the bag on a plate.
- Avoid vacuum packing food with sharp points that could pierce the bag.
cleaning
• Always unplug the appliance from the mains before cleaning and then wash your hands.
- Never immerse the vacuum sealer in water or any other liquid.
- Never clean with abrasive detergent products or scouring pads.
- Clean outer surfaces of the appliance using a soft damp cloth (no detergent) before and after use.
- Use paper towel to clean the inside of the appliance.
- Liquids sucked from the bags may collect in the vacuum chamber: if this happens, clean using a slightly damp cloth and a mild detergent. Next, rinse with fresh water and dry thoroughly with a clean, dry cloth.
- Clean the provided accessories (hose, stopper) and detachable parts (heat strip and bottom seal) with warm soapy water. The surfaces should then be rinsed with fresh water and carefully dried using a soft cloth.
- Thoroughly dry all parts of the appliance and its accessories before using it again.
- Keep the appliance's lid unlocked when not in use.
storage
- Store your vacuum sealer flat in its original packaging and in a cool, dry place, out of reach of children.
- The power cord folds away in its compartment underneath the appliance (see Figures 18 and 19 below).
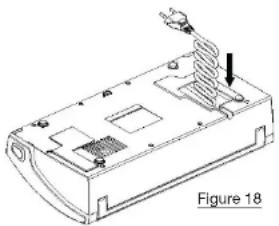
natural_image
Technical line drawing of a device casing with a coiled spring and mounting bracket (no text or symbols)
natural_image
Technical line drawing of a rectangular electronic device casing with internal components (no text or symbols)troubleshooting guide
Before contacting your retail store's after-sales service counter, try the following steps.
The appliance doesn't work when I press the button or the button:
- Check that the power cord is not damaged, that it is plugged in correctly and that the power point is working. To check, plug a different appliance into the socket in question. If it still does not work, check the circuit breakers or fuses in your home.
• Make sure the bag is placed correctly inside the vacuum chamber. - Lower the lid and make sure it is properly closed. You should hear a click when each side locks. Press down firmly.
- Wait long enough to allow the appliance to cool down between uses.
- If you use the provided hose, make sure it is properly connected to the appliance and to the airtight container or vacuum stopper.
The bag is not properly sealed:
• Make sure there are no creases or holes in the pre-sealed bags.
- Check the condition of the top and bottom seals; make sure they are free of wear, cracks and damage.
- Check that the bag is inserted correctly into the vacuum chamber. Resume vacuum packing, holding the bag with both hands and gently stretching it to keep it flat before closing the lid.
- Check that the heat strip is perfectly clean when heat sealing.
- Moisture from highly liquid foods may prevent the bag from sealing properly. Cut the bag and leave it open, clean and dry the inside and then re-seal the bag.
- This may be caused by the heat strip overheating during the sealing process. Give the appliance time to cool down sufficiently between uses. Leave the appliance to cool down for 30 minutes with the lid open before using it again.
Do not attempt to repair this appliance yourself. If you are unable to solve your specific problem using the above information, bring the appliance to your retail store's after-sales service counter.
natural_image
Technical line drawing of a mechanical device with internal channels and directional arrows (no text or symbols)
natural_image
Diagram of a device with internal channels and a labeled figure 'Figura 2' (no text or symbols on the diagram itself)natural_image
Technical illustration of a mechanical component with internal channels and directional arrows, labeled as Figure 1 (no text or symbols on the diagram itself)Figura 1

natural_image
Line drawing of a mechanical device with paper feed and rollers (no text or symbols)Figura 10
natural_image
Exterior view of a microwave oven and a small electronic device (no visible text or symbols)Figura 14
Figura 15
natural_image
Exterior view of a laboratory gas collection device with tubing and control panel (no visible text or symbols)natural_image
Close-up of a gloved hand pressing a button on a medical device with a close-up view (no visible text or symbols)Figura 16
natural_image
Close-up of a microwave oven with control panel and adjacent plastic housing (no visible text or symbols)Figura 14
natural_image
Exterior view of a modern office building (no signage)Figura 17
natural_image
Technical line drawing of a device with a coiled spring and heating element, labeled as Figura 18 (no text or symbols on the diagram itself)
natural_image
Technical line drawing of a device casing with internal components (no text or symbols)natural_image
Technical illustration of a mechanical component with arrows indicating direction (no text or symbols)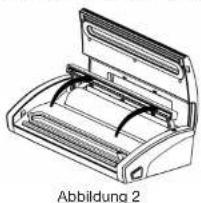
natural_image
Technical line drawing of a mechanical device with internal components, labeled 'Abbildung 2' (no other text or symbols)natural_image
Technical illustration of a mechanical device with labeled parts, showing internal structure and directional arrows (no text or symbols beyond label)Abbildung 1
natural_image
Line drawing of a mechanical device with rollers and a paper sheet, labeled 'Abbildung 10' (no text or symbols on the diagram itself)Abbildung 10
natural_image
Close-up of a microwave oven and its internal air vent (no visible text or symbols)Abbildung 14
Abbildung 15
natural_image
Exterior view of a laboratory instrument with digital display and tubing (no visible text or symbols)natural_image
Close-up of a hand pressing a button on a medical device (no visible text or symbols)Abbildung 16
natural_image
Close-up of a microwave oven and a small electronic device (no visible text or symbols)Abbildung 14
natural_image
Medical device with digital display and internal medical device (no visible text or symbols)Abbildung 17
natural_image
Technical line drawing of a mechanical device with a spring and heating element, labeled 'Abbildung 18' (no other text or symbols)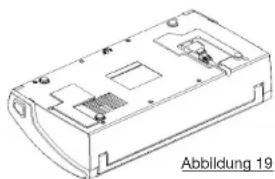
natural_image
Technical line drawing of a 3D electronic device casing with internal components (no text or symbols)Fehlerbehebung
natural_image
Technical line drawing of an open air duct device labeled 'Atbeelding 2' (no other text or symbols)natural_image
Line drawing of a paper feeder machine with paper roll and paper holder (no text or symbols)Afobeelding 10
natural_image
Two electronic devices: a portable air conditioner unit and a small rectangular device with internal components (no visible text or symbols)Afbeelding 14

Afbeelding 15
natural_image
Black and white photo of a handheld device with a coiled cable and a bottle, no visible text or symbols.natural_image
Close-up of a hand pressing a button on a device with a transparent display (no visible text or symbols)Afbeelding 16
natural_image
Exterior view of a modern office building (no signage)Afbeelding 14
natural_image
Close-up of a medical device with a digital display and a small rectangular device inside a transparent container (no visible text or symbols)Afbeelding 17
All information, designs, drawings and pictures in this document are the property of SOURCING & CREATION. SOURCING & CREATION reserves all rights to its brands, designs and information. Any copy and reproduction through any means shall be deemed and considered as counterfeiting.
Protection of the environment
This symbol attached to the product means that it is an appliance whose disposal is subject to the directive on waste from elec trical and electronic equipment (WEEE). This appliance may not in any way be treated as household waste and must be subject to a specific type of removal for this type of waste. Recycling and recovery systems are available in your area (waste removal) and by distributors. By taking your appliance at its end of life to a recycling facility, you will contribute to environmental conservation and prevent any harm to your health.
\* Tested in our laboratories
Warranty valid from the date of purchase (receipt as proof of purchase). This warranty does not cover defects or damage caused by improper set up, incorrect use, or normal wear and tear of this product.