Hair Clipper - Hair clippers Xiaomi - Free user manual and instructions
Find the device manual for free Hair Clipper Xiaomi in PDF.

User questions about Hair Clipper Xiaomi
0 question about this device. Answer the ones you know or ask your own.
Ask a new question about this device
Download the instructions for your Hair clippers in PDF format for free! Find your manual Hair Clipper - Xiaomi and take your electronic device back in hand. On this page are published all the documents necessary for the use of your device. Hair Clipper by Xiaomi.
USER MANUAL Hair Clipper Xiaomi
Read this manual carefully before use, and retain it for future reference.
Precautions
- This appliance is not intended for use by persons (including children) with reduced physical, sensory or mental capabilities, or lack of experience and knowledge, unless they have been given supervision or instruction concerning use of the appliance by a person responsible for their safety.
- Children should be supervised to ensure that they do not play with the appliance.
- Cleaning and user maintenance shall not be made by children without supervision.
Europe-EU declaration of conformity
CE We Shenzhen Kolamama Technology Co., Ltd., hereby, declares that this equipment is in compliance with the applicable Directives and European Norms, and amendments. The full text of the EU declaration of conformity is available at the following internet address: http://www.mi.com/global/service/support/declaration.html
WEEE Disposal and Recycling Information
All products bearing this symbol are waste electrical and electronic equipment (WEEE as in directive 2012/19/EU) which should not be mixed with unsorted household waste. Instead, you should protect human health and the environment by handing over your waste equipment to a designated collection point for the recycling of waste electrical and electronic equipment, appointed by the government or local authorities. Correct disposal and recycling will help prevent potential negative consequences to the environment and human health. Please contact the installer or local authorities for more information about the location as well as terms and conditions of such collection points.
WARNINGS
- This appliance contains built-in lithium-ion battery.
- Do not disassemble, impact, crush the battery or throw it into fire.
- If there is severe swelling, do not continue to use.
- Do not leave the battery in high temperature environment.
- For the purposes of recharging the battery, only use the detachable supply unit provided with this appliance.
- Use only with
supply unit. - This appliance contains batteries that are non-replaceable.
- The appliance is intended for trimming purposes only.
- Cutting blades may become hot after prolonged use.
- Before cleaning and maintenance, the charging cable must be unplugged and the clipper must be turned off.
- The instructions for disassembling the battery are for reference only when discarding the clipper and should not be followed for maintenance.
- Before removing the battery, make sure to unplug the charging cable and drain the battery.
- The product will no longer be usable once the battery is removed.
CAUTIONS
If the battery has leaked and you accidentally touch it, rinse the area with plenty of water and seek medical attention immediately.

Suitable for cleaning under an open water tap.
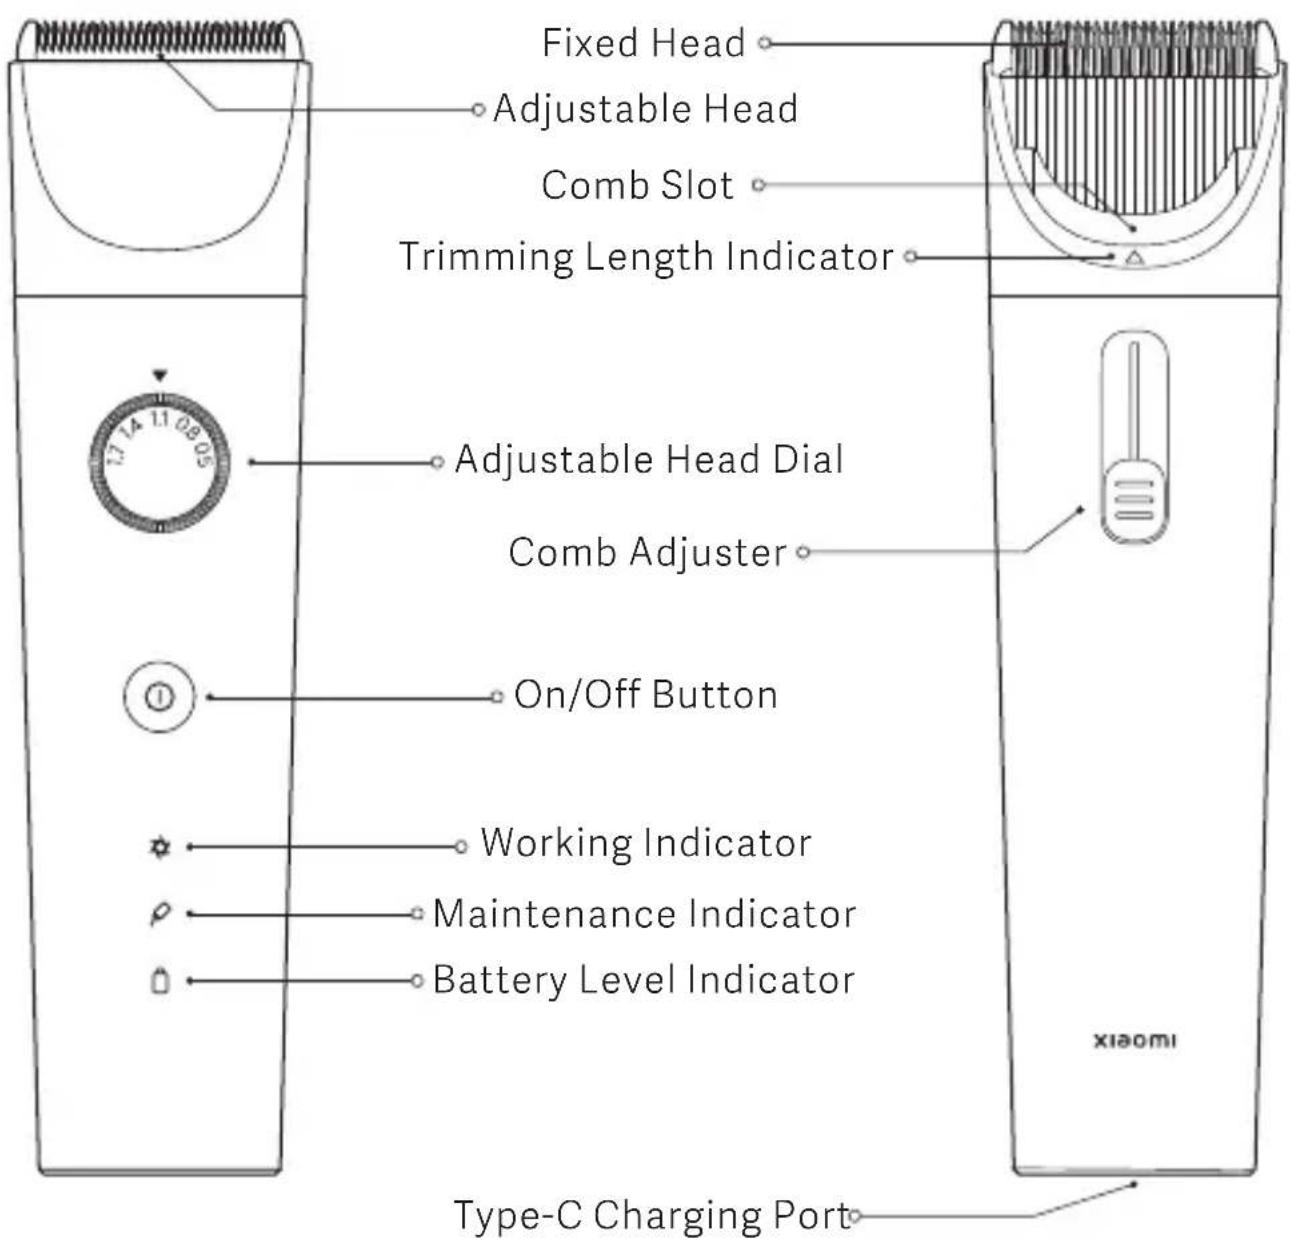
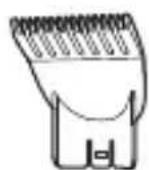
Product Overview
text_image
Fixed Head Adjustable Head Comb Slot Trimming Length Indicator Adjustable Head Dial Comb Adjuster On/Off Button Working Indicator Maintenance Indicator Battery Level Indicator Type-C Charging Port xiaomi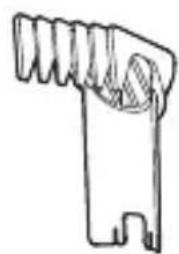
natural_image
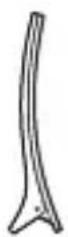
Simple line drawing of a mechanical component with no text or symbols3–21 mm Adjustable Comb
natural_image
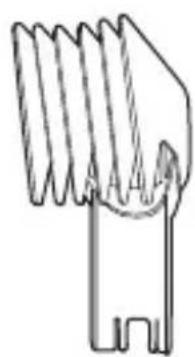
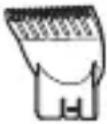
Simple line drawing of a mechanical component with no text or symbols23–41 mm Adjustable Comb
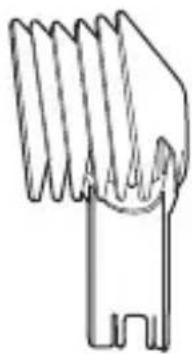
Thinning Comb
Hair Clip
natural_image
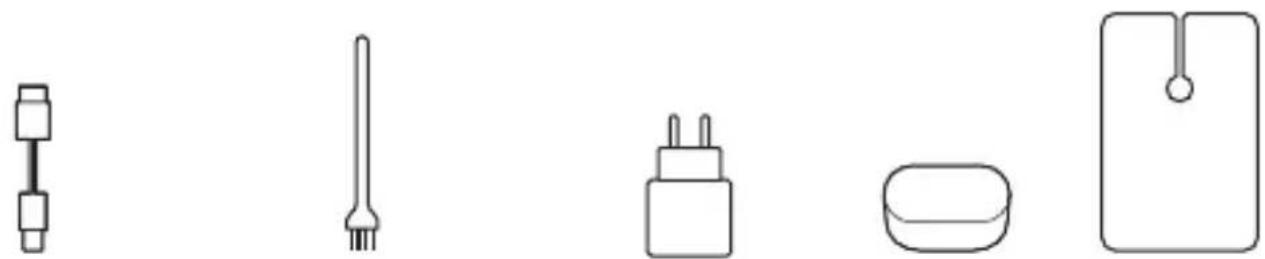
Line drawings of five different household appliances or fixtures (no text or symbols)Cleaning BrushChRagingAdapteSponge Barber Cape
Assembly & Disassembly
I. Assembling the comb
To install a comb, insert the numbered end into the slot until it clicks into place.
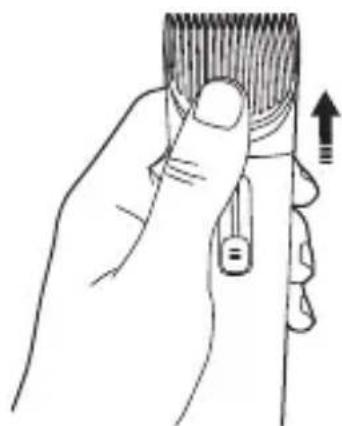
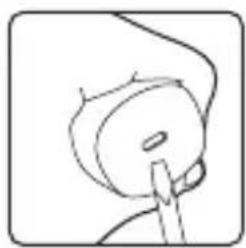
II. Removing the comb
As shown in the image, hold the top of the comb and pull it upwards to remove it.

natural_image
Illustration of two hands using a mechanical tool to adjust or install a component, showing motion arrows (no text or symbols)Note
You can also attach and remove the thinning comb as shown above.
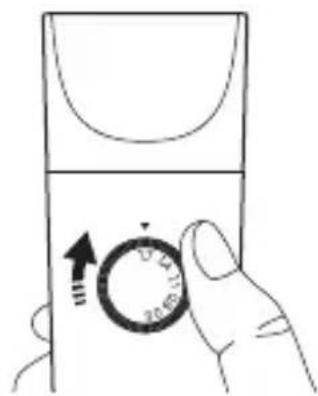
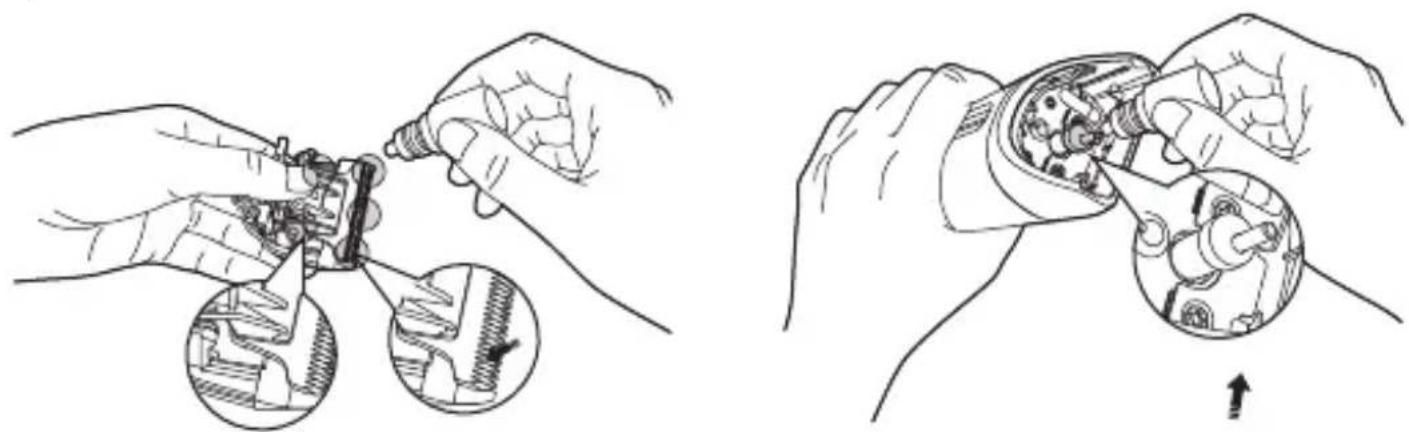
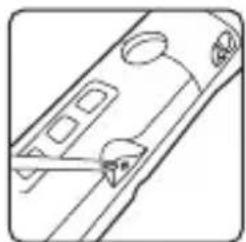
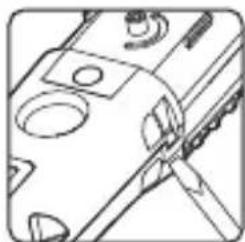
III. Attaching the blade head
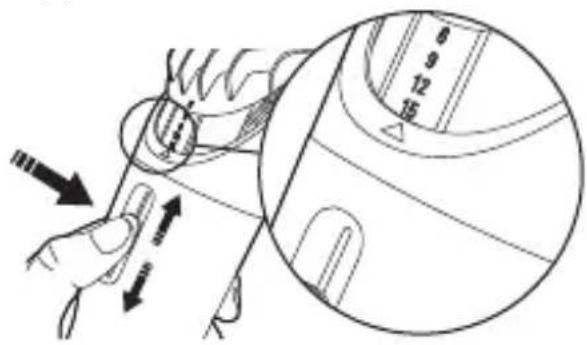
- Using the dial, set the adjustable head to 1.7 mm.
text_image
Hand holding a device with a circular dial indicator showing 20-01.11 and directional arrows- To install the blade head, align clip (A) on the blade head with slot (B) on the clipper, then firmly press the blade head until it clicks into place.
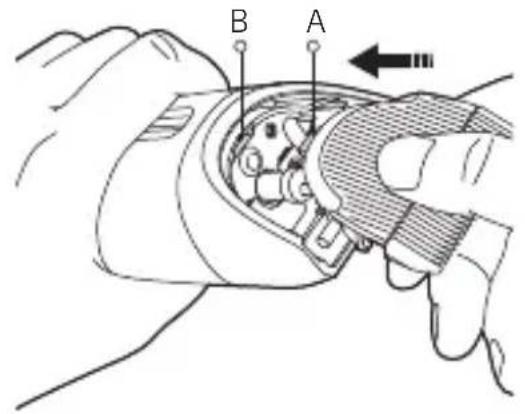
text_image
B A
natural_image
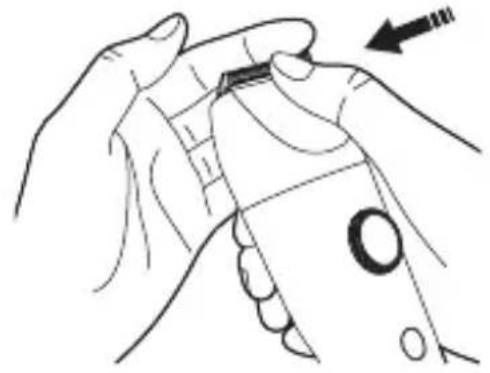
Illustration of a hand holding a wrist with a shaded area and an arrow indicating force or pressure (no text or symbols present)IV. Removing the blade head
Turn off the power and hold the clipper with the front facing up, as shown in the image. Place your thumb against the blade head and push firmly to remove it.
natural_image
Line drawing of a hand holding a small object with an arrow indicating motion (no text or symbols)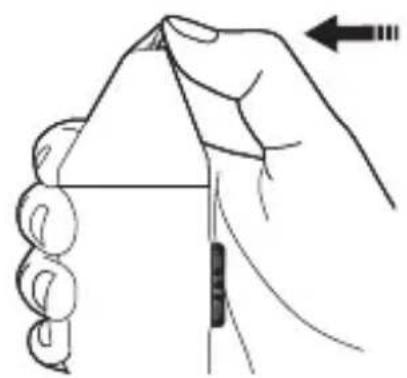
natural_image
Illustration of a hand holding a folded paper or sheet with a ruler and an arrow indicating direction (no text or symbols)CAUTIONS
- To avoid dropping or breaking the blade head, push with one hand and use the other hand to catch it when removing it.
- If the blade head is damaged, it can cause hair to get stuck or the blade head to not work, so please replace the blade head as soon as possible.
- When in use, the blade head will heat up slightly. This is normal and does not affect use.
- The service life of the blade head depends on the frequency of use and maintenance.
How to Use
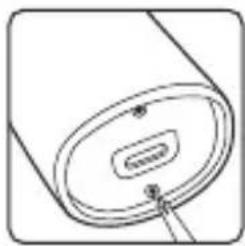
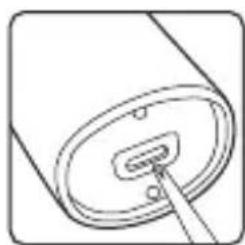
Charging
- Before charging, make sure the clipper is turned off.
- Plug the charging cable into the charging port on the clipper, and use the provided power adapter to charge the clipper. The battery level indicator will blink white slowly
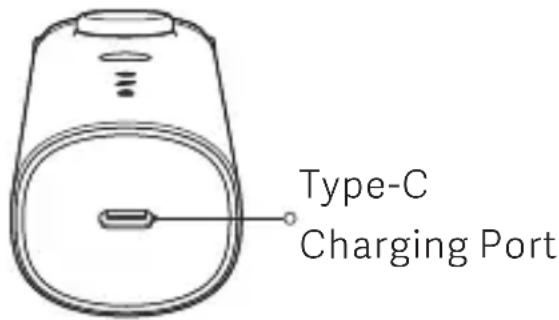
text_image
Type-C Charging Portwhen charging and will remain white once fully charged.
- It should take about 2.5 hours to fully charge the clipper.
- The fully charged clipper should run for about 180 minutes.
- If the battery is running low, the battery level indicator will light up red. You can continue to use the clipper after connecting it to a power source.
Note
Connect the clipper to a power source and wait a few seconds before turning it on again. If the battery is depleted before charging, please wait a few minutes before turning it back on.
On/Off button
| Operation Clipper status | |
| Press | On/off |
Indicators
| Clipper status Indicator status | ||
 | On Always white | |
| Off Off | ||
 | Blade head needs oil | Always white |
| Blade head is working normally | Off | |
 | Sufficient battery | Always white |
| Low battery | Always red | |
| Battery is depleted | Blinks red 3 times then turns off | |
| Charging | Blinks white slowly | |
| Fully charged | Always white | |
Using the comb
-
Use a comb to brush the hair in the direction of the hair growth.
-
Choose a suitable comb and attach it to the clipper.
-
As shown in the image, slide the comb adjuster up and down to change the trimming length. The number shown by the trimming length indicator is the length of the hair left after trimming.
-
Place the teeth of the comb on the scalp and move the clipper slowly against the direction of hair growth.
text_image
Diagram showing hand operating a device with directional arrows and measurement scale, likely illustrating a mechanical or electrical component.Slide to adjust the trimming length
Notes
- Start trimming at a longer length, and gradually reduce the setting until you reach the desired length.
- When using a comb, it is recommended to set the adjustable head dial to 0.5 mm, otherwise the final hair length may be different from the selected comb length.
- The length of the hair after trimming will differ slightly from the trimming length.
CAUTIONS
- Before using the clipper, make sure that the hair is clean and dry. Do not use the clipper on wet, freshly washed hair.
- Be careful when trimming for the first time. Do not move the clipper too fast and make sure to move it smoothly and gently.
- In the case of broken skin, infection or swelling on the scalp, do not use the clipper to prevent any secondary injury.
Select the adjustable comb or thinning comb depending on the desired hairstyle:
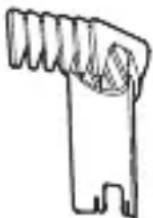 | 3–21 mmAdjustableComb | It achieves a length of 3–21 mm after trimming, has seven lengths to choose from and is best suited for shorter hairstyles. |
 | 23–41 mmAdjustable Comb | It achieves a length of 23–41 mm after trimming, has seven lengths to choose from and is best suited for medium-length hairstyles. |
 | Thinning Comb | For trimming layers and ends |
natural_image
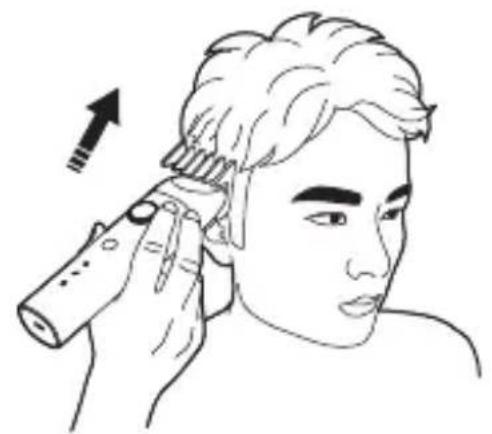
Illustration of a person applying a hair accessory to their ear, with an arrow indicating direction (no text or symbols)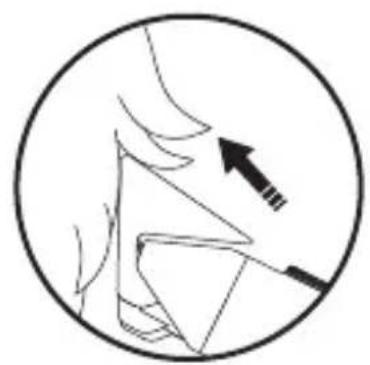
natural_image
Simple line drawing of a human face with an arrow pointing to the nose area (no text or symbols)Move the clipper against the direction of hair growth
natural_image
Side-view line drawing of a person's head with a hairpin, showing head and neck anatomy (no text or symbols)
natural_image
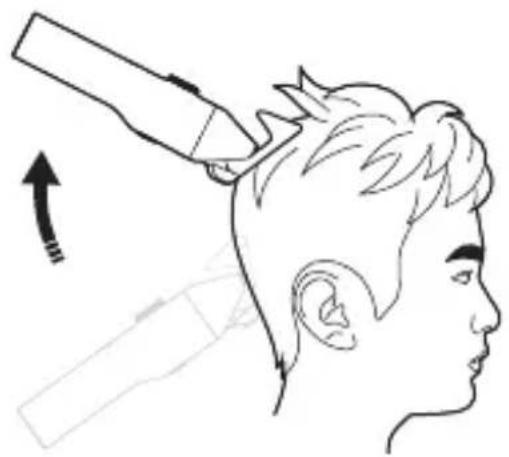
Simple line drawing of a person's head with a stick above their head, showing motion direction (no text or symbols)Go over multiple times with different lengths
Notes
- Using a comb helps prevent trimming hair too short by accident and control the overall length of the hairstyle.
- Since hair tends to grow in different directions, the clipper must be moved in different directions (upwards/downwards/across) to keep it going against the direction of hair growth.
- Trim repeatedly across the whole head to ensure the clipper catches all the hair to be trimmed.
- Make sure the top of the comb stays in contact with the scalp to get an even trim.
- For better results on curly, sparse or longer hair, brush the hair in the moving direction of the clipper.
- Clean hair from the combs and blade heads to avoid them getting clogged and affecting the clipper's performance.
- If the neck hole in the barber cape is too big or small, use a clip to adjust it.
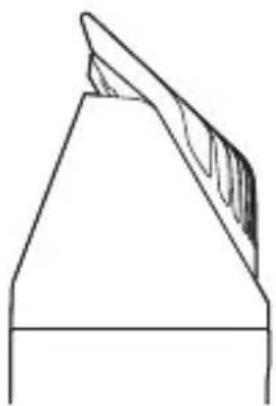
Using the thinning comb
The thinning comb will only cut half of the hair that goes through its teeth. It can be used to thin thicker hair and create a natural look.
-
Push the thinning comb into the comb slot to keep it close to the blade head.
-
Turn the clipper on and move it slowly against the direction of hair growth.
natural_image
Pure technical line drawing of a mechanical component or tool (no text or symbols)Thinning comb is close to the blade head
natural_image
Illustration of a hand holding a hairpin with a finger, showing the tip and handle (no text or symbols)Push with your thumb to remove the thinning comb
CAUTIONS
-
The adjustable combs will trim all hair in an area to the same length, while the thinning comb will only trim half the hair of this area. Make sure you understand this difference.
-
It is not recommended to use the thinning comb on very short hair.
-
Make sure to only use the thinning comb once in each area, otherwise all the hair in this area might get cut short.
Using the adjustable head
-
When trimming the contours of the neck and sideburns, there's no need to use a comb. Instead, change the length of the adjustable head.
-
Rotate the adjustable head dial to change the length of the blade head. The number pointed by the arrow above the dial is the length of the hair left after trimming.
-
When trimming the contours of the neck and sideburns, it is recommended to move the clipper slowly with its back facing up.
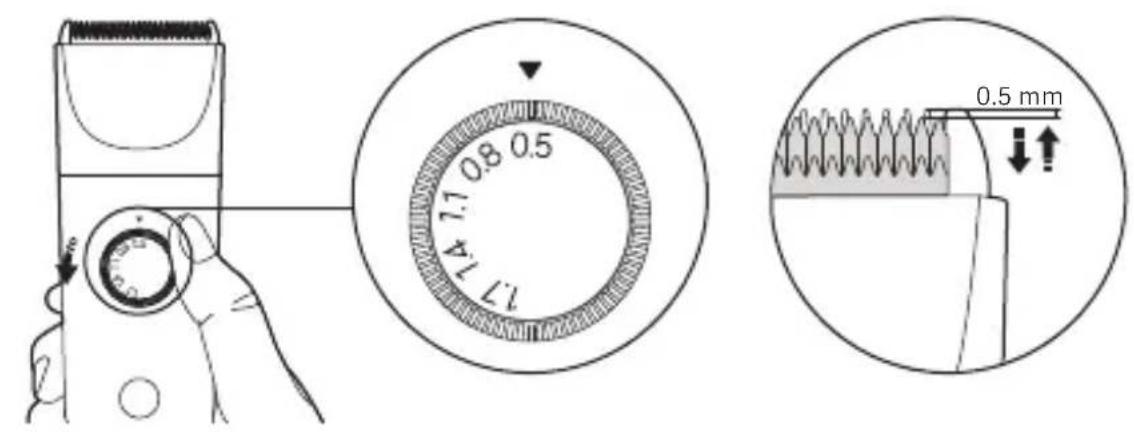
text_image
17 74 0.8 0.5 17 74 0.5 mmSetting the adjustable head
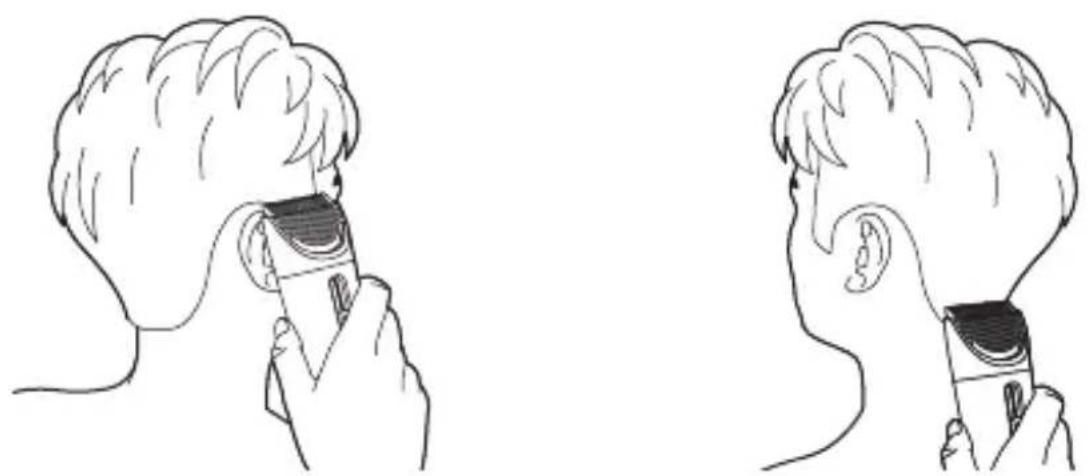
natural_image
Illustration of a person using a handheld device to interact with another person's ear (no text or symbols present)Trimming the contours of the neck and sideburns
Care & Maintenance
I. Cleaning the blade head and body
1. Remove the blade head.
2. Use the cleaning brush to remove any hair from the blade.
3. Rinse the blade head and body separately to remove all the hair.
4. Wipe with a cloth and leave to air dry.
5. Reattach the blade head to the clipper and store in a safe place.
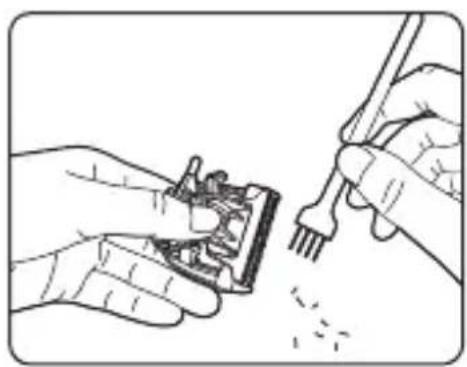
natural_image
Illustration of hands using a tool to adjust or install electronic components (no text or symbols visible)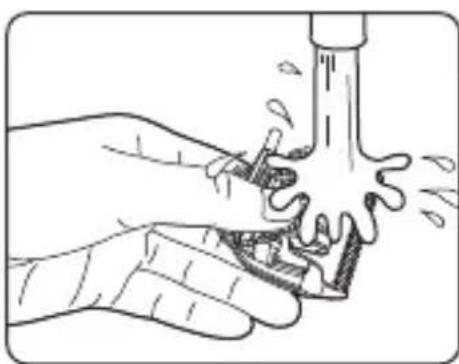
natural_image
Illustration of hands using a faucet to lift water, showing fluid flow (no text or symbols)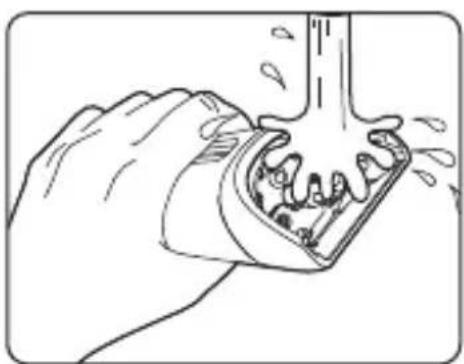
natural_image
Illustration of a hand using a tool to lift a mechanical component (no text or symbols)CAUTIONS
- Rinse the blade head with clean water. Do not use salt water or hot water. Do not soak the clipper in water. After cleaning, be sure to dry the blade head to prevent the spring from getting rusted.
- Only clean the clipper with a soft cloth dipped in tap water or soapy water. Do not use paint thinner, gasoline, alcohol, or other chemicals.
- Never wash the charging cable.
- Never take apart the adjustable head or any other parts for cleaning, as they may not be able to be reassembled.
• The appliance is intended for trimming purposes only.
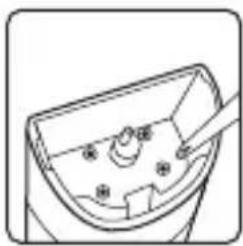
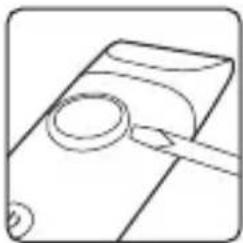
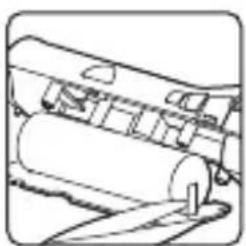
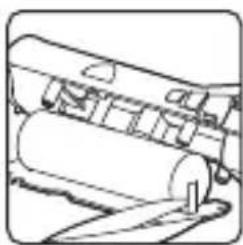
II. Maintaining the blade head
As shown in the images, make sure to add lubricating oil (sold separately) to the spots shown before each use and after cleaning. Add 1–2 drops to each of the six spots shown.
natural_image
Two-step mechanical assembly diagram showing hand tooling and disassembly of components (no text or labels)Adding oil to the blade head Adding oil to the motor
Environmental Protection
When disposing of the clipper, do not throw it out with your household waste. Instead, take it to a government-designated recycling center, as this helps protect the environment.
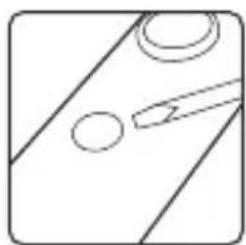
Removing the battery
- After turning the clipper off, pry open the bottom cover with a flat-head screwdriver, and unscrew the screws on the bottom and inside the blade head slot.
natural_image
Simple line drawing of a hand holding a small object, possibly a tool or device (no text or symbols)Pry open the bottom cover
natural_image
Simple line drawing of a cylindrical object with a central slot and a small protrusion, no text or symbols present.Unscrew the screws on the bottom
natural_image
Simple line drawing of a device with a handle and control buttons (no text or symbols)Unscrew the screws inside the blade head slot
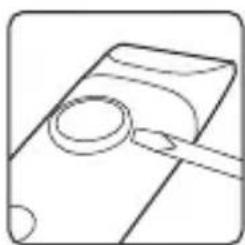
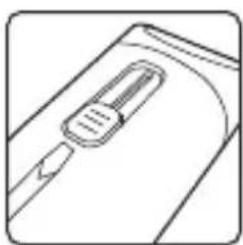
- Use a flat-head screwdriver to pry out the on/off button, the adjustable head dial, and the comb adjuster, then push the inner part out from the bottom.
natural_image
Simple line drawing of a diagonal line with two circles and a tool, no text or symbols present.Pry out the on/off button
natural_image
Simple line drawing of a magnifying glass over a document (no text or symbols)Pry out the adjustable head dial
natural_image
Simple line drawing of a device with a handle and scroll (no text or symbols)Pry out the comb adjuster
natural_image
Simple line drawing of a cylindrical object with a small internal component and a pointer inserted (no text or symbols)Push the inner part out from the bottom
- Unscrew the fixing screws, then pry open the clip. Cut the metal tabs attaching the two ends of the battery to the circuit board.
natural_image
Pure technical line drawing of a mechanical component with no text or symbolsUnscrew the fixing screws
natural_image
Pure mechanical assembly diagram showing a tool interacting with a component (no text or symbols)
natural_image
Mechanical assembly diagram showing a cylindrical component with a base and a pin (no text or symbols)Cut the metal tabsPry open the clip
Specifications
| Name | Xiaomi Hair Clipper |
| Model | LFQ04KL |
| Charging Time | 2.5 hours |
| Working Voltage | 3.7 V == |
| Working Power | 3 W |
| Rated Input | 5 V ==1 A |
| Net Weight | 266 g |
| Item Dimensions | 47 × 45 × 182 mm |
| Power Consumption | Off mode: ≤0.3 W |
| Time to Enter the Condition | Off mode: ≤20 min |
Power Adapter
| Information Published | Value and Precision |
| Manufacturer's Name | Jiangxi Jian Aohai Technology Co., Ltd. |
| Model Identifier | A520-050100U-EU1 |
| Input Voltage | 100–240 V ~ |
| Input Frequency | 50/60 Hz |
| Rated Output Voltage | 5 V = = |
| Rated Output Current | 1 A |
| Nominal Output Power | 5 W |
| Average Active Efficiency | 73.62% |
| Efficiency at Low Load (10%) | 68.32% |
| No-load Power Consumption | 0.075 W |
Troubleshooting
| Issues Possible | Causes Solutions | |
| The comb is wobbly | The comb is not properly installed | Reinstall the comb |
| The motor is not working | The battery is depleted | Charge the battery |
| The motor is damaged | Contact the after-sales service | |
| Hair isn't cut smoothly or is getting caught | Using an unsuitable comb Choose a different comb | |
| Blade head isn't lubricated | Add lubricating oil to the blade head | |
| Battery level is low | Charge the battery | |
| The blade head doesn't move or shakes abnormally | The blade head is damaged Replace the blade head | |
| The blade head is not properly installed | Reinstall the blade head | |
| There are foreign objects in the blade head | Clean the blade head | |
| Charging errors | The motor is damaged | Contact the after-sales service |
| The charging cable is damaged | Replace the charging cable | |
| The battery is damaged | Contact the after-sales service | |
| Working noise issues | The blade head is not properly installed | Reinstall the blade head |
| The blade head is damaged | Replace the blade head | |
| The motor is damaged | Contact the after-sales service | |
WARRANTY NOTICE
THIS WARRANTY GIVES YOU SPECIFIC RIGHTS, AND YOU MAY HAVE OTHER RIGHTS CONVEYED BY LAWS OF YOUR COUNTRY, PROVINCE OR STATE. INDEED, IN SOME COUNTRIES, PROVINCES OR STATES, CONSUMER LAW MAY IMPOSE A MINIMUM WARRANTY PERIOD. OTHER THAN AS PERMITTED BY LAW, XIAOMI DOES NOT EXCLUDE, LIMIT OR SUSPEND OTHER RIGHTS YOU MAY HAVE. FOR A FULL UNDERSTANDING OF YOUR RIGHTS WE INVITE YOU TO CONSULT THE LAWS OF YOUR COUNTRY, PROVINCE OR STATE.
1. LIMITED PRODUCT WARRANTY
XIAOMI warrants that the Products are free from defects in materials and workmanship under normal use and use in accordance with the respective Product user manual, during the Warranty Period.
The duration and conditions related to the legal warranties are provided by respective local laws. For more information about the consumer warranty benefits, please refer to Xiaomi's official website https://www.mi.com/global/support/warranty.
Xiaomi warrants to the original purchaser that its Xiaomi Product will be free from defects in materials and workmanship under normal use in the period mentioned above.
Xiaomi does not guarantee that the operation of the Product will be uninterrupted or error free.
Xiaomi is not liable for damages arising from non-compliance with the instructions related to the use of the Product.
2.REMEDIES
If a hardware defect is found and a valid claim is received by Xiaomi within the Warranty Period, Xiaomi will either (1) repair the product at no charge, (2) replace the product, or (3) refund the Product, excluding potential shipping costs.
3. HOW TO OBTAIN WARRANTY SERVICE
To obtain warranty service, you must deliver the Product, in its original
packaging or similar packaging providing an equal degree of Product protection, to the address specified by Xiaomi. Except to the extent prohibited by applicable law, Xiaomi may require you to present proofs or proof of purchase and / or comply with registration requirements before receiving warranty service.
4. EXCLUSIONS AND LIMITATIONS
Unless otherwise stipulated by Xiaomi, this Limited Warranty applies only to the Product manufactured by or for Xiaomi and identifiable by the trademarks, trade name or "Xiaomi" or "Mi" logo.
The Limited Warranty does not apply to any (a) Damage due to acts of nature or God, for example, lightning strikes, tornadoes, flood, fire, earthquake or other external causes; (b) Negligence; (c) Commercial use; (d) Alterations or modifications to any part of the Product; (e) Damage caused by use with non-Xiaomi products; (f) Damage caused by accident, abuse or misuse; (g) Damage caused by operating the Product outside the permitted or intended uses described by Xiaomi or with improper voltage or power supply; or (h) Damage caused by service (including upgrades and expansions) performed by anyone who is not a representative of Xiaomi.
It is your responsibility to backup any data, software, or other materials you may have stored or preserved on the product. It is likely that the data, software or other materials in the equipment will be lost or reformatted during the service process, Xiaomi is not responsible for such damage or loss.
No Xiaomi reseller, agent, or employee is authorized to make any modification, extension, or addition to this Limited Warranty. If any term is held to be illegal or unenforceable, the legality or enforceability of the remaining terms shall not be affected or impaired.
Except as prohibited by laws or otherwise promised by Xiaomi, the after-sales services shall be limited to the country or region of the original purchase.
Products which were not duly imported and/or were not duly manufactured by Xiaomi and/or were not duly acquired from Xiaomi or a Xiaomi's official seller are not covered by the present warranties. As per applicable law you may benefit from warranties from the non-official retailer who sold the product. Therefore, Xiaomi invites you to contact the retailer from whom you purchased the product.
The present warranties do not apply in Hong Kong and Taiwan.
5. IMPLIED WARRANTIES
Except to the extent prohibited by applicable law, all implied warranties (including warranties of merchantability and fitness for a particular purpose) will have a limited duration up to a maximum duration of this limited warranty. Some jurisdictions do not allow limitations on the duration of an implied warranty, so the above limitation will not be applied in these cases.
6. DAMAGE LIMITATION
Except to the extent prohibited by applicable law, Xiaomi shall not be liable for any damages caused by accidents, indirect, special or consequential damages, including but not limited to loss of profits, revenue or data, damages resulting from any breach of express or implied warranty or condition, or under any other legal theory, even if Xiaomi has been informed of the possibility of such damages. Some jurisdictions do not allow the exclusion or limitation of special, indirect, or consequential damages, so the above limitation or exclusion may not apply to you.
7.XIAOMI CONTACTS
For customers, please visit the website:
https://www.mi.com/global/support/warranty
The contact person for the after-sale service may be any person in Xiaomi's authorized service network, Xiaomi's authorized distributors or the final vendor who sold the products to you. If in doubt please contact the relevant person as Xiaomi may identify.
Manufactured for: Xiaomi Communications Co., Ltd.
Manufactured by: Shenzhen Kolamama Technology Co., Ltd.
(a Mi Ecosystem company)
Address: 419, Building 2 & 3, Building M-10, Ma Que Ling Industrial Zone, Ma Ling Community, Yuehai Street, Nanshan District, Shenzhen, Guangdong, China
For further information, please go to www.mi.com
For detailed e-manual, please go to www.mi.com/global/support/user-guide User Manual Version: V1.1
natural_image
Simple line drawing of a mechanical component with no text or symbolsnatural_image
Simple line drawing of a hand holding a tool or connector (no text or symbols)natural_image
Illustration of two hands using a tool to adjust or install a mechanical component, showing motion arrows (no text or symbols)Hinweis
text_image
Diagram showing a hand holding a device with a circular dial indicating speed, marked with arrows and numerical values.natural_image
Illustration of a hand holding a wrist with a shaded circular area and an arrow indicating force or movement (no text or symbols present)natural_image
Illustration of a hand holding a small object with an arrow indicating direction (no text or symbols present)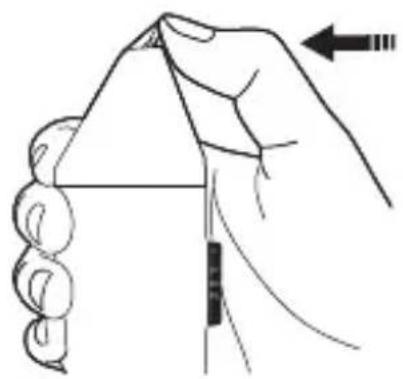
natural_image
Illustration of a hand holding a triangular object with a ruler inserted, showing motion direction (no text or symbols)VORSICHTSMASSNAHMEN
natural_image
Line drawing of a device casing with internal components and a pointer arrow (no text or symbols)Typ-C Ladeanschluss
text_image
Diagram showing hand operating a device with directional arrows and numbered parts, likely illustrating a mechanical or electrical component.natural_image
Illustration of a person applying hair to their ear with a brush (no text or symbols)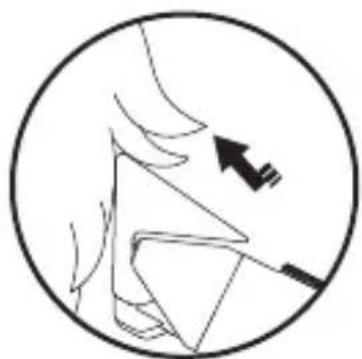
natural_image
Diagram of a human head in profile with an arrow indicating direction (no text or symbols)natural_image
Side-view line drawing of a person's head with a hairdryer applying powder to their neck (no text or symbols)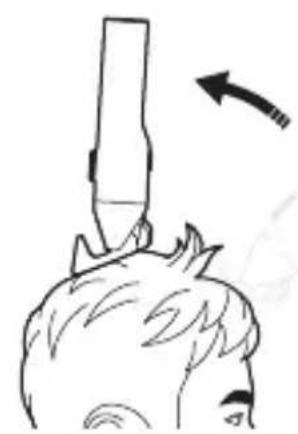
natural_image
Simple line drawing of a person's head with a tool above their head, showing an arrow indicating direction (no text or symbols)natural_image
Pure technical line drawing of a mechanical component or tool (no text or symbols)natural_image
Line drawing of a hand holding a hairpin with an arrow indicating upward motion (no text or symbols)natural_image
Illustration of a person using a handheld device to interact with another person's ear (no text or symbols present)natural_image
Illustration of hands using a tool to adjust or install electronic components (no text or symbols visible)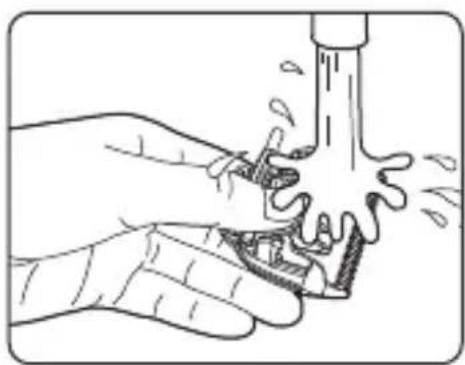
natural_image
Illustration of hands using a tool to clean or wash a surface, no text or symbols present
natural_image
Illustration of a hand using a tool to lift or remove material from a container (no text or symbols)VORSICHTSMASSNAHMEN
natural_image
Illustration of hands assembling mechanical components with two circular insets showing close-ups of internal parts (no text or symbols)natural_image
Line drawing of hands assembling a mechanical component, showing internal gears and shafts (no text or symbols)natural_image
Simple line drawing of a hand holding a circular object with a handle, no text or symbols presentnatural_image
Diagram of a cylindrical device with a central connector and a small pin inserted (no text or symbols)natural_image
Simple line drawing of a mechanical component with no text or symbolsnatural_image
Simple line drawing of a mechanical component with two circles and a tool, no text or symbols present.natural_image
Simple line drawing of a magnifying glass over a document (no text or symbols)natural_image
Simple line drawing of a mechanical component with a handle and internal slot (no text or symbols)natural_image
Simple line drawing of a cylindrical object with a small rectangular component inserted, no text or symbols present.natural_image
Pure technical line drawing of a mechanical component with no text or symbolsnatural_image
Technical line drawing of a mechanical component with circular features and a tool (no text or symbols)natural_image
Line drawing of a mechanical device with rollers and a handle (no text or symbols)https://www.mi.com/global/support/warranty
Adresse: 419, Building 2 & 3, Building M-10, Ma Que Ling Industrial Zone, Ma Ling Community, Yuehai Street, Nanshan District, Shenzhen, Guangdong, China
natural_image
Simple line drawing of a mechanical component with no text or symbolsnatural_image
Simple line drawing of a mechanical component with no text or symbolsnatural_image
Line drawings of five different household appliances or fixtures (no text or symbols)natural_image
Illustration of hands using a tool to interact with a device, showing a mechanical component (no text or symbols present)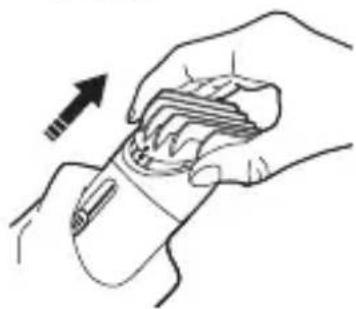
natural_image
Illustration of hands holding a wristwatch with an arrow indicating motion (no text or symbols)Nota
text_image
Hand holding a dial indicator with directional arrows and measurement markingsnatural_image
Illustration of a hand holding a wrist with a shaded circular area and an arrow pointing to a specific area (no text or symbols present)IV. Rimuovere la testina con lame
natural_image
Line drawing of two hands holding a device with a circular mark and arrow indicating motion (no text or symbols)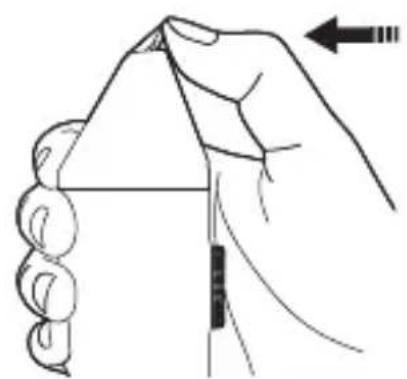
natural_image
Illustration of a hand holding a triangular object with an arrow indicating direction (no text or symbols)ATTENZIONE
natural_image
Simple line drawing of a cylindrical device with a central port and side ports (no text or symbols)text_image
Diagram showing hand operating a device with directional arrows and numbered parts, likely illustrating a mechanical or electrical component.natural_image
Illustration of a person applying hair to their ear with a handheld tool (no text or symbols)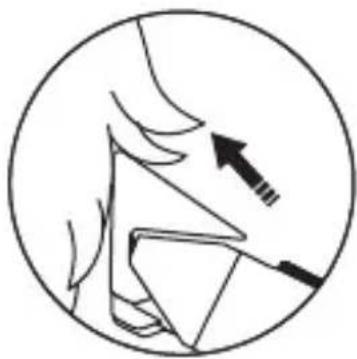
natural_image
Simple line drawing of a hand holding a triangular object with an arrow pointing to it, enclosed in a circle (no text or symbols)natural_image
Line drawing of a person's head with a hairdryer applying product to the ear, showing a directional arrow (no text or symbols)
natural_image
Simple line drawing of a person's head with a stick above their head, showing motion (no text or symbols)natural_image
Pure technical line drawing of a mechanical component or tool (no text or symbols)natural_image
Line drawing of a hand holding a comb with an arrow indicating upward motion (no text or symbols)natural_image
Line drawing of two human head views showing hand positioning and ear positioning (no text or symbols)natural_image
Illustration of hands using a tool to adjust or install electronic components (no text or symbols visible)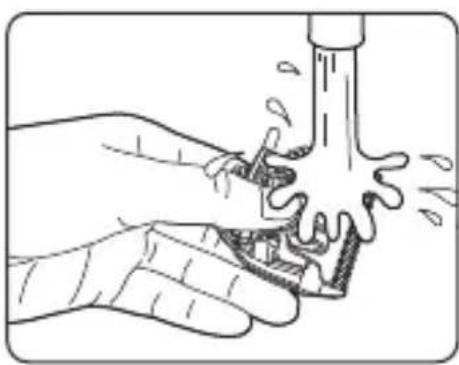
natural_image
Illustration of hands using a tool to clean or wash a water bottle (no text or symbols present)
natural_image
Illustration of a hand using a tool to lift or remove material from a container (no text or symbols)ATTENZIONE
natural_image
Two-step mechanical assembly diagrams showing hand tooling and disassembly (no text or symbols)natural_image
Simple line drawing of a hand holding a small object, possibly a tool or device (no text or symbols)natural_image
Simple line drawing of a cylindrical object with a central oval and two small dots, no text or symbols present.natural_image
Simple line drawing of a device with a handle and screw holes (no text or symbols)natural_image
Simple line drawing of a mechanical component with no text or symbolsEstrarre il pulsante acceso/spento
natural_image
Simple line drawing of a magnifying glass over a document (no text or symbols)natural_image
Simple line drawing of a mechanical component with a handle and central slot (no text or symbols)natural_image
Simple line drawing of a cylindrical container with a slot inserted, no text or symbols presentnatural_image
Pure technical line drawing of a mechanical component without any text, numbers, or symbolsnatural_image
Pure mechanical assembly diagram showing a cutting tool interacting with a component (no text or symbols)natural_image
Line drawing of a mechanical device with rollers and a handle (no text or symbols)https://www.mi.com/global/support/warranty
Indirizzo: 419, Building 2 & 3, Building M-10, Ma Que Ling Industrial Zone, Ma Ling Community, Yuehai Street, Nanshan District, Shenzhen, Guangdong, China
natural_image
Simple line drawing of a mechanical component with no text or symbolsnatural_image
Pure line drawing of a mechanical component with no text or symbolsnatural_image
Simple line drawing of a rectangular object with a vertical line and a circular hole at the top (no text or symbols)Cap de barbier
natural_image
Illustration of hands using a tool to adjust or install a mechanical component (no text or symbols visible)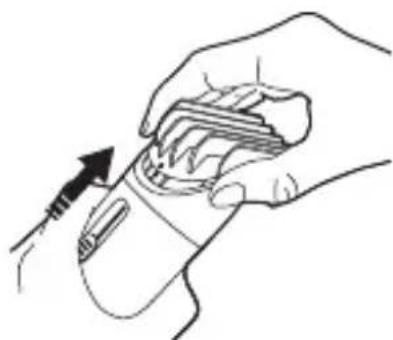
natural_image
Line drawing of a hand holding a medical or electronic device with a tool, no text or symbols presentRemarque
text_image
Diagram showing a hand holding a dial indicator with an upward arrow and '10.00' label, likely illustrating a directional change or adjustment.natural_image
Illustration of a hand holding a wrist with a shaded circular area and an arrow pointing to a point (no text or symbols)natural_image
Illustration of a hand holding a small electronic device with an arrow indicating motion (no text or symbols present)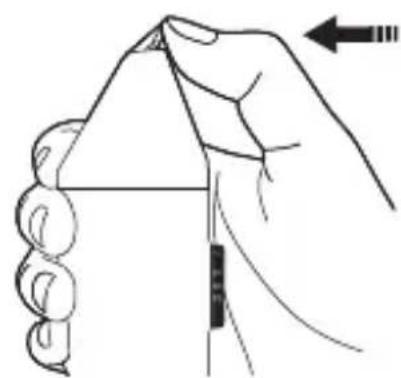
natural_image
Illustration of a hand holding a triangular object with a ruler and an arrow indicating direction (no text or symbols)MISES EEN EGARDE
natural_image
Line drawing of a device with a circular body and internal components, no text or symbols presentPort de charge de Type C
text_image
Diagram showing hand turning a tool with directional arrows and a circular dial, labeled with numbers 6, 9, 12, 15.natural_image
Illustration of a person applying hair to their ear with a brush (no text or symbols)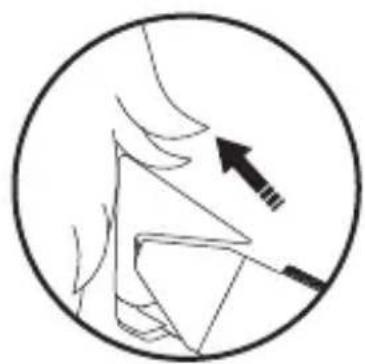
natural_image
Diagram of a hand holding a tool with an arrow indicating direction (no text or symbols)natural_image
Line drawing of a person's head with a hairdryer applying product to the ear (no text or symbols)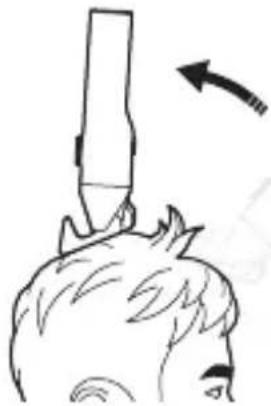
natural_image
Simple line drawing of a person's head with a stick above their head, showing motion direction (no text or symbols)natural_image
Pure technical line drawing of a mechanical component or tool (no text or symbols)natural_image
Illustration of a hand holding a tool with an arrow indicating upward motion (no text or symbols)natural_image
Line drawing of a person using a handheld device to interact (no text or symbols present)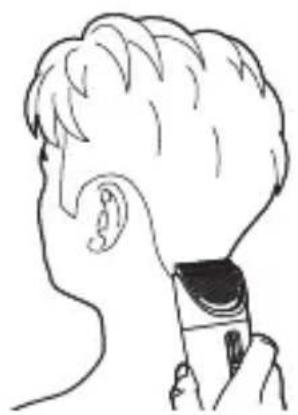
natural_image
Line drawing of a person's head and ear with a device attached (no text or symbols)natural_image
Illustration of hands using a tool to adjust or install electronic components (no text or symbols visible)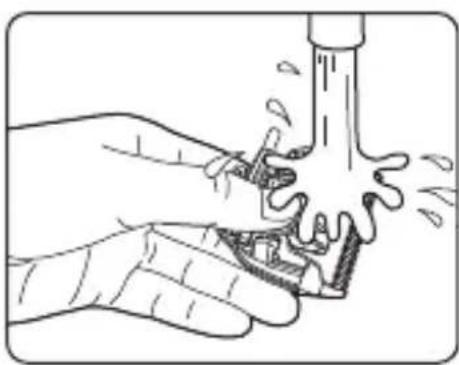
natural_image
Illustration of hands using a tool to clean or wash a pipe (no text or symbols)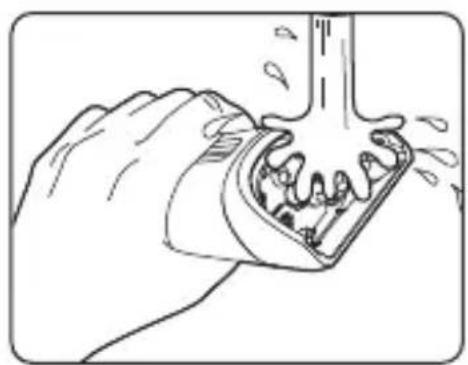
natural_image
Illustration of a hand using a tool to lift or remove a mechanical component (no text or symbols visible)MISESEENEGARDE
natural_image
Two-step diagram showing hands assembling electronic components, with close-ups of internal parts (no text or symbols)natural_image
Simple line drawing of a hand holding a small object, possibly a tool or device, with no visible text or symbols.natural_image
Simple line drawing of a cylindrical object with a labeled component (no text or symbols)natural_image
Simple line drawing of a mechanical component with no text or symbolsnatural_image
Simple line drawing of a cutting board with two circular holes and a tool (no text or symbols)natural_image
Simple line drawing of a magnifying glass over a document (no text or symbols)natural_image
Line drawing of a mechanical component with a handle and internal slot (no text or symbols)natural_image
Simple line drawing of a cylindrical object with a small rectangular component inserted, no text or symbols present.natural_image
Pure technical line drawing of a mechanical component without any text, numbers, or symbolsnatural_image
Pure mechanical assembly diagram showing a cutting tool interacting with a component (no text or symbols)Ouvrir la pince
natural_image
Line drawing of a mechanical device with rollers and a handle (no text or symbols)Pour les clients, consultez le site Web : https://www.mi.com/global/support/warranty
Adresse : 419, Building 2 & 3, Building M-10, Ma Que Ling Industrial Zone, Ma Ling Community, Yuehai Street, Nanshan District, Shenzhen, Guangdong, China
http://www.mi.com/global/service/support/declaration.html
natural_image
Simple line drawing of a mechanical component with no text or symbolsPeine ajustable de 3-21 mm
natural_image
Simple line drawing of a hand holding a piece of wood or metal, with no text or symbols present.Peine ajustable de 23-41 mm
natural_image
Simple line drawing of a rectangular object with a vertical line and a circular hole at the top (no text or symbols)barbero
natural_image
Illustration of hands using a tool to interact with a device, showing a finger movement (no text or symbols present)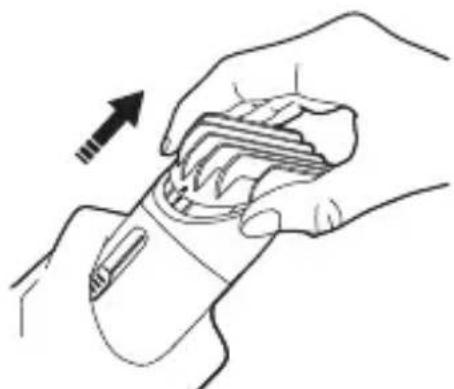
natural_image
Illustration of hands holding a medical or electronic device with an arrow indicating motion (no text or symbols present)text_image
Diagram showing a hand holding a dial with directional arrows and a speed limit label, likely illustrating a speed measurement or control mechanism.natural_image
Illustration of a hand holding a wrist with a shaded circular area and an arrow indicating direction (no text or symbols)natural_image
Line drawing of a hand holding a small object with an arrow indicating direction (no text or symbols)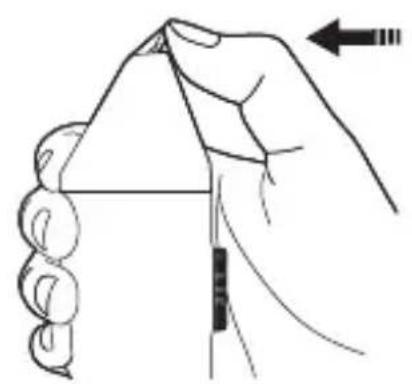
natural_image
Illustration of a hand holding a triangular object with a ruler, showing motion direction (no text or symbols)PRECAUCIONES
text_image
Diagram showing hand operating a device with directional arrows and numbered parts, likely illustrating a mechanical or electrical component.natural_image
Illustration of a person applying hair to their ear with a handheld device (no text or symbols)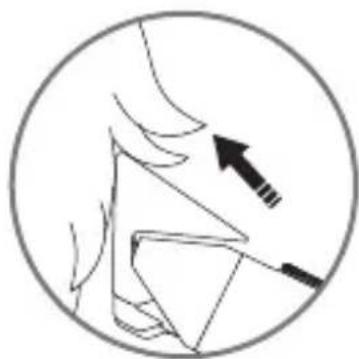
natural_image
Diagram of a human head with an arrow pointing to a specific anatomical structure (no text or labels)natural_image
Line drawing of a person's head with a hairdryer applying powder to the ear (no text or symbols)
natural_image
Simple line drawing of a person's head with a tool above their head, showing a curved arrow indicating direction (no text or symbols)natural_image
Pure technical line drawing of a mechanical component or bracket (no text or symbols)natural_image
Line drawing of a hand holding a hairpin with an arrow indicating upward motion (no text or symbols)natural_image
Line drawing of a person using a handheld device to interact with their ear (no text or symbols present)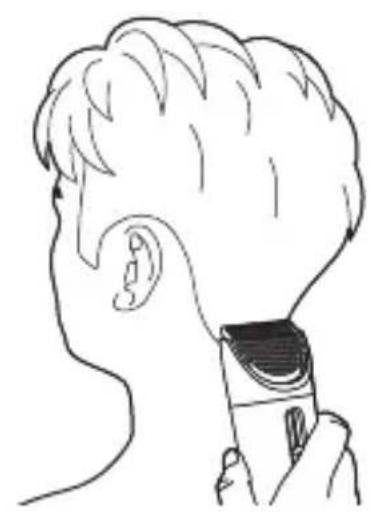
natural_image
Line drawing of a person's head and ear with a hairpin, no text or symbols presentnatural_image
Illustration of hands using a tool to adjust or repair electronic components (no text or symbols visible)
natural_image
Illustration of hands using a tool to clean or wash a surface, no text or symbols present
natural_image
Illustration of a hand using a tool to lift or remove a mechanical component (no text or symbols visible)PRECAUCIONES
natural_image
Simple line drawing of a hand holding a small object with a handle (no text or symbols)natural_image
Simple line drawing of a cylindrical object with a central connector and a small hole, no text or symbols present.natural_image
Simple line drawing of a device with a handle and screw holes (no text or symbols)natural_image
Simple line drawing of a table with two circles and a pointer (no text or symbols)natural_image
Simple line drawing of a magnifying glass over a document (no text or symbols)natural_image
Line drawing of a mechanical component with a handle and lever (no text or symbols)natural_image
Simple line drawing of a cylindrical object with a small rectangular component inserted, no text or symbols present.natural_image
Pure technical line drawing of a mechanical component with no text or symbolsnatural_image
Pure technical line drawing of a mechanical component with no visible text or symbolsnatural_image
Pure mechanical diagram showing a cylindrical component with internal components and a base, without any text, numbers, or symbols.https://www.mi.com/global/support/warranty
Dirección: 419, Building 2 & 3, Building M-10, Ma Que Ling Industrial Zone, Ma Ling Community, Yuehai Street, Nanshan District, Shenzhen,
Guangdong, China
http://www.mi.com/global/service/support/declaration.html.
natural_image
Simple line drawing of a mechanical component with no text or symbolsnatural_image
Simple line drawing of a hand holding a tool or connector (no text or symbols)natural_image
Simple line drawing of a rectangular object with a vertical line and a circular hole at the top (no text or symbols)Montaż i demontaż
natural_image
Illustration of two hands performing a manual tool manipulation technique (no text or symbols present)Uwaga
text_image
Hand holding a dial indicator with directional arrows and numerical values, likely illustrating a measurement or control system.natural_image
Illustration of a hand holding a wrist with a shaded circular area and an arrow indicating force or movement (no text or symbols)natural_image
Line drawing of two hands holding a small object with an arrow indicating direction (no text or symbols)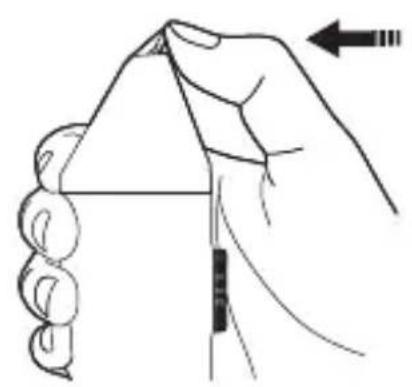
natural_image
Illustration of a hand holding a triangular object with a ruler and arrow indicating force direction (no text or symbols)PRZESTROGI
natural_image
Line drawing of a device with a circular body and a rectangular element, no text or symbols presenttext_image
Diagram showing hand operating a device with numbered parts and directional arrows indicating motion or movement.natural_image
Illustration of a person applying hair to their ear with a handheld tool (no text or symbols)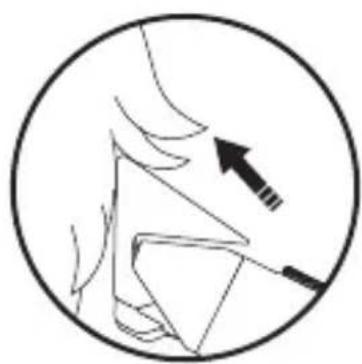
natural_image
Simple line drawing of a human head and neck with an arrow pointing to the lower side (no text or symbols)natural_image
Side-view line drawing of a person's head with a hairdryer applying product to their neck (no text or symbols)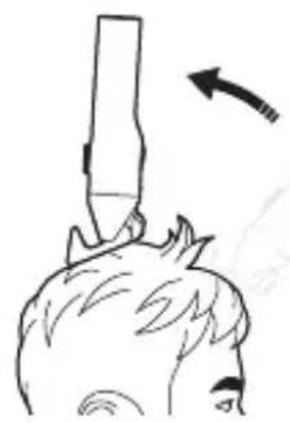
natural_image
Simple line drawing of a person's head with a stick above their head, showing motion direction (no text or symbols)natural_image
Pure technical line drawing of a mechanical component or tool (no text or symbols)natural_image
Illustration of a hand holding a hairpin with a finger, showing the tip and handle (no text or symbols)natural_image
Line drawing of two human head views showing hand positioning and ear positioning (no text or symbols)natural_image
Illustration of hands using a tool to adjust or repair electronic components (no text or symbols visible)
natural_image
Illustration of hands using a tool to clean or wash a water bottle (no text or symbols)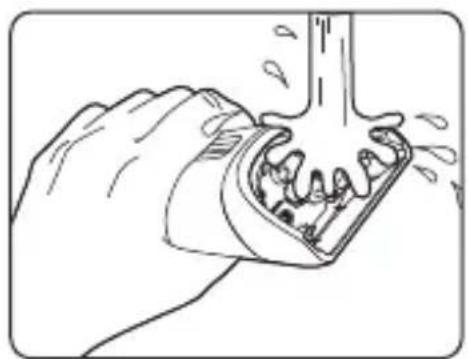
natural_image
Illustration of a hand using a tool to lift or remove material from a mechanical component (no text or symbols)PRZESTROGI
natural_image
Two-step mechanical assembly diagrams showing hand tooling and disassembly of components (no text or symbols)natural_image
Simple line drawing of a hand holding a circular object with a handle (no text or symbols)natural_image
Simple line drawing of a cylindrical object with a central rectangular feature and a small dot at the base (no text or symbols)natural_image
Simple line drawing of a device interior with a handle and control buttons (no text or symbols)natural_image
Simple line drawing of a table with two circles and a pointer (no text or symbols)natural_image
Simple line drawing of a device with a circular component and a handle (no text or symbols)natural_image
Simple line drawing of a mechanical component with a handle and internal slot (no text or symbols)natural_image
Simple line drawing of a cylindrical object with a small internal component and a pointer inserted (no text or symbols)natural_image
Pure technical line drawing of a mechanical component without any text, numbers, or symbolsnatural_image
Pure mechanical assembly diagram showing a component with holes and a tool (no text or symbols)Odczep zacisk
natural_image
Technical line drawing of a mechanical device with no visible text or symbolshttps://www.mi.com/global/support/warranty
Adres: 419, Building 2 & 3, Building M-10, Ma Que Ling Industrial Zone, Ma Ling
Community, Yuehai Street, Nanshan District, Shenzhen, Guangdong, China
Xiaomi Technology Netherlands B.V.
Prinses Beatrixlaan 582, 2595BM, The Hague, The Netherlands
contact@support.mi.com
UK REP.
Xiaomi Technology UK Limited
Davidson House, Forbury Square, Reading, Berkshire RG1 3EU
contact@support.mi.com