60124 - Electric sprayer Chapin - Free user manual and instructions
Find the device manual for free 60124 Chapin in PDF.

User questions about 60124 Chapin
0 question about this device. Answer the ones you know or ask your own.
Ask a new question about this device
Download the instructions for your Electric sprayer in PDF format for free! Find your manual 60124 - Chapin and take your electronic device back in hand. On this page are published all the documents necessary for the use of your device. 60124 by Chapin.
USER MANUAL 60124 Chapin
Failure to do so may result in damage to property and/or person.
natural_image
White CHAPIN RECHARGEABLE spray sprayer with attached black spray bottle and control arm (no text or symbols on body)
See website for warranty details
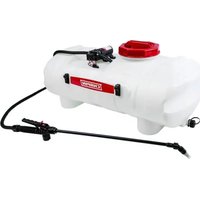
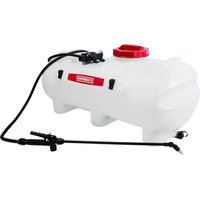
Model 60124, 60120
4G/15L
CONGRATULATIONS!
YOU HAVE JUST PURCHASED A QUALITY CHAPIN PRODUCT.
BEFORE RETURNING THIS PRODUCT FOR ANY REASON, PLEASE CALL:
1-800-950-4458
When calling, please have the following information available: Sales receipt & model number. This number connects you directly with the manufacturer of this product. Our Technical Support Team will be happy to help you with any assembly, troubleshooting and replacement information you may need.
WARNING
WARNING: IMPROPER USE OR FAILURE TO FOLLOW INSTRUCTIONS CAN RESULT IN EXPLOSIVE FAILURE CAUSING SERIOUS EYE OR OTHER INJURY.
For safe use of this product you must read and follow all instructions. Do not leave sprayer in the hot sun. Heat can cause pressure build-up resulting in possible explosion. Do not store or leave solution in tank after use. Always wear goggles, gloves, long sleeve shirt, long pants and full foot protection when spraying. Do not attempt to modify this sprayer. Replace parts only with manufacturer's original parts.
Never spray flammable, caustic, acidic, chlorine, bleach, petroleum based, or other corrosive solutions or heat, pressure, or gas producing chemicals. Always read and follow chemical manufacturer's instructions before use with this sprayer as some chemicals may be hazardous when used with this sprayer.
WARNING
WARNING: For safe operation, read this manual before using the charger. The battery is not fully charged out of the carton. Before using the sprayer and charger, read the safety instructions below. Then follow charging procedures outlined.
NOTE: Set "On-Off" switch to off position when not in use.
CAUTION
PRE-USE CHECK: Before each use check tightness of hose nut to be sure hose is securely attached to the shut-off assembly. Ensure that all nozzle and wand connections are tight. Do Not exceed a tank solution temperature of 120^ F/49° C.
NOTE: The tank and hose may have residual water in it due to quality testing performed on the sprayer.
IMPORTANT SAFETY INSTRUCTION FOR BATTERY PACKS READ ALL INSTRUCTIONS
- Do not incinerate the battery pack even if it is severely damaged or is completely worn out. The battery pack can explode in a fire. Toxic fumes and materials are created when battery packs are burned.
- Do Not charge or use battery in explosive atmospheres, such as in the presence of flammable liquids, gases or dust. Inserting or removing the charger may ignite the dust or fumes.
- If battery contents come into contact with the skin, immediately wash area with mild soap and water. If battery liquid gets into the eye, rinse water over the open eye for 15 minutes or until irritation ceases. If medical attention is needed, the battery electrolyte for Lithium-Ion batteries is composed of a mixture of liquid organic carbonates and lithium salts.
-
Contents of opened battery cells may cause respiratory irritation. Provide fresh air. If symptoms persist, seek medical attention.
WARNING: Burn hazard. Battery liquid may be flammable if exposed to spark or flame. -
Charge the battery only with charger provide by Chapin.
- DO NOT splash or immerse in water or other liquids. This may cause premature cell failure.
- Do not store or use the tool and battery pack in locations where the temperature may reach or
exceed 105°F (40°C) (such as outside sheds or metal buildings in summer). WARNING: Never attempt to open the battery pack for any reason. If battery pack case is cracked or damaged, do not insert into charger. Do not crush, drop or damage battery pack. Do not use a battery pack or charger that has received a sharp blow, been dropped, run over or damaged in any way (i.e., pierced with a nail, hit with a hammer, stepped on). Damaged battery packs should be returned to service center for recycling.
WARNING: Fire hazard. Do not store or carry battery so that metal objects can contact exposed battery terminals.
For example, do not place battery in aprons, pockets, tool boxes, product kit boxes, drawers, etc., with loose nails, screws, keys, etc.
Transporting batteries can possibly cause fires if the battery terminals inadvertently come in contact with conductive materials such as keys, coins, hand tools and the like. The US Department of transportation Hazardous Material Regulations (HMR) actually prohibit transporting batteries in commerce or on airplanes (i.e., packed in suitcases and carry-on luggage) UNLESS they are properly protected from short circuits. So when transporting individual batteries, make sure that the battery terminals are protected and well insulated from materials that could contact them and cause a short circuit. NOTE: Lithium-Ion batteries should not be put in checked baggage.
STORAGE RECOMMENDATIONS
- The best storage place is one that is cool and dry away from direct sunlight and excess heat or cold.
- Long storage will not harm the battery pack or charger.
CHARGING PROCEDURE
Your sprayer comes with an enclosed 20V Lithium-ion battery. To get started use the charger provided to charge the battery.
- Red Light - Indicates the battery is charging.
- Green Light - Indicates the charge is complete.
Recharge discharged batteries as soon as possible after use or battery life may be greatly diminished. It is recommended that the batteries be recharged after each use.
LEAVING THE CHARGER PLUGGED IN
The charger and battery pack can be left connected with the green LED glowing indefinitely. The charger will keep the battery pack fresh and fully charged.
IMPORTANT SAFETY INSTRUCTIONS FOR BATTERY CHARGERS
SAVE THESE INSTRUCTIONS:
This manual contains important safety instructions for battery chargers.
- Before using charger, read all instructions and cautionary markings on charger, battery pack, and product using battery pack.
WARNING: Shock hazard. Do not allow any liquid to get inside charger.
CAUTION: Burn hazard. To reduce the risk of injury, charge only designated Chapin batteries. Other types of batteries my burst causing personal injury and damage.
CAUTION: Under certain conditions, with the charger plugged into the power supply, the charger can be shorted by foreign material. Foreign materials of a conductive nature such as, but not limited to, steel wool, aluminum foil, or any build up of metallic particles should be kept away from charger cavities. Always unplug the charger from the power supply when there is no battery pack in the cavity. Unplug charger before attempting to clean.
WARNING: DO NOT attempt to charge the battery pack with any chargers other than the ones in this manual.
The charger and battery pack are specifically designed to work together.
• These chargers are not intended for any uses other than charging designated Chapin rechargeable batteries.
Any other uses may result in risk of fire, electric shock or electrocution.
- Do not expose charger to rain or snow.
- Pull by plug rather than cord when disconnecting charger. This will reduce risk of damage to electric plug and cord.
- Make sure that cord is located so that it will not be stepped on, tripped over, or otherwise subjected to damage or stress.
- Do not use an extension cord unless it is absolutely necessary. Use of improper extension cord could result in risk of fire, electric shock, or electrocution.
- An extension cord must have adequate wire size (AWG or American Wire Gauge) for safety. The smaller the gauge number of the wire, the greater the capacity of the cable, that is 16 gauge has more capacity than 18 gauge. When using more than one extension to make up the total lenght, be sure each individual extension contains at least the minimum wire size.
- Do not operate charger with damaged cord or plug - have them replaced immediately.
- Do not operate charger if it has received a sharp blow, been dropped, or otherwise damaged in any way.
Take it to an authorized service center.
- Do not disassemble charger; take it to an authorized service center when service or repair is required.
Incorrect reassembly may result in a risk of electric shock electrocution or fire. - Disconnect the charger from the outlet before attempting any cleaning. This will reduce the risk of electric shock.
Removing the battery pack will not reduce the risk. - NEVER attempt to connect 2 chargers together.
- The charger is designed to operate on standard household electrical power (120Volts). Do not attempt to use it on any other voltage.
Symbols
The label on your sprayer may include the following symbols.
V ____ volts
Hz hertz
min minutes.....
____ ____ direct current
Class I Construction [grounded]
☐ Class II Construction [double insulated]
Read instruction manual before use
Use proper eye protection
A..... amperes
W..... watts
\~...... alternating current
n_0 ...... no load speed
earthing terminal
⚠️ ____ safety alert symbol
... /min or rpm revolutions or reciprocation per minute
Use proper respiratory protection
O…… Use proper hearing protection
IMPORTANT CHARGING NOTES
- Longest life and best performance can be obtained if the battery pack is charged when the air temperature is between 65°F and 75°F (18°-24°C). DO NOT charge the battery pack in an air temperature below +40°F (+4.5°C), or above +105°F (+40.5°C). This is important and will prevent serious damage to the battery pack.
- The charger and battery pack may become warm to touch while charging. This is a normal condition, and does not indicate a problem. To facilitate the cooling of the battery pack after use, avoid placing the charger or battery pack in a warm environment such as in a metal shed, or an uninsulated trailer.
- If the battery pack does not charge properly:
a. Check current at receptacle by plugging in a lamp or other appliance.
b. Check to see if receptacle is connected to a light switch which turns power off when you turn out the lights.
c. Move charger and battery pack to a location where the surrounding air temperature is approximately 65^ F and 75^ F ( 18^-24^ C).
- The battery pack should be recharged when it fails to produce sufficient power on jobs which were easily done previously. DO NOT CONTINUE to use under these conditions. Follow the charging procedure. You may also charge a partially used pack whenever you desire with no adverse effect on the battery pack.
- Foreign materials of a conductive nature such as, but not limited to, steel wool, aluminum foil, or any buildup of metallic particles should be kept away from charger cavities. Always unplug the charger from the power supply when there is no battery pack in the cavity. Unplug charger before attempting to clean.
- Do not freeze or immerse charger in water or any other liquid.
WARNING: Shock hazard. Do not allow any liquid to get inside charger. Never attempt to open the battery pack for any reason. If the plastic housing of the battery pack breaks or cracks, call 1-800-822-8837 for recycling information.
APPLICATIONS & USE FOR YOUR SPRAYER
Avoid using a sprayer for general cleaning purposes if plant protection or herbicide chemicals have already been used in the sprayer. If a sprayer has been used for plant protection or as an herbicide, clean the sprayer completely (see cleaning section) before using.
Plant Food: Use different spray patterns for optimum foliage feeding or for fungicide and pesticide application.
Herbicides: Reduce weeds and unwanted plants but avoid using the same sprayer for plant feeding or protection without thoroughly cleaning (see cleaning section) the sprayer first.
General Household Use: Apply detergents, cleaning solutions, warm water (do not exceed 120^ F/49°C) or nontoxic household cleaning chemicals for carpets, floors, walls, glass, counter tops and ceilings. DO NOT use sprayer that has been used with herbicides, pesticides or other toxic chemicals for household applications.
General Outdoor Use: Use the sprayer for cleaning windows or with a detergent for general purpose cleaning.
SPRAYER COMPONENTS & USE INFORMATION
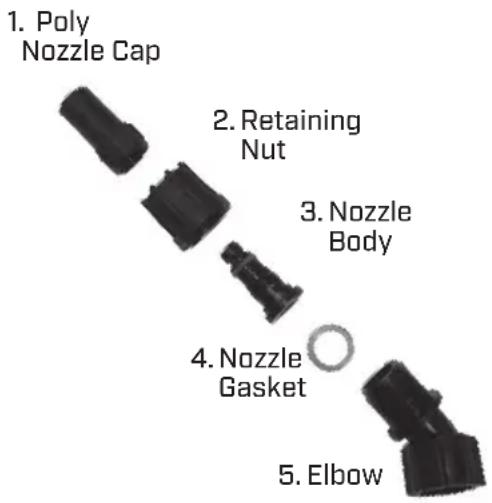
NOZZLE ASSEMBLY/ DISASSEMBLY
Unscrew the nozzle cap (1) from the nozzle body (3) with retaining nut (2) fastened tightly to the elbow (5). Unscrew the retaining nut (2). Push the nozzle body (3) with the nozzle gasket (4) out of the retaining nut (2). To reinstall the nozzle, reverse the above instructions.
text_image
1. Poly Nozzle Cap 2. Retaining Nut 3. Nozzle Body 4. Nozzle Gasket 5. ElbowWAND ASSEMBLY
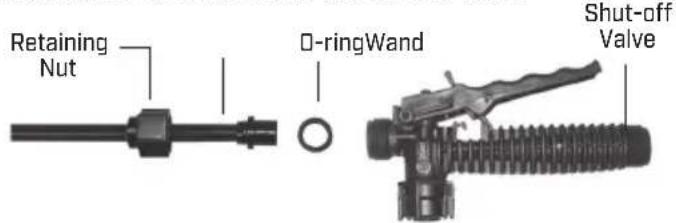
- Make sure the o-ring is installed on the end of the wand. Insert the wand into shut-off valve.
- Turn and tighten the retaining nut clock-wise onto the shut-off valve.
text_image
Retaining Nut D-ringWand Shut-off ValveINSTALLING THE SHOULDER STRAP
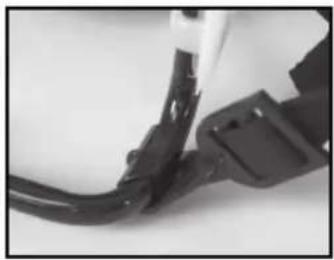
The top of the shoulder straps are attached to the tank. Attach the lower end of the straps by clipping the strap hooks to the metal frame between where the frame exits the tank and curves around.
natural_image
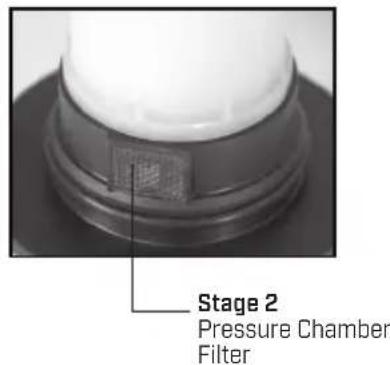
Close-up of a black plastic connector with a curved cable or wire attachment (no visible text or symbols)3 STAGE FILTERING SYSTEM
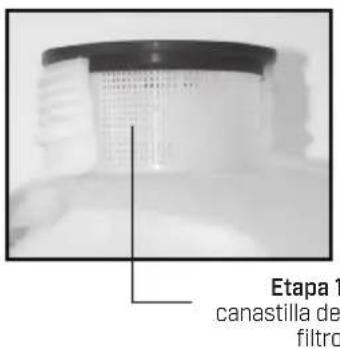
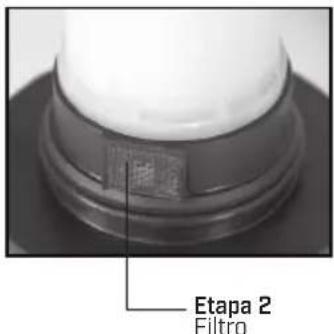
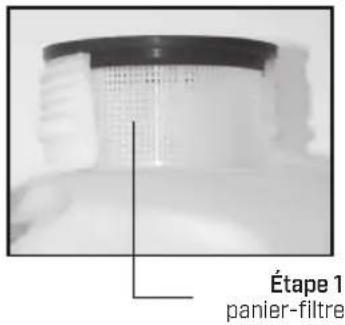
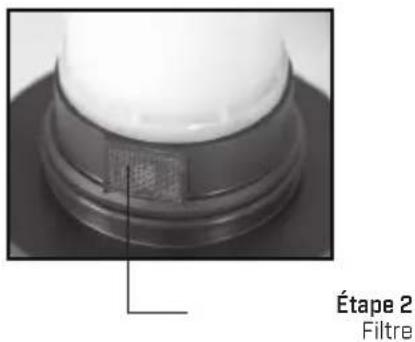
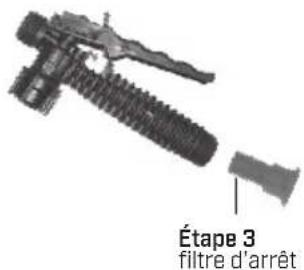
This backpack sprayer is equipped with a 3 stage filtering system (Figure 1-3). Stage 1 is a filter basket incorporated into the tank opening where fluid is added. Stage 2 is a filter integrated into the pressure chamber. Stage 3 is a removable filter incorporated into the shut-off assembly. Periodic cleaning of these filters is recommended to ensure consistent fluid flow through the sprayer. This will also reduce sprayer component wear.
To clean the stage 2 filter, point a heavy stream of water towards the filter to flush debris free. Turn tank upside down to empty water and debris. Repeat as necessary. If you are unable to remove the debris, removal of the entire pump assembly may be required. Please call Chapin customer service at 1-800-950-4458.
The stage 3 filter is a removable filter incorporated into the inlet side of the shut-off valve [see section "Disassembling and Repairing the Shut-off Valve"). Make sure pressure is released before detaching the hose from the shut-off.
Figure 1
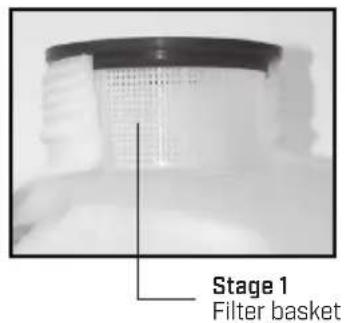
text_image
Stage 1 Filter basketFigure 2
text_image
Stage 2 Pressure Chamber FilterFigure 3
natural_image
3D rendered mechanical component with threaded end and cylindrical shaft (no text or symbols visible)Stage 3 Removable Shut-off Filter
FILLING THE SPRAYER
Make sure the filter basket is in place to keep debris from entering the tank.
Determine the amount of mixture needed for your application. Add the proper amount of water to the tank. Add the proper amount of liquid chemical to the tank (check the chemical label for proper ratio of chemical). Stir mixture in tank with a clean utensil (like a paint stirrer). The tank will hold the 4-gallon (15.1L) capacity plus up to 64 ounces of the chemical.
It is not necessary to completely fill the sprayer tank with each use. You can fill the tank with only the amount needed for each application.
Always follow the manufacturer's instructions included on their product label.
- Turn switch to on position.
- Remove tank cap.
- Spray liquid back into tank to prime pump.
- Release shut-off handle. Pump should stop running.
- Replace cap & begin spraying.
- When finished spraying turn switch to off position.
- Re-charge sprayer.
Note: Unit is equipped with a battery protection circuit. If sprayer abruptly stops after spraying for an extended period of time, the battery may require charging.
POWDER-BASED CHEMICALS
Powder-based chemicals (powder mixed with liquids to make the spraying agent) are usually abrasive and can cause wear. When you use a powder-based chemical in your sprayer, make sure it is thoroughly dissolved in the liquid solution. Thoroughly clean and flush the sprayer with water to extend the life of the sprayers parts.
CLEANING
• Always empty the sprayer and clean the tank thoroughly after each use.
Other Cleaning Hints:
- Improper spray distribution usually means the nozzle is clogged, remove the nozzle and clean it.
- Soap can be added to the water to clean the tank.
- Do not use strong cleaning agents or abrasives.
- If you use a chemical agent to clean the tank follow the manufacturer's recommendations for the disposal of the waste water.
- Follow the chemical manufacturers instructions for clean up.
STORING / MAINTAINING YOUR SPRAYER
- The sprayer should be stored out of direct sunlight in a cool dry space.
- Before freezing weather make sure to drain all liquid in the tank, pump, hose,
shut-off valve, wand and nozzle, to avoid liquid expansion and cracking in the sprayer components (See "Cleaning" section). Lock the shut-off valve in the "open" position. - When service is required call your nearest dealer and always insist on original manufactured replacement parts.
- Inspect the hose, wand, tank and shut-off valve for wear, damage or leaks on a regular basis and repair defects promptly.
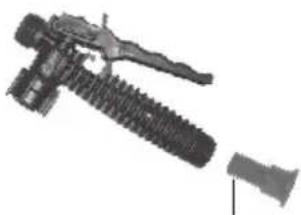
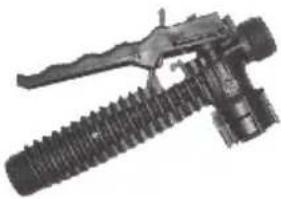
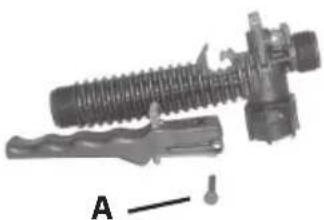
DISASSEMBLING AND REPAIRING THE SHUT OFF VALVE
natural_image
Close-up of a mechanical tool with threaded end and handle (no visible text or symbols)Figure 1
- Assembled shut-off valve Figure 1.
natural_image
Mechanical component with threaded shaft and attached bracket, labeled A (no text or symbols on the object itself)Figure 2
- Remove the retaining pin (A) Figure 2 by placing the notched end of the retaining pin on a hard surface and push down. Remove the retaining pin and slide the handle off the valve.
text_image
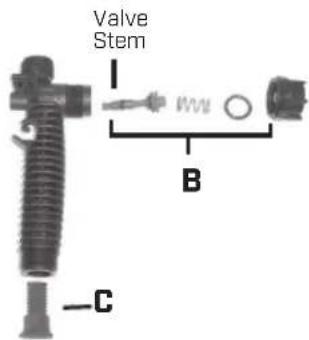
Valve Stem B CFigure 3
- Remove the retaining nut (o-ring attached), spring, and valve stem (B)
Figure 3. Replace worn parts. Lubricate the O-rings and reassemble by reversing the steps above. Place the handle groove in the slotted area of the valve stem and make sure the locking clip is positioned in the neutral position (see "Helpful Spraying Information" section). Insert the retaining pin. Push down on the handle a few times to distribute the lubricant evenly. Check filter (C) in end of shut-off valve for debris. Remove filter and flush with water to clean out.
Symptom Possible Reason Correction
| Unit runs but does not spray Pump is not primed Activate shut-off handle until liquid sprays out. Release handle and pump will shut-off. | |
| Unit will not start Battery pack not installed properly Check battery pack installation. | |
| Battery pack not charged Check battery pack charging requirements. | |
| Battery will not charge Charger not plugged in Plug charger into a working outlet. | Refer to “Important Charging Notes” for more details. |
| Surrounding air temperature too hot or too cold Move charger and battery pack to a surrounding air temperature of above 40 degrees F (4.5°C) or below 105 degrees F (+40.5°). | |
Unit shuts off abruptly Battery has reached its maximum thermal limit. Allow battery pack to cool down.
| Out of charge. (To maximize the life of the battery it is designed to shut off abruptly when the charge is depleted.) | Place on charger and allow to charge. | |
| Shut-off leaks | Connections loose | Tighten connection. |
| Worn or damaged shut-off | Rebuild or replace the shut-off valve. | |
| Wand assembly leaks | Connections loose | Tighten connection. |
| Damaged or worn o-ring/gasket | Replace o-ring/gasket. | |
| Nozzle assembly leaks | Connections loose | Tighten connection. |
| Damaged or worn o-ring/gasket | Replace o-ring/gasket. | |
| Leak between pump assembly and tank | Pump clamp loose | Tighten clamp. |
| O-ring worn or damaged | Replace pressure chamber o-ring. | |
| Hose leaking at tank outlet | Hose clamp loose | Tighten clamp. |
| Hose leaking at shut-off | Connection loose | Tighten retaining nut. |
| Damaged or worn o-ring/gasket | Replace o-ring/gasket. |
Recycling Spent Battery
In some areas, it is illegal to place spent lithium-ion batteries in the trash or municipal solid waste stream. You may also contact your local recycling center for information on where to drop off the spent battery, or call 1-800-8-BATTERY.
REPLACEMENT PARTS ORDER INFORMATION

text_image
6-8231 Shut-off Assembly 6-8146 Filter Basket & Cap 6-8232 Wand Assembly Elbow O- ring Hose Gasket Nozzle Gasket Wand O-ring 6-8235 O-ring Kit 6-8233 StrapsCongratulations!
You have just purchased a quality Chapin product.
Register Your Sprayer Online@ www.chapinmfg.com/warranty.asp
20V PULVERIZADOR DE MOCHILA RECARGABLE
MANUAL DE USO Y
CUIDADO
ADVERTENCIA
Failure to do so may result in damage to property and/or person.

text_image
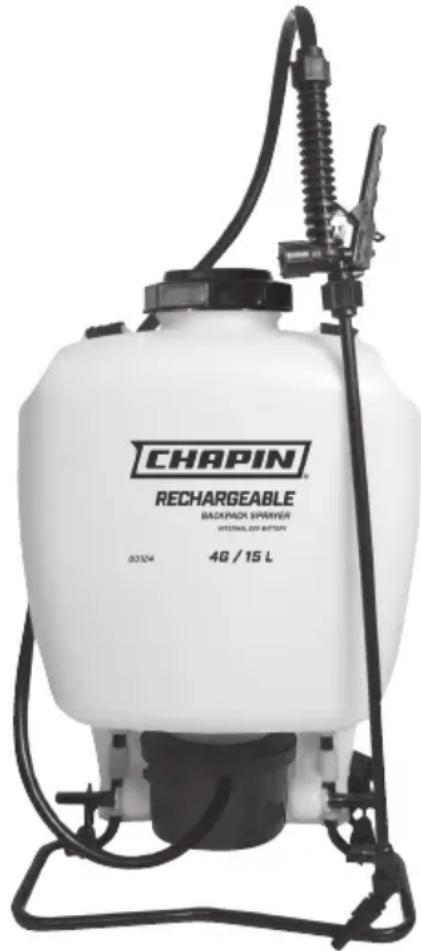
CHAPIN RECHARGEABLE BACKPACK SPRAYER 4G / 15 L 85524natural_image
Close-up of a black mechanical component with a curved cable and clasp (no visible text or symbols)Figura 1
text_image
Etapa 1 canastilla de filtroFigura 2
text_image
Etapa 2 FiltroFigura 3

natural_image
Mechanical tool with threaded end and attached bracket (no visible text or symbols)natural_image
Close-up of a mechanical tool with threaded base and handle (no visible text or symbols)Figura 1
natural_image
Mechanical assembly diagram showing a threaded component with attached parts and a labeled section A (no text or symbols on the main subject)Figura 2
Failure to do so may result in damage to property and/or person.
text_image
CHAPIN RECHARGEABLE BACKPACK SPRAYER INTERNAL DR BATTERY 83524 4G / 15 LRECOMMANDATIONS D'ENTREPOSAGE
natural_image
Close-up of a black plastic connector with a cable, no visible text or symbolsFigure 1
text_image
Étape 1 panier-filtreFigure 2
text_image
Étape 2 FiltreFigure 3
natural_image
Close-up of a mechanical tool with threaded end and handle (no visible text or symbols)Figure 1
natural_image
Mechanical component with threaded shaft and attached bracket, labeled A (no text or symbols on the object itself)Figure 2