97084 - Electric sprayer Chapin - Free user manual and instructions
Find the device manual for free 97084 Chapin in PDF.

User questions about 97084 Chapin
0 question about this device. Answer the ones you know or ask your own.
Ask a new question about this device
Download the instructions for your Electric sprayer in PDF format for free! Find your manual 97084 - Chapin and take your electronic device back in hand. On this page are published all the documents necessary for the use of your device. 97084 by Chapin.
USER MANUAL 97084 Chapin
Failure to do so may result in damage to property and/or person.

See website for warranty details
natural_image
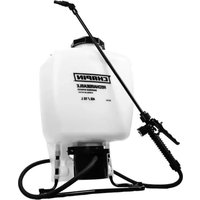
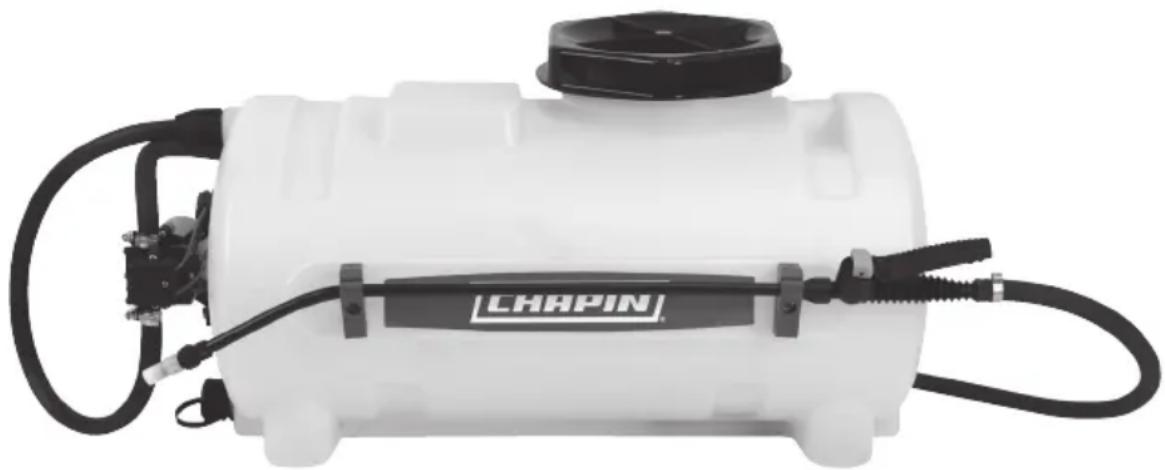
White agricultural sprayer with black label 'CHAPIN' and hose, no visible text or symbols beyond brandingModel 97080, 97084 • 8G/30L
CONGRATULATIONS!
YOU HAVE JUST PURCHASED A QUALITY CHAPIN PRODUCT.
BEFORE RETURNING THIS PRODUCT FOR ANY REASON, PLEASE CALL:
1-800-950-4458
When calling, please have the following information available: Sales receipt & model number. This number connects you directly with the manufacturer of this product. Our Technical Support Team will be happy to help you with any assembly, troubleshooting and replacement information you may need.
WARNING

IMPROPER USE OR FAILURE TO FOLLOW INSTRUCTIONS CAN RESULT IN EXPLOSIVE FAILURE CAUSING SERIOUS EYE OR OTHER INJURY.
FOR SAFE USE OF THIS PRODUCT YOU MUST READ AND FOLLOW ALL INSTRUCTIONS. DO NOT LEAVE SPRAYER IN THE HOT SUN. HEAT CAN CAUSE PRESSURE BUILD-UP RESULTING IN POSSIBLE EXPLOSION. DO NOT STORE OR LEAVE SOLUTION IN TANK AFTER USE. ALWAYS WEAR GOGGLES, GLOVES, LONG SLEEVE SHIRT, LONG PANTS AND FULL FOOT PROTECTION WHEN SPRAYING.
DO NOT ATTEMPT TO MODIFY THIS SPRAYER. REPLACE PARTS ONLY WITH MANUFACTURER'S ORIGINAL PARTS.
NEVER SPRAY FLAMMABLE, CAUSTIC, ACIDIC, CHLORINE, BLEACH, PETROLEUM BASED OR OTHER CORROSIVE SOLUTIONS OR HEAT, PRESSURE, OR GAS PRODUCING CHEMICALS. ALWAYS READ AND FOLLOW CHEMICAL MANUFACTURER'S INSTRUCTIONS BEFORE USE WITH THIS SPRAYER AS SOME CHEMICALS MAY BE HAZARDOUS WHEN USED WITH THIS SPRAYER.
ENSURE THE WIRING HARNESS DOES NOT BECOME PINCHED OR DAMAGED IN ANY WAY. THIS MAY DAMAGE THE PUMP OR CAUSE THE WIRING HARNESS TO OVERHEAT, RESULTING IN MELT DOWN OR FIRE.
SOME CHEMICALS WILL DAMAGE THE PUMP VALVES IF ALLOWED TO SOAK UNTREATED FOR A LONG PERIOD OF TIME. ALWAYS FLUSH THE PUMP WITH WATER AFTER USE. DO NOT ALLOW CHEMICALS TO SIT IN PUMP FOR EXTENDED TIMES OF IDLENESS. FOLLOW CHEMICAL MANUFACTURERS INSTRUCTIONS ON DISPOSAL OF ALL WASTE WATER FROM THE SPRAYER.
CAUTION
THIS SPRAYER HAS BEEN DESIGNED TO BE ATTACHED TO STABLE SURFACES.
Assembly Instructions
Suggested Tools:
Allen wrench
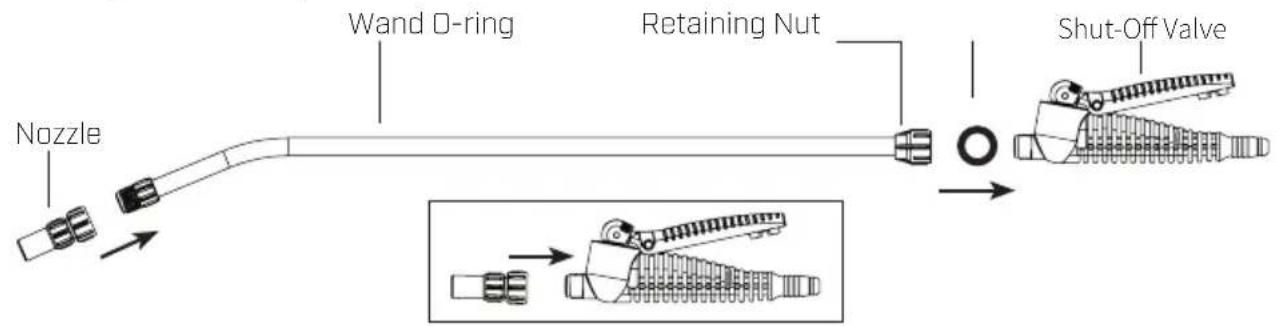
NOZZLE/WAND ASSEMBLY
Attach nozzle to shut-off Valve or extension wand.
Screw nozzle assembly onto male threaded end of the extension wand.
Screw female threaded end of extension wand onto shut-off assembly. Tighten retaining nut securely.
text_image
Nozzle Wand D-ring Retaining Nut Shut-Off ValveOPERATION
The pumping system draws solution from the tank, through the strainer and to the pump. The pump forces the solution under pressure to the spray wand.
The pump has a pressure switch which will shut the pump off when it reaches 60 PSI.
Regularly inspect the suction supply screen on the inside of the tank. Flush with water to clear any accumulated debris.
AFTER SPRAYING
After use, fill the sprayer part way with water. Start the sprayer and allow clear water to be pumped through the plumbing system and out through the spray wand.
Refill the tank about half full with clean water and a chemical neutralizer and then repeat cleaning instructions. Flush the entire sprayer with the neutralizing agent. Follow the chemical manufacturer's disposal instructions of all wash or rinsing water.
WINTER STORAGE
Drain all water and chemical out of sprayer, paying special attention to pump and valves. These items are especially prone to damage from chemicals and freezing weather.
The sprayer should be winterized before storage by pumping a solution of RV antifreeze through the entire plumbing. Proper care and maintenance will prolong the life of the sprayer.
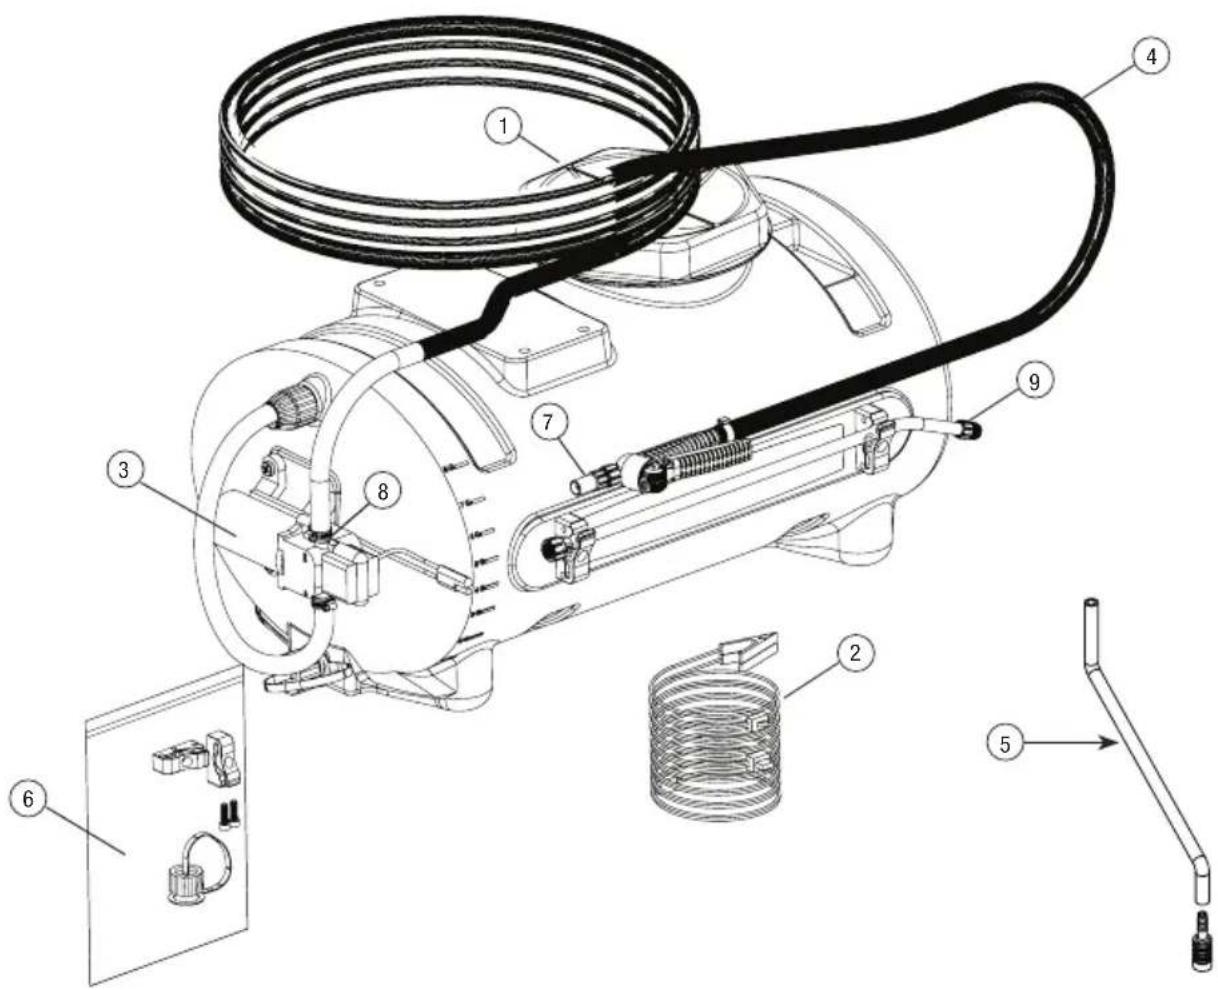
REPLACEMENT PARTS
text_image
Technical diagram of a mechanical device with numbered components and exploded view, likely for assembly or maintenance instructions.REF NO. PART NO. QTY DESCRIPTION
| 1 6-8270 1 Lid, Tank | |||
| 2 6-8320 1 Harness, Wire, S/S | |||
| 3 6-9206 1 Pump, 1.0 GPM | |||
| 4 6-4670 1 Hose, 10'/Shut-off Kit | |||
| 5 6-9227 1 Suction Hose Assembly | |||
| 6 6-8329 1 Drain Plug Kit, Wand Clip (pair) | |||
| 7 6-9075 1 Nozzle Kit | |||
| 8 6-8300 2 Worm Gear Clamp | |||
| 9 6-7749 1 Wand, 18" Curved Poly |
To Order Replacement Parts: 1-800-950-4458
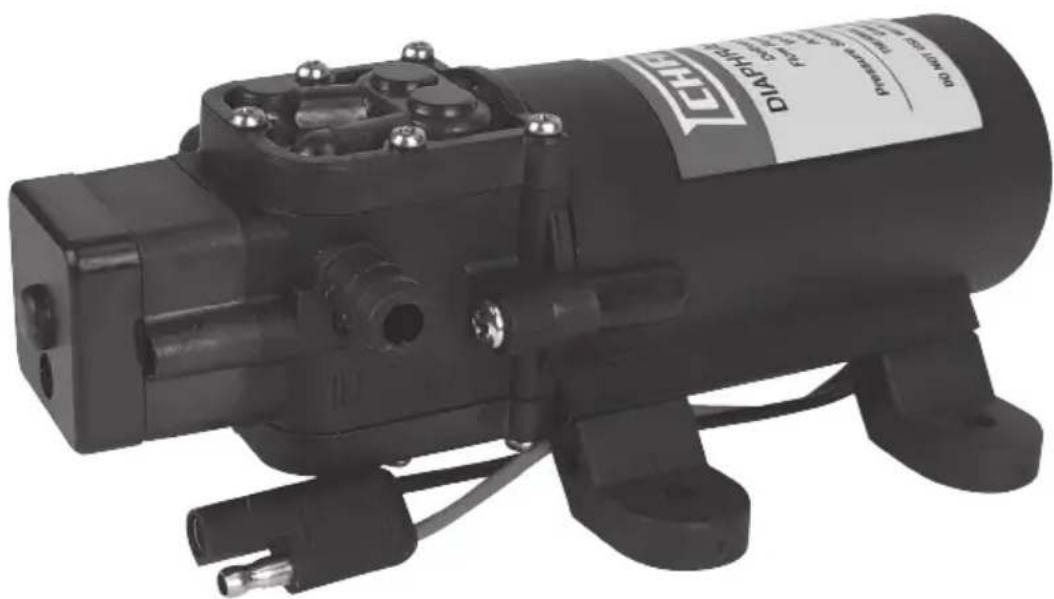
DIAPHRAGM PUMP SPECIFICATIONS
Fits Chapin 8, 15 and 25 gallon ATV sprayers
12 Volt DC, totally enclosed, non ventilated
Max amp rating: 3.0 MAX
Leads: 6" long
2 chamber positive displacement diaphragm pump, self priming, capable of being run dry, demand or bypass model.
Priming Capabilities: 4 feet [1.2 ml]
Max Pressure: 60 PSI
3/8" Straight hose barb
text_image
DC DC 120 DC 125 DC 130 DC 135 DC 140 DC 145 DC 150 DC 155 DC 160 DC 165 DC 170 DC 175 DC 180 DC 185 DC 190 DC 195 DC 200 DC 205 DC 210 DC 215 DC 220 DC 225 DC 230 DC 235 DC 240 DC 245 DC 250 DC 255 DC 260 DC 265 DC 270 DC 275 DC 280 DC 285 DC 290 DC 295 DC 300 DC 305 DC 310 DC 315 DC 320 DC 325 DC 330 DC 335 DC 340 DC 345 DC 350 DC 355 DC 360 DC 365 DC 370 DC 375 DC 380 DC 385 DC 390 DC 395 DC 400 DC 405 DC 410 DC 415 DC 420 DC 425 DC 430 DC 435 DC 440 DC 445 DC 450 DC 455 DC 460 DC 465 DC 470 DC 475 DC 480 DC 485 DC 490 DC 495 DC 500 DC 505 DC 510 DC 515 DC 520 DC 525 DC 530 DC 535 DC 540 DC 545 DC 550 DC 555 DC 560 DC 565 DC 570 DC 575 DC 580 DC 585 DC 590 DC 595 DC 600 DC 605 DC 610 DC 615 DC 620 DC 625 DC 630 DC 635 DC 640 DC 645 DC 650 DC 655 DC 660 DC 665 DC 670 DC 675 DC 680 DC 685 DC 690 DC 695 DC 700 DC 705 DC 710 DC 715 DC 720 DC 725 DC 730 DC 735 DC 740 DC 745 DC 750 DC 755 DC 760 DC 765 DC 770 DC 775 DC 780 DC 785 DC 790 DC 795 DC 800TROUBLESHOOTING
CONDITION CHECK/SOLUTION
| Pump won't start Correct voltage (12 - 13V) and electrical connections | |
| Correct voltage at switch | |
| Pump will not prime(No discharge with motor running) | Debris in strainer |
| Restriction (kinks) in inlet / outlet tubes | |
| Debris / swelling in inlet / outlet valves | |
| Pump will not shut-off(output line closed and no leaks) | Air trapped in outlet line or pump head |
| Correct voltage to pump | |
| Debris in pump inlet / outlet valves | |
| Loose drive assembly or pump head screws | |
| Pressure switch operations / adjustments | |
| Leaks from pump head or switch | Loose screws at switch or pump head |
| Switch diaphragm ruptured or pinched | |
| Punctured diaphragm if fluid is present | |
| Pump makes noise, but no output | Prime with garden hose by removing intake hose and flood with water while pump is running until water starts flowing (this may take up to 15 minutes to create suction). |
| To better understand the priming process see video at: https://www.youtube.com/watch?v=IrNeAvNL7Fs or search "Priming the Pump on Your Chapin ATV Sprayer" at Chapin International's YouTube page | |
SPRAY & PUMP FAQ
1. Why does the pump not run all the time?
This is an on- demand pump and only runs with flow; spray wand, by-pass, spray tips or leak in system.
2. Why does the pump surge while using the spray wand?
Low flow/high pressure may cause the pump to surge (or cycle). This could happen when the spray wand is adjusted for a small or fine spray pattern. To overcome, adjust the nozzle for higher flow.
3. How do I adjust the pressure?
Pressure can only be adjusted by adjusting the nozzle.
4. My pump quit and will not restart - what should I check?
Check all electrical connections. Ensure switch is in the on position. Check in-line fuse. Ensure correct voltage (12-13 volt).
5. Low flow or no flow at all - what should I check?
Check for a clogged suction hose and/or suction strainer. Often you will need to clean the suction strainer. Check for proper voltage. Check filter in shut-off.
6. Is there a fuse for the sprayer?
Yes, an in-line fuse, in the wire harness.
7. What size fuse should I use as a replacement?
3.0 amp
8. What is the range of the spray wand?
30 foot max
9. How should I clean the tank after use?
- Rinse tank thoroughly with water only, empty, refill with water.
- Empty sprayer by spraying no less than 1 minute to rinse out line. The remaining water can be drained per the drain plug.
- Store sprayer tank upside down, in a warm dry location.
10. Can the spray tip on the wand be replaced with a different type of tip?
Yes, however your wand comes with a #18 tip which is standard. Brass tips generally produce better spray patterns than plastic.
11. Each time I turn on the pump my fuse blows.
- Excessive voltage
- Improper adjustment of the pressure switch
• Damaged wiring harness
12. What is the warranty [time duration] on pump, tank, and accessories?
1 year after purchase.
Congratulations!
You have just purchased a quality Chapin product.
Register Your Spreader Online@ www.chapinmfg.com/warranty.asp
EZ MOUNT™
MANUAL DE USO Y CUIDADO
Failure to do so may result in damage to property and/or person.
natural_image
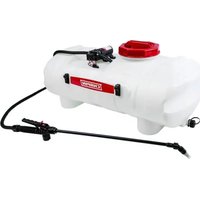
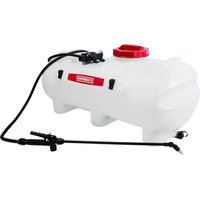
White outdoor spray sprayer with black and white components, labeled 'CHHPIN' on the side (no other text or symbols visible)Modelo 97080, 97084 • 8G/30L
¡FELICITACIONES!
ACABA DE COMPRAR UN PRODUCTO DE CALIDAD CHAPIN.
REGISTRE SU ESPARCIDOR EN LÍNEA EN WWW.CHAPINMFG.COM/WARRANTY.ASP
VISIT US ON THE INTERNET: WWW.CHAPINMFG.COM
text_image
Technical diagram of a mechanical device with numbered components and exploded view, likely for assembly or maintenance instructions.REF NO. PART NO. QTY DESCRIPTION
natural_image
Black industrial pump with attached metal fittings and mounting base (no visible text or symbols)Failure to do so may result in damage to property and/or person.

natural_image
White outdoor spray sprayer with black and white components, labeled 'CHHPIN' on the side (no other text or symbols visible)text_image
Technical diagram of a mechanical device with numbered components and exploded view, including wiring, springs, and battery pack.ARTICLE NO PIÈCE QTÉ DESCRIPTION
natural_image
Black industrial pump with attached metal components and mounting base (no visible text or symbols)GUIDE DE DÉPANNAGE