
GrandMeister 36 - Audio Amplifier HUGHES & KETTNER - Free user manual and instructions
Find the device manual for free GrandMeister 36 HUGHES & KETTNER in PDF.

| Product type | Analog programmable tube guitar amplifier head |
| Brand | Hughes & Kettner |
| Model | GrandMeister 36 |
| Dimensions (W x H x D) | 446 x 171 x 152 mm |
| Weight | 7.7 kg |
| Mains power supply | 100 V, 120 V, 220-230 V or 240 V depending on version (corresponding fuses) |
| Max. power consumption | 200 W |
| Output power | 36 W (reducible to 18, 5, 1 W or silent) |
| Preamp tubes | 3 x 12AX7 |
| Output stage tubes | 4 x EL84 |
| Channels | 4 (Clean, Drive, Lead, Ultra) with independent controls |
| Built-in effects | Reverb, Delay, Modulation (Chorus, Flanger, Phaser, Tremolo), Noise Gate |
| Special features | Power Soak, Red Box Out (XLR), TSC™ (Tube Safety Control), AES (auto cutoff), programmable MIDI (128 Presets), series effects loop |
| Inputs / Outputs | Input 6.3 mm, Send/Return 6.3 mm, Line Out 6.3 mm, balanced Red Box Out XLR, 7-pin MIDI In, 5-pin MIDI Out/Thru, Speaker 8-16 Ω |
| Maintenance and cleaning | Clean with a dry cloth; entrust all repairs to a qualified specialist |
| Safety | Grounding, do not expose to humidity, do not open the housing, use only recommended accessories |
| Spare parts and repairability | IEC127 fuses (5x20 mm), spare tubes (characteristics S1-S7, matched in pairs); replacement by qualified personnel only |
| General information | User manual available in 72 pages; manufacturer warranty under conditions |
Frequently Asked Questions - GrandMeister 36 HUGHES & KETTNER
User questions about GrandMeister 36 HUGHES & KETTNER
0 question about this device. Answer the ones you know or ask your own.
Ask a new question about this device
Download the instructions for your Audio Amplifier in PDF format for free! Find your manual GrandMeister 36 - HUGHES & KETTNER and take your electronic device back in hand. On this page are published all the documents necessary for the use of your device. GrandMeister 36 by HUGHES & KETTNER.
USER MANUAL GrandMeister 36 HUGHES & KETTNER
Hughes & Kettner® TECHNOLOGY OF TONE
GrandMeister 36
Undigital. Total recall.
Manual 1.4
Important Safety Instructions! Read before connecting!
This product has been built by the manufacturer in accordance with IEC 60065 and left the factory in safe working order. To maintain this condition and ensure non-risk operation, the user must follow the advice and warning comments found in the operating instructions. The unit conforms to Protection Class 1 (protectively earthed). If this product shall be used in vehicles, ships or aircraft or at altitudes exceeding 2000 m above sea level, take care of the relevant safety regulations which may exceed the IEC 60065 requirements.
WARNING: To prevent the risk of fire and shock hazard, do not expose this appliance to moisture or rain. Do not open case – no user serviceable parts inside. Refer service to qualified service personnel.

This symbol, wherever it appears, alerts you to the presence of uninsulated dangerous voltage inside the enclosure – voltage that may be
sufficient to constitute a risk of shock.

This symbol, wherever it appears, alerts you to the presence of externally accessible hazardous voltage. External wiring connected to any
terminal marked with this symbol must be a "ready made cable" complying with the manufacturers recommendations, or must be a wiring installed by instructed persons only.

This symbol, wherever it appears, alerts you to important operating and maintenance instructions in the accompanying literature.
Read the manual.

This symbol, wherever it appears, tells you: Take care! Hot surface! To prevent burns you must
not touch.
- Read these instructions.
- Keep these instructions.
- Follow all warnings and instructions marked on the product and in this manual.
- Do not use this product near water. Do not place the product near water, baths, wash basins, kitchen sinks, wet areas, swimming pools or damp rooms.
- Do not place objects containing liquid on the product – vases, glasses, bottles etc.
- Clean only with dry cloth.
- Do not remove any covers or sections of the housing.
- The set operating voltage of the product must match the local mains supply voltage. If you are not sure of the type of power available consult your dealer or local power company.
- To reduce the risk of electrical shock, the grounding of this product must be maintained. Use only the power supply cord provided with this product, and maintain the function of the center (grounding) pin of the mains connection at any time. Do not defeat the safety purpose of the polarized or grounding-type plug.
- Protect the power cord from being walked on or pinched particularly at plugs, convenience receptacles, and the point where they exit from the device! Power supply cords should always be handled carefully. Periodically check cords for cuts or sign of stress, especially at the plug and the point where the cord exits the device.
- Never use a damaged power cord.
-
Unplug this product during lightning storms or when unused for long periods of time.
-
This product can be fully disconnected from mains only by pulling the mains plug at the unit or the wall socket. The product must be placed in such a way at any time, that disconnecting from mains is easily possible.
- Fuses: Replace with IEC127 (5x20mm) type and rated fuse for best performance only! It is prohibited to use "patched fuses" or to short the fuse-holder. Replacing any kind of fuses must only be carried out by qualified service personal.
- Refer all servicing to qualified service personnel. Servicing is required when the unit has been damaged in any way, such as:
- When the power cord or plug is damaged or frayed.
- If liquid has been spilled or objects have fallen into the product.
- If the product has been exposed to rain or moisture.
- If the product does not operate normally when the operating instructions are followed.
- If the product has been dropped or the cabinet has been damaged.
- Do not connect external speakers to this product with an impedance lower than the rated impedance given on the product or in this manual. Use only cables with sufficient cross section according to the local safety regulations.
- Keep away from direct sunlight.
- Do not install near heat sources such as radiators, heat registers, stoves or other devices that produce heat.
- Do not block any ventilation openings. Install in accordance with manufacturer's instructions. This product must not be placed in a built-in installation such as a rack unless proper ventilation is provided.
- Always allow a cold device to warm up to ambient temperature, when being moved into a room. Condensation can form inside it and damage the product, when being used without warming up.
- Do not place naked flame sources, such as lighted candles on the product.
- The device must be positioned at least 20 cm/8" away from walls with free air space in between, and there must be free air space of at least 50 cm / 20" immediately above the unit within which no object(s) may be placed or positioned.
- Use only with the cart, stand, tripod, bracket or table specified by the manufacturer or sold with the product. When a cart is used, use caution when moving the cart/product combination to avoid injury from tip-over.
- Use only accessories recommended by the manufacturer, this applies for all kind of accessories, for example protective covers, transport bags, stands, wall or ceiling mounting equipment. In case of attaching any kind of accessories to the product, always follow the instructions for use, provided by the manufacturer. Never use fixing points on the product other than specified by the manufacturer.
- This appliance is NOT suitable to be used by any person or persons (including children) with limited physical, sensorical or mental ability, or by persons with insufficient experience and/or knowledge to operate such an appliance. Children under 4 years of age must be kept away from this appliance at all times.
- Never push objects of any kind into this product through cabinet slots as they may touch dangerous voltage points or short out parts that could result in risk of fire or electric shock.
- This product is capable of delivering sound pressure levels in excess of 90 dB, which may cause permanent hearing damage! Exposure to extremely high noise levels may cause a permanent hearing loss. Wear hearing protection if continuously exposed to such high levels.
- The manufacturer only guarantees the safety, reliability and efficiency of this product if:
- Assembly, extension, re-adjustment, modifications or repairs are carried out by the manufacturer or by persons authorized to do so.
- The electrical installation of the relevant area complies with the requirements of IEC (ANSI) specifications.
- The unit is used in accordance with the operating instructions.
- The grounding of the center pin of the mains plug is maintained to reduce the risk of shock.
Things to do before operating the amp
- Please read these instructions carefully, particularly the notes on safety, before operating the amp.
- The manufacturer disclaims any liability on responsibility whatsoever for any damage or defect to this and other devices resulting from misuse.
- Before you plug this amp into a mains power outlet, make sure its Power and Standby switches are off and that the voltage rating indicated on its rear panel matches your local mains current.
- A word of warning before you fire up your GrandMeister 36: It's loud, and high volume levels can cause hearing damage. To avoid very loud and unwelcome surprises, make a habit of backing the Volume knob of the guitar connected to the GrandMeister 36 all the way down before switching on the amp!
GrandMeister 36
Undigital. Total recall.
1 Quick Start....3
2 The fundamentals of handling GrandMeister 36 .... 3
3 The channel section 5
4 The effects section 5
5 The Master Section ....6
6 Rear panel 6
7 Tube Safety Control (TSC™) 8
8 MIDI 9
9 AES 10
10 Technical Data.... 11
1 Quick Start
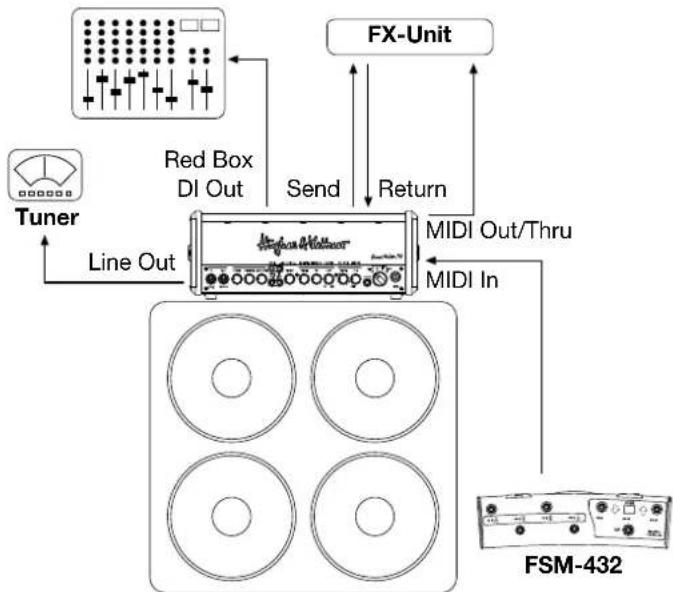
flowchart
graph TD
    A["Tuner"] -->|Line Out| B["Red Box DI Out"]
    B -->|Send| C["FX-Unit"]
    C -->|Return| D["MIDI Out/Thru"]
    D -->|MIDI In| E["FSM-432"]
    E --> F["Output"]
Mains In: Connect the factory-included power cord (Mains Lead) to this socket.
MIDI In: Connect the MIDI Out of your favourite MIDI controller to the MIDI In. Though this is a 7-pin interface, you can connect a standard 5-pin MIDI cable and use any standard MIDI controller. The two additional terminals (1 and 7) serve to supply phantom power to the Hughes & Kettner FSM-432 MIDI board.
The MIDI In is as important as the Input for your guitar! Only via MIDI you will have access to all 128 presets of the GrandMeister 36.
Input: Connect your guitar to this input using a shielded cord equipped with 6.3 mm (1/4") jack plugs.
Speaker: Connect a speaker cabinet designed for guitar amps to this jack. Using a single speaker cord, you can connect any cab with an impedance of 8 Ω to 16 Ω. We recommend the matching cabs Hughes & Kettner TM 112 or TM 212.
Power/On Switch: Set this switch to On to get the mains power flowing. The amp lights up, and the tubes will begin to heat up.
Play/Standby Switch: Give the tubes about 30 seconds to get toasty; then you can flip the "Standby" switch to "Play". The amp is now ready to operate. When taking a longer break from playing, please use the "Standby" switch so the tubes remain at operating temperature. This protects them and ensures they last longer.
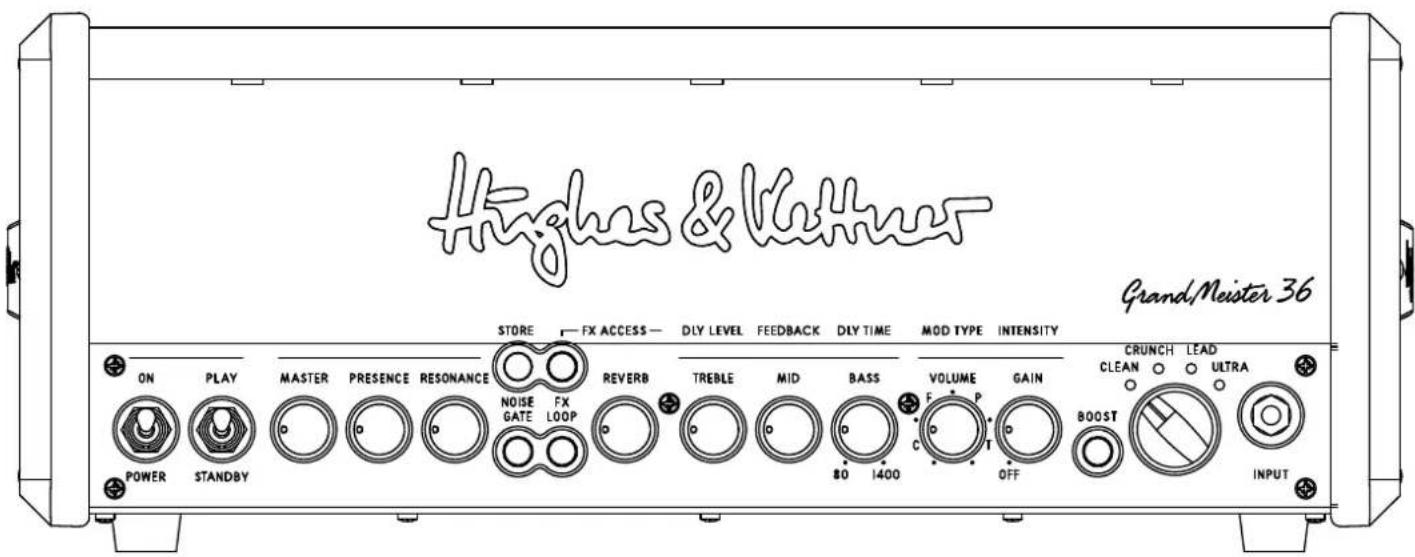
2 The fundamentals of handling GrandMeister 36
GrandMeister 36 is a tube amp, and it works much like other tube amps. But its handling concept is more advanced, so time spent getting to know how it operates is time well spent. The following basic facts will help you under stand the amp's operating concept:
- Although GrandMeister 36 is an analog tube amplifier, all its switch in and controlling functions (except the Master knob) are programmable.
- Depending on the amp's operation mode, some knobs and switches have different functions.
- All settings can be saved and recalled via MIDI. For this purpose, you can store your sound settings into 128 memory slots, the so-called presets.
2.1 How the knobs work
GrandMeister 36 is a four-channel tube amp. All four channels are controlled by the same set of knobs. Your choice of channel determines the knob's assignment. For example, when you have chosen the Clean channel via the chicken-head selector switch (see chapter 3), the Gain knob will determine the Clean channel's amount of gain. If you switch to the Lead channel, you can use the Gain knob to control the Lead channel's gain amount. The great advantage of this design is that the channels are truly independent and do not share Gain, Volume, or tone controls. You can even adjust Presence, Resonance and Reverb settings separately for every channel if you like!
Note: The knobs look and feel like standard-issue pots with a 300-degree control range and left and right stops. But there's a difference that may take some time getting used to: The knob setting programmed in a preset is independent of the knob's physical position. In other words, when
you switch from one preset to another, the knob's actual position is 2.4 Programming a preset
not reflect the setting programmed in the preset, and you may well hear something other than what you're seeing would suggest. The knob will respond like any other conventional pot as soon as you move it. The Store LED in the Master section tells you the knob's
setting stored in the preset. It lights up when the physical position of the knob corresponds to the preset setting. You can learn more on this in section 2.4.
Heads Up: You may hear a soft background noise when twisting knobs. This sound is made by the Programmable Resistor Network (PRN™), as it switches its 256 resistors: Each of these rotary controls consists of 256 individual resistors in serial array, 256 switches, and a memory with the ability to save and recall every switch's position.
2.2 Selecting presets
Presets can only be changed via MIDI. You can use any MIDI footswitch, MIDI controller, or MIDI equipped pedal board to switch presets. Both MIDI devices, amp (receiver) and the controller (sender), should use the same channel. Otherwise, MIDI commands will be ignored or get lost. The factory default is MIDI channel 1 and "Omni On" (amp receives on all 16 MIDI channels) to guarantee instant operation. If the GrandMeister 36 does not react on program changes properly, see chapter 8.1 to change the MIDI channel or refer to the manual of your favourite MIDI controller.
2.3 Using the Hughes & Kettner FSM-432 MIDI Board
Let's have a look on the Hughes & Kettner FSM-432 first. It serves to select the 128 memory slots arranged in 32 banks of four presets each. You can easily configure setups any way you wish, say by assigning the four presets of a bank to a song.
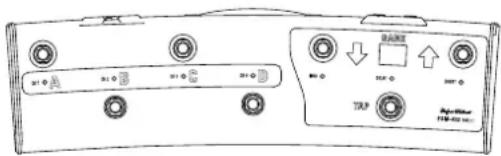
Preset A, B, C, D
Presets within a bank activate directly, that is, you can switch straight from A to B within the same bank. The LEDs above the A, B, C, and D buttons indicate the selected preset.
Bank Up/Down
To access a preset in another bank, select the target bank using the Up and Down buttons. You can continue playing with the current preset while you're navigating. The display of the FSM-432 shows the banks number; it flashes until you select a preset in the target bank by pressing A, B, C, or D. The FSM-432 will not switch over to the new preset until you do this.
Tap
Tap offers you a quick, convenient way of adjusting delay time. It's particularly handy on stage: Simply tap your foot on the Tap button in time with the beat to match delay time to the tempo. See section 4.3 for more info.
Programming a preset is as simple as it can get. Once you have found your favourite setting, exactly that setting of every single knob and switch (except the Master Volume) can be stored into a preset with the Store button. This is pretty much like playing a tube amp with 128 channels, each with its own Gain, Volume, EQ and even effects setting.
Storing settings by overwriting the currently selected preset
An easy way to store edited settings is to simply overwrite the most recently selected preset. To do this, press and hold the Store button for about two seconds until its light flashes briefly and then extinguishes. The Channel LED (see chapter 3) also flashes to confirm the write operation. Release the Store button, and your settings will be stored.
Storing settings by selecting a new memory slot
If you do not wish to overwrite the current preset, you can easily select a new memory slot instead. In this case, rather than holding the Store button down for two seconds, press it briefly and then release it. Its light stays on to signify that GrandMeister 36 is primed and ready to receive a MIDI program change to define a memory slot.
- From the FSM-432: Select a MIDI bank from 1 to 32 on the FSM-432. The bank number in the display flashes to signify that the FSM-432 is waiting for input via one of the four preset buttons A to D. Then engage preset button A, B, C, or D. The display stops flashing, the light on the Store button extinguishes, and the preset is stored.
- From any other MIDI device: as soon a program change is sent, the preset will be stored and can be recalled just by sending that program change again.
Reading out stored knob settings
When you select a preset, the single knobs' actual positions may not represent their stored values. But it is easy enough to read the information out: Select a preset, grab the knob of your choice and twist it to the left or right until the Store button lights up. Now the knob's position matches the setting stored in the preset.
3 The channel section
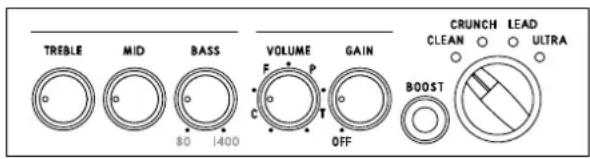
Grand Meister 36 sports four channels, each and accessible via a chicken-head selector switch. The power amp feedback circuit, which has a formative hand in shaping your tone, is also reconfigured during channel switching. The programmable knobs (see 2.1) afford you full access to all sound parameters in every channel. We even painstakingly fine-tuned the knobs' control ranges and characteristics to match the selected channel's voicing.
1 Clean Channel: GrandMeisters Clean channel certainly merits its name. It delivers sparkling fresh sounds and offers tons of headroom. It's worth your while to experiment with different Gain settings in combination with the switchable Boost.
2 Drive Channel: Your first stop for classic overdrive at its finest. This channel sweeps the sonic spectrum from clean to mean, and countless tones in between. Engage Boost to conjure a rude rock roar.
3 Lead Channel: This channels masterfully musical compression sends those riffs and licks flying off your fingertips. Hit Boost for an extra helping of in-your-face solo sound.
4 Ultra Channel: Get your high-gain tone right here. The Ultra channel's top end slices, dices, but never sacrifices its thunderous low end for raging metal riffs and larger-than-life lead tone. Dropped tuning conjures a quasi religious experience.
5 Gain: The Gain knob determines input sensitivity and therefore the preamps saturation level. Paired with Boost, it is your most sound-sculpting tool.
6 Boost: Boost targets specific frequency ranges and kicks them up a notch. This yields even more assertive, creamie depending on the channel.
7 Bass, Mid, Treble: The three-band voicing section's sound-shaping action is fine-tuned for each channel, and it specifically frequency ranges that define each channels characteristic tone.
Heads Up: These are classic passive tone controls that influence one another. For example, if you crank the Mid knob, the Bass knob will be less effective than when you back the Mid knob down. Presence and Resonance are independent of the three-band voicing controls; that is, their action remains unaffected by other knobs settings.
8 Volume: Use the Volume knob to adjust preset levels and adjust their relative balance to other presets.
Heads Up: Unlike a conventional Volume control, this kind bring the level all the way down; it merely boosts or cuts the given level. The 12 o'clock position is the best starting point for adjusting volume.
Caution: Please don't use this knob to control the amp's overall output level – that's the Master knob's job (see 5.1)!
4 The effects section
GrandMeister 36 offers three independent effect modules with reverb, delay and modulation effects as well as a noise gate. All of them can be used simultaneously.
Heads Up: The far left knob positions of the "Reverb", "Dly Level", and "Intensity" knobs bypass the given effect. Twisting those knobs counter clockwise to the far left take the pitchyeffect module out of the signal path.
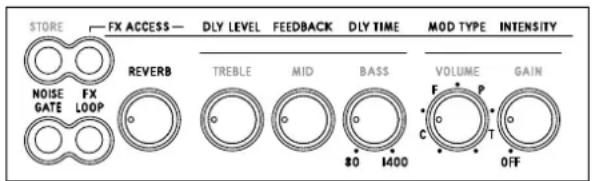
1 Reverb: GrandMeister's digital reverb matches the warmth and musicality of classic spring reverbs. A genuine improvement over its analog forebears, it automatically adjusts the reverb tail – the higher the Reverb volume setting, the longer the reverb time.
2 FX-Access: You always have direct access to the "Reverb". In order to access the Delay and Modulation effects, just press the FX-Access button – it will start flashing. Now you are in the FX-mode, and the channel control knobs now serve as effects controls. To exit the FX-mode, press FX-Access again. It stops flashing and you are back to the tone control mode.
3 Delay: The Delay module's "Dly Level", "Feedback" and "Dly Time" knobs afford you total control over all parameters.
3.1 Dly Level: Adjusts the volume of repetitions, sweeping from all the way off to just as loud as the original signal.
i3o2Feedback: Adjusts the number of repetitions from one to infinite.
3.3 Dly Time: Adjusts the time to the next repetition from 80 milliseconds to 1.4 seconds. When you're tapping in delay time on the FSM-432's Tap button (see section2r3); the effect adopts the new time after your second tap. The Tap LED flashes for about five seconds in sync with the beat to give you a visual indication of delay time. The Tap function only works when the Delay is active. If the Delay is off – or more accurately, bypassed as the effect will not adopt your Tap tempo.
4 Modulation FX: This module serves up four modulation effects – Chorus, Flanger, Phaser, and Tremolo.
4.1 Mod Type: Each effect is assigned to one quarter of this knob's control range. The first quarter addresses Chorus, the second addresses Flanger, the third addresses Phaser, and the final quarter addresses Tremolo. You can adjust the modulation effect's rate within its assigned quarter. The more you turn "Mod Type" up, the faster the rate gets.
4.2 Intensity: This knob adjusts the volume of the modulation effects.
5 FX-Loop: This serial loop lets you patch in external effects devices: Connect the Send jack in the FX-Loop section on the amp's rear panel to your effects processor's input and the Return jack to the processor's output (see chapter 6.6). The FX-Loop button activates and deactivates the loop.
6 Noise Gate: The programmable Noise Gate button switches the IDB ^TM noise gate on and off for each preset. When activated, the noise gate kicks in to mute the amp as the signal level drops below a certain threshold. The gate remains shut until you hit the guitar strings. When you do so, it opens up again. The Noise Gate Hard/Soft knob on the amp's rear panel controls the noise gate's response, see chapter 6.5.
5 The Master Section
The Master section lets you adjust the amp's overall volume, Resonance and Presence.
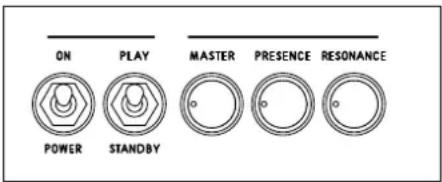
1 Master: As the name suggests, this knob puts the power amp and its volume level at your thumb and forefinger's command. Handle it carefully and you will enjoy a gratifying rather than an agonizing aural experience.
Heads Up: Unlike channel and effect controls, the Master knob is not programmable! It works like any conventional knob, and its physical position indicates the actual setting. It's always a good idea to back the Master knob off by twisting it to the far left position before powering the amp up.
2 Resonance: Set the Resonance knob to 12 o'clock, and you will hear the normal resonance created by the amp-and-cabinet combination. Twisting it counter clockwise dampens the speakers and the cabinets resonance for a looser, softer sound that sweetens up clean tone. Turning the knob clockwise intensifies resonance for a tighter, punchier low-end that works well with distorted sounds.
3 Presence: This knob controls the amount of generated by the amp – the higher the setting, the more intense the effect.
Heads Up: Resonance and Presence can be programmed into every preset, or these controls can be used as a master control that is not changed by switching presets, like the Master Volume control. If you want Resonance and Presence as a global control, press Store and FX-Access simultaneously for three seconds until the Store LED starts flashing. Now the FX-Access LED indicates if you are in Global Mode (flashing) or in Preset Mode (not flashing). You can change the mode with the FX-Access button: if it does not flash (Preset Mode), press it to change to Global Mode. If it flashes (Global Mode), press it to change to Preset Mode. To store your changes press Store for three seconds until it stops flashing.
6 Rear panel
1 Speaker: GrandMeister 36 offers one speaker output for 8 Ω to 16 Ω cabinets. Connect a speaker cabinet designed for guitar amps to this jack.
Using a single speaker cord, you can connect any cabinet or combination of cabinets whose total impedance ranges between 8 Ω and 16 Ω. The formulas below serve to calculate the overall impedance (R) of two cabinets with different impedances (R1 and R2):
$$ R = R 1 + R 2 $$
- For cabinets wired in series:
Example: If you connect two 8 Ω cabinets, the overall impedance is 16 Ω. However, very few modern cabinets are wired in series. Parallel circuits are far more common.
• For cabinets wired in parallel:
$$ R = (R 1 \times R 2) / (R 1 + R 2) $$
Here is an example with two 16 Ω cabs:
$$ R = (1 6 \times 1 6) / (1 6 + 1 6) $$
$$ R = 2 5 6 / 3 2 = 8 \Omega $$
2 Power Soak: This feature lets you enjoy the benefits of full-blown power amp saturation at low volume, so you can play at home in your living room without alienating the neighbours. Its silent recording capability lets you capture genuine tube-driven tone via a mixing console without having to drive speakers. And if you want to rehearse in silence any time day or night, simply plug a set of headphones into the mixer. Thanks to the amp's programmability, you can easily program your own set of studio and home presets.
None of the buttons in this section lights up when the amp is in 'normal' operating mode (36 watts of output power). Pushing one of the four buttons will activate the output power reducing function. When you press the 18W button TSC™ disables two tubes to reduce the output power by half to 18 watts. When you press the 5W and 1W buttons, some the power is converted into heat to further reduce the output to 5 watts and 1 watt, respectively. In Speaker Off mode, all the power is converted into heat and the amp is muted. Re-pressing the currently selected and therefore illuminated button will deactivate the Power Soak and bring you back to 36 watts of output power.
Note that if you choose to mute the amp, you do not need to connect a speaker. Designed to enable silent recording, this option provides the full signal to the Red Box output. To protect the power amp, GrandMeister 36 automatically engages this mute circuit as soon as the plug is pulled from the Speaker Out port.
Heads Up: Cutting down the power from 36 to 18 watts is done by TSC ^™ shutting down one pair of tubes (see section 7.1), which is why two TSC ^™ LEDs always light up when the amp is in 18 W, 5 W, 1 W and Speaker Off modes. In this case, TSC ^™ is simply indicating that two tubes are off, and not that it has detected a fault.

3 Tube Safety Control (TSC™): We devoted an entire chapter to the Tube Safety Control. See section 7 to learn more about it.
4 Red Box Out: Invented by Hughes & Kettner, the Red Box has for years set the industry standard for analog guitar DI boxes with built-in speaker emulation. Built into the GrandMeister's output section, amp's speaker out signal, which is tapped post power amp and pre Power Soak, into a balanced, frequency-compensated signal that you can patch directly to a mixing console. This signal sounds very authentic when piped through a PA or studio monitors. It always sounds like the cab itself, not like a mic'ed cab! Feel free to add some ambience or room effects.
Note: Use a microphone cord to patch this signal to a mixing console. Make sure the mixing console's XLR input is set to line level. If the mixing console lacks XLR inputs or if these cannot be set to line level, you will need an XLR to 6.3 mm (1/4") jack adapter readily available in music stores.
Heads Up: The amp's Master knob settings and the selected Power Soak mode directly affect the signal level: Stepping up to 36 watts, watts changes the Red Box Out level as it does the Speaker Out level. Stepping down from 18 watts to 5 watts, 1 watt and Speaker Off (for silent recording) does not change the level! So you can step up from 18 watts to 36 watts on the fly (via preset change), for example, to boost the volume for leads when playing live. The level of the signal sent to the Red Box Out (and to the mixing console) will be bumped up accordingly. The level of the 18 W, 5 W, 1 W and Speaker Off modes remains the same for a very good reason: That way you can choose the right Speaker Out level for the rehearsal room, home practicing and silent recording without having to adjust Master knob settings.
48 volts phantom power: If you want to switch on your mixing desk's 48 volts phantom power, you can do so without any problems. The Red Box Out automatically filters DC phantom power of mixing desks' microphone inputs.
4.1 Speaker Cabinet Type: This button lets you select a classic or modern type of cabinet. Please note that this feature is rather a subtle pre-filter than a radical sound shaping tool.
5 Noise Gate Hard/Soft: This knob controls the noise gate's sensitivity. The noise gate's IDBTM technology automatically adapts the standard attack and threshold parameters. Its far left position is labeled Hard; its far right position is labeled Soft. The further you twist the Noise Gate Hard/Soft knob to the right, the more sensitive the noise gate's response. Set it to 12 o'clock if you want it to open up at very soft signal levels. The further you twist the knob to the left, the harder the noise gate kicks in and cuts off signals.
Outboard noise gates sandwiched between the guitar and amp or plugged into the FX loop can only measure the signal at one point. The Intelligent Dual Breakpoint (IDBTM) technology gauges the signal at two points, directly at the Input jack and post preamp, but pre effects. The noise gate uses these two values to calculate the optimum response. What's more, it does not cut off Reverb and Delay signals.
Heads Up: The Sensitivity knob's setting applies to all presets that incorporate the noise gate. This is convenient and intentional: If conditions on stage are different in the rehearsal room, you can adjust the noise gate's response for all presets with one simple tweak.
Top v12 r's obleis the universal setting. It you wish to use the noise gate as a stylistic device when playing fast staccato riffs at high gain levels, then dial in a setting towards the Hard end of the control range
6 Line Out, FX Send, FX Return
6.1 Line Out: The Line Out offers the preamp signal to patch it to another power amp or to a tuner.
6.2 FX Send: Connect the FX Send to your external effects processor's input.
6.3 FX Return: Connect the FX Return to your external effects processor's output.18
Tip: If you're a stomp-box user, you may want to try the four-cord method: For devices that work best plugged into the front end of the amp, simply connect the guitar to the input of the first pedal in the chain, and the last pedal's output to the amp's Input. Now do the same for devices that work best in the FX loop: Connect the pedal's output to the amp's FX Return and the amp's FX Send to the pedal's input. This lets you route chorused, phased and other modulated signals into the GrandMeister's preamp and time-based effects such as reverb and delay after the preamp.
If your multi effector features amp models, you can patch these straight to the GrandMeister's power amp via the FX Return. In combination with the Power Soak and the Red Box Recording Out, this gives you a powerful recording front end that offers very interesting re-amping and sound-shaping options for just about every conceivable signal.
Heads Up: You can bypass the GrandMeister's preamp by routing amp models into the FX Return. However, when you switch channels its power amp is re-voiced to deliver the best tone for that channel. This means every channel sounds different, even if you decide to use only the power amp! You probably want the amp model's sound and volume to remain consistent with your original programming. If so, you'll have to remember which channel you used for programming and select it when you activate the amp model. However, the better option is to program a preset to do this for you.
7 MIDI In: MIDI In is a 7-pin interface, you can connect a standard 5-pin MIDI cable. The two additional terminals serve to supply phantom power to the Hughes & Kettner FSM 432 MIDI board.
Heads Up: The FSM-432 comes with a 7-pin MIDI cable. You do not need a power source for the FSM-432 because phantom power is provided. If you wish to use a 5-pin MIDI cable, you will however need a wall wart. For such cases, the FSM-432 provides an innovative mains port that accepts any AC or DC adapter rated for 9 to 15 volts.
8 MIDI Out/Thru: MIDI Out/Thru forwards signals patched In to other devices. You can connect any external MIDI-enabled signal processor that you wish to switch synchronously with GrandMeister 36.
7 Tube Safety Control (TSC™)

TSC™ adjusts the bias to improve the amp's tonal and technical stability and to extend the power tubes' lives. It does this automatically and continuously, so there is nothing for you to do but to enjoy the convenience. You can swap tubes easily, quickly, and safely: All the hard work of biasing gets done automatically, so swapping tubes is an exercise in speed and convenience. This is a big help not only in case of a defect, but also when you want to compare different brands of replacement tubes.
Caution: Replacing tubes is a job best left to qualified professionals! TSC™ merely spares the technician the biasing effort.
To use the full information TSC ^™ can provide you with, you will have to look at the four LEDs in the TSC ^™ section on the rear panel of the amp. Each LED is assigned to the power tube occupying that corresponding position. The LEDs will give you two different kinds of information: Firstly, they indicate the operating status of the tubes see section 7.1). TSC ^™ constantly performs an error diagnosis and will even shut down defective tubes if necessary in order to avoid a total failure of the amp. In addition, you can easily get a read-out of the individual tube's bias points, using any standard guitar pick (see section 7.2).
7.1 Automatic Status Indications
All LEDs light up and stay on
All LEDs remain on for as long as the amp is in standby mode. When you flip the "Standby" switch to "Play", they will extinguish after a few seconds. If all of the LEDs remain illuminated, the most likely cause is a blown anode fuse that needs to be replaced by a technician. The anode fuse can trip if a tube is already defective when the amp is switched on, and TSC™ does not have enough time to measure the idle current and to then shut the faulty tube down.
None of the LEDs lights up
The power tubes are operating normally.
One LED lights up continuously
If only one LED lights up, then the tube assigned to this LED is not delivering enough current and has been shut down. If the LED does not extinguish after a few minutes, this tube must be replaced.
Two LEDs light up continuously
To tell! Olls you one of two things: Either the two corresponding tubes are not delivering enough current and therefore have to be replaced (see the instructions for one illuminated LED, section 7.1), or the power soak is active. In the latter case, two tubes are switched off automatically, and the two illuminated LEDs are indicating this (also see section 6.2).
One LED flashes, another lights up continuously
The tube assigned to this flashing LED is generating too much current and therefore has been shut down. This tube has to be replaced. In this type of power amp, it takes a pair of tubes working together to produce the best sound. So TSC ^™ also switches the defective tube's counterpart off (indicated by the continuously lighting up LED), so it doesn't degrade the other pair's tone. There is no need to replace this tube, because there's nothing wrong with it.
Now this is where TSC ^TM 's intelligence saves your gig: If a tube failure like this occurs in a conventional amp, its fuse usually trips and you can't operate it until you replace the tube and fuse. Thanks to TSC ^TM , you can continue playing for as long as the LED remains illuminated. Anyway, please note that shutting down one pair of tubes will halve the amp's output power from 36 to 18 watts. And don't forget to replace the defective tube after your show.
7.2 Manual Read-Out
TSC ^™ is able to check the power amp tubes' bias points to let you determine if tube pairs are matching. This can easily be done by inserting a guitar pick into the slot right next to the LEDs while the amp is switched on (rather than in Standby mode). All LEDs will flash several times. The number of flashes of every single LED will give you information about the Hughes & Kettner tube rating of the assigned tube as well as about its bias. The tube ratings table below (7.3) shows the Hughes & Kettner tube ratings and how flash counts translate to a rating. For example, if the TSC ^™ LED flashes six times, the assigned tube has an S2 rating. The chart also tells you that the tube's bias point is set to 13 volts.
Please make sure that the difference in flash counts between the single LES is no greater than four flashes. Only if the difference is no greater than four flashes, TSC ^TM will ensure optimum sound. If the difference in flash counts is greater than four, we recommend installing a matched set of tubes to improve the tone. This is strictly a matter of tone – technically speaking, the amp will continue to operate safely.
Heads Up: The two inside tubes and the two outside are matched pairs. If just a single tube is swapped, ensure the replacement matches that of its counterpart. If all tubes are replaced, ensure they all share the same ratings. You can buy replacement tubes from your local dealer. The original Hughes & Kettner rating (S1-S7, 0-12) is shown on a sticker on the tube.
7.3 Tube ratings tables
| Flashes Rating Bias [V] | ||
| 1 | S7 | 10 |
| 2 | S6 | 10.6 |
| 3 | S5 | 11.2 |
| 4 | S4 | 11.8 |
| 5 | S3 | 12.4 |
| 6 | S2 | 13 |
| 7 | S1 | 13.6 |
| 8 | 0 | 14.2 |
| 9 | 1 | 14.8 |
| 10 | 2 | 15.4 |
| 11 | 3 | 16 |
| 12 | 4 | 16.6 |
| 13 | 5 | 17.2 |
| 14 | 6 | 17.8 |
| 15 | 7 | 18.4 |
| 16 | 8 | 19 |
| 17 | 9 | 19.6 |
| 18 | 10 | 20.2 |
| 19 | 11 | 20.8 |
| 20 | 12 | 21.4 |
| 21 | * | 22 |
| 22 | * | 22.6 |
| 23 | * | 23.2 |
| 24 | * | 23.8 |
| 25 | * | 24.4 |
8 MIDI
As you've learned in chapter 2.2, presets can only be changed via MIDI. Sender (controller) receiver (amp) must use the same channel. The factory default is MIDI channel 1 and "Omni On". If the amp does not react on program changes properly, the MIDI channel has to be changed.
8.1 Setting MIDI channels and switching Omni On/Off
Flip the Play/Standby switch to Standby. Now press and hold Noise Gate and FX-Loop simultaneously for three seconds. The Store button will light up. This assigns special programming functions to the following LEDs and buttons:
- FX-Access: lights up to indicate GrandMeister 36 is configured to receive incoming program changes via all MIDI channels (Omni On, default). If the LED is not illuminated, the amp receives messages via the selected channel only (Omni Off). To change the Omni mode, just press the FX Access button.
- Noise Gate now serves as a +1/up button, FX Loop now serves as a -1/down button. Use those buttons to change the MIDI channel.
- When configuring MIDI channels, the four Channel LEDs serve to indicate the MIDI channels. Consult the table below for the MIDI channel assignments. They show what in tech-speak is called binary code:
| MIDI Channel | Clean Crunch | Lead | Ultra | |
| 1 = | ○ | ○ | ○ | ○ |
| 2 = | ○ | ○ | ○ | ● |
| 3 = | ○ | ○ | ● | ○ |
| 4 = | ○ | ○ | ● | ● |
| 5 = | ○ | ● | ○ | ○ |
| 6 = | ○ | ● | ○ | ● |
| 7 = | ○ | ● | ● | ○ |
| 8 = | ○ | ● | ● | ● |
| 9 = | ● | ○ | ○ | ○ |
| 10 = | ● | ○ | ○ | ● |
| 11 = | ● | ○ | ● | ○ |
| 12 = | ● | ○ | ● | ● |
| 13 = | ● | ● | ○ | ○ |
| 14 = | ● | ● | ○ | ● |
| 15 = | ● | ● | ● | ○ |
| 16 = | ● | ● | ● | ● |
Press and hold the Store button for more than three seconds to save the settings and quit MIDI setup mode. The amp is back in normal operating mode.
8.2 MIDI implementation chart / controller list
In addition to controlling all switching functions via sending MIDI program changes, you can also change the parameters of every single editing function of the amp in real time via sending MIDI control changes. The following chart shows the editable functions and the corresponding controller numbers:
| Controller number | Function |
| 1 Modulation Intensity | |
| 4 Delay Time, 128 steps, 51 ms to 1360 ms | |
| 7 | V o l u m |
| 9 Mute On-Off. On status remains active until the amp channel is changed,the volume parameter is changed or the amp is re-started. | |
| 12 Mod-FX Type | |
| 20 Gain (soft) | |
| 21 Bass | |
| 22 Mid | |
| 23 Treble | |
| 24 Resonance | |
| 25 Presence | |
| 26 Modulation Speed (always for the active modulation effect) | |
| 27 Delay Feedback | |
| 28 Delay Volume | |
| 29 Reverb Volume | |
| 30 Power Soak Switching (5 sectors) | |
| 31 Channel Switching (4 sectors) | |
| 52 Mod-FX On-Off | |
| 53 Delay On-Off | |
| 54 Reverb On-Off | |
| 55 FX-Loop On-Off | |
| 56 Gain (hard) | |
| 57 Volume (hard) | |
| 63 Noise Gate On-Off | |
| 64 Boost On-Off | |
8.3 Factory Reset
A factory reset is a seldom-needed feature. Nonetheless, please read these instructions carefully to ensure you don't accidentally delete your presets. You can perform a factory reset by doing the following:
Press "Store" and "FX Access" simultaneously while powering the amp up by using the Power/On switch. Both buttons will flash three times to indicate the successful factory reset.
Caution: Please note that this procedure is a last-resort option. It will reset all settings, including the 128 MIDI-switchable presets (chapter 2) and the basic MIDI configuration (chapter 8.1).
9 AES (EU version only)


Referred to Commission Regulation (EC) No. 1275/2008, electrical and electronic devices need to be equipped with an energy saving mechanism which auto switches the device off after not being used for a certain
period of time. On your GrandMeister 36, this mechanism is called AES. It can be activated and deactivated with the mini switch right next to the speaker jack.
Factory default is AES on; the mini switch is in the left position. In this mode, the amp will automatically be switched off after a phase of silence of about 90 minutes. The phase of silence is reset and starts again, as soon as the amp(receives an input signal (e.g. by playing a note). A quite gentle) signal is enough to trigger the re-start of the 90 minutes phase of silence until the amp will switch off automatically. After automatically being shut down by AES, the amp can be switched back on by flipping the Power/ On switch off and then on again.
Moving the mini switch to the right will deactivate AES, so it will not shut down the amp.
10 Technical Data
GrandMeister 36 Head
| Preamp tubes 3x 12AX7 | |
| Power tubes 4x EL84 | |
| Power output 36 watts | |
| Max. power consumption 200 watts | |
| Mains voltage tolerance range +/-10% | |
| Ambient operating temperature range 0° to +35°C | |
| Mains fuse, 100 volts 250 V / T 2 A L | |
| Mains fuse, 120 volts 250 V / T 1.6 A L | |
| Mains fuse, 220-230 volts 250 V / T 800 mA L | |
| Mains fuse, 240 volts 250 V / T 800 mA L | |
| Input jack 6.3 mm (1/4"), unbalanced, 1 MOhms | |
| Sensitivity (Clean, without Boost, all Pots in center position, Master in max. position) | -23 dbV |
| Max. Input (without Boost) 0 dbV | |
| Return jack 6.3 mm (1/4"), unbalanced, 25 kOhms | |
| Sensitivity (Clean, without Boost, all Pots in center position) | 0 dbV |
| Sensitivity (Clean, without Boost, all Pots in center position, Master in max. position) | -10 dbV |
| Max. Input | +14 dbV |
| Send jack | 6.3 mm (1/4"), unbalanced, 220 Ohms |
| Nominal Level (Clean, without Boost, all Pots in center position) | -10 dbV |
| Max. Level +10 dbV | |
| Line Out jack | 6.3 mm (1/4"), unbalanced, 220 Ohms |
| Nominal Level (Clean, without Boost, all Pots in center position) | -10 dbV |
| Max. Level | +10 dbV |
| Red Box Out | XLR, balanced, 1360 Ohm |
| Nominal Level | -10 dbV (at 3 watts output) |
| Max. Level | +3 dbV |
| MIDI In | 7-pin, 20 V DC phantom power (150mA), 5-pin compatible |
| MIDI Out/Thru | 5-pin |
| Dimensions | 446 x 171 x 152 mm |
| Weight | 7,7 kg / 17 lbs. |
$$ R = (1 6 \times 1 6) / (1 6 + 1 6) $$
$$ \mathrm{R} = 2 5 6 / 3 2 = 8 \Omega $$
7 Tube Safety Control (TSC™)

| MIDI-Kanal | Clean | Crunch | Lead | Ultra |
| 1 = | ○ | ○ | ○ | ○ |
| 2 = | ○ | ○ | ○ | ● |
| 3 = | ○ | ○ | ● | ○ |
| 4 = | ○ | ○ | ● | ● |
| 5 = | ○ | ● | ○ | ○ |
| 6 = | ○ | ● | ○ | ● |
| 7 = | ○ | ● | ● | ○ |
| 8 = | ○ | ● | ● | ● |
| 9 = | ● | ○ | ○ | ○ |
| 10 = | ● | ○ | ○ | ● |
| 11 = | ● | ○ | ● | ○ |
| 12 = | ● | ○ | ● | ● |
| 13 = | ● | ● | ○ | ○ |
| 14 = | ● | ● | ○ | ● |
| 15 = | ● | ● | ● | ○ |
| 16 = | ● | ● | ● | ● |
$$ R = (1 6 \times 1 6) / (1 6 + 1 6) $$
$$ R = 2 5 6 / 3 2 = 8 \Omega $$
7 Tube Safety Control (TSC™)
TSC ^TM
| Canal MIDI | Clean | Crunch | Lead | Ultra |
| 1 = | ○ | ○ | ○ | ○ |
| 2 = | ○ | ○ | ○ | ● |
| 3 = | ○ | ○ | ● | ○ |
| 4 = | ○ | ○ | ● | ● |
| 5 = | ○ | ● | ○ | ○ |
| 6 = | ○ | ● | ○ | ● |
| 7 = | ○ | ● | ● | ○ |
| 8 = | ○ | ● | ● | ● |
| 9 = | ● | ○ | ○ | ○ |
| 10 = | ● | ○ | ○ | ● |
| 11 = | ● | ○ | ● | ○ |
| 12 = | ● | ○ | ● | ● |
| 13 = | ● | ● | ○ | ○ |
| 14 = | ● | ● | ○ | ● |
| 15 = | ● | ● | ● | ○ |
| 16 = | ● | ● | ● | ● |
I tasti-preset A B C D
$$ R = (1 6 \times 1 6) / (1 6 + 1 6) $$
$$ R = 2 5 6 / 3 2 = 8 \Omega $$
7 Tube Safety Control (TSC™)

| Canale MIDI | Clean Crunch | Lead Ultra | ||
| 1 = | ○ | ○ | ○ | ○ |
| 2 = | ○ | ○ | ○ | ● |
| 3 = | ○ | ○ | ● | ○ |
| 4 = | ○ | ○ | ● | ● |
| 5 = | ○ | ● | ○ | ○ |
| 6 = | ○ | ● | ○ | ● |
| 7 = | ○ | ● | ● | ○ |
| 8 = | ○ | ● | ● | ● |
| 9 = | ● | ○ | ○ | ○ |
| 10 = | ● | ○ | ○ | ● |
| 11 = | ● | ○ | ● | ○ |
| 12 = | ● | ○ | ● | ● |
| 13 = | ● | ● | ○ | ○ |
| 14 = | ● | ● | ○ | ● |
| 15 = | ● | ● | ● | ○ |
| 16 = | ● | ● | ● | ● |
$$ R = (1 6 \times 1 6) / (1 6 + 1 6) $$
$$ \mathrm{R} = 2 5 6 / 3 2 = 8 \Omega $$
7 Tube Safety Control (TSC™)

| Canal MIDI Clean Crunch Lead Ultra | ||||
| 1 = | ○ | ○ | ○ | ○ |
| 2 = | ○ | ○ | ○ | ● |
| 3 = | ○ | ○ | ● | ○ |
| 4 = | ○ | ○ | ● | ● |
| 5 = | ○ | ● | ○ | ○ |
| 6 = | ○ | ● | ○ | ● |
| 7 = | ○ | ● | ● | ○ |
| 8 = | ○ | ● | ● | ● |
| 9 = | ● | ○ | ○ | ○ |
| 10 = | ● | ○ | ○ | ● |
| 11 = | ● | ○ | ● | ○ |
| 12 = | ● | ○ | ● | ● |
| 13 = | ● | ● | ○ | ○ |
| 14 = | ● | ● | ○ | ● |
| 15 = | ● | ● | ● | ○ |
| 16 = | ● | ● | ● | ● |
プリセットA、B、C、Dボタン
| MIDIチャンネル | Clean | Crunch | Lead | Ultra | |
| 1 = | ○ | ○ | ○ | ||
| 2 = | ○ | ○ | ● | ||
| 3 = | ○ | ○ | ○ | ||
| 4 = | ○ | ○ | ● | ||
| 5 = | ○ | ● | ○ | ||
| 6 = | ○ | ● | ● | ||
| 7 = | ○ | ● | ○ | ||
| 8 = | ○ | ● | ● | ||
| 9 = | ● | ○ | ○ | ||
| 10 = | ● | ○ | ● | ||
| 11 = | ● | ○ | ○ | ||
| 12 = | ● | ○ | ● | ||
| 13 = | ● | ● | ○ | ||
| 14 = | ● | ● | ● | ||
| 15 = | ● | ● | ○ | ||
| 16 = | ● | ● | ● |
Magdeburger Str.8, 66606 St. Wendel, Germany

预先设置按钮 A、B、C、D
$$ R = 2 5 6: 3 2 = 8 \Omega $$
2 Power Soak :
3 Tube Safety Control (TSC™):
7 Tube Safety Control (TSC™):

| MIDI 通道 Clean Crunch Lead | Ultra | |||
| 1 = | ○ | ○ | ○ | ○ |
| 2 = | ○ | ○ | ○ | ● |
| 3 = | ○ | ○ | ● | ○ |
| 4 = | ○ | ○ | ● | ● |
| 5 = | ○ | ● | ○ | ○ |
| 6 = | ○ | ● | ○ | ● |
| 7 = | ○ | ● | ● | ○ |
| 8 = | ○ | ● | ● | ● |
| 9 = | ● | ○ | ○ | ○ |
| 10 = | ● | ○ | ○ | ● |
| 11 = | ● | ○ | ● | ○ |
| 12 = | ● | ○ | ● | ● |
| 13 = | ● | ● | ○ | ○ |
| 14 = | ● | ● | ○ | ● |
| 15 = | ● | ● | ● | ○ |
| 16 = | ● | ● | ● | ● |
International Inquiries:
Fax: +49 - 68 51 - 905 200
hkinternational@hughes-and-kettner.com
www.hughes-and-kettner.com

facebook.com/hughesandkettner
Copyright 03/2014 by Music & Sales GmbH.
Subject to change without notice.