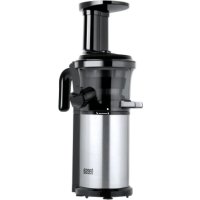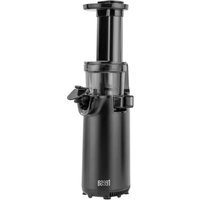
TSA3233 - Juicer Teesa - Free user manual and instructions
Find the device manual for free TSA3233 Teesa in PDF.


| Product type | Juice extractor |
| Brand | Teesa |
| Model | TSA3233 |
| Dimensions | 98 x 120 x 360 mm |
| Weight | 1.8 kg |
| Power supply | 220 - 240 V, 50/60 Hz |
| Power | 130 W |
| Rotation speed | 60 - 80 rpm |
| Max continuous working time | 20 minutes |
| Extraction rate | < 80% |
| Technology | Single auger |
| Reverse function | Yes |
| Construction | Vertical |
| Auger material | Tritan |
| Housing material | ABS |
| Strainer material | Stainless steel + Tritan |
| Noise level | < 65 dB |
| Pulp container capacity | 450 ml |
| Juice container capacity | 600 ml |
| Safety | Overheating and incorrect assembly protection |
| BPA free | Yes |
| Power cord length | 0.9 m |
| Included accessories | Juicer, 2 containers, brush, pusher |
| Maintenance | Some parts dishwasher safe; preliminary cleaning possible |
Frequently Asked Questions - TSA3233 Teesa
User questions about TSA3233 Teesa
0 question about this device. Answer the ones you know or ask your own.
Ask a new question about this device
Download the instructions for your Juicer in PDF format for free! Find your manual TSA3233 - Teesa and take your electronic device back in hand. On this page are published all the documents necessary for the use of your device. TSA3233 by Teesa.
USER MANUAL TSA3233 Teesa
text_image
Technical diagram of a blender with numbered parts for identification and assembly reference.| CS DE | EN FR GR | |||
| Víko s otvorem produkty | nÉinfüllstutzen mit Deckel | Food chute lid | Couvercle avec orifice pour les produits | Kapáki trofoðoaiaç trophíç |
| Šnek | Schnecke | Auger | La vis sans fin | Trupávi |
| Miska | Schüssel | Bowl | Bol | Mnoλ |
| Motorová jednotka | Motoreinheit | Motor unit | Unité moteur | Maváda kivntříra |
| Přepínač napájení | Netzschalter | Power switch | Interrupteur d'alimentation | Diakóntης trofoðoaiaç |
| Nádoba na šťávu | Saftbehälter | Juice container | Collecteur de jus | Δοχείο χυμού |
| Nádoba na dřeň | Zellstoffbehälter | Pulp container | Collecteur de pulpe | Δοχείο πολτού |
| Posunovać | Stopfer | Pusher | Poussoir | Ωθητής |
| Kartáček na čistění | Reinigungsbürste | Cleaning brush | Brosse de nettoyage | Βούρτσα καθαρισμού |
| Otvor na odpad | Zellstoffauswurf | Pulp ejector | Orifice pour la pulpe | Εκχυτήρας πολτού |
| Otvor na šťávu | Saftauslauf | Juice ejector | Orifice pour le jus | Εκχυτήρας χυμού |
| Blokáda proti kapání | Auslaufschutzdeckel | Anti-spill cap | Fermeture d'égouttement | Κάλυμμα κατά των διαρροών |
| HU NL | PL RO SK | |||
| Fedél termék betöltő nyílással | Deksel met opening voor producten | Pokrywa z otworem na produkty | Capac dispozitiv pentru pulpa de fructe | Veko s plnlaclm otvorom |
| Cśiga Schroef Śilmak | Melc pentru stoarcere | Slimák | ||
| Keverótál Kom Misa | Vas de stoarcere | Misa | ||
| Motoregység Motoreenheid | Jednostka sllnikowa | Unitate motor | Motorová jednotka | |
| Tápellátás kapcsoló | AAN/UIT schakelaar | Przełącznik zasilania | Comutator alimentare | Prepinać napájania |
| Gyümölcslé tároló | Sapcontainer Pojemnik na sok Colector suc Nádoba na šťavu | |||
| Gyümölcpép tároló | Pulpcontainer Pojemnik na miąższ | Colector pulpă | Nádoba na dužinu | |
| Tömőkar Stamper | Popychacz Tub de alimentare Vtláčadlo | |||
| Tisztító kefe | Reinigingsborstel | Szczoteczka do czyszczenia | Perie de curățare | Čistlaca kefka |
| Gyümölcpép nyilás | Opening voor pulp | Otwór na miąższ | Deversor pulpă | Otvor na dužin |
| Gyümölcslé nyilás | Opening voor sap | Otwór na sok | Deversor suc | Otvor na šťavu |
| Csepegés gátló | Druppelstop | Blokada kapania | Capac anti-deversare | Krytka proti kvapkaniu |
text_image
Diagram illustrating the step-by-step assembly of a blender with labeled parts and directional arrows indicating process flow.CS
POUŽÍVÁNÍ ODŠTAVŇOVAČE
natural_image
Technical line drawing of a three-step industrial device with internal components and assembly steps (no text or symbols)CS
ČISTĚNÍ A SKLADOVÁNÍ
text_image
Diagram illustrating the step-by-step assembly of a blender with labeled parts and directional arrows indicating process flow.BENUTZEN DES LANGSAMEN ENTSAFTERS
text_image
Technical diagram showing three stages of a mechanical device with labeled components and directional arrows indicating assembly or operation.DE
Thank you for purchasing TEESA appliance. Read this instruction manual and keep it for future reference. Producer does not take responsibility for damages caused by inappropriate handling and use of the product.
SAFETY INSTRUCTIONS
In order to reduce the risk of injuries or damages, follow basic safety precautions applied when using any electrical device, including the following:
- Read the entire instruction manual before you start installation and assembly and keep it for future reference. Keep the manual for future reference.
- Before connecting the device to power supply socket, make sure the voltage indicated on the device corresponds to the voltage in the power supply socket.
- Connect the power cord to the power supply socket. If you have to use an electrical extension lead, it must be earthed.
- This appliance MUST NOT be supplied through an external switching device, such as a timer, or connected to a circuit that is regularly switched and off by the utility, as it may lead to damage of the device
- Place the device onflat,stable surface. Do not use this appliance on a tilted or unstable table.
- Clean this device in accordance to instructions listed in "Cleaning and Maintenance" section
- Clean the parts and attachments that come in contact with food before first use!
- ALWAYS turn off the device and disconnect it from the mains supply:
- if it's not operating correctly
- if there's an uncommon voice when using
• before disassembling the device
- before cleaning
- when not in use
-
Check the strainer every time you want to use the appliance.
-
When you disconnect the power cord of the device, grasp and pull the plug, not the cord/cable.
-
Keep the device out of the reach of children. Do not leave children unsupervised with the product.
-
This appliance may be used by children who are above 8 years old and by persons with reduced physical, sensory or mental capabilities, or lack of experience and knowledge, if they are supervised and guided by a person who is responsible for their safety in a cautious manner for all the safety precautions being understood and followed. Children should be supervised to ensure that they do not play with the appliance. Children should not perform cleaning and servicing of the device unsupervised.
13.Fixed power cable may only be replaced in an authorized service point.
- Keep the device and its cord/cable away from heat, water, moisture, sharp edges and any other factor which may damage the appliance or its cord.
15.Do not place the appliance in water or any liquid; nor handle/use it with wet or moist hands.
16.Do not use the product for purposes different from displayed in this operating manual.
17.Do not leave the appliance unattended when it's working.
- Producer of this product is not responsible for damages caused by inappropriate handling and using of the device.
19.ALWAYS disconnect the product form the power mains when it is not in use.
20.DO NOT use this device if the cord or the plug is damaged, or the appliance is broken.
-
Do not attempt to repair this device yourself. Only authorized and qualified personnel may repair this device. Never disassemble the motor body of the device. Do not use unauthorized accessories.
-
Use only authorized accessories.
23.Device for indoor use only. Appliance for indoor and household use only. The device is
constructed to process normal household quantities. This device is not intended for professional use.
24.Do not move the appliance while it is operating.
-
This appliance is suitable exclusively for food preparation. Do not place inside the device anything that is not food.
-
Don't place hot ingredients inside the appliance. Hot ingredients should be cooled down prior to processing in the appliance (max. ingredient temperature is 50^ ).
-
Always securely clamp in place all parts before the motor is turned on. n. Do not disassemble while the device is operating.
28.Do not disassemble while the device is operating. Make sure the motor stops completel before disassembling.
-
All parts apart from motor unit are suitable for dishwasher cleaning.
-
If the device get stuck, try reverse gear or turn off and unplug the appliance before removing the ingredients blocking the stuck part of the device.
-
Always wait until the moving parts stop running after switching off, and then unplug the appliance before opening, disassembling or removing the parts.
32.Do not use for more than 20 minutes at a time, allow motor to cool before reusing. N device has an overheat protection, which means that when the motor's temperature increases significantly, the Julcer will stop operation for safety reasons. Let it cool down before using it again.
- Never touch any moving parts when the device is connected to power supply. Never stop or use your fingers or any object (for example a spatula) into to the device while the appliance is running - use only pusher provided.
34.Do not reinsert the extracted pulp into the juicer.
35.Do not process fruit dunked in wine, honey, sugar etc.
-
This product is strictly prohibited for non-load operation or overload operation.
-
IMPORTANT: In order to ensure children's safety, please keep all packaging (plastic bags, boxes, etc.) out of their reach. Caution! Do not allow small children to play with there is a danger of suffocation!
BEFORE FIRST USE
Wash the parts that will have contact with food before first use. Rinse thoroughly with warm water and allow to air dry Never submerge the device motor unit In water or any other liquid
ASSEMBLY
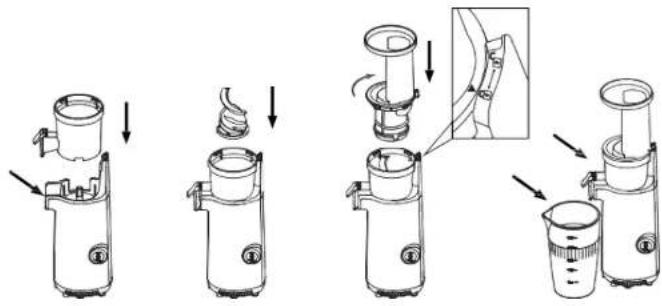
- Assemble the bowl to the motor unit. Make sure to properly assemble the bowl.
- Assemble the strainer to the bowl
- Place the food chute lid onto the bowl.
- Pay attention to the markings on the bowl and the food chute lid: align the spot of lid with the open padlock on the bowl. Twist clockwise to lock.
Note: If the device has not been correctly assembled or the food chute lid is not completely locked onto the bowl, the device will not start.
text_image
Diagram illustrating the step-by-step assembly of a blender with labeled parts and a magnified view showing the process.- Once all parts have been properly assembled, connect the device to power supply socket.
- Place the juice and pulp containers under the ejectors.
- Food preparation:
- Cut the ingredients before processing. Tough and fibrous products like celery should be chopped fine, across the fibers.
- When extracting ingredients like carrots or beets, extract with a combination of other fruits and vegetables with more water content to increase the juice yield.
- Do not process frozen fruits. Thaw them completely before juicing!
- Large quantities of ingredients put into the feeding tube at once can cause the juicer to stop.
- Before placing food in the food chute, make sure all products have been thoroughly washed/peeled if necessary.
- Make sure to remove any hard seeds or pits, such as cherry or plum pits, as it will not process in the juicer and can damage the auger
- Be careful when processing fine seed fruits – the seeds may easily jam the strainer.
- Insert the ingredients one piece at a time.
- Do not put dried or hard ingredients like whole grains, beans, fruits with hard seeds or ice into the juicer. These may damage the juicer parts.
- Some fruits have too much starch to juice, e.g. avocado, banana, mango, fig, papaya, dragon fruit, strawberries, grape.
- Do not use ingredients containing excessive amounts of vegetable oil or animal fat, as the device may get damaged.
-
Do not reinsert the extracted pulp into the juicer.
-
The slow juicer has 3 settings:
-
-
- starts the motor for juicing
• 0 - stops operation
- starts the motor for juicing
-
-
R - auger moves in the opposite direction. (Note: press and hold the switch to R position for reverse rotations)
-
When placing any food in the slow juicer, the auger will automatically pull in the food, and begin juicing immediately. DO NOT push, force, or over stuff the unit. The pusher provided
with the slow juicer is only to use when food obstructs the inside of the food chute.
- If the Ingredients become jammed in the screw and the food chute does not open, tu the power switch to OFF (0). Then press and hold the R (reverse) button until the ingredients become dislodged. Repeat REVERSE - OFF - FORWARD as often as needed to achieve the desired result. Należy powtarzać tę sekwencję aż do uzyskania pożądanego wyniku.
- Under the bowl, there is a silicone pad that prevents juice from exiting through the p ejector When using the slow juicer, make sure the silicone pad is firmly in place. When cleaning the bowl, make sure to slide the pad out and run water through the pulp eje to remove excess food.
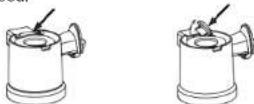
Turn off the slow juicer when juicing is complete. Do not run the device without any food in the unit as this could damage the motor.
TIPS
- It is advised to consume the juice as soon as possible after processing. Stored juice will subject to oxidation.
- IMPORTANT: juice clarity varies depending on toughness of processed ingredient. The softer the ingredient the lower the clarity.
- Close the anti spill cap and extract two or more different products. The juice will mix the juice bowl, so you could open the cap and get an already mixed juice straight to glass.
- If the ingredients are not fresh, the juice yield will be lower due to the decreased water content in the ingredients.
DISASSEMBLING
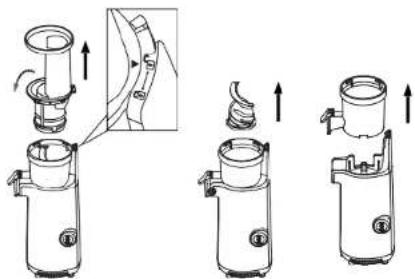
- Rotate the food chute lid counterclockwise when and pull it upward.
• Pull out the auger from juicing bowl.
• Take out juicing bowl.
text_image
Technical diagram showing three stages of a mechanical device with directional arrows indicating assembly or operation.CLEANING AND MAINTENANCE
- In case of tougher stains or when the parts have discolored by food (carrots, oranges etc.), soak them in mild soapy water and rub them gently with kitchen towel dipped in cooking oil and then clean in the usual way.
- Do not use water with a temperature above 40^ for washing.
- The slow juicer has a self pre-cleaning process when switching between different types of juices. To clean, simply place juice container under the juice ejector and pour water though the food chute while the unit is on. This will rinse out most of the remaining residue from your last juicing. When the water from the slow juicer begins to run clear, that is an indication the unit is clean and ready to make a new juice recipe.
NOTE: This process is not an alternative to a complete cleaning of each disassembled part.
TROUBLESHOOTING
| Problem | Possible solution |
| Device does not work | Check power cord and power source.Check that all parts have been assembled correctly. |
| Machine jams, clogs or stops operating | Check food chute is clear and is not blocked. Make sure the food pieces are small enough.Check that hard seeds have been removed before juicing and are not stuck in the machine.Turn machine off, and switch to reverse for 3 seconds.Disassemble upper section and clear remaining pulp. |
| Squeaking noise / bowl is shaking when juicing | The device may make a squeaking noise when:Processing hard Ingredients (like carrots).This is normal.Work without products. Do not run the juicer without any food! |
| Leaking from underneath the bowl | Be sure the silicone pad is tightly in place.The device has been overloaded (do not put too much ingredients into the bowl at once). |
| Too much pulp coming out | Cut food into smaller pieces, especially fibrous foods to avoid fibers scrapping around the auger. Insert food at a slower pace and allow all food pulp to eject the before adding more. |
| Cannot open juicing bowl cover | Please confirm whether there is too n residue in the juicing bowl. If yes, ple press the „ON" button to remove the residue.Please confirm whether there are hard objects as core stuck in the juicing bIf yes, press the „Reverse" button to ret the hard objects to the feeding tube. |
SPECIFICATION
MAIN FEATURES
Keeps the nutritions, avoids oxidations
Strainer with small holes
Dishwasher safe parts
Easy to clean
Easy to assemble
Anti-drip juice outlet
Anti-slip feet
BPA free: Yes
Power: 130 W
Power supply: 220-240 V; 50/60 Hz
Power cord length: 0,9 m
Dimensions: 98 x 120 x 360 mm
Weight: 1,8 kg
Set includes: slow juicer, 2 containers, brush, pusher
USED MATERIALS
Auger: Tritan
Housing: ABS
Strainer: Stainless steel + Tritan
TECHNICAL DATA
Speed: 60 - 80 rpm
Motor: DC
Extraction rate: < 80%
Construction: Single auger
Reverse rotations: Yes
Design: Vertical
Noise level: < 65 dB
Continuous working time: =< 20 minutes
Pulp container capacity: 450 ml
Juice container capacity: 600 ml
Protections: Against overheat and incorrect
assembly
Correct Disposal of This Product
(Waste Electrical & Electronic Equipment)
-
(Applicable in the European Union and other European countries with separate collection systems) This marking shown on the product or its literature, indicates that it should not be disposed with other household wastes at the end of its working life. To prevent possible harm to the environment or human health from uncontrolled waste disposal, please separate this from other types of wastes and recycle it responsibly to promote the sustainable reuse of material resources. Household users should contact either the retailer where they purchased this product, or their local government office, for details of where and how they can take this item for environmentally safe recycling. Business users should contact their supplier and check the terms and conditions of the purchase contract. This product should not be mixed with other commercial wastes for disposal.
Made in China for Lechpol Electronics Leszek Sp.k., ul. Garwolińska 1, 08-400 Miętnec.