
Batium 25.24X - Battery charger GYS - Free user manual and instructions
Find the device manual for free Batium 25.24X GYS in PDF.


| Product type | Automatic battery charger |
| Brand | GYS |
| Model | Batium 25.24X |
| Supply voltage | 230 V AC |
| Output voltages | 6 V, 12 V, 24 V |
| Max charge current | 25 A |
| Selectable currents | 7 A, 15 A, 25 A |
| Battery capacity (auto mode) | 35 to 350 Ah |
| Battery capacity (traction mode) | 35 to 180 Ah |
| Battery types | Lead, liquid or gel electrolyte, open lead traction |
| Charging functions | IUoU curve (auto), IUIo (traction), SOS Recovery, forced charge, voltmeter |
| Display | 3-digit digital screen + LED indicators |
| Protections | Short circuit, reverse polarity, anti-spark, overheating |
| Warranty | 2 years (parts and labor) |
| Maintenance | Dust with blower, check connections; do not use solvents |
| Place of use | Indoors only |
| Compliance | CE, EAC, CMIM |
| Supplied accessories | Battery clamps, power cable |
| Internal fuse | Yes, replacement by after-sales service |
Frequently Asked Questions - Batium 25.24X GYS
User questions about Batium 25.24X GYS
0 question about this device. Answer the ones you know or ask your own.
Ask a new question about this device
Download the instructions for your Battery charger in PDF format for free! Find your manual Batium 25.24X - GYS and take your electronic device back in hand. On this page are published all the documents necessary for the use of your device. Batium 25.24X by GYS.
USER MANUAL Batium 25.24X GYS
FR 2 / 3-8 / 45-48
EN 2 / 9-14 / 45-48
DE 2 / 15-20 / 45-48
ES 2 / 21-26 / 45-48
RU 2 / 27-32 / 45-48
NL 2 / 33-38 / 45-48
IT 2 / 39-44 / 45-48
BATIUM
Electronic Battery Charger 25/24X
INTERFACE DU PRODUIT / PRODUCT INTERFACE / BEDIENFELD / INTERFAZ DEL PRODUCTO / ИНТЕРФЕЙС АППАРАТА / BEDIENING VAN HET APPARAAT / INTERFACCIA DEL PRODOTTO
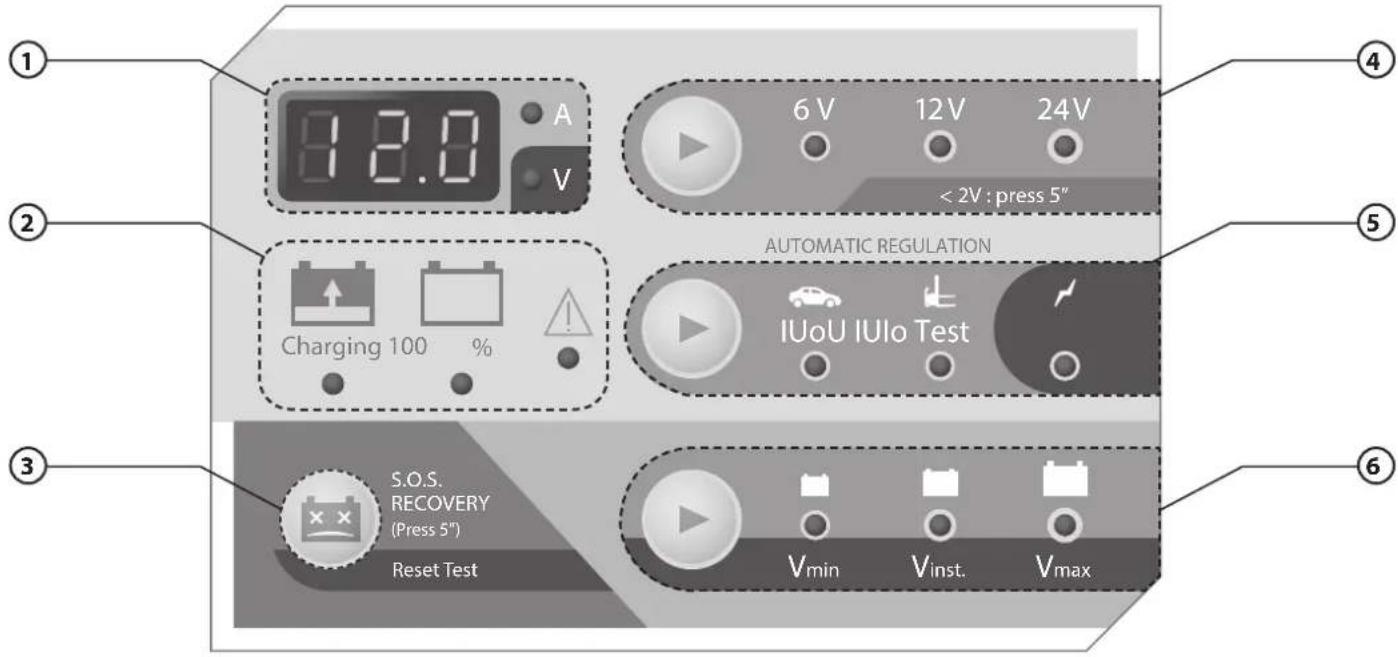
| 1 | Afficheur / Display / Display / Indicador / Индикатор / Display / Schermo |
| 2 | Voyant de charge + voyant défaut / Charge light + fault light / Kontrollleuchten: Ladevorgang und Fehler / Indicador de carga + indicador fallo / Индикатор зарядки + индикатор сбоя / Lampjes laden + lampje storing / Spia di carica + spia errore |
| 3 | Sélecteur SOS Recovery / SOS Recovery key / Auswahl SOS Recovery-Funktion / Tecla SOS Recovery / Выбор SOS Recovery / Keuzeschakelaar SOS Recovery / Selettore SOS Recovery. |
| 4 | Sélecteur de tension batterie + charge forcée 5 sec / Select the battery voltage + forced charge 5 sec / Auswahl der Batteriespannung; erzwungene Ladung (5 sec drücken) / Seleccionador de tensión de batería + carga forzada 5 sec / Переключатель напряжения АКБ + принудительная зарядка 5 сек. / Keuze accus- panning + geforceerd laden 5 seconden / Selettore di tensione della batteria + carica forzata 5 sec |
| 5 | Sélecteur courbe de charge / Charging curve selector / Auswahl der Ladekennlinie / Seleccionador de curva de carga / Переключатель кривой зарядки / Keuze laadcurve / Selettore della curva di carica |
| 6 | Sélecteur d'allure de charge / Cigarette lighter selector / Auswahl der Ladegeschwindigkeit / Seleccionador de velocidad de carga / Переключатель скорости зарядки / Keuze laadsnelheid / Selettore di andamento della carica |
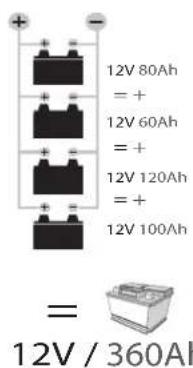
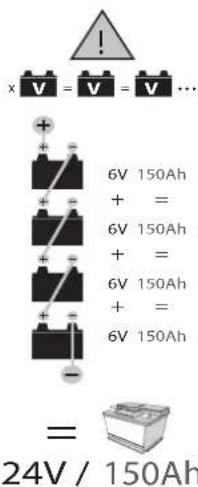
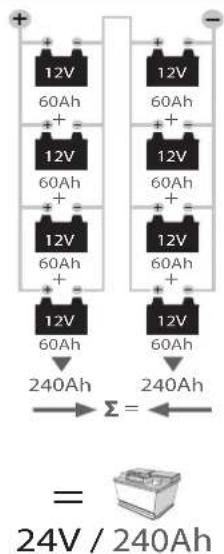
COMBINAISON BATTERIES / BATTERIES COMBINATION / ZUSAMMENSCHALTUNG VON BATTERIEN / COMBINACIONES BATERÍAS / АККУМУЛЯТОРНАЯ КОМБИНАЦИЯ / MOGELIJKE ACCU COMBINATIES / COMBINAZIONE BATTERIE
Parallel
Serial
INSTRUCTIONS DE SÉCURITÉ

ANOMALIES, CAUSES, REMEDES
This manual includes guidelines on the operation of your device and the precautions to follow for your own safety.
Ensure it is read carefully before first use and keep it handy for future reference. This device should only be used for charging within the limits indicated on the device and in the manual. The safety instructions must be followed. In case of improper or unsafe use, the manufacturer cannot be held responsible

Device suitable for indoor use only. Do not expose to rain or excessive moisture.
This device may be used by children from age 8 and by persons with reduced physical, sensory or mental capabilities or lack of experience and knowledge, provided that they are under supervision or have been told how to use the device safely and are aware of the potential risks. Children must not use the device as a plaything. Cleaning and servicing tasks may not be carried out by children unless they are supervised.
Do not use for charging non-rechargeable batteries
Do not operate the device with a damaged power supply cord or a damaged mains plug.
Never charge a frozen or damaged battery.
Do not cover the device
Do not place the device near a fire or subject it to heat or to longterm temperatures exceeding 50°C
Do not obstruct the cooling vents. Refer to the installation section before operating the machine.
The automatic mode of operation and usage restrictions are explained below in these operating instructions.

Risk of explosion and fire!
A battery being charged can emit explosive gas.
- During the charge, the battery must be placed in a well ventilated area.

- Avoid flames and sparks. Do not smoke.

- Protect the electrical contacts of the battery against short-circuiting.



Acid projection hazard!
- Wear safety goggles and protective gloves
- If your eyes or skin come into contact with battery acid, rinse the affected part of the body with plenty of water and seek immediate medical assistance.

Connection / disconnection:
- Disconnect the power supply before connecting/disconnecting the device to/from the battery.
- The terminal of the battery that is not connected to the car frame must be connected first. The other connection must be made on the car frame, far from the battery and the fuel line. The battery charger must be connected to the power supply network.
- After the starting/charging process, disconnect the booster/battery charger from the power supply network and remove the connector from the car frame and then the connector from the battery, in this order.
Connection:

- This device must be connected to an earthed power supply
- Connection to the mains must be made according to the national installation regulations.
- This hardware is compliant with the IEC 61000-3-12.
• This equipment complies with the IEC 61000-3-11.
Maintenance:

- If the power supply cable is damaged, it must only be replaced by a cable specified or supplied by the manufacturer or its after-sales service.
• Service should be performed by a qualified person - Warning! Always remove the power plug from the wall socket before carrying out any work on the device.
- If the internal fuse is blown, it must be replaced by the manufacturer, its after-sales service or an equally qualified person.
- Regularly take off the cover and remove dust with an air gun. Take the opportunity to have a qualified person check the electrical connections with an insulated tool.
- Under no circumstances should solvents or other aggressive cleaning agents be used.
- Clean the device's surfaces with a soft, dry cloth.
Regulations

- The device complies with European Directive.
- The certificate of compliance is available on our website.
• EAC conformity mark (Eurasian Economic Commission)
• Equipment in conformity with Moroccan standards. - The declaration C° (CMIM) of conformity is available on our website (see cover page).

Disposal:
- This product should be disposed of at an appropriate recycling facility. Do not dispose of in domestic waste.
GENERAL DESCRIPTION
BATIUM 25/24X is designed to charge 6V, 12V and 24V batteries. It has 3 functions:
- The IUoU charging curve allows to charge lead acid batteries, with liquid or gel electrolyte, from light vehicles to heavy goods vehicles with a battery capacity of 35 Ah to 350 Ah.
- The IUIo charging curve allows to charge open lead traction batteries (e.g. for forklifts, floor sweepers...), from 35 Ah to 180 Ah capacity.
- The «Voltage measurement» function is used to measure the voltage of the alternator, starter or battery.
CONNECTION AND GENERAL OPERATION (p.2)

Precaution: Check the electrolyte level.
Fill it up if necessary, before starting the charge.
| 1 | Connect the clamps: red clamp on the + terminal of the battery and black clamp on the - terminal. Connect the charger:- Directly to the battery, using the charger's standard clamps.- or the device's specific connector, by replacing the clamps with a dedicated connector while observing the correct polarity and current . |
| 2 | Connect the charger to the 230 V mains. |
| 3 | Set the switch to «ON» (back of the product). The display and all the keypad LEDs light up. |
| 4 | Choose the charging curve (5):- IUoU for automotive batteries,- IUIo for traction batteries. |
| 5 | Select the battery voltage 6 V /12 V / 24 V (4) according to the recommendation features on the battery or according to the battery coupling (series or parallel cf p.2).Risk of explosion or acid splash in case of incorrect voltage selection (24V for a 12V battery). |
| 6 | Choose the charging rate, according to the capacity (Ah) written on the battery (6).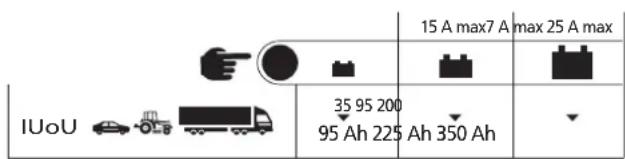 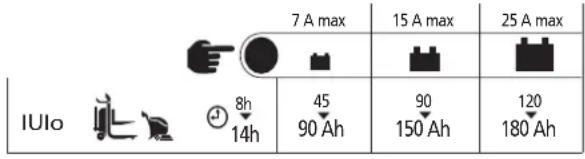 |
| 7 | Before starting the load, the Batium performs the following operations:a - It analyses the battery: voltage/battery status.... Batium indicates any anomaly (see table «Anomalies, causes, remedies»).b - It recovers the battery when the voltage is too low. |
8 The Batium starts the charge. It indicates the battery charge status (2), and by alternating 3s on the display (1): the voltage in V and the current in A.
| Light on. Display | |||
| IUoU function | Battery charging & suggested SOS start as the charger has detected a sulphated battery/low voltage |  Charging flashing light Charging flashing light | SOS flashing until the battery can be recovered (max 1h50) |
| Main charge. |  Charging fixed Charging fixed | Alternating display of current (Ampere) and voltage (Volt). | |
| Charge supplement (equalisation) | Charging +  fixed + 100% flashing light fixed + 100% flashing light | Alternating display of current (Ampere) and voltage (Volt). Duration 2 hours. | |
| Floating charge |  100% fixed 100% fixed |  fixed. fixed. | |
| IUIo function | Battery charging. Analyses and recovers the battery in case of sulphation/low voltage (if possible) |  Charging flashing light Charging flashing light | Alternating display of current (Ampere) and voltage (Volt). |
| Main charge. |  Charging fixed Charging fixed | ||
| Charge supplement (equalisation) | Charging +  fixed + 100% flashing light fixed + 100% flashing light | ||
| Charge finished |  100% fixed 100% fixed | [2ZST] fixed. | |
Specific to the IUoU function
Once the charge is finished, the charger is in floating mode F is can remain connected to the battery and compensates for the self-discharge.
Specifics of the IUIo function
When charging is complete, the BATIUM is switched off and indicates . If the battery stays connected after the end of charge, every 72h, the Batium restarts a charge cycle to compensate for the self-discharge of the battery.
Specific to «SOS Recovery» mode
- Once the battery is desulfated, the Batium resumes a regular IUoU charge.
- If it fails to retrieve the battery, it indicates on the display BAF HS.
9 When the battery is charged (green light 100%), set the switch to « OFF ».
10 Disconnect the power supply cable.
11 Disconnect the clamps / or the battery connector.
Nb: During a power failure, the Batium memorises the last configuration (except in "SOS Recovery" mode), and takes over the last parameters.
«SOS RECOVERY» FUNCTION» (p.2)
This function is for automotive batteries (IUoU) that have been deeply discharged. It allows a stronger desulphation of the battery.
To activate this feature, follow these steps:
- Always disconnect the battery from the vehicle (△ DANGER OF OVERVOLTAGE).
- Connect the clamps of the Batium to the battery.
-
Connect the Batium to the mains then position the switch to «ON».
-
Select the IUoU charging curve (5).
- Activate the function by pressing the «SOS recovery» button (3) for 5 seconds until S05 appears on the display.
- Select voltage (4) and charging rate (6).
- Do not touch anything for a few seconds, the process begins (process identical to §8).
FORCED LOAD FUNCTION (p.2)
If the battery is heavily discharged (voltage below 2 V), the Batium will not start and this is indicated by signals:
• The display shows no BRT,
- The «battery voltage», «capacity» and «charging curve» indicators are lit.
- Press for 5 seconds, the display shows 505 no 84h
- Force the charge by pressing (4), the display shows For cEd.
- The cycle starts.
The charger detects a battery with a voltage higher than 0.5 V ( ± 0.3 V) and starts a battery recovery cycle.
VOLTMETER FUNCTION (TEST MODE) (p.2)
This function allows the BATIUM to measure the voltage of the vehicle's battery, alternator or starter motor. Proceed as follows:
- Switch the Batium 25.24X on.
- Select «test» mode (5).
- Connect the charger to the battery.
- Select the desired voltage (6):
| Vmin | To get the minimum battery voltage. |
| Vinst. | To get the battery voltage in real time. |
| Vmax | To get the maximum battery voltage. |
- Press «Reset test» (3) to reset the voltages.
- Press (5) to exit the «Test» mode.
PROTECTIONS
The Batium 25-24X is protected against short-circuits and polarity reversals. It has an anti-spark feature which prevents sparks whilst connecting the device to the battery. The device will not deliver current if there is no battery detected (no voltage in the clamps).
TROUBLESHOOTING
TROUBLESHOOTING CAUSES SOLUTIONS
| 1 | The unit will beep,led onthe display flashes: | The Batium has detected a polarity reversal to the clamps. | Connect the red clamp to the positive terminal (+) and the black clamp to the negative terminal (-) of the battery. |
| 2 | By positioning the interrupter to « ON », no indicator switches on. | The charger has detected an abnormal mains power supply voltage. | Wait 10 seconds. If nothing is displayed, try another power socket. |
| 3 | During charging,the display shows: | The machine is overheating. Use the charger in a well-ventilated room and try again a few minutes later. | |
| 4 | The display showsno BAtt | The Batium does not detect a battery. The clamps are incorrectly connected. | Make sure that the clamps are properly connected. Carry out the connection again. |
| The Batium does not detect a battery. | Clean the contacts or start in force mode. | ||
| 5 | Display flashes+the voltage indicator remains on+a new voltage indicator flashes | The Batium detects a voltage error and suggests another selection (vol-tage indicator flashes). | Select the proper voltage at least 10 seconds after the first press. If the voltage is not rectified within a minute, the Batium starts the charge automatically using the suggested voltage (flashing indicator). |
| 6 | The display shows by flashing. | The battery is short-circuited or non recoverable. | Change the battery. |
| A consumer hasremained unin- tentionally connected to the battery during charging. (e.g : lights) | Switch off the consumer and continue the charge. | ||
| The charger is used as a power supply to compensate for the use of power consumers that are dragging the battery's energy. | Charger behaves normally but incorrect use.The indicator that signals the end of the charge cannot switch on. | ||
| The charging speed is not adapted to the battery. | Set at the higher load rate. If you are already on the 25 A speed, use a more powerful charger. | ||
WARRANTY
The warranty covers faulty workmanship for 2 years from the date of purchase (parts and labour).
The warranty does not cover:
- Transit damage.
- Normal wear of parts (eg. : cables, clamps, etc..).
- Damages due to misuse (power supply error, dropping of equipment, disassembling).
- Environment related failures (pollution, rust, dust).
In case of failure, return the unit to your distributor together with:
- The proof of purchase (receipt etc ...)
- A description of the fault reported
FUNCTIE GEFORCEERD LADEN (p.2)







- BATIUM
- ELECTRONIC BATTERY CHARGER 25/24X
- INSTRUCTIONS DE SÉCURITÉ
- ANOMALIES, CAUSES, REMEDES
- RISK OF EXPLOSION AND FIRE
- ACID PROJECTION HAZARD
- CONNECTION / DISCONNECTION
- CONNECTION
- MAINTENANCE
- REGULATIONS
- DISPOSAL
- GENERAL DESCRIPTION
- CONNECTION AND GENERAL OPERATION (P.2)
- PRECAUTION: CHECK THE ELECTROLYTE LEVEL
- SPECIFIC TO THE IUOU FUNCTION
- SPECIFICS OF THE IUIO FUNCTION
- SPECIFIC TO «SOS RECOVERY» MODE
- SOS RECOVERY» FUNCTION» (P.2)
- FORCED LOAD FUNCTION (P.2)
- VOLTMETER FUNCTION (TEST MODE) (P.2)
- PROTECTIONS
- TROUBLESHOOTING
- WARRANTY
- FUNCTIE GEFORCEERD LADEN (P.2)
Brand : GYS
Model : Batium 25.24X
Category : Battery charger