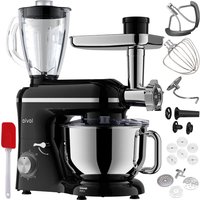
ChefAssistant Plus LVSTM02 - Food Processor Lovio - Free user manual and instructions
Find the device manual for free ChefAssistant Plus LVSTM02 Lovio in PDF.


User questions about ChefAssistant Plus LVSTM02 Lovio
0 question about this device. Answer the ones you know or ask your own.
Ask a new question about this device
Download the instructions for your Food Processor in PDF format for free! Find your manual ChefAssistant Plus LVSTM02 - Lovio and take your electronic device back in hand. On this page are published all the documents necessary for the use of your device. ChefAssistant Plus LVSTM02 by Lovio.
USER MANUAL ChefAssistant Plus LVSTM02 Lovio
natural_image
Line drawing of a kitchen mixer with a blender and tray (no text or symbols)Model: LVSTM02P
text_image
Technical diagram of a kitchen mixer with labeled parts including stand, fan, and bowl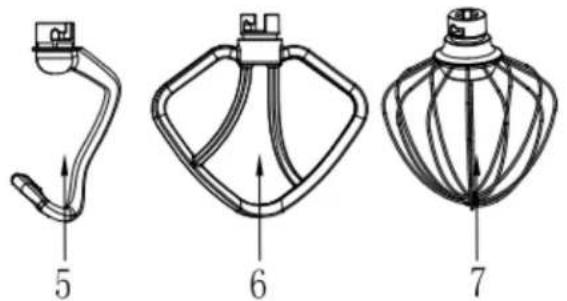
natural_image
Three technical line drawings of a mechanical device with labeled parts (no text or symbols present)natural_image
Technical line drawing of two mechanical components (no text or symbols)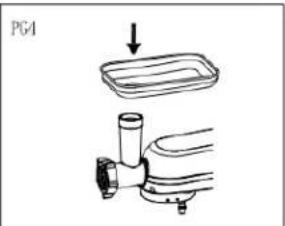
text_image
PG4natural_image
Symbol of a trash bin with no text or numbers presentPlanetary mixer ChefAssistant Plus Operating instructions
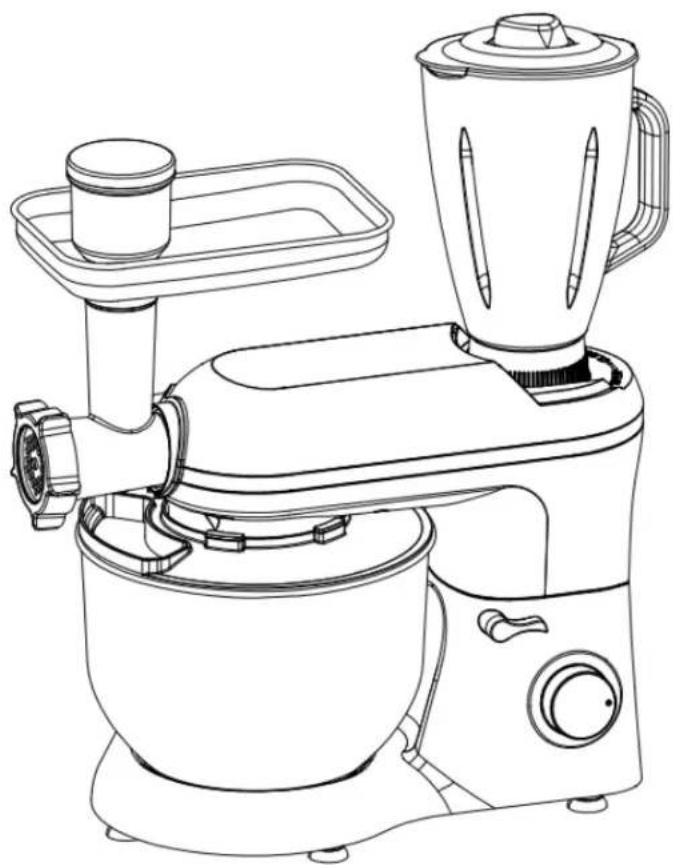
natural_image
Line drawing of a kitchen mixer with a blender and tray (no text or symbols)Model: LVSTM02P
Rated voltage: 220-240V 50-60Hz
Frequency tensions: 50-60Hz
Rated power: 1900W
Retain this manual for future reference and pass it on to future users with the device
SECURITY ISSUES
WARNING! Risk of electric shock
Before starting up the appliance, read the operating instructions carefully and keep them together with the guarantee, receipt. If possible, keep the outer packaging as well. If you pass this appliance on to others, please pass on the operating instructions as well.
The device is intended for private use only and for its intended purpose. This device is not suitable for commercial use. Do not use it outdoors. Keep it away from heat sources, direct sunlight, moisture (never immerse it in any liquid) and sharp edges. Do not use the device with wet hands. If the device is wet or damp, unplug it immediately.
- When cleaning or putting away the appliance, switch off the appliance and always pull the plug from the socket (pull the plug, not the cable) if the appliance is not in use, and unplug the supplied accessories.
- Do not leave the appliance unattended. If you leave the work area, always switch off the appliance or unplug it from the socket (by pulling the plug, not the cord).
- Regularly check the device and cable for damage.
- Do not use the device if it is damaged. Do not attempt to repair the appliance on your own. If the power cord is damaged, it must be replaced by the manufacturer, its service representative or similarly qualified persons in order to avoid danger.
- Use only original spare parts and accessories.
- Pay particular attention to: "Special safety instructions for this device"!
Children and the elderly
- To ensure the safety of children, please keep all packaging (plastic bags, boxes, polystyrene, etc.) out of their reach.
Caution: do not allow small children to play with the film as there is a danger of suffocation!
- When using the blender and chopper, the appliance must not be used by children. The appliance and its cord should be out of the reach of children.
- When using the beater and whisk, the appliance may be used by children aged 8 years and older if they are supervised or have been instructed in the safe use of the appliance and understand the risks involved. User cleaning and maintenance must not be carried out by children unless they are 8 years and older and are supervised.
● This device is not a toy. Children should not play with the device. - The equipment may be used by persons with limited physical, sensory or mental abilities or persons without experience and knowledge if they are supervised or have been instructed in the safe use of the equipment and understand the risks involved.
Special safety instructions for this equipment
- Always disconnect the unit from the power supply if it is left unattended and before assembly, disassembly or cleaning.
- Switch the appliance off and disconnect it from the power supply before changing accessories or approaching parts that move during use. Do not misuse the device.
- CAUTION: To avoid the danger of accidentally resetting the thermal switch, the unit must not be powered by an external switching device, such as a timer, or connected to a circuit that is regularly switched on and off by utilities.
- Do not tamper with any safety switches.
- Do not insert any objects into the rotating hooks while the machine is running.
- Place the unit on a smooth, flat and stable working surface.
- Do not insert the appliance plug into a power socket without all the necessary accessories installed.
NOTE: Make sure the blender is switched off before removing it from the base.
Description of the device
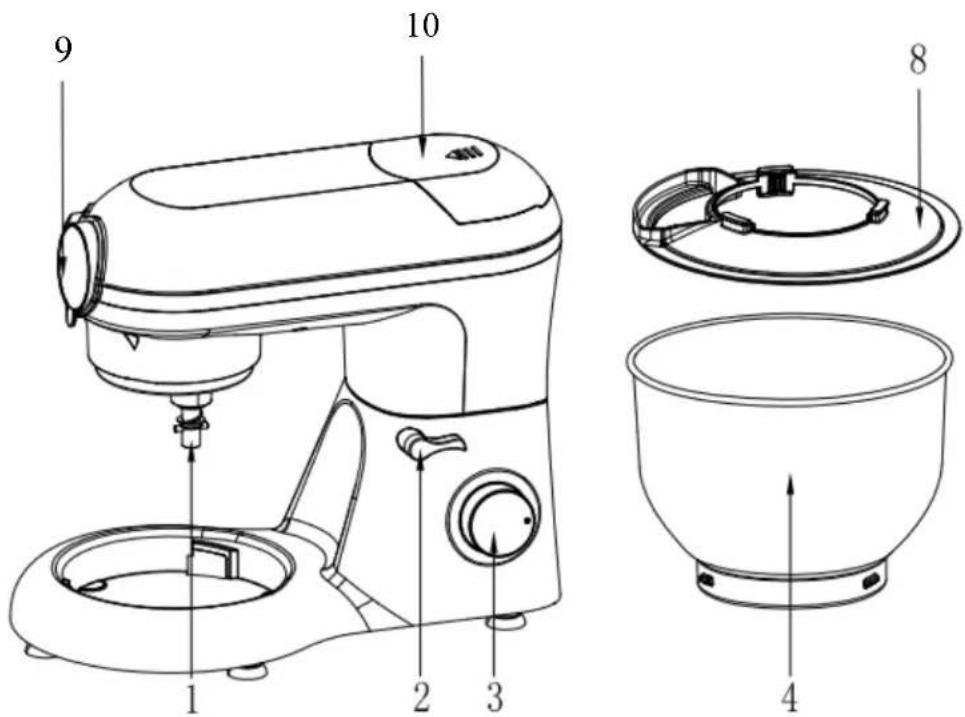
text_image
9 10 8 1 2 3 4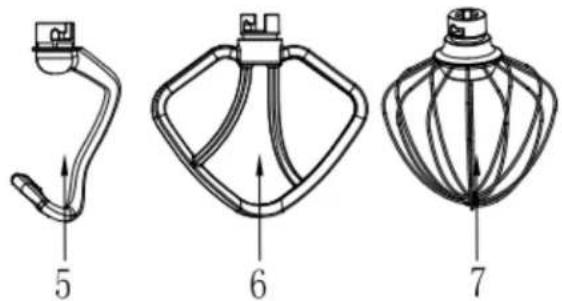
text_image
5 6 7Main components and accessories:
| 1 | Main drive | 6 | Mixing tip |
| 2 | Arm lifting lever 7 Whisk attachment | ||
| 3 | Speed control knob 8 Bowl lid | ||
| 4 | Bowl 9 Front drive cover | ||
| 5 | Dough hook | 10 | Blender drive cover |
How to use the device
-
wash accessories with clean water, rinse and dry before use.
-
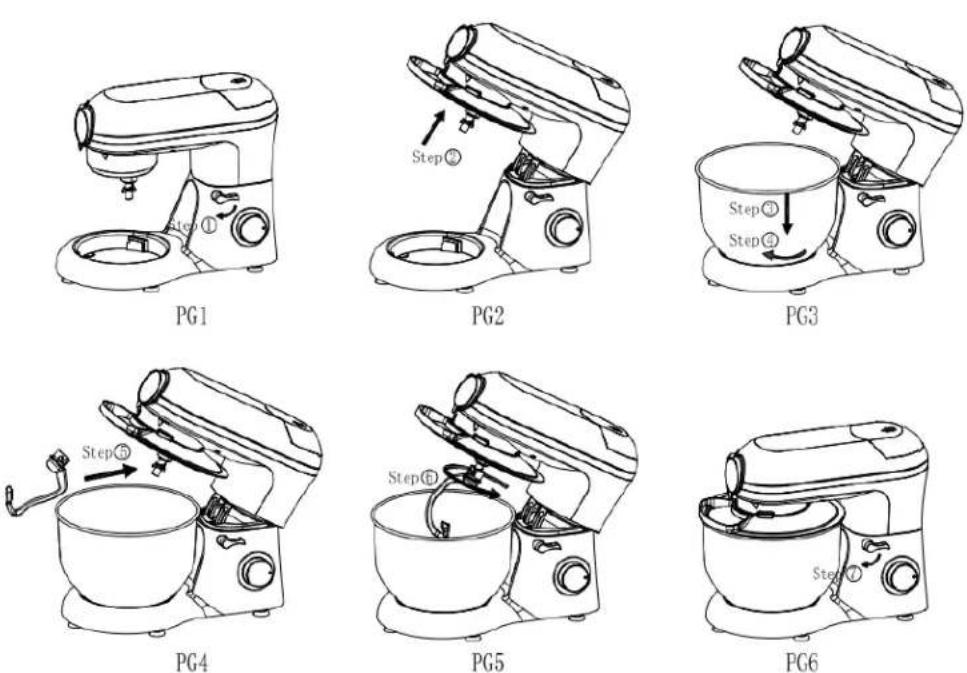
place the unit on a flat, clean and dry surface, turn the arm lift levers(2) the arm will lift automatically. (PG1 and PG2).
-
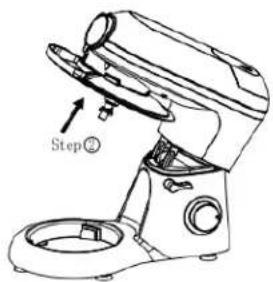
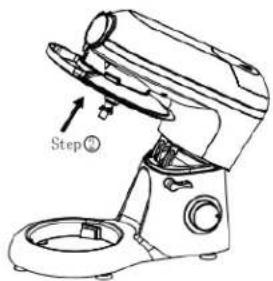
fit the bowl cover to the tip as per step 2 in illustration PG2.
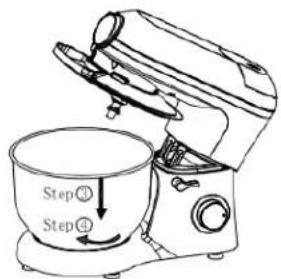
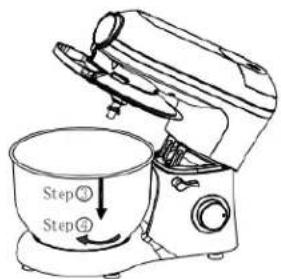
4 Fit the mixing bowl(4) onto the machine (step 3 in illustration PG3), turn the bowl clockwise until you feel resistance and the bowl is locked - step 4 in illustration PG3.
- the quantity of dough should not be exceeded - the total weight can be up to 1.5 kg:
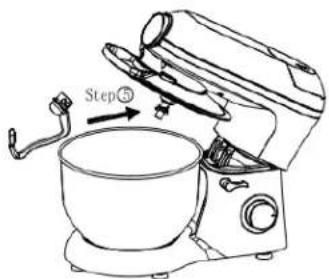
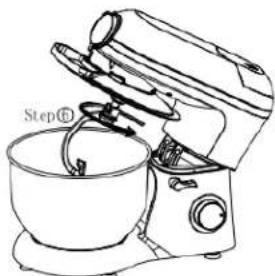
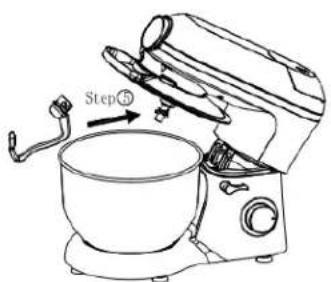
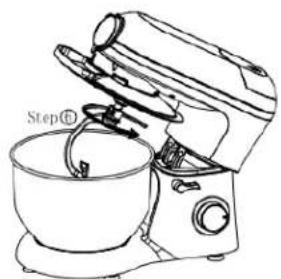
6 Fit the required accessories (5)/(6)/(7) (only one of the three can be used at a time) onto the main drive(1) as per step 5 in illustration PG4, push the fitted end upwards and then turn a quarter turn anticlockwise to the locking position - step 6 in illustration PG5.
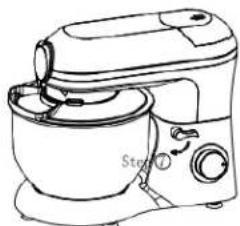
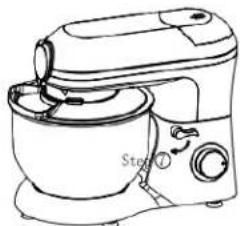
7 Press the arm lift lever(2), gently push the arm down so that it returns to the horizontal position and you will hear the arm lift lever lock(2) click. (When the arm is raised the unit will not turn on.)
-
then plug in the plug and switch on the power switch.
-
Set the speed dial(3) to the desired speed to start blending.
When the dough has reached the desired consistency, turn the speed control knob(3) back to speed 0 to finish.
-
when finished: turn the arm lifting lever(2) clockwise, raise the arm, turn the mixing bowl counterclockwise, remove the bowl, then remove the dough.
-
turn off the unit and disconnect it from the power supply before changing accessories or approaching moving parts during use.
Guidance
Level adjustment and suggested accessories for no more than 1.5 kg of mixture
| Accessory | Photo | Speed | Time (min) | Quantity of ingredients | Instructions |
| Dough hook | 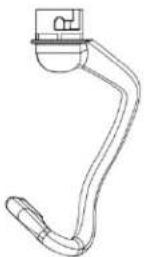 | 1-3 | 3-5 | 1000g flour+538g water | Speed level 1 for 30 sec, speed level 2 for 30 sec, then speed level 3, before 2-4 minutes until the desired consistency is achieved. |
| Mixing tip | 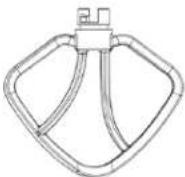 | 2-4 | 3-10 | 660g flour+840g water | Speed level 2 for 20 sec, then speed level 4 for at least 2 min 40 sec. |
| Tip for whisking | 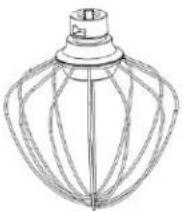 | 5-6 | 3-10 | 3 egg whites | Use speed level 5 or 6 for at least 3 minutes. |
Blending cup
The blender is used for chopping and blending ingredients. Using this device, you will prepare, among other things, soups, sauces, smoothies, children's meals, drinks, desserts, purees, etc.
Precautions:
1) Do not plug the blender into an outlet before using it. Ensure that the blender is installed correctly and that the lid is securely in place before starting.
2) When finished, disconnect and remove the blender attachments from the machine.
3) Do not add ingredients above 80^ C to the cup.
4) Do not add more than 1.5L of liquid to the cup.
5) Always fit the lid on the cup correctly.
6) Do not remove the mixing container or lid during operation.
7) Do not exceed 3 minutes of continuous blender operation.
How to fit the blender cup:
1) Remove the blender drive cover(10) by sliding it towards the back of the appliance as shown in illustration PG1.
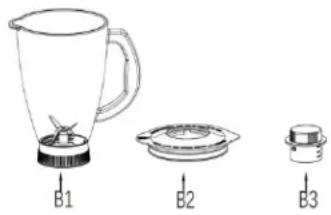
2) Fit and press the cup lid(B2) onto the blender cup(B1) as shown in illustration PG2.
3) Place and twist the bleder lid cap(B3) into the blender lid(B2) as shown in illustration PG3.
4) When everything is ready, place the kelich on the bledner drive and turn it clockwise until you feel the lock, as shown in PG4.
5) Use the speed control knob(3) to start the blading. The recommended speeds for the blading function are level 3-6.
| B1: Blender cup | B2: Cup lid | B3: Cup lid cap |
 |  | |
Note:
To add ingredients during operation, you can do so by removing the cap of the cup lid. Take extra care when working with the appliance. When finished, disconnect the accessory from the appliance and wash and dry the cup.
Disassembly after use:
1) Set the speed control knob to level 0.
2) Turn the cup counterclockwise.
3) Remove the lid of the cup(B2) and pour the contents into the target vessel.
4) Wash by hand using lukewarm water and a mild detergent, then leave to dry.
The cup and accessories are not dishwasher safe.
Meat mincer
How to assemble and use a meat grinder:
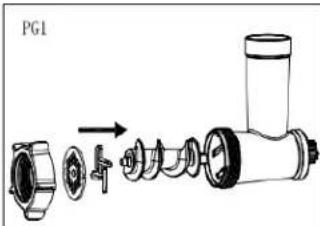
1) To install the meat grinder accessory, first install the meat grinder blade(M6) on the screw head of the meat grinder(M4), attach the selected sieve(M7) (coarse hole, medium hole or fine hole), take care to align the groove between the meat grinder sieve(M7) and the meat grinder(M3) and tighten the lock nut(M5) on the meat grinder(M3) as shown in illustration PG1.
2) Remove the front drive cover(9) as shown in illustration PG2.
3) Press the locking button on the front of the unit, hold the meat mincer(M3), insert it into the front drive opening and rotate counterclockwise to the locked position as shown in illustration PG3.
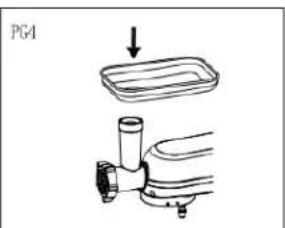
4) Fit the tray(M2) onto the razor body(M3) as shown in illustration PG4.
5) Cut the meat into strips, the width of the strips should not be greater than the opening of the tray(M2).
6) Plug the power cord into an outlet, then set the speed dial(3) to the desired gear (recommended speed is level 1-3), place the meat on the tray(M2) and insert it into the feed opening. Use the pusher(M1) to slowly push the meat into the feed opening of the meat grinder. Do not insert your
fingers into the meat mincer's feed opening!
7) After use, switch the speed control knob(3) to level 0 and pull the plug.
| M1 | Pusher | 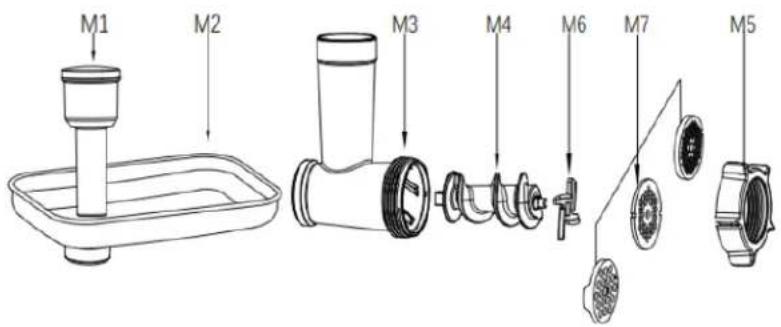 |
| M2 | Tray | |
| M3 | Shaver body | |
| M4 | Shaver bolt | |
| M5 | Cap security | |
| M6 | Blade | |
| M7 | Sieve |
text_image
PG1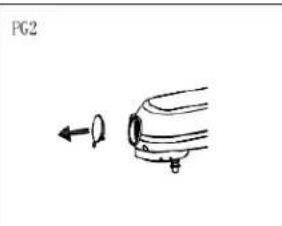
text_image
PG2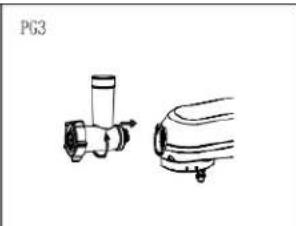
natural_image
Technical line drawing of two mechanical components (no text or symbols)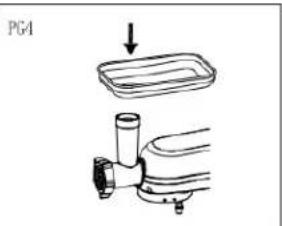
text_image
PGASausage making attachment
How to install and use the sausage making attachment:
1) Fit the attachment bracket(S1) onto the screw head(M4) and place the sausage attachment(S2) onto it. Tighten the lock nut(M5) on the meat grinder(M3). Mount the whole thing in the front drive hole according to the method of mounting the meat grinder.
2) Prepare the minced meat stuffing and add the appropriate toppings. Mix evenly and marinate for the specified time.
3) Prepare the casing to be filled with the stuffing. Soak the casing in water before use and tie a knot at the end. Pull the casing over the beginning of the sausage attachment(S2).
4) Insert the power cord plug into the power outlet. Then set the speed knob(3) to the desired gear (recommended speed 3-6). Insert the stuffing into the opening of the tray(M2). The casing will gradually start to fill with stuffing. Pull gently on the end of the casing to reach the desired thickness of the sausage. When you get close to the end of the casing, stop filling and tie a knot at the end of the sausage.
5) The sausage should be hung up and dried for the specified time, after which it should be subjected to the heat treatment of your choice.
| M1 | Pusher | 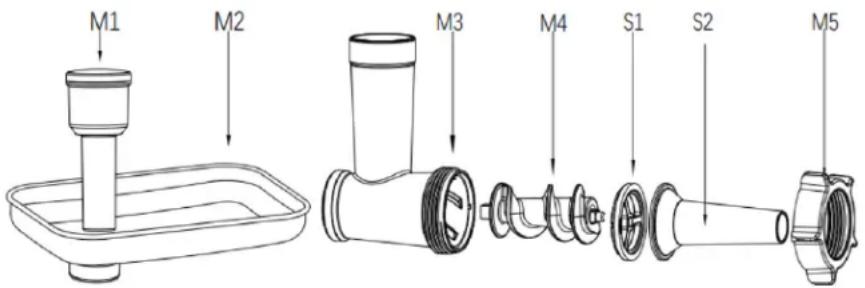 |
| M2 | Tray | |
| M3 | Shaver body | |
| M4 | Shaver bolt | |
| M5 | Locking nut | |
| S1 | Attachment bracket | |
| S2 | Sausage starter |
Cookie attachment (Optional accessory to be purchased separately) How to install and use the cookie maker attachment:
1) First place the attachment bracket(S1) on the screw head(M4), place the dough forming attachment(C1) in the locknut(M5), tighten the locknut(M5) on the machine body(M3). Then insert the cake attachment(C2) into the slot of the dough forming cap(C1).
2) Adjust the shape of the cakes to be made by moving the attachment(C2).
3) Insert the power cord plug into the socket, then set the speed dial to the desired gear (recommended speed levels are 3-6).
4) Cut the dough into strips, insert the dough through the hole in the tray(M2).
5) When the dough sticks to the inside wall of the machine body, you can gently push it with the pusher(M1).
6) When the correct amount of dough has come out of the mould(C2), set the speed control knob to 0 and move the mould(C2) so that a section of dough is cut off and a cake is formed.
| M1 Pusher | 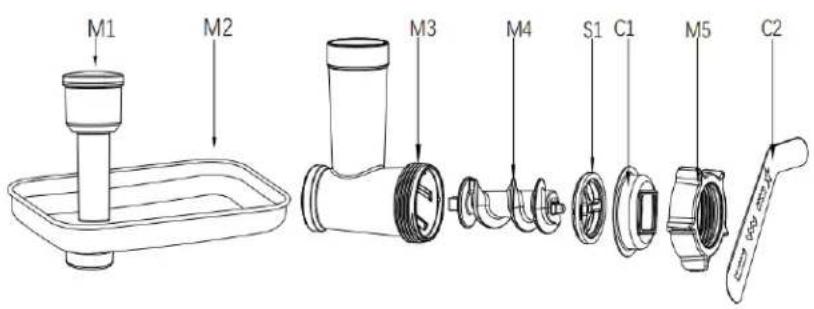 | |
| M2 Tray | ||
| M3 | Shaver body | |
| M4 | Shaver bolt | |
| M5 | Locking nut | |
| S1 Attachment bracket | ||
| C1 | Dough shaper | |
| C2 Biscuit attachment | ||
Pasta starter
How to install and use the pasta making attachment
1) Install one of the pasta caps(P1) on the screw head(M4), tighten the lock nut(M5) on the machine body(M3).
2) Insert the power cord plug into the socket, then set the speed dial(3) to the desired gear (recommended speed levels are 3-6).
3) The kneaded dough should be cut into strips and then placed one by one into the feed opening of the machine.
4) When the dough sticks to the inside wall of the machine body, you can gently push it with the pusher(M1).
| M1 | Pusher | 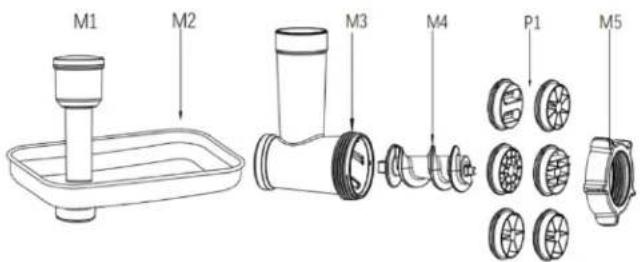 |
| M2 | Tray | |
| M3 | Shaver body | |
| M4 | Shaver bolt | |
| M5 | Locking nut | |
| P1 | Pasta cutter |
Vegetable shredding attachment (Optional accessory to be purchased separately)
How to install and use the shredding attachment:
1) Remove the front drive cover(9).
2) Insert the blade of your choice (small hole blade(V3), thick hole blade(V4), slicing blade (V5) into the inside of vegetable slicing housing V2. As shown in illustration PG1 and PG2.
3) Press the locking button on the front of the unit, connect the vegetable slicing housing connector (V2) to the front drive section, turn counterclockwise and lock. As shown in illustration PG3.
4) Place a container under the outlet of the housing. Shredded vegetables will fall into it.
5) Cut potatoes or other vegetables into pieces, the size suitable for the opening in the vegetable cutter.
6) Insert the power cord plug into the socket, then set the speed control knob(3) to the desired gear (recommended speed levels are 3-5).
7) Insert the vegetable into the opening of the attachment and press gently with pusher VI. As shown in illustration PG4.
8) After use, set the speed dial(3) to 0 and disconnect the power plug.
| V1 | Pusher | 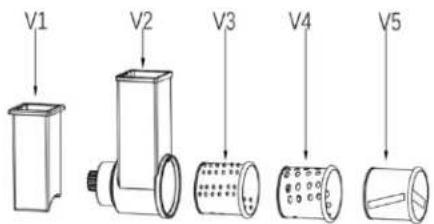 |
| V2 | Attachment housing | |
| V3 | $mall bore blade | |
| V4 | Large bore blade | |
| V5 | Slicing blade |
PG1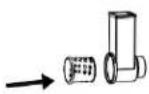 | PG2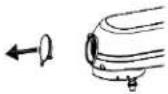 | PG3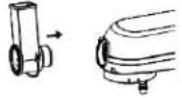 | PG4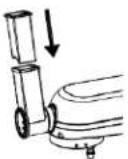 |
Steel pasta attachment (Optional accessory to be purchased separately) How to mount and use the pasta attachment;
| Attachment | Function | Level speeds | Width pasta |
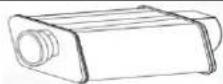 | Rolling cakes | 2-6 | Up to 140mm |
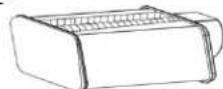 | Pasta Fettucine | 2-6 6.5mm | |
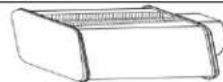 | Pasta Spaghetti | 2-6 2mm |
| Pull in direction of arrow and turn to adjust | Setting table rolls | Suggested use |
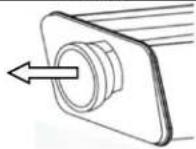 | 1-2 | Kneading and sprinkling of dough |
| 3-4 Egg noodles | ||
| 4-5 | Pasta Spaghetti,Fettuccine,Lasagna | |
| 6-7 | Thin Fettuccine, Tortellini, Linguini | |
BEFORE FIRST USE
To avoid damage, do not wash or immerse the cap in water or other liquid. Do not wash in the dishwasher. Note: These attachments are for preparing pasta dough only. Do not cut or knead anything other than pasta to avoid damaging the attachment.
INSTALLATION AND USE
1) Remove the front drive cover(9) and select the required cap.
2) Step 1: Install the selected attachment into the front drive of the unit. Step 2: Turn counterclockwise to fit into the front drive. As shown in illustration PG1.
3) Step 3: Once the cap is fully attached, pull out the pasta roller adjustment knob, illustration PG2.
4) Step 4: Turn the dial to set the width of pasta you need, as shown in illustration PG3.
5) Step 5: Plug the machine into an outlet and set the machine speed to 2-6. Place the flattened dough on the rollers and knead. Illustration PG4.
6) When finished using, set the speed dial(3) to 0 and disconnect the power cord.

text_image
PG1 Step ① Step ② PG2 Step ③ PG3 Step ④ PG4 Step ⑤NOTES:
1 Cut the dough into pieces that fit in a pasta roller.
2 Pull out the pasta roller adjustment knob and turn it to setting 1. Release the knob, making sure the pin on the pasta roller housing enters the hole on the back of the adjustment knob, allowing the knob to fit into the roller housing.
- place the flattened dough on the rollers and knead. Fold the dough in half and roll again. Repeat this process until the dough is smooth and elastic and covers the width of the rolling pin. Lightly dust the pasta with flour as you roll and cut to keep it dry and separate.
4 Pass the dough through the rollers to further flatten the dough sheet. Charge the roller to setting 3 and repeat the rolling process. Continue increasing the roller setting until the desired thickness is reached. Do not fold the dough at this stage.
-
To make pasta, replace the pasta roller with the slicer of your choice. Pass the flattened sheets of dough through the slicer. To determine the correct thickness for each type of pasta, see "Table of roller settings".
-
you can dust the dough with dry flour if the pasta is too soft and cracked.
Examples of recipes
Please bear in mind that the following recipes are only suggestions and do not guarantee the desired result. The end result may vary depending on many factors. We recommend experimenting and adjusting ingredients and methods to achieve the best possible result.
Linseed rolls
Ingredients: 30g linseed, 40g water, 250g bread flour, 3g dry yeast, 30g sugar, 3g salt, 10g milk powder, 20g butter, 1 egg.
- Soak 30 g of linseed in 40 g of water for 12 hours.
- Put 250g bread flour, 3g dry yeast, 30g sugar, 3g salt, 10g powdered milk, 150g water into a bowl, knead the ingredients using a dough hook on levels 1-3, then add 20g butter and continue kneading until the dough is smooth. Then add the soaked flaxseed, and again using the dough hook knead until the dough is well kneaded. Cover with cling film and leave to double in volume in a warm place.
- Once again knead thoroughly, remove from the bowl and divide into six small breads. Once
shaped, cover the rolls and leave to rise at about 38^ C for 1 hour.
- Once risen, brush the surface of the bread with beaten egg. Preheat the oven to 180^ C. Set the top and bottom heaters to 180^ C and bake for 20 minutes, then remove from the oven and set aside to cool.
Homemade pizza
Ingredients: 170 g pizza flour, 100 g water, 1.5 g salt, 15 g white sugar, 2 g yeast.
1 Put 170 g flour, 100 g water, 1.5 g salt, 15 g sugar and 2 g yeast into a bowl. Mix with a dough hook on levels 1-3. Once the dough is kneaded, add the butter and continue kneading until it can be pulled out and forms an elastic ball.
2. leave the dough to rise (until doubled in volume) in a warm place.
3. while the dough is ripening you can prepare your favourite ingredients for the pizza.
4. after it has risen, knead the dough thoroughly once more. Divide the dough in half, roll out half of the dough and let it rest for 5 minutes. Then gently roll out with a rolling pin to the size of the tin and place the rolled out dough in it.
5 Set the heat mode to upper and lower heat, preheat the oven to 200^ C. Gently brush the top of the dough with olive oil, then spread the pizza sauce evenly, skipping the edges. Then add the cheese and your favourite ingredients. Place the pizza tray on the second level of the preheated oven and bake for approx. 20 minutes, until the cheese is melted and the edges of the pizza are browned.
French baguette
Ingredients: 250g high gluten flour, 50g low gluten flour, 150g water, 10g sugar, 3g yeast powder, 1g salt.
- put all ingredients into the bowl, use the dough hook on levels 1-3 and knead the dough.
2 Cover the kneaded dough with cling film and leave to rise (double inert) in a warm place.
3 Once risen, knead thoroughly once more, remove from the bowl and divide into 4 portions. Take a portion of the dough and roll it into an oval shape, then roll from top to bottom. - then cover the rolled out dough with cling film and let it rise (double in volume).
- brush the surface with sesame oil, preheat the oven to 180^ C, place the cake tin on the middle shelf of the oven and bake for 20 minutes.
Lemon cake
Ingredients: 100 g cake flour, 5 eggs, 50 g oil, 80 g sugar, a small amount of lemon juice, 55 g milk.
- separate the 5 egg yolks from the whites, add 20g of sugar to the yolks (leave the whites, you'll need them later), mix with the whisk attachment on level 6 until the sugar has completely dissolved. Add the milk and continue to mix evenly on level 6.
- pour in the oil and continue whisking until smooth.
- add the cake flour sifted through a sieve and mix evenly to a smooth paste and transfer to another bowl.
- add a few drops of lemon juice to the egg whites, add the remaining sugar in 3 batches and beat with a whisking tip on level 5-6 to a stiff froth.
- with 1/3 of the beaten foam, fold it into the egg yolk mixture and mix evenly and very gently with a spatula, pour the mixed mixture into the remaining foam and again mix very gently and evenly.
- grease the surface of the cake tin with oil, then pour in the resulting mixture.
- Preheat the oven to 150^ C, set the top and bottom heat mode and bake for about 50 minutes until beautifully golden.
Resolution of typical faults
| Fault Cause Solution | ||
| The device suddenly stops working during use. | It may happen that the machine has been running for too long or the ambient temperature is too high, causing the machine's motor temperature to be too high; the machine triggers an overheating protection programme - automatic shutdown. | Set the speed control knob to "0", disconnect the power supply, wait for the machine to return to room temperature so that it can be restarted (usually 15-30 minutes are needed, the ambient temperature changes the cooling time). |
| The unit does not respond to the speed control knob. | The appliance plug is not properly inserted from the socket. | Check that the power plug is properly connected to the socket. |
| The arm of the unit is not lowered correctly, the arm lift lever is not locked. | Ensure that the machine arm is lowered correctly and that the arm lift lever is locked. | |
| Excessive noise during operation of the unit. | 1.The machine will run louder in high gear than in low gear.2.The amount of ingredients being mixed is too high, causing the machine to overload.3.Voltage is not stable.4.The operating time is too long. | 1.Select the correct gear for mixing food as recommended in the instructions.2.Reduce the amount of mixed ingredients.3.If the voltage is unstable, wait until the voltage stabilises before using the device.4.If the operating time is too long, stop operation and wait for the unit to cool down. |
| The speed of the device drops or is unstable. | 1.The temperature in the room is low, causing the lubricant in the machine to harden.2.the mixed ingredients are too hard and there are too many of them, which puts too much strain on the machine.3.Voltage is not stable. | 1.Remove the mixing vessel and leave the machine in gear "1" for 5 minutes to soften the grease in the machine and restore speed stability.2.dilute the ingredients or reduce the amount.3.If the voltage is unstable, wait until the voltage stabilises before using the device. |
| The device sways and shakes during operation. | 1.the rubber suction cups in the base of the unit do not adhere properly.2.the appliance is not placed on a smooth and level surface. | 1.Check that the suction cups on the base of the unit fit properly.2.Place the unit on a smooth and flat surface. |
| The appliance arm does not lower when the bowl cover is in place. | Bowl cover incorrectly fitted, bowl not fitted as instructed. | Turn the bowl cover so that it is correctly fitted. Fit the bowl according to the instructions. |
| Pollen, dirt in mixed ingredients | Dirt falls into the dough from the main drive. | Before use, check that the main drive and accessories are dry and that there is no water or dust on the surface. Clean the components with a damp cloth. |
Cleaning and maintenance
NOTE: The mixer and its components are not dishwasher safe. Make sure all parts are dry before using the appliance again after washing.
Discolouration or deformation can occur when exposed to high temperatures.
| Cleaning the housing of the appliance | 1. do not immerse the appliance in water. Do not direct the water jet directly onto the appliance to prevent water from entering the appliance, and to avoid short circuits, electric shock, leaks, rust and other malfunctions.2. do not use cloths that are not well drained.3. do not use detergent/vinegar/salt or other caustic, strongly acidic, strongly alkaline cleaning agents to clean the appliance body. Otherwise you may damage the surface of the appliance.4. Do not use sharp or rough tools such as wire sponges to clean the unit and accessories. Otherwise you will easily damage the surface.5. Use a damp, soft cloth to clean the unit. |
| Cleaning accessories | Do not place aluminium parts in the dishwasher or wash them with caustic, strongly acidic or alkaline cleaning agents. Do not wash accessories in the dishwasher (except for stainless steel parts or surface treated Teflon parts).2. Do not soak for long periods in detergents, seawater, vinegar or other corrosive liquids.3. Use lukewarm water and a mild detergent for cleaning.4. Dry the accessories after cleaning. |
| Special cleaning | 1 The rotating drive can produce a black residue due to the high speed and friction during operation. Clean it immediately with a damp cloth after each use and keep the part dry.2. Watch out for sharp parts. |
| Maintenance and storage | 1. You can use olive oil to apply on the blade's surface, knife plate, and mixing pot to ensure the dry and wet environment to oxidize it.2 Store the device in a dry and shaded place. |
lovio
HOME
SERVICE HOTLINE
tel: +48 22 123 96 60 or e-mail: serwis@manta.com.pl
Monday to Friday, 9 a.m. to 5 p.m.
The manufacturer reserves the right to make changes to the product specifications without prior notice.
CE
Manta S.A. hereby declares that this product complies with the essential requirements and other provisions of the so-called "New Approach" Directives of the European Union.

natural_image
Symbol of a trash bin with crossed lines indicating no waste, and a solid black rectangle below (no text or labels)The device is marked with the symbol of a crossed-out waste container, in accordance with European Directive 2012/19/EU and the Polish Act of 11 September 2015. (Journal of Laws 2015 item 1688) on Waste Electrical and Electronic Equipment (WEEE). Products marked with this symbol should not be disposed of or thrown away with other household waste at the end of their useful life. The user is obliged to dispose of waste electrical and electronic equipment by delivering it to a designated point where such hazardous waste is recycled. The collection of this type of waste in separate locations and the proper recovery process contribute to the protection of natural resources. Proper recycling of waste electrical and electronic equipment has a positive impact on human health and the environment. For information on where and how to dispose of waste electrical and electronic equipment in an environmentally safe manner, the user should contact the relevant local authority, the waste collection point or the point of sale where they purchased the equipment.
Attention!
Product design and technical specifications are subject to change without prior notice. This applies in particular to technical specifications, software, pictures and the user manual. This user manual serves as a general orientation for the operation of the product. The manufacturer and distributor assume no liability for any inaccuracies resulting from errors in the descriptions contained in this user manual.
natural_image
Line drawing of a kitchen mixer with a blender and tray (no text or symbols)Modell: LVSTM02P
natural_image
Technical line drawing of a mechanical component with no visible text or symbols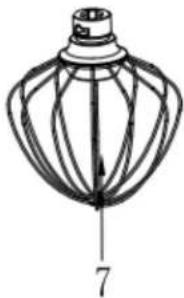
natural_image
Technical line drawing of a mechanical component with radial structure and labeled dimension (7), no readable text or symbols beyond the number.natural_image
Symbol of a trash bin crossed with no text or numbers, representing waste sorting or disposal (no text present)natural_image
Line drawing of a kitchen mixer with a blender and tray (no text or symbols)Modelo: LVSTM02P
natural_image
Technical line drawing of a mechanical component with no visible text or symbols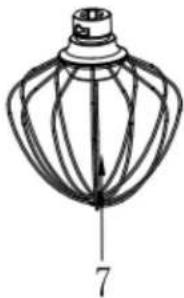
natural_image
Technical line drawing of a mechanical component with radial structure and labeled dimension (7), no readable text or symbols beyond the number.natural_image
Line drawing of a kitchen mixer with control panel and handle (no text or symbols)PG1
text_image
Step②PG2
text_image
Step① Step④PG3
text_image
Step⑤PG4
natural_image
Line drawing of a kitchen mixer with a bowl and stand mixer (no text or symbols)PG5
natural_image
Line drawing of a kitchen mixer with stand mixer (no text or symbols)PG6
Orientación
natural_image
Symbol of a trash bin with no text or numbers presentnatural_image
Line drawing of a kitchen mixer with a blender and tray (no text or symbols)Modèle: LVSTM02P
Tension nominale: 220-240V 50-60Hz
Puissance nominale: 1900W
Fréquence tensions: 50-60Hz
natural_image
Technical line drawing of a mechanical component with no visible text or symbols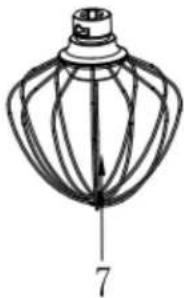
natural_image
Technical line drawing of a mechanical component with radial structure and labeled dimension (7), no readable text or symbols beyond the number.natural_image
Line drawing of a kitchen mixer with handle and control panel (no text or symbols)PG1
text_image
Step②PG2
text_image
Step① Step②PG3
text_image
Step⑤PG4
natural_image
Line drawing of a kitchen mixer with a bowl and stand mixer (no text or symbols)PG5
natural_image
Line drawing of a kitchen mixer with a stand mixer (no text or symbols)PG6
Orientations
natural_image
Technical line drawing of two mechanical components, one with a cylindrical shaft and arrow indicator, the other with a curved handle (no text or symbols)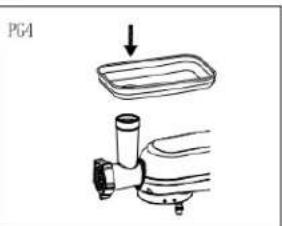
text_image
PGAnatural_image
Symbol of a trash bin with no text or numbers presentnatural_image
Line drawing of a kitchen mixer with a blender and tray (no text or symbols)Model: LVSTM02P
Nazivni napon: 220-240V 50-60Hz
Frekvencija napon: 50-60Hz
Nazivna snaga: 1900W
natural_image
Technical line drawing of a mechanical component with no visible text or symbols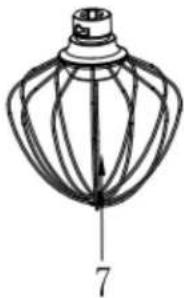
natural_image
Technical line drawing of a mechanical component with radial structure and labeled dimension (7), no readable text or symbols beyond the number.Glavne komponente i pribor:
natural_image
Technical line drawing of two mechanical components (no text or symbols)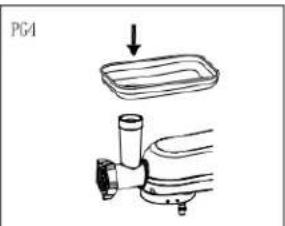
text_image
PGADodatak za izradu kobasica
natural_image
Symbol of a waste bin with no text or labels, featuring a crossed-out box and a solid rectangle below (no text or symbols present)natural_image
Line drawing of a kitchen mixer with a blender and tray (no text or symbols)Modelo: LVSTM02P
text_image
Technical diagram of a kitchen mixer with labeled parts including stand, fan, and bowl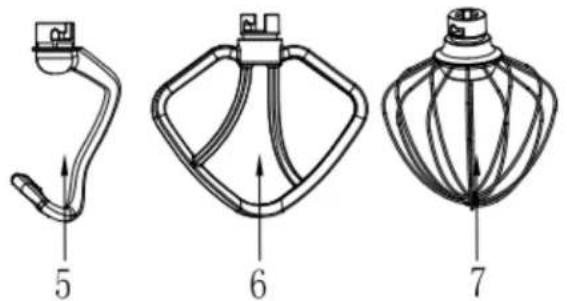
natural_image
Three technical line drawings of a mechanical device with labeled parts (no text or symbols present)natural_image
Symbol of a trash bin with crossed lines indicating no waste, and a solid black rectangle below (no text or labels)natural_image
Line drawing of a kitchen mixer with a blender and tray (no text or symbols)Model: LVSTM02P
Nazivna napetost: 220-240 V 50-60 Hz
Frekvenca napetosti: 50-60 Hz
Nazivna moč: 1900W
natural_image
Technical line drawing of a mechanical component with no visible text or symbols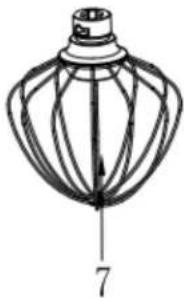
natural_image
Technical line drawing of a mechanical component with radial structure and labeled dimension (7), no readable text or symbols beyond the number.Glavne komponente in dodatki:
natural_image
Technical line drawing of two mechanical components (no text or symbols)