Dolphin W20 - Vacuum Cleaner MAYTRONICS - Free user manual and instructions
Find the device manual for free Dolphin W20 MAYTRONICS in PDF.

User questions about Dolphin W20 MAYTRONICS
0 question about this device. Answer the ones you know or ask your own.
Ask a new question about this device
Download the instructions for your Vacuum Cleaner in PDF format for free! Find your manual Dolphin W20 - MAYTRONICS and take your electronic device back in hand. On this page are published all the documents necessary for the use of your device. Dolphin W20 by MAYTRONICS.
USER MANUAL Dolphin W20 MAYTRONICS
Robotic Pool Cleaner W 20
EN
User Instructions....p. 1-11
FR
natural_image
Exterior view of a modern office building (no signage)


EN
Robotic Pool Cleaner W 20
User Instructions
Contents
- INTRODUCTION 2
- SPECIFICATIONS 2
- WARNINGS AND CAUTIONS 2
3.1 Warnings....2
3.2 Cautions....2 - POOL CLEANER PARTS 3
- USING THE POOL CLEANER....4
5.1 Setup....4
5.2 Putting the Pool Cleaner into the pool....5
5.3 Removing the Pool Cleaner from the pool....5 - CLEANING THE FILTER BAG OR CARTRIDGES ......6
6.1 Removing and cleaning the filter bag....6
6.2 Replacing the filter bag....7
6.3 Cleaning the filter cartridges ....8
6.4 Cleaning the impeller 9 - REMOTE CONTROL UNIT 10
- OFFSEASON STORAGE....11
- TROUBLESHOOTING....11
- CADDY ASSEMBLY....67
Robotic Pool Cleaner W 20
User Instructions
1. INTRODUCTION
Thank you for purchasing a Maytronics Robotic Pool Cleaner.
We are sure that your Maytronics Robotic Pool Cleaner will provide you with reliable, convenient and cost effective pool cleaning. Its reliable filtration in all pool conditions and active brushing enhance maximum pool hygiene.
Robotic Pool Cleaners by Maytronics deliver advanced cleaning technology, long lasting performance and easy maintenance.
The Robotic Pool Cleaner is designed for shallow pools - minimum depth 0.20m/0.65ft.
2. SPECIFICATIONS
Motor protection: IP 68
Minimum depth: 0.20m/0.65ft
Maximum depth: 5m/16.4ft
Digital switch-mode power supply
• Input - 100-250 AC Volts
- 50-60 Hertz
• 180 Watt
- Output - <30 VDC
• IP 54
3. WARNINGS AND CAUTIONS
3.1 Warnings

- Use the originally supplied power supply only
- Ensure the electrical outlet is protected by a ground fault interrupter (GFI) or an earth leakage interrupter (ELI)
- Keep the power supply out of standing water
- Position the power supply at least 3m/10ft away from the edge of the pool
- Do not enter the pool while the Pool Cleaner is working
- Unplug the power supply before servicing
3.2 Cautions
When not in use store the Pool Cleaner on the Caddy in a shaded area.
Use the Pool Cleaner in the following water conditions only:
| Chlorine Max 4 ppm | |
| pH 7.0 - 7.8 | |
| Temperature 6°-34°C/43°-93°F | |
| NaCl Maximum = 5000 ppm | |
4. POOL CLEANER PARTS
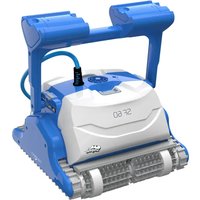
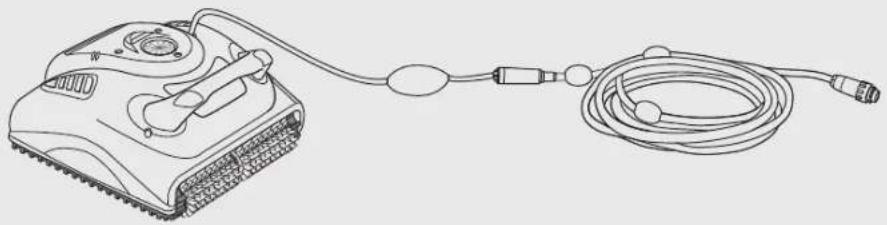
▶ Robotic Pool Cleaner W 20
natural_image
Line drawing of a portable electronic device connected to a coiled cable (no text or symbols)▶ Filtration

natural_image
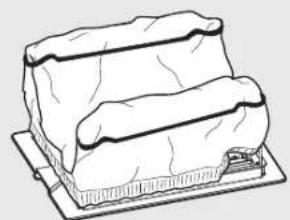
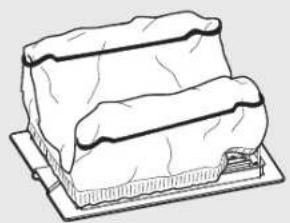
Line drawing of a rectangular dessert with layered edges and a flat base (no text or symbols)Bottom lid and filter Bag
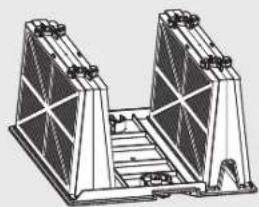
Optional Filtration
natural_image
Technical line drawing of a mechanical assembly with two triangular supports and a central staircase (no text or symbols)Cartridge with net filters (x4)

Ultra-fine filter (x4)
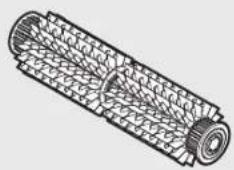
▶ Brush
natural_image
Technical line drawing of a cylindrical mechanical component with internal mesh structure (no text or symbols)PVC Brush
Ideal for all pool surfaces
▶ Remote Control
natural_image
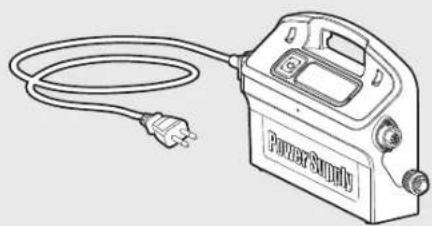
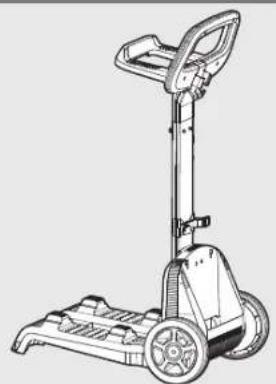
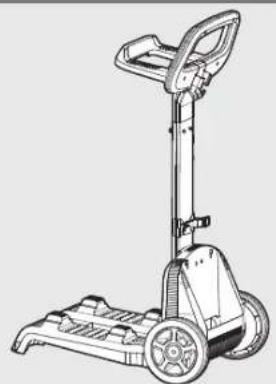
Line drawing of a remote control device with display and rotary knob (no text or symbols)▶ Power Supply Caddy
natural_image
Line drawing of a power surge device with a cable and plug (no text or symbols)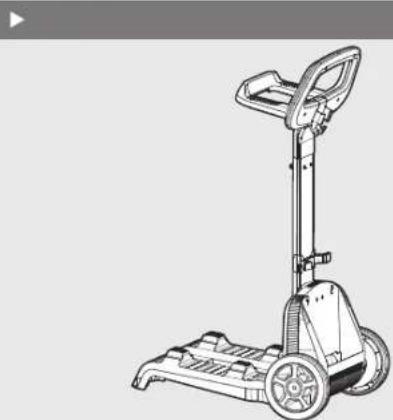
natural_image
Line drawing of a manual push cart with wheels and handle (no text or symbols)5. USING THE POOL CLEANER
The Pool Cleaner is very easy to use. Just follow the simple steps to get started, and your Pool Cleaner is ready to go.
5.1 Setup
Before using the Pool Cleaner for the first time perform the following steps:
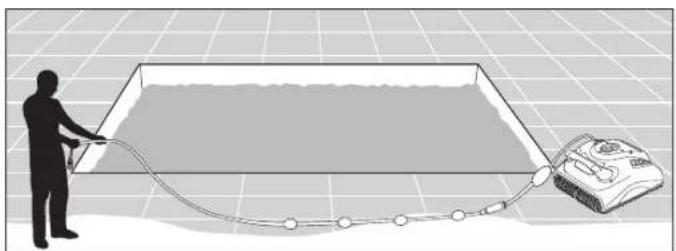
Unwind the cable and stretch it out completely so that it has no kinks.
natural_image
Silhouette of a person pulling a rope near a water tank on a grid background (no text or symbols)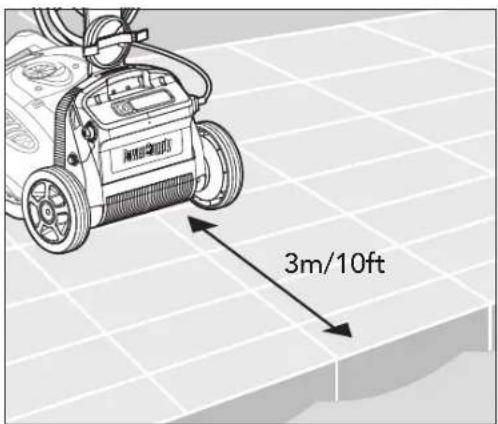
text_image
3m/10ftPosition the power supply so that it is approximately in the middle of the long side of the pool at a distance of 3m/10ft.
text_image
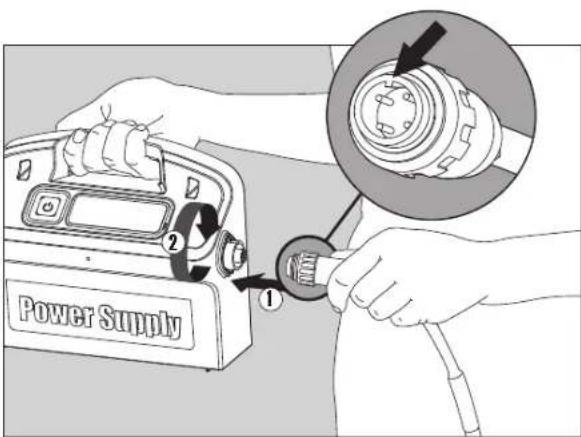
Power Supply ① ②Attach the floating cable to the power supply by inserting it with the notch on the connector (1) lined up with the groove in the socket on the power supply and turning clockwise (2).
natural_image
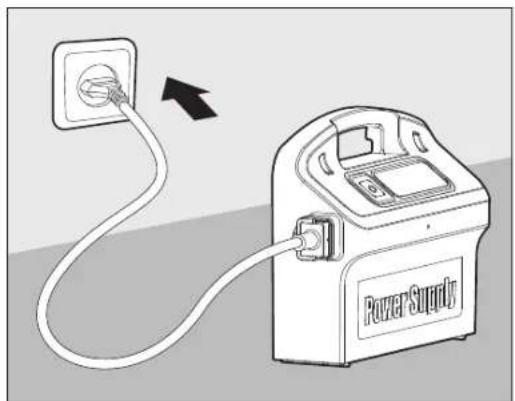
Diagram of a power supply device connected to a socket, showing wiring and connection (no text or symbols)Plug in the power supply and leave it in the OFF position.
5.2 Putting the Pool Cleaner into the pool
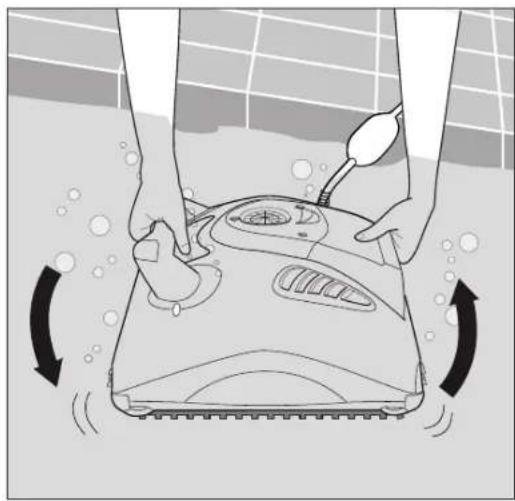
Holding the Pool Cleaner upside down in the water, gently rock it back and forth with your fingers holding the plastic doors on the bottom lid open to release trapped air. Continue until no more bubbles are released.
Release the Pool Cleaner and let it sink to the floor of the pool.
Make sure that the floating cable is free of any obstructions.
To avoid kinks in the floating cable, place approximately enough cable in the water for the Pool Cleaner to reach the farthest corner of the pool.
natural_image
Illustration of hands cleaning a tiled floor with a moving tool and rotating buttons (no text or symbols)Turn the power supply ON.
The Pool Cleaner will now operate until it has reached the end of the cleaning cycle.

text_image
ON Power Supply5.3 Removing the Pool Cleaner from the pool

Turn OFF and unplug the power supply.
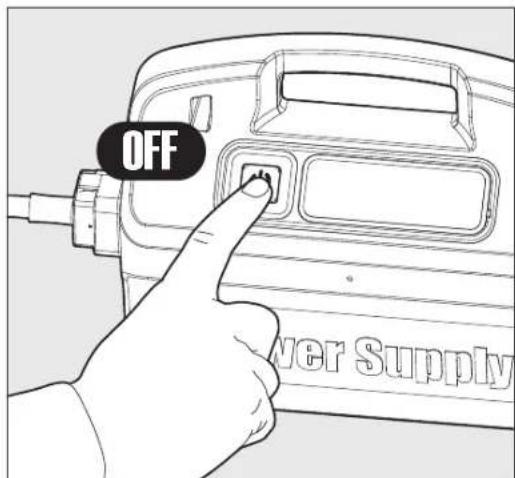
text_image
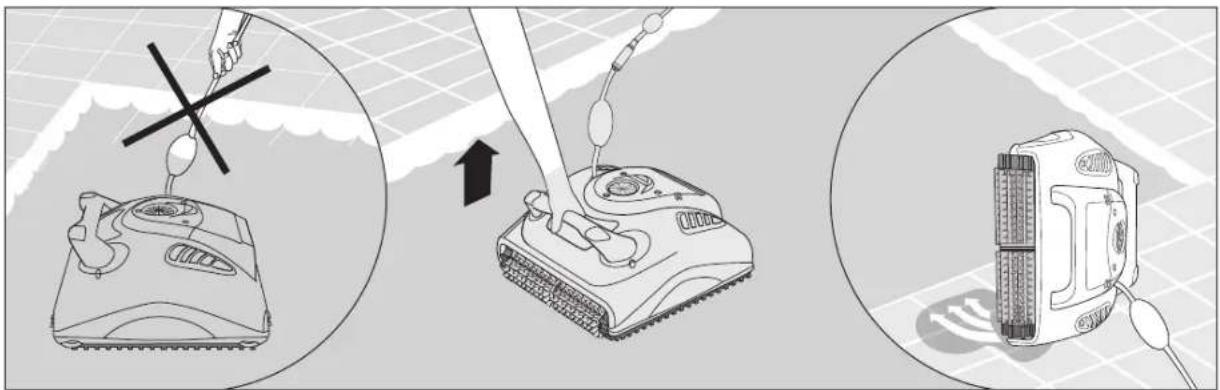
OFF Power SupplyUsing the floating cable, bring the Pool Cleaner to the pool's edge.
Using the handle, remove the Pool Cleaner from the pool.

DO NOT PULL THE POOL CLEANER FROM THE POOL USING THE CABLE.
text_image
Diagram illustrating the process of a tank-mounted sensor device with labeled components and directional arrows indicating assembly or operation.Place the Pool Cleaner on the edge of the pool and let the water drain out.
6. CLEANING THE FILTER BAG OR CARTRIDGES
Depending on the model, your Pool Cleaner may be equipped with a filter bag or cartridge. It is recommended to clean the filter bag or cartridge after each cleaning cycle.
6.1 Removing and cleaning the filter bag

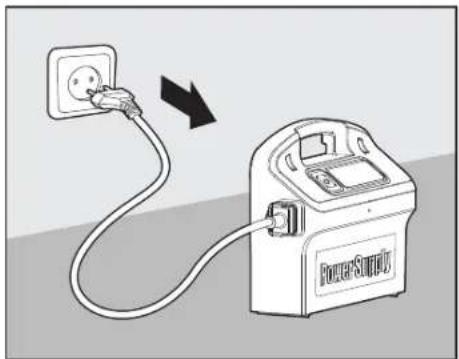
Unplug the power supply.
natural_image
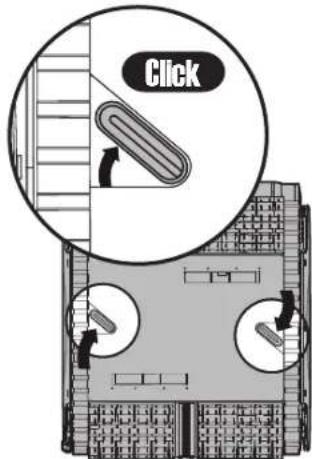
Illustration of a power supply connected to an electrical outlet (no text or symbols)Turn the Pool Cleaner upside-down. Open the bottom lid.
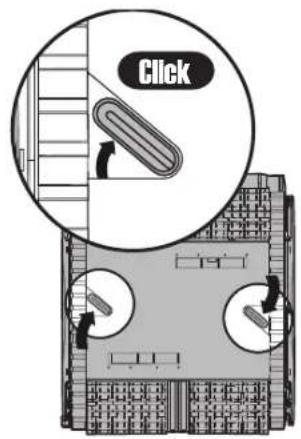
text_image
Click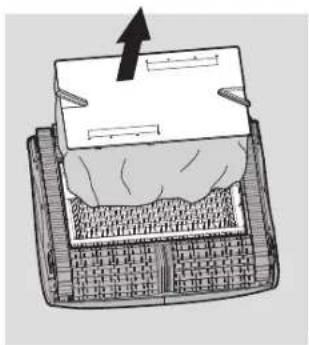
natural_image
Diagram of a mechanical device with a paper lid and textured base, showing an upward arrow (no text or symbols present)
natural_image
Diagram showing two mechanical components: a block on a base and a housing with a handle, both without any text or symbols.Remove the filter bag.
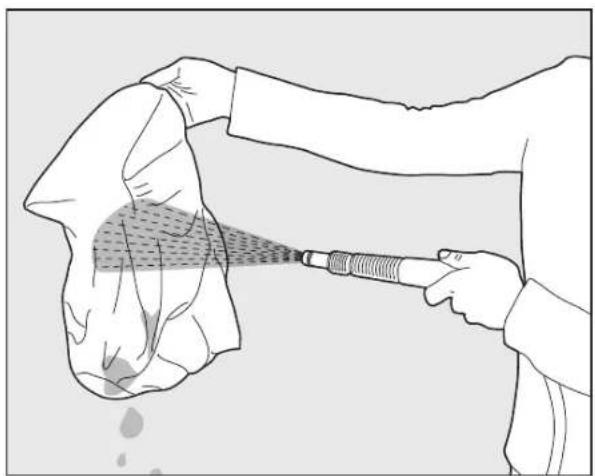
Clean the filter bag with a hose.
We recommend that you periodically wash the filter bag in a washing machine using the gentle cycle program.
Periodically clean the brushes with a hose.
natural_image
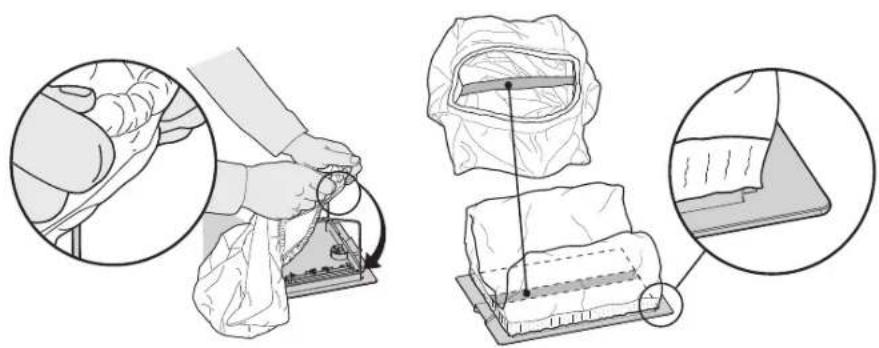
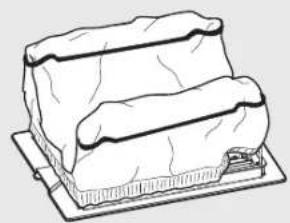
Illustration of a person using a handheld tool to spread fabric or material, with no visible text or symbols.6.2 Replacing the filter bag
Put the filter bag over the frame so that the strap is in the middle of the shortest side.
Make sure that filter bag is positioned properly on the frame.
natural_image
Illustration showing a person using a medical or electronic device to interact with a patient's back panel, with magnified insets highlighting the process (no text or symbols present)6.3 Cleaning the filter cartridges
Note: Don't let the filter cartridges dry out before cleaning.

Unplug the power supply.
With the Pool Cleaner upside down open the bottom lid and pull it out.
text_image
Click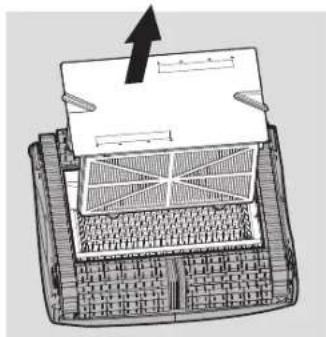
natural_image
Diagram of a computer keyboard with an upward arrow indicating orientation (no text or symbols present)
natural_image
Technical diagram of a mechanical assembly with two views: top shows a clamping mechanism, bottom shows a structural frame (no text or symbols)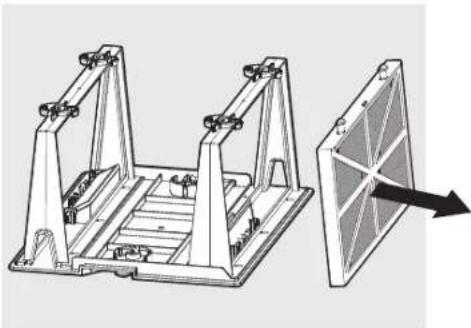
natural_image
Technical illustration of a mechanical frame assembly with an arrow indicating direction (no text or symbols present)Open the clips and remove the filter.
Clean the filters with a hose.
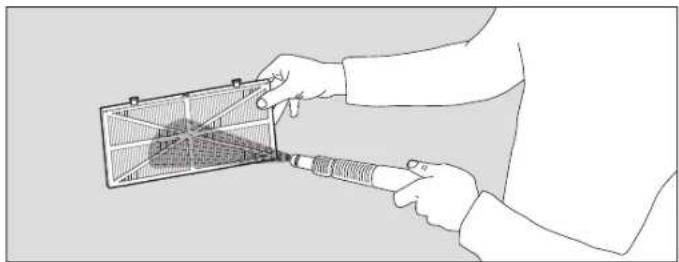
natural_image
Illustration of a person using a handheld device to interact with a grid-patterned fan (no text or symbols visible)
text_image
Technical diagram of a mechanical device with labeled components and directional arrows indicating motion or assembly.Insert the filters with the plastic backing facing out. Insert the cartridge unit.
6.4 Cleaning the impeller
If you notice debris trapped in the impeller open the impeller and remove the debris.
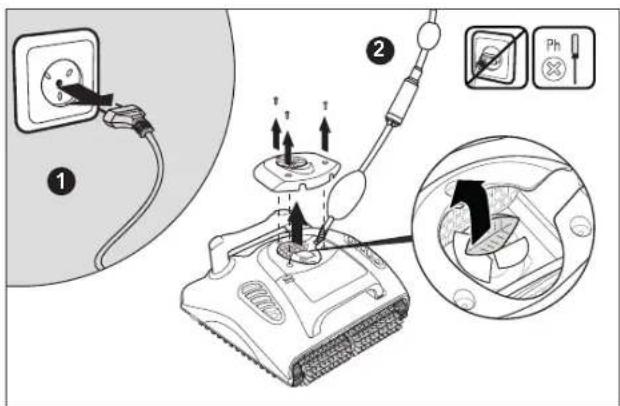
text_image
Diagram illustrating electrical switch installation steps with labeled components and directional arrows
Unplug the power supply.
Using a screwdriver, remove the screws on the impeller cover and remove it.
Clear any debris that may be in the impeller.
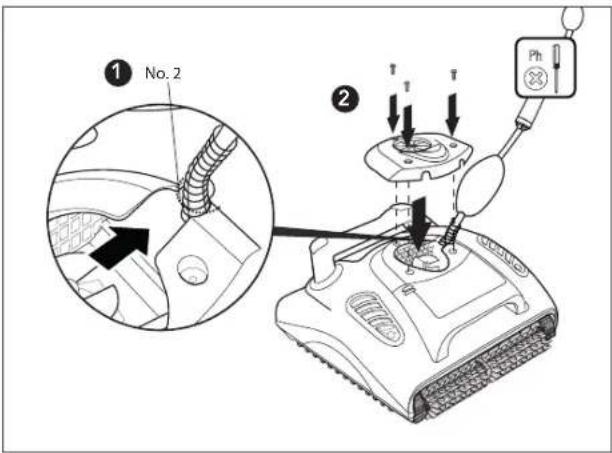
text_image
① No. 2 ② T T T PhReplace the screws.
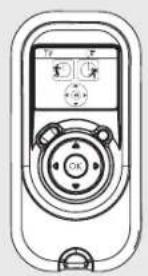
7. REMOTE CONTROL UNIT
Maytronics Cycle Selector Remote Control
The Remote Control Unit offers two operation modes - Automatic mode and Manual direction mode. In Automatic cleaning mode, the fast or regular cleaning cycle can be selected. In Manual direction mode, the pool cleaner direction can be controlled manually.
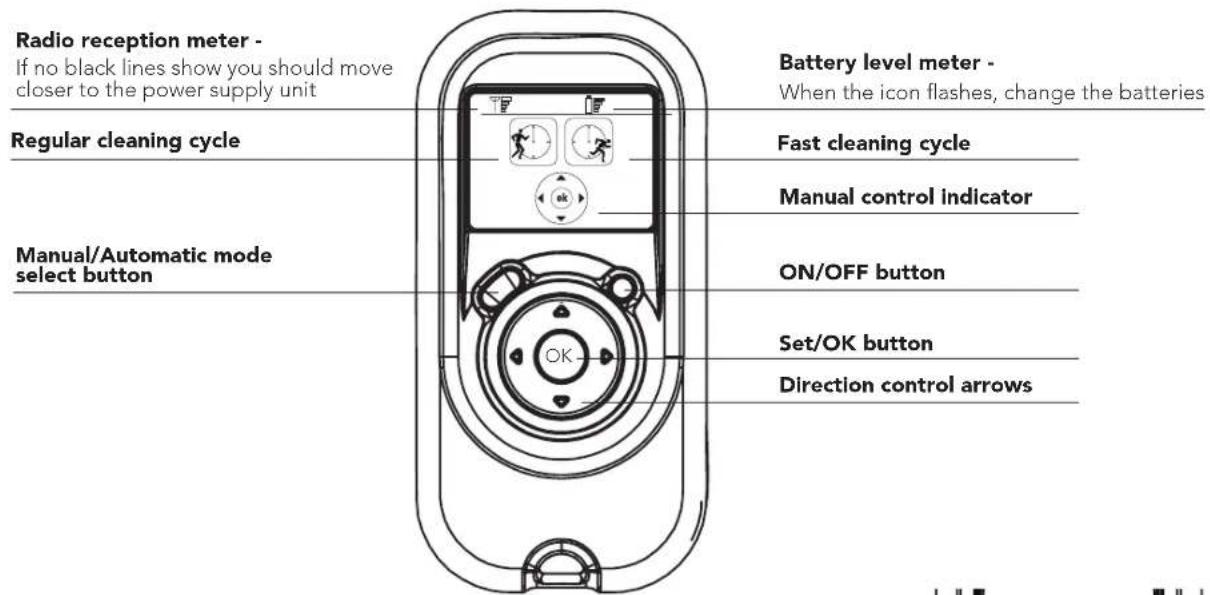
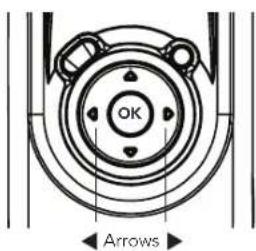
The Control Panel of the Remote Control Unit
text_image
Radio reception meter - If no black lines show you should move closer to the power supply unit Regular cleaning cycle Manual/Automatic mode select button Battery level meter - When the icon flashes, change the batteries Fast cleaning cycle Manual control indicator ON/OFF button Set/OK button Direction control arrowsManually controlling the direction of the Pool Cleaner
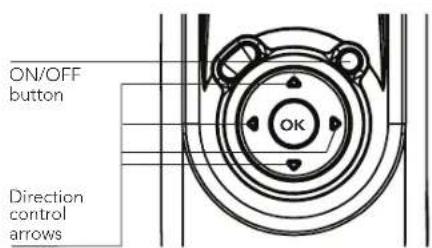
- Press the ON/OFF button once - The Remote Control Unit will start-up in Manual direction control mode.
- To manually control the direction of the pool cleaner, utilise the Direction control arrows.
Exiting Manual Direction Control Mode and set the Automatic Mode
To exit the Manual direction control mode press the Manual/Automatic Selection button ONCE only.
The Digital screen will light up and the two (regular/fast) icons will show up.
text_image
ON/OFF button Direction control arrows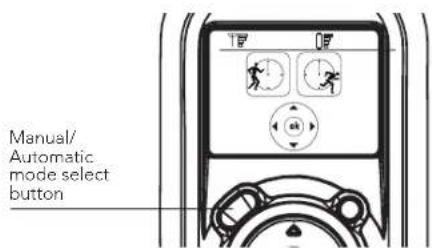
text_image
Manual/ Automatic mode select buttonTo choose regular or fast cleaning cycle use the right or left arrows. When you reach the required function press the Set/OK button.
text_image
OK ArrowsNote: After 2 minutes, if no button is pressed the Remote Control Unit will shut-down and the Pool cleaner will continue to work as started.
If the Pool Cleaner will not be in use for an extended period, perform the following storage steps:
- Disconnect the Pool Cleaner from mains
- Make sure that no water is left in the Pool Cleaner
- Thoroughly clean the filter bag or cartridges and insert in place
- Roll up the cable so that it has no kinks and place on the Caddy
- Store the Pool Cleaner upright on the Caddy or simply upside down in a protected area out of direct sun / rain / snow at a temperature of between 5^ - 45^ / 41^ - 113^
9. TROUBLESHOOTING
Before contacting your W 20 distributor please read through this guide.
| Symptom Solution | |
| Cable twisting or cable coils up Check for | any obstruction in the pool |
| Remove excess cable from the pool | |
| Make sure filter bag / filter cartridge is clean | |
| Straighten cable and lay it in the sun periodically | |
| W 20 is moving in circles or does not reach all pool areas | Check for foreign objects in moving parts |
| Make sure filter bag / filter cartridge is clean and well mounted and that the filter doors are closed | |
| Make sure that there is enough cable laid out to cover the whole pool | |
| Before using the W 20 at the beginning of the season you should brush any algae from the floor and walls of the pool | |
| Remote control is not working Check if the batteries need replacing | |
| Motor is not working | Check if the impeller is blocked |
| Check if the drive system is blocked | |
| Electrical problem (power supply), check power source. If power source is in order, please contact your W 20 distributor | |
Additional troubleshooting is available at our Website: www.maytronics.com
FR
natural_image
Line drawing of a portable electric heater connected to a coiled cable (no text or symbols)▶ Filtration

natural_image
Line drawing of a rectangular dessert with cream topping, placed on a tray (no text or symbols)natural_image
Technical line drawing of a mechanical assembly with two vertical supports and a central platform (no text or symbols)Cartouche + filtre filet (x4)
natural_image
Technical line drawing of a cylindrical mechanical component with internal mesh structure (no text or symbols)natural_image
Line drawing of a remote control device with display and rotary buttons (no text or symbols)natural_image
Line drawing of a power supply device with a plug and cable (no text or symbols)▶
natural_image
Line drawing of a mobile phone support with wheels and handle (no text or symbols)5. UTILISATION DU NETTOYEUR DE PISCINE
natural_image
Silhouette of a person pulling a rope with a device attached, against a grid background (no text or symbols)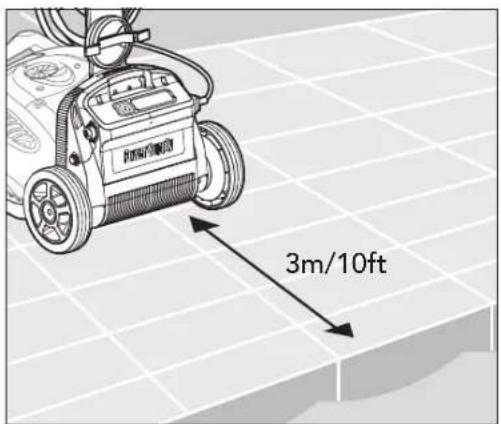
text_image
3m/10fttext_image
Power Supply ① ②natural_image
Diagram of a power supply connected to a plug, showing wiring and connection (no text or symbols)natural_image
Illustration of hands cleaning a tiled floor with a moving phone and directional arrows indicating motion (no text or symbols)text_image
ON Power Supplytext_image
OFF Power Supplytext_image
Diagram illustrating the process of a robotic device with labeled parts and directional arrows indicating sequence.text_image
Diagram showing a power outlet connected to a power supply unit with an arrow indicating direction of connection or change.natural_image
Diagram of a mechanical device with a block and textured base, showing an upward arrow (no text or symbols)
natural_image
Diagram showing two views of a device with an upward arrow, one open and one lying flat (no text or symbols)natural_image
Illustration of a person using a handheld tool to spread fabric or material, no text or symbols presentnatural_image
Illustration showing a person using a medical or laboratory device to interact with a tissue sample, with magnified insets highlighting the process (no text or symbols present)natural_image
Diagram of a computer monitor with an open screen and a grid-patterned base, showing no text or symbols.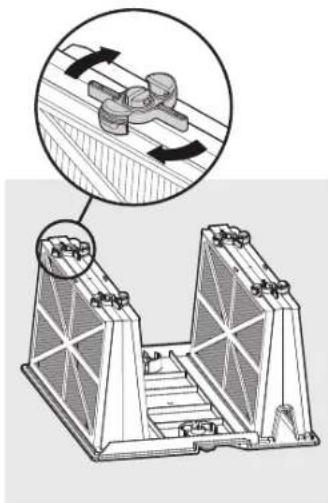
natural_image
Technical illustration of a mechanical assembly with two views showing internal components and directional arrows (no text or symbols)
natural_image
Technical illustration of a mechanical assembly with two frame supports and a separate panel with an arrow indicating direction (no text or symbols present)natural_image
Line drawing of a person using a handheld device to interact with a grid-patterned device (no text or symbols visible)
text_image
Technical diagram of a mechanical device with labeled components and directional arrows indicating assembly or movement.text_image
Diagram illustrating a mechanical device with labeled parts and directional arrows, including a plug, switch, and a close-up of the component.
text_image
① No. 2 ② T T Phtext_image
OK Flèchesnatural_image
Line drawing of a portable electronic device connected to a coiled cable (no text or symbols)▶ Filtrazione
natural_image
Line drawing of a rectangular object with layered structure on a base (no text or symbols)natural_image
Technical line drawing of a mechanical structure with two symmetrical supports and a central staircase (no text or symbols)natural_image
Technical line drawing of a cylindrical mechanical component with internal mesh structure (no text or symbols)natural_image
Illustration of a power supply unit with a cable and plug, no text or symbols present
natural_image
Line drawing of a manual push cart with wheels and handle (no text or symbols)5. UTILIZZAZIONE DEL PULITORE
natural_image
Silhouette of a person pulling a rope near a water tank on a grid background (no text or symbols)
text_image
3m/10fttext_image
Power Supply ① ②natural_image
Diagram of a power supply device connected to a socket, showing wiring and connection (no text or symbols)natural_image
Illustration of hands cleaning a floor scrubber with rotating buttons and bubbles (no text or symbols)text_image
ON Power Supplytext_image
OFF Power Supplynatural_image
Three-step diagram showing a tank being adjusted, with no text or symbols present.natural_image
Illustration of a power supply connected to an electrical outlet (no text or symbols)natural_image
Diagram of a mechanical device with a paper lid and textured base, showing an upward arrow (no text or symbols present)
natural_image
Diagram showing two mechanical components: a block on a base and a housing with a handle, both without any text or symbols.natural_image
Illustration of a person using a handheld tool to spread or spray a cloth over a garment (no text or symbols)natural_image
Illustration showing a person using a medical or laboratory device to interact with a bag, with magnified insets highlighting the process (no text or symbols present)natural_image
Diagram of a mechanical device with a paper sheet and grid-patterned base, showing an upward arrow (no text or symbols present)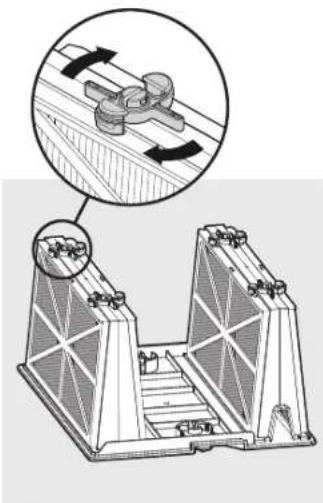
natural_image
Technical diagram of a mechanical assembly with two views showing internal components and directional arrows (no text or labels)
natural_image
Technical illustration of a mechanical frame assembly with an arrow pointing to a panel (no text or symbols present)natural_image
Line drawing of a person using a handheld device to interact with a grid-patterned device (no text or symbols visible)
natural_image
Technical diagram of a mechanical device with three views showing internal components and directional arrows (no text or symbols)text_image
Diagram illustrating electrical switch installation steps with labeled components and directional arrows
text_image
① No. 2 ② T T T Phnatural_image
Line drawing of a portable electric heater connected to a coiled cable (no text or symbols)▶ Filtration
natural_image
Line drawing of a rectangular dessert with cream topping, placed on a tray (no text or symbols)natural_image
Technical line drawing of a mechanical assembly with two vertical supports and a central platform (no text or symbols)natural_image
Technical line drawing of a cylindrical mechanical component with internal mesh structure (no text or symbols)natural_image
Line drawing of a remote control device with buttons and display (no text or symbols)natural_image
Line drawing of a power supply device with a plug and cable (no text or symbols)▶

natural_image
Line drawing of a mobile phone support with wheels and handle (no text or symbols)natural_image
Silhouette of a person spraying water with a cable, connected to a device on a grid background (no text or symbols)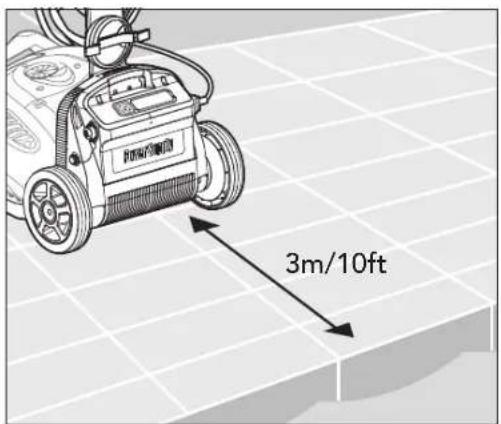
text_image
3m/10fttext_image
Power Supply ① ②natural_image
Diagram of a power supply device connected to a socket, showing wiring and connection (no text or symbols)natural_image
Illustration of hands cleaning a tiled floor with a saw, showing motion arrows (no text or symbols)text_image
ON Power Supplytext_image
OFF Power Supplytext_image
Diagram illustrating the process of a robotic device with labeled parts and directional arrows indicating sequence.text_image
Diagram showing a power outlet connected to a power supply unit with an arrow indicating direction of connection or change.natural_image
Diagram of a mechanical device with a base and internal components, showing no text or symbols.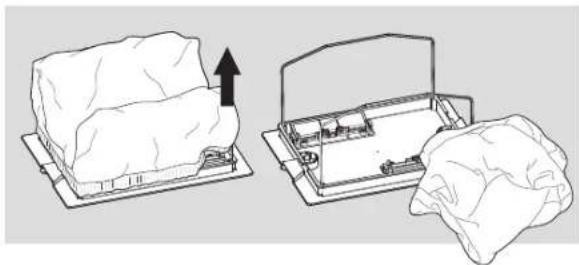
natural_image
Diagram showing two steps of a mechanical device with an upward arrow, one open and one closed, both without any text or symbols.Extraiga la bolsa del filtro.
natural_image
Illustration of a person using a handheld tool to filter or spread material from a cloth (no text or symbols)natural_image
Illustration of a medical procedure showing steps to connect a patient's arm and a patient's bed, with magnified insets (no text or symbols)natural_image
Diagram of a computer monitor with an open lid and keyboard, showing internal components and a black arrow indicating motion (no text or symbols present)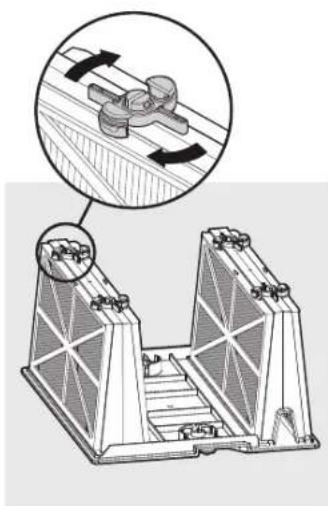
natural_image
Technical illustration of a mechanical assembly with two views showing internal components and directional arrows (no text or symbols)
natural_image
Technical illustration of a mechanical assembly with two frame supports and a separate panel with an arrow indicating direction (no text or symbols present)natural_image
Line drawing of a person using a handheld device to interact with a grid-patterned device (no text or symbols visible)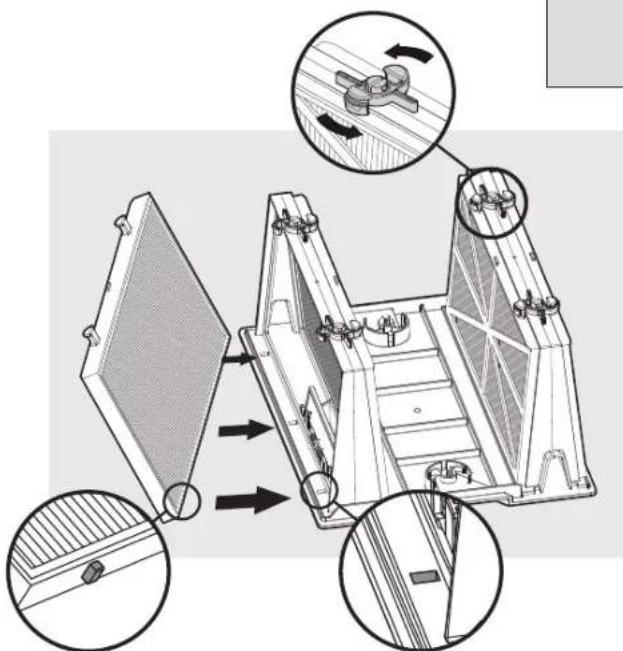
text_image
Technical diagram of a mechanical device with labeled components and directional arrows indicating assembly or movement.text_image
Diagram illustrating a mechanical device with labeled parts and directional arrows, including a plug, switch, and a close-up of the component.
text_image
① No. 2 ② T T Phnatural_image
Line drawing of a remote control device with buttons and display screen (no text or symbols)natural_image
Line drawing of a portable electronic device connected to a coiled cable (no text or symbols)▶ Filterung
natural_image
Line drawing of a rectangular dessert with cream topping, placed on a tray (no text or symbols)natural_image
Technical line drawing of a structural support frame with two towers and a ladder (no text or symbols)natural_image
Technical line drawing of a cylindrical mechanical component with internal mesh structure (no text or symbols)natural_image
Line drawing of a remote control device with display and rotary buttons (no text or symbols)natural_image
Line drawing of a power surge device with a cable and plug (no text or symbols)
natural_image
Line drawing of a manual push cart with wheels and handle (no text or symbols)5. VERWENDUNG DES POOLREINIGERS
natural_image
Silhouette of a person pulling a rope with a device connected to a rectangular container (no text or symbols visible)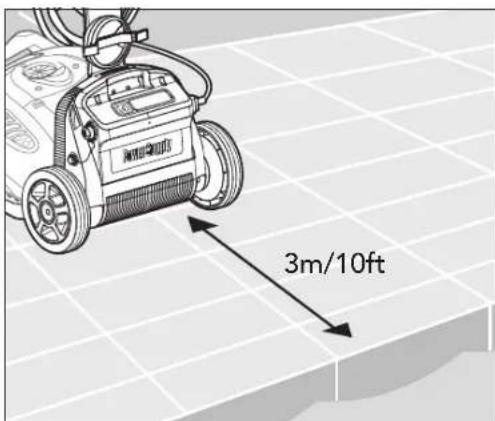
text_image
3m/10fttext_image
Power Supply ① ②natural_image
Diagram of a power supply device connected to a socket, showing wiring and connection (no text or symbols)natural_image
Illustration of hands cleaning a floor scrubber with rotating buttons and bubbles (no text or symbols)text_image
ON Power Supplytext_image
OFF Power Supplynatural_image
Three-step diagram showing a tank being adjusted, with no text or symbols present.text_image
Diagram showing a power supply connected to an electric shock absorber with a plug inserted into the socket.natural_image
Diagram of a mechanical component with a downward arrow indicating force or direction (no text or symbols present)
natural_image
Diagram showing two mechanical components: a block on a base and a housing with a handle, both without any text or symbols.natural_image
Illustration of a person using a handheld tool to spread or spray a cloth over a garment (no text or symbols)natural_image
Illustration of a medical procedure showing steps to adjust equipment with a magnified inset (no text or symbols)natural_image
Diagram of a computer monitor with an upward arrow indicating orientation, showing internal layout and screen (no text or symbols)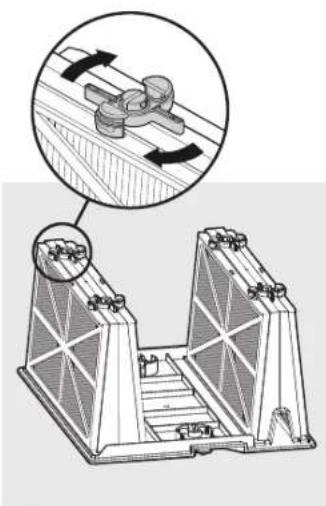
natural_image
Technical diagram of a mechanical assembly with two views showing internal components and directional arrows (no text or symbols)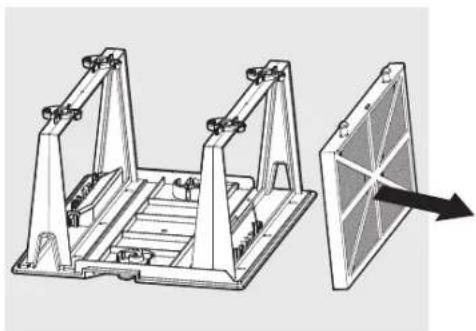
natural_image
Technical illustration of a mechanical frame assembly with an arrow indicating direction (no text or symbols present)natural_image
Illustration of a person using a tool to interact with a grid-patterned device (no text or symbols visible)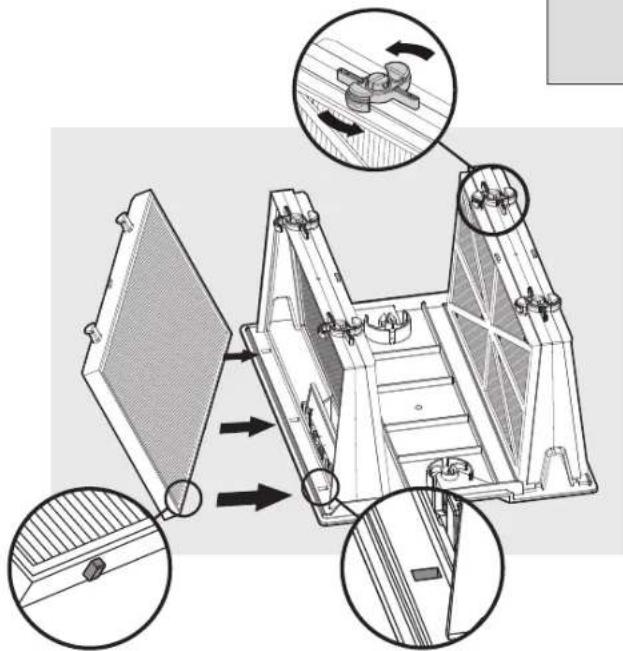
text_image
Technical diagram of a mechanical device with labeled components and directional arrows indicating motion or assembly.text_image
Diagram illustrating a device installation procedure with labeled steps and component diagrams
text_image
① No. 2 ② T T T Phnatural_image
Line drawing of a portable electric heater connected to a coiled cable (no text or symbols)▶ Filtração

natural_image
Line drawing of a rectangular dessert with cream topping, placed on a tray (no text or symbols)natural_image
Technical line drawing of a mechanical assembly with two triangular components and a central platform (no text or symbols)natural_image
Technical line drawing of a cylindrical mechanical component with internal mesh structure (no text or symbols)natural_image
Line drawing of a remote control device with buttons and display (no text or symbols)natural_image
Line drawing of a power surge device with a power plug and cable (no text or symbols)▶
natural_image
Line drawing of a mobile phone support mechanism (no text or symbols)5. UTILIZAR O ASPIRADOR DE PISCINA
natural_image
Silhouette of a person pulling a rope with a device attached, against a grid background (no text or symbols)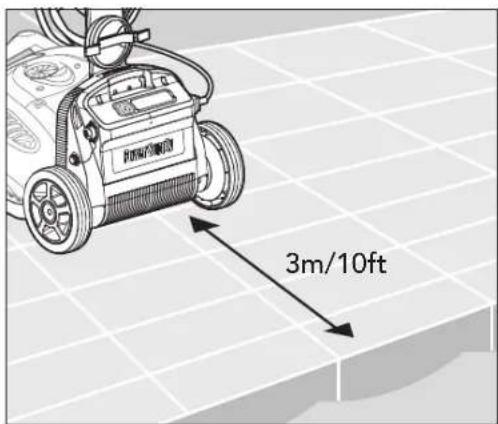
text_image
3m/10fttext_image
Power Supply ① ②natural_image
Diagram of a power supply device connected to a socket, showing wiring and connection (no text or symbols)natural_image
Illustration of hands cleaning a tiled floor with a saw, showing motion arrows (no text or symbols)text_image
ON Power Supplytext_image
OFF Power Supplytext_image
Diagram illustrating the process of a robotic device with labeled parts and directional arrows indicating sequence.text_image
Diagram showing a power outlet connected to a power supply unit with an arrow indicating direction of connection or change.natural_image
Diagram of a mechanical device with a component and directional arrow, no visible text or symbols
natural_image
Diagram showing two views of a device with an upward arrow, one open and one lying flat (no text or symbols)natural_image
Illustration of a person using a handheld tool to spread fabric or material, no text or symbols present6.2 Substituir o saco de filtro
natural_image
Illustration showing a person using a medical or laboratory device to interact with a tissue sample, with magnified insets highlighting the process (no text or symbols present)natural_image
Diagram of a computer monitor with an open lid and keyboard, showing internal components and a black arrow indicating motion (no text or symbols)
natural_image
Technical illustration of a mechanical assembly with two views showing internal components (no text or symbols)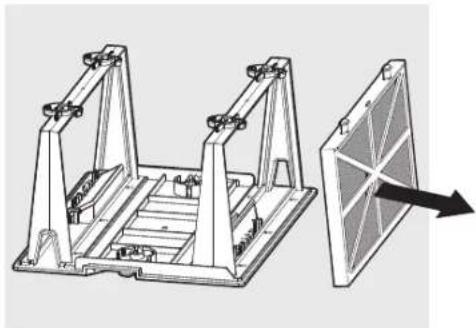
natural_image
Technical illustration of a mechanical assembly with two frame supports and a separate panel with an arrow indicating direction (no text or symbols present)natural_image
Line drawing of a person using a handheld device to interact with a grid-patterned device (no text or symbols visible)
text_image
Technical diagram of a mechanical device with labeled components and directional arrows indicating assembly or movement.text_image
Diagram illustrating a mechanical device with labeled parts and directional arrows, including a plug, switch, and a close-up of the component.
text_image
① No. 2 ② T T Phnatural_image
Line drawing of a remote control device with buttons and dials (no text or symbols)natural_image
Technical line drawing of a mobile cart with a downward arrow indicating motion (no text or symbols)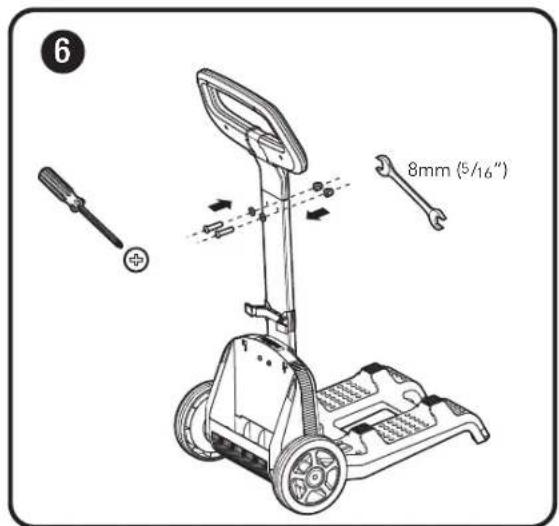
text_image
6 8mm (5/16")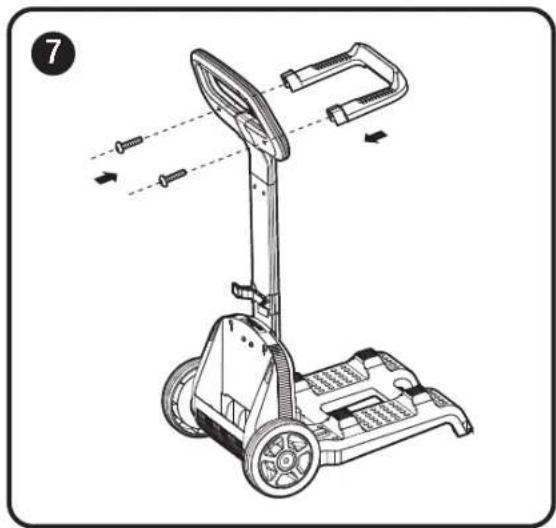
natural_image
Line drawing of a mobile phone with wheels and sensor components, no text or symbols present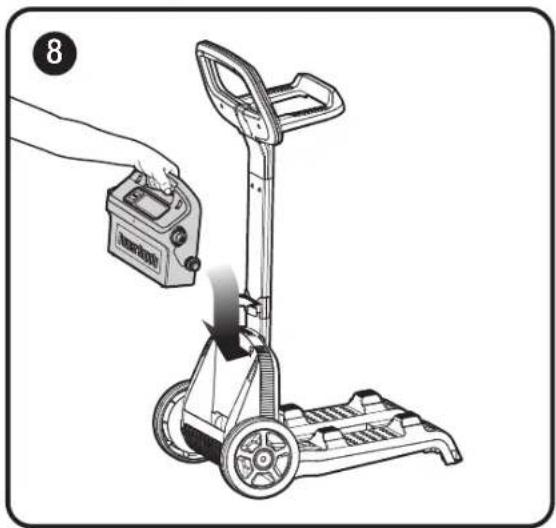
natural_image
Illustration of a hand using a handheld device to lift a manual pallet jack (no text or symbols visible)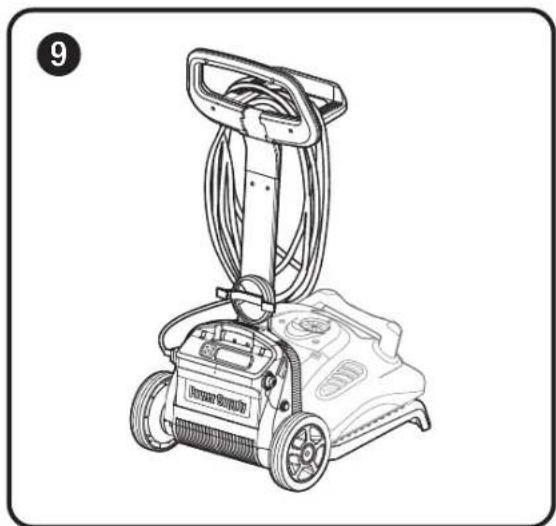
natural_image
Line drawing of a power supply machine with wheels and attached circuit board (no text or symbols)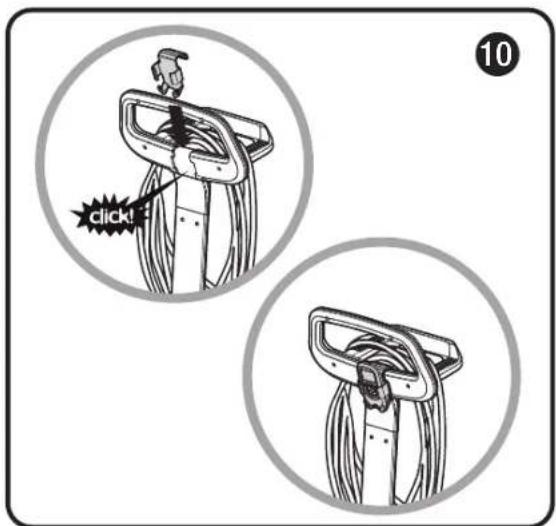
text_image
10 click!