
ProfiClear Premium - Water filter OASE - Free user manual and instructions
Find the device manual for free ProfiClear Premium OASE in PDF.

| Product type | Individual filtration module |
| Brand | Oase |
| Model | ProfiClear Premium |
| Category | Pond water filter |
| Dimensions (L × W × H) | 830 × 665 × 815 mm |
| Weight (empty) | 40 kg |
| Weight in water (without devices) | 265 kg |
| Flow capacity | 10,000 - 33,000 l/h |
| Number of sieve baskets | 2 |
| Filter media capacity | 2 litres (total) |
| Inlet pipes (Ø 180 mm) | 2 |
| Outlet pipes DN 110 | 2 |
| Outlet pipes 2" | 2 |
| Dirt outlet pipe DN 75 | 1 (with shut-off valve) |
| Compatible pumps | AquaMax Gravity Eco, AquaMax Eco Premium, AquaMax Eco Twin (max. 1) |
| Compatible UVC device | Bitron Gravity |
| Admissible water temperature | +4 °C to +35 °C |
| Installation type | Pumped system or gravity system |
| Intended use | Cleaning of garden ponds |
| Routine maintenance | Cleaning the container, rinsing the sieve baskets |
| Winter storage | Drain and cover the container |
| Recommended filter media | Activated carbon, zeolite, peat, phosphate binder |
Frequently Asked Questions - ProfiClear Premium OASE
User questions about ProfiClear Premium OASE
0 question about this device. Answer the ones you know or ask your own.
Ask a new question about this device
Download the instructions for your Water filter in PDF format for free! Find your manual ProfiClear Premium - OASE and take your electronic device back in hand. On this page are published all the documents necessary for the use of your device. ProfiClear Premium by OASE.
USER MANUAL ProfiClear Premium OASE
natural_image
Black-and-white underwater photo of two koi fish swimming, one with white spots and the other in black and white (no text or symbols)ProfiClear Premium Individualmodul
GB Operating instructions
FR Notice d'emploi
natural_image
3D rendering of a mechanical device with internal components and housing (no visible text or symbols)
A
PROClear0018
B
ProfClear2016


E
ProfiClear0012
F
ProfClear 0.00
G
Proficient004B

H
ProofClear3010
|

ProfileClear0011
J
K

Inhaltsverzeichnis
1 Information about these operating instructions 19
1.1 Symbols used in these instructions.... 19
2 Product Description 20
2.1 Delivery scope and unit configuration 20
2.2 Function description.... 20
2.3 Optional configurations for installation as a gravity-fed system.... 21
2.4 Intended use.... 21
3 Safety information....21
4 Installation 22
4.1 Preparing the unit connection 22
4.2 Installing the filter pump in the container.... 23
4.2.1 Connecting the AquaMax Gravity Eco pump to the DN 110 outlet.... 23
4.2.2 Connecting the AquaMax Gravity Eco pump to the 2" outlet 23
4.2.3 Connecting the AquaMax Eco Premium pump to the 2" outlet.... 24
4.3 Installing a UVC clarifying unit in the container.... 24
5 Installation and connection 25
5.1 Installation planning.... 25
5.2 Information regarding pipes 25
5.3 Installing the filter module and connecting it to additional filter modules 25
5.4 Returning the water to the pond.... 25
6 Commissioning/start-up 26
7 Remedy of faults.... 26
8 Maintenance and cleaning....27
8.1 Cleaning the container....27
8.2 Maintenance of the filter media 27
9 Storage/Over-wintering....27
10 Disposal....27
11 Technical data 28
Spare parts.... 128
Translation of the original Operating Instructions
1 Information about these operating instructions
Welcome to OASE Living Water. You made a good choice with the purchase of this product ProfiClear Premium Individual Modul.
Prior to commissioning the unit, please read the instructions of use carefully and fully familiarise yourself with the unit. Ensure that all work on and with this unit is only carried out in accordance with these instructions.
Adhere to the safety information for the correct and safe use of the unit.
Keep these instructions in a safe place! Please also hand over the instructions when passing the unit on to a new owner.
1.1 Symbols used in these instructions
The symbols used in this operating manual have the following meanings:
Risk of injury to persons due to dangerous electrical voltage
This symbol indicates an imminent danger, which can lead to death or severe injuries if the appropriate measures are not taken.
Risk of personal injury caused by a general source of danger
This symbol indicates an imminent danger, which can lead to death or severe injuries if the appropriate measures are not taken.
i Important information for trouble-free operation.
☐ A Reference to one or more figures. In this example: Reference to Fig. A.
→ Reference to another section.
GB
2 Product Description
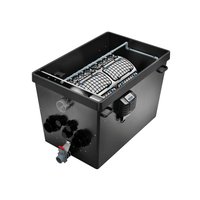
The OASE filter system ProfiClear Premium includes the filter modules "Drum Filter Module", "Moving Bed Module" and "Individual Module". The filter system can be operated as a pump fed or gravity fed system. All filter modules are suitable for both system except for the Drum Filter Module.
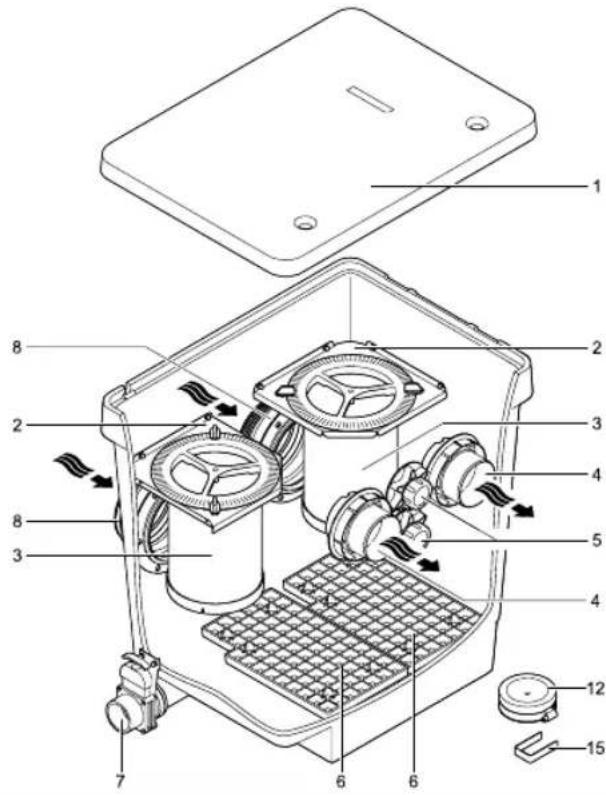
2.1 Delivery scope and unit configuration
| ☐ A ProfiClear Premium Individual Module Quantity | |||
| 1 | Container cover 1x | ||
| 2 Strainer holder for strainer basket (3) 2x | |||
| 3 | Strainer basket- can be filled with filter media such as activated carbon or zeolite | 2x | |
| 4 DN 110 outlet- optional connection for a Bitron Gravity UVC clarifying unit- optional connection for a filter pump such as AquaMax Gravity Eco | 2x | ||
| 5 2" connection, closed with plug- optional connection for a filter pump type AquaMax Eco | 2x | ||
| 6 | Grid tray- for optimum installation of filter pumps, floats up when not weighed down | 1x | |
| 7 DN 75 dirt outlet with slide valve 1x | |||
| 8 | ∅180 mm inlet | 2x | |
| 12 Cover for DN 110 outlet 2x | |||
| 15 | Metal clip- serves for fastening the power cables of additional units installed in the container to the inside edge of the container | 2x | |
2.2 Function description
The ProfiClear Premium Individual Module is designed for enhanced filtering of pond water and can be adapted to the individual conditions of your pond. For this it contains two strainer baskets that can be filled with filter media such as activated carbon or zeolite.
The filter module can be integrated in a gravity fed or pump fed system.
The filter module can be installed as a pump chamber at a distance of 2m from a swimming pond to conform with standards.
(Attention: Larger distances may be prescribed in some countries).
Activated carbon such as AquaActiv Carbon is made from hard coal, brown coal, peat or coconut shell. With the aid of activated carbon, chemical contaminants such as pesticides, herbicides and pharmaceutical residues can be removed from the water. Fulvic acid is also adsorbed.
Phosphate binders such as Aqua Activ PhosLess bind large quantities of phosphates and heavy metals. Phosphates are particularly responsible for the growth of algae.
Pond peat such as AquaActiv AquaHumin is also a natural mineral and contains large quantities of humic acid. It is able to reduce undesirably high carbonate levels and pH values. It also prevents the growth of algae.
Zeolite such as AquaActiv PondLith is a naturally occurring mineral. Over the course of time, the surface of the zeolite is colonised by bacteria that are important for nitrification. Contaminants such as ammonium are also adsorbed.
Filter media < 8 mm must be additionally filled into a filter medium bag.
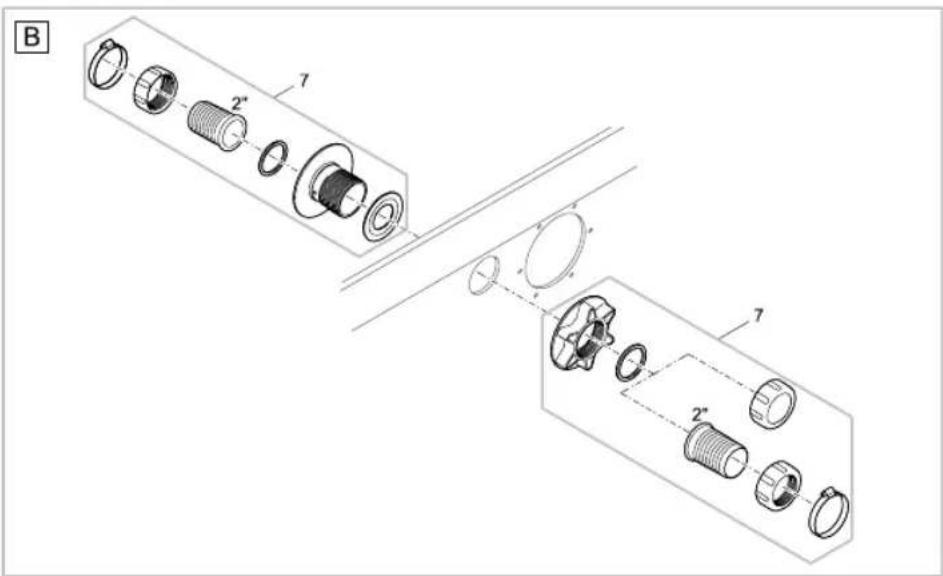
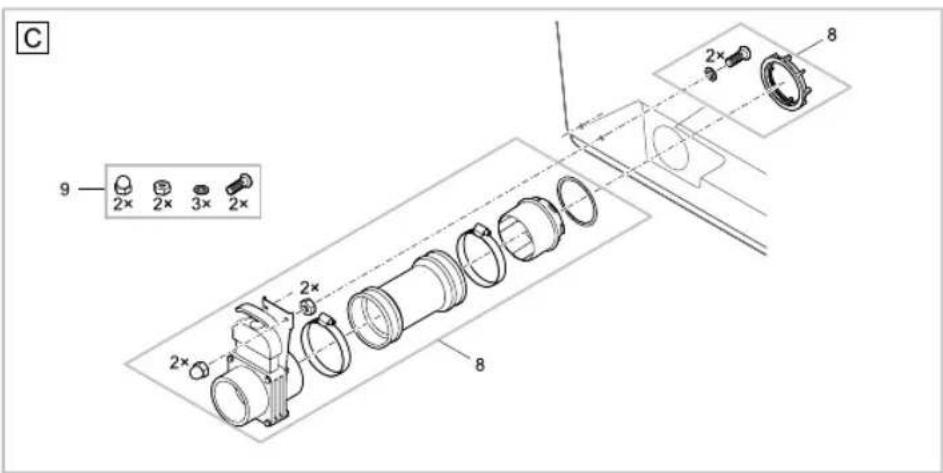
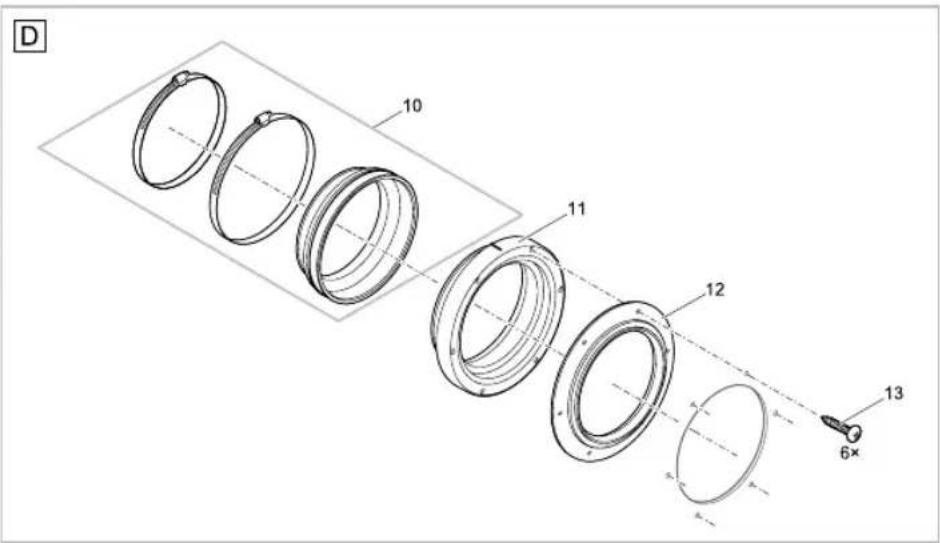
2.3 Optional configurations for installation as a gravity-fed system
For installation as a gravity-fed system, the ProfiClear Premium Individual Module can be extended by installing filter pumps and UVC clarifying units. The DN 110 and 2" connections can be used for this.
▶ Suitable filter pumps:
- AquaMax Gravity Eco
- AquaMax Eco Premium
- AquaMax Eco Twin (max. 1 pce.)
- Suitable UVC clarifying unit: Bitron Gravity.
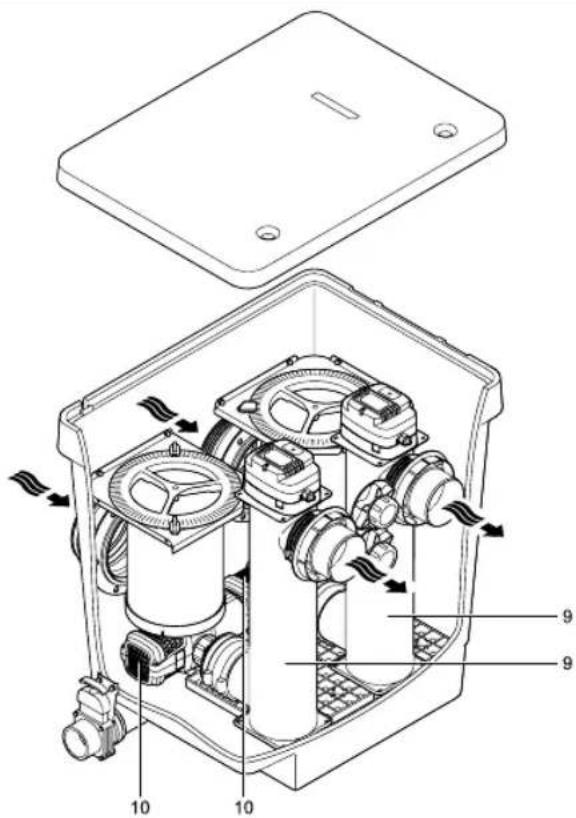
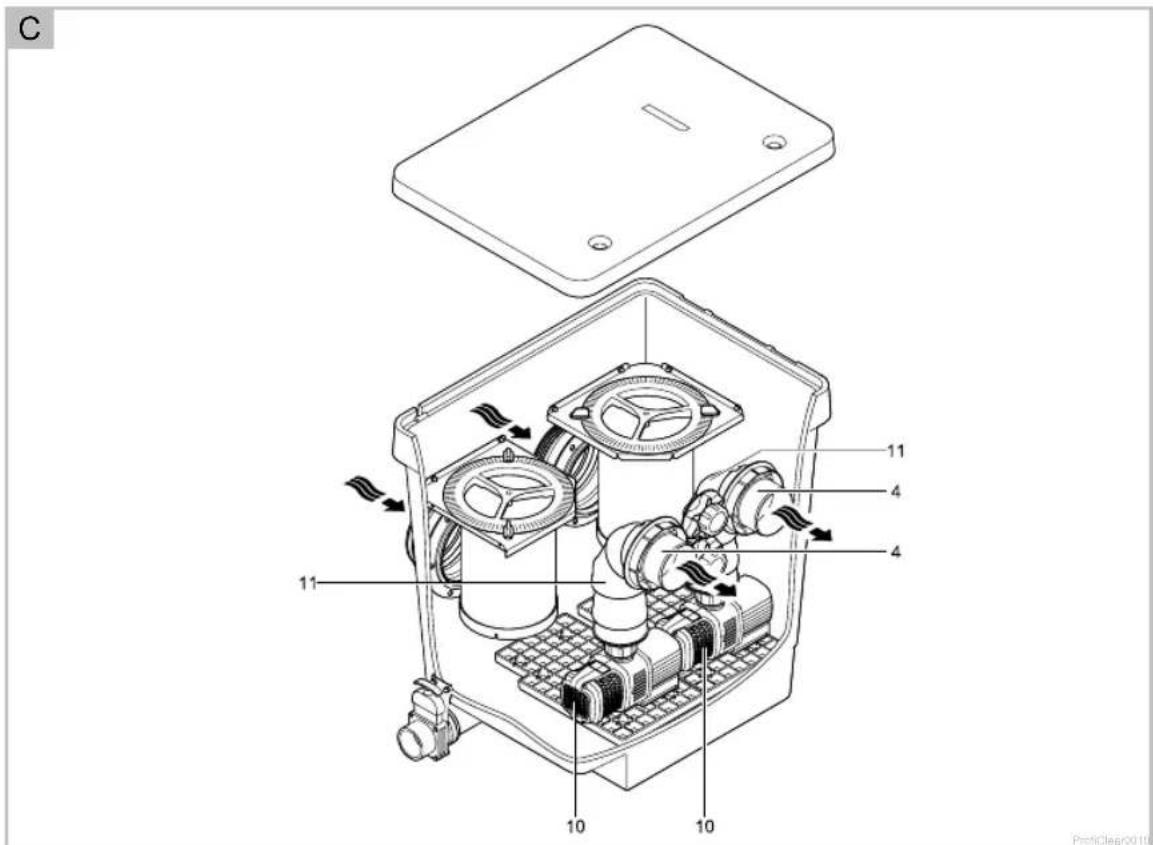
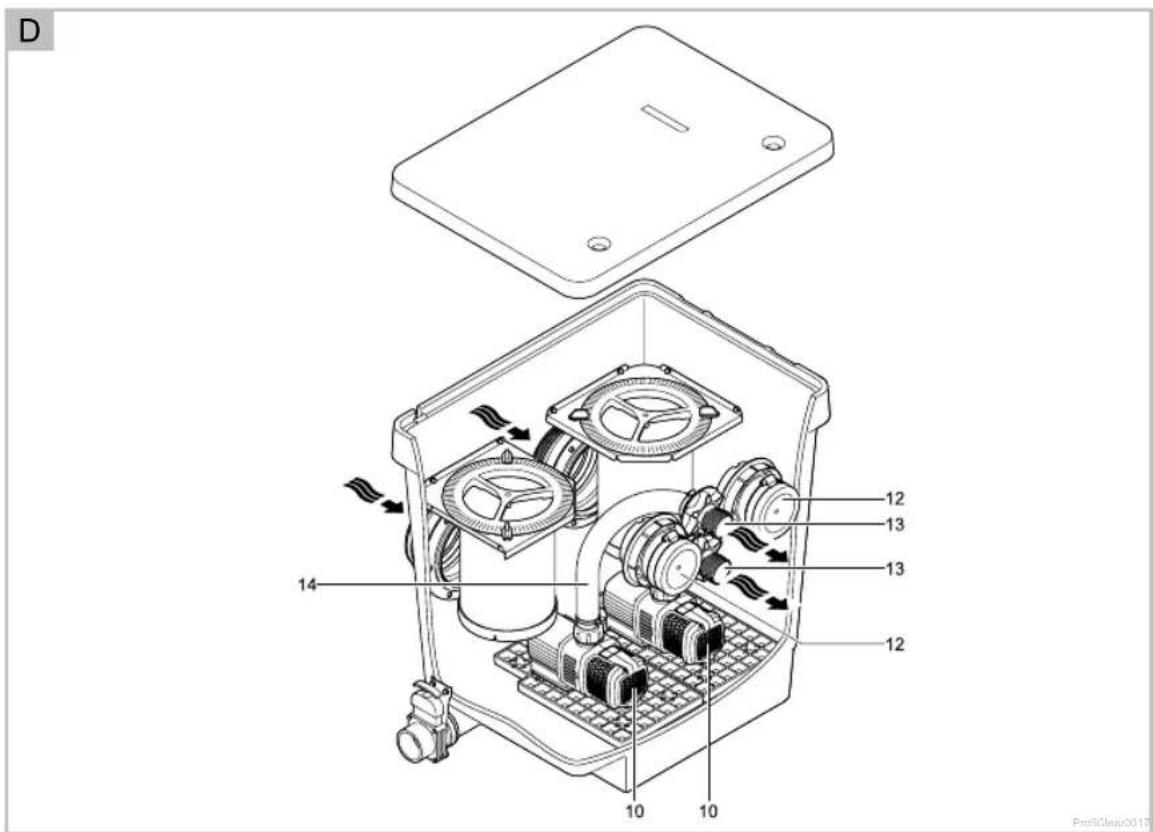
▶ Figures B, C, D show some of these connection options with the filter pump AquaMax Gravity Eco as an example:
- □ B: AquaMax Gravity Eco (10), connected to the Bitron Gravity UVC clarifying unit (9)
- □ C: AquaMax Gravity Eco (10), connected to the DN 110 outlet (4) by a DN 110 pipe connection (11)
- □ D: AquaMax Gravity Eco (10), connected to the 2" outlet (13) by a 2" hose (14)
- □ D: DN 110 plug (12), used for closing the unused DN 110 outlet
▶ Further options on request! Please refer to the operating manuals of the filter pumps and/or UVC clarifying units.
2.4 Intended use
ProfiClear Premium Individual Modul, in the following termed "unit", and all other parts from the delivery scope may be used exclusively as follows:
▶ For cleaning garden ponds.
▶ Operation under observance of the technical data.
The following restrictions apply to the unit:
▶ Only operate with water at a water temperature of min. +4 °C to max. +35 °C.
▶ Never use the unit to convey fluids other than water.
▶ Never run the unit without water.
▶ Do not use for commercial or industrial purposes.
▶ Do not use in conjunction with chemicals, foodstuff, easily flammable or explosive substances.
3 Safety information
Hazards to persons and assets may emanate from this unit if it is used in an improper manner or not in accordance with its intended use, or if the safety instructions are ignored.
This unit can be used by children from the age of 8 and by persons with physical, sensory or mental impairments or lack of experience and knowledge, as long as they are supervised or instructed on how to use the unit safely and are able to understand the potential hazards. Do not allow children to play with the unit. Do not allow children to clean or maintain the unit without close supervision.
GB
4 Installation
▶ The following tools are required:
- 10 mm ring spanner
- 7 mm socket spanner, 8 mm socket spanner
- PZ3 Phillips screwdriver
- Cordless drill/screwdriver with PZ3 bit (do not set to "drill"!)
4.1 Preparing the unit connection
Before installing, connecting and starting up the unit, perform the following tasks:
- 2 Remove 2 × strainer baskets(□ A 3)
- 1 Fit 1× DN 75 slide valve (□ A 7)
- 2 Fit 2×∅ 180 mm inlets (☐ A 8)
- 2 Fit 2× DN 110 outlets (☐ A 4)
- 2 Fit 2× 2" outlets (□ A 5)
▶ Remove the container cover to perform the following work.
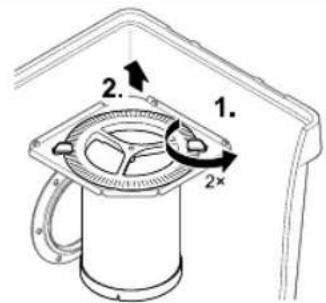
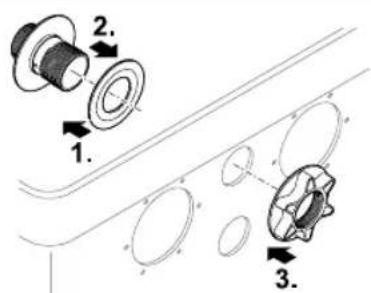
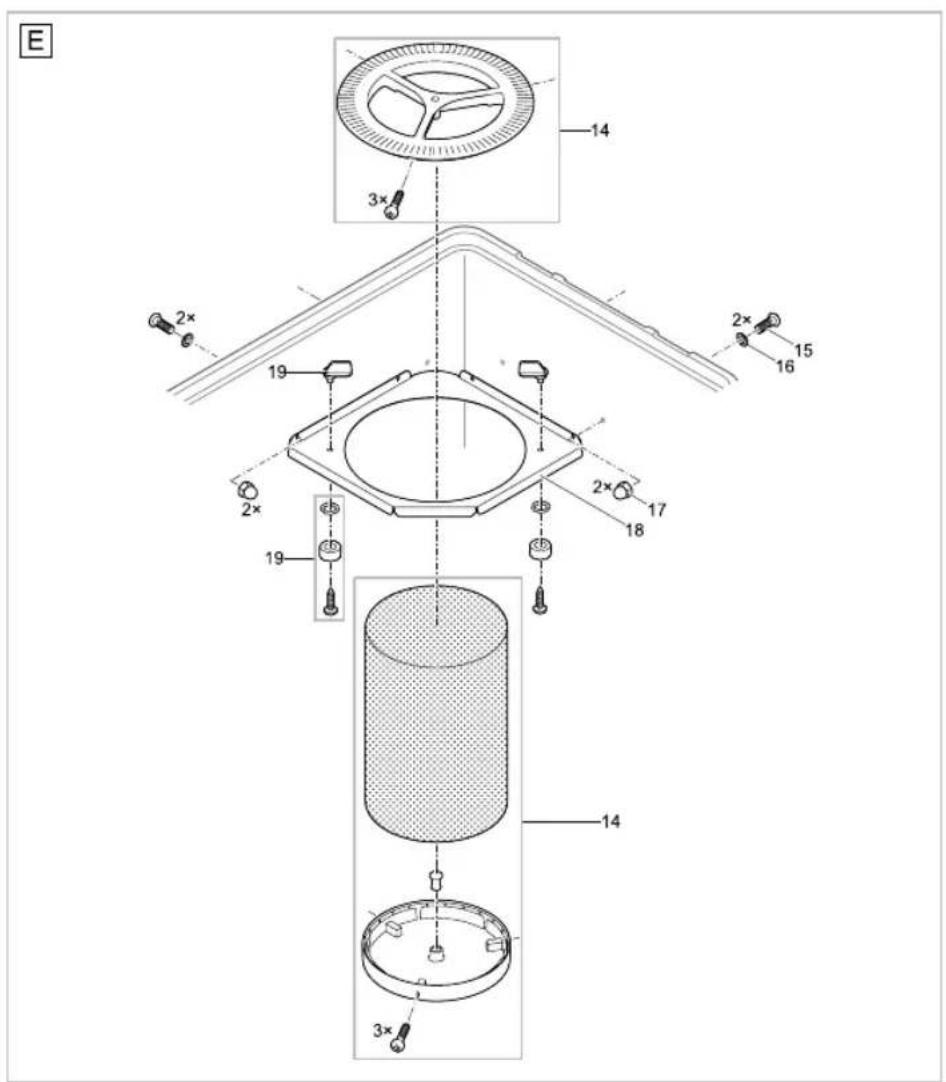
Removing the strainer baskets
How to proceed:
□E
- Undo both locking mechanisms (turn through 90°).
- Lift out the strainer baskets
Fitting the DN 75 slide valve
How to proceed:
□F
- Fit the slide valve into the connecting sleeve and secure with a hose clip.
- Fit the connecting sleeve onto the connection.
- Secure the holding plate of the slide valve to the outside of the container with cap nuts.
- Secure the hose clip on the connection.
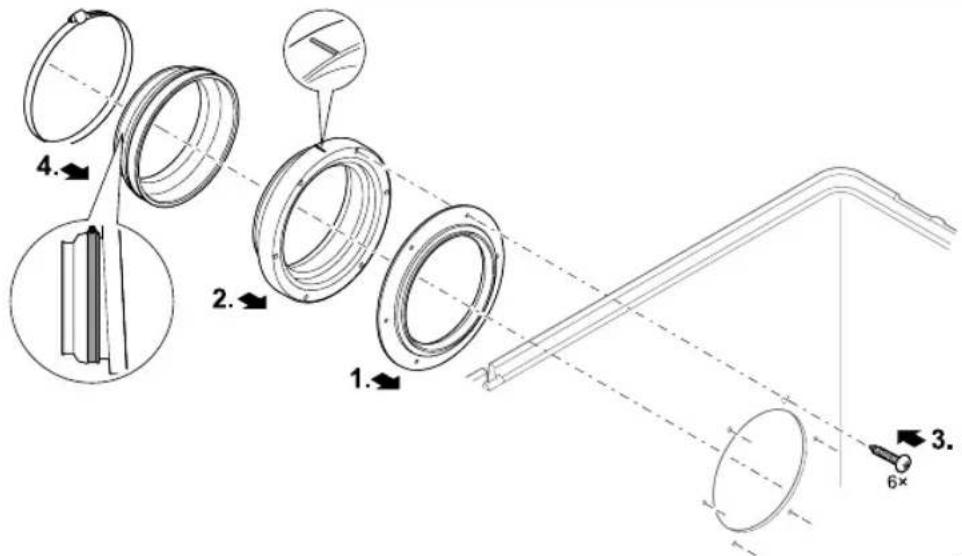
Fitting the ∅ 180 mm inlet
How to proceed:
□G
- If not already done: Fit the seal into the wall of the container from the outside. Ensure that the hole pattern of the seal is aligned to the hole pattern of the container.
- Fit the inlet to the seal.
Ensure that the raised marking is at the top and aligned in relation to the hole pattern. - Fasten the seal and inlet from the inside with oval head screws.
- Tighten all screws diagonally using the cordless screwdriver to ensure that the sealing ring is uniformly applied. Further tighten the screws using a Phillips screwdriver.
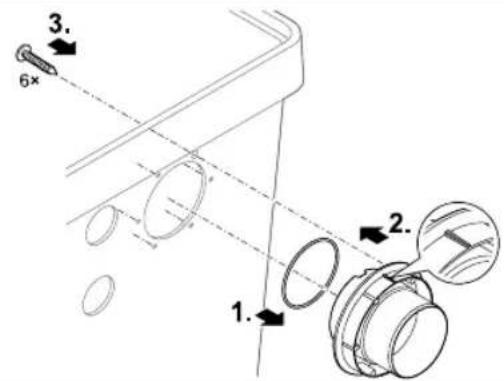
Fitting the DN 110 outlet
How to proceed:
H
-
Fit the O ring onto the outlet.
-
Fit the outlet into the respective hole of the container wall from the outside.
- Ensure that the raised marking is at the top and aligned in relation to the hole pattern.
- Fasten the outlet from the inside with oval head screws.
- Tighten all screws diagonally using the cordless screwdriver to ensure that the sealing ring is uniformly applied. Further tighten the screws using a Phillips screwdriver.
- If necessary: Close the outlet with the cover cap or connect further DN 110 pipes.
Fitting the 2" outlet
How to proceed:
□1
-
Push the flat seal onto the 2" connection.
-
Insert the 2" connection (long side first) from the inside into the hole.
-
Secure the 2" connection with the star grip nut.
-
Screw the 2" hose connector with flat seal and union nut from the inside onto the 2" connection.
-
Either screw the cover cap with flat seal or the 2" hose connector with flat seal and union nut from the outside onto the 2" connection.
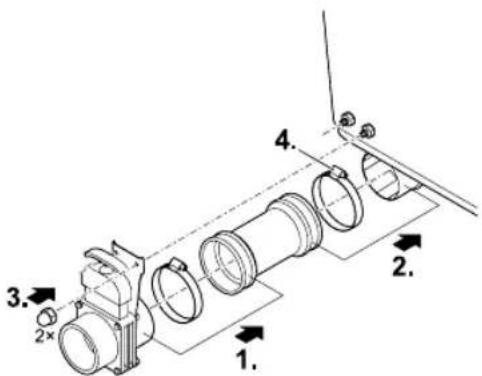
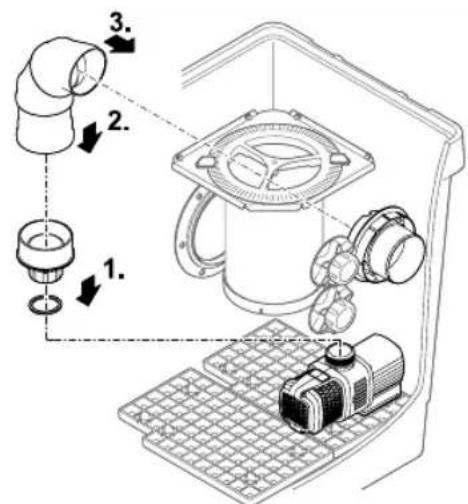
4.2 Installing the filter pump in the container
A maximum of two AquaMax Gravity Eco pumps can be installed in the container of an Individual Module. For this purpose, each pump must be equipped with a rubber foot and a vibration damper.
4.2.1 Connecting the AquaMax Gravity Eco pump to the DN 110 outlet
To ensure optimum connection of an AquaMax Gravity Eco pump to a DN 110 outlet, use a pipe connection consisting of the combination (DN 110): 45° connection bend - short straight pipe - 45° connection bend - short straight pipe.
How to proceed:
□ J
-
Prepare the filter pump according to the attendant operating manual with the connection adapter for the DN 110 connection.
-
Align the pipe connection (consisting of two 45^ connection bends and coupling sleeve) for connecting the filter pump to the DN°110 connection and glue together. Then fasten it to the connection adapter of the filter pump (secure using a pipe clip or glue). Place the filter pump in the container.
-
Connect the pipe connection to the DN 110 connection in the same way.
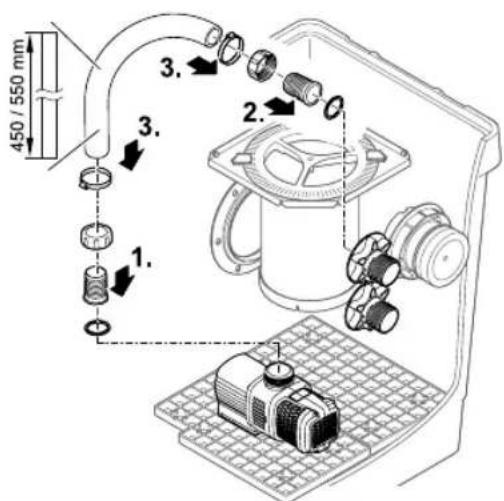
4.2.2 Connecting the AquaMax Gravity Eco pump to the 2" outlet
How to proceed:
□K
-
Fit a 2" hose connector with flat seal inserted and union nut to the filter pump.
-
Fit a 2" hose connector with flat seal inserted and union nut from the inside to the 2" connection.
-
Connect the hose and secure both ends with hose clips.
- GB -
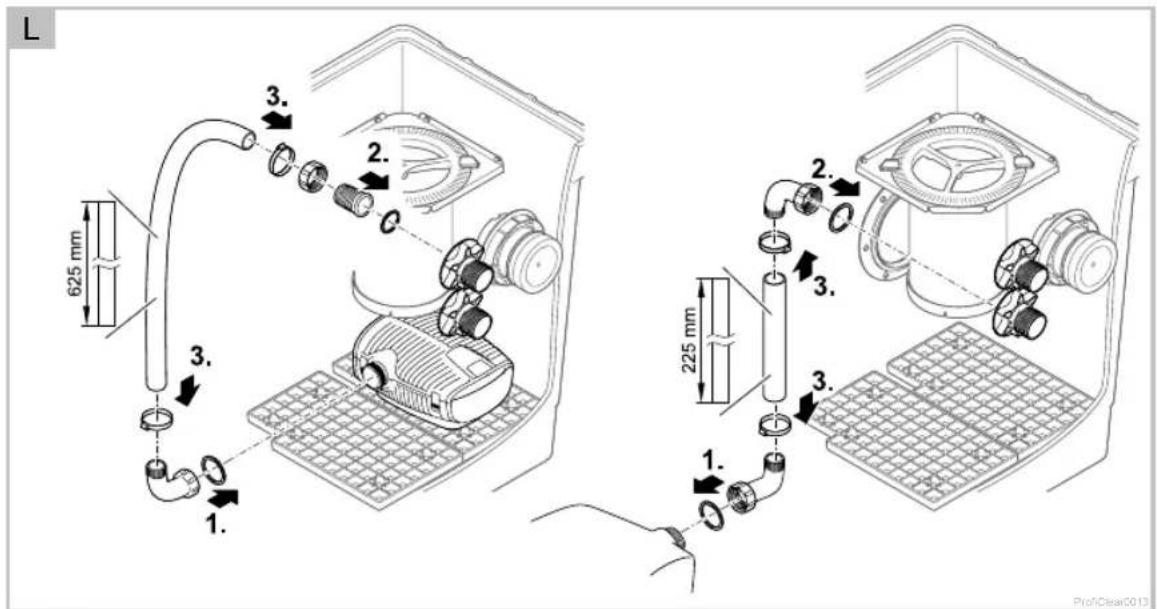
4.2.3 Connecting the AquaMax Eco Premium pump to the 2" outlet
The Individual Module offers space for installing two AquaMax Eco Premium filter pumps. In this case, the second filter pump has to be turned through 180° in relation to the other pump and installed slightly offset to the rear. The filter pumps are connected to the 2" outlets. The 2" hoses used for the connection should be connected to the filter pumps via a connection bend.
For the filter pump offset to the rear: Connect the 2" hose directly to the inside hose connector of the 2" outlet without using a second connection bend.
For the front filter pump: Connect a short connection hose with a second connection bend to the 2" outlet.
OASE recommends the 2" connection bend, Order No.: 50540.
How to proceed:
□L
-
Fit the O ring onto the outlet.
-
Fit the outlet into the respective hole of the container wall from the outside.
Ensure that the raised marking is at the top and aligned in relation to the hole pattern.
- Fasten the outlet from the inside with oval head screws.
4.3 Installing a UVC clarifying unit in the container
▶ A maximum of two Bitron Gravity UVC clarifying units can be installed in the container of the Individual Module in conjunction with two AquaMax Gravity Eco pumps. Please refer to the Bitron Gravity operating manual for information about installation.
5 Installation and connection
5.1 Installation planning
Note:
Use suitable transport and lifting aids to transport and install the unit.
The unit weighs more than 25 kg ( Technical Data).
Plan the installation of the filter system. With careful planning, taking the ambient conditions into account, you will obtain optimum operating results.
The following conditions must be met:
As the filter modules are very heavy when filled, they must be placed on a suitable base (at least on slabs, but preferably on a poured concrete base) to prevent them from subsiding.
▶ Plan sufficient space for carrying out cleaning and maintenance work.
- Drain the dirty water into the drain or far enough away from the pond so that it cannot flow back into the pond.
- If the coarse soiling and dirty water both run into the same pipe, it is important to use at least DN 110 pipes.
▶ Use a suitable system for removing coarse soiling, e.g. ProfiClear Premium Drum Filter Module.
5.2 Information regarding pipes
▶ Use suitable pipes.
- Do not use any right-angled bends. Bends with a maximum angle of 45^ are very efficient.
▶ Glue plastic pipes to ensure a permanent and reliable joint or use socket joints with clips to stop them from coming apart.
▶ Standing water in pipes can freeze when there is a hard frost and cause pipes to burst. For this reason, lay the pipes and hoses with a gradient (50 mm/m) to ensure that they can run empty.
For gravity fed systems, it must be possible to shut off the supply from the pond and the return to the pond for maintenance and repair work. For this reason, install suitable slide valves.
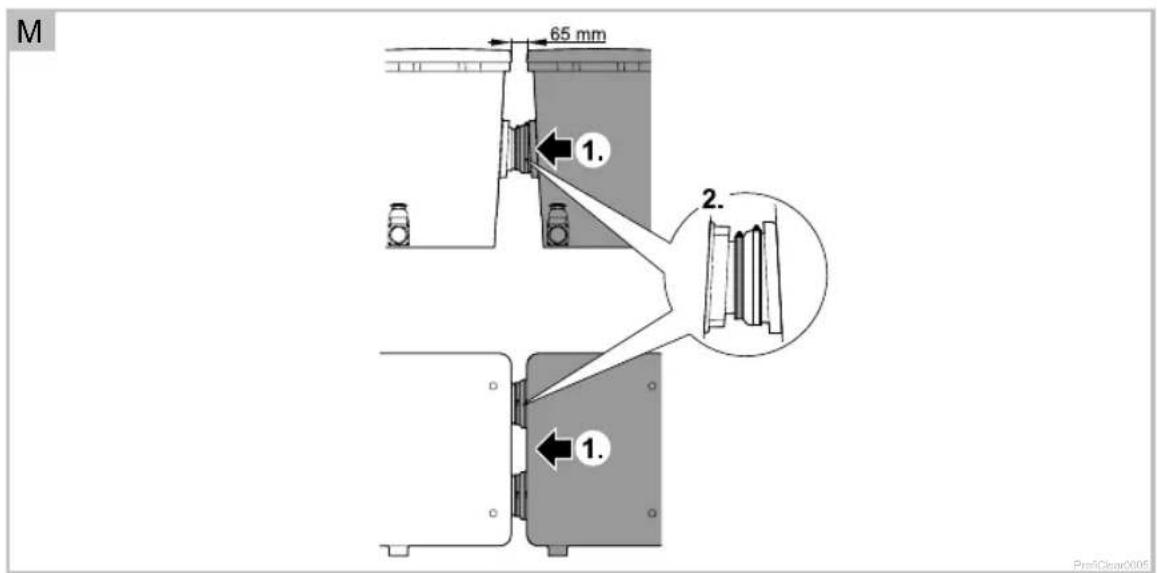
5.3 Installing the filter module and connecting it to additional filter modules
The Individual Module is fitted as the final stage in a row of ProfiClear Premium filters.
How to proceed:
□M
-
Position the Individual Module container behind the Moving Bed container or the drum filter and push it towards the other module (drum filter or other Moving Bed module) until the outlet socket of the other module slides inside the rubber socket of the Individual Module up to the stop.
The slide valves of the soiled water drains are all located on the same side. -
Secure the connection with a hose clip.
-
First position the hose clip screw at the top, then tighten. This facilitates later installation steps.
5.4 Returning the water to the pond
After it has passed through all cleaning stages, the clean water has to be returned to the pond. For this, connect DN 110 pipes to both DN 110 outlets.
GB
6 Commissioning/start-up
How to proceed:
- Close the slide valve for the DN 75 dirt outlet at the bottom of the container.
- Check that the entire filter system (pipes and hoses) is complete.
- Fill the container with water:
- Pump fed system: Switch on the filter pump.
- Gravity fed system: Open the slide valves (supply and return) of the ProfiClear Premium filter series to allow the water to flow.
- Check all pipes, hoses and their connections for leaks.
- Expansion seals may leak initially until they have fully expanded on contact with water.
- Fill the strainer baskets with filter medium ( Function description), if necessary.
- When all filter containers are filled with water, switch on the other electrical units (e.g. filter pumps). If using filter starters (e.g. OASE BioKick CWS), do not operate any UVC clarifying units for at least 24 hours so as not to disturb the colonisation of the filter media by micro-organisms.
7 Remedy of faults
| Malfunction | Possible cause | Remedy |
| No flow of water | Filter pump not switched on | Switch on the filter pump, connect the power plug |
| Supply to filter system or return to pond blocked | Clean the supply and/or return | |
| Water flow insufficient | Bottom drain, pipe or hose blocked Clean, replace if necessary | |
| Hose kinked Check hose, and replace if necessary | ||
| Excessive loss in lines Reduce line length to necessary minimum | ||
| No water is pumped out of the container | Filter pump in the container is defective Refer to the filter pump operating manual | |
8 Maintenance and cleaning

Attention! Dangerous electrical voltage.
Possible consequences: Death or severe injury.
Protective measures: Isolate the unit prior to reaching into the water and carrying out any work on the unit. Secure the unit from being switched on inadvertently.
The entire filter system only needs to be taken out of operation for cleaning and maintenance if it is extremely soiled.
▶ Do not use any chemical cleaning agents as they would kill the filter bacteria.
8.1 Cleaning the container
How to proceed:
- Switch off all filter pumps.
- Switch off all other electrical units of the filter system (e.g. UVC clarifying unit).
- Only applies to gravity fed systems: Close the slide valves (supply and return) of the filters connected in series to prevent further water flow.
- Open the slide valve for the DN 75 dirt outlet at the bottom of the container and dispose of the soiled water in a permissible way.
- Carry out cleaning measures.
- Close the slide valve (dirt outlet).
- Start up the filter system again ( Start-up).
8.2 Maintenance of the filter media
Please refer to the manufacturer's specifications for maintenance of the filter media. Otherwise it is sufficient to occasionally remove and rinse the strainer baskets.
9 Storage/Over-wintering
The unit is protected from frost:
The unit can be operated as long as the water temperature does not go below +4 °C.
The unit is not protected from frost:
Take the unit out of operation at water temperatures below +8^ C or, at the latest, when freezing temperatures are to be expected.
- Drain the unit as far as possible, clean thoroughly and check for damage.
▶ Empty all hoses, pipes and connections as far as possible.
▶ Leave the slide valves open.
▶ Cover the filter container to prevent the penetration of rain water.
▶ Protect pipes and slide valves that are in contact with water from frost.
10 Disposal
Support us in our endeavour to keep our environment intact, and adhere to the following disposal information!
Dispose of the unit in accordance with the national legal regulations.
- GB -
11 Technical data
| ProfiClear Premium Individual Module | |||
| Dimensions L × W × H mm 830 × 665 × 815 | |||
| without water kg 40 Weight | |||
| with water but without units kg 265 | |||
| Individual filter pellets maximum | 2 × 8 | |||
| Strainer baskets quantity pces. 2 | |||
| Inlet | quantity | pces. | 2 |
| connection | mm | ∅ 180 | |
| Outlet | quantity | pces. | 2 |
| connection | DN 110 | ||
| quantity | pces. | 2 | |
| connection | 2" | ||
| Dirt outlet | quantity | pce. | 1 |
| connection | DN 75 | ||
| Circulating capacity | minimum | l/h | 10000 |
| maximum | l/h | 33000 | |
Table des matières
ProfiClear0051
| Pos. | ProfiClear Premium Individual Modul |
| 5 | 19005 |
| 6 | 16387 |
| 7 | 18833 |
| 8 | 18446 |
| 9 | 18448 |

Pro1Clear0052
| Pos. | ProfitClear Premium Individual Modul |
| 10 | 17251 |
| 11 | 26987 |
| 12 | 26957 |
| 13 | 27572 |
| 14 | 18800 |
| 15 | 20292 |
| 16 | 20609 |
| 17 | 6117 |
| 18 | 17534 |
| 19 | 18812 |
Prof Clear0053


CE
1939707-13
OASE GmbH · www.oase-livingwater.com
Tecklenburger Straße 161 - 48477 Hörstel - Postfach 20 69 - 48469 Hörstel - Germany

- ProfiClear Premium Individualmodul
- Inhaltsverzeichnis
- Translation of the original Operating Instructions
- Information about these operating instructions
- Symbols used in these instructions
- Product Description
- Delivery scope and unit configuration
- Function description
- Optional configurations for installation as a gravity-fed system
- Intended use
- Safety information
- GB
- Installation
- Preparing the unit connection
- Removing the strainer baskets
- Fitting the DN 75 slide valve
- Fitting the ∅ 180 mm inlet
- Fitting the DN 110 outlet
- Fitting the 2" outlet
- Installing the filter pump in the container
- Connecting the AquaMax Gravity Eco pump to the DN 110 outlet
- Connecting the AquaMax Gravity Eco pump to the 2" outlet
- - GB -
- Connecting the AquaMax Eco Premium pump to the 2" outlet
- Installing a UVC clarifying unit in the container
- Installation and connection
- Installation planning
- Note:
- Information regarding pipes
- Installing the filter module and connecting it to additional filter modules
- Returning the water to the pond
- Commissioning/start-up
- Remedy of faults
- Maintenance and cleaning
- Cleaning the container
- Maintenance of the filter media
- Storage/Over-wintering
- Disposal
- Table des matières
Brand : OASE
Model : ProfiClear Premium
Category : Water filter