Click & Mash 3605 - Hand blender CASO - Free user manual and instructions
Find the device manual for free Click & Mash 3605 CASO in PDF.

| Product type | Cordless immersion blender |
| Brand | CASO |
| Model | Click & Mash 3605 |
| Power supply | Rechargeable lithium-ion battery via USB-C |
| Battery life | Up to 30 minutes |
| Charging time | Approximately 3 hours |
| Speed | Variable by pressing the power button |
| Safety | Double-action safety switch, overheating protection |
| Blade material | Stainless steel |
| Included accessories | Potato masher, whisk, milk frother, multi-chopper with knife, mixing bowl, battery, USB-C cable, pot protection |
| Main functions | Blend, chop, mash, whisk, froth milk |
| Dishwasher compatibility | Whisk, milk frother, multi-chopper container, pot protection, mixing bowl |
| Motor unit cleaning | Wipe with a damp cloth, do not immerse |
| Battery indicator | 5 white LEDs for charge status |
| Warranty | 24 months (Germany, Austria, Netherlands; for other countries contact service) |
Frequently Asked Questions - Click & Mash 3605 CASO
User questions about Click & Mash 3605 CASO
0 question about this device. Answer the ones you know or ask your own.
Ask a new question about this device
Download the instructions for your Hand blender in PDF format for free! Find your manual Click & Mash 3605 - CASO and take your electronic device back in hand. On this page are published all the documents necessary for the use of your device. Click & Mash 3605 by CASO.
USER MANUAL Click & Mash 3605 CASO
natural_image
Exterior view of a Coso micrometer stand (no text or symbols visible on body)

| DE | Weitere Sprachen dieser Bedienungsanleitung fi nden Sie unter www.caso-design.de oder wenn Sie den QR-Code scannen. |
| EN | To see these operating instructions in more languages, visit www.caso-design.de or scan the QR code. |
| FR | Vous trouverez ce mode d'emploi en plusieurs langues sur www.caso-design.de ou en scannant le code QR. |
| NL | Je vindt deze gebruiksaanwijzing met vertaling in verschillende talen op de volgende link op de website www.caso-design.de. U kunt ook de QR-code scannen om toegang te krijgen tot de vertalingen. |
| TR | Bu kılavuzun diğer dillere çevirileri için şu bağlantıya bakınız: www.caso-design.de. Bu amaçla, geçerli QR kodunu da tarayabilirsiniz. |
| RU | Это руководство по эксплуатации на других языках вы найдете, перейдя по ссылке www.caso-design.de или отсканировав QR-код. |
| RO | Aceste instrucțiuni de utilizare sunt disponibile în alte limbi la adresa www.caso-design.de sau scanând codul QR. |
| HE | www.caso-design.de www.caso-design.de www.caso-design.de www.caso-design.de www.caso-design.de www.caso-design.de www.caso-design.de www.caso-design.de www.caso-design.de www.caso-design.de www.caso-design.de www.caso-design.de www.caso-design.de www.caso-design.de www.caso-design.de www.caso-design.de www.caso-design.de www.caso-design.de www.caso-design.de www.caso-design.de www.caso-design.dewww.caso-design.de www.caso-design.de www.caso-design.de www.caso-design.de www.caso-design.de www.caso-design.de www.caso-design.de www.caso-design.de www.caso-design.de www.caso-design.de www.caso-design.de www.caso-design.de www.caso-design.de www.caso-design.de www.caso-design.de www.caso-design.de www.caso-design.de www.caso-design.de www.caso-design.de www.caso-design. |
| AR | وّإذَا إِمْنَالْعُثُورِ عَلَى الْمَزِيدِ مِنَ لَغَاتِ هَذَا الْدَلِيلِ عَلَى الْمُوْقَعِ الْإِلْكَتَرُونِيِيمُّنَ الْعُثُورِ عَلَى الْمَزِيدِ مِنَ لَغَاتِ هَذَا الْدَلِيلِ عَلَى الْمُوْقَعِ الْإِلْكَتَرُونِيِيمُّنَ الْعُثُورِ عَلَى الْمَزِيدِ мِنَ لَغَاتِ هَذَا الْدَلِيلِ عَلَى الْمُوْقَعِ الْإِلْكَتَرُونِيِيمُّنَ الْعُثُورِ عَلَى الْمَزِيدِ مِنَ لَغَاتِ هَذَا الْدَلِيلٍ عَلَى الْمُوْقَعِ الْإِلْكَتَرُونِيِيمُّنَ الْعُثُورِ عَلَى الْمَزِيدِ مِنَ لَغَاتِ هَذَا الْدَلِيلٍ عَلَى الْمُوْقَعِ الْإِكْتَرُونِيِيمُّنَ الْعُثُورِ عَلَى الْمَزِيدِ مِنَ لَغَاتِ هَذَا الْدَلِيلٍ عَلَى الْمُوْقَعِ الْإِكْتَرُونِيِيمُّنَ الْعُثُورِ وَمَزِ الْمَزِجَابِةِ السَّرِيَعَةِ قَمْت بَمْسَحْ رَمْز الْمَزِجَابِةِ السَّرِيَعَةِ قَمْت بَمْسَحْ رَمْز الْمَزِجَابِةِ السَّرِيَعَةِ قَمْت بَمْسَحْ رَمْز الْمَزِجَابِةِ السَّرِیَعَةِ قَمْت بَمْسَحْ رَمْز الْمَزِجَابِةِ السَّرِیَعَةِ قَمْت بَمْسَحْ رَمْز الْمَزِجَابِةِ السَّرِیَعَةِ قَمْت بَمْسَحُ رَمْز الْمَزِجَابِةِ السَّرِیَعَةِ قَمْت بَمْسَحُ رَمْز الْمَزِجَابِةِ السَّرِیَعَةِ قَمْت بَمْسَحُ رَمْز الْمَزِجَابِةِ |
Technische Daten / Technical Data / Caractéristiques techniques / Technische gegevens / Teknik bilgiler / Технические характеристики / Date tehnice /
| Gerät / Device / Appareil / Aparaat / Cihaz / Прибор / Aparat / اجهاز/הכלה | Kabelloser Stabmixer / Cordless handheld mixer / Mixeur plongeant sans fil / Draadloze staaf-mixer / Kablosuz el blenderi / Беспроводной блендер / Mixer vertical fără fir / خلاط يدوي لاسلكي |
| Name / Name / Nom / Name / Adı / Наименование Nume / الاس / אַרְבָרִים | CASO Click & Mash |
| Artikel-Nr. / Item No. / N°. d'article / Artikelnr. / Ürün no. / N° артикула / Cod articol / رقم البند | 03605 |
| Anschlussdaten Gerät / Connection data device / Données de connexion de l'appareil / Apparaat voor verbindingsgegevens / Cihaz bağlantı bilgileri / Информация о подключении прибора / Date de conectare aparat / אַרְבָרִים/הכלה | DC 12V |
| Leistungsaufnahme / Power consumption / Données de raccordement / Vermogens / Nominal çıkışı / Параметры подключения / Date de conectare / القوة / אַרְבָרִים | 180 W |
| Außenabmessungen (B/H/T) / External measurements (W x H x D) / Dimensions externes (l/h/p) / Afmetingen (BxHxD) / Diş Gövdenin Boyutu (Y/G/D) / Габаритные размеры (Ш/B/Г) Dimensiuni exterioare (lätime/înälțime/adâncime) / (הכלה/הכלה/הכלה/הכלה/הכלה/הכלה/הכלה/הכלה/הכלה/הכלה/הכלה/הכלה/הכלה/הכלה/הכלה/הכלה/הכלה/הכלה/הכלה/הכלה/הכלה/הכלה/הכלה/הכלה/הכלה/הכלה | 70 mm x 425 mm x 100 mm |
| Nettogewicht / Net weight / Poids net / Nettogewicht / Net ağırlık / Bec / Greutate netă / (الوزن الصافي) | 960 g |
The following warning notices are used in the Operating Manual concerned here.

DANGER
A warning notice of this level of danger indicates a potentially dangerous situation. If the dangerous situation is not avoided, this can lead to death or serious injuries.
Observe the instructions in this warning notice in order to avoid the danger of death or serious personal injuries.

WARNING
A warning notice of this level of danger indicates a possible dangerous situation. If the dangerous situation is not avoided, this can lead to serious injuries.
Observe the instructions in this warning notice in order to avoid the personal injuries.

ATTENTION
A warning notice of this level of danger indicates a possible dangerous situation. If the dangerous situation is not avoided, this can lead to slight or moderate injuries.
Observe the instructions in this warning notice in order to avoid the personal injuries.
PLEASE NOTE
A notice of this kind indicates additional information, which will simplify the handling of the machine.
Intended use
This device is only intended for use in households in enclosed spaces for
- chopping food
- blending liquids and soft ingredients
- pureeing cooked food, e.g. for soups, sauces and baby food
- frothing milk
• whipping cream, egg whites, etc.
This appliance is intended to be used in household and similar applications, such as:
- in kitchens, for employees in shops, offices and other commercial areas,
- in farms,
• by customers in hotels, motels and other similar residential environments,
• in bed and breakfast establishments.
Uses for a different purpose or for a purpose which exceeds this description are considered incompatible with the intended or designated use.

WARNING
Danger due to unintended use! Dangers can emanate from the device if it is used for an unintended use and/or a different kind of use.
▶ Use the device exclusively for its intended use.
▶ Observe the procedural methods described in this Operating Manual.
Claims of all kinds due to damages resulting from unintended uses are excluded. The User bears the sole risk.
General Safety information
PLEASE NOTE
Please observe the following general safety notices with regard to the safe handling of the device.
Examine the device for any visible external damages prior to using it. Never put a damaged device into operation.
PLEASE NOTE
Children must not use this appliance. Keep the appliance and its power supply unit away from children.
The device may be used by individuals with reduced physical, sensory or mental capabilities or a lack of experience and / or knowledge of their use if they are supervised or have been instructed at to the safe use of the device and have understood the resulting hazards.
▶ Cleaning and maintenance work must not be carried out by children without supervision.
▶ Children are not allowed to play with the device.
Only customer service departments authorized by the manufacturer may carry out repairs on the device, as otherwise the guarantee entitlements will be null and void in the event of any subsequent damages. Improperly performed repairs can cause considerable dangers for the user.
▶ Defective components must always be replaced with original replacement parts. Only such parts will guarantee that the safety requirements are fulfilled.
Use the appliance only as described in the user's guide to avoid possible injury from misuse.
▶ Operate the appliance only in dry indoor areas.
▶ Do not operate the appliance unattended.
▶ Do not use the appliance:
- if the appliance itself or parts are damaged,
- if the battery or power cord is damaged,
- if the appliance has been dropped.
Do not make any modifications to the appliance. Only have repairs carried out by a specialist workshop, as appliances that have not been repaired properly endanger the user. Please also observe the enclosed warranty conditions.
▶ Only use the appliance with original accessories.
The appliance is equipped with a safety switch and initially only starts when both switches are pressed simultaneously.
Remove the accessories from the appliance when it is unattended, not in use or being cleaned.
Remove the battery before cleaning, maintaining, disassembling or assembling the appliance.
PLEASE NOTE
The appliance has overheating protection. If the appliance overheats, it will stop automatically. Wait about 30 minutes before using the appliance again.
▶ Do not overload the appliance and do not operate it with no load.
▶ Make sure that all parts are correctly fitted and secure.
Sources of danger / Danger of injury

WARNING
Careless use of the appliance may result in injury. Note the following warnings to avoid injury.
The blades are sharp. Be careful when handling or cleaning the appliance. Be careful when emptying the blending container.
▶ After switching off, wait until the motor has come to a standstill before opening the appliance and replacing accessories. Do not touch any parts that are still moving!
Remove the battery when not supervised and before assembling, replacing accessories, disassembling or cleaning.
▶ Stop processing food immediately if the rotating accessory stops rotating or only rotates very slowly
The multi-chopper accessories and the blending container are not suitable for chopping hot or liquid ingredients at temperatures above 80 °C.
Dangers due to electrical power

DANGER
Mortal danger due to electrical power! Mortal danger exists when coming into contact with live wires or subassemblies! Observe the following safety notices to avoid dangers due to electrical power:
▶ Do not charge the battery with a damaged USB-C charging cable or power adapter.
The rechargeable battery supplied must not be replaced with other rechargeable batteries. You can purchase a replacement battery from us (Art. no: 3624).
▶ Never disassemble the battery, expose it to high temperatures or throw it into a fire.

DANGER
If the battery has leaked, do not allow the battery acid to come into contact with your skin, eyes or mucous membranes. In the event of contact with battery acid, rinse the affected areas immediately with plenty of clean water and seek medical assistance without delay.
Do not immerse the appliance in water or other liquids, and do not put it in the dishwasher.
Transport inspection

WARNING
Do not allow children to play with packaging materials due to risk of suffocation.
PLEASE NOTE
Examine the shipment to ensure the unit and manual are included and inspect the unit for any visible damage.
Immediately notify the carrier and/or the supplier about an incomplete shipment or any damage as a result of inadequate packaging or mishandling.
Setup location requirements
In order to ensure the safe and trouble-free operation of the device, the setup location must fulfil the following prerequisites:
- Place the device on a firm and even work surface.
- Choose the setup location in such a way that children cannot reach any hot surfaces on the device.
- The device is not intended to be installed in a wall or a built-in cupboard.
- Do not set up the device in a hot, wet or extremely damp environment or near flammable material.
Electrical connection
In order to ensure the safe and trouble-free operation of the device, the following instructions must be observed for the electrical connection:
- Before connecting the device, compare the connection data (voltage and frequency) on the rating plate with those of your electrical network. This data must agree in order that no damages occur in the device. If in doubt, ask your qualified electrician.
FR
Sécurité
Table of contents - Operation
1 General 54
1.1 Information on this manual....55
1.2 Limitation of liability 55
1.3 Copyright protection....55
1.4 Delivery scope 55
1.5 Unpacking....55
2 Design and Function....56
2.1 Overview....56
2.2 Control Panel 57
2.3 Rating plate....57
3 Operation and Handling 57
3.1 Before first use 57
3.2 Tips for using the device....57
3.3 Assembly 57
3.3.1 for using the blender shaft, whisk or milk frother 57
3.3.2 for using the multi-chopper 58
3.4 Operation 58
3.4.1 If food gets stuck during use....58
3.5 Recipes for the blender shaft or multi chopper 59
3.5.1 Recipe for green pesto | Ingredients for 4 portions 59
3.5.2 Recipe for a tomato and feta spread 59
3.6 Battery indicator before and during use....60
3.7 Charging the battery....60
3.8 Display of the charging process 60
4 Cleaning and Maintenance 60
4.1 Safety information....61
4.2 Cleaning....61
5 Troubleshooting 61
5.1 Safety notices 61
5.2 Troubleshooting table 62
6 Disposal of the Old Device 62
6.1 Disposal of the packaging....63
7 Guarantee....63
1General
Please read the information contained herein so that you can become familiar with your device quickly and take advantage of the full scope of its functions. Your appliance will serve you for many years if you handle it and care for it properly. We wish you a lot of pleasure in using it!
1.1 Information on this manual
These operating instructions are a component of the Cordless handheld mixer Click & Mash (referred to hereafter as the Device) and provide you with important information for the initial commissioning, safety, intended use and care of the device. The Operating Instructions must be available at all times at the device. This Operating Manual must be read and applied by every person who is instructed to work with the device:
- Commissioning, - Operation,
- Troubleshooting and/or • Cleaning
Keep the Operating Manual in a safe place and pass it on to the subsequent owner along with the device.
1.2 Limitation of liability
All the technical information, data and notices with regard to the installation, operation and care are completely up-to-date at the time of printing and are compiled to the best of our knowledge and belief, taking our past experience and findings into consideration. No claims can be derived from the information provided, the illustrations or descriptions in this manual. The manufacturer does not assume any liability for damages arising as a result of the following:
• Non-observance of the manual
• Uses for non-intended purposes
- Improper repairs
- Technical alterations, modifications of the device
- Use of unauthorized spare parts
Modifi cations of the device are not recommended and are not covered by the guaran- tee. All translations are carried out to the best of our knowledge. We do not assume any liability for translation errors, not even if the translation was carried out by us or on our instructions. The original German text remains solely binding.
1.3 Copyright protection
This document is copyright protected. CASO GmbH reserves all the rights, including those for photomechanical reproduction, duplication and distribution using special processes (e.g. data processing, data carriers, data networks), even partially. Subject to content and technical changes.
1.4 Deliveryscope
As a rule, the articles are delivered with the following components:
- CASO Click & Mash
- Rechargeable battery
- Blender shaft
- Bowl guard
- Whisk with accessory adapter
- Milk frother
- Multi-chopper container with attachment
- Multi-chopper blade
- Blending container
• USB-C charging cable (without power adapter)
• Operation Manual
1.5 Unpacking
Carefully remove the packaging material and unit from the carton.
PLEASE NOTE
If possible, keep the original packaging for the duration of the guarantee period in the event a return is necessary.
2 Design and Function
This chapter provides you with important information of the design and function of the device.
2.1Overview
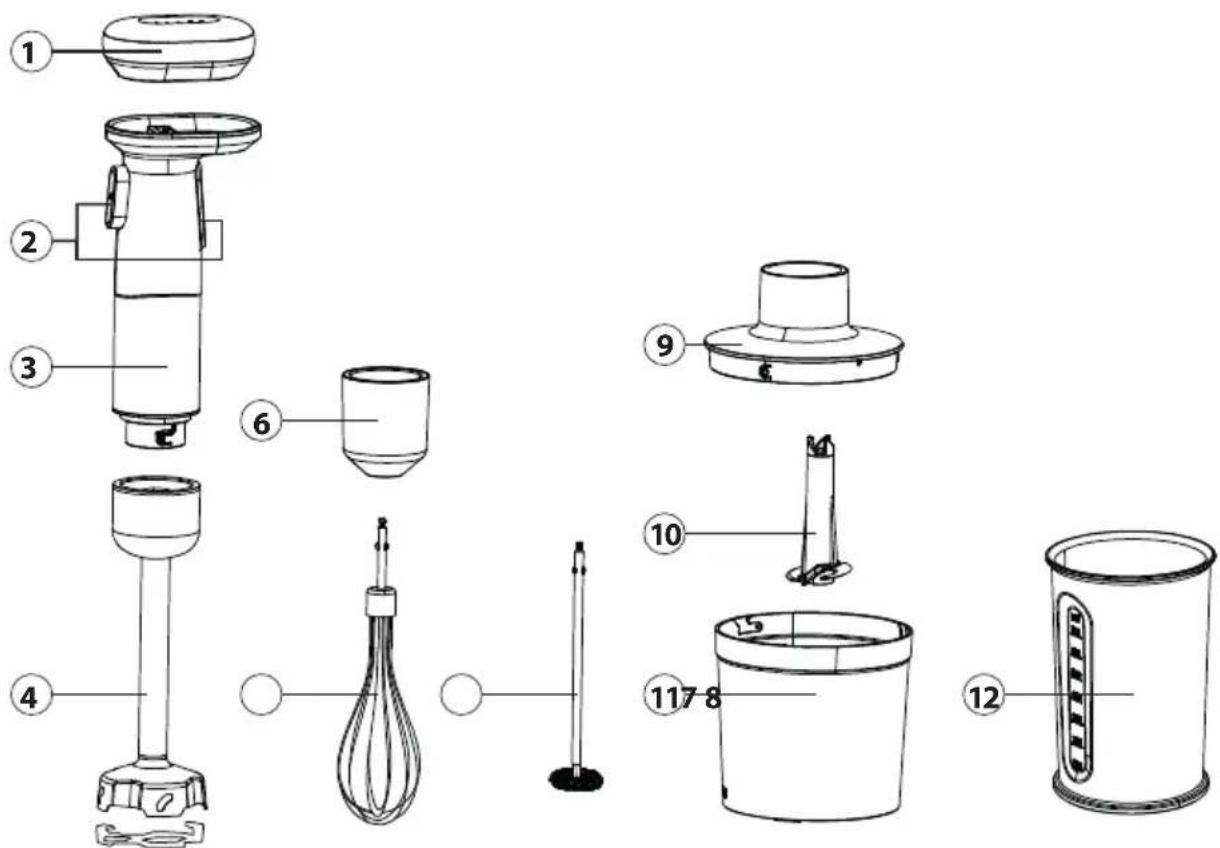
① Battery
② Control buttons
③ Motor unit
④ Blender shaft
⑤ Bowl guard
⑥ Accessory adapter
⑦ Whisk
⑧ Milk frother
⑨ Multi-chopper attachment
10 Multi-chopper blade
⑪ Multi-chopper container
12 Blending container
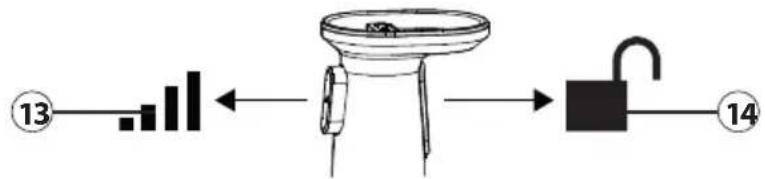
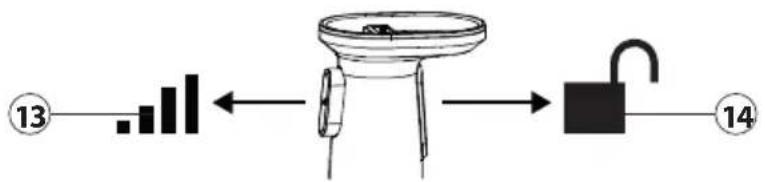
2.2 Control Panel
flowchart
graph LR
    A["13"] --> B["Bar"]
    B --> C["←"]
    C --> D["Valve"]
    D --> E["Unlabeled Block"]
    E --> F["14"]
13 Power button
⑭ Safety switch
2.3 Ratingplate
The rating plate with the connection and performance data is located on the back of the appliance.
3 Operation and Handling
This chapter provides you with important information and notes on the operation and basic settings of the appliance.
3.1 Before first use
Clean the device as described in the "Cleaning and maintenance" section.
PLEASE NOTE
To achieve the best performance, we recommended that you fully charge the battery before first use.
Before use, make sure that all parts are correctly assembled and in place.
There may be a slight odour when using the appliance for the first time. This is harmless and disappears with time.
3.2 Tips for using the device
- Allow hot food to cool down before processing it. (max. 80 °C).
- Pre-cut large ingredients into pieces before processing them.
3.3Assembly
3.3.1 for using the blender shaft, whisk or milk frother
- Place the blending container on a stable surface.
- If applicable, insert the whisk or milk frother into the accessory adapter.
- Place the motor unit on the blender shaft or the accessory adapter.
- Turn the motor unit and the blender shaft or accessory adapter in opposite directions (in the direction of the 🔒 symbol on the blender shaft or accessory adapter) until both parts click into place.
- When using the blender shaft, you can also place the bowl guard on the blender shaft to protect bowls and containers.
- Place the rechargeable battery on the motor unit by positioning the contacts on top of each other.
- The battery docks magnetically and the appliance is ready for use.
3.3.2 for using the multi-chopper
- Place the multi-chopper container on a stable surface.
- Hold the blades on the drive shaft and place the blade unit on the metal shaft in the container.
- Cut the desired food into coarse pieces and place them in the container.
- Attach the multi-chopper attachment. Pay attention to the recesses in the container attachment and the container.
- Place the motor unit on the container attachment and slowly turn the unit clockwise until it clicks into place.
- Place the rechargeable battery on the motor unit by positioning the contacts on top of each other.
- The battery docks magnetically and the appliance is ready for use.
3.4Operation

WARNING
The blades are sharp. Be careful when handling or cleaning the appliance.
The appliance has overheating protection. If the appliance overheats, it will stop automatically. Wait about 30 minutes before using the appliance again.
The appliance is equipped with a safety switch and initially only starts when both switches are pressed simultaneously.
- Assemble the appliance as described under „Assembly“.
- To begin, press the safety switch ( ■ ) at the same time as the power button ( ).
- Once the appliance has started, you can release the safety switch.
- You can determine the speed of the appliance by the pressure you exert on the power button.
- When you release the power button, the appliance stops working.
- If you press only the power button again immediately afterwards, the appliance will continue to work. This allows you to pulse the operation.
- After use, wait until all parts have come to a standstill.
- Remove the battery from the motor unit before dismantling the accessories.
PLEASE NOTE
Tip! It usually only takes a few seconds to chop food. We recommend chopping the food at intervals.
Immerse the blender shaft, whisk or milk frother in the food before starting the appliance. Move the appliance slowly up and down and in circles to process the ingredients.
After 3 seconds at a standstill, you must press the safety switch again at the same time as the power button to start the appliance.
3.4.1 If food gets stuck during use
- Release the power button and wait until the appliance has come to a standstill.
-
Remove the battery and, when using the multi-chopper, the motor unit and the multi-chopper attachment.
-
Loosen the food using a fork or knife. Be careful as the blades are sharp.
-
Once the food has been removed and the blades are free, reassemble the appliance and continue operation.
PLEASE NOTE
Pay attention to the MAX marking on the multi-chopper container and do not overfi ll the blending container.
Do not grind any hard foods such as nutmeg, peppercorns, cartilage or stones.
The container is designed for max. 80 °C. Do not add any food that is hotter than 80 °C.
Before starting the appliance, always check that it is correctly assembled.
3.5 Recipes for the blender shaft or multi chopper
3.5.1 Recipe for green pesto | Ingredients for 4 portions
Ingredients:
- 50 g pine nuts • 3 - 4 cloves of garlic
- 1 tsp salt
- 3 bunches of basil leaves
- 100 g grated or sliced Parmesan cheese • 200 ml olive oil
Preparation:
- Toast the pine nuts in a pan without fat until golden brown and leave to cool briefly on a plate.
- Peel the garlic, place it in the blending container or multi-chopper container with the salt, pine nuts and basil leaves and chop.
- Add the Parmesan and olive oil and continue to chop until the desired consistency is achieved.
- For pasta dishes, mix the pesto with 1 - 2 tablespoons of pasta water and serve with the pasta.
3.5.2 Recipe for a tomato and feta spread
Ingredients:
- 2 cloves of garlic
- 12 small onion
- 200 g cream cheese
- 150 g feta cheese
- Approx. 70 g dried tomatoes (preserved in oil), drained weight
- 1 tsp basil (fresh or dried) • salt, pepper, oregano
Preparation:
- Peel and quarter the onion. Peel the garlic and place it in the blending container or multi-chopper container with the onion. Chop for 5-10 seconds.
- Add the cream cheese, tomatoes and spices. Chop and mix until a uniform consistency is achieved.
- Break the feta into small pieces and add. Carefully mix in the feta using the pulse control.
- The oil in which the tomatoes were marinated can also be used for flavouring. Mix in some of the oil in step 2.
3.6 Battery indicator before and during use
To check the battery status before use, press the small button on the bottom of the battery. Using the device discharges the battery. The indicator lights go out one after the other and show the battery capacity.
• 81% to 100% of capacity: 5 white LEDs
• 61% to 80% of capacity: 4 white LEDs
• 41% to 60% of capacity: 3 white LEDs
• 21% to 40% of capacity: 2 white LEDs
• < 20% of capacity: 1 white LED
PLEASE NOTE
The battery life depends on the consistency, texture and quantity of the food to be processed. On average, the appliance has a battery life of up to 30 min.
3.7 Charging the battery
- Remove the battery from the motor unit.
- Connect the USB C end (smaller end) of the charging cable to the bottom of the battery.
- Connect the USB plug (larger end) of the charging cable to a suitable charging adapter.
- Plug the charging adapter (not included in the scope of delivery) into the socket.
- During the charging process, the LED display fl ashes and indicates the charging progress. The LEDs light up permanently as soon as the device is fully charged.
- Remove the charging cable.
PLEASE NOTE
It takes about 3 hours until the battery is fully charged.
The device cannot be used during the charging process.
The device can be stored for up to 6 months when the battery is fully charged. If the device is stored for more than 6 months, it should be recharged before the next use.
3.8 Display of the charging process
The indicator lights provide feedback on the charging status during the charging process:
• < than 20% of capacity: all LEDs flash in sequence
• 20% to 40% of capacity: 1 LED lights up continuously and the others flash one after the other
- 41% to 60% of capacity: 2 LEDs light up continuously and the others flash one after the other
- 61% to 80% of capacity: 3 LEDs light up continuously and the others flash one after the other
- 81% to 99% of capacity: 4 LEDs light up continuously and one fl ashes.
• 100% capacity: all LEDs light up continuously.
4 Cleaning and Maintenance
This chapter provides you with important notices with regard to cleaning and maintaining the device. Please observe the notices to prevent damages due to cleaning the device incorrectly and to ensure trouble-free operation.
4.1 Safetyinformation

ATTENTION
Please observe the safety instructions, before cleaning your device:
Remove the battery from the appliance before cleaning and when it is not in use.
Clean the appliance immediately after each use. Extended waiting unnecessarily complicates cleaning and can make it impossible in extreme cases. Excessive accumulations of dirt can even damage the device under certain circumstances.
If dampness penetrates into the device, this can damage the electronic components.
Do not use any aggressive or abrasive cleaning agents or solvents.
Do not scrape off stubborn dirt with hard items.
Do not immerse the motor unit in water or other liquids, and do not put it in the dishwasher.
The blades are very sharp, so handle them with care when cleaning.
▶ Never leave the blades in soapy water so that they float „invisibly“ in the water.
Dry all parts before reusing or storing them. Store the parts, as well as sharp knives, out of the reach of children.
4.2Cleaning
Motor unit
Wipe the outside of the motor unit with a soft, damp cloth after every use.
Accessories
- Half fill the Multi-chopper container with warm water, add a few drops of washing-up liquid and let the device run for 30 seconds. Rinse container thoroughly with luke-warm water and then dry it thoroughly.
- Clean the whisk adapter, blender shaft, multi-chopper attachment and multi-chopper blade under running water with a little washing-up liquid.
- The whisk, milk frother, multi-chopper container bowl guard and blending container can be cleaned in the dishwasher.
5Troubleshooting
This chapter provides you with important notices with regard to operating the device. Observe the following notices to avoid dangers and damages:
5.1 Safetynotices

ATTENTION
Repairs of electrical appliances must be carried out by qualified person who are trained by the manufacturer.
Repairs performed by untrained persons may result in considerable hazards for the user and damage the machine.
5.2 Troubleshootingtable
If an error occurs, then an error code will appear on the control panel display. It describes the reason for the error.
| Problem Possible cause Solution | ||
| The appliance does not work even though the buttons are pressed. | The appliance is not assembled correctly. | Check the assembly of the appliance. |
| The battery has not been placed correctly on the motor unit or the battery is empty. | Check the position of the battery or charge the battery. | |
| The appliance stops during operation. | The appliance has been in operation for too long, it is blocked or there is too much food in the multi chopper container. | Allow the appliance to cool down for at least 15 minutes and remove some of the food if necessary. |
| The appliance vibrates unusually or is louder than usual. | The multi-chopper container is not assembled correctly or is standing on an uneven surface. | Check the assembly of the appliance. Place the appliance on a level surface. |
| There is too much food in the container. | Remove some of the food. | |
| The lights on the battery flash quickly and one lights up blue. | The motor unit has over-heated. | Leave the appliance to rest for at least 30 minutes. |
| The battery lights flash quickly and one lights up red. | The battery is overheated or has been discharged too much. | Allow the battery to rest for at least 30 minutes and charge it. |
PLEASE NOTE
If you cannot solve the problem by carrying out the steps described above, our Customer Service will help you free of charge.
Clean the device before you send it to customer service.
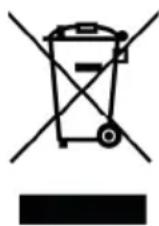
6 Disposal of the Old Device
Old electric and electronic devices frequently still contain valuable materials. However, they also contain damaging substances, which were necessary for their functionality and safety. If these were put in the non-recyclable waste or were handled incorrectly, they could be detrimental to human health and the environment. Therefore, do not put your old device into the non-recyclable waste under any circumstances.
PLEASE NOTE
Utilise the collection point, established in your town, to return and recycle old electric and electronic devices. If necessary, contact your town hall, local refuse collection service or your dealer for information.
▶ Ensure that your old device is stored safely away from children until it is taken away.
6.1 Disposal of the packaging
The packaging protects the device against damages during transit. The packaging materials are selected in accordance with environmentally compatible and recycling-related points of view and can therefore be recycled. Returning the packaging back to the material loop saves raw materials and reduces the quantities of accumulated waste. Take any packaging materials that are no longer required to "Green Dot" recycling collection points for disposal.

7Guarantee
We provide a 24-month guarantee for defects caused by production or material faults, beginning on the date of purchase. Our guarantee is valid for Germany, Austria and the Netherlands. For all other countries, please contact us.
Your legal guarantee claims as per Art. 437 ff . German Civil Code (BGB) will remain unaff ected by this. You may exercise your statutory guarantee rights free of charge. The guarantee does not cover damage caused by improper handling or use of the product or defects which have only a minor impact on the product's functionality or value. In addition to this, the guarantee also excludes parts which are subject to wear and tear; transport damages insofar as we are not responsible for them and damages caused by repairs which were not carried out by us.
This product has been constructed for non-commercial use (domestic use) and its performance is designed to meet the corresponding needs. The guarantee only covers commercial use insofar as it is comparable to domestic use. The product is not intended for any other type of commercial use.
In the case of legitimate complaints we may either repair the defective product or replace it with a defect-free product at our discretion. Obvious defects must be notified to us within 14 days of the product's delivery. Any further claims are excluded.
When making a guarantee claim please contact us before you return the product (always with the purchase receipt!). Our contact details ("Guarantor") are provided at the beginning of this instruction manual.
DE
EN
FR
NL
TR
RU
2.3Plaquesignalétique
① Batterij
② Bedieningsknoppen
③ Motoreenheid
④ Blender
⑤ Potbescherming
⑥ Accessoires adapter
⑦ Klopper
⑧ Melkopschuimer
⑨ Multi-hakselaar hulpstuk
10 Multi-hakselmes
⑪ Multi-vernietiger container
12 Mengbeker
2.2 Bedieningselementen
flowchart
graph LR
    A["Step 13"] --> B["Bar Chart"]
    B --> C["Lock"]
    C --> D["Padlock"]
    D --> E["Step 14"]
1
Akü
2
| DE | Weitere Sprachen dieser Bedienungsanleitung fi nden Sie unter www.caso-design.de oder wenn Sie den QR-Code scannen. |
| EN | To see these operating instructions in more languages, visit www.caso-design.de or scan the QR code. |
| FR | Vous trouverez ce mode d'emploi en plusieurs langues sur www.caso-design.de ou en scannant le code QR. |
| NL | Je vindt deze gebruiksaanwijzing met vertaling in verschillende talen op de volgende link op de website www.caso-design.de. U kunt ook de QR-code scannen om toegang te krijgen tot de vertalingen. |
| TR | Bu kılavuzun diğer dillere çevirileri için şu bağlantıya bakınız: www.caso-design.de. Bu amaçla, geçerli QR kodunu da tarayabilirsiniz. |
| RU | Это руководство по эксплуатации на других языках вы найдете, перейдя по ссылке www.caso-design.de или отсканировав QR-код. |
| RO | Aceste instrucțiuni de utilizare sunt disponibile în alte limbi la adresa www.caso-design.de sau scanând codul QR. |
| HE | www.caso-design.de |
| AR | وّمّت بمسح رمز الاستجابة السريعة |