Oceana 7x50 - Binoculars CELESTRON - Free user manual and instructions
Find the device manual for free Oceana 7x50 CELESTRON in PDF.

User questions about Oceana 7x50 CELESTRON
0 question about this device. Answer the ones you know or ask your own.
Ask a new question about this device
Download the instructions for your Binoculars in PDF format for free! Find your manual Oceana 7x50 - CELESTRON and take your electronic device back in hand. On this page are published all the documents necessary for the use of your device. Oceana 7x50 by CELESTRON.
USER MANUAL Oceana 7x50 CELESTRON
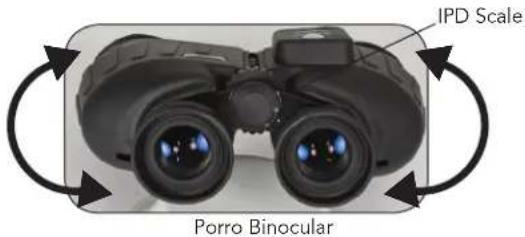
ADJUSTING THE INTERPUPILLARY DISTANCE (IPD)
Since the distance between the eyes (specifically, the distance between the centers of the pupils) varies among individuals, the two eyepieces of the binoculars must be correctly aligned (adjusted). This is called adjusting the interpupillary distance. To adjust this distance, lift the binoculars up to your eyes (using both hands) and look through them at an object in the distance. Move the two halves of the binoculars about the hinge until you see one clear circle of image through both eyes.
text_image
IPD Scale Porro BinocularADJUSTING FOCUS
Since most people have a variance of vision from their left eye to their right eye, you must adjust the focusing system. Use the following steps to achieve focus: (1) Close your right eye and look through the left side of the binoculars with your left eye at the subject matter. Rotate the center focusing wheel until the image appears in sharp focus; (2) Close your left eye and look through the right eyepiece (called the diopter). Rotate the right eyepiece until the image appears in sharp focus; (3) Look through both eyepieces with both eyes open. Since you've already adjusted the right eyepiece, use only the center focusing wheel to refocus on a new object at a different distance.
Hint: Eyeglasses worn for nearsightedness should be worn when using binoculars as you may not be able to reach a sharp focus at infinity without them.
natural_image
Black binoculars with visible lens and control panel (no text or symbols on main subject)SET THE RUBBER EYECUPS
Keep the Rubber Eyecup up if you do not wear eyeglasses but fold them down if you do wear eyeglasses to obtain the maximum field of view.
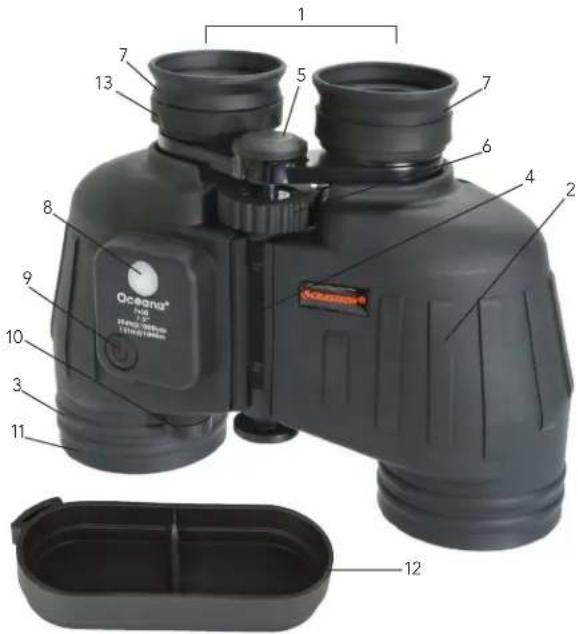
PARTS OF THE BINOCULAR
- Eyepieces
- Main Body
- Objective Lenses
- Body Shaft
- IPD Scale
- Focus Wheel
- Rubber Eyecups
- Compass Window
- Button for Compass Illuminator
- Battery Compartment
- Objective Lens Caps
- Eyepiece Protective Cap
- Diopter Adjustment
text_image
Oceana F-50 13 7 5 7 6 4 2 8 9 10 3 11 12INSTALLING THE BATTERIES - TWO LR44 BUTTON CELL
The batteries included with your binocular are for illuminating the compass, so you can see it easily in the dark. You need to install the batteries which are located in the case pocket. Unscrew the battery cap by hand and then remove the screw with a coin or screwdriver. The batteries are to be installed with the positive (+) side facing up towards you. Replace the screw and battery cap. If you will not be using the binocular for a long period of time (a few months or more), you should take the batteries out to preserve their life.
natural_image
Close-up of binoculars with a close-up of the lens and adjustment knob (no text or symbols visible)USING THE RETICLE AS A MEASURING DEVICE
View Angle
View Angle of an object is the angle between the rays from the binocular to its edges. Usually, this angle is measured at the horizontal or vertical direction, and defined as Horizontal View Angle and Vertical View Angle. A mil's reticle (shown to the right) that has a horizontal and vertical scale can measure the viewing angle of an object. The Celestron binocular uses 10 mils for each number (1,2,3,... as shown here).
Measuring the Horizontal View Angle
When the Horizontal View Angle is smaller than the horizontal scale range (-40\~+40 mils) inside the binocular, aim one edge of the object at a horizontal scale line (the center or the outmost line is selected according to the image size of the object usually) and read its value. Then read the value of the scale at which another edge was located. Add these two values and this is the measured Horizontal View Angle. The Horizontal View Angle of the target (sailboat) is 5 decade mils (50 mils).
When the Horizontal View Angle is larger than the horizontal scale range (-40\~+40 mils), use vertical line splits (for example: mast, sail, etc.) on the object can be selected to make the necessary estimated measurements in a step by step fashion.
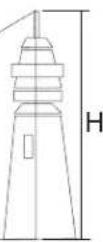
Measuring the Vertical View Angle
Vertical View Angle measurement is similar to measuring the Horizontal View Angle. When the Vertical View Angle measurement is small, aim the intersecting point of the vertical and horizontal lines of the reticle at the lower part of the object and read the scale value at the top of the object. The angle included between the upper and lower parts of the target (lighthouse) is 6 decade mils (60 mils).
When the Vertical View Angle is larger than the vertical scale range (70 mils), it can be measured in steps, and the angle can be obtained by summing up the value of each step.
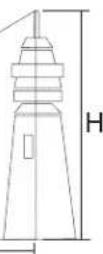
Using the Reticle to Measure Distance
The distance measurement of a target can be calculated by using the mil reticle.
The formula of distance measurement: L(km) = H(m)/
L — the distance between the observer and the object (km)
H — the height of the object (m)
ω — the View Angle of the object measured with the reticle of the binocular (mil).
When measuring the distance, estimate the width or height of the object and next measure the View Angle of the object. Accordingly, you can calculate the distance between the observer and the object using the formula.
For example:
There is an adult whose height is 1.70 m. (H = 1.70 m)
The Vertical View Angle of the adult is 4 decade mils (40 mils)
L = H / = 1.7 / 40 = 0.0425 ~km = 42.5 ~m
Therefore: the distance between the observer and the adult is 42.5 m. (for feet conversion, multiply 42.5 by 3.28).
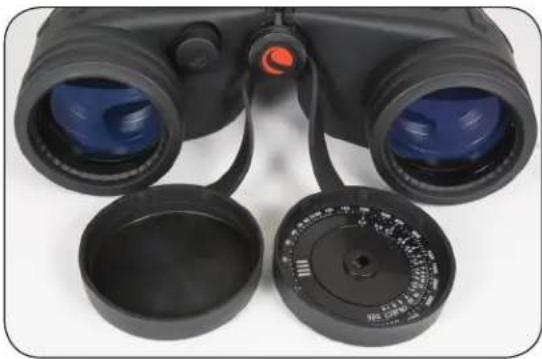
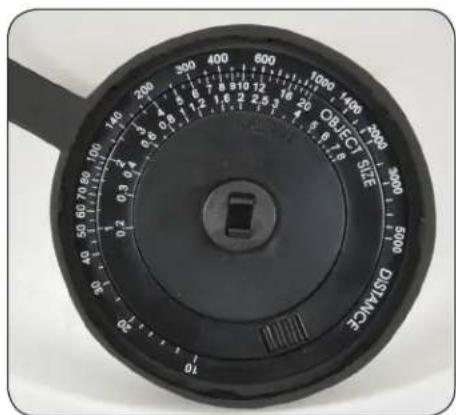
USING THE CALCULATOR DIAL AS A MEASURING DEVICE
The Calculator Dial can be used to determine distance quickly and easily without calculation. The Calculator Dial is located inside one of the lens caps as shown. The Calculator Dial includes a triangular Angle Index Mark marked "ANGLE", a rotational Active Ring and a Fixed Scale marked "DISTANCE". There are two scales in the Active Ring, one is for View Angle and the other is Size marked "OBJECT SIZE".
natural_image
Close-up of black binoculars with blue lenses and open case lids (no visible text or symbols)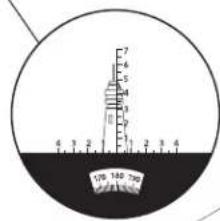
text_image
170 180 200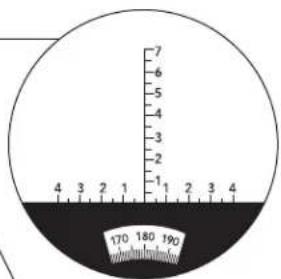
text_image
7 6 5 4 3 2 1 4 3 2 1 2 3 4 170 180 190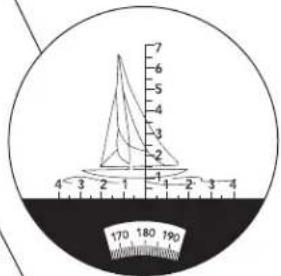
text_image
7 6 5 4 3 2 1 4 3 2 1 4 3 4 170 180 190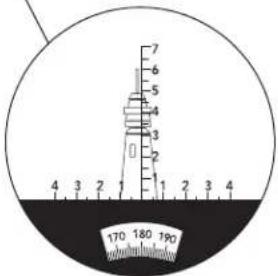
text_image
7 6 5 4 3 2 1 2 3 4 170 180 190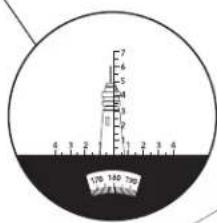
text_image
7 6 5 4 3 2 1 0 100 180 780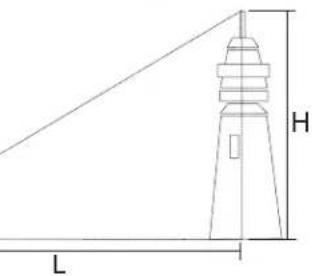
text_image
H LFirst, measure the View Angle value of an object, and rotate the Active Ring and place this value at the Angle Index Mark. Then, find the division indicating the size of the object (see formula below), it indicates a point at the Fixed Scale. Look at the Fixed Scale, the distance is shown at that point on the Fixed Scale.
natural_image
Close-up of a black industrial measuring dial with scale and pointer (no text or symbols visible)USING THE CALCULATOR DIAL AS A MEASURING DEVICE
For example: You observe a lighthouse, and its measured Vertical View Angle is 6 decade mils. You need to rotate the Active Ring and place the division marked "6" in the View Scale at the Angle Index Mark. Its assuming height is 12 m, the division marked "12" in the Size Scale points to the division marked "200" in the Fixed Scale. This tells us that the lighthouse's distance is 200 m from us.
The Size Scale and Fixed scale of the Calculator Dial are in a "ratio" to each other. When your observing object is too large or too small, you can zoom it tenfold or discretionarily, and zoom the measuring result in the same way. Thus, you can get more convenience, especially when you aren't familiar with diversified units.
HOW TO MEASURE AN OBJECTS SIZE (HEIGHT AND WIDTH)
According to the formula for distance measurement, you can calculate the height using:
H = L × ω. (Height = Distance × View Angle)
When measuring the size, you first estimate the distance to the object and then measure the View Angle. With these measurements, you can calculate the height of the target using the formula.
For example:
The distance is 0.6 km between the observer and the object. You can measure that the Horizontal View Angle is 6 decade mils (60 mils) and the Vertical View Angle is 3 decade mils (30 mils). So, using the formula you can get:
The height: H = 0.6 × 30 = 18 m (for feet divide 18 by 3.28)
The width: H = 0.6 × 60 = 36 m
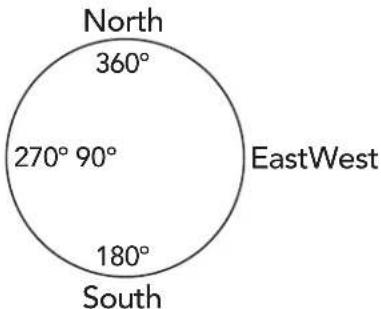
USING THE COMPASS
The Compass is aligned with the vertical range finding scale.
The Compass by itself will only indicate direction to or from an object but not relative position. To determine position, you need a map or chart and a protractor.
The azimuth angle can be measured through the analog Compass which is built into the binocular. It shows the azimuth of the object relative to the observer. Each graduation of the Compass equals one degree of angle. When the object lies north from you, the Compass reads 360^ . The Compass degrees will increase when you turn it clockwise. 90^ means the object lies in the east from you, 180^ means the south and 270^ means the west.
In order to insure precise angle measurements, the binocular should be kept horizontal and level when reading the compass, and the object should lie in the middle of the reticle.
Note: When using the Compass, always keep in mind the local variation between magnetic north (the Compass reading) and true north. Do not put your finger or hand over the white button (compass window), as it allows light to enter the binocular, so the Compass readings can be seen.
text_image
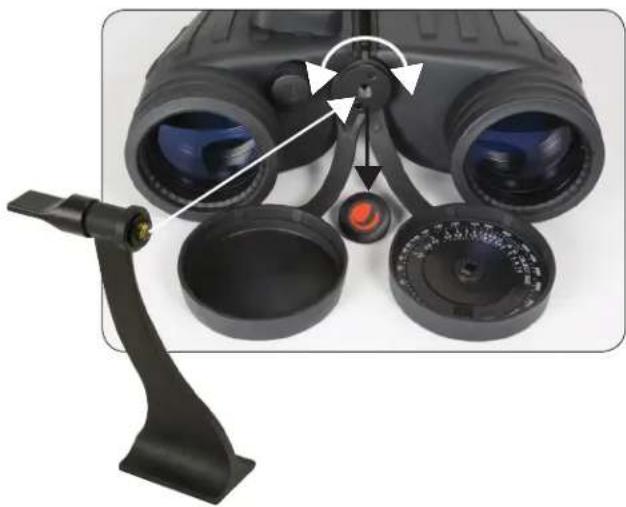
North 360° 270° 90° EastWest 180° SouthATTACHING YOUR BINOCULARS TO A TRIPOD
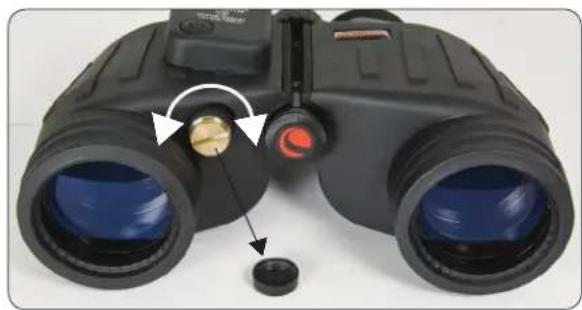
These binoculars feature a built-in tripod adapter fitting which is a threaded screw hole underneath a cap. To attach a binocular tripod adapter, remove the cap and then thread the screw from the binocular tripod adapter into the threaded screw hole. The other end of the binocular tripod adapter attaches to a photographic tripod. Mounting binoculars this way allows for added stability and comfort.
natural_image
Close-up of a black binoculars with adjustment knobs and a lever mechanism (no text or symbols visible)CARE AND CLEANING: Binoculars do not need routine maintenance other than making sure that the objective lenses and eyepieces are kept clean. If repairs become necessary, they should be serviced by the manufacturer or a qualified binocular repair company. If your binocular is roughly handled or dropped, there is a good chance that the collimation (alignment of the optics) will be out and they should be serviced. Dirty objective lenses and/or eyepieces mean less light transmission and loss of brightness, as well as unsharp images. Keep your optics clean! When not using your binocular, store it in the soft case provided after putting the lens caps on. Avoid touching the glass surfaces, however, if fingerprints (which contain mild acid) do get on the glass, they should be cleaned as soon as possible to avoid damaging the coatings. To clean the optical surfaces, we recommend a lens/optics cleaning kit available at most photo or optical shops. Follow the instructions provided with the kit closely. If you have a lot of dust or dirt accumulated, brush it off gently with a camel's hair brush and/or utilize a can of pressurized air before using the cleaning kit. Alternately, you could use the Celestron LensPen (# 93575) made especially for cleaning binoculars. Never attempt to clean your binocular internally or try to take it apart!
CAUTION! Viewing the Sun may cause permanent eye damage. Do not view the Sun with your binocular!
PROBLEMS OR REPAIR: If warranty problems arise or repairs are necessary, contact the Celestron customer service department if you live in the U.S.A. or Canada. If you live elsewhere, please contact the Celestron dealer you purchased the binocular from or the Celestron distributor in your country (listings are located at www.celestron.com).
WARRANTY: Your binocular has the Celestron Limited Lifetime Warranty for U.S.A. and Canadian customers. For complete details of eligibility and for warranty information on customers in other countries, visit the Celestron website.
This product is designed and intended for use by those 14 years of age and older. Product design and specifications are subject to change without prior notification
FCC Note: This equipment has been tested and found to comply with the limits for a Class B digital device, pursuant to part 15 of the FCC Rules. Those limits are designed to provide reasonable protection against harmful interference in a residential installation. This equipment generates, uses, and can radiate radio frequency energy and, if not installed and used in accordance with the instructions, may cause harmful interference to radio communications. However, there is no guarantee that interference will not occur in a particular installation. If this equipment does cause harmful interference to radio or television reception, which can be determined by turning the equipment off and on, the user is encouraged to try to correct the interference by one or more of the following measures:
- Reorient or relocate the receiving antenna.
- Increase the separation between the equipment and receiver.
- Connect the equipment into an outlet on a circuit different from that to which the receiver is connected.
- Consult the dealer or an experienced radio/TV technician for help.
FOR COMPLETE SPECIFICATIONS AND PRODUCT INFORMATION, VISIT: WWW.CELESTRON.COM
2835 Columbia Street • Torrance, CA 90503 U.S.A. • Tel: 310.328.9560
©2012 Celestron • All rights reserved. • Printed in China • 06-12
FRANÇAIS
JUMELLES OCEANA 7x50
Modèle n° 71189-A
NOUS VOUS REMERCIONS D'AVOIR FAIT L'ACQUISITION DE JUMELLES CELESTRON. NOUS ESPÉRONS QU'ELLES VOUS PROCURERONT DES ANNÉES DE SATISFACTION. POUR UTILISER VOS JUMELLES AU MIEUX, VEUILLEZ PRÉALABLEMENT LIRE CE MODE D'EMPLOI ET CES CONSIGNES D'ENTRETIEN.
RÉGLAGE DE LA DISTANCE INTERPUPILLAIRE (DIP)
natural_image
Illustration of binoculars with directional arrows indicating rotational motion (no text or symbols)Jumelles de Porro
RÉGLAGE DE LA MISE AU POINT
natural_image
Black binoculars with visible lens and control knobs (no text or symbols on the device itself)INSTALLATION DES ŒILLETONS EN CAOUTCHOUC
natural_image
Close-up of a black binoculars with adjustment knobs and a close-up of the lens (no text or symbols visible)UTILISATION DU RÉTICULE COMME INSTRUMENT DE MESURE
Angle de vision

The Ground Truth image displays a single, solid horizontal line. According to Rule 2 (UNDERSCORE & LINE RULES), this is a stylistic or background line, not a placeholder underscore. Therefore, the OCR result must ignore it and output nothing or only meaningful text. The provided OCR content is "____", which consists of four underscores. This is an incorrect interpretation of the line as a placeholder, violating the rule that stylistic lines must be ignored. The OCR has hallucinated underscores where none should exist based on the GT's visual context. Hence, the OCR result is inconsistent with the Ground Truth.
UTILISATION DU CADRAN DE CALCUL COMME INSTRUMENT DE MESURE
natural_image
Close-up of black binoculars with blue lenses and a dial, no visible text or symbolstext_image
North 360° 270° 90° EastWest 180° SouthFIXATION DES JUMELLES SUR UN TRÉPIED
natural_image
Close-up of binoculars with adjustment knobs and a handle, no visible text or symbolsnatural_image
Black binoculars with visible lens and control panel (no text or symbols on the device itself)ANPASSEN DER GUMMI-AUGENMUSCHELN
natural_image
Close-up of black binoculars with a dial indicator and a close-up of the lens (no text or symbols visible)VERWENDUNG DER STRICHPLATTE ALS MESSINSTRUMENT
Betrachtungswinkel
natural_image
Close-up of black binoculars with blue lenses and black case covers (no visible text or symbols)natural_image
Close-up of a black industrial diameter gauge dial with measurement scales and a central knob (no text or symbols visible)VERWENDUNG DER TASCHENRECHNERSKALA ALS MESSINSTRUMENT
text_image
North 360° 270° 90° EastWest 180° SouthAUFSETZEN DES FERNGLASES AUF EINEM STATIV
natural_image
Close-up of binoculars with adjustment knobs and a handle, no visible text or symbolsBINOCOLO OCEANA 7x50
MODELLO N. 71189-A
RAZIE PER AVER ACQUISTATO UN BINOCOLO CELESTRON. CI AUGURIAMO CHE FORNISCA ANNI DI PRESTAZIONI OTTIMALI. PER LE OTTENERE PRESTAZIONI MIGLIORI, LEGGERE QUESTE ISTRUZIONI PER L'USO E LA CURA DEL BINOCOLO.
text_image
SCALA DIPnatural_image
Black binoculars with visible lens and control panel (no text or symbols on the device itself)POSIZIONE DEI PARAOCCHI IN GOMMA
natural_image
Close-up of black binoculars with adjustment knobs and a close-up of the lens (no text or symbols visible)Angolo di visione
natural_image
Close-up of black binoculars with blue lenses and a dial, no visible text or symbols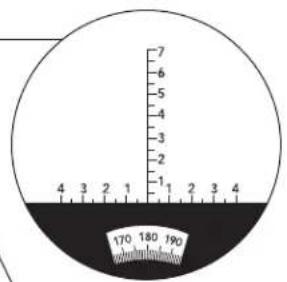
text_image
7 6 5 4 3 2 1 4 3 2 1 2 3 4 170 180 190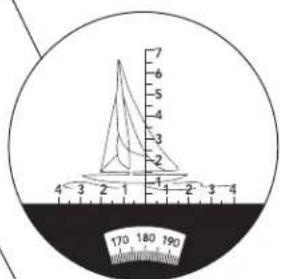
text_image
7 6 5 4 3 2 1 4 3 2 1 -2 -3 -4 170 180 190
text_image
7 6 5 4 3 2 1 4 3 2 1 2 3 4 170 180 190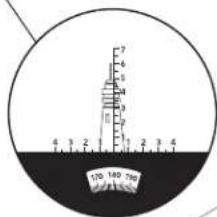
text_image
130 180 760
m = 311
L