Outland X 10x50 - Binoculars CELESTRON - Free user manual and instructions
Find the device manual for free Outland X 10x50 CELESTRON in PDF.

User questions about Outland X 10x50 CELESTRON
0 question about this device. Answer the ones you know or ask your own.
Ask a new question about this device
Download the instructions for your Binoculars in PDF format for free! Find your manual Outland X 10x50 - CELESTRON and take your electronic device back in hand. On this page are published all the documents necessary for the use of your device. Outland X 10x50 by CELESTRON.
USER MANUAL Outland X 10x50 CELESTRON
natural_image
Two black outdoor binoculars with visible lenses, displayed against a green background (no text or symbols on the binos themselves)Outland®X
BINOCULAR | JUMELLE | BINOCULARES | FERNGLAS | BINOCOLI

natural_image
Abstract diagram with a dark green background, white wavy lines, and an orange horizontal bar over a yellow background (no text or symbols)
text_image
ENGLISH ....2 FRANÇAIS....12 ESPAÑOL....22 DEUTSCH....32 ITALIANO....42
natural_image
Abstract wavy line pattern on a pale yellow background, no text or symbols presentCELESTRON® OUTLAND X BINOCULARS
Thank you for purchasing a Celestron Outland X binocular. We trust this binocular will provide you with years of enjoyment and faithful service. Please read the instructions carefully before using your binocular to ensure proper use and care.
text_image
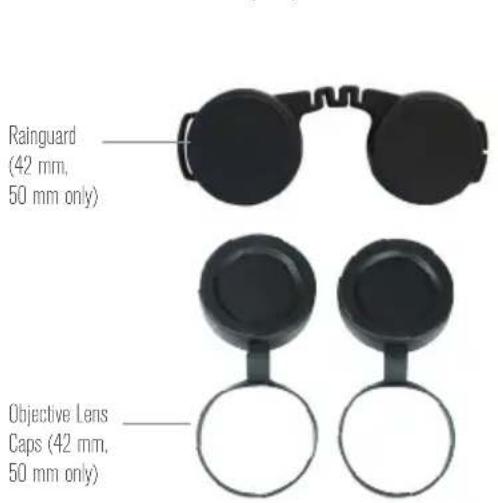
Rainguard (42 mm, 50 mm only) Objective Lens Caps (42 mm, 50 mm only)
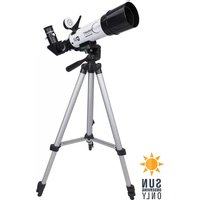
WARNING: Never look at the sun while using your binocular.
Looking at the sun can cause permanent eye damage.
text_image
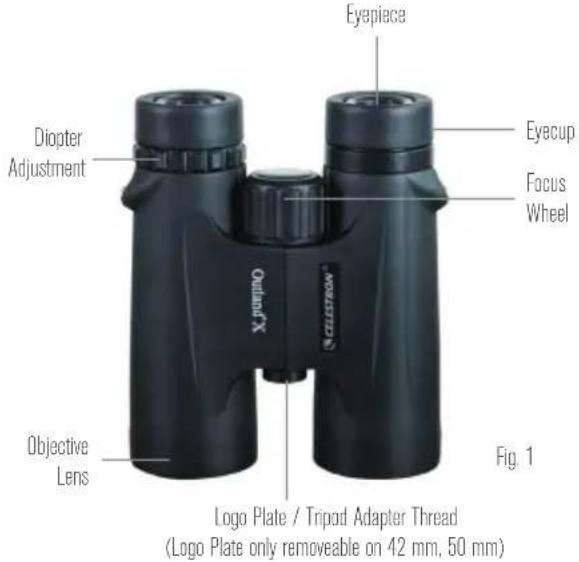
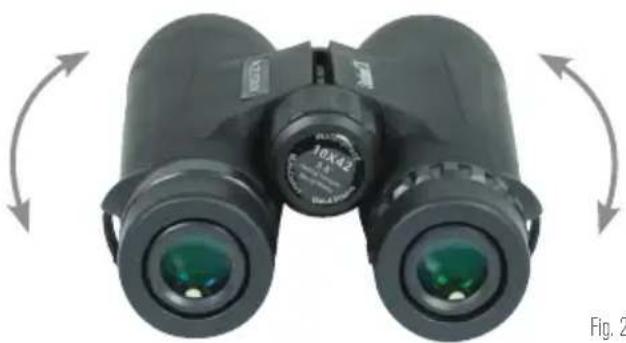
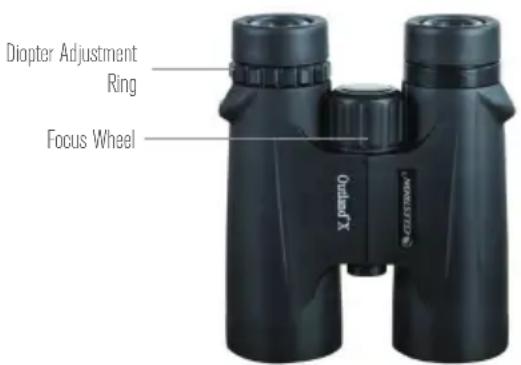
Eyepiece Eyecup Focus Wheel Diopter Adjustment Objective Lens X MUSTEEN Fig. 1 Logo Plate / Tripod Adapter Thread (Logo Plate only removable on 42 mm, 50 mm)ADJUSTING THE INTERPUPILLARY DISTANCE (IPD)
The interpupillary distance, or the distance between the pupils, varies from person to person. The binocular must be correctly aligned (adjusted) to the distance between your pupils to achieve a single, clear image. To adjust this distance, lift the binocular up to your eyes (using both hands) and look through them at an object in the distance. Move the two barrels (halves) of the binocular closer together or further apart until you see a single, clear image (Fig. 2). Check that the interpupillary distance is set correctly every time you use your binocular.
natural_image
Black binoculars with green lenses, shown in a circular motion arrow (no text or symbols on the binoculars themselves)SETTING THE DIOPTER / FOCUSING
To ensure a crisp, sharp image the focusing system of the binocular must be set to compensate for any differences in your eyesight. This is achieved by setting the diopter (located on the right eyepiece) before use. To set the binocular to your eyesight follow the instructions below.
- View an object in the distance through the binocular.
- Cover the right objective lens with your hand or the objective lens cap.
- Rotate the focus wheel until the image viewed with your left eye is clear and sharp.
- Cover the left objective lens with your hand or objective lens cap.
-
Viewing the same object, adjust the diopter ring until the image viewed with your right eye is clear and sharp.
-
Your binocular is now adjusted to your eyes and focusing on any object can now be achieved by simply turning the focus wheel.
TIP: Eyeglasses worn for nearsightedness should be worn when using binoculars as you may not be able to obtain focus at infinity without them.
text_image
Diopter Adjustment Ring Focus WheelFig. 3
EYECUP ADJUSTMENT
The Outland X binoculars feature twist-up eyecups to accommodate both eyeglass and non-eyeglass wearers. If you do not wear eyeglasses, twist the eyecups counterclockwise until they reach the up position. If you wear eyeglasses, make sure that the eyecups are in the down position to obtain the maximum field of view. The eyecups can be set at positions between fully up and down which may suit some users better.
natural_image
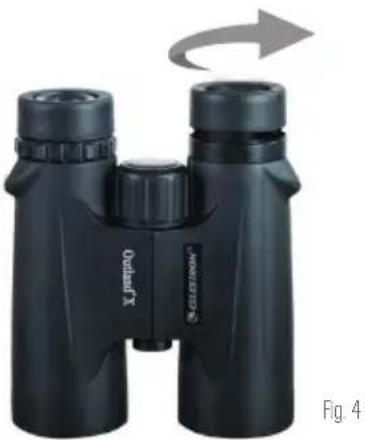
Black outdoor binoculars with a gray arrow indicating rotation (no text or symbols on the binches themselves)TRIPOD ADAPTABILITY
The 42 and 50 mm versions of the Outland X binoculars feature built-in threads that allow the binocular to be attached to a tripod using a binocular tripod adapter. These threads can be accessed by unscrewing the logo plate found on the front of the hinge (Fig. 5). To attach the binocular to a tripod, thread the adapter into the binocular and attach the other end of the adapter to a photographic tripod. Mounting the binocular on a tripod allows for added stability and comfort during prolonged viewing.
natural_image
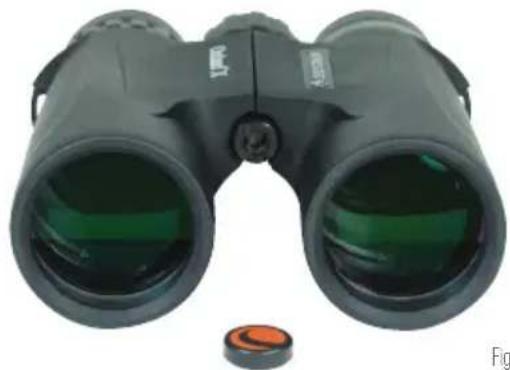
Black binoculars with green lenses and orange buttons, shown from a low angle (no text or symbols visible)Fig. 5
WATERPROOF / FOGPROOF
The Outland X series binoculars are waterproof and filled with dry nitrogen gas to prevent the housing from fogging internally.
CARE AND STORAGE
Your Celestron binocular will provide you years of dependable service if it is cared for and stored properly.
- Protect the binocular from impact and do not force any of the moving parts beyond their limits.
- Protect the optics of your binocular by putting on all lens caps when not in use.
-
Store your binocular in a cool, dry place whenever possible.
-
When storing for an extended period of time, place the binocular in a plastic bag or airtight container with a desiccant.
- Do not leave the binocular in a car on a hot/sunny day or near anything that generates heat as this may cause damage.
- Clean any dust, dirt or water that may get on the binocular or inside moving parts as soon as possible to prevent any unforeseen damage.
CLEANING
Proper cleaning of the lenses is essential to maintaining the optical integrity of your binocular. Dirty lenses diminish the amount of light transmitted through the binocular and your overall viewing experience.
- Remove any dust on the lenses with a soft lens brush or can of pressurized air.
- Remove any fingerprints, stains or smudges from the lens surface with a soft, clean lens
cloth or lens tissue by rubbing in a circular motion. Start in the middle of the lens and work your way to the edges. Breathe lightly on the lens to provide moisture if needed.
- For a more thorough cleaning we recommend the use of a lens/optics cleaning kit available at most photo or optical shops. Follow the directions supplied with the cleaning kit for best results.
SERVICE AND REPAIR
If warranty problems arise or repairs are necessary, contact the Celestron customer service department if you live in the United States or Canada. If you live outside of these countries, please contact the dealer
you purchased your binocular from or the Celestron distributor in your country. A list of our distributors can be found on our website., www.celestron.com
WARRANTY
Your binocular is covered under the Celestron Limited Lifetime Warranty. Celestron warrants these binoculars to be free from defects in materials and workmanship for the binoculars' usable lifetime to the original owner. Celestron will repair or replace the binoculars which, upon inspection by Celestron, are found to be defective in materials or workmanship and within the definitions of the limits described below.
This warranty does not cover products that have been subject to abuse, misuse, physically damaged, altered, or had unauthorized repairs or modifications. This warranty does not cover defects due to normal wear and tear and other conditions.
This warranty is valid to U.S.A. and Canadian customers who have purchased their binocular from an authorized Celestron dealer in the
U.S.A. or Canada. For products purchased outside of the U.S.A. or Canada please contact your local Celestron Distributor or authorized Dealer for applicable warranty information.
Additional warranty information and eligibility details can be found on the Celestron website.
This product is designed and intended for use by those 14 years of age and older. Product design and specifications are subject to change without prior notification.
For complete specifications and product information:
2835 Columbia Street • Torrance, CA 90503 U.S.A Tel: 800.421.9649
www.celestron.com

natural_image
Abstract diagram with a dark green background, white wavy lines, and an orange horizontal bar over a yellow background (no text or symbols)
natural_image
Abstract black-and-white line pattern on a dark background, no text or symbols presentJUMELLE | FRANÇAIS
JUMELLES OUTLAND X DE CELESTRON
natural_image
Black binoculars with green lenses, shown in a row with rotational arrows indicating rotation (no text or symbols on the binoculars themselves)RÉGLAGE DU DIOPTRE/FOCALISATION
natural_image
Black outdoor binoculars with a curved arrow indicating rotation (no text or symbols on the binches themselves)Fig. 4
ADAPTABILITÉ DU TRÉPIED
natural_image
Black binoculars with green lenses and orange buttons, no visible text or symbolsFig. 5
ÉTANCHE/ANTIBUÉE
natural_image
Abstract diagram with a dark green background, white wavy lines, and an orange horizontal bar over a yellow background (no text or symbols)
natural_image
Abstract black-and-white line pattern on a dark background, no text or symbols presentBINOCULARES | ESPAÑOL
BINOCULARES OUTLAND X DE CELESTRON
natural_image
Black binoculars with green lenses, shown in a row with rotational arrows (no text or symbols on the binoculars themselves)Fig. 2
CONFIGURAR LA DIOPTRÍA / ENFOQUE
natural_image
Black outdoor binoculars with a gray arrow indicating rotational motion (no text or symbols on the binches)Fig. 4
ADAPTABILIDAD DE TRÍPODE
natural_image
Black binoculars with green lenses and a small orange button, shown without any text or symbols.Fig. 5
natural_image
Abstract diagram with a dark green background, white wavy lines, and an orange horizontal bar over a yellow background (no text or symbols)
natural_image
Abstract black-and-white line pattern on a dark background, no text or symbols presentFERNGLAS | DEUTSCH
OUTLAND X-FERNGLASES VON CELESTRON
natural_image
Black binoculars with green lenses, shown in a row with rotational arrows indicating rotation (no text or symbols on the binoculars themselves)natural_image
Black outdoor binoculars with a gray arrow indicating rotation (no text or symbols on the binches)Abb. 4
STATIV-ANWENDBARKEIT
natural_image
Black binoculars with green lenses and a small orange button, shown against a white background (no text or symbols visible)Abb. 5
natural_image
Abstract diagram with a dark green background, white wavy lines, and an orange horizontal bar over a yellow background (no text or symbols)
natural_image
Abstract black-and-white line pattern on a dark background, no text or symbols presentBINOCOLI | ITALIANO
BINOCOLO CELESTRON OUTLAND X
natural_image
Black binoculars with green lenses, shown in a circular motion arrow (no text or symbols on the binoculars)Fig. 2
natural_image
Black outdoor binoculars with a curved arrow indicating rotation (no text or symbols on the binches)Fig. 4
ADATTABILITÀ DEL TREPPIEDE
natural_image
Black binoculars with green lenses and a small orange button, shown without any text or symbols.Fig. 5
IMPERMEABILE/ANTIAPPANNAMENTO
©2014 Celestron • All rights reserved • Printed in China • 0314