VC 6 Cordless ourFamily extra - Vacuum Cleaner Kärcher - Free user manual and instructions
Find the device manual for free VC 6 Cordless ourFamily extra Kärcher in PDF.

| Product type | Cordless stick vacuum |
| Brand | Kärcher |
| Model | VC 6 Cordless ourFamily extra |
| Battery voltage | 25.2 V |
| Battery type | Li-Ion |
| Charging time (discharged battery) | 235 minutes |
| Runtime in normal operation | 50 minutes |
| Runtime in maximum operation (Boost) | 12 minutes |
| Nominal power | 250 W |
| Dust container capacity | 0.8 L |
| Weight (without accessories) | 1.7 kg |
| Filters | HEPA filter (EN 1822:1998), air inlet filter |
| Charger | Model YLS0241A-E300060, 30 V, 100-240 V~ 50-60 Hz, protection class II |
| Included accessories | Motorized multifunction brush, crevice tool, 2-in-1 upholstery tool, mini turbo tool, soft brush, 2-in-1 furniture brush, LED crevice tool, extension hose, flexible crevice tool, motorized soft brush, filter cleaning tool, wall mount or independent parking station |
| Special functions | Boost mode, dust detector, LED light on floor brush |
| LED display | Battery charge status, Boost mode, error messages |
| Intended use | Dry cleaning of hard and textile surfaces indoors |
| Storage and charging | Wall mount or independent parking station with charging function |
| Maintenance | Regular cleaning of the air inlet filter, HEPA filter, dust container and brushes |
| Safety | Do not vacuum liquids, hot ashes, or flammable substances; removable battery, safe charger |
| Warranty | According to country conditions (see warranty document) |
Frequently Asked Questions - VC 6 Cordless ourFamily extra Kärcher
User questions about VC 6 Cordless ourFamily extra Kärcher
0 question about this device. Answer the ones you know or ask your own.
Ask a new question about this device
Download the instructions for your Vacuum Cleaner in PDF format for free! Find your manual VC 6 Cordless ourFamily extra - Kärcher and take your electronic device back in hand. On this page are published all the documents necessary for the use of your device. VC 6 Cordless ourFamily extra by Kärcher.
USER MANUAL VC 6 Cordless ourFamily extra Kärcher
natural_image
Exterior view of a white and black vacuum cleaner with green head cover and yellow base (no text or symbols visible)Deutsch 6
English 12
Français 17
Italiano 25
Español 31
Português 37
Nederlands 43
Türkçe 49
Svenska 55
Suomi 61
Norsk 66
Dansk 72
Eesti 78
Latviešu 84
Lietuviškai 89
Polski 96
Magyar 102
Čeština 108
Slovenčina 114
Slovenščina 120
Românește 125
Hrvatski 131
Srpski 137
Ελληνικά 143
Русский 149
Українська 156
Қазақша 163
Български 170
العربيه 177
A
17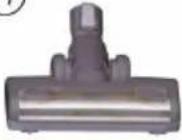 | 18 | 19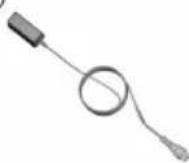 | 20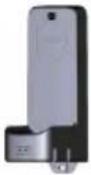 | 21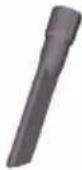 |
| 22 | 23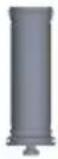 | 24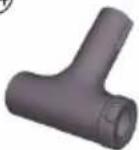 | 25 | 26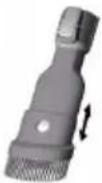 |
27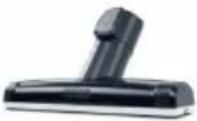 | 28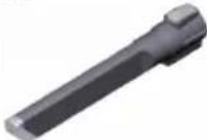 | 29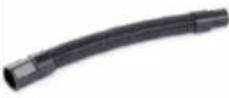 | 30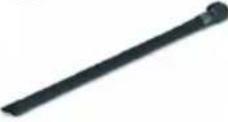 | 31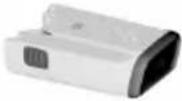 |
32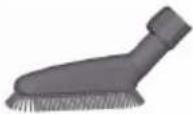 | 33 | 34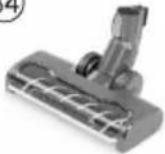 | ||

natural_image
Two-step diagram of a hand-operated device with labeled parts, showing step 1 and step 2 (no text or symbols present)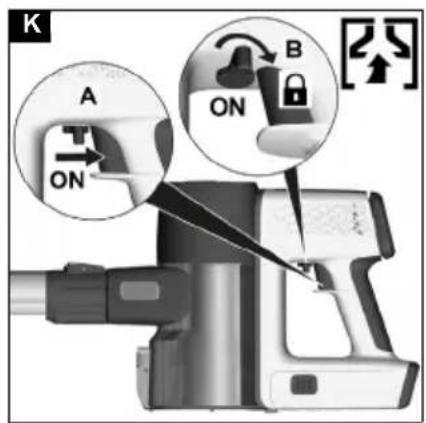
natural_image
Two views of a mechanical device with labeled parts, showing front and side views (no text or symbols present)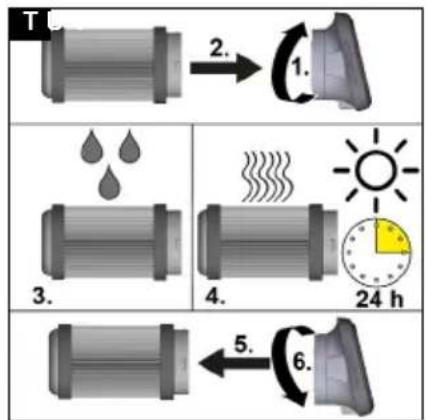
flowchart
graph TD
    A["Step 1: Droplet"] -->|2.| B["Step 2: Heat Dip"]
    B --> C["Step 3: Droplet"]
    C --> D["Step 4: Heat Exchanger"]
    D --> E["Step 5: Wind Turbine"]
    E --> F["Step 6: Spindle Switch"]
    style A fill:#f9f,stroke:#333
    style B fill:#ccf,stroke:#333
    style C fill:#cfc,stroke:#333
    style D fill:#fcc,stroke:#333
    style E fill:#cff,stroke:#333
    style F fill:#ffc,stroke:#333
flowchart
graph TD
    A["Component 1"] -->|2.| B["Assembly Step 1"]
    B --> C["Cut into Component 3"]
    C --> D["Assembly Step 4"]
    D --> E["Final Product 6"]
    E --> F["Final Product"]
natural_image
3D rendering of a compact electric shaver with handle and control panel (no text or symbols visible)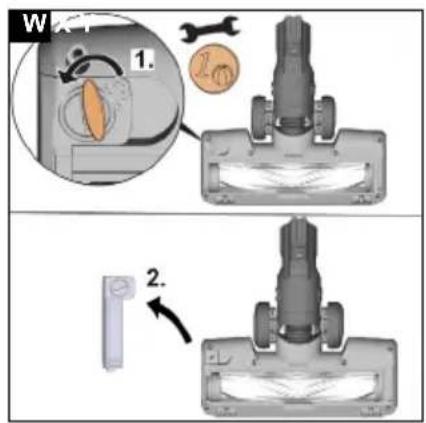
natural_image
3D rendering of a vacuum cleaner with internal components and mounting base (no visible text or symbols)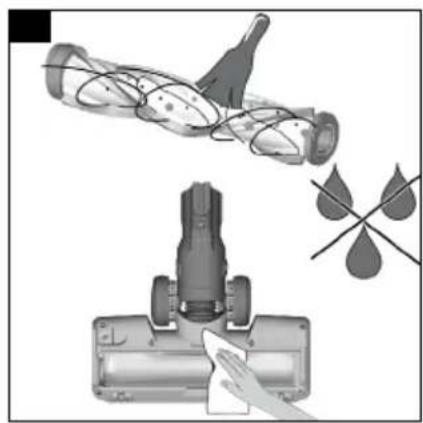
natural_image
Illustration of a vacuum cleaner cleaning a cylindrical object with a handle, accompanied by a close-up of the component (no text or symbols present)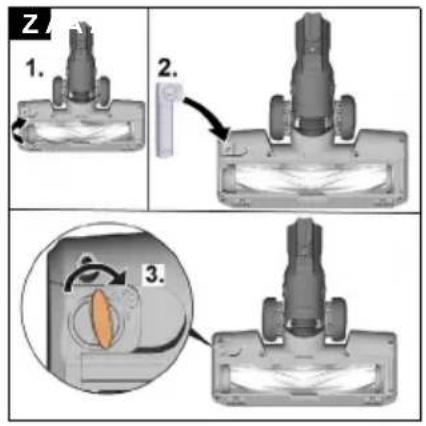
natural_image
Illustration of a hand cleaning a cylindrical device with a rose and leaf drop nearby (no text or symbols)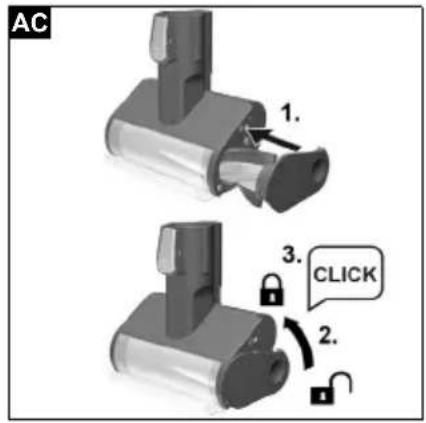
natural_image
Two identical diagrams of a vacuum cleaner with labeled parts, shown from different angles (no text or symbols present)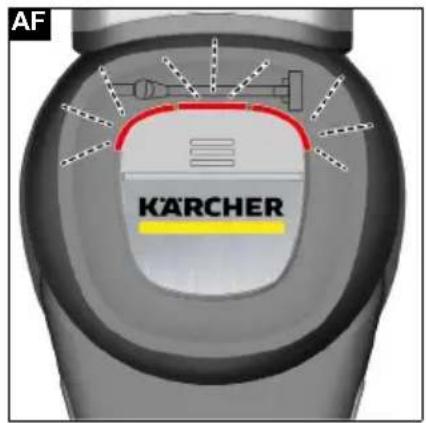
Inhalt
Environmental protection.... 12
Accessories and spare parts 12
Warranty 12
Scope of delivery.... 12
Description of the unit.... 12
Installing the wall bracket/free-standing parking station with charging function 13
Initial startup 13
Operation.... 14
How to use the Accessories 15
Transportation 15
Storage.... 15
Care and service 15
Troubleshooting guide 17
Technical data 17
General notes


Read these original operating instructions and the enclosed safety instructions before using the device for the first
time. Proceed accordingly.
Keep both books for future reference or for future owners.
Intended use
- Only use the device in private households.
- The device is intended exclusively for cleaning dry surfaces
- The following are not in accordance with the intended use:
— Cleaning people, animals, plants or clothing on the body.
— Soaking up water or other fluids.
— Extraction of glowing ashes, coal, cigarettes or other flammable or easily inflammable substances.
— Use in the vicinity of explosive or highly flammable substances.
Environmental protection

The packing materials can be recycled. Please dispose of packaging in accordance with the environmental regulations.

Electrical and electronic appliances contain valuable, recyclable materials and often components such as batteries, rechargeable batteries or oil, which - if handled or disposed of incorrectly - can pose a potential threat to human health and the environment. However, these components are required for the correct operation of the appliance. Appliances marked by this symbol are not allowed to be disposed of together with the household rubbish.
Notes on the content materials (REACH)
Current information on content materials can be found at: www.kaercher.com/REACH
Accessories and spare parts
Only use original accessories and original spare parts. They ensure that the appliance will run fault-free and safely.
Information on accessories and spare parts can be found at www.kaercher.com.
Warranty
The warranty conditions issued by our relevant sales company apply in all countries. We shall remedy possible malfunctions on your appliance within the warranty period free of cost, provided that a material or manufacturing defect is the cause. In a warranty case, please contact your dealer (with the purchase receipt) or the next authorised customer service site.
(See overleaf for the address)
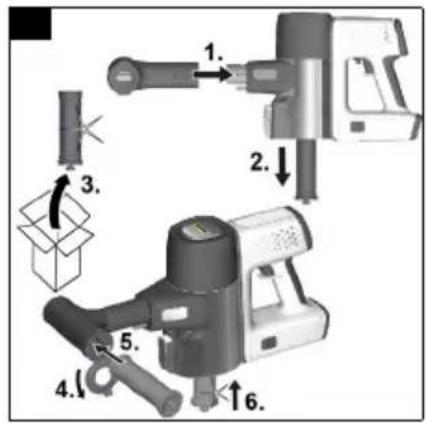
Scope of delivery
The scope of delivery for the appliance is shown on the packaging. Check the contents for completeness when unpacking. If any accessories are missing or in the event of any shipping damage, please notify your dealer.
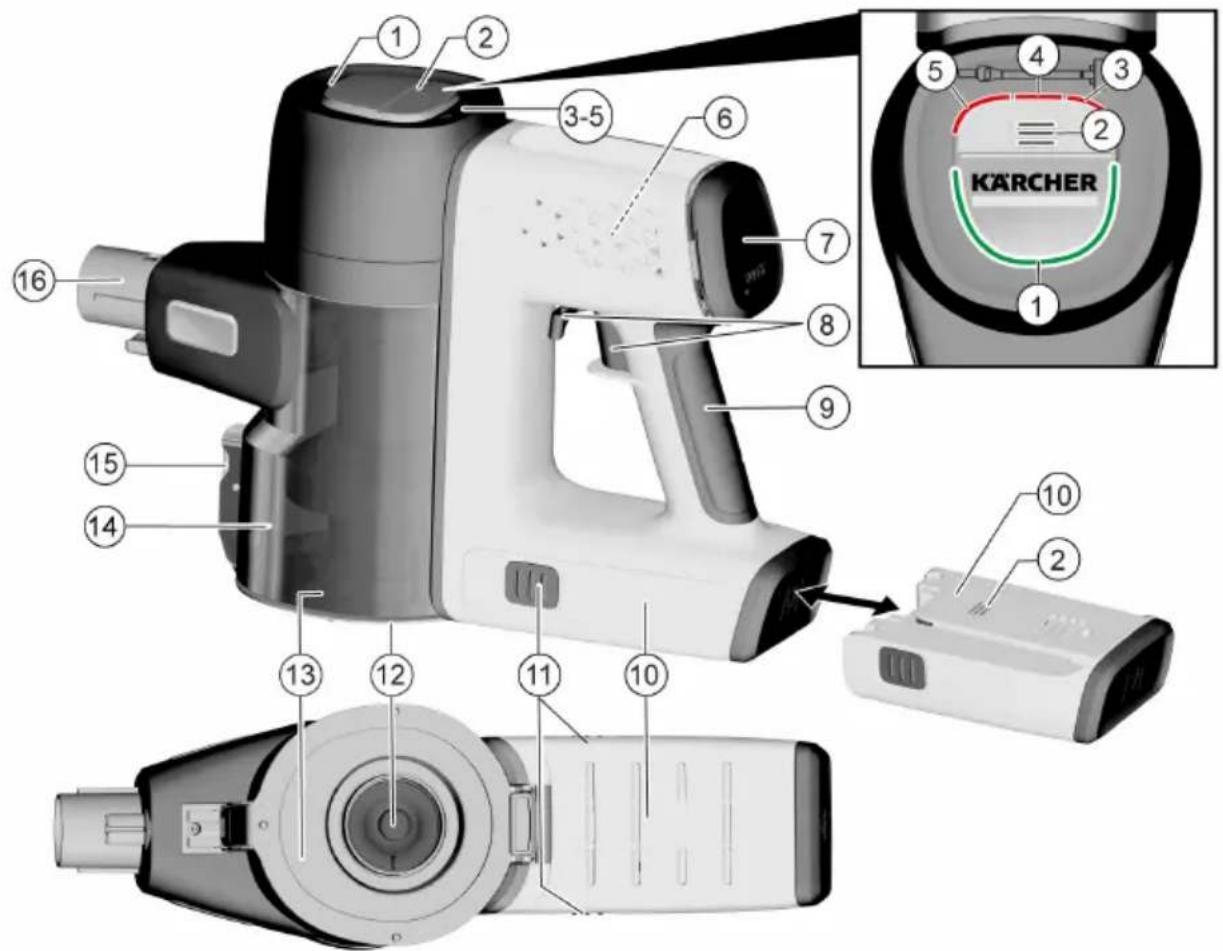
Description of the unit
The scope of delivery of the unit (dependent on model) is shown on the packaging. These operating instructions describe all possible options.
See graphics page for illustrations.
Illustration A
① Boost function LED indicator light
② Battery/battery error message LED indicator light
③ Floor nozzle fault LED indicator light
④ Suction duct fault LED indicator light
⑤ Dust sensor fault LED indicator light
⑥ HEPA-Filter
⑦ Boost function button (increases the suction performance)/HEPA filter cover
⑧ On/Off switch with locking lever
⑨ Handle
⑩Replaceable battery
⑪ Battery unlocking button
⑫ Air inlet filter
⑬Dust container cover flap
⑭Dust container
15 Dust container cover flap unlocking button
⑯Dust container suction fitting
⑰Motor-driven electric brush with universal brush roll and LED light
⑱Suction pipe
⑲Charger
20 Wall bracket with charging function
21** Crevice nozzle
22** 2-in-1 upholstery nozzle
23** Air inlet filter (2x)
24** Filter cleaning tool
25** Mini turbo nozzle
26** 2-in-1 furniture brush
27** Large upholstery nozzle
28** LED crevice nozzle
29** Extension hose
30** Flexible crevice nozzle
31** Removable battery (2x)
32** Soft brush
33** Free-standing parking station
34** Soft motorized brush (hard floor nozzle)
* EN 1822:1998
** optional
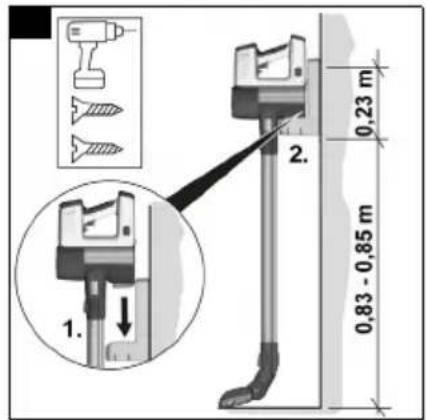
Installing the wall bracket/free-standing parking station with charging function
The scope of delivery includes either a wall bracket or a free-standing parking station with charging function for correct storage of the vacuum cleaner and accessories.
• Installing the wall bracket
Note
Mount the wall bracket at a suitable point using the screws and dowels supplied.
For safe storage of the device, the lower screw fastening of the wall bracket should be placed at a distance of 0.83-0.85 m from the floor.
Illustration F
ATTENTION
Material damage due to incorrect installation
Incorrect installation can damage both the device and the floor covering if it falls.
Use suitable mounting tools for wall mounting.
Take the weight of the device and the loading capacity of the installation location into account when selecting the fasteners.
⚠ WARNING
Risk of electric shock and injuries
Make sure there are no electrical cables, water or gas pipes in the wall around the mounting area.
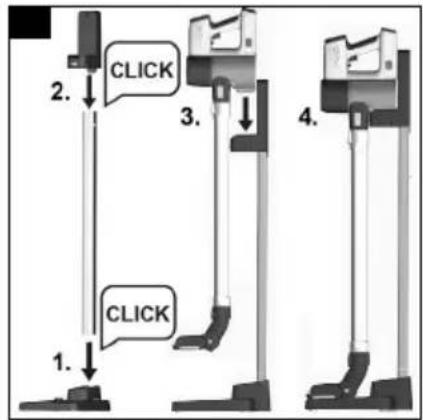
• Installing the free-standing parking station
Note
Installation on the wall is not necessary.
1 Assemble the base, connecting tube and bracket so that they audibly click into place.
2 Place the unit in the support.
Illustration G
ATTENTION
Risk of injury or damage to property
If the parking station is placed in an unfavourable position (e.g. in the middle of a room), this constitutes a tripping hazard and may result in injury and/or it can fall over and damage the unit.
Place the unit with the parking station in a safe, quiet place (e.g. wall, corner).
Note
Removal is carried out by pressing the unlocking buttons on the rear side of the parking station on the base and support.
Initial startup
Installing accessories
Note
The multi-function brush is also driven by its own integrated motor and must therefore always be connected
directly to the hand-held device or the suction pipe in order to ensure the power supply.
All other accessor parts can also be used directly with the hand-held device or with the suction pipe to increase the reach.
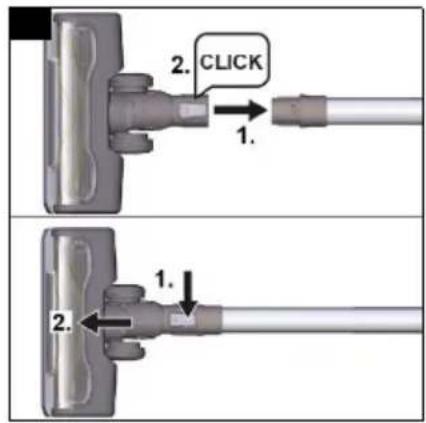
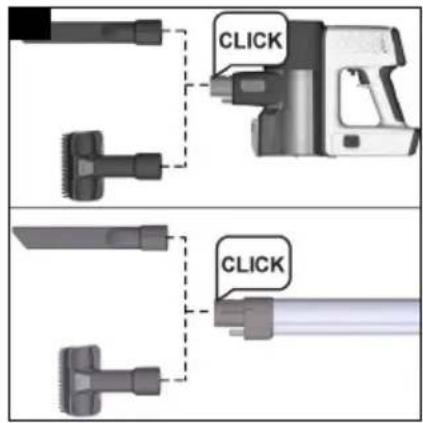
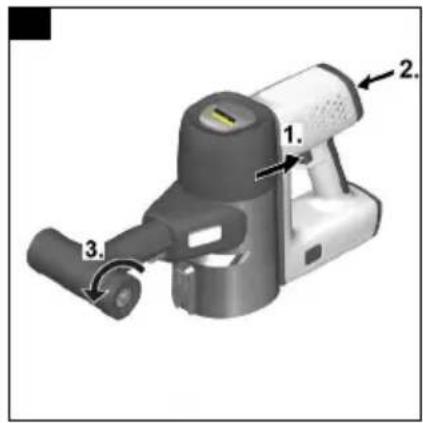
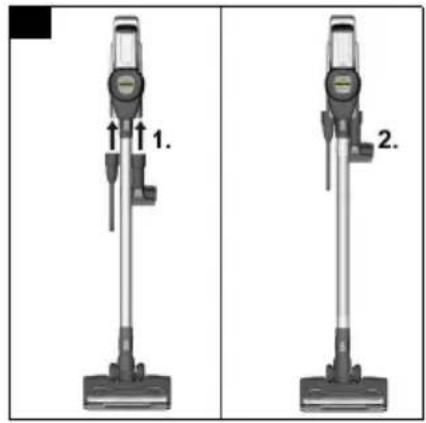
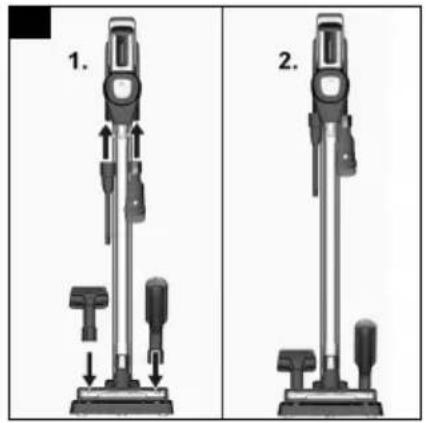
- Push the suction pipe on to the suction fitting of the dust container until it audibly clicks into place.
- Press the unlocking button and remove the suction pipe from the suction fitting.
Illustration B
- Push the floor nozzle on to the suction pipe until it audibly clicks into place.
- Press the unlocking button and remove the floor nozzle from the suction pipe.
Illustration C
- Push accessory, such as the crevice nozzle, on to the suction fitting of the dust container or suction pipe until it audibly clicks into place.
Illustration D
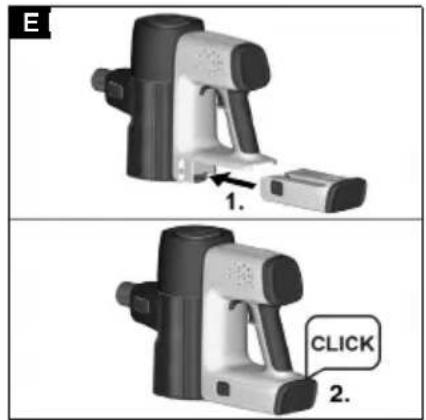
Inserting the battery
ATTENTION
Dirty contacts
Damage to the device and battery
Check the battery mount and the contacts for soiling and clean them as necessary before inserting the battery.
Note
Use only fully charged batteries.
- Push the battery into the mounting in the device until it audibly latches into place.
Illustration E
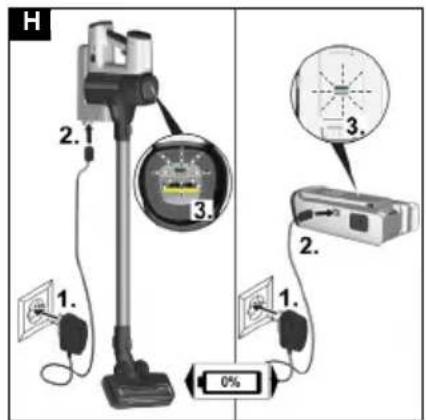
Battery charging
Note
The device is not supplied with a charged battery. Fully charge the battery before using it for the first time. Please observe the enclosed safety instructions for battery powered vacuum cleaners.
Note
The battery can be charged with the device or separately (e.g. for variants with an additional battery).
Note
For a detailed description of the LED displays, see chapter LED display
- Charge the battery with the device.
- To charge the device, attach it to the wall bracket with charging function included in the scope of delivery.
Illustration F
- Charge the battery separately.
- Place the battery on a flat and safe surface to charge it.
ATTENTION
Material damage due to incorrect battery storage
Incorrect storage during charging can result in the battery e.g. falling down or damaging heat-sensitive surfaces.
Make sure charging of the separate battery takes place on a flat, smooth and heat-insensitive surface.
Furthermore, the battery should not be covered with objects (e.g. fabrics or papers) while it is being charged.
- Plug the charger into a socket.
Insert the connecting plug into the charging socket of the wall bracket / battery.
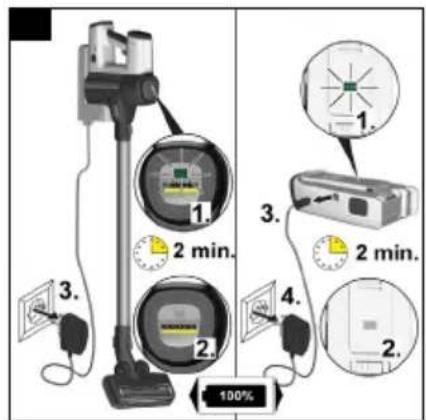
Depending on the battery status, the 3 LED indicator lights flash or light up green during the charging process.
Illustration H
- When the device is fully charged, all 3 LED indicator lights light up continuously green for 2 minutes and then go out.
Remove the charger from the socket/charging cable from the battery charging socket and socket.
Illustration I
- Remove the device from the wall bracket or insert the battery into the device, see chapter Inserting the battery
The device is ready for use.
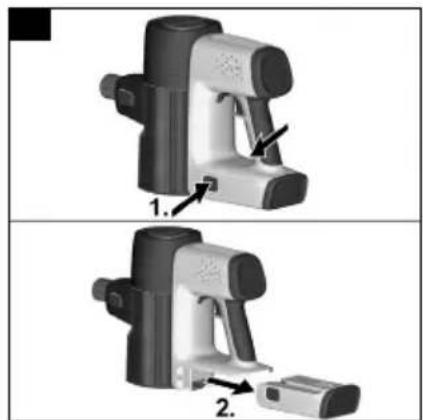
Removing the battery
⚠ WARNING
Uncontrolled startup
Risk of injury
Remove the battery from the device before service and care work or if the device is not going to be used for a long period of time.
-
Press the unlocking button.
-
Remove the battery from the device.
Illustration J
Operation
LED display
The LEDs on the head of the device and on the battery indicate information about the battery status, boost mode and error messages.
The charging state of the battery is indicated by the 3 green LEDs on the device as well as by the 3 green LEDs on the battery.
See figure A on the graphics page and chapter Description of the unit
Battery charging state
| LED Duration of | lighting | Meaning |
| 1st LED flashes green | 1 s on / 1 s off | Battery charged below 7.5 % |
| 1st LED lights up green | continuously B | Battery charged below 40 % |
| 1st and 2nd LEDs light up green | continuously B | Battery charged below 70 % |
| 3 LEDs light up green | continuously | Battery charged above 70 % |
| 3 LEDs flash green | 125 ms on / 125 ms off | Battery fault, after 30 s the signal goes out |
The charging progress of the battery is indicated by the 3 green LEDs on the device as well as by the 3 green LEDs on the battery. The LEDs only light up when the battery is correctly installed.
While charging
| LED Duration of | lighting | Meaning |
| 1st LED flashes green | 0.2 s from off to on /0.6 s on /0.2 s from on to off /1 s off | Battery charging, battery charged below 40 % |
While charging
| LED Duration of | lighting | Meaning |
| 1st LED lights up green2nd LED flashes green | continuously0.2 s from off to on /0.6 s on /0.2 s from on to off /1 s off | Battery charging, battery charged below 70 % |
| 1st and2nd LEDs light up green3rd LED flashes green | continuously0.2 s from off to on /0.6 s on /0.2 s from on to off /1 s off | Battery charging, battery charged below 99 % |
| 3 LEDs light up green | 2 min continuous lighting, then off | Battery fully charged |
Error message
| LED Duration of lighting | Meaning |
| Suction duct flashes red | 125 ms on / 125 ms off |
| Floor nozzle LED flashes red | 125 ms on / 125 ms off |
| See also chapter Troubleshooting guide | |
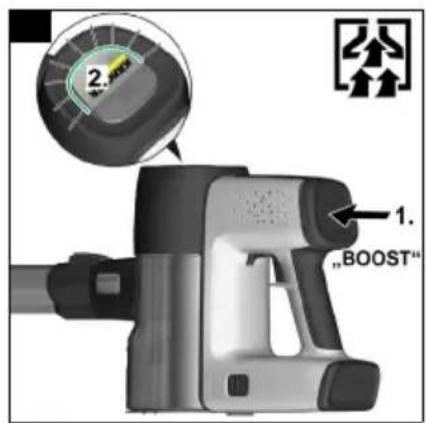
Boost mode
| LED Duration of lighting | Meaning |
| LED half ring lights up green | continuously Boost mode on |
Changing accessories
To change accessories, see chapter Installing accessories
Vacuuming
- Install the required accessories, see chapter Installing accessories.
- Switch on the device, depending on cleaning requirements:
- Press the On/Off switch and keep it pressed during operation.
or
- Turn the locking lever to switch the device directly to continuous operation.
Illustration K
- If necessary, press the Boost button to increase the dust intake.
Illustration L
Note
When the device is switched off, the boost function is automatically disabled.
The boost function can also be switched off by pressing the Boost button again.
Ending operation
- Switch off the device.
Release the On/Off switch or disable the locking lever.
Note
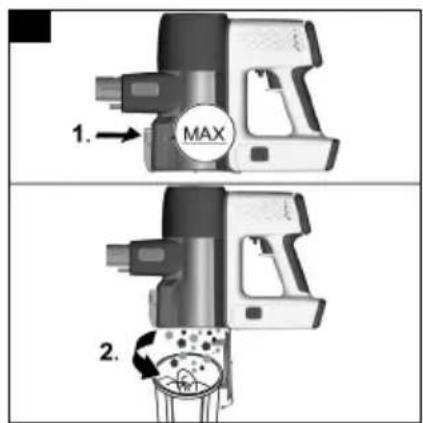
To ensure an optimum suction performance, empty the dust container and clean the air inlet filter after each use.
Empty the dust container at the latest when the "MAX" marking is reached.
-
Remove the suction pipe or accessory.
-
Empty the dust container into a waste container. a Press the unlocking button.
The dust container flap opens.
b Empty the dust container.
Illustration M
-
To close the flap, push the dust container upwards until it clicks into place.
-
Clean the air inlet filter, see chapter Cleaning the air inlet filter
-
Depending on the scope of delivery, attach the unit to the wall bracket or to the free-standing parking station with charging function.
Illustration F
Illustration G
- Storage of the accessories is to be carried out in accordance with the scope of delivery.
Illustration AE
- Charge the unit with battery or charge the battery only, see chapter Battery charging.
How to use the Accessories
General instructions for use
- Which accessories are included in the scope of delivery is shown on the device packaging.
- Accessories not included in the packaging can be purchased in a KÄRCHER specialist shop or from www.kaercher.com.
- Test the accessory at an inconspicuous point before using it in a sensitive area.
- Follow the manufacturer's cleaning instructions.
- Connect the motor-driven electric nozzle to the suction pipe or the hand-held device.
- Also connect the other accessory parts, such as crevice nozzle, to the hand-held device or push it directly onto the suction pipe to increase the reach.
Motor-driven multi-function brush
Ideal for hard floors and carpets.
The motor-driven multi-function brush removes dirt stuck between the carpet fibres particularly effectively.
2-in-1 upholstery nozzle
The frame with the surrounding bristles can be taken off pressing the unlocking button.
- The soft brush is suitable for furniture with hard surfaces
- The wide brush is used to clean upholstered furniture, curtains, etc.
Crevice nozzle
For edges, joints, heaters and areas that are difficult to reach.
Soft brush
The soft brush has particularly soft bristles for cleaning sensitive surfaces such as keyboards, lamps, etc.
Flexible crevice nozzle
The flexible crevice nozzle increases the reach. For cleaning hard-to-reach places, such as between the car seats.
Flexible extension hose
Due to the extension and flexibility, hard-to-reach areas such as in the car can be reached and cleaned.
Large upholstery nozzle
For cleaning textile surfaces such as sofas, armchairs, mattresses, car seats, etc.
2-in-1 furniture brush
For gentle cleaning of sofas and delicate furniture. Depending on requirements, the accessory can be used as a furniture or upholstery nozzle by pressing the button.
Mini turbo brush
Ensures efficient removal of pet hair and dust particles from upholstered furniture, mattresses or other soft surfaces. The rotating round brush picks up even the finest hairs.
LED crevice nozzle
For cleaning corners and hard-to-reach areas. Thanks to the lights, even the finest dust in dark gaps becomes visible.
Soft motor-driven brush (Hard floor nozzle)
For hard floors and sensitive wooden floors. Extracts coarse and fine dirt simultaneously.
Transportation
The battery has been tested in accordance with the relevant rules for international transport, and can be transported / shipped.
Storage
ATTENTION
Moisture and heat
Risk of damage
Store battery packs indoors only, at low humidity and temperatures below 20°C.
The battery pack display shows the current charging state during storage.
Care and service
General care instructions
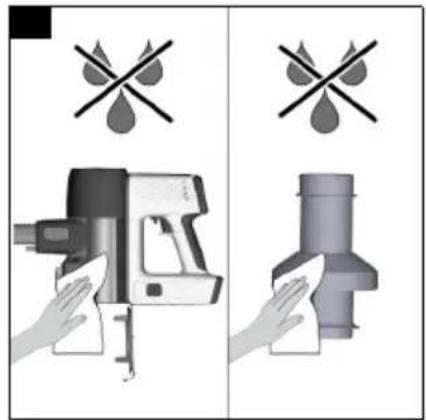
- Clean the device and plastic accessory parts with a commonly available plastic cleaner.
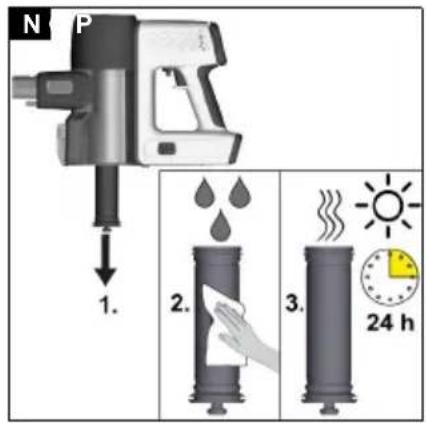
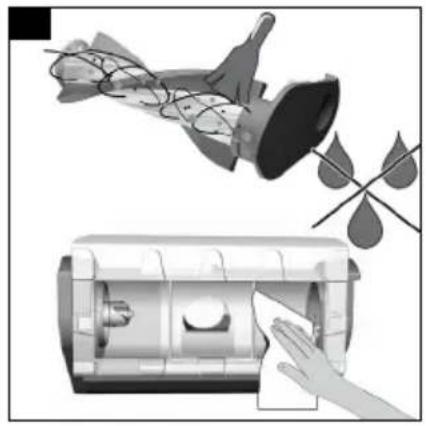
Cleaning the air inlet filter
Note
The device can be cleaned manually or using a filter cleaning device.
Cleaning the air inlet filter manually
1 Switch off the device.
2 Pull the soiled air inlet filter down at the filter stick, carefully beat it and clean it with a damp cloth or running water.
Illustration N
a Reinsert the fully dried air inlet filter.
b Check for correct seating.
Cleaning the air inlet filter with a filter cleaning device
Note
A new air inlet filter must be installed in the dust container during filter cleaning.
1 Switch off the device.
2 Push the filter cleaning device on to the suction pipe branch and pull the air inlet filter out of the device using the filter stick.
Illustration O
a Push the soiled air inlet filter into the filter cleaning device.
b Insert a new air inlet filter into the dust container.
c Switch on the device and let it run in boost mode while turning the side cover.
d Remove the cleaned air inlet filter from the filter cleaning tool and reinsert it in the dust container after removing the new air inlet filter.
e Check that the air inlet filter is correctly seated.
Illustration P
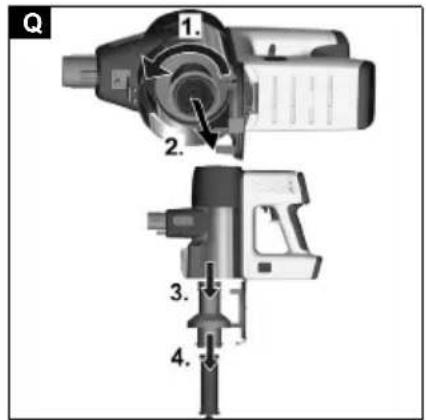
Cleaning the dust container and cyclone filter
Note
Before cleaning the dust container and cyclone filter, empty the dust container, see chapter Ending operation
1 Switch off the device.
2 Remove the cyclone filter and air inlet filter.
a Remove the cyclone filter from the dust container by turning it anticlockwise.
b Remove the cyclone filter from the dust container and take the air inlet filter out of the cyclone filter.
Illustration Q
ATTENTION
Short circuit hazard
There are cables or contacts in the dust container and cyclone filter for the power supply.
Make sure that the cables or contacts do not get wet when cleaning.
3 Clean the dust container and cyclone filter with a soft brush or a slightly damp cloth
Illustration R
4 Clean the air inlet filter, see chapter Cleaning the air inlet filter
5 Re-insert the dry dust container and cyclone filter with air inlet filter into the device and close the flap.
Cleaning the HEPA filter/replacing the HEPA filter
Note
The HEPA filter ensures clean exhaust air.
- Clean the HEPA filter if it is visibly dirty.
-
Replace the HEPA filter if there is visible damage.
-
Switch off the device.
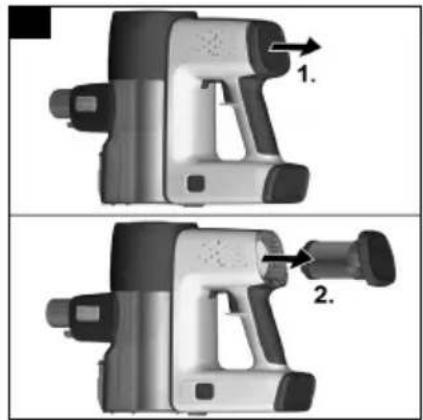
-
Cleaning the HEPA filter.
a Pull the HEPA filter cover with the HEPA filter out of the device.
Illustration S
ATTENTION
Short circuit hazard
Power supply cables or contacts are located in the cover of the HEPA filter.
Before cleaning with water, remove the cover of the HEPA filter so that the cables or contacts do not get wet.
- Carefully knock off the HEPA filter or if it is very dirty: a Unscrew/remove the cover of the HEPA filter.
b Clean the HEPA filter under running water. Do not rub or brush off.
c Then let the HEPA filter dry completely. Illustration T
d Fasten/screw on the HEPA filter cover.
ATTENTION
Health risk
HEPA filters that are not completely dry when installed in the device can be a breeding ground for spores and mould.
Make sure that the HEPA filter is completely dry on installation.
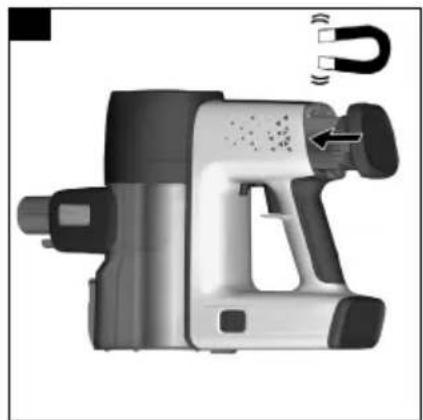
- Insert the dry HEPA filter into the device.
Illustration V
Note
The HEPA filter only needs to be inserted into the device, a magnet allows the HEPA filter to snap into place automatically.
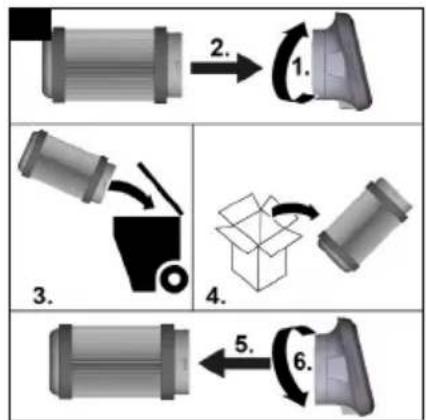
- Replacing the HEPA filter
a Pull the HEPA filter cover with the HEPA filter out of the device.
b Unscrew/pull off the cover of the HEPA filter and dispose of the used filter.
c Attach/screw on the new HEPA filter cover. Illustration U
Illustration S
- Insert the HEPA filter into the device.
Illustration V
Cleaning the multi-function nozzle
- Switch off the device.
- Remove accessories.
ATTENTION
Short circuit hazard
The multi-function brush contains electrical components.
You must not immerse the multi-function brush in water or clean it with a damp cloth.
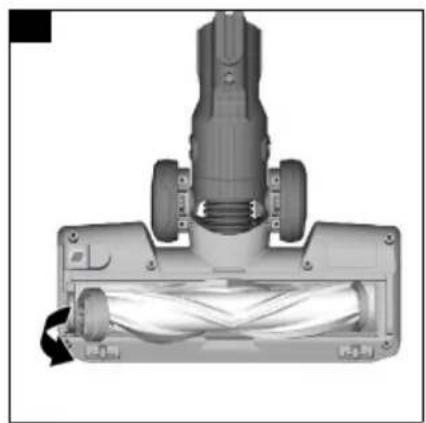
- Clean the multi-function brush.
a Unlock the brush roll cover / support with a coin or other object and remove it.
Illustration W
b Remove the brush roll from the brush opening in the direction of the arrow.
Illustration X
c Remove the dirt e.g. with a brush. Any tangled threads or hairs can be carefully cut off with scissors.
d Carefully clean the brush opening with a cloth or soft brush.
Illustration Y
e Insert the brush roll into the brush opening.
f Lock the brush roll with a coin or other object.
Illustration Z
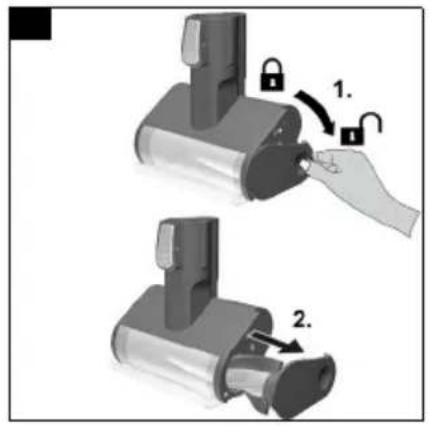
Cleaning the mini turbo nozzle
- Switch off the device.
- Remove accessories.
ATTENTION
Short circuit hazard
The mini turbo nozzle contains electrical components. Do not immerse the mini turbo nozzle in water or clean it with water.
a Press down the brush roller cover and remove the brush roller.
Illustration AA
b Remove residue, e.g. with a brush. Any tangled threads or hairs can be carefully cut off with scissors.
c Carefully clean the brush opening with a cloth or soft brush.
Illustration AB
d Diagonally insert the brush roller fully into the brush opening, pressing upwards until the cover has clicked into place.
Illustration AC
Troubleshooting guide
Malfunctions often have simple causes that you can remedy yourself using the following overview. When in doubt, or in the case of malfunctions not mentioned here, please contact your authorised Customer Service.
The device does not start up
Battery is empty.
- Charge the rechargeable battery.
Battery is not inserted correctly.
- Push the battery into the mount until it locks into place.
Battery is defective.
- Replace the battery.
The battery is not charging
The charging plug/mains plug is not connected correctly.
- Connect the charging plug/mains plug correctly.
The socket is defective.
- Check that the socket is working.
The wrong charger is being used
- Check that the correct charger is being used.
The device stops during operation or the suction performance is poor
The battery has overheated.
- Stop work and wait until the battery temperature is back in the normal range.
The accessories, the suction opening on the dust container or the suction pipes are clogged.
- Remove the clog with a suitable aid.
The dust container is full.
● Empty the dust container.
The filters are soiled.
● Clean the filters, see chapter Care and service.
Roller brush is blocked.
- Remove any blockage.
The LED indicator lamp for the suction channel and / or floor nozzle flashes red Illustration AF
Blockage in the suction channel due to bulky objects / particles.
- Remove the clog with a suitable aid.
The dust container is full.
● Empty the dust container.
The filters are soiled.
● Clean the filters, see chapter Care and service.
Blockage in the floor nozzle due to bulky objects / particles.
- Remove the clog with a suitable aid.
Brush roll has got caught in long carpet fringes.
- Wear the device to separate the floor nozzle from the carpet.
Abnormal engine noise
The accessories, the suction opening on the dust container or the suction pipes are clogged.
- Remove the clog with a suitable aid.
Technical data
Electrical connection
| Voltage of charger V 25,2 |
| Nominal power W 250 |
| Battery pack type Li-ION |
| Charger 30 V |
TEK
Model YLS0241A-
E300060
Part number 9.754-741.0
| Nominal voltage of charger V 100 - | 240 |
Frequency Hz 50 - 60
| Charging time when the battery is min completely discharged | 235 |
Protection class

Device performance data
| Tank content | 1 | 0,8 |
| Operating time when battery is ful- min | 50 |
| ly charged in normal operation |
| Operating time in maximum mode min when battery fully charged | 12 |
Dimensions and weights
| Weight (without accessories) | kg 1,7 |
Subject to technical modifications.
Contenu
De accu is oververhit.
De stofcontainer is vol.
- Leeg de stofcontainer.
De stofcontainer is vol.
- Leeg de stofcontainer.
www.kaercher.com/REACH
Tarvikute monteerimine
Märkus
Üldised hooldusjuhised
www.kaercher.com/REACH
natural_image
Black hand icon giving a thumbs-up gesture (no text or symbols)THANK YOU!
MERCI! DANKE! iGRACIAS!

Register your product and benefit from many advantages.
www.kaercher.com/welcome


Rate your product and tell us your opinion.
natural_image
Icon showing a gear and wrench inside a square frame (no text or symbols)www.kaercher.com/dealersearch
Alfred Kärcher SE & Co. KG
Alfred-Kärcher-Str. 28-40
71364 Winnenden (Germany)
Tel.: +49 7195 14-0
Fax: +49 7195 14-2212