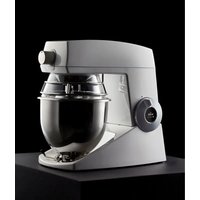
TEDDY - Food Processor Witt - Free user manual and instructions
Find the device manual for free TEDDY Witt in PDF.


| Product type | Food processor |
| Brand | Witt |
| Model | TEDDY |
| Dimensions (W x D x H) | 462 x 240 x 400 mm |
| Net weight | 22.0 kg |
| Power supply | 230 V ~ 50/60 Hz (2.4 A) or 115 V ~ 50/60 Hz (4.8 A) |
| Power | 300 W |
| Bowl capacity | 5 L (stainless steel) |
| Speeds | 5 positions + neutral position and lock position |
| Main functions | Kneading, mixing, whisking (depending on tool) |
| Materials | Bowl, hook, paddle, and whisks in stainless steel; splash guard and plastic lid |
| Supplied accessories | Bowl, lid, filling tray, hook, paddle, whisks, splash guard, cable |
| Continuous sound level | 70 dB(A) maximum |
| Safety | Automatic shut-off timer after 45 min; stop if cover raised; overheating protection; thermal fuses; bowl lock; IP42 rating |
| Maintenance | Motor lubricated for life; tools and bowl dishwasher safe; clean housing with a damp sponge; do not spray with water |
| Warranty | 2 years on manufacturing or material defects (domestic use) |
| Maximum capacity (bread dough) | 2.5 kg of dough |
| Maximum capacity (shortcrust pastry) | 2 kg of dough |
| Maximum capacity (whipped cream) | 1 liter of cream |
| Maximum capacity (egg whites) | 20 eggs |
| Maximum capacity (shortbread) | 12 eggs |
| Maximum capacity (mixed stuffing) | 3 kg |
| Accessory socket | Yes, for meat grinder (optional) |
Frequently Asked Questions - TEDDY Witt
User questions about TEDDY Witt
0 question about this device. Answer the ones you know or ask your own.
Ask a new question about this device
Download the instructions for your Food Processor in PDF format for free! Find your manual TEDDY - Witt and take your electronic device back in hand. On this page are published all the documents necessary for the use of your device. TEDDY by Witt.
USER MANUAL TEDDY Witt
natural_image
Modern kitchen mixer with black body and metallic control panel, displayed against a dark background (no text or symbols visible)RENG∅RING OG HYGIEJNE 8
VEDLIGEHOLDELSE 8
FEJLFINDING OG L∅SNINGSMULIGHEDER....8
TILBEH∅RSTILSLUTNING....9
ANBEFALEDE HASTIGHEDER FOR HJÆLPETRÆK......9
REKLAMATION....10
SERVICE....10
SIKKERHEDSANVISNINGER
natural_image
Simple line drawing of a cylindrical container with a base and top, no text or symbols present.Ris Ifyldningsbakke Skål
ANBEFALEDE ARBEJDSHASTIGHEDER
• Position 1-2: Lav hastighed Æltning
• Position 1-3: Mellemhastighed Blanding
• Position 1-5: Høj hastighed Piskning
RENG∅RING OG HYGIEJNE
Fig. 6 Sikringer i kabelstik
TILBEH∅RSTILSLUTNING
OVERSIKT OVER APPARATET
INTRODUKSJON TIL APPARATET....15
ANBEFALTE DRIFTSHASTIGHETER....16
BETJENING AV APPARATET 16
APPARATETS MAKSIMALE HASTIGHET....17
OVERBELASTNING....17
RENGJ∅RING OG HYGIENE 17
VEDLIKEHOLD 17
FEILS∅KING OG L∅SNINGSMULIGHETER....17
MONTERING AV TILBEH∅R 18
ANBEFALTE HASTIGHETER FOR HJELPETREKK ...... 18
REKLAMASJON 19
SERVICE....19
SIKKERHETSANVISNINGER
INTRODUKSJON TIL APPARATET
natural_image
Simple line drawing of a bowl with a small outlet (no text or symbols)ANBEFALTE DRIFTSHASTIGHETER
natural_image
Diagram of a funnel pouring liquid into a container with an upward arrow indicating flow (no text or symbols)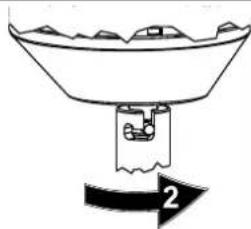
natural_image
Simple line drawing of a funnel-shaped container with a side outlet and an arrow labeled '2' (no text or symbols on the diagram itself)Fig. 4 Redskap monteres i bajonettaksel
RENG∅RING OG HYGIEJNE
Fig. 6 Sikringer i støpselet
RENGÖRING OCH HYGIEN 26
UNDERHÅLL 26
FELSÖKNING OCH ÅTGÄRDER 26
MONTERING AV TILLBEHÖR 27
REKOMMENDERADE HASTIGHETER FÖR HJÄLPUTTAG 27
REKLAMATION.... 28
SERVICE.... 28
SÄKERHETSANVISNINGAR
natural_image
Simple line drawing of a cylindrical container with a small outlet (no text or symbols)flowchart
graph TD
    A["Neutral position (Ω)"] --> B["400"]
    B --> C["witt Varimixer"]
    C --> D["Arrow to right"]
    D --> E["Arrow to left"]
    E --> F["Arrow to right"]
    F --> G["Arrow to right"]
    G --> H["Arrow to right"]
    H --> I["Arrow to right"]
    I --> J["Arrow to right"]
    J --> K["Arrow to right"]
    K --> L["Arrow to right"]
    L --> M["Arrow to right"]
    M --> N["Arrow to right"]
A: Lässymbol B: Neutral position C: Hastigheter
Fig. 3 Kontrollvredets tre positioner
natural_image
Diagram of a funnel pouring liquid into a container with an upward arrow indicating flow direction (no text or symbols)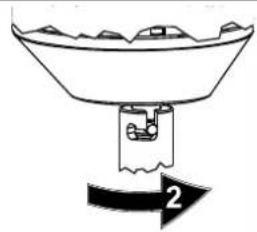
natural_image
Simple line drawing of a funnel-shaped container with a submerged object and an arrow labeled '2' (no text or symbols on the diagram itself)RENGÖRING OCH HYGIEN
Fig. 6 Säkringar i kabelkontakten
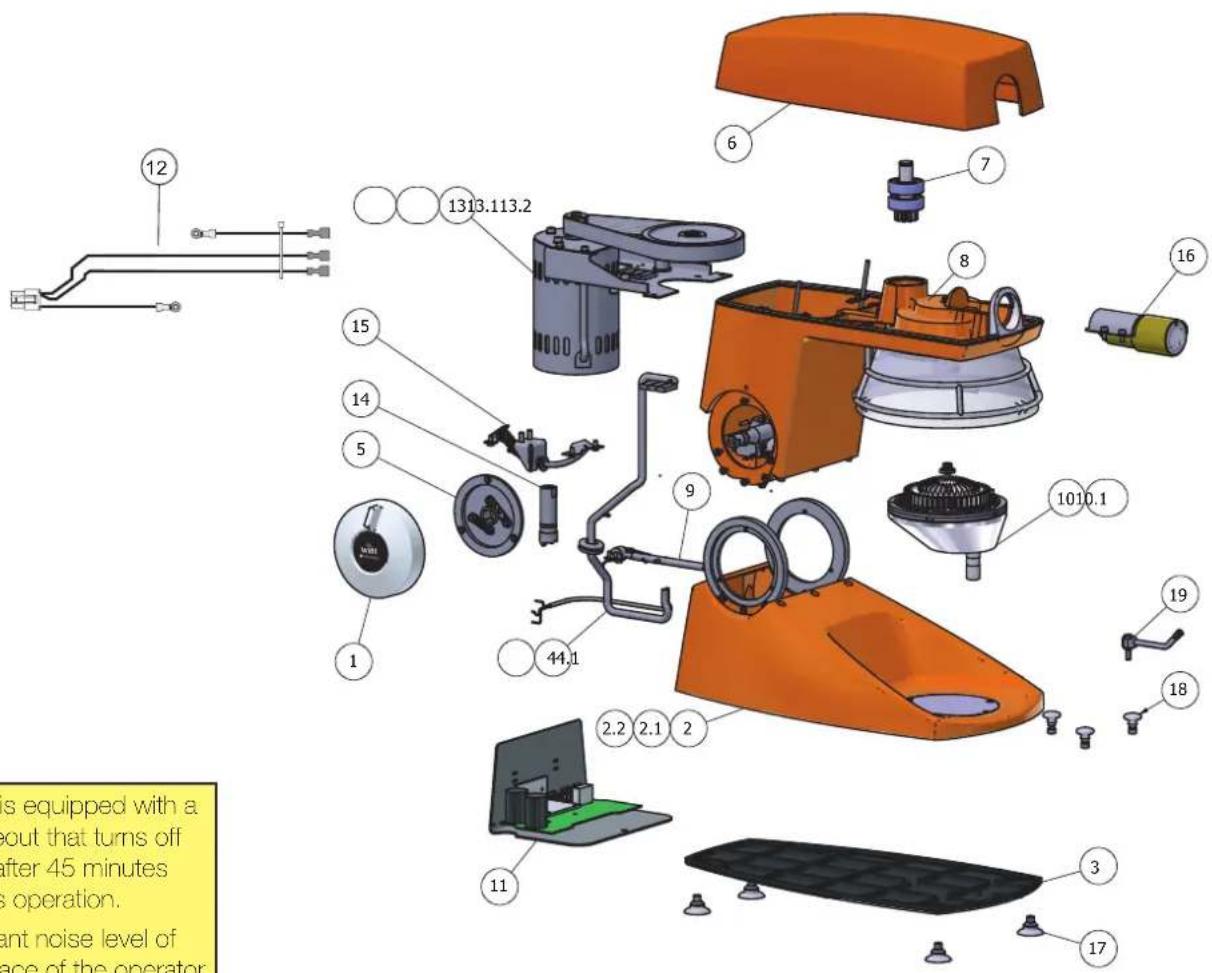
Kuva 1 Koneen osat
1 Operating button, left and right
2 Base
2.1 Fuse 2.5 Amp, slow blow, 230V
2.2 Fuse 5 Amp, slow blow, 100/110V
3 Bottom plate
4 Cable, 115V
4.1 Cable, 230V
5 Tilt bearing, left and right
6 Lid
7 Intermediate shaft
8 Upper part
9 Lock pin
10 Planetary head
10.1 Toothed wheel rim
11 Frequency transformer 115V, 230V
12 Cable
13 Transmission and motor
13.1 Poly-V belt and pulley
13.2 Poly-V belt
14 Release housing
15 Weight compensator
16 Attachment drive
17 Machine feet
18 Fixing of bowl
19 Bowl lock
The mixer is equipped with a safety-timeout that turns off the mixer after 45 minutes continuous operation. The constant noise level of the workplace of the operator is lower than 70 dB (A).
CONTENTS
SAFETY INSTRUCTIONS....40
INSTALLATION OF A NEW MACHINE....41
CONNECTING TO A POWER SOURCE....42
INTRODUCTION TO THE MACHINE....42
RECOMMENDED WORK SPEEDS 43
HOW TO OPERATE THE MACHINE ....43
THE MACHINE'S MAXIMUM CAPACITY 44
OVERLOADING 44
CLEANING AND HYGIENE.... 44
MAINTENANCE....44
TROUBLESHOOTING AND POTENTIAL SOLUTIONS ... 44
ATTACHING ACCESSORIES....45
RECOMMENDED SPEEDS FOR ATTACHMENT DRIVE . 45
WARRANTY AND SERVICE 46
SERVICE....46
SAFETY INSTRUCTIONS
- Please read through the entire instructions before using the device.
- Turn off the device before attaching or removing accessories.
- Keep fingers away from moving parts and attached accessories.
- Keep lose parts and clothing away from the device while operating it.
- This device is only for household use. The manufacturer does not accept liability if the device is not used correctly or if these instructions are not followed.
- Never leave the device unsupervised when it is in operation. This especially applies when there are children or people with special needs nearby.
- Make sure that the device's nominal voltage matches your power supply. Attaching the device to an incorrect power source will immediately terminate the warranty.
- The device must be grounded.
- If you are using an extension cord, this must also be grounded. Make sure that no one can trip over the cord.
- Turn off the device and unplug it when you are done using it and when cleaning it.
- Never operate the device if the cord, plug or device is damaged. Contact an authorised service centre.
- All other maintenance other than common maintenance and cleaning must be performed by an authorised service centre.
- In order to avoid electric shocks, neither the cord nor device may ever be lowered into water or other fluids.
- Do not let the cord of the device hang near children or get close to or come into contact with the hot parts of the device, other sources of heat or sharp table edges.
- Turn off the device and unplug it before removing or replacing the moving parts.
- Do not touch the balloon whisk, the flat whisk or the dough hook when the device is in operation.
- Only use one accessory at a time and make sure to use the splash guard lid for the other rotating parts.
- The device is not intended to be used by people with physical, sensor or mental impairments and/or lack of experience and knowledge or by children unless they have been guided and instructed in how to use the device by a person responsible for their safety.
- The device will automatically turn off if the motor head is lifted or if there is a short circuit. Please turn off the device first and then turn it back on again. Reset the speed and then the device is ready to be used.
- The device is equipped with a overheating safety feature which will automatically cut power to the device if it starts overheating.
- Do not let children play with the device.
- Using the device incorrectly may damage the product or injure someone.
- This device is intended for household use and similar applications, such as use by:
- Kitchen staff at stores, offices and other working environments
- Being used by hotel/motel guests and in other kinds of residential environments, including
- Bed and breakfasts
- Always ensure that the device is not attached to a power source if it is left unsupervised and also before adding or removing parts and before cleaning.
- The device may not be operated via an external timer or a separate remote control system.
- Avoid any kind of contact with moving parts!
- The device may not be used by children. Keep the device and cord out of reach of children.
The constant noise level of the of the machine as perceived by the operator is lower than 70 dB (A). The user's safety is ensured by:
• The machine only being able to start when the top part is lowered.
- The top part only being able to tip up when the machine has stopped.
- An overcurrent protection circuit protecting against voltages that are too high or too low.
• The machine being delivered with a fixed safety screen.

The machine may only be operated by persons aged 14 or older.
The machine must be monitored when it is in operation.

The machine is designed to make products which during the processing do not trigger reactions or release substances that may be harmful to the user.

Limbs may be injured if hands are put into the bowl while the machine is running.
INSTALLATION OF A NEW MACHINE
The machine is delivered with the following equipment:
| √ Cable | √ | Hook |
| √ Bowl | √ | Spatula |
| √ Bowl lid | √ | Whisk |
| √ Filling tray | √ | Splash guard |
Before the machine is used, make sure that all parts are included.
Measurements and weight:
Witt Varimixer Teddy including equipment:
• Net weight with equipment 22.0 kg
• The exterior dimensions of the machine 462 × 240 × 400 mm


Setup:
The machine needs to be placed on a stable and vertical worktop.
CONNECTING TO A POWER SOURCE

The included cable must be used!
The machine must be grounded!
- The machine may only be attached to a 1-phase power supply with grounding and the included cable must be used.
- There must be used a type C outlet with two prongs and grounding.
- Ensure that the net voltage matches the voltage specified on the type plate located at the bottom of the machine and as specified on the packaging.
- The machine must be protected by a differential switch and a fuse of no more than 10 A.
- A fuse has been integrated into the cable plug, 2.5A for 230V and 5A for 115V.
The machine's electrical characteristics:
| Supply voltage (V) | Frequency (Hz) | Electric current (A) | Power (W) |
| 230 | 50/60 | 2.4 | 300 |
| 115 | 50/60 | 4.8 | 300 |
INTRODUCTION TO THE MACHINE
Everything about the machine is operated using the operating buttons on the side of the machine. The two buttons can be used simultaneously or individually and used for both start/stop, speed adjustments and to open/close the machine.
The attachment drive A makes it possible to attach a meat grinder.
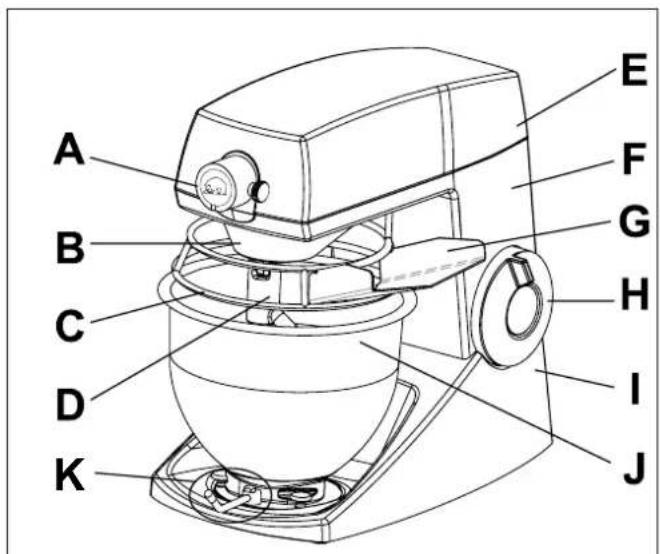
Figure 1 How the machine is structured
A Attachment drive, extra equipment
B Installing mixing tools / planetary rotation
C Stainless stool safety screen
D Bayonet shaft
E Lid
F Upper part
G Loose filling tray
H Operating button (x2)
I Baso
J Bowl, 5L capacity
K Locking arm
Equipment:
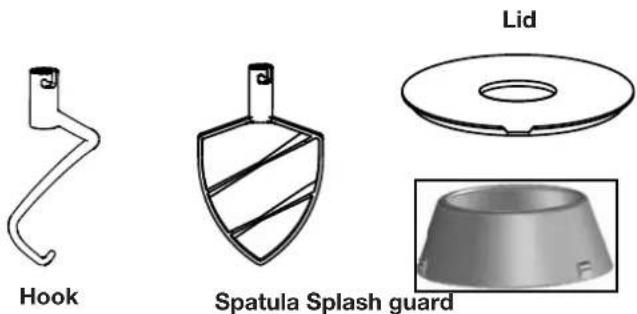
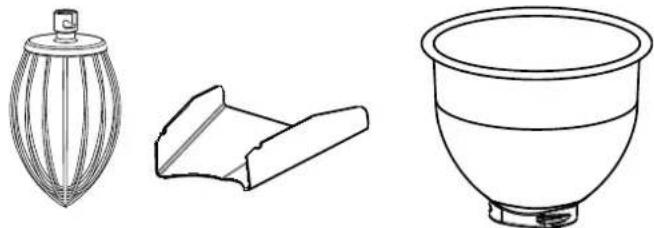
The machine is delivered with the following standard equipment:
- Stainless steel bowl
- White plastic lid for bowl
- Filling tray
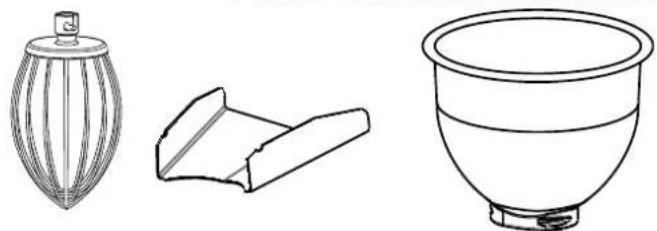
• Stainless steel dough hook for kneading dough
• Stainless steel spatula for mixing work
• Stainless steel whisk for whisking - Plastic splash guard
natural_image
Line drawings of three kitchen utensils: a vertical stirrer, a folded blade, and a bowl (no text or symbols)Whisk Filling tray Bowl
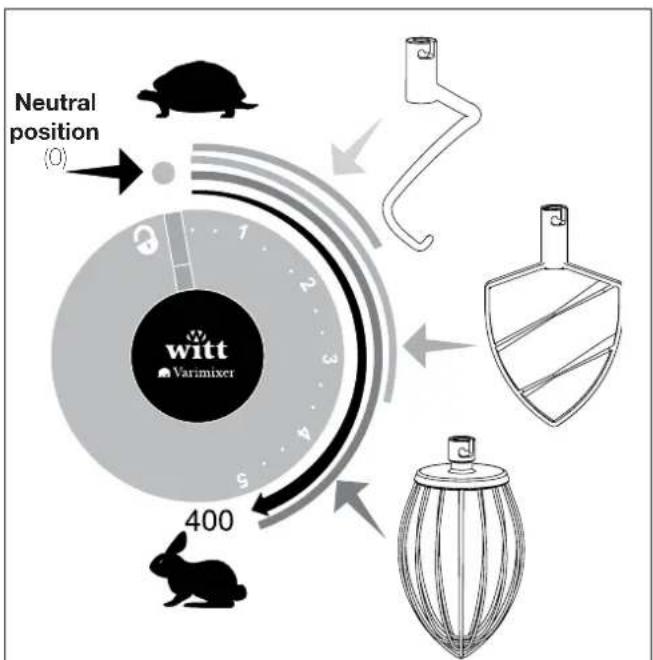
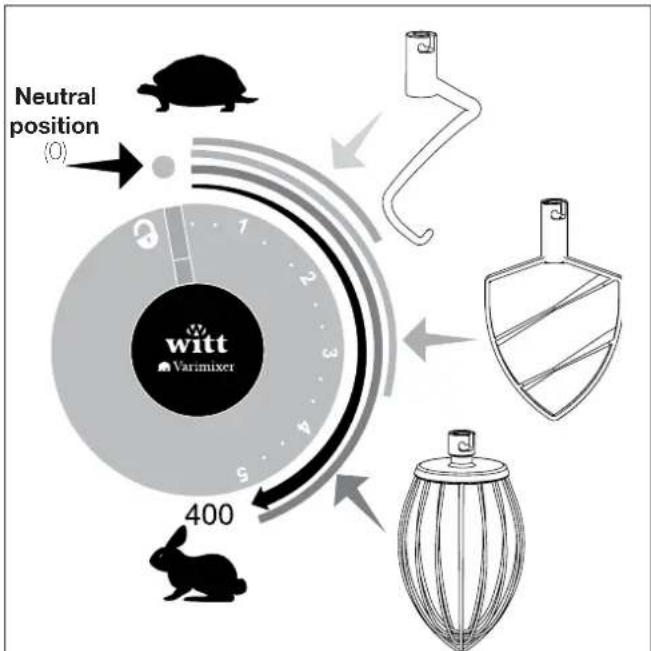
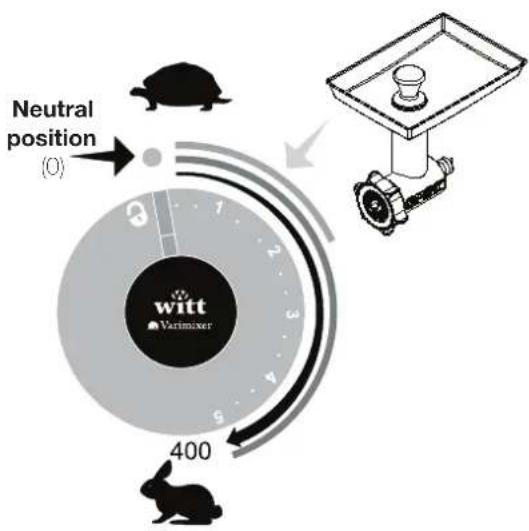
RECOMMENDED WORK SPEEDS
• Position 1-2: Low speed Kneading
• Position 1-3: Medium speed Mixing
• Position 1-5: High speed Whisking
flowchart
graph TD
    A["Neutral position (0)"] --> B["400"]
    B --> C["Red Arrow to witt Varimixer"]
    C --> D["White Shell Box"]
    D --> E["Rabbit"]
    style A fill:#f9f,stroke:#333
    style B fill:#ccf,stroke:#333
    style C fill:#cfc,stroke:#333
    style D fill:#fcc,stroke:#333
    style E fill:#cff,stroke:#333
Figure 2 Recommended work speed settings
Please note: The bowl must be attached when the machine starts!
The machine must be monitored while it is in operation.
A. Turn the operating button to the lock symbol (Figure 3A)
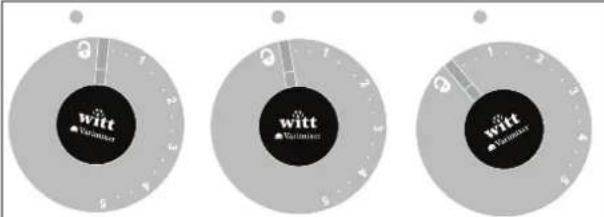
A: Lock symbol B: Neutral position C: Speeds
Figure 3 The three positions of the dial
B. Tip the upper part of the machine back
C. Attach the desired tool to the bayonet shaft and turn it clockwise to lock it in place (Figure 4)
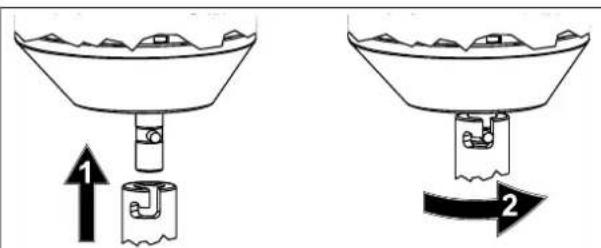
Figure 4 Tools are installed in the bayonet shaft
D. Place the bowl between the three locking bolts in the foot of the machine and turn it clockwise until it locks into position (Figure 5). The locking arm should be twisted counterclockwise to lock the bowl in place.
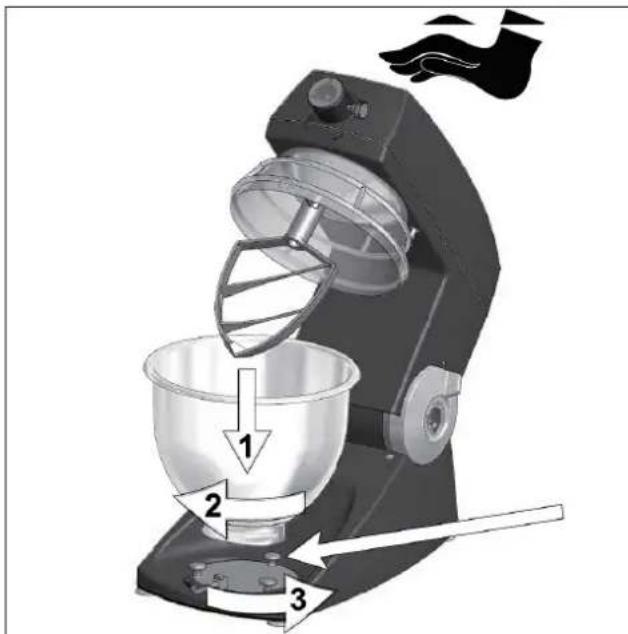
Figure 5 The bowl is placed on the machine and twisted into position using the locking bolts - the locking arm is twisted counterclockwise.
E. Fill the bowl with the desired ingredients.
F. Close the machine - there will be a clicking sound when it is properly closed.
G. Start the machine by turning the operating button away from the lock symbol and past 1. To avoid sprays and flour in the air, it is recommended to increase the speed gradually up to the desired speed (Figure 3C), and also see Figure 2 for the recommended work speeds.
H. Stop the machine by turning the operating button back to the neutral position (Figure 3B).
I. The upper part of the machine can only be tipped back when the operating button is turned to the locking symbol (Figure 3A).
THE MACHINE'S MAXIMUM CAPACITY
The machine's work capacity depends on:
• The tool being used
• The nature and amount of the product that is being processed
• The optimal speed for a good result

If you are using amounts that are too large, this will always negatively impact the quality of the work and the life expectancy of the machine.
Overloading can also result in the machine suddenly stopping.
| Product | Raw material | Approximately maximum amount |
| Bread dough 60 % | Kg of dough | 2,5 |
| Shortcrust pastry | Kg of dough | 2 |
| Cream | Litre of bream | |
| Egg whites | Number of eggs | 20 |
| Sand cake | Number of eggs | 12 |
| Mixed minced meat | kg | 3 |
OVERLOADING
If the machine is moving when, for example, it is kneading dough this is not an error or an indication of it being overloaded.
When there is an overload, the electronic variator will reduce power to the motor and stop it.

If the machine stops due to overloading, turn the dial back to the neutral position and then the machine can be restarted.
If the motor stops after being used for a long time and cannot be immediately restarted, it is because the motor's thermal sensors have disconnected the power - the machine therefore needs to cool down before it can be restarted. This ensures that the machine is not destroyed.
The machine has two thermal fuses which will automatically turn back on if the thermal sensor has turned them off.
CLEANING AND HYGIENE
The equipment's ability to resist water/fluids and firm substances getting into it matches an IP42 code rating
After use:
- Remove the bowl and tools
- Wash the bowl and tools using warm water and cleaning agents / a degreaser / disinfectants. Then rinse them in clean water and dry them off.

Water must not be sprayed on the machine!
The tools and bowl can be put in a dishwasher.
- Dry the shell of the planetary gear, the bayonet shaft and the screen. Use a moist sponge and a cleaning agent / disinfectant. Then dry the various parts off with a sponge and clean water.
• Make sure that the various parts are thoroughly cleaned. - Never use abrasive cleaning tools that scratch the surface.
- Use cleaning tools suitable for coated surfaces and plastics (polycarbonate).
MAINTENANCE
The machine requires no maintenance. The motor and bearings for the mechanical parts are lubricated to last for the lifetime of the machine.
Safety feature:
Make sure that the safety feature is working on a regular basis:
- The motor has to stop when the dial is i the neutral position. (See Figure 3B)

If the security feature is not working, you must not use the machine. Please contact your retailer.
TROUBLE SHOOTING AND POTENTIAL SOLUTIONS

If a problem cannot be fixed, please contact your retailer.
The machine does not start:
Check that...
• The upper part of the machine is completely tipped down
- The plug is attached to a power source and there the power is on.
• The plug is attached to a correct power source.
- The fuse in the cable plug (Figure 6.1) is not broken. If the fuse is defective, it can be replaced with the extra fuse (Figure 6.2) which is also found in the cable plug.
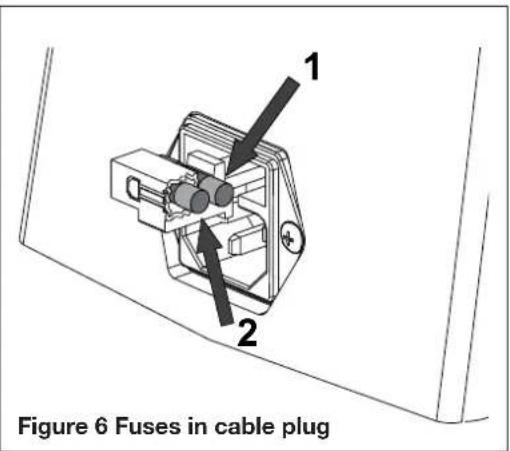
The machine is stopping while it is being used:
- The machine is being overloaded due to too high speeds or from being overfilled. See the "Overloading" section.

If the power cuts out, turn the dial back to the neutral position and then the machine can be restarted.
The tool is stuck in the bayonet shaft:
This is normally due to insufficient cleaning or damaged holes in the tool:
- Twist the tool back and forth until it can be removed.
- Contact your retailer
- Abnormal noise:
Metallic noise...
• The tool is crooked and hits the bowl
• The bowl is damaged or not placed properly
ATTACHING ACCESSORIES
The machine can be equipped with an attachment drive with various speeds and accessories can be attached.

The machine must always be turned off before attaching or removing accessories.
Attaching accessories (Figure 7):
• Gather the accessories that you want to attach
- Stop the machine
- Turn the cover plate C away from the hole
- When attaching accessories to the front A, the axle B should be inserted into the machine's attachment drive D
- Twist the accessory until the pin E is by the slot G to ensure a correct attachment.
- The accessory should be pushed as far into the attachment drive D as possible. (The pin E should be inside the slot G so that the accessory's axle is correctly attached to the attachment drive)
- The accessories are attached by turning the star knob H clockwise.
Removing accessories (Figure 7):
- Stop the machine
- Turn the star knob H counterclockwise until the locking screw is out of the hole F
- Remove the accessory from the attachment drive and then clean it
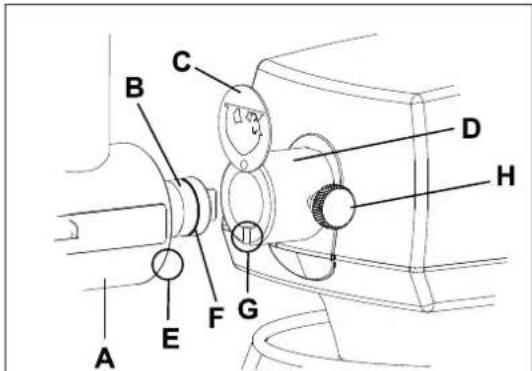
Figure 7 Attaching accessories
RECOMMENDED SPEEDS FOR THE ATTACHMENT DRIVE
WARRANTY AND SERVICE
There is a 2-year warranty period if your new product stops working due to manufacturing or material faults which begins from the documented date of purchase. The warranty covers materials and the cost of labour. When inquiring about service, please state the product name and serial number. You can find this information on the type plate. You can write down the information here in these instructions so that you have them at hand. This makes it easier for the service technician to find the correct spare parts.
The warranty does not cover:
- Faults and damage that are not due to manufacturing or material issues
- Damage caused by failure to properly maintain the device - including failing to clean it
- Fire and/or water damage or moisture damage on the product
- Damage caused during transport if the product was transported without proper packaging
- Damage caused by the use of unoriginal spare parts
- Damage resulting from failing to follow the instructions on how to use the device
- If the device has not been set up/assembled as specified in the instructions
- If non-professionals have installed or repaired the product
- Batteries or any other parts subject to normal wear and tear
Damage during transport
If the product is damaged during transport and this is discovered when the retailer delivers the product to the customer, this is exclusively a matter between the customer and the retailer. In cases where customers have handled the transport of the product themselves, the supplier shall not be liable for any potential damage during transport. Any damage caused during transport must be reported immediately and no later than 24 hours after the product has been delivered. If not, the customer's claim will be rejected.
Unnecessary service
If the product is sent in to be serviced and it turns out that the fault could have been fixed independently by following the product's instruction manual, the customer will need to pay the service fee.
Commercial purchases
Commercial purchases are all purchases of devices that are not intended to be used in private households but instead intended to be used for commercial purposes (in restaurants, cafés, canteons, etc.) or intended to be rented out or otherwise used by multiple users in turn. There is no warranty offered for commercial purchases, as this product is only intended for regular household use.
SERVICE
For service and spare parts in England and Ireland please call below-mentioned number and you will be directed accordingly or send us an email.
Witt UK & Ireland Ltd.
(44) 148 351 6633 / info@witt.dk
We accept no liability for printing errors.
The manufacturer/distributor cannot be held liable for damage to products or individuals if the safety instructions were not followed. The warranty shall not cover cases where the instructions have not been followed.
OVERZICHT VAN HET APPARAAT
natural_image
Simple line drawing of a bowl with liquid inside, no text or symbols presentGarde Vulschep Kom
AANBEVOLEN SNELHEDEN
A: Slotsymbol B: Neutrale positie C: Snelheden
Fig. 4 Gereedschap in de bajonetkoppeling bevestigen
REINIGING EN HYGIËNE
Fig. 6 Zekeringen in de stekker
natural_image
Technical illustrations of three mechanical components: a curved tool, a shield-shaped component, and a circular cup-like part (no text or symbols)Crochet
natural_image
Line drawings of three kitchen utensils: a cylindrical fan, a folded blade, and a bowl (no text or symbols)natural_image
Diagram of a funnel pouring liquid into a container with an upward arrow indicating flow (no text or symbols)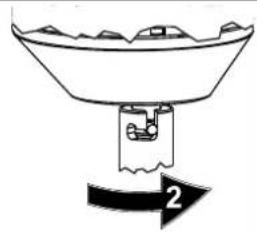
natural_image
Simple line drawing of a funnel-shaped container with a submerged object and an arrow labeled '2' (no text or symbols on the diagram itself)
- SIKKERHEDSANVISNINGER
- ANBEFALEDE ARBEJDSHASTIGHEDER
- RENG∅RING OG HYGIEJNE
- TILBEH∅RSTILSLUTNING
- OVERSIKT OVER APPARATET
- SIKKERHETSANVISNINGER
- INTRODUKSJON TIL APPARATET
- ANBEFALTE DRIFTSHASTIGHETER
- SÄKERHETSANVISNINGAR
- RENGÖRING OCH HYGIEN
- CONTENTS
- SAFETY INSTRUCTIONS
- INSTALLATION OF A NEW MACHINE
- Measurements and weight:
- Setup:
- CONNECTING TO A POWER SOURCE
- INTRODUCTION TO THE MACHINE
- Equipment:
- RECOMMENDED WORK SPEEDS
- THE MACHINE'S MAXIMUM CAPACITY
- OVERLOADING
- CLEANING AND HYGIENE
- After use:
- MAINTENANCE
- Safety feature:
- TROUBLE SHOOTING AND POTENTIAL SOLUTIONS
- The machine does not start:
- The machine is stopping while it is being used:
- The tool is stuck in the bayonet shaft:
- ATTACHING ACCESSORIES
- Attaching accessories (Figure 7):
- Removing accessories (Figure 7):
- RECOMMENDED SPEEDS FOR THE ATTACHMENT DRIVE
- WARRANTY AND SERVICE
- The warranty does not cover:
- Damage during transport
- Unnecessary service
- Commercial purchases
- SERVICE
- OVERZICHT VAN HET APPARAAT
- AANBEVOLEN SNELHEDEN
- REINIGING EN HYGIËNE
Brand : Witt
Model : TEDDY
Category : Food Processor