
X-Plorer Serie 65+ RR8L85 - Robot vacuum ROWENTA - Free user manual and instructions
Find the device manual for free X-Plorer Serie 65+ RR8L85 ROWENTA in PDF.

| Product type | Robot vacuum with mopping function and automatic emptying dock |
| Brand | Rowenta |
| Model | X-Plorer Serie 65+ RR8L85 |
| Dimensions (approx.) | 35 x 35 x 10 cm (diameter x height) |
| Weight (approx.) | 3.5 kg |
| Power supply | Integrated rechargeable battery, automatic charging and emptying dock (100-240 V) |
| Runtime | Approximately 120 minutes (depending on usage) |
| Main functions | Suction, mopping (mop), automatic dustbin emptying, laser mapping, scheduled cleaning, app control |
| Sensors | Anti-drop sensors, anti-collision sensors, laser navigation sensor |
| Weekly maintenance | Cleaning sensors, main brush, side brush, filter; emptying dustbin |
| Spare parts replacement | Hygiène+ dust bag (when full), filter (2 times/year), mop pad (2 times/year), side brush (2 times/year), main brush (if necessary) |
| Safety | Automatic shut-off in case of overheating, stair detection, do not use on wet floor |
| Connectivity | Wi-Fi 2.4 GHz, free Rowenta app |
| Water tank capacity | Approximately 250 ml (estimated) |
| Dustbin capacity | Approximately 500 ml (estimated) |
| Noise level | Approximately 65 dB (estimated) |
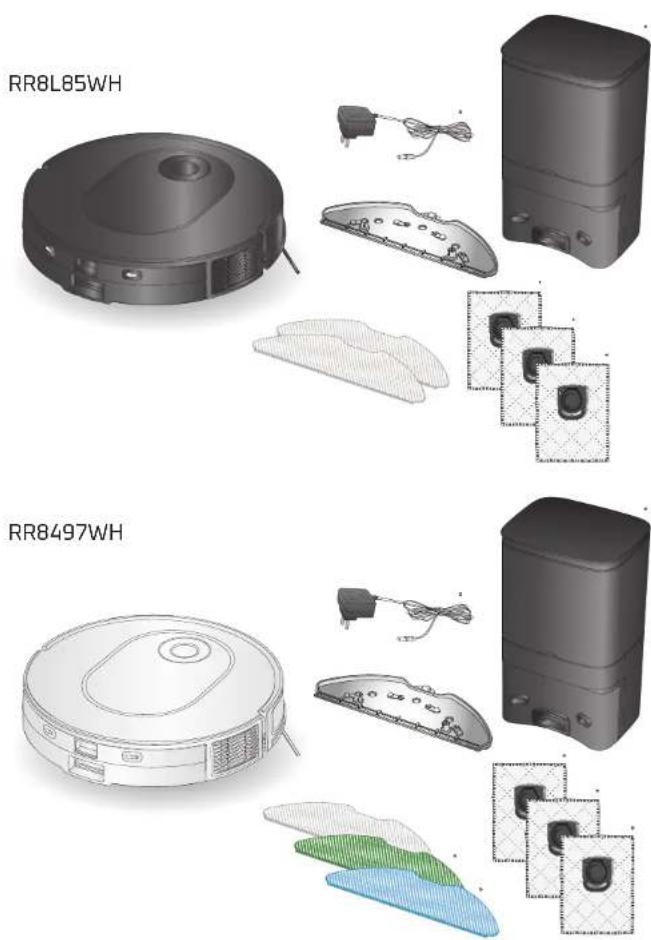
| Box contents | Robot, emptying dock, side brush, mop pad holder, 3 mop pads, Hygiène+ bag, cleaning tool, manual |
Frequently Asked Questions - X-Plorer Serie 65+ RR8L85 ROWENTA
User questions about X-Plorer Serie 65+ RR8L85 ROWENTA
0 question about this device. Answer the ones you know or ask your own.
Ask a new question about this device
Download the instructions for your Robot vacuum in PDF format for free! Find your manual X-Plorer Serie 65+ RR8L85 - ROWENTA and take your electronic device back in hand. On this page are published all the documents necessary for the use of your device. X-Plorer Serie 65+ RR8L85 by ROWENTA.
USER MANUAL X-Plorer Serie 65+ RR8L85 ROWENTA
natural_image
Black robotic vacuum cleaner with blue LED indicator light, no visible text or symbols on the device itself.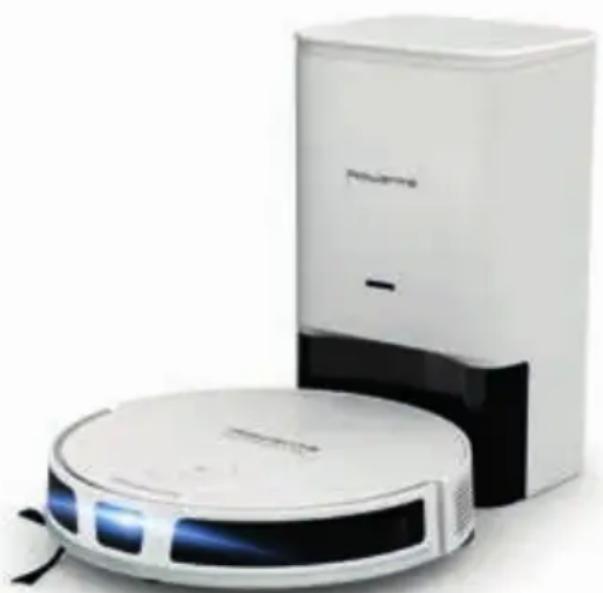
natural_image
Two white robotic vacuum cleaner units, one with blue LED and the other with black handle (no visible text or symbols)
What's in the box? page 04
Product overview page 05
Before cleaning page 07
Install the robot page 08
Connect the robot with the free app page 10
Use the main app features page 10
Use the robot without the app page 11
Use the robot with the mopping function page 12
Maintain the robot and its accessories page 16
Replace the dust bag when it's full page 21
Component replacement frequency page 23
Store the robot when you don't use it page 24
Do's and don'ts page 24
Unpair your robot page 27
Common issues and solutions page 28
Please read carefully the "Safety and use instructions" booklet before first use.
For more information:
www.rowenta.com
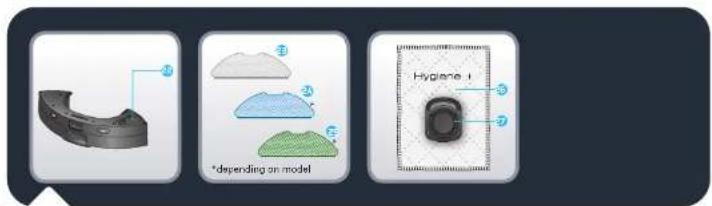
What's in the box?
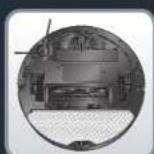
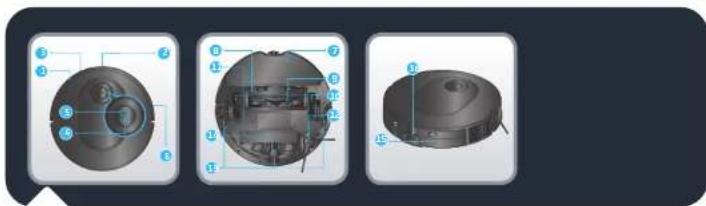
Product Overview
EN
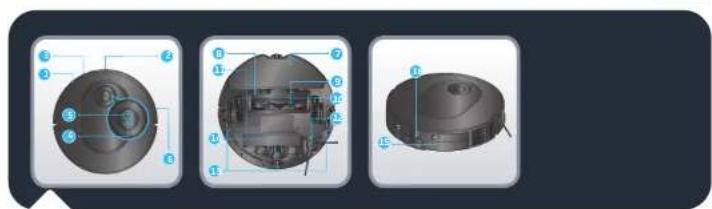
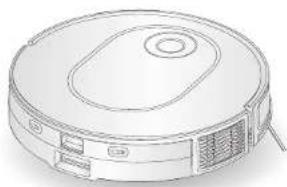
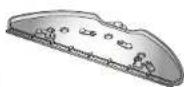
- Infrared sensor
- Point laser
- Bumper
- Home button
- Press to return to station
- Power/Start/Pause button
-
Press and hold to turn on or off
-
Press to start or pause cleaning
- Anti-collision strip
- Mop pad
- Main brush cover
- Mainbrush
- Wheel
- Battery
- Side Brush
-
Anti-drop sensor
-
Front wheel
- Charging plots
- Dust bin and water tank release button
natural_image
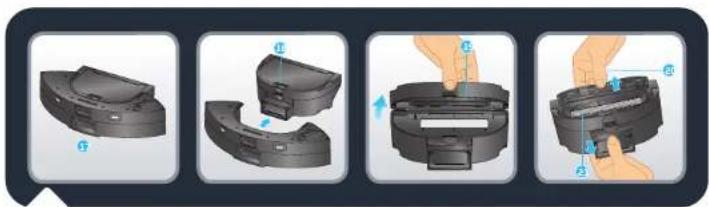
Four-step diagram showing a mechanical component being adjusted, with no visible text or symbols.- 2-in-1 dust bin and water tank
-
Dust bin and water tank separation button
-
Dust bin opening
- Filter cover
- Filter
opening
er - opening
er - opening
er
-
EN
Product Overview
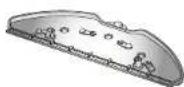
- Stopper
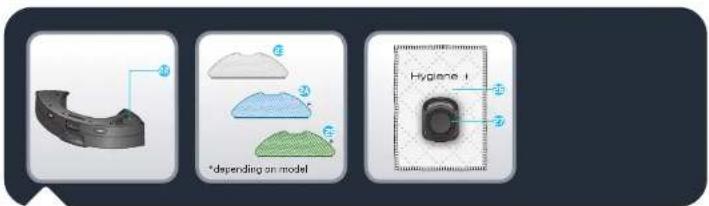
- Washable grey mop for standard use
-
Washableblue scrubbing mop for hard stains
-
Washablegreen microfiber mop to capture fine dust (to use without water)
-
Hygiene+ dust bag
-
Hygiene+ dust bag handle
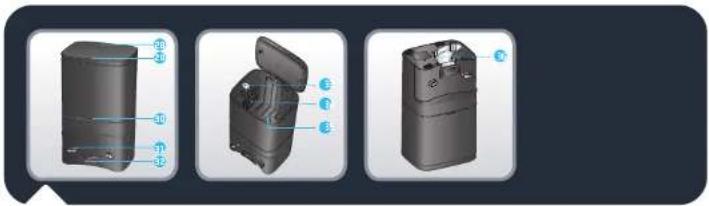
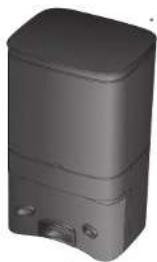
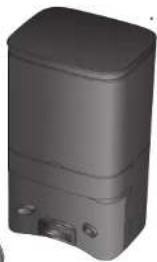
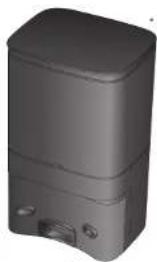
- Automaticdust collecting station
- Station lid
-
Status indicator light • Light off: charging/ powered off • White blinking: dust collecting
-
White light on:
station plugged in and robot not
connected
• Red: lid open/bag not installed -
Red blinking: bag full/error
-
Chargingcontacts
- Suctioninlet
- Ejectbutton
- Dust bag handle insertion slot
- Dust bag chamber
- Dust channel cover
Before cleaning
EN
natural_image
Interior layout of a modern living room with sofa, curtains, pendant lights, and a red 'X' symbol (no text or symbols present)
natural_image
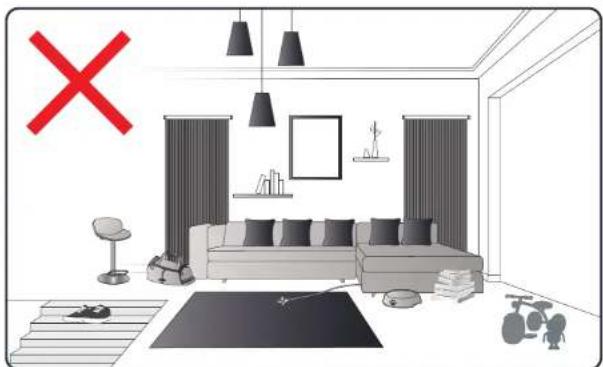
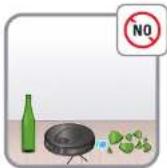
Interior layout diagram of a modern living room with sofa, chairs, and wall-mounted furniture (no text or symbols)Please read the following tips to improve cleaning efficiency. Tidy up cables, cords, small and loose items. Remove any unstable, fragile, precious or dangerous items from the ground. Make sure each room door is open. Your robot may encounter some difficulties on dark floors and on carpets: with fringes, too thick, with long piles, too light (ex: bathroom carpet). For optimum anti-drop sensors efficiency, remove any item (ex: shoe) from the stairs. When using the robot in a raised area, place a physical barrier at the edge of a drop to prevent accidental falls. Do not stand in narrow spaces, such as hallways so the robot is not blocked.
EN
Install the robot

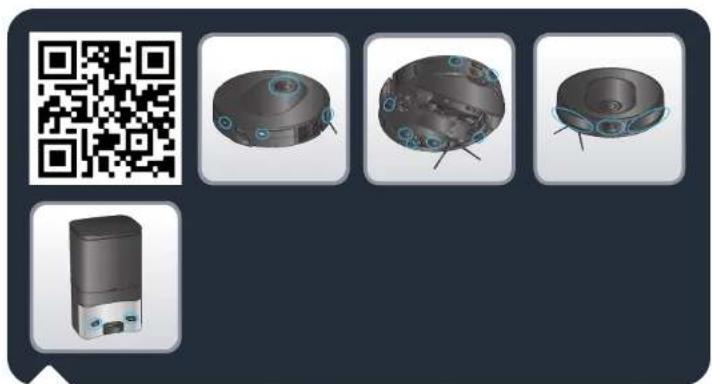
Flash the QR-Code above to know how to install and connect the robot in video. Read the following instructions for more detailed informations.
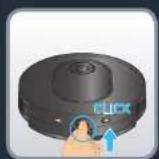
Remove all protections (protective films) on the station and on the robot. Reverse the robot, install the side brush by gently clipping it. The side brush is correctly installed when you hear a "click" sound.
Install the robot
EN
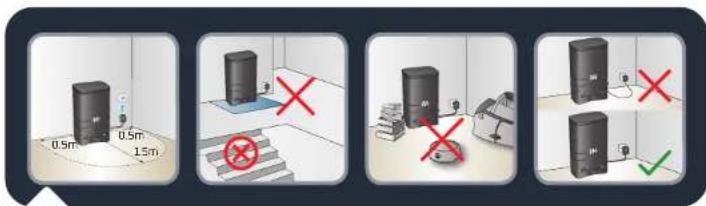
Install the Automatic Dust Collecting Station on a hard and flat floor. Avoid parquet, wooden floors and carpet. Place the station in a clear space against a wall, with no stairs in front of the station. Keep at least 0.5 m of clearance on either side and 1.5 m in front. Make sure the chosen location is close to the Wi-Fi box or has good Wi-Fi signal strength. Keep the area around the station clear from any object, reflective surface, mirror, table and chair. Keep the station away from direct sunlight. Plug the "power" cable. Make sure the "power" cable remains against the wall.
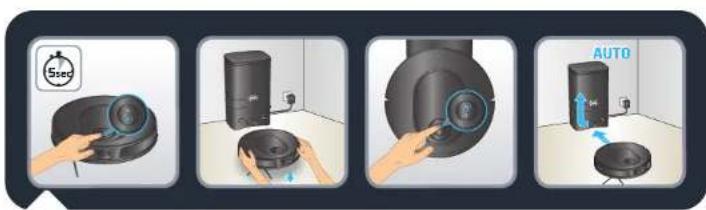
Turn the robot on by pressing and holding the "Power" button until the robot lights turn on (\~5 seconds). Place the robot from 20 to 50 cm in front of the station. Press the "Home" button, the robot will automatically dock to the station. (Do not manually place the robot against the station). Once the robot is docked, the dust collection will be automatically activated for few seconds. Please note that the minimum time interval between two dust collections is 5 minutes. Wait 3-4 hours for the robot to be fully charged. The station light is off when the robot is charging. For the first-time cleaning, please ensure that the robot is fully charged. The robot is fully charged when the white indicators on the robot are normally set on. For the first time use, the robot will explore the environment and clean your home at the same time. Once it is done, the robot will come back where it started and the map of your home will be displayed on your app. Do not lift the robot during the first cleaning, it prevents the map creation. This robot is equipped with a fixed laser technology. It means that it will need to self-relocate often by turning on itself while cleaning. This is how it detects its environment. If you have carpets with fringes, please place barriers around carpets to prevent the robot from getting stuck in the fringes. If you have an outdoor area (garden, balcony, patio, etc.) accessible with a threshold less than 2 cm high or without threshold (for example with a French window, a patio door, a bay window, etc.), please close this access to the robot.

Connect the robot with the free app

Flash the QR-Code above to know how to install and connect the robot in video. You can also find the detailed pairing instructions step by step in a PDF document by flashing the QR-Code below.

Use the main app features

Flash the QR-Code above to know how to use the main features of the application in video.
Use the robot without the app

Press the button "Power" to start automatic cleaning. The robot will scan the area. It will automatically split the room into small zones, first cleans zone edges and then cleans inside the zone in a zig zag. The robot will clean all accessible area, zone by zone. Press the button "Power" at any time to pause cleaning and press it again to resume cleaning. If the robot is on standby, press the button "Power" once to wake up the robot and a second time to start cleaning.
If you start the robot from the station, it will automatically return to its station at the end of the cleaning session or if the battery level is too low. If the battery runs low during the cleaning session, the robot will automatically return to its station to charge. After charging, the robot will resume cleaning where it left off.
If the robot is not on its station when it starts cleaning, it will automatically return to its starting point at the end of the cleaning session or if battery level is too low.
If the robot doesn't start when you press the button "Power", the battery level may be too low, please charge the robot.
At the end of the cleaning session, the robot will automatically return to the station. But if you want to manually end the cleaning session, press the "Home" button once to stop the robot at any time and press it again to send the robot back to the station. If the robot fails to find the station, manually place the robot in front of the station and press the "Home" button. Once the robot is docked, the dust collection will be automatically activated for few seconds. Please note that the minimum time interval between two dust collections is 5 minutes.

Use the robot with the mopping function


Flash the QR-Code above to know how to use the mopping function in video. Read the following instructions for more detailed informations.
The different types of mops (depending on model):
- Washable grey mop for standard use
- Washable blue scrubbing mop for hard stains
- Washable green microfiber mop to capture fine dust (to use without water)
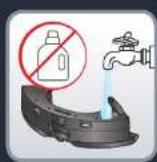

To fill the water tank:
Press the release button of the water tank to unclip it & pull it to separate from the robot. Open the stopper of the water tank and fill it with clean water until the water tank is full. Do not use hot water. Close the stopper once the water tank is filled.
Warning: Do not add cleaning agents/detergents in the water tank. This may clog the pipes and make the water tank not functioning anymore. Clip the water tank back into the robot. The water tank is correctly installed when you hear a "click" sound.
Use the robot with the mapping function


Moisten the mop cloth with water before use. If you use the green mop, don't moisten it. Attach the mop to the mop pad. Take the mop pad and clip it at the back of the robot. Press the "Power" button to start cleaning & mopping session.
Warning: Do not use the mopping function on carpets. Set up a vacuum only session in app, or if you want to use the mopping function avoiding carpets, you can set "no mop zones" in app.
EN
Use the robot with the mopping function
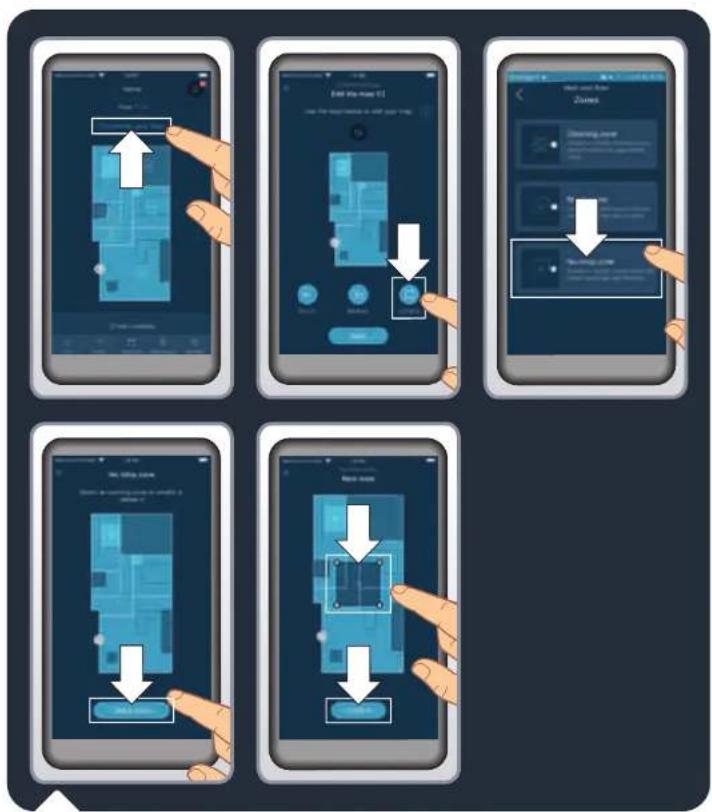
To preserve fragile floors or carpets, you can set « no mop zones » in the app. On the homepage, "click" on « Customize your floor », then on « Zones ». Select « No mop zones » and add a zone on the map that you can customize (size, location). To save the no mop zone, "click" on « Confirm ». You can create as many « no mop zones » as necessary. When the water tank is installed, the robot is not allowed to clean in these zones.
Use the robot with the mapping function
EN
At the end of the cleaning session, unclip the mop pad from under the robot and remove the dirt mop cloth. Unclip the 2-in-1 dust bin and water tank by pressing and holding its release button and pull it outwards. Open the stopper and empty the remaining water from the water tank.

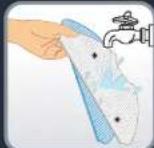
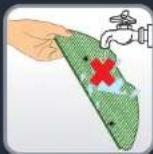
Wash the mop cloth under water or in the laundry machine. Let it dry for 24 hours. Please replace the mop cloth after 100 washes. You can buy kit of new mops on www.rowenta.com

Maintain the robot and its accessories Maintain
natural_image
Product display featuring a QR code, four 3D mechanical components with blue circular features, and a small device (no text or symbols visible)Flash the QR-Code above to know how to maintain the robot to keep its performance. Always switch off the robot by pressing and holding the "Power" button for 5 seconds and unplug the station before any manipulation.
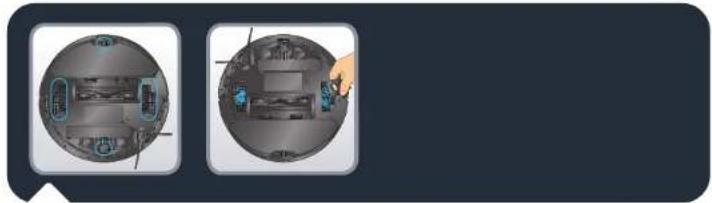
Once a week, clean the sensors.
With a clean, soft and dry cloth, wipe the robot sensors (in front, top, back and bottom of the robot), the laser window, the sensors and charging contacts of the station. Wipe the two buttons on top of the robot.
obot and its accessories
natural_image
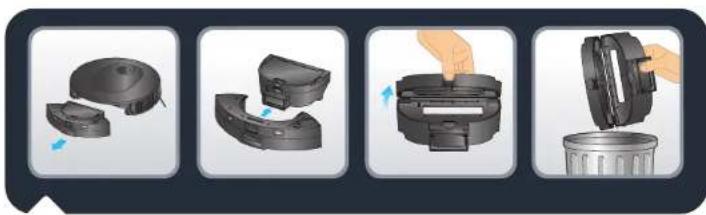
Four-step diagram showing a device being processed into a waste bin, with no visible text or symbols.After each use, clean the dust box
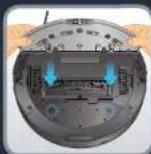
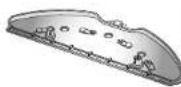
When the robot returns to its station, separate the 2-in-1 dust bin and water tank from the rest of the robot: press and hold its release button and pull it outwards. Press the dust bin and water tank separation button to horizontally lift the dust bin and separate it from the water tank.
Open the dust bin and empty it into the bin, gently tap the dust bin to knock off dirt. Close the dust box.
Note: The dust bin opening may not open or close properly if there is too much dust in the hinges. Please clean hinges with a clean, soft and dry cloth to remove dust.
EN
Maintain the robot and its accessories
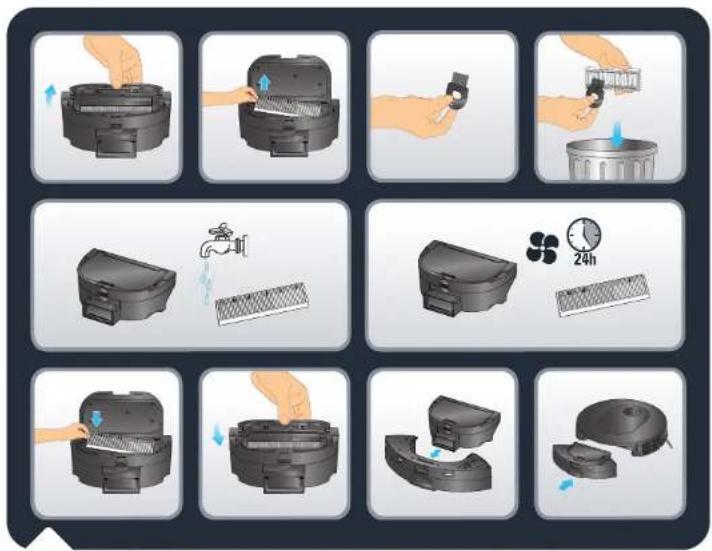
Once a week, clean the filter
Always switch off the robot by pressing and holding the "Power" button for 5 seconds, and unplug the station before any manipulation.
Open the filter cover to take out the filter and remove it from the dust box.
Take the cleaning tool supplied in the pack. Use the brush part of the cleaning tool to clean the filter. You can also wash the dust bin and the filter under water. Let them out to dry for 24 hours. Put the filter back to its original place. Reinstall the dust bin into the water tank, and then install the 2-in-1 dust bin and water tank back to the robot.
Note : Never use the robot without the pleated filter. It would damage the robot.
Maintain the robot and its accessories
EN
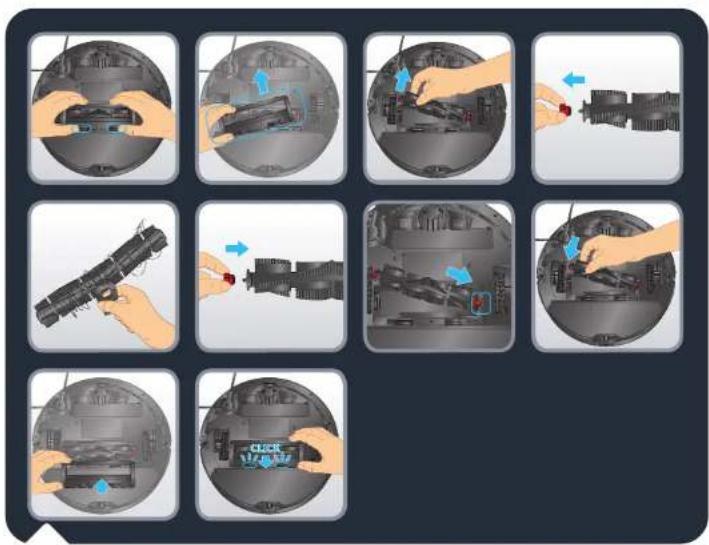
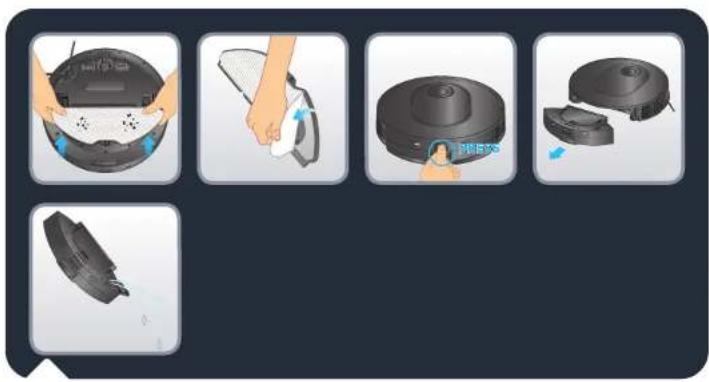
Once a week, clean the main brush
Always switch off the robot by pressing and holding the "Power" button for 5 seconds, and unplug the station before any manipulation.
Turn the robot upside down. Press the latches of the brush cover and pull to remove it. Take out the brush. Pull the brush head on the right side of the brush to remove it and get rid of tangled hair. Take the cleaning tool and use the blade part to cut off the tangled hair. Replace the brush head before reinstalling the brush in the robot. Re-install brush cover. The cover is correctly installed when you hear a "click" sound.
EN
Maintain the robot and its accessories

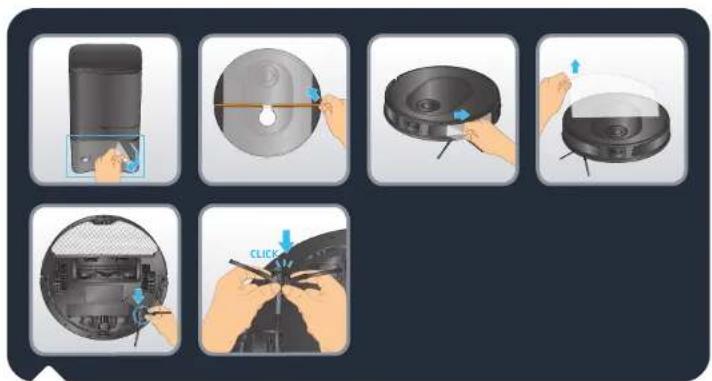
Once a week, clean the side brush
Always switch off the robot by pressing and holding the "Power" button for 5 seconds and unplug the charging base before any manipulation.
Turn the robot upside down. Take the side brush with two hands by the plastic parts and pull to unclip it. Do not pull by the bristles of the side brush. Remove the tangled hair. Re-install the side brush by gently clipping it. The side brush is correctly installed when you hear a "click" sound.
Note: The side brush can be difficult to remove, if you can't unclip it, try pulling from a different angle. To remove the tangled hair, you can use the blade of the cleaning tool.
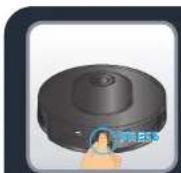
natural_image
Two circular views of a smart home with internal electronics and a hand pointing to a device (no text or symbols visible)Once a month, clean the wheels
Always switch off the robot by pressing and holding the Power button for 5 seconds, and unplug the station before any manipulation.
The wheels may be entangled by hair or dirt. Turn the robot upside down. Clean the wheels by removing the tangled hair.
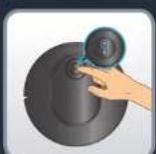
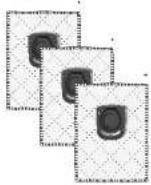
Replace the dust bag when it's full
EN

Flash the QR-Code above to watch how to change the dust bag in video. Read the following instructions for more detailed informations.
When the dust bag is full, the light indicator of the station is blinking in red. Open the station lid. Press the Eject button. Take out the used dust bag by the dust bag handle. Throw it away in the bin. Take a new Hygiene+ bag. Install it in the station by sliding the dust bag handle in the insertion slot. Clip it to the station. The dust bag is correctly installed when you hear a "click" sound. Close the station lid. The light indicator of the station is white for few seconds before the light is off. If the light indicator is red, the dust bag is not in place or not correctly installed or the station lid is open.
EN
The light indicator of the station is still blinking red after replacement of the dust bag

If the light indicator is blinking in red after replacing the dust bag, or if the dust collection stops after a short period of time, a foreign item may block the dust channel of the station. Please unplug the station before any manipulation. Violent disassembly is prohibited. Do not use blunt object. Reverse the station upside down. With a screwdriver, remove the 5 screws that hold the cover of the dust channel. Remove the cover of the dust channel. Check wether there are foreign matters blocking the dust channel. If the dust channel is blocked, remove the foreign matters with your fingers or with a bottle brush. After cleaning the dust channel, please put the cover back and 5 screws back. Reverse the station and replug the "power" plug. Place the robot in front of the station and press the "Home" button on the robot. The robot will automatically return to the station and start a dust collection for few seconds. The light indicator of the station is white for few seconds before the light is off.
Component replacement frequency
EN
Components and accessories can be bought on www.rowenta.com
| Component Cleaning the component Replacing the component | ||
| Dust bin After each use Not applicable | ||
| Water tank After each use Not applicable | ||
| Mops After each use Twice a year | ||
| Filter Once a week Twice a year | ||
| Central brush Once a week If required | ||
| Sensors | Once a week | Not applicable |
| Wheels | Once a month | Not applicable |
| Side brush | Once a month | Twice a year |
| Docking station | Once a week | Not applicable |
| Auto Empty Station | Once a week | Not applicable |
| Hygiene+ dust bag | Not applicable | When full |
EN
Store the robot when you don't use it
In order to extend the battery lifespan, always keep the robot charging at its station. When not using the robot for a long time, please fully charge the battery, switch off the robot by pressing and holding the "Power" button for 5 seconds. Store the robot in a cool dry place.
Do's and don'ts
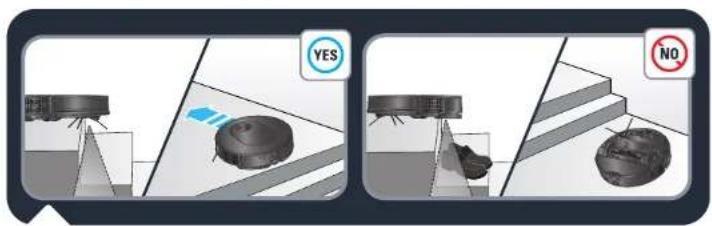
The robot has anti-drop sensors to detect stairs. The robot will change direction when detecting them. For optimum anti-drop sensors efficiency, remove any item (ex: shoe) from the stairs. When using the robot in a raised area, place a physical barrier at the edge of a drop to prevent accidental falls.
Do's and don'ts
EN
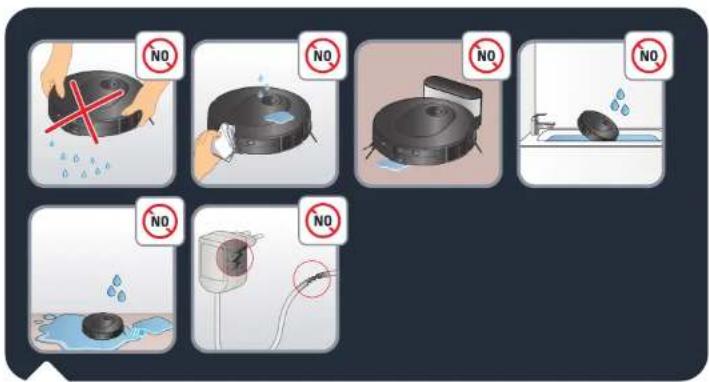
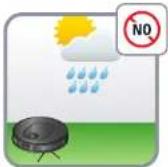
Do not shake the robot. Do not put water or any wet cloth on the robot. Do not charge the robot when the ground is flooded. Do not submerge the robot in water. Do not use the robot on wet surfaces or surfaces with standing water.
Do not use the product if the cord or charger is damaged.
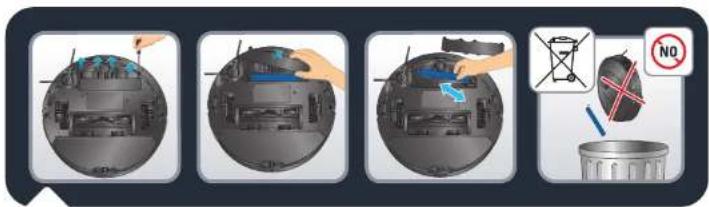
Before disposing of the device, remove the battery and dispose of it in accordance with local laws and local arrangements. If you have any questions, please contact your product dealer who can tell you what to do.

Do's and don'ts


Do's and don'ts

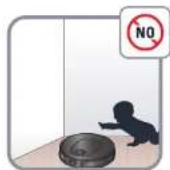
Do not leave children unattended, do not allow children to play with the robot.
Do not use the robot outside home.
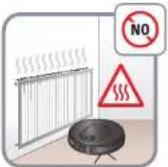
Do not use the robot in a overheated environment.
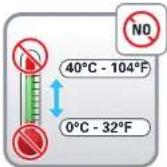
Do not use the robot when the home temperature is below 0^ C ( 32^ F) and above 40^ C ( 104^ F).
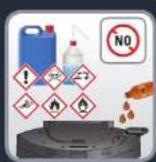
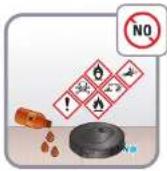
Do not spread cleaning agents on the floor before using the robot.
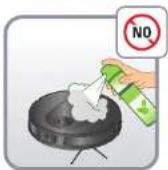
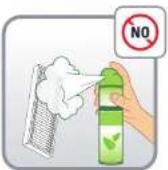
Do not use cleaning agents, aerosol cleaners or cleaning spray to clean the robot and the filter.
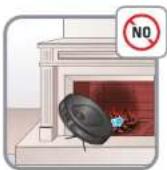
Do not throw the robot in the fire.
Do not use the robot to clean broken glass.
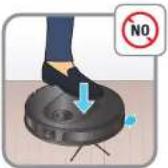
Do not walk or climb on the robot, do not move the robot with the foot.
Do not allow children or pets to ride on the robot.
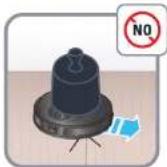
Do not put any item on the robot.
Do not use the robot without the filter, it would damage the robot.
Unpair your robot
To disable Wi-Fi module on robot, simultaneously press the "Home" and "Power" buttons until you hear a beep sound. The robot will automatically removes its connection to the phone. The 2 buttons will then slowly flash for a few minutes. The robot will automatically removes its connection to the phone and router. Once it is done, you can't go back. To pair again, you will need to do the pairing process again.

Common issues and solutions
| FAULTSOLUTION | |
| Cannot start the robot | Make sure the robot is connected to "power" supply.Make sure the battery is fully charged.Make sure the robot is ON. Press and hold the START button for 5 seconds until the robot lights are on.Check whether the dust box and water tank are properly installed. |
| The robot suddenly stops working | Check whether the robot is stuck or blocked by obstacles.Check whether the battery is too low.If the problem persists, please switch OFF the robot by pressing and holding the START button for 5 seconds. Wait for 30 seconds, and switch ON by pressing the START button for 5 seconds to restart it.The appliance may be overheating:Stop the appliance and leave cool for at least 1 hour.If it overheats on repeated occasions, contact the Approved Services Center. |
| Cannot charge the robot | Make sure the station is properly connected to the "power".Make sure the robot is ON. Press and hold the START button for 5 seconds until the robot lights are on.Check whether the indicator on the robot is flashing during charging.Wipe dust off charging contacts with dry cloth.Make sure the robot and the station are connected through the changing contacts.Make sure the station light is white when it's connected to "power" and robot is not on the station |
| The charger is getting hot | This is perfectly normal. The robot can remain permanently connected to the station without any risk. |
| The robot cannot return to the station | Clear the station of objects within 0.5 m on the left and right sides and within 1.5 m ahead.Make sure that the robot starts cleaning from the station without abnormal movement.When the robot is near the station, it can return faster. But if the station is located far away, the robot will need more time to return. Please wait during its return.Clean the charging contacts with dry cloth.Make sure the station light is white when it's connected to "power" and robot is not on the station |
| The cleaning schedule is not executed | Make sure the robot has been "power'ed on. Press and hold the START button for 5 seconds until the robot lights are on.Make sure the cleaning schedule has been set correctly in the application at the desired time, and the cleaning schedule is saved.Check whether the battery level is too low to start cleaning.The robot will not start any scheduled cleaning when a task is being performed.Check whether the dust box and water tank are properly installed. |
| The suction is whistling or running is very loud during cleaning | Check the suction inlet for any obstruction.Empty the dust bin.Clean the filter.Check whether the filter is wet due to water or other liquids on the floor. Let the filter dry naturally thoroughly before use.Check whether the dust box and water tank are properly installed.Check whether the main brush or side brush is blocked by any foreign item, remove the main brush or side brush and clean it. |
Common issues and solutions

| FAULTSOLUTION | |
| The central brush does not rotate | • Check werther the main brush is blocked by any foreign item, remove the main brush and clean it. • Check werther the central brush and the brush cover are correctly installed. |
| Abnormal action or sweep route of the robot | • Carefully clean the sensors with dry cloth. • Switch OFF the robot by pressing and holding the START button for 5 seconds, wait for 30 seconds and switch on by pressing and holding the START button for 5 seconds to restart the robot. |
| No water released during mopping | • Make sure there is enough water in the water tank. • Check werther the water tank is currently installed. • Check werther the humidity level is set at the desired level in the application. • Check whether the water outlet is blocked. |
| The robot cannot connect to your Wi-Fi network | • Ensure that your Wi-Fi router supports 2.4GHz and 802.11 hga hands as this equipment does not support 5GHz bands. • Check if the automatic reconnection to your domestic WiFi network is correct • Activate the mobile data of your smartphone • Don't use a VPN (Virtual Private Network) • Retry the process and check that you have selected the correct WiFi network • Retry the process and make sure you have entered the correct WiFi password • Keep your phone close to the robot and the station until the end of the pairing process • After several attempts, unplug and reping the product • Reset the robot, press and hold the "Home" button for 15 seconds • Press and hold for 5 seconds the "Home" and « Start » button until the two buttons lights are blinking • Restart your smartphone • In case a warning window appears for internet connection, please maintain the connection with the robot • If the failure persists, contact our support team (telephone number depending on your country of residence, find it on the assistance leaflet in the packaging). • Make sure the station light indicator is white when it's connected to "power" and when the robot is not on the station. |
| The map is lost | • The map may be lost if the robot has been manually moved to another location during cleaning or if the "home" environment has been changed (moved furniture). Please restart mapping by launching in the app a new exploration or a new cleaning session from the station. |
| The robot returns to the station before it has finished cleaning | • The battery level may be too low to finish cleaning, the robot will return to the station to charge. When its battery is full, the robot will resume cleaning where it has left to finish cleaning. • The robot may be unable to reach certain areas blocked by furniture or barriers, tidy up these area to make them accessible. • Verify the no go zones and no mop zones set in the application. Add, modify or delete zones according to your needs. |
| The robot gets stuck | • The robot may be tangled with something, manually remove the blocked item and restart the cleaning session by pressing the START button. • The robot may be stuck under furniture with an entrance of similar height, please set a physical barrier or a no go zone in the app. • Rotate and press the wheels to check whether there is any foreign object wrapped or struck, remove it. |

natural_image
3D rendering of a circular robotic vacuum cleaner with control panel and ventilation slots (no text or symbols visible)


natural_image
3D rendering of a gray rectangular electronic device with two ports and a lid (no text or symbols visible)

RR8497WH

natural_image
Line drawing of a circular vacuum cleaner with ventilation slots and a handle (no text or symbols)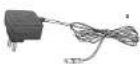

natural_image
3D rendering of a gray rectangular electronic device with a small button and mounting bracket (no text or symbols visible)

natural_image
Interior layout of a modern living room with sofa, curtains, pendant lights, and a red 'X' symbol (no text or symbols present)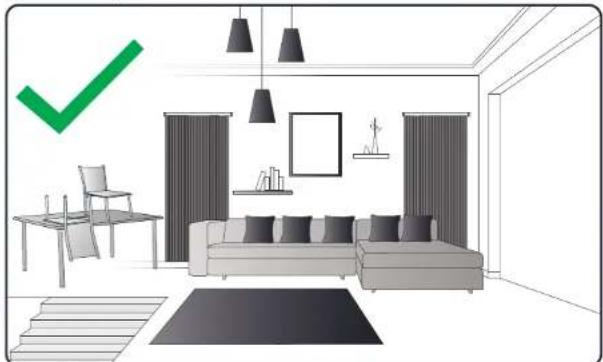
natural_image
Interior layout of a modern living room with sofa, chairs, and wall art (no text or symbols)natural_image
Product display image showing a QR code, four 3D mechanical components with blue circular features, and a small device (no text or symbols visible)natural_image
Four-step diagram showing a device being processed into a waste bin, with no visible text or symbols.natural_image
Two circular diagrams showing interior views of a device with labeled components, one pointing at a hand and the other holding a blue object (no text or symbols present)natural_image
Product assembly diagram of a robotic vacuum cleaner with labeled components (no text or symbols on main image)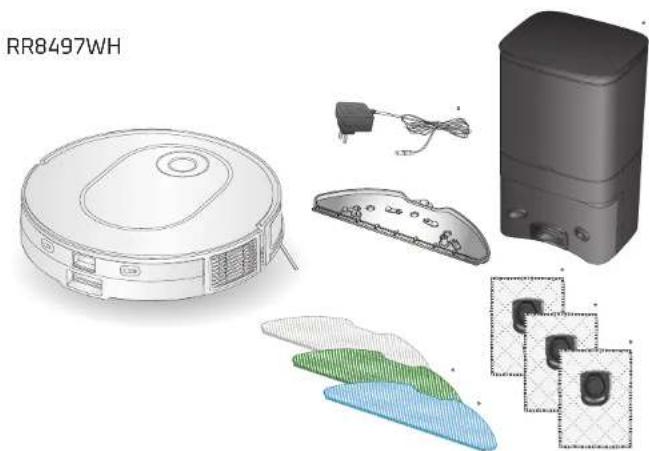
natural_image
Product diagram of a robotic vacuum cleaner with internal components and labeled part (no text or symbols on main diagram)Produktübersicht
DE
natural_image
Three technical diagrams of a mechanical component with numbered parts, showing cross-sectional views (no text or symbols present)natural_image
Four-step diagram showing a hand holding a device with labeled parts (no text or symbols present)natural_image
Interior layout of a modern living room with sofa, curtains, pendant lights, and a red 'X' symbol (no text or symbols present)
natural_image
Interior layout diagram of a modern living room with sofa, chairs, and wall-mounted furniture (no text or symbols)natural_image
Product display image showing a QR code, four 3D mechanical components with blue circular features, and a small device (no text or symbols visible)natural_image
Four-step diagram showing a device being processed into a waste bin, with no visible text or symbols.natural_image
Two circular views of a device interior with visible internal components and a hand pointing to a component (no text or symbols)natural_image
Diagram showing a robotic device interacting with a vehicle, enclosed in a transparent frame (no text or symbols)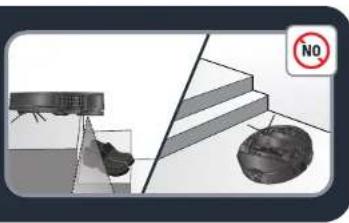
natural_image
Product assembly diagram of a robotic vacuum cleaner with labeled components (no text or symbols on main image)
natural_image
Exploded view diagram of a robotic vacuum cleaner with internal components and labeled part (RR8497WH), no readable text or symbols beyond label.natural_image
Interior layout of a modern living room with sofa, curtains, pendant lights, and a red 'X' symbol (no text or symbols present)
natural_image
Interior layout diagram of a modern living room with sofa, chairs, and wall-mounted furniture (no text or symbols)natural_image
Product display image showing a QR code, four 3D mechanical components with blue circular features, and a small device (no text or symbols visible)natural_image
Four-step illustration showing a device being processed into a waste bin, with no visible text or symbols.natural_image
Two circular diagrams showing interior views of a device with labeled components and a hand pointing to a screen (no text or symbols present)natural_image
Product assembly diagram of a robotic vacuum cleaner with labeled components (no text or symbols on main image)
natural_image
Technical illustration of a robotic vacuum cleaner with internal components and labeled part (RR8497WH), showing exploded view and assembly details.natural_image
Four-step diagram showing a mechanical component being handled, with no visible text or symbols.natural_image
Interior layout of a modern living room with sofa, curtains, pendant lights, and a red 'X' symbol (no text or symbols present)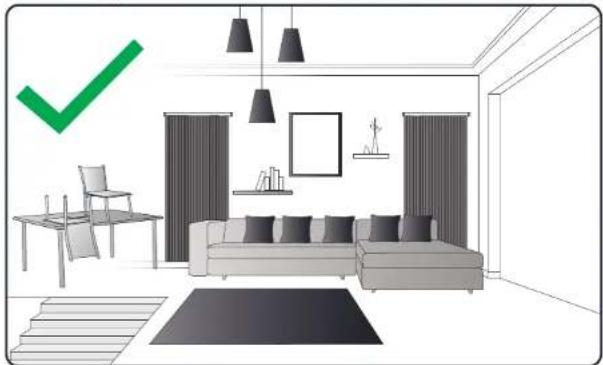
natural_image
Interior layout diagram of a modern living room with sofa, chairs, and wall-mounted furniture (no text or symbols)natural_image
Product display image showing a QR code, four 3D mechanical components with blue circular features, and a small device (no text or symbols visible)natural_image
Four-step illustration showing a device being processed into a trash bin, with no visible text or symbols.natural_image
Two circular views of a smart home interior with visible furniture and tools, no text or symbols present.natural_image
Product assembly diagram of a robotic vacuum cleaner with labeled components (no text or symbols on main image)
natural_image
Illustration of a robotic vacuum cleaner with various internal components and accessories (no text or symbols)Productoverzicht
NL

-
Infraroodsensor
-
Puntlaser
-
Bumper
-
Knop Home
natural_image
Four-step diagram showing a mechanical assembly process with labeled parts (1, 2, 3, 4) and directional arrows indicating steps (no text or symbols beyond labels)-
2-in-1 stofbak en waterreservoir*
-
Scheidingsknop stofbak en waterreservoir
-
Opening van de stofbak
-
Filteropening
-
Filter
NL
Productoverzicht
natural_image
Three views of a mechanical device with labeled parts, shown from different angles (no text or symbols present)natural_image
Interior layout of a modern living room with sofa, chairs, lamp, and wall art (no text or symbols)
natural_image
Interior layout diagram of a modern living room with sofa, chairs, and wall art (no text or symbols)natural_image
Product display image showing a QR code, four 3D mechanical components with blue circular features, and a small device (no text or symbols visible)natural_image
Four-step illustration showing a device being processed into a waste bin, with no visible text or symbols.Maak de stofbak na elk gebruik schoon
natural_image
Two circular views of a device interior, showing internal components and a hand interacting with the interior (no text or symbols visible)Components and accessories can be bought on www.rowenta.com
natural_image
3D rendering of a circular robotic vacuum cleaner with control panel and ventilation slots (no text or symbols visible)
natural_image
3D rendering of a gray rectangular electronic device with ports and lid (no text or symbols visible)
RR8497WH
natural_image
Line drawing of a circular vacuum cleaner with ventilation slots and a handle (no text or symbols)

natural_image
3D rendered image of a gray rectangular electronic device with a small handle and control panel (no text or symbols visible)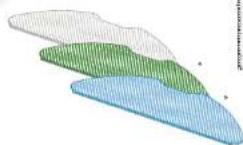

natural_image
Three views of a cylindrical electronic device with labeled parts, shown from different angles (no text or symbols present)natural_image
Interior layout of a modern living room with sofa, wall art, and a red 'X' symbol (no text or symbols present)
natural_image
Interior layout diagram of a modern living room with sofa, chairs, curtains, and pendant lights (no text or symbols)natural_image
Product display panel showing a QR code, four 3D model views of a device, and one labeled device (no text or symbols on the devices themselves)natural_image
Four-step diagram showing a device being processed into a waste bin, with no visible text or symbols.natural_image
Top-down view of a smart home with two circular insets showing interior layout and equipment (no text or symbols visible)natural_image
Product assembly diagram of a robotic vacuum cleaner with labeled components (no text or symbols on main image)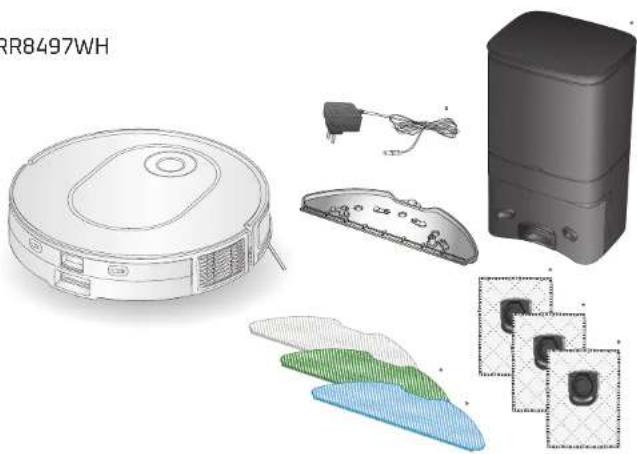
natural_image
Technical illustration of a robotic vacuum cleaner with internal components and a control panel (no text or symbols)200201
natural_image
Four-step diagram showing a mechanical assembly process with labeled parts (no text or symbols present)natural_image
Interior layout of a modern living room with sofa, curtains, pendant lights, and a red 'X' symbol (no text or symbols present)
natural_image
Interior layout diagram of a modern living room with sofa, chairs, curtains, and pendant lights (no text or symbols)natural_image
Product display image showing a QR code, four 3D mechanical components with blue circular features, and a small device (no text or symbols visible)natural_image
Four-step diagram showing a device being processed into a waste bin, with no visible text or symbols.natural_image
Two circular views of a smart home interior with visible furniture and electronics (no text or symbols)natural_image
3D rendering of a circular robotic vacuum cleaner with control panel and ventilation slots (no text or symbols visible)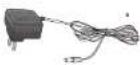


natural_image
3D rendering of a gray rectangular electronic device with two ports and a lid (no text or symbols visible)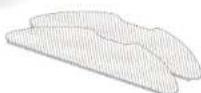

RR8497WH

natural_image
Line drawing of a circular vacuum cleaner with ventilation slots and a handle (no text or symbols)
natural_image
3D rendering of a gray rectangular electronic device with ports and a lid (no text or symbols visible)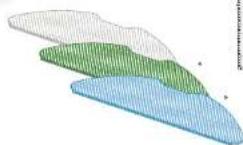
natural_image
Three views of a cylindrical electronic device with labeled components (no text or symbols visible)natural_image
Interior layout of a modern living room with sofa, curtains, pendant lights, and a red 'X' symbol (no text or symbols present)
natural_image
Interior layout diagram of a modern living room with sofa, chairs, and wall-mounted furniture (no text or symbols)natural_image
Product display image showing a QR code, four 3D mechanical components with blue circular features, and a small device (no text or symbols visible)natural_image
Illustration of five different cleaning or packaging steps showing a hand holding a waste bin (no text or symbols present)natural_image
Two circular views of a smart home interior with visible furniture and devices (no text or symbols)
- EN
- Product Overview
- Before cleaning
- Connect the robot with the free app
- Use the main app features
- Use the robot without the app
- To fill the water tank:
- Use the robot with the mopping function
- Use the robot with the mapping function
- Maintain the robot and its accessories Maintain
- Once a week, clean the sensors.
- obot and its accessories
- After each use, clean the dust box
- Maintain the robot and its accessories
- Once a week, clean the filter
- Once a week, clean the main brush
- Once a week, clean the side brush
- Once a month, clean the wheels
- Replace the dust bag when it's full
- The light indicator of the station is still blinking red after replacement of the dust bag
- Component replacement frequency
- Store the robot when you don't use it
- Do's and don'ts
- Unpair your robot
- Common issues and solutions
- NL
- Productoverzicht
- Maak de stofbak na elk gebruik schoon
Brand : ROWENTA
Model : X-Plorer Serie 65+ RR8L85
Category : Robot vacuum