
Family Anniversary - Electric bike Urban Arrow - Free user manual and instructions
Find the device manual for free Family Anniversary Urban Arrow in PDF.


| Product Type | Electric bike |
| Brand | Urban Arrow |
| Model | Family Anniversary |
| Total length | 258 cm |
| Maximum height | 120 cm |
| Crate width / handlebar width | 69 cm / 64 cm |
| Weight of empty e-bike | 48 kg |
| Maximum combined weight | 250 kg (bike + rider + load) |
| Maximum rider weight | 125 kg |
| Power supply | Bosch lithium-ion battery, 230 V mains charger |
| Range | Variable depending on assistance, terrain, and load |
| Electric assistance | Up to 25 km/h, 4 levels (ECO, TOUR, SPORT, TURBO) |
| Display | Bosch Nyon with color screen, Bluetooth, USB |
| Brakes | Front and rear disc brakes |
| Transmission | Enviolo hub gears or chain/belt |
| Front / rear tires | 20 inches / 26 inches |
| Tire pressure | Front 2.4-3.5 bar / Rear 3-4 bar |
| Safety | Frame lock, battery lock, 3-point harness, front/rear lights, reflectors |
| Maintenance | Monthly checks by owner, service at authorized dealer every 2500 km or 12 months |
| Frame warranty | 5 years |
| Battery and other parts warranty | 2 years (excluding wear parts) |
| Country of manufacture | Netherlands |
Frequently Asked Questions - Family Anniversary Urban Arrow
User questions about Family Anniversary Urban Arrow
0 question about this device. Answer the ones you know or ask your own.
Ask a new question about this device
Download the instructions for your Electric bike in PDF format for free! Find your manual Family Anniversary - Urban Arrow and take your electronic device back in hand. On this page are published all the documents necessary for the use of your device. Family Anniversary by Urban Arrow.
USER MANUAL Family Anniversary Urban Arrow
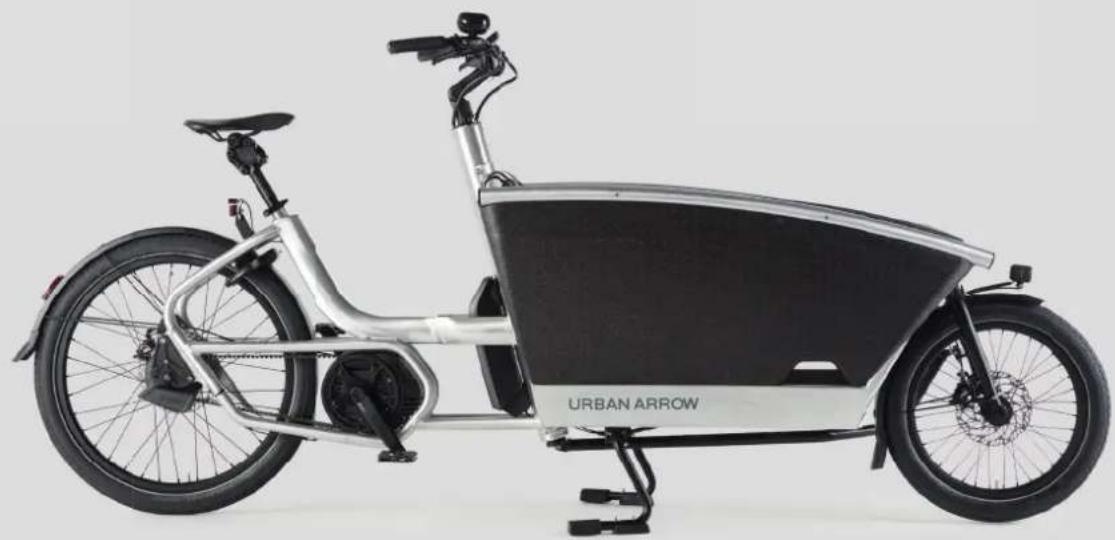
Urban Arrow Family Anniversary
User manual
EN User manual 1
NL Gebruikershandleiding 71
DE Gebrauchsanweisung 141
FR Manuel de l'utilisateur 215
Table of contents
1 About this manual 2
2 The Urban Arrow Family e-bike 6
3 Safety 14
4 Before first use 16
4.1 Bike fit 16
4.1.1 Saddle height adjustment 17
4.1.2 Handlebar/stem adjustment 18
4.2 Setting up the lights 20
4.3 Configuration of the display 21
4.3.1 Configuration of the Nyon display 21
4.3.2 The Nyon display and Bosch e-bike Connect app 22
5 Getting ready to bike 23
5.1 Gathering first experience 23
5.2 Influences on the operating range 23
5.3 Safety check before every ride 24
5.4 Tyres 24
5.5 E-bike battery capacity check 25
5.6 Activating your e-bike 25
5.6.1 Inserting, removing, securing and charging the Nyon display 26
5.6.2 Placing and removing the e-bike battery from the battery cradle 27
5.6.3 Switching the e-bike on and off 29
5.6.4 Switching the e-bike battery on and off 30
5.7 Opening, closing and adjusting the three point harness 30
5.8 Parking the e-bike or going for a ride 32
5.8.1 Incorrect position of the kickstand 35
5.9 Turning the bike lights on and off 35
5.10 Power supply of external devices via USB connection of the Nyon display 36
6 Changing settings during biking 37
6.1 Adjusting the cadence 37
6.2 Changing the assistance level 37
6.3 Switch push assistance mode on and off 38
6.3.1 Switching the push assistance mode on and off with a Nyon display 38
6.4 Resetting display functions 39
6.4.1 Resetting display functions with a Nyon display 39
6.5 Resetting error code indications 39
7 After biking 40
7.1 Locks 40
7.2 Charging the e-bike battery 41
7.3 Storing the e-bike battery and the Nyon display 43
8 Cleaning and maintenance 45
8.1 Cleaning 45
8.2 Maintenance 45
8.2.1 Frame maintenance 45
8.2.2 Speed sensor check 46
8.2.3 Punctures 46
8.2.4 Maintenance check 47
8.2.5 Disc brake adjustment 51
8.2.6 Lubrication 52
8.2.7 Spares, accessories and safety-critical parts 52
9 Transport 54
10 Solutions to possible problems 55
11 Service plan 60
12 Disposal 61
13 EC Declaration of Conformity 62
14 Appendices 64
14.1 Appendix A Torque values 64
14.2 Appendix B Overview Maintenance 66
1 About this manual
First of all, thanks for choosing Urban Arrow!
Urban Arrow stands for Smart Urban Mobility and we have reinvented the transport bicycle: afresh new design, lightweight, safe and comfortable materials together with the powerful and reliable German Bosch electric pedal assist and A-brand components (e.g. Magura, Tektro, SKS, Enviolo, Schwalbe). That's why Urban Arrow has been a multiple award winner; Eurobike Award (2010, 2015 and 2021), ISPO Brand New Award (2013), Extra Energy award (2016 and 2017).
You have chosen the most famous type of Urban Arrow so far: the Family model. This model is designed for families with young children who want a green, affordable and also time saving alternative to owning a (second) car.
At first glance, the Urban Arrow Family Anniversary, specially developed for its tenth anniversary, seems identical to the very first model. It's especially the rough brushed aluminium colour that gives this impression. But the Family has undergone multiple design iterations in its ten year lifespan and is now better crafted than ever before. What once started as a niche product for the Dutch bicycle market has, ten years later, grown into an icon and a frontrunner in the international urban mobility revolution.
This manual will help you learn everything you need to know about your Urban Arrow bike. It explains how to ride and operate the bike and how to perform basic maintenance tasks. It is strongly recommended to read it in full.
Used symbols
| [052C] | Warning Indicates | a hazardous situation that, if not avoided, could result in serious or fatal injury and/or serious damage to a product or surrounding. |
| [40ZY] | Caution Indicates | a hazardous situation that, if not avoided, could result in minor or moderate injury and/or damage to a product or surrounding. |
 | Note Information | that should be considered important, but is not injury or damage related. |
| Tip Tip U | Useful information. |
Copyright and disclaimer
The information in this document is subject to change without prior notification. All rights reserved. Nothing in this material may be simplified, modified or translated without prior written permission from Urban Arrow, apart from insofar as permitted under the Copyright Act.
Nothing herein may be considered as an additional warranty. Urban Arrow is not liable for technical or other errors in or omissions from this material.
Urban Arrow is continuously improving its product range to bring you a better and safer riding experience. It might be possible that some features in this manual are different from the bike as you have bought. Check the most recent information on www.urbanarrow.com/en/folders-manuals
Warranty
Urban Arrow guarantees that this product has been manufactured according to the latest European safety standards and quality requirements applicable to this type of product and that this product, at the time of purchase, has no defects in workmanship and material. During production various quality checks have been performed. Should it happen that, despite all our efforts, during our warranty period(s) your Urban Arrow shows a material and/or manufacturing fault (with normal use as described in the manual), then Urban Arrow is required to respect this warranty. If you feel your warranty should be applied or if you want detailed information on the application of your warranty please contact your Urban Arrow dealer.
The following warranty stipulations apply to your Urban Arrow*. All terms are applicable counting from date of purchase.
- A five year warranty on the frame and the fork except for wear parts.
- A two year warranty on the paint and on visible rust from the inside.
- A two year warranty on all other parts. Wear parts such as the tyres, the chain or belt, the pedals, bearings, the seat belts, ball ends, etc. are exempt from this warranty.
- A two year guarantee on the battery. The capacity of the battery will decrease depending on the number of charge cycles and battery life. This decrease in capacity is not covered by the warranty.
- During the valid warranty period(s) all parts where Urban Arrow has determined that there is a construction or a material defect, will be repaired or reimbursed at Urban Arrow's discretion.
- The factory warranty can only be claimed upon presentation of the original purchase invoice.
* The warranty stipulations are applicable only by the first owner.
Your warranty will be voided or will not be applicable in case your Urban Arrow (and/or its parts):
- Has been altered in its construction.
Never make any modifications to your electrical drive unit or fit any other products which would be suitable for increasing the performance of your e-bike.
- Has seen insufficient maintenance (for sufficient maintenance please follow the service plan as described in chapter 11).
- Has been misused or has been involved in an accident.
- Has defects following normal wear.
- Has been damaged during transport.
- Has been damaged through mounting accessories (such as bags) not sold or produced by Urban Arrow.
- Has been used differently than the product is intended for.
- Has continued to be used despite damage and/or defects have been found, and this made the damage worse.
- Has not been maintained/serviced by a registered Urban Arrow dealer.

Only a qualified bike dealer should perform any necessary work on the drive system. Unauthorized work on any of the drive system parts could endanger you, and your warranty may become void.
Claiming warranty:
- Complaints and warranty claims will be dealt with by your Urban Arrow dealer. In the event of complaints or questions about the warranty, your Urban Arrow dealer will always be your first point of contact, since this is where the contract of sale was concluded. Urban Arrow will then make a definitive assessment on whether the warranty applies. The dealer must send the part in question, together with the purchase invoice, to Urban Arrow, stating the complaint.
- Your dealer may charge you for any assembly or dismantling costs.
- Your dealer may charge you for the transport charges associated with getting the bicycle and/or parts from your dealer to Urban Arrow.
Liability
A claim honored by Urban Arrow under these warranty terms and conditions does not constitute any admission of liability on the part of Urban Arrow for any loss or damage suffered by the owner or third parties. Any liability on the part of Urban Arrow for consequential damage is hereby excluded. The liability of Urban Arrow is limited to whatever is set out in the warranty terms and conditions, unless otherwise arising from a mandatory legal provision.
Disclaimer
Urban Arrow has taken great care in compiling these warranty terms and conditions. But liability as a consequence of printing or typographical errors is excluded.
Assistance
In case you need help or have any questions regarding your Urban Arrow please contact your local Urban Arrow dealer. A list of authorised Urban Arrow dealers can be found online:
Dealer list www.urbanarrow.com/en/dealerlocator
For more Urban Arrow information, technical information and news items please check our website and our social media channels:
Our website www.urbanarrow.com
Our YouTube channel www.youtube.com/urbanarrowcom
Our Facebook page www.facebook.com/urbanarrowcom
Our Instagram account www.instagram.com/urbanarrow
Our Twitter account www.twitter.com/urbanarrowcom
You can also contact us by:
Phone +31 (0)20 6722968
E-mail service@urbanarrow.com
Mail Urban Arrow
Gyrocoopweg 6-8
1042 AB, Amsterdam
The Netherlands
2 The Urban Arrow Family e-bike
The Urban Arrow Family bike is an e-bike. The bike is intended to be used on a regular paved surface and the tires are intended to maintain ground contact. The bike contains an electrical drive unit that assists you up to a speed of 25 km/h when riding. As soon as you push on the pedals the assistance is switched on and it switches off as soon as you stop pedalling or when you have reached a speed of 25 km/h. The e-bike has four different assistance levels (ECO, TOUR, SPORT and TURBO) and a number of gears for an optimal driving experience. The bike can also be ridden as a normal bicycle (no assistance) and has a push assistance mode in which the e-bike can be pushed at low speed without pedalling.
Your Urban Arrow bike comes with a bench mounted inside the box and two sets of seat belts. This bench provides enough room for two young children. The bench will also fit one adult. Adults will not be able to use the seat belts.
Check the local regulations to learn about possible restriction with regard to transport of passengers on a bike.
Check the local regulations on registering and using e-bikes on public roads.
Tip The bench can be removed and refitted depending on your cargo space requirements. Check with your Urban Arrow dealer for advice.
| Important technical specifications of the e-bike | |
| Total length 258 cm | |
| Height Max. 120 cm (depending on | handlebar height the e-bike can be less high) |
| Width box / handlebar 69 cm / 64 | cm |
| Weight of the empty e-bike 48 kg | |
| Max. combined weight e-bike (e-bike, rider and load) - Enviolo Cargo / Heavy Duty | 250 kg |
| Max. rider weight 125 kg | |
The A-weighted emission sound pressure level at the driver ears is less than 70 dB(A).
Never overload your e-bike. This has a negative impact on the steering and braking behaviour of the e-bike which may lead to accidents. For damage caused by bike overload any warranty claims shall be invalid.
The e-bike can be used within a temperature range between -5 °C and 40 °C.
EN
7User r
The e-bike contains the following parts:
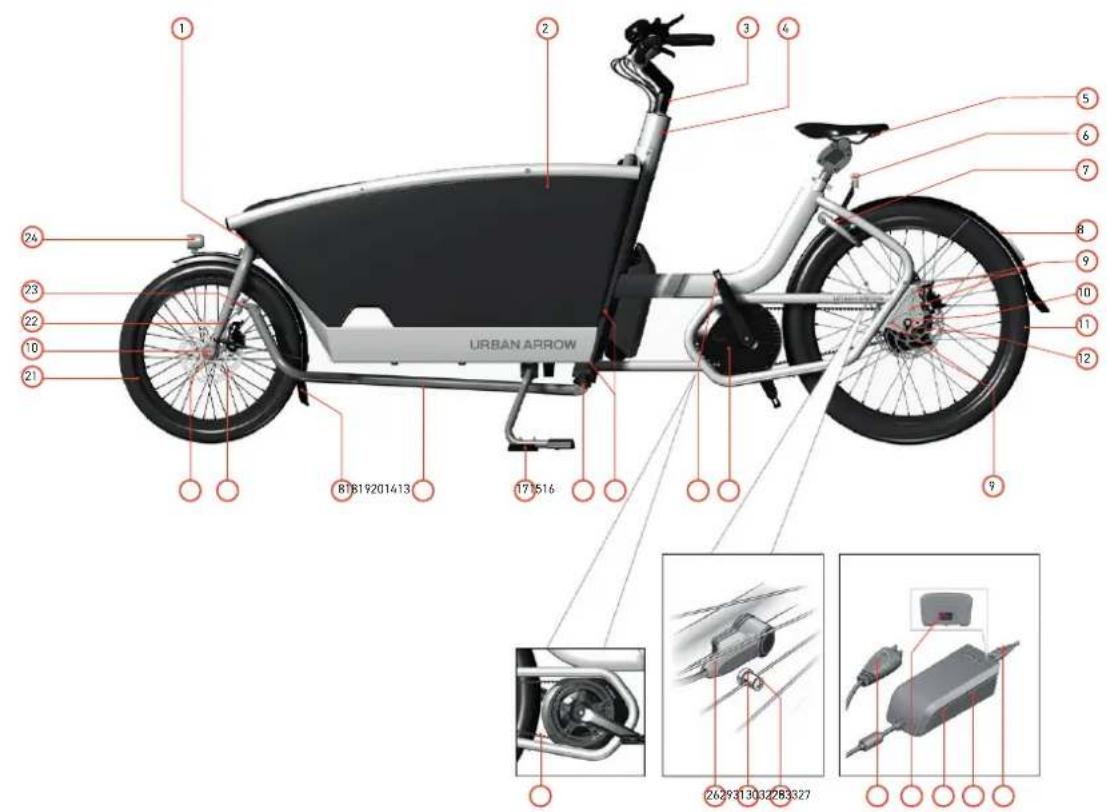
Image 1 : General overview (side view)
Image 1: General overview (side view)
1 Ahead steering set front fork
2 Foam box
3 Ahead steering set steering shaft
4 Head tube
5 Saddle
6 Rear light including brake light
7 Ring lock including lock rubbers
8 Fender
9 Drop out bolt
10 Axle nut
11 Rear wheel (26")
12 Pad
13 Pedal crank arms
14 Pedals
15 Main frame connecting bolt
16 Hingeable pivot joint
17 Kickstand
18 Steering rod
19 Disc brake
20 Front wheel thru axle
21 Front wheel (20")
22 Rigid front fork
23 Steering rod bearing
24 Front light
25 Sprockets
26 Speed sensor
27 Speed sensor magnet
28 Speed sensor magnet bolt
29 Charger plug
30 Socket for mains connection
31 Battery charger
32 Safety warnings
33 Power cord charger plug
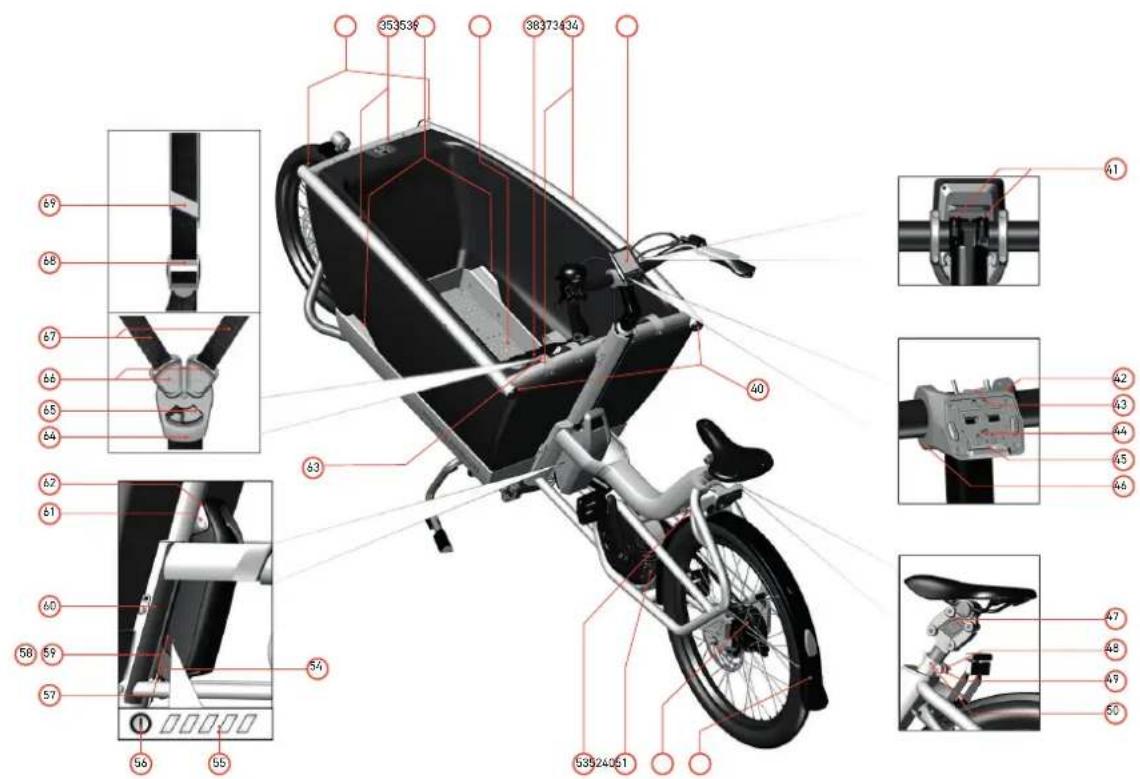
Image2: Generaloverview(topview)
Image 2: General overview (top view)
34 Front reflector
35 Protection tube
36 Access sill
37 Drain holes
38 Bench
39 Nyon display
40 Rear reflector
41 Handlebar angle bolts
42 Top part display holder
43 Release mechanism
44 Bore for locking screw display
45 Display holder
46 Bottom part display holder
47 Suspension seat post
48 Seat post quick release
49 Adjusting screw for seat post clamp
50 Seat post clamp
51 Gear hub
52 Electrical drive unit
53 Ring lock key (same key as battery lock)
54 Bottom part of battery holder
55 Charge-control indicator
56 On/Off button
57 Battery
58 Socket for charger plug
59 Charging socket cover
60 Frame number
61 Battery lock
62 Top part of battery holder
63 Three point harness including Fidlock buckle
64 Main buckle
65 Buckle slider
66 Shoulder belt buckles
67 Shoulder belts
68 Adjustment buckle
69 Shoulder padding
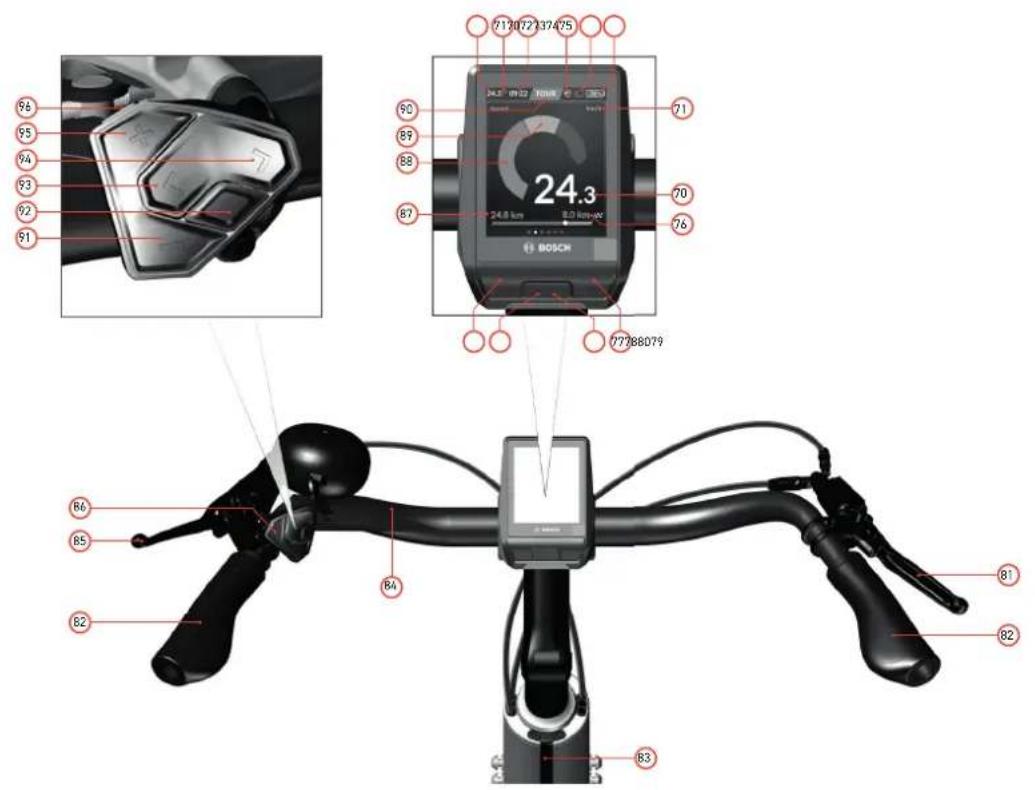
Image3:HandlebarwithNyondisplay
Image 3: Handlebar with Nyon display
70 Speed
71 Unit of speed indicator
72 Time indicator
73 Connection to heart rate monitor
74 Light indicator
75 Battery charge indicator of the e-bike battery
76 Range information
77 Bike lights button
78 USB port
79 USB port protective cover
80 On/ off button display
81 Rear brake (right)*
82 Handle grip
83 Stem
84 Handlebar
85 Front brake (left)*
86 Control unit
87 Distance travelled
88 Motor output
89 Your performance
90 Assistance level indicator
91 Decrease assistance level button - / scroll down button
92 Select button
93 Previous / left page button <
94 Next / right page button >
95 Increase assistance level button + / scroll up button
96 Push assistance button
* There are regional and personal preferences regarding which brake lever operates which brake. If you want the standard setup changed please refer to your Urban Arrow dealer.
The e-bike contains a few parts that can be exchanged depending on your preference. Contact your Urban Arrow dealer in case you are interested in one of the following exchanges:
- Seat post clamp without a quick release, different saddle, different stem, different handlebar;
- Duo battery kit instead of single battery. This will double the capacity of your battery;
- Exchange standard seat post suspension spring - for a different degree of hardness.
Also contact your Urban Arrow dealer in case you are interested in the following range of accessories: various rear carriers, various sun- and raincovers, poncho, box cover, bike parka, child seat adapter, Yepp Mini adapter, front bench, luggage net, floor mat.

In some countries (e.g. Switzerland) the law does not allow for an extra front bench to be fitted.
Maybe your needs will change over time. Then it is good to know that Urban Arrow developed a range of e-bikes in addition to the Family model: a transport bike (Cargo L), a longer version (Cargo XL) and a shorter electric two-wheeled transport bike (Shorty).
3 Safety
Read all safety warnings and all instructions. Failure to follow the warnings and instructions may result in electric shock, fire and/or serious injury. Save all safety warnings and instructions for future reference.

Warning
- When you cycle with a damaged front fork it can cause the front fork to break during riding. This may lead to loss of control of the bike. Always have your bike checked by your Urban Arrow dealer in case the front fork of your bike was hit or your bike ran into an object with the front wheel.
- Children may only use the e-bike and all its components under supervision or after having been instructed by a responsible person. Otherwise, there is danger of operating errors and injuries.
- Supervise children during use, cleaning and maintenance of the bike. Don't let children play with the charger. Keep the battery out of reach of children. Risk of electrical shock.
- Entrapment danger. Cutting danger. Crushing danger. Potential risk of serious injuries. Don't let children play with the bike or parts of the bike. Pay special attention to spinning wheels and to the brake rotors.
- Do not open the electrical drive unit yourself. Opening of the electrical drive unit can cause leakage of water into the
drive unit, which may lead to malfunctioning of the electrical drive unit. The electrical drive unit must be repaired only by qualified experts and only with original spare parts. This will ensure that the safety of the electrical drive unit is maintained. Unauthorized opening of the electrical drive unit will void warranty claims.
- Prevent accumulation of snow and ice between fenders and tires and around the belt drive. Risk of belt breaking.
- Never make any modifications to your electrical drive unit or fit any other products which would be suitable for increasing the performance of your e-bike. This normally reduces the lifetime of the system and risks damage to the electrical drive unit and the bike. If you handle the system improperly you also endanger your safety and that of other road users, thus run the risk of high personal liability costs and possibly even criminal prosecution in the event of accidents attributable to manipulation. There is also a risk you loose the guarantee and warranty claims on the bike you have purchased.
- Always use original Bosch batteries approved by your Urban Arrow dealer. When you use other batteries, Urban Arrow shall not assume any liability and warranty. The use of incorrect batteries can cause short circuiting and/or overheating which may lead to injuries and pose a fire hazard.
- Use the battery only together with e-bikes that have an original Bosch electrical drive unit. This is the only way to protect the battery against dangerous overload.
-
Never open the battery. Danger of short-circuiting which may cause burns or a fire. When you open the battery voids any and all warranty claims.
-
Protect the battery against heat (e.g. prolonged sun exposure) and fire. There is a risk of explosion. Never store or operate the battery near hot or flammable objects.
- Never submerge the battery in water or clean using a jet of water. Danger of short-circuiting which may pose a fire hazard.
- Keep the battery not being used away from paper clips, coins, keys, nails, screws or other small metal objects, that can make a connection from one terminal to another. Shorting the battery-pack terminals together may cause burns or a fire. For short-circuiting damage caused in this manner, any and all warranty claims through Bosch shall be invalid.
- Under abusive conditions, liquid may be ejected from the battery. Avoid contact. If contact accidentally occurs, flush with water. If liquid contacts eyes, additionally seek medical help. Liquid ejected from the battery may cause skin irritations or burns.
- Place down the battery only on clean surfaces. In particular, avoid soiling the charge socket and the contacts, e. g. by means of sand or soil. Danger of short-circuiting which may pose a fire hazard.
- Never attempt to charge or use a damaged battery. There is a risk of explosion. Always contact your Urban Arrow dealer when your battery is damaged.
- Keep the charger away from rain or moisture. The penetration of water into a battery charger increases the risk of an electric shock.
-
Keep the battery charger clean. Contamination can lead to danger of an electric shock.
-
Never operate the battery charger on easily inflammable surfaces (e.g., paper, textiles, etc.) or surroundings. The heating of the battery charger during the charging process can pose a fire hazard. Before each use, check the battery charger, cable and plug. If damage is detected, do not use the battery charger. Damaged battery chargers, cables and plugs increase the risk of an electric shock. Never open the battery charger yourself. Contact your Urban Arrow dealer when your battery charger is damaged.
- A sticker in English is adhered to the bottom of the charger (marked 31 in the diagram on the graphics page). This says: Use ONLY with BOSCH lithium-ion batteries. Follow this instruction.
- When using the on-board computer with Bluetooth® and/or WiFi, interference can occur with other devices and equipment, aircraft and medical devices (e.g. pacemakers, hearing aids). Likewise, injury to people and animals in the immediate vicinity cannot be excluded entirely. Do not use the on-board computer with Bluetooth® in the vicinity of medical devices, petrol stations, chemical plants, areas with a potentially explosive atmosphere or on blast sites. Do not use the on-board computer with Bluetooth® in aeroplanes. Avoid using the on-board computer near your body for extended periods.
- Do not allow yourself to be distracted by the on-board computer's display. If you do not focus exclusively on the traffic, you risk being involved in an accident. If you want to make entries in your on-board computer other than switching the assistance level, stop and enter the appropriate data.

Caution
- Batteries must not be subjected to mechanical impacts. There is a risk that the battery will be damaged causing vapors to escape. The vapors can irritate the respiratory system. Provide for fresh air and seek medical attention in case of complaints.
- The battery may give off fumes if it becomes damaged or is used incorrectly. Provide a fresh air supply and seek medical advice in the event of pain or discomfort. These fumes may irritate the respiratory tract.
- Observe the mains voltage! The voltage of the power supply must correspond with the data given on the nameplate of the battery charger. Battery chargers marked with 230 V can also be operated with 220 V. When the main voltage is too high the battery will be damaged.
- Please observe the operating and storage temperatures of the e-bike components. Protect the electrical drive unit, display and battery against extreme temperatures (e.g. from intense sunlight without adequate ventilation) and reflection of sunlight coming from energy-efficient glass. The components (especially the battery) can become damaged through extreme temperatures.
4 Before first use
On delivery of your bike the battery is supplied partially charged. To ensure full battery capacity, completely charge the battery in the charger before using for the first time. See paragraph 7.2 how to charge the battery.
Prior to your first ride your bike needs to be fit in an optimal way. In this chapter we explain how this should be done.
4.1 Bike fit
Adjust the saddle height and handlebar position according to your personal preference in order to ride your new bike in an optimal way.
Tips for an optimal setting (see image 4):
- Don't put the handlebar too low or too far away. Leaning too much forward will put stress on your lower back and wrists.
- When adjusting the saddle height your feet (not just the toes) should touch the ground while seated on the saddle.
- When positioning your foot on the pedal at its lowest point your knee should be slightly bent.
It is common for an Urban Arrow bike to be ridden by more than one rider. In that case adjusting the seat post height to the correct height is more critical than adjusting the handlebar height.

Please consult your Urban Arrow dealer for a professional bike
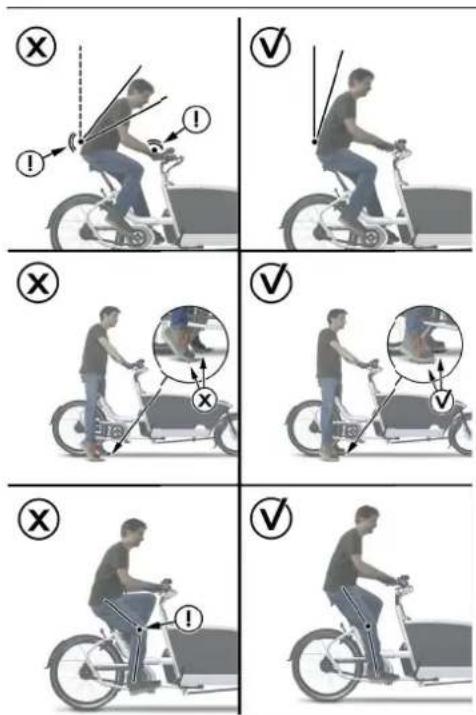
Image4:Bikefittips
4.1.1 Saddleheightadjustment
The height of the saddle is adjusted as follows:
- Open the seat post quick release 48 located on the seat post
clamp. The seat post will now sit loose in the frame (see image5).
The seat post clamp should remain in place. There is no need to slide it off the frame or to take if off completely.
- Putthesaddleattherequiredheight.Payattentiontothe following:
In case you have a suspension seat post: The indication on the seat post (a line of vertical stripes) should never be visible. When you extend the seat post beyond the minimum insertion mark the seat post can break during cycling, which may lead to loss of control of the bike.
- Closetheseatpostquickreleasecompletelybypushingit againsttheseatpostclamp(seeimage7).
Is the seat post able to turn in the clamp when the lever is closed or are you not able to close the seat post quick release? Then the clamp force needs to be adjusted. Adjust the clamp force as follows:
- Opentheseatpostquickrelease48.
- Adjust the clamp force:
a.Turntheadjustingscrewoppositetheleverafewturns clockwise to make the clamp tighter.
b.Turntheadjustingscrewoppositetheleverafewturns counter clockwise to make the clamp looser.
- Closetheseatpostquickreleasecompletelybypushingit against the seat post clamp.
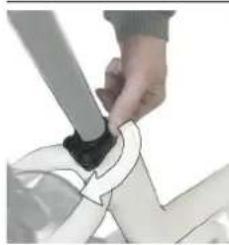
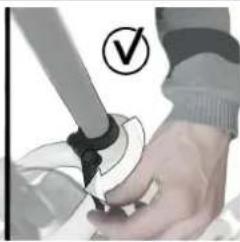
Image5:Openingtheseatpostquickrelease
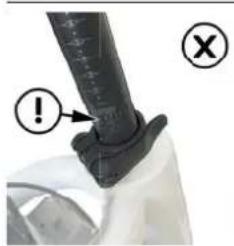

Image6: Suspensionseatpost-Mininsertionseatpost
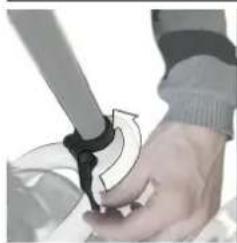
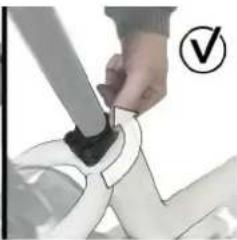
Image7: Closingtheseatpostquickrelease
18 Urban Arrow Family Anniversary
4.1.2 Handlebar/stemadjustment
The handlebar position can be adjusted according to your personal preference. Adjusting the angle of the stem will change the handlebar height and the distance between the rider and the handlebar.
The angle of the stem can be adjusted as follows:
- Turnthetwostemangleboltsafewturnscounterclockwise to loosen it (see image 8 A). There is no need to rotate the bolt any further.
Use a 5mm Allen key.
- Adjust the angle of the stem 83 to the required setting.
- Turntheboltsclockwisetotightenit.
The angle of the handlebar can be adjusted as follows:
- Turn the 4 handlebar bolts 41 a few turns counter clockwise to loosen it (see image 8 B). There is no need to rotate the bolt any further.
Use a 4mm Allen key.
It could be that you have a version that only has 2 handlebar bolts. Use a 5mm Allen key in that case.
- Adjust the angle of the handlebart to there required setting.

When a range is indicated on the side of the stem: Always stay within the range indicated on the side of the stem while adjusting (see image 10). When you adjust the stem to a position out of this range the stem might break during cycling. This may lead to loss of control of the bike.
- Turntheboltsclockwisetotightenit.
Tip Use one hand to hold one end of the handlebar and use it to move the handlebar to the required position. Use your other hand to tighten the bolt.

The bolt should be tightened to the correct torque. Overtightening could lead to the bolt breaking, not tightening the bolt enough could lead to slippage of stem and bars (they could move when you ride over a bump for instance). A conf dent home mechanic should be able to judge the correct torque by hand. Check appendix A for the correct torque values.
- Sit on the saddle and face forward. Rotate the grips 82 to optimise the angle of the brake levers 81 and 85. The angle of the brake levers is set correctly when the brake levers visually disappear behind the grips. (see image 11).

Always check the angle of the brake lever after you change the stem angle. Change the angle of the grips if necessary. When the brake levers have an incorrect position it is more diff cult to exert force, which may lead to reduced break performance.
Tip If you feel you cannot achieve a good bike fit by changing the angle of the stem you might need a different stem and/or handlebar fitted. Please contact your Urban Arrow dealer for advice. Tip If you are unsure how to adjust the stem or need bike fitting advice, please contact to your Urban Arrow dealer.
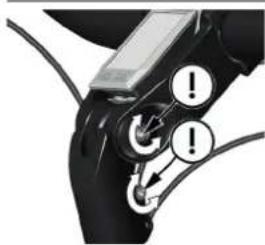
Image8A:Turningthestemanglebolts
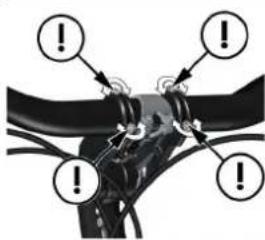
Image8B:Turningthehandlebaranglebolts
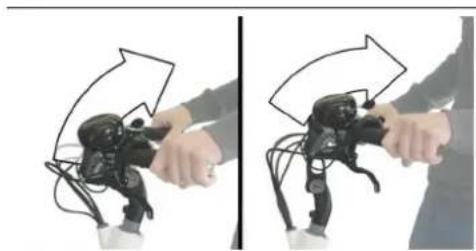
Image9:Adjustingthestemangle
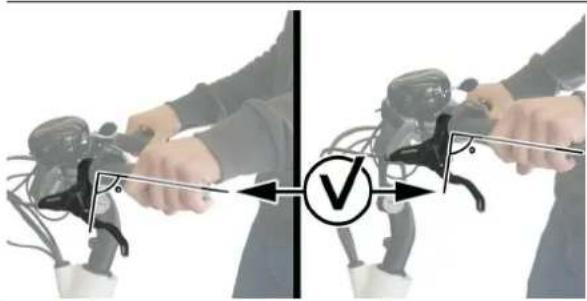
Image11: Correct the brake lever angle for the different stem positions
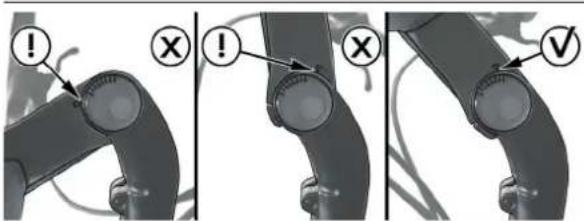
Image 10 : Stay within the range indicated on the side of the stem
4.2 Settingupthelights
The rear light is fixed in the correct position and does not need to be adjusted. For optimal visibility the front light should be set up correctly (see image 12). It can be tilted up and down. This allows for the light beam to be projected closer or further away from the bike. Ideally the beam should be aimed the furthest you can see it on the ground.
Never set up the front light in such a way that the beam is pointing upward. This can cause upcoming traffic to be blinded after which they may lose control over their transportation device and cause an accident.
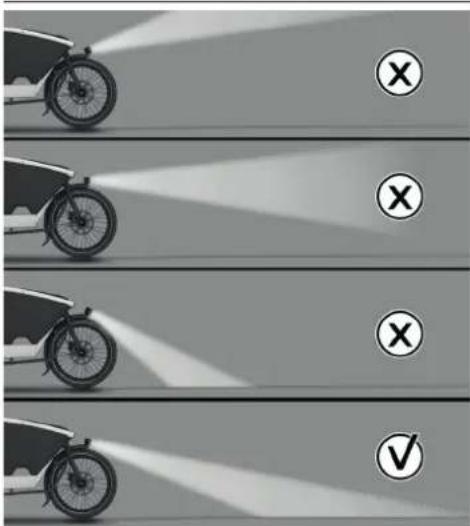
Image 12: Front light beam angle
4.3 Configuration of the display
Depending on the type of display on your bike there are different configuration options. In this paragraph we explain the configuration of the Nyon display.
4.3.1 Configuration of the Nyon display
The following system settings can be changed in the menu System settings on the Nyon display:
| System settings Explanation | |
| Check for update The system checks for new updates here. | |
| Brightness The brightness can be adjusted in steps of 25% from 25-100%. When the Automatic option is selected, the brightness automatically adjusts to the ambient light. | |
| Time zone The correct time zone can be selected here. | |
| Time format The time format can be changed here. | |
| Design The colour of the background can be changed here. | |
| Units The correct units (Metric or Imperial) can be selected here. | |
| Language The required language for the interface can be selected here from 9 options. | |
| Factory reset This menu item can be used to reset the display to factory settings. |
The following system settings can be changed in the menu My eBike on the Nyon display:
| System settings Explanation | |
| Counters (such as average values or the number of kilometers travelled that day) | The counter values can be automatically or manually reset here. |
| Wheel circum. The value | of the wheel circumference can be adjusted or reset here. |
| eShift The cadence can be set here. | |
The following non-changeable system settings are available in the menu My eBike on the Nyon display:
| System settings Explanation | |
| Next service Indicates the distance till your e-bike needs the next service. | |
| Components The serial number, part number, and software version (when applicable) of the Bosch e-bike battery, motor, and display. |
Only the basic settings are explained in this manual. For more information, please visit the online Nyon Bosch manual: www.bosch-ebike.com/en/products/nyon
Selecting system settings in System settings or My eBike

To select the system settings, the display should be placed in the holder 45. Settings can only be selected while the e-bike is stationary. You can't select Settings while riding.
- Swipe the display 39 to navigate to the status screen.
- Tap the Settings button. The menu Settings will appear.
- Tap the System settings or My eBike.
- Tap the required system setting you want to adjust.
- Tap the < on the Nyon display to go back to the previous menu.
4.3.2 The Nyon display and Bosch e-bike Connect app
The Bosch e-bike Connect app shows your e-bike rides in detail and you can for instance enter a destination and have it transferred to your Nyon display. The app is available in the App Store or the Google Play Store. To be able to use the Connect app you have to create an User ID.
One of the premium features of the Connect app is the 'Lock' function. It is a complement to a mechanical lock. It disables the motor support when the display is taken out of the holder. Your e-bike automatically unlocks when the same display is placed back in the holder again.
For more information on the Bosch e-bike Connect app go to www.ebike-connect.com
5 Getting ready to bike
5.1 Gathering first experience
It is recommended to gather first experience with the e-bike away from roads with heavy traffic. Test the operating range of your e-bike under different conditions before planning longer and more challenging rides. Also try out the different assistance levels and take some time to understand the gear hub.
When you first start using the e-bike it is recommended to start in low gear and assistance level ECO or TOUR.
The motor output depends on the amount of your pedalling power and the settings of the assistance level on the display. In general:
- Applying less pedaling power means lower assistance or support.
- Applying a lot of pedaling power means higher assistance or support.
As soon as you feel safe, you can participate in traffic with the e-bike as with any other bicycle.
When you hit an object with your bike it can cause damage to the front fork and the front wheel. Always be careful when your ride against and over kerbstones. Adjust your speed.
Be careful when touching the disc brakes after heavy use. They can get very hot.
It is recommended that the rider uses a bicycle helmet.
5.2 Influences on the operating range
The operating range depends on many factors, such as:
- Assistance level,
• Gear switching behavior,
• Bicycle tyres and tyre pressure, - Model, age and condition of the e-bike battery,
- Route profile (inclines) and road or path conditions (road or path surface),
• Head wind and ambient temperature,
• Weight of the e-bike, rider and equipment/luggage.
For this reason, it is not possible to precisely predict the range before and during a trip. General rules:
- For the same motor output of the electrical drive unit: The less power or force you have to bring about to reach a certain speed (e.g. through optimal use of the gears), the less energy the electrical drive unit will consume, and the greater the range of your e-bike battery.
- The higher the assistance level under otherwise same conditions, the lower the range.
5.3 Safetycheckbeforeeveryride
To ensure your bike is safe to ride please check the following safety points before every ride (see image 13). These are quick checks to avoid mechanical malfunctions. Don't use the bike if your bike fails on any of the points and you are not able to solve the issue following the instructions in this manual. Contact your Urban Arrow dealer to discuss the problem.
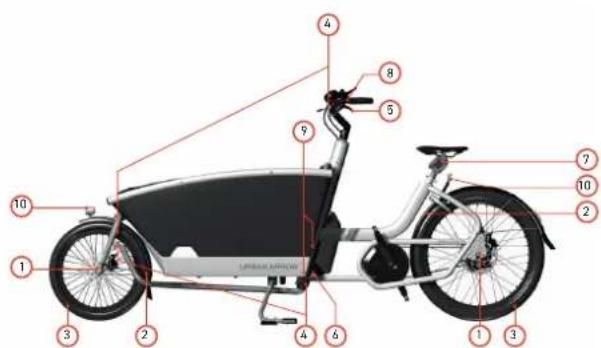
Image13:Quicksafetycheck
- Check if the axle nuts 10 and the drop out bolts 9 aren't loose.
- Check if the tyres aren't running against the fenders 8, the frame or the lock 7.
-
Checkifthetyresarewellinflated.(seeparagraph5.4for information on the correct tyre pressure).
-
Check if the linkage between the handlebar 84 and the fork 22 is play free and that the linkage turns directly and smooth.
- Check if the brakes 81 and 85 are working.
- Make sure the kickstand 17 folds upwards and keeps its position.(seeparagraph5.8.1 for information on the correct position of the kickstand and how to correct the position in case it is not correct).
- Check if the seat post 47 doesn't slip in the frame, make sure the seat post clamp 50istightened.
- Check if the stem 83, handlebar 84 and grips 85 aren't slipping or loose.
- Check if the main frame connecting bolts 15 aren't loose.
- Check if the front 24 and rear lights 6 are working.
- Check if the lock rubbers 7 aren't torn and/or cracked.
5.4Tyres
Infl ate your tyres to the correct pressure:
• Front tyre 2.4-3.5 bar
- Rear tyre 3-4 bar
Tip Ask your Urban Arrow dealer for a correct pump that fits the Schrader valves of your bike.
5.5 E-bike battery capacity check
There are two ways to check the charge conditions of the e-bike battery:
- On the battery
- On the display
When the e-bike battery is empty the e-bike can be ridden as a normal bicycle without assistance.
Checking the charge conditions on the e-bike battery is done as follows:
- Press the on/off button 56 on the battery.
- Check the five green LEDs of the charge-control indicator 55 on the battery.
Each LED indicates approx. 20% capacity. When the battery is completely charged, all five LEDs light up.
If the capacity of the battery is below 5%, all LEDs of the charge-control Indicator go out.
Checking the charge conditions of the e-bike battery on the Nyon display is done as follows:
- Press the on/off button 80 on the Nyon display.
- Check the battery charge-control indicator 75 on the Nyon display.
| Colour of the Indicator | Explanation |
| Green The e-bike battery is over 30% charged | |
| Orange The e-bike battery is between 15% and 30% charged | |
| Red The e-bike battery is between 0% and 15% charged | |
| Red + ! The capacity for assisting the drive has been used up, and assistance is switched off. The remaining capacity will be provided for the bike lights and the on-board computer. | |
If the e-bike battery is being charged on the bike, a corresponding notification will be displayed.
If the display is removed from the holder, the state of charge that was last displayed for the battery was saved.
5.6 Activating your e-bike
Your e-bike can only be activated (switched on and off) when the following requirements are met:
- The display is properly inserted in the holder (in case of an Nyon display)
- A charged e-bike battery is inserted into the battery cradle
• The speed sensor is connected properly
There is no specific order in mounting the display and the battery.
In the following paragraphs we will explain you how to:
- Insert, remove, secure and charge the Nyon display
- Place and remove the e-bike battery from the battery cradle
- Switch the e-bike on and off
In case the speed sensor is not connected properly, the text 'Error 503' will appear on the screen of your display. Cycling remains possible but there will be no pedalling assistance as the electrical drive unit will be turned off automatically while functioning in this error mode. Check paragraph 8.2 for more information on how to check the speed sensor.
5.6.1 Inserting, removing, securing and charging the Nyon display Inserting the Nyon display is done as follows:
- Place the lower part of the display into the display holder 45 (see image 14A).
- Tilt the top part of the display towards the display holder 45 until the display 39 is firmly fixed in the display holder 45.
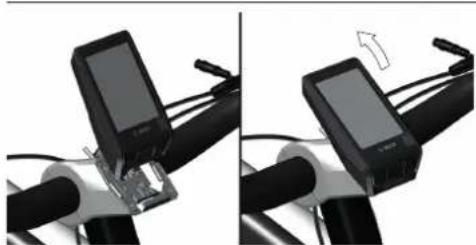
Image 14 A: Inserting the display
Removing the Nyon display from your bike is done as follows:
- Press the release mechanism 43 and tilt the display 39 upwards to remove the display from the display holder 45 (see image 14B).
If the display is removed from the holder, all values for the functions are saved and can still be scrolled through.
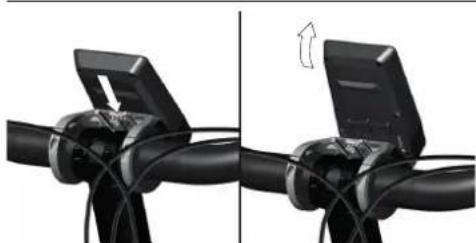
Image 14B: Removing the display
Securing the Nyon display against removal is done as follows:
You need a locking screw (M3 screw, 5mm long).
- Remove the display holder 45 from the handlebars.
- Place the display 39 in the display holder 45.
- Screw the locking screw into the thread at 44.
- Place the display holder 45 back onto the handlebars.
There are two ways to supply energy to the display:
-
Energy supply by the battery of the e-bike: If the display is in the holder 45, a sufficiently charged battery is inserted in the e-bike and the e-bike is turned on, then the onboard computer is powered by the battery of the e-bike.
-
Energy supply by the internal battery of the display: If the display is removed from the holder 45, the energy is supplied via an internal battery.
If the display battery's charge is running low, a warning message appears on the display.
Charging the internal battery of the Nyon display is done as follows:
-
Insert the e-bike battery 57 in the battery cradle (see paragraph 5.6.2).
-
Put the display in the holder 45.
-
Press the on/off button 56 of the e-bike battery to switch on the e-bike battery.
Tip You can also charge the display via the USB port 78 (see paragraph 5.10).
- Press the on/off button 80 of the display to switch on the display. The internal battery of the display will be charged now.
Tip If no power is drawn from the e-bike for about 10 minutes and no button is pressed on the display, the e-bike and therefore also the e-bike battery will shut down automatically to save energy. The display will not be charged when the e-bike battery is off.
To maximise the lifespan of the on-board computer's battery, it should be recharged for one hour every three months.
If the internal battery of the Nyon display is not recharged, the date and time will be retained for up to 6 months. When the display is switched on again, the date and time will be reset if a Bluetooth® connection to the Connect app has been established and the smartphone has successfully identified the current location via GPS (see paragraph 4.3.2 for more information on the Connect app).
5.6.2 Placing and removing the e-bike battery from the battery cradle
Inserting the e-bike battery is done as follows:
- Press the on/off button 56 of the e-bike battery to switch off the e-bike battery 57.
! Sparks may be generated between the terminals of your battery and ones of the holder when you don't switch off the battery. These sparks may lead to injuries.
-
Check if the upper and lower battery holder 62 and 54 are clean (no dirt or debris).
-
Place the key into the battery lock 61.
The battery lock uses the same key as the ring lock 53.
-
Unlock the battery lock by turning the key counter clockwise.
-
Place the battery with the contacts on the lower holder on the e-bike (see image 15).
-
Tilt the battery into the top part of the battery holder until it engages. The battery is now locked. See image 16 and 17 for a correctly and incorrectly fitted battery.
You will hear a click when the battery is inserted correctly.
-
Check if the battery is tightly seated. There should be very little play.
-
Remove the key from the battery lock.
Removing the key prevent the e-bike battery from being removed by unauthorised persons when the e-bike is parked.
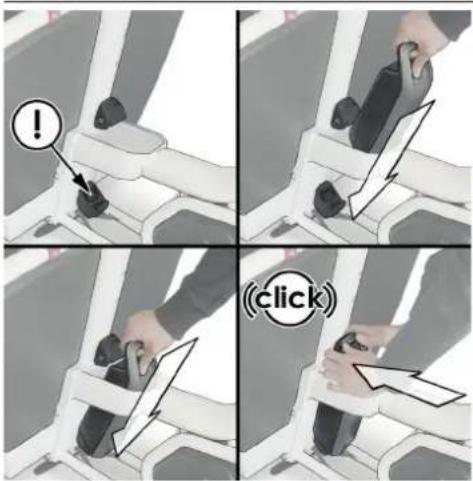
Image 15: Inserting the battery in the battery cradle
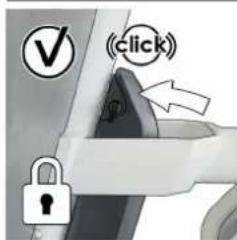
Image 16 : Feedback correctly fitted battery
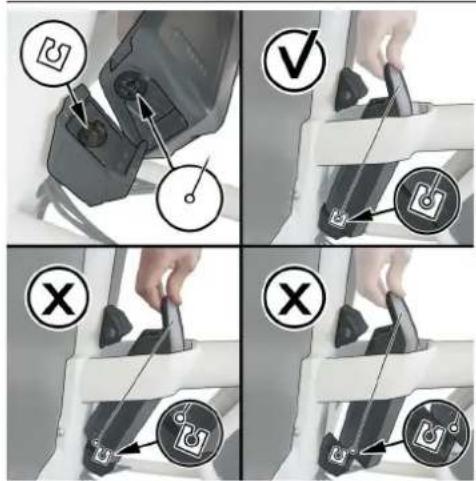
Image 17: Incorrectly fitted battery
Removing the e-bike battery is done as follows:
- Press the on/off button 80 of the e-bike battery to switch off the battery 57.
- Place the key into the battery lock 61.
Tip The battery lock uses the same key as the ring lock. - Unlock the battery lock by turning the key counter clockwise (see image 18).
The lock mechanism pushes the battery out of the cradle, making it easy to take it out.
- Tilt the battery out of the top part of the battery holder 62.
- Pull the battery out of the bottom part of the battery holder 54.
Tip Mind that the key of the battery lock is also used to unlock the bike lock. We advise you to never leave it behind in the battery lock to prevent theft of the e-bike.
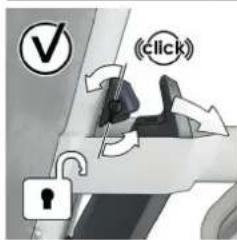
Image 18 : Unlocking the e-bike
Always take your battery out of the frame when you are parking it for longer periods or in high risk areas. It is an expensive part to replace and there is always a chance it will be stolen.
5.6.3 Switching the e-bike on and off
There are multiple ways to switch on the e-bike:
- When the display is not yet inserted into the holder (in case of an Nyon display):
a. Switch on the display and place it into the holder. The e-bike will automatically switch on.
b. Insert the display into the holder. Switch on the display.
- When the display is already inserted in the holder:
a. Switch on the e-bike battery (see paragraph 5.6.3).
b. Switch on the display.
This is under the condition that a charged e-bike battery is inserted in the battery cradle and the speed sensor is properly connected.
There are multiple ways to switch off the e-bike off:
- Switch off the display by pressing the on/off button 80 of the Nyon display.
- Switch off the e-bike battery (see paragraph 5.6.3).
- Remove the display out of its holder (in case of an Nyon display) (see paragraph 5.6.1).
If no power is drawn from the e-bike for about 10 minutes (e.g. because the e-bike is not moving) and no button is pressed on the display for 10 minutes, the e-bike and therefore also the e-bike battery will shut down automatically to save energy.
The e-bike can also be ridden as a normal bicycle without assistance at any time by switching off the e-bike. Be aware that the lights are not functioning when the e-bike is switched off. Put the assistance level on OFF if you want to drive without any assistance but want your lights to function.
5.6.4 Switching the e-bike battery on and off
Switching on the e-bike battery is done as follows:
- Press the on/off button 56 of the battery 57. The LEDs of indicator 55 light up and at the same time indicate the charge condition.
Switching off the battery is done as follows:
- Press the on/off button 56 of the battery 57. The LEDs of indicator 55 go out. This also switches off the e-bike.
If the capacity of the e-bike battery is below 5%, no LED on the charge-control indicator 55 lights up. It is only visible on the display, if the e-bike is switched on.
If no power is drawn from the e-bike drive for about 10 minutes (e.g. because the e-bike is not moving) and no button is pressed on the display or the control unit of the e-bike, the e-bike and therefore also the e-bike battery will shut down automatically to save energy.
5.7 Opening, closing and adjusting the three point harness
A three point harness to keep the child in his seat is standard equipment on the e-bike. The Fidlock buckle closes the harness. Two harnesses are mounted, to be used by children seated on the bench.
The length of the belts should be adjusted to the size of the passengers. The belts should not be loose nor too tight. A grown up should be able to put their hand between the belt and the chest of the child. If an adult is seated on the bench they can hold the protection tube to secure themselves.

Always secure young passengers with the seat belts before a ride. When young passengers can move freely in the foam box they can be launched when you have to brake. This can potentially be fatal. The three point harness only provides protection up to a certain level in case of an accident.

Never use the bench seats for children who are not able to sit Independently. The bench does not offer sufficient head support which may lead to neck or head injury.

To provide easy access to the box for (little) passengers, a cut-6 has been made in the side of the foam box to create a step. can be used to climb in and out of the foam box.
Closing the three point harness is done as follows:
- Place both shoulder belt buckles 66 onto the main buckle 64 (see image 19). The magnets in the buckles ensure the parts lock at the correct position.
- Pull the shoulder belts 67 to check if the harness is securely closed.
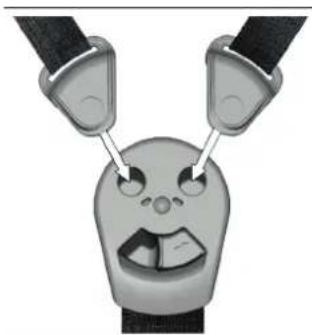
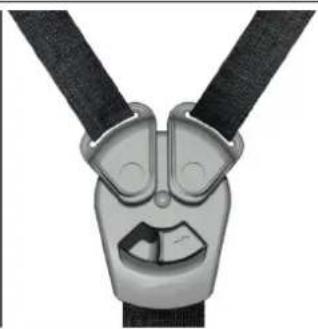
Image 19 : Closing the three point harness
Opening the three point harness is done as follows:
- Slide the buckle slider 65 counter clockwise. Both shoulder belt buckles 66 are released from the main buckle 64 (see image 20).
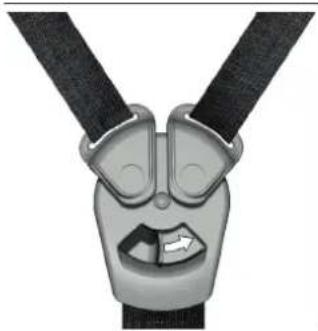
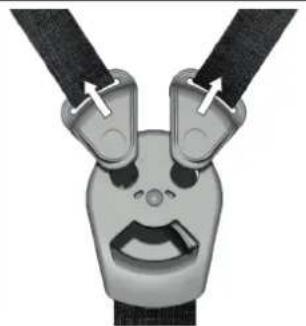
Image 20 : Opening the three point harness
Adjusting the length of the shoulder belts
If the harness can't be closed because the shoulder belts are too tight or the child can still move around too much the length of the shoulder belts need adjustment. Adjusting the length is done as follows:
a. Extend the length of the shoulder belts 67 by pushing the shoulder belt 67 through the adjustment buckle 68 (see image21).
b. Tightentheshoulderbeltsbypullingtheshoulderbelt through the adjustment buckle.
The position of the shoulder padding can be adjusted by sliding the padding over the shoulder belts.
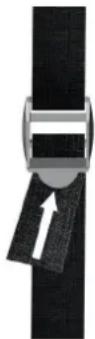
Image21:Extendingtheshoulderbelts
Transportingluggage
Check if your luggage is secured properly, so it cannot move around during the ride.
Tip Use other strap material to secure your luggage.
5.8 Parking the e-bike or going for a ride
When you want to park the bike, put it on the kickstand. Putting the bike on the kickstand is done as follows:
- Dismountthee-bike.
- Takepositionononesideofthee-bike.
- Hold the grips 82 - one hand on each grip (see step 1 in image 22)-and pushdowntheendofthekickstand17withyour foot (see step 2 in image 22). Simultaneously pull the bike backwards with one hand on each grip (see step 3 in image 22).
Never park your bike with the front pointing down a slope (even small ones). The kickstand could be overcome by the weight of the bike alone or a small push and cause your bike to fall over.
Never pull the bike backwards to get it off the kickstand. This will make the kickstand move in the wrong direction which can damage the kickstand mechanism.
There is no need to switch off the e-bike before putting it on the kickstand.
Never leave the Nyon display or the battery on the e-bike when you park the e-bike to prevent theft of the display and/or the battery.
! Park your bike in a socially acceptable manner. Don't block the road or sidewalk. Don't lock your bike to bikes that aren't yours.
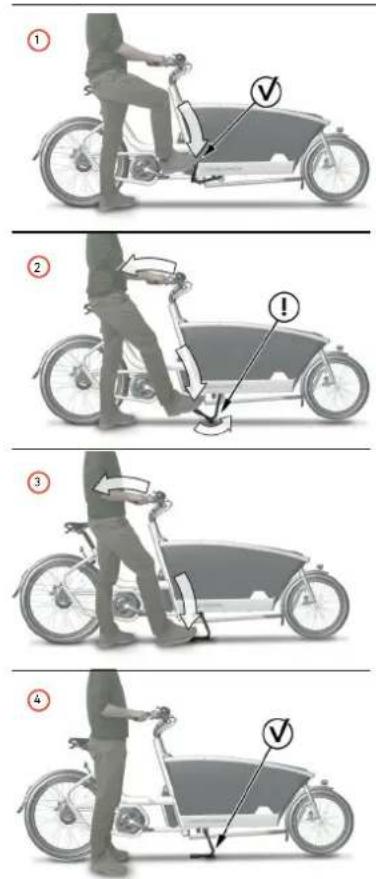
Image 22: Putting the bike on its kickstand
Taking the e-bike off the kickstand to go for a ride is done as follows: 1. Unlockthebike(seeparagraph7.1).

Always unlock your bike before you take it off the kickstand. The lock can bend or snap the spokes of your rear wheel when the wheel starts to turn.
2.Takepositionononesideofthebike.
-
Hold the grip 82 closest to you with one hand (see step 1 in image23).
-
Pull the handle located underneath the saddle 5 upwards with yourotherhand(seestep2inimage23).
-
Push the bike forward. Thespring loaded kick stand will rotate upwards and move out of the way (see step 3 and 4 in image 23).

With a heavy load inside the box, pushing forward might require an extra push against the box with your knee.

If your kickstand does not keep its rotated upwards position, there might be an underlying technical problem. Please contact your Urban Arrow dealer for maintenance.
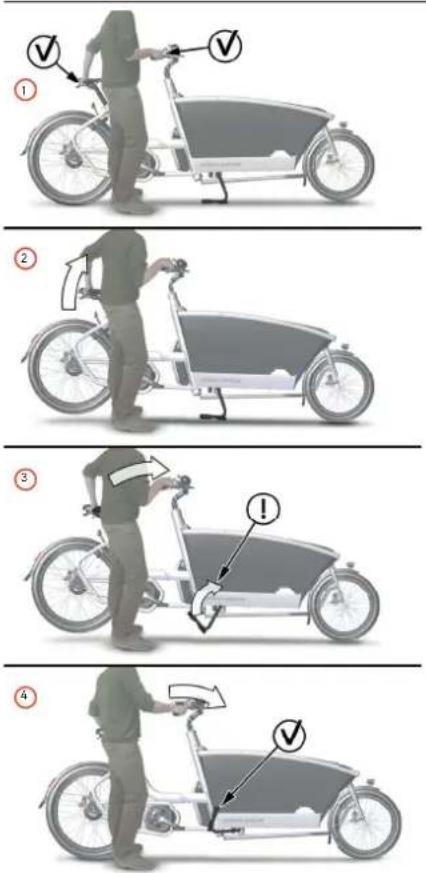
Image23:Takingthebikeofitskickstand
5.8.1 Incorrect position of the kickstand
It can occur that the kickstand ends up in a wrong position. For instance when you pull the bike backwards trying to get it off the kickstand.
See image 24 to recognise the correct and incorrect positions.
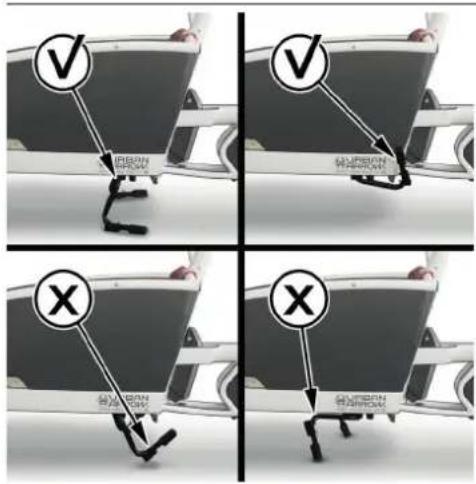
Image 24 : Correct and incorrect kickstand positions
Adjusting the kickstand when it has an incorrect position is done as follows:
- Lift the rear wheel to let the kickstand rotate freely. The kickstand will automatically turn to its correct position.
If the kickstand doesn't turn to the correct position, there is a mechanical problem. Contact your Urban Arrow dealer to have it solved.
5.9 Turning the bike lights on and off
Your e-bike has a front and rear light. It is advised to have your lights turned on at all times, also during the daytime. The increased visibility to other traffic will increase your safety.
Never cover the reflectors or the lights during cycling. It can cause poor visibility in traffic which may lead to collisions and/or accidents. Always contact your Urban Arrow dealer when one of the reflectors is missing to arrange replacement. Always contact your Urban Arrow dealer when the lights stop working or do not turn on using the described method.
Your lights will not turn off when the battery is empty. They will continue to work for many hours after the electric assistance stops. You will have enough time to get home safely when the battery drains during a ride.
In this paragraph we explain how to turn on the lights. This depends on the type of display on your bike.
Turning on the lights with the Nyon display is done as follows:
- Press the on/off button 80 on the display to turn on the e-bike (see paragraph 5.6.3 for the requirements).
- Press the light button 77 to switch on the lights.
Switching the bike light on and off has no effect on the back lighting of the display.
Contact your Urban Arrow dealer in case the front and rear light don't turn on simultaneously or don't turn on at all.
There are multiple ways to turn off the lights. Turning off the lights is done as follows:
- Press the on/off button 80 on the display. The lighting symbol 74 will disappear from the display.
• Turn off the e-bike (see paragraph 5.6.3). - Remove the display from the e-bike (see paragraph 5.6.1).
5.10 Power supply of external devices via USB connection of the Nyon display
With the USB connection on the Nyon it is possible to operate and charge most devices whose power supply is possible via USB (e.g. various mobile phones).
If electrical loads are connected, this can affect the range of the eBike.
Supplying your external device with power via the display is done as follows:
- Place the display in the display holder 45. See paragraph 5.6.1 for instructions.
- Place a charged battery in the battery holder. See paragraph 5.6.2 for instructions.
- Open the USB port protective cap 79.
- Connect the USB connection of the external device to the USB port 78. Use the USB charging cable Micro A - Micro B (available from your Urban Arrow e-bike dealer).
- Close the USB port protective cap after disconnecting the external device.
A USB connection is not a waterproof plug-in connection. Moisture can cause internal damage to the display. Always completely seal the USB connection with the protective cap 79. Never connect an external device when you ride in the rain.
If the display is switched off during charging via a USB cable, the display can only be switched on again once the USB cable has been disconnected.
6 Changing settings during biking
There are a few settings that can be changed while driving, being: adjusting the cadence, changing the assistance level and switching the push assistance mode on and off. When standing still a number of display functions can be reset. In the following paragraphs we explain how you can change the above mentioned settings.
6.1 Adjusting the cadence
Adjusting the cadence settings is done as follows:
- Press the select button 92. The quick menu appears.
- Press the > button 94 until the eShift Cadence screen appears.
- Select the desired cadence setting using the + button 95 or - button 91 and press the selection button 92 to confirm your choice.
Selecting a lower cadence will put less stress in the drive train and you will gain speed more quickly.
It is recommended to briefly interrupt the pedaling while changing cadence. This makes adjusting the cadence easier and reduces the wear of the drive train.
Selecting a lower cadence setting riding away from a stop will reduce strain on the drive train components and increases the operating life of your bicycle. Selecting the correct cadence setting will also affect the range of your battery positively.
6.2 Changing the assistance level
The electrical drive unit of the e-bike assists you when you pedal. The level of assistance can be changed while cycling or standing still. You can also ride your e-bike as a normal bicycle without assistance.
The following assistance levels are available:
| No assistance O | FF The m | motor assistance is switched offand the e-bike can be used as a normalbicycle. The push assistance cannot beactivated in this assistance level. |
| ECO Effective assistance at maximumefficiency for maximum cruising range. | ||
| TOUR Uniform assistance, for touring with longcruising range. | ||
| SPORT Powerful assistance for sportive ridingas well as for urban traffic. | ||
| Maximumassistance | TURBO Maximum assistance, supporting highestcadence for sportive riding. | |
Changing the assistance level with the Nyon display is done as follows:
a. Shifting to a higher assistance level by pressing the + button 95 on the control unit until the desired assistance level appears on the indicator 90.
b. Shifting to a lower assistance level by pressing the -button 91 on the control unit until the desired assistance level appears on the indicator 90.
The maximum motor output depends on the selected assistance level.
If the display is removed from the holder, the assistance level that was last displayed is saved.
6.3 Switch push assistance mode on and off
The push assistance feature makes it easier to push the e-bike. The speed in this function depends on the set gear and cannot exceed 6 km/h (max.). The lower the set gear, the lower the speed in the push-assistance function (at full output). How the push assistance is switched on or off depends on the type of display on your bike.
The cranks with the pedals will rotate when the push assistance is switched on. Make sure your legs are a sufficient distance away from the cranks with the pedals. There is risk of injury.
Never use the push-assistance function when the bike is locked. This may lead to damage of your spokes.
6.3.1 Switching the push assistance mode on and off with a Nyon display
Switching on the push assistance when you have a Nyon display is done as follows:
- Press the push assistance button 96.
- Within 3 seconds after pressing the push assistance button: Press and hold + button 95 on the control unit. The electrical drive unit is switched on.
The push assistance cannot be activated in the OFF assistance level.
There are multiple situations in which the push assistance of the Nyon display switches off:
- When you release the + button 96.
- In case the wheels of the e-bike are blocked (e.g. by applying the brakes or hitting an obstacle).
- When the speed of your e-bike exceeds 6 km/h.
6.4 Resetting display functions
In this paragraph we explain how to reset a number of display functions depending on the type of display on your bike.
6.4.1 Resetting display functions with a Nyon display
With the Nyon display the trip data (averages and distance) and the range calculation can be reset.
- Swipe the display 39 to navigate to the status screen.
- Tap the Settings button. The menu Settings will appear.
- Tap My eBike.
- Tap the required system setting you want to adjust.
- Tap the < on the Nyon display to go back to the previous menu.
Resetting the display to factory setting is done as follows:
All user data will be lost when resetting the display to factory settings.
- Swipe the display 39 to navigate to the status screen.
- Tap the Settings button. The menu Settings will appear.
- Tap System setting.
- Tap Factory reset.
- Tap to confirm.
- Tap the < on the Nyon display to go back to the previous menu.
6.5 Resetting error code indications
The components of the e-bike are continuously and automatically monitored. If an error is detected, the corresponding error code will appear on the Nyon display.
Depending on the type of error, the electrical drive unit may automatically shut down. In this case cycling is possible, but there will be no pedalling assistance while functioning in this error mode. Take your e-bike to your Urban Arrow dealer to have it repaired as soon as possible.
Resetting error code indications on the display is done as follows:
- Press any button on the Nyon display 39 to return to the standard indication. Depending on the error code the indication will appear on the display again after the e-bike has been switched off and on.
7 After biking
7.1 Locks
Your e-bike is provided with two locks, one lock on the rear frame and one lock on the battery. These two locks share the same key. Lock the bike, using the wheel lock and preferably an additional lock to secure the e-bike to a static object. This will reduce the chance of theft.

Your lock and set of keys come with a Yourplus code card. Keep this card for reference. In case of loss of the keys, check the Abus website (www.abus.com) for information on how to order a new key. You can also contact your dealer.
Closing the ring lock is done as follows:
- Put the e-bike on the kickstand (see paragraph 5.8). This will prevent damage to the spokes when closing the ring lock.
- Rotate the key 53 20 to 30 degrees clockwise (not a full turn) and hold it in this position (see image 25).
- Simultaneously push down the lever on the opposite side of the lock till the pin snaps into its end position. The key is released (see image 26).
Tip If the pin hits a spoke, rotate the wheel slightly.
- Take out the key from of the lock (and store it in a safe place).
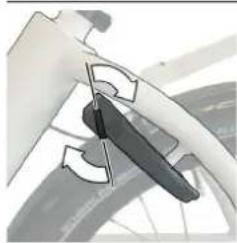
Image 25: Rotate the key 20 to 30 degrees clockwise

Image 26 : Push down the lever
Opening the ring lock is done as follows:
- Put the e-bike on the kickstand (see paragraph 5.8).
- Put the key 53 in the ring lock.
- Rotating the key counter clockwise. The pin is spring loaded and will return to its unlocked position automatically.

The key will remain in the lock when the lock is open. It cannot be taken out.
7.2 Charging the e-bike battery
Before you use the e-bike battery for the first time you need to check the battery before you can charge it fully. Checking is done as follows:
- Press the on/off button 56 to switch on the battery. At least one of the LEDs will light up.
When no LED of the charge-control indicator 55 lights up, the battery may be damaged. Contact your Urban Arrow dealer.
There are two ways of charging the e-bike battery (see image 27):
- Charging while the battery is placed in the battery holder on the e-bike.
- Charging the battery after you removed it from the e-bike.
Before each use, check the battery charger, cable and plug. If damage is detected, do not use the battery charger. Damaged battery chargers, cables and plugs increase the risk of an electric shock. Never open the battery charger yourself. Contact your Urban Arrow dealer when your battery charger is damaged.
Keep the battery charger clean. Contamination can lead to danger of an electric shock.
Always keep the charger away from rain or moisture. The penetration of water into a battery charger increases the risk of an electric shock.
A sticker in English is adhered to the bottom of the charger (see 32 in image 1). This says: Use ONLY with BOSCH lithium-ion batteries.
Do not expose the charger to rain or wet conditions. If water enters a charger there is risk of electric shock.
Use caution when touching the charger during the charging procedure. Wear protective gloves. Especially in high ambient temperatures, the charger can heat up considerably.
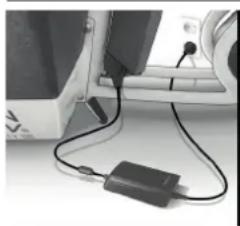
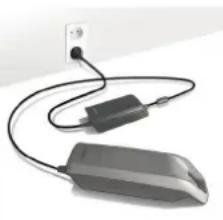
Image 27 : Charging a battery
The e-bike battery is equipped with a temperature control indicator, which enables charging only within a temperature range between 0 °C and 40 °C. The battery can be recharged at any time without shortening the lifespan and interrupting the charging process does not damage the battery.
The electrical drive unit is deactivated during the charging procedure.
The e-bike battery must not be left unattended while charging.
Charging the e-bike battery while placed in the battery holder is done as follows:
- Press the on/off button 56 to switch off the battery.
- Clean the cover of the charge socket 59. Avoid soiling the charge socket and the contacts, e.g. by means of sand or soil.
- Lift the cover of the charges socket.
- Plug the charger plug 29 into the charge socket 58 on the bottompartofthebatteryholder(seeimage28).
- Plug the charger plug 33 of the power cord into the charger socket30ofthecharger.
- Connectthemainscableofthebatterychargertothemains supply. The charging procedure will start.
Tip See below for more information on the charging status and what to do after charging.
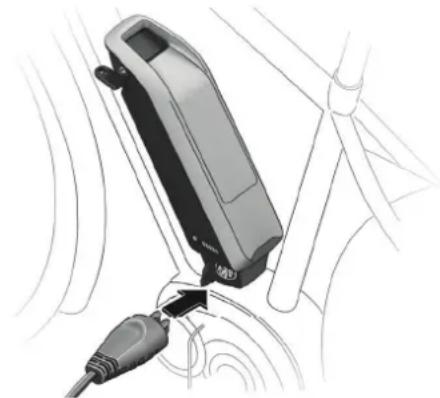
Image28: Pluggingcharger pluginchargesocketonthebottom part of the battery holder
Charging the e-bike battery after it has been removed from the e-bike is done as follows:
- Placedownthebatteryonacleansurface. In particular, avoid soiling the charge socket and the contacts, e.g. by means of sand or soil.
- Press the on/off button 56 to switch off the battery.
- Removethebatteryfromtheholder(seeparagraph5.6).
- Insert the charger plug 29 of the battery charger into the socket(seeimage29)onthebattery.
- Connect themains cable of the battery chargerto themains supply. The charging procedure will start.
Tip See below for more information on the charging status and what to do after charging.

Image29: Pluggingcharger plugin charges octonthe battery
Charging state of the e-bike battery
The e-bike battery can be charged with or without the display. When charging without the display, the charging procedure can be observed on the battery charge-control indicator 55. When charging with the display the bars on the display show the progress as well.
The Nyon display can be removed during the charging procedure or fitted after the charging procedure has started.
Each continuously lit LED on the charge-control indicator 55 is equivalent to a charge capacity of approx. 20 %. A flashing LED indicates the charging of the next 20 %. Once the e-bike battery is fully charged, the LEDs extinguish immediately and the display (in case mounted) is switched off. The charging procedure is terminated.
Aftercharging
The procedure after the charging procedure is terminated is as follows:
- Disconnect the charger from themainpowersupply.
- Disconnect the battery from the charger. The battery automatically switches off.
- If you have charged the battery while placed in the battery holder on the bike, carefully close the charge socket with the cover so no dirt or water can get into the charge socket.
Once the battery is charged it will switch off. If the charger is not disconnected from the battery after charging, after a few hours the charger will switch itself back on, check the charging state of the battery and begin the charging procedure again if necessary.
7.3 Storing the e-bike battery and the Nyon display
If you plan to park your bike for a longer period we advise you to do the following:
- Charge the e-bike battery to approximately 60% (3 to 4 LEDs lit on the charge-control indicator 55).
- Take out the e-bike battery and take off the Nyon display. Store them in a dry and safe place.
• Regularly recharge the battery of the Nyon display. -
Check the charge condition after 6 months. When only one LED of the charge-control indicator lights up, recharge the e-bike battery again to approx. 60%.
-
Don't connect the e-bike battery permanently to the charger.
- Don't store the e-bike battery on the bike.
- Store the e-bike battery in a dry, well-ventilated location.
Protect the battery against moisture and water. Under unfavorable weather conditions, it is recommended e.g. to remove the battery from the e-bike and store it in an enclosed location until being used again.
2 When the e-bike battery is stored discharged (empty) for longer periods, it can become damaged despite the low self-discharging feature and the battery capacity may be strongly reduced.
Activating and deactivating the storage mode of the Nyon display
The Nyon display has an energy-saving storage mode which minimises the rate at which the internal battery discharges.
2 Setting to this mode erases the date and time.
Activating the storage mode of the Nyon display is done as follows:
- Press and hold the on/off button 80 of the display for at least 8 seconds.
2 If the display does not start when the on/off button 80 is pressed briefly, the display is in storage mode.
2 Should you perform this action if the display is, contrary to expectations, already in storage mode, the display will reset Itself. The display will restart after approx. 5 seconds. If the display does not restart, press the on/off button 80 for 2 seconds.
Deactivating the storage mode of the Nyon display is done as follows:
- Press and hold the on/off button 80 of the display for at least 2 seconds.
Temperature
The e-bike battery can be stored at temperatures between -10°C and +60°C . Take care that the maximal storage temperature is not exceeded. As an example, do not leave the battery in a vehicle in summer and store it out of direct sunlight. For a long battery life storing the e-bike battery at a room temperature of approx. 20°C is of advantage.
8 Cleaning and maintenance
Be aware that the display can activate itself when the e-bike is pushed backwards. When you press the on/off button on the activated display the electrical drive unit could switch on. Remove the battery from the e-bike before you begin work (e.g. inspection, repair, assembly, maintenance, work on the chain, etc.) on the e-bike, transport it by car or plane, or store it. Unintentional activation of the electrical drive unit poses a risk of injury.
8.1 Cleaning
- Keep all components of your e-bike clean, especially the battery contacts and corresponding holder contacts. Clean them carefully with a soft, damp cloth.
Tip It is advised to regularly clean the lenses of your lights, it will improve the lighting performance. - All components including the electrical drive unit may not be immersed in water or cleaned with a high-pressure cleaner.
- The foam box used on the Family model is made from a sturdy foam material called EPP (Expanded Polypropylene). EPP insulates very well and has good wear and tear resistance. Regular bicycle maintenance or generic household cleaning products will not affect the material. Don't use solvents.
- Never submerge the e-bike battery in water.
- Clean your bike in shorter intervals when you cycle on roads have been prepared with winter road salt. The road salt may cause damage to parts of your bike.
Never submerge the battery in water or clean using a jet of water. Danger of short-circuiting which may pose a fire hazard.
The gear hub and grip shifter are sealed and well protected from the external environment. However, never use water under pressure (such as pressure washers or water jets) when you clean these parts to prevent malfunctions due to water penetration.
Never use aggressive cleaners on any of the parts of your e-bike. This may cause permanent damage to the bike.
8.2 Maintenance
8.2.1 Frame maintenance
The aluminium frame is uncoated, showing the material at its purest. As no coating can hide eventual sloppiness, this raw aluminium finish can only be achieved by the high quality build, while the typical brush strokes emphasize the material properties even more. As aluminium protects itself against corrosion by nature through a nano corrosion layer, the visual tone of the frame may vary over time. If you want to get the lighter brush stroke finish back, you can easily do this by brushing the frame with a rough piece of cloth.
8.2.2 Speedsensorcheck
In order for the speed sensor to function:
-
The clearance between the speeds sensor 26 and its speed sensormagnet 27 needs to be at least 5 mm, yet no more than 17 mm after a turn of the wheel (see image 30). See later in this paragraph for information on how to adjust the clearance if necessary.
-
Thespeedsensorneedstobeconnectedproperly.
Contact your Urban Arrow dealer in case the speed sensor is not connected properly.
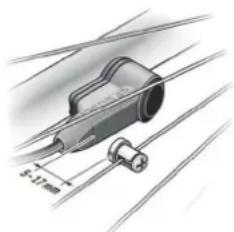
Image30: Distance between the speeds sensor and the speeds sensor magnet
The speed indication on your display will fail in case the speed sensor doesn't function properly. The text 'error 503' will appear on the screen of your display.
Cycling remains possible when the speed sensor doesn't function, but there will be no pedalling assistance as the electrical drive unit will be turned off automatically while functioning in this error mode.
Adjusting the clearance between the speed sensor magnet and the speed sensor is done as follows:
- Loosen the screw of the speed sensor magnet 28 by turning it counter clockwise.
- Position the speed sensor magnet 27 in such a manner that it runs past the mark of the speed sensor at the correct clearance (min. 5 mm, max. 17 mm, see image 30).
- Fastenthespeedsensormagnettothespokebyturningthe screw clockwise.
In case the speed is still not being indicated in the speed indication, please contact your Urban Arrow dealer.
8.2.3 Punctures
8.2.3.1 Preventingpunctures
There are ways to prevent punctures beside mounting puncture resistant tyres. Please check the following check-up and riding tips.
Check-ups
- Check the surface of your tyres from time to time, running your hand or fingers over the surface. This way you might find sharp objects logged in the outer surface before they
puncture the inner tube of your tyre. Be careful doing this with your bare hands.
- Check the wear of your tyres. The tread of your tyres will become thinner over the distance, making it easier to be punctured.
- Keep your tyres at the correct tyre pressures. Low tyre pressures will increase the chance of picking up dirt and debris. Low tyre pressures can also cause pinch punctures where the inner tube is damaged by being pinched between rim and tyre over bumps. For correct tyre pressures please check paragraph 5.4.
Riding tips
- Avoid riding through potholes.
- Avoid riding into train/tram tracks. The tyres are wide enough not to be caught by the track but your steering will be affected.
- Avoid train/tram track in the wet. Don't cross them at too parallel an angle. The track can be very slippery.
- Avoid hitting curbstones at too high a speed. It may cause damage to your bike.
- The side of the road is where dirt accumulates. Avoid riding there if there is room in traffic and the situation allows.
- Have an eye on the road and drive around debris and dirt sitting on the road. Having a safe road position is more important though, don't change direction without checking the traffic around you.
In case of a puncture don't continue riding. There is a big chance you will damage the tyre, the wheel or even the frame. Dismount the bike and walk home.

Cycling with a punctured tyre can cause seriously reduced road holding which may lead to loss of control of the bike. Never continue cycling in case of a punctured tyre.
At home you can:
- Fix the puncture yourself in case you have good access to the puncture: use a repair kit and follow the instructions that come with the repair kit.
- Fix the puncture yourself in case you don't have good access to puncture: remove the wheel from the frame and fix the puncture.

You need to be a confident and skilled home mechanic to remove and replace a wheel from the frame.
- Contact a professional bike mechanic (preferably an Urban Arrow dealer) who can fix the puncture for you.
8.2.4 Maintenance check
When you have your e-bike maintained/serviced by your Urban Arrow dealer all necessary maintenance will be performed by your dealer. But in between the maintenance you can perform the following checks yourself regularly to detect potential issues:
- Check tyres for wear and damage: A worn tyre can be recognized by checking the tread pattern. If the pattern has
disappeared in the middle of the tread (difference between lowered and raised material cannot be distinguished) the tyre is worn and should be replaced (see image 31). If you notice long or deep tears the tyre should be replaced even if the tread hasn't worn out yet. Contact your Urban Arrow dealer for the correct spare part.
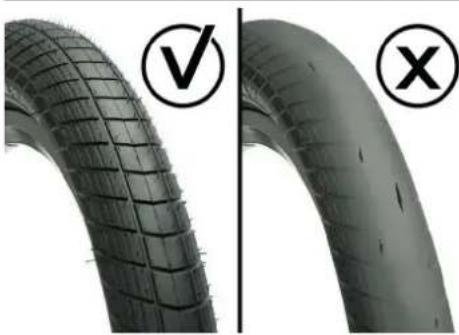
Image31:Tyrewear
- Check tyre pressure: Riding a too low tyre pressure damages the tyre. In the sidewalls tears will appear that cannot be repaired. Sometimes a few hundred km's at too low pressure is enough to ruin the tyres. The correct tyre pressure is as follows:
a.Frontwheel:2.4-3.5bar
b.Rearwheel:3-4bar
Tip Ask your Urban Arrow dealer for a correct pump that fits the Schrader valves of your bike.
- Wheel trueness: If a wheel is out of true it will wobble while spinning. You can check this by putting the bike on its stand and giving the wheels a spin (see image 32). If the wheel is spinning look at the rim and tyre separately. An incorrectly fitted tyre can also cause a wobble. A new wheel needs to settle and will require its trueness being checked more often. Contact your Urban Arrow dealer in case your wheel wobbles to have your wheel fixed.
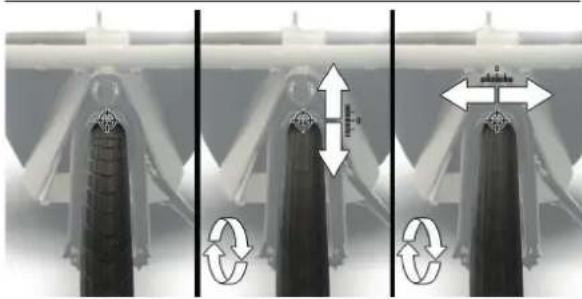
Image32: Checking the wheel trueness
- Check the rim for damage. Damage can take the form of dents and cracks in the rim surfaces and around the spoke holes. Always check the rim after hitting a solid object or pothole at speed or after you rode with a fl at tyre. A damaged rim may damage the tyre and could make the wheel go out of true. Contact your Urban Arrow dealer in case you detect rim damage.
- Check play on the hub axle (see image 33). Hub bearings can develop play due to wear. Excessive hub play can affect brake performance, it can cause other mechanical problems as well as affect the handling of the bike. Contact your Urban Arrow dealer in case you detect play on the hub axle.
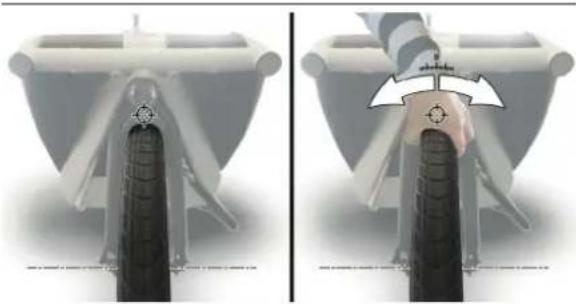
Image33: Checkingplayonthehubaxle
- Check play on the steering linkage (see image 4): the steering input of the handlebar needs to be transferred to the front wheel. This action is provided for by the steering linkage. The linkage consists of a vertical head tube 18 and a horizontal head tube 34. The steering column is connected to the steering rod with hingeable pivot joint. The steering rod is linked to the front fork with a ball joint.

A malfunctioning steering linkage during cycling may lead to loss of control of the bike. This can potentially be fatal. Always contact your Urban Arrow dealer in case the steering linkage feels loose or encounters excessive resistance. Never continue to ride the bike when there is no response from the front wheel after you give steering input.
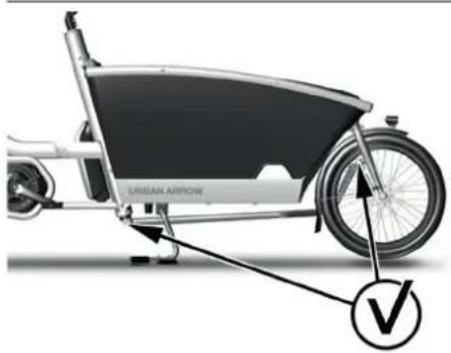
Image34:Checkplayonthesteeringlinkage
- Check the wheels for damaged and/or loose spokes.
- Check the brake hoses for damage and check if the brake hoses don't come in contact with moving parts of the bike.
- Check the chain tension: a. When you have each drive: wigglethe chainglidercase so you can hear and feel whether the chain is still tight or not.
b. When you have a drive belt: the tension can be measured with the Gates Carbon Drive Mobile Apps, offered on both iPhone and Android. These apps can measure the belt tension in the form of natural frequency (Hz) of the belt span. Operating instructions are provided within each app. The belt tension for your Urban Arrow should be between 35 Hz and 50 Hz.
Tip You can also use a Gates Krikit meter to determining the correct belt tension.

Prevent accumulation of snow and ice between fenders and tires and around the belt drive. Risk of belt breaking.
- Check the Ahead steering set front fork for play: Stand next to the bike. Pull the front brake tightly. Push the bike forwards and backwards. If the bike moves there is Ahead steering set front fork play.

Always contact your Urban Arrow dealer in case of Ahead steering set front fork play. When you ignore headset play it can cause extra wear on the headset bearings and it can affect the handling characteristics of the bike in a negative way.
- Check the lock rubbers for tears and/or cracks (see 'R' in image 35): damaged lock rubbers may cause the ring lock to
(partly) come off the bike frame. Lock rubbers give the lock a certain flexibility to prevent a spoke from breaking in case you take a bike off its kickstand while being locked. Contact your Urban Arrow dealer to replace the damaged lock rubber(s) by a new one.
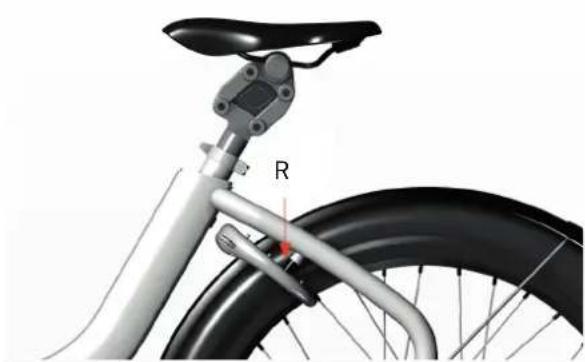
Image 35 : Checking the lock rubbers
Contact your Urban Arrow dealer in the following cases:
- If the chain audibly scratches the chain case. A chain will wear over time causing it to increase in length. Have your dealer adjust the chain tension.
-
If you feel there is excessive resistance caused by the chain case.
-
If the front wheel does not change direction when steering input (handlebar rotation) is given stop riding immediately and contact your Urban Arrow dealer.
- If you detect play in the pedals or cranks, for instance if you can feel them move around during a pedal stroke.
- If you notice a significantly reduced operating period after charging. The battery life can be prolonged when being properly maintained and especially when being operated and stored at the right temperatures. With increasing age, however, the battery capacity will diminish, even when properly maintained. A significantly reduced operating period indicates that the battery is worn out and must be replaced. You can replace the battery yourself.
- If you see a wobble in the wheel. First make sure the tyre is seated correctly on the rim. If it is seated correctly ask your Urban Arrow dealer to repair the wheel.

As with all mechanical components, the e-bike is subjected to wear and high stresses. Different materials and components may react to wear or stress fatigue in different ways. If the design life of a component has been exceeded, it may suddenly fall, possibly causing injuries to the rider. Any form of crack, scratches or change of coloring in highly stressed areas indicate that the life of the component has been reached and it should be replaced.
8.2.5 Disc brake adjustment
The hydraulic disc brakes on your e-bike are self-adjusting. Every time you brake the lever will readjust so you cannot tell brake pad wear from the lever. You can have your Urban Arrow dealer check the brake wear for you or you can check the pads of both the front and the rear wheel for wear yourself.

When the lever can be pushed easily all the way to the handlebar there is something wrong with the hydraulics. Stop riding the bike and have it checked by your Urban Arrow dealer.

If you hear suspect noises while using the brakes or have noise coming from the brakes while riding have your disc brakes looked after.
Checking the brake pads (of both the front and rear wheel) for wear is done as follows:
- A pin with a split end is keeping the brake pads in position. Use pliers to remove this pin (see image 36).
- Take out the brake pads (see image 36 for removal of the brake pads at the rear wheel) and check them for wear. If the friction material is less than 1mm the pads should be replaced. For replacement of the pads contact your Urban Arrow dealer.
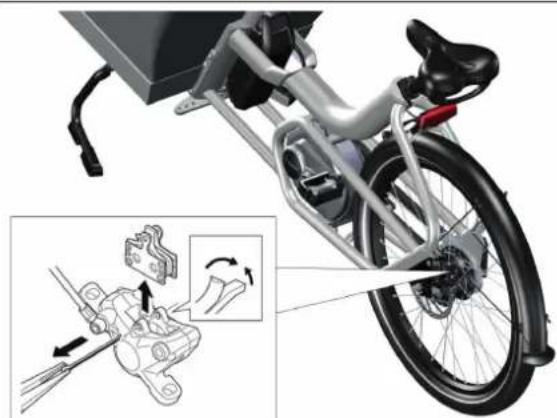
Image 36 : Removing the brake pads in order to check them for wear
8.2.6 Lubrication
When you have your e-bike maintained/serviced by your Urban Arrow dealer all necessary lubrication will be performed by your dealer. There is no need to lubricate the belt.
8.2.7 Spares, accessories and safety-critical parts
Always use genuine replacement parts approved by your Urban Arrow dealer. When using other replacement parts, Urban Arrow shall not assume any liability and warranty.
Contact your Urban Arrow dealer for the following e-bike spare parts:
- Brake friction pad
- Belt
- Sprockets
• Disc brake fluid
• Grips
E-bikebattery
Always use original Bosch batteries approved by your Urban Arrow dealer. When you use other batteries, Urban Arrow shall not assume any liability and warranty. The use of incorrect batteries can cause short circuiting and/or overheating which may lead to injuries and pose a fire hazard.
Contact your Urban Arrow dealer in case the following accessory needs replacement:
• Charger for the e-bike battery
Contact your Urban Arrow dealer in case the following safety critical parts need replacement:
- Handlebar
- Stem
- Front fork
- Seat post
- Headset
- Brakes
- Pedals
- Wheel (front and rear)
• Light (front and rear)
• Three point harness including Fidlock buckle - Reflectors
- Speed sensor
- Tyre (front and rear)
Aftermarket modification to the speed sensor is considered as tampering.
Don't fit your bike with tyres of a different measurement than specified (21 and 11). When you use a tyre with deviating specs it will affect both the Bosch electric system as well as the handling of the bike.
9 Transport
The batteries are subject to the Dangerous Goods Legislation requirements. Private users can transport undamaged batteries by road without further requirements.
When being transported by commercial users or third parties (e.g. air transport or forwarding agency), special requirements on packaging and labelling must be observed (e.g. ADR regulations). If necessary, an expert for hazardous materials can be consulted when preparing the item for shipping.
Dispatch batteries only when the housing is undamaged. Tape or mask off open contacts and pack up the battery in such a manner that it cannot move around in the packaging. Inform your parcel service that the package contains dangerous goods. Please also observe the possibility of more detailed national regulations. In case of questions concerning transport of the batteries, please refer to an authorised Bosch e-bike dealer. The Bosch e-bike dealers can also provide suitable transport packaging.

When you carry your e-bike outside of your car, e.g. on a luggage rack, the battery and/or display could fall out of their holders during transport. Always remove the battery and the display during transport to prevent damage to them.

Be aware that the display can activate itself when the e-bike is pushed backwards. When you press the on/off button on the activated display the electrical drive unit could switch on. Remove the battery from the e-bike before you begin work (e.g. inspection, repair, assembly, maintenance, work on the chain, etc.) on the e-bike, transport it by car or plane, or store it. Unintentional activation of the electrical drive unit poses a risk of injury.
10 Solutions to possible problems
| Problem Cause Solution | ||
| The LEDs of the charge-control indicator on the battery extinguish on indicator 55. | The capacity for assisting the drive has been used up and assistance is gently switched off. The remaining capacity is made available for the lighting and the display. | Charge the battery (see paragraph 7.2). |
| The battery charge-control indicator 75 flashes. | The capacity for assisting the drive has been used up. The capacity of the e-bike battery is enough for about 2 hours of lighting. | Charge the battery (see paragraph 7.2). |
Two LEDs of the charge-control indicator 55 flash.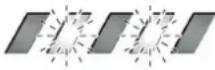 | There is defect of the battery detected. Contact your Urban Arrow dealer. | |
Three LEDs of the charge-control indicator 55 flash.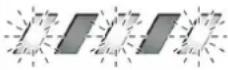 | The battery is not within the right charging temperature range. | Disconnect the battery from the charger until its temperature has adjusted. The right charging temperature range is between 0 °C and 40 °C. |
| The charger fails. Contact your | Urban Arrow dealer. | |
| The e-bike battery is switched off. | The battery is empty. Charge the battery (see paragraph 7.2). | |
| The battery switches off after it has not been used for 10 minutes. | Switch on the e-bike (see paragraph 5.6.3). Contact your Urban Arrow dealer in case the battery doesn't switch on again or in case it switches off again after a retry. | |
| There is a hazardous situation. A protective circuit automatically switches off the battery. The battery is protected against deep discharging, overcharging, overheating and short-circuiting through the "Electronic Cell Protection" (ECP). | Switch on the e-bike (see paragraph 5.6.3). Contact your Urban Arrow dealer in case the battery doesn't switch on again or in case it switches off again after a retry. | |
| The speed is not being indicated in the speed indication 70. | If the distance between speed sensor 26 and speed sensor magnet 27 is too small or too large, or if the speed sensor is not properly connected. | Loosen the speed sensor magnet bolt 28 and fasten the speed sensor magnet 27 to the spoke in such a manner that it runs past the mark of the speed sensor 26 at the correct clearance (see paragraph 8.2). If the speed is still not being indicated in the speed indication 70 after this, please contact your Urban Arrow dealer. |
| My bike can't be switched on. | The bike does not meet all requirements to be switched on. | See paragraph 5.6 the check the requirements. |
| A message regarding the battery of the Nyon display appears on the display. | The internal battery pack of the Nyon display is weak. I. | Insert the e-bike battery in the e-bike (see paragraph 5.6.2).II. Put the display in the display holder (see paragraph 5.6.1).III. Switch the e-bike battery on (see paragraph 5.6.3).IV. Switch the display on. The internal battery of the Nyon display will be charged. |
| The front and/or rear light of my bike doesn't work. | I. The light is broken.II. The lighting cable is broken.III. One of the connectors is loose. | Contact your Urban Arrow dealer. |
| The pedalling assistance is not working. | The electrical drive unit has entered the error 503 mode. The message 'error 503' appears on the screen of your display. | Check your speed sensor (see paragraph 8.2.2). |
| There is excessive resistance when I cycle. | Chain tension might be too high.⚠ Incorrect chain tension can cause increased wear on other drive train components. Always contact your Urban Arrow dealer in case of chain wear or when the chain tension is too tight. | Contact your Urban Arrow dealer to have the chain tension adjusted. |
| The front wheel does not change direction when I steer/ rotate the handlebar. | I. The steering rod or steering rod bearings are not functioning properly.II. The stem is loose. | Stop riding immediately and contact your Urban Arrow dealer. |
| I can feel the pedals or cranks of the bike moving during a pedal stroke (I detect play). | I. The pedals are not connected correctly to the cranks.II. The bearing has been damaged. | Contact your Urban Arrow dealer to fix the play in the pedals or cranks. |
| The operating period of the e-bike battery after charging has significantly reduced over time. | The e-bike battery is worn out. Contact your Urban Arrow dealer to replace the e-bike battery by a correct new one. | |
| I see or feel a wobble in the front or rear wheel of the bike. | I. The tyre is not seated correctly on the rim.II. The wheel is out of true. | Check if the tyre is seated correctly on the rim.I. If the reflecting line on the side of the tyre does not run parallel to the rim: the tyre is not seated correctly on the rim. Deflate your tyre and inflate it to the correct pressure (see paragraph 5.4).II. Contact your Urban Arrow dealer to repair the wheel when the wheel is out of true. |
| The steering linkage feels loose. | There is play in the steering rod and/or steering rod bearings. | Contact your Urban Arrow dealer. |
| I feel excessive resistance when steering. | The steering linkage doesn't work properly. Contact your Urban Arrow dealer. | |
| After switching on the display the text ‘Service’ appears on the screen for a few seconds. | Your e-bike needs servicing. Contact your Urban Arrow | dealer. |
| I hear a audible rattle coming from my wheel. | A spoke is loose. Check your spokes and contact your U | urban Arrow dealer in case there is a spoke missing or you detect a damaged spoke. |
| The message ‘error 503’ appears on the screen of your display.* | There is a problem with the speed sensor. Check your s | speed sensor (see paragraph 8.2.2). |
| My ring lock seems to be loose or has (partly) come off the bike frame. | Lock rubbers give the lock a certain flexibility to prevent a spoke from breaking in case you take a bike off its kickstand while being locked. When the lock rubbers are torn and/or cracked the ring lock might seem loose or the ring lock (partly) comes off the bike frame. | Contact your Urban Arrow dealer to replace the damaged lock rubber(s) by a new one. |
| There is no speed indication visible on the screen of your display. | There is a problem with the speed sensor. Check your s | speed sensor (see paragraph 8.2.2). |
* For all the other Bosch error codes, please check the supplied Bosch manual.
11 Service plan
Having maintenance carried out following the Urban Arrow service plan will keep your Urban Arrow in top shape. The check-ups and adjustments that are part of regular maintenance will prevent breakage and costly repairs. Some Urban Arrow dealers can arrange a pickup service for your bike. Check with your dealer for the possibilities.

Your warranty will be voided in case your Urban Arrow has not been maintained/services by a registered Urban Arrow dealer.
When the service appointment is due, the Nyon display shows a message each time it's switched on.
Check paragraph 14.2 to see about the regular maintenance intervals and the aspects that are checked when your Urban Arrow dealer services your bike.
| Model information | |
| Model type | |
| Frame number * | |
| Gear hub number | |
| Model information | |
| E-bike system | |
| Motor serial number ** | |
| Battery serial number ** | |
| Charger serial number ** | |
| Display serial number ** | |
| Dealer | |
| Delivery date | |
* Since 2021 Urban Arrow frame numbers start with seven digits followed by the letters "RF" followed by the characters "MM", "KN" or "GP".
** Each of these components have a label containing the serial number. This serial number starts with 'S/N'.
| Owner Information | |
| Name | |
| Address | |
| Country | |

The gear hub and grip shifter internal freewheel mechanisms are serviceable.
12 Disposal
Your bike contains electrical components and needs to be disposed via your Urban Arrow dealer.
Chargers, batteries, accessories and packaging should be recycled in an environmentally friendly manner. Therefore electrical parts like the battery, charger and display are marked with the crossed out wheely bin: do not dispose these along with household waste.
Apply tape over the contact surfaces of the battery terminals before disposing of batteries. Do not touch severely damaged e-bike batteries with your bare hands – electrolyte may escape and cause skin irritation. Store the defective battery in a safe location outdoors.
Cover the terminals if necessary and inform your Urban Arrow dealer. They will help you to dispose of it in accordance with the regulations to ensure that materials can be recycled.
Only for EU countries: In accordance with Directive 2012/19/EU and Directive 2006/66/EC respectively, electronic devices that are no longer usable and defective/drained batteries must be collected separately and recycled in an environmentally friendly manner.
Please return batteries and (the electric and electronic parts of) your bike that are no longer usable to an Urban Arrow dealer.
13 EC Declaration of Conformity
(English version is original)
The manufacturer: Smart Urban Mobility B.V.
Gyroscoopweg 6-8
1042 AB, Amsterdam
The Netherlands
declares that the following product:
Name of product: Urban Arrow
Function: Bicycle with pedal assistance, equipped with an auxiliary electric motor having a maximum continuous rated power of 0.25 kW, of which the output is progressively reduced and finally cut off as the vehicle reaches a speed of 25 km/h, or sooner, if the cyclist stops pedalling (EPAC).
Type: Family, Shorty and Cargo
meets the requirements of Directive 2006/42/EC (concerning machines);
meets the requirements of Directive 2004/108/EC (concerning electromagnetic compatibility);
and declares that the following specifications and (parts of) European (harmonized) standards have been applied:
EN 15194:2017, Electric Power Assisted Bicycles – electric parts of the bicycle
and declares that the included battery charger meets the requirements of Directive 2006/95/EC (concerning low voltage);
and declares to be the responsible legal entity for the composition of the construction file.
Amsterdam, January 29, 2021
Gerald van Weel (Director Smart Urban Mobility B.V.)

URBAN ARROW
EN
14Appendices
14.1 AppendixATorquevalues
While making adjustments or while doing maintenance on your Urban Arrow please use a torque spanner and take into account the recommended torquesettingsasshowninimage37.
3
4
6
2
5
1
7
Image37:Torquevalues
| Number Where What Tool Torque (Nm) Remark | |||||
| 1 Rear axle 2x M10 wheel axle nut | 15 mm spanner 40 Nm | ||||
| 2 Adjusting screw quick release seat post | 1x M6 quick release | ||||
| 3 Seat post - saddle 2x M6 saddle | bolts 5 mm hex wrench | 12 Nm | |||
| 4 Stem bolt 1x M6 cylinder head | bolt | 5 mm hex wrench 18 Nm | |||
| 5 Ahead steering set steering shaft | 1x M6 cylinder head bolt | 5 mm hex wrench 8 Nm | |||
| 6 Front fork - headset clamp | 2x M5 cylinder head clamp bolts | 5 mm hex wrench 6 Nm Tighten alternately. The bolts are located underneath the Urban Arrow logo plate. | |||
| 7 Front wheel thru axle | 1x axle 110 mm x 15 mm | 6 mm hex wrench 8 - 10 Nm | |||
14.2 Appendix B Overview Maintenance

Service check-up at the dealer
• After 500 km;
• after 1500 km;
• every 2500 km;
• or every 12 months, whatever comes first.
| Category Service or Maintenance Before every ride Monthly | Dealer | Service Check-Up | |
| Wheels Check tyre pressure. Tyre pressure should be 2.4-3.5 bar (front tyre) and 3-4 bar (rear tyre). | Rider / owner | ||
| Check tyre tread and sidewalls for wear and cracks. | Rider / owner Urban Arrow dealer | ||
| Check for damaged and/or loose spokes. | Rider / owner Urban Arrow dealer | ||
| Check spoke tension. All spokes should at least have the same tension and the tension should not be too low. | |||
| True or retighten spokes if needed. Urban Arrow dealer | |||
| Check wheel nuts and spanners. Urban Arrow dealer | |||
| Check the rim for damage. Rider / owner | |||
| Check play on the hub axle. Rider / owner Urban Arrow dealer | |||
| Brakes Check the function of both brakes.Do not ride the bike if brake power is insufficient. | Rider / owner Urban Arrow dealer | ||
| Check for oil leakage at the seals. Rider / owner Urban Arrow dealer | |||
| Check brake pads wear; replace when needed. | Rider / ownerAsk your dealer for help if you are not sure how to spot excessive brake pad wear. | ||
| Check the brake hoses for damage.There shouldn't be any sharp bends, nods in the hoses. Check if the brake hoses don't come in contact with moving parts of the bike. | Rider / owner UrbanArrow dealer | ||
| Check thickness of the disc rotors. Urban Arrow dealer | |||
| Category Service or Maintenance Before every ride Monthly Dealer | Service Check-Up | ||
| Drive train When you have a chain drive: wiggle the chain glider case so you can hear and feel whether the chain is still tight or not. When you have a belt drive: the tension can be measured with the Gates Carbon Drive Mobile Apps, offered on both iPhone and Android. These apps can measure the belt tension in the form of natural frequency (Hz) of the belt span. Operating instructions are provided within each app. The belt tension for your Urban Arrow should be between 35Hz and 50 Hz.⚠ Prevent accumulation of snow and ice between fenders and tires and around the belt drive. Risk of belt breaking.💡 You can also use a Gates Krikit meter to determining the correct belt tension. | Rider / owner Urban | Arrow dealer | |
| Check chain/belt wear, replace if needed. Replacing the chain on time prevents unnecessary wear to chainring and sprocket. | Urban Arrow dealer | ||
| Category Service or Maintenance Before every ride Monthly Dealer | Service Check-Up | |||
| Check chainwheel and sprocket wear, replace parts if needed. | Urban Arrow dealer | |||
| Check crank bolts, tighten if needed. Urban Arrow dealer | ||||
| Check function of Bosch motor unit. Urban Arrow dealer | All service work to the motor can only be done by a certified Urban Arrow/ Bosch dealer. | |||
| Steering Check if the linkage between the handlebar and the fork is play free and that the linkage turns directly and smooth. | Rider / ownerContact your dealer if you feel there are irregularities in the steering linkage. | Urban Arrow dealer | ||
| Check Ahead steering set front fork for play. Adjust when needed.Play in the headset could provoke vibrations. It is essential that play is eliminated. Check with your dealer when in doubt. | Rider / owner Urban | Arrow dealer | ||
| Check for play on ball joints or its threaded connection. | Rider / owner Urban | Arrow dealer | ||
| Check ball joints for function and wear, replace if needed. | Urban Arrow dealer | |||
| Frame Clean and polish the frame. Rider / owner | (at least every 6 months) | |||
| Category Service or Maintenance Before every ride Monthly | Dealer | Service Check-Up | ||
| Check connecting bolts between front and rear frame by hand. | Urban Arrow dealer | |||
| Check frame for irregularities. Urban | Arrow dealer | |||
| Controls Check if the seat post doesn't slip in the frame, make sure the seat post clamp is tightened. Check if the seat post is not extended too far out. | Rider / owner Urban Arrow dealer | |||
| Check stem - handlebar connection. Urban | Urban Arrow dealer | |||
| If Installed: Check the suspension seat post for play or irregularities. | Urban Arrow dealer | |||
| If Installed: Clean and lube the suspension seat post. Check all hinges and bolts. | Urban Arrow dealer | |||
| Other Check that the front and rear light work. | Rider / owner Urban Arrow dealer | |||
Inhoudsopgave
2 De Urban Arrow Family e-bike 76
3 Veiligheid 84
Onze website www.urbanarrow.com
Ons YouTube kanaal www.youtube.com/urbanarrowcom
Onze Facebook pagina www.facebook.com/urbanarrowcom
Onze Instagram account www.instagram.com/urbanarrow
Onze Twitter account www.twitter.com/urbanarrowcom
E-mail service@urbanarrow.com
Post Urban Arrow
Gyrocoopweg 6-8
1042 AB, Amsterdam
Nederland
2 De Urban Arrow Family e-bike
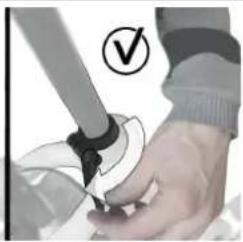
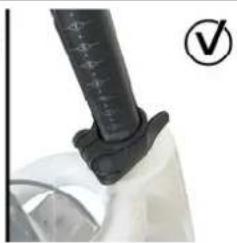
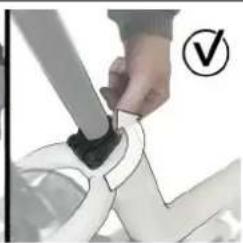
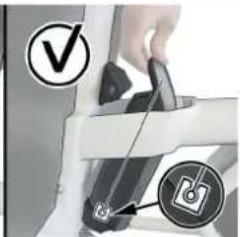
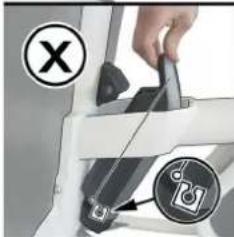
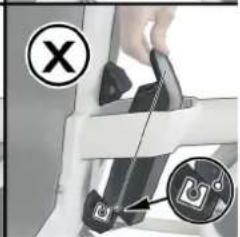
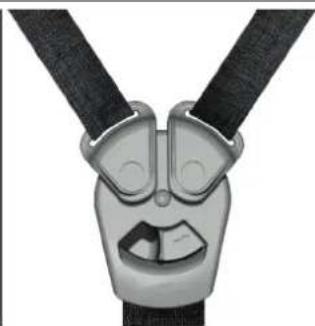
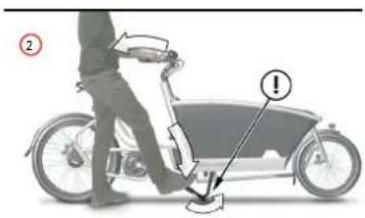
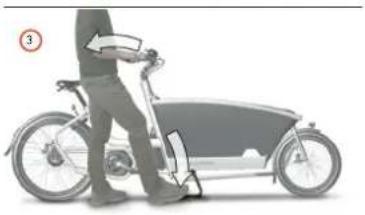
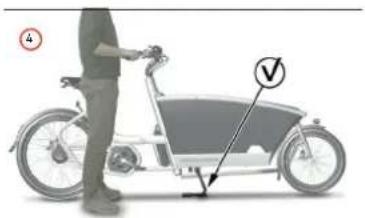
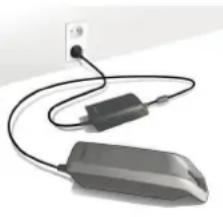
Gerald van Weel (Director Smart Urban Mobility B.V.)

URBAN ARROW
14Bijlagen
www.urbanarrow.com/en/folders-manuals
Garantie
E-Mail service@urbanarrow.com
E-Mail Urban Arrow
Gyrocoopweg 6-8
1042 AB, Amsterdam
Niederlande
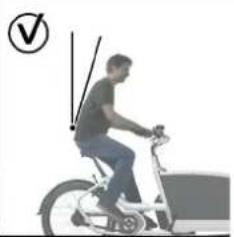
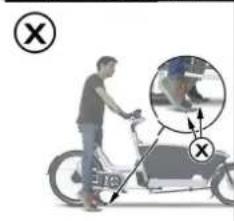
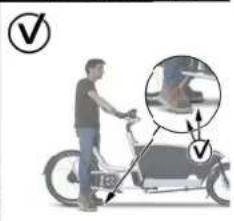
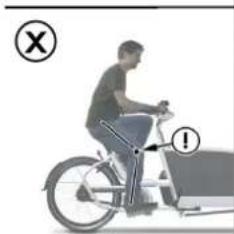
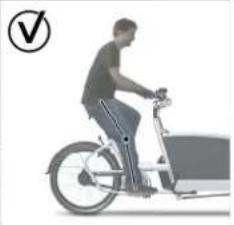
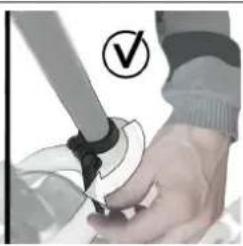
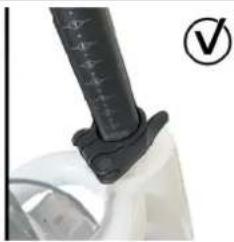
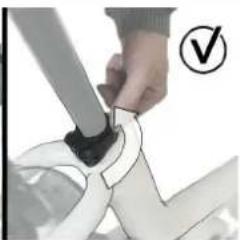
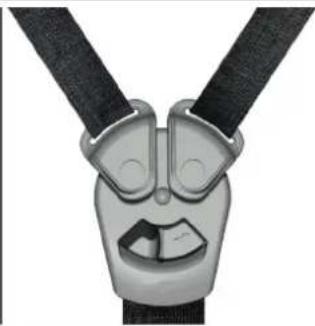
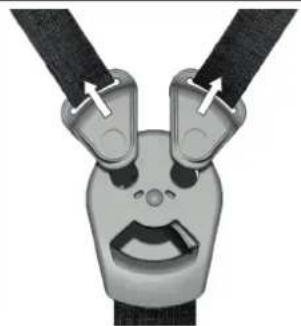
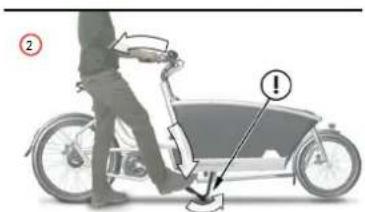
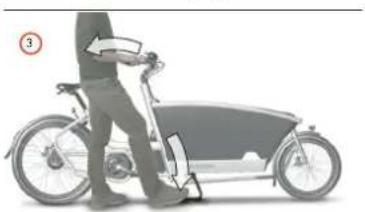
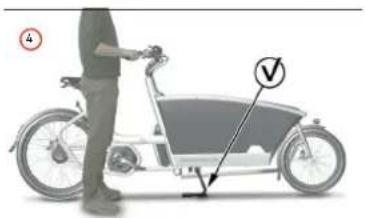
8.2.6 Lubrification 269
E-mail service@urbanarrow.com
Courrier Urban Arrow
Gyrocoopweg 6-8
1042 AB, Amsterdam
Pays-Bas
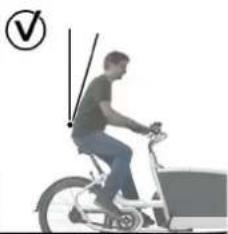
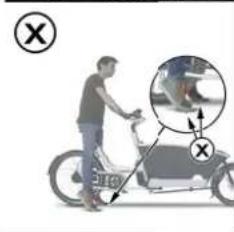
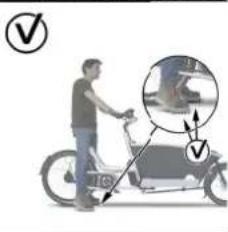
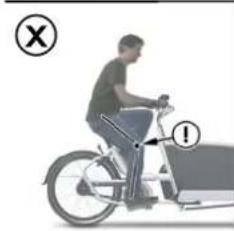
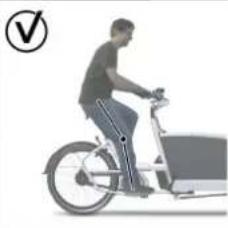
Image5 :Ouvrirleblocagerapidedelatigedeselle
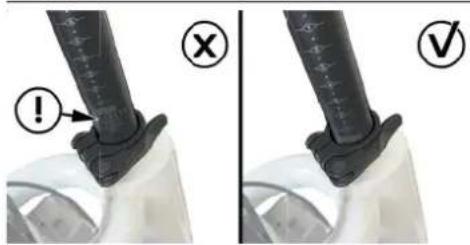
Image7 :Fermerleblocagerapidedelatigedeselle
4.1.2 Réglageduguidon/delapotence
Image8A: Tournerlesboulonsd'angledelapotence
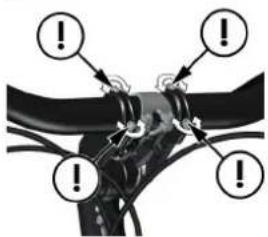
Image8B: Tournerlesboulonsd'angleduguidon
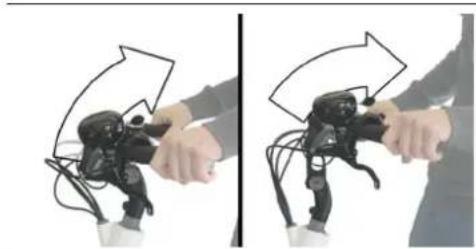
Image9:Réglerl'angledelapotence
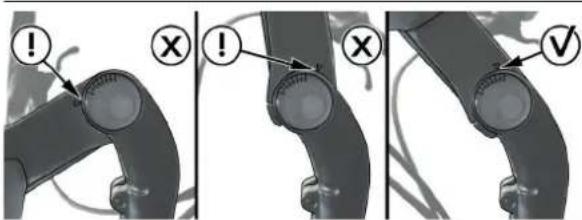
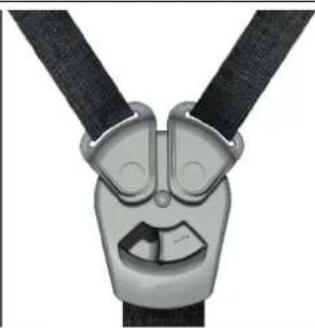
Image20: Ouvertureduharnaisàtroispoints
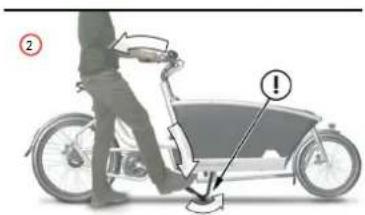
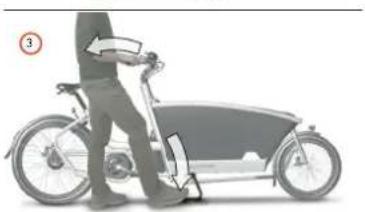
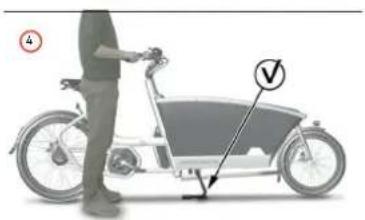
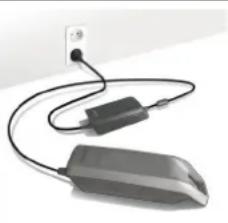
Image34:Vérifiezlejeusurlatringleriededirection
Gerald van Weel (Directeur de Smart Urban Mobility B.V.)

URBAN®
ARROW
FR
14Annexes




- URBAN ARROW FAMILY ANNIVERSARY
- USER MANUAL
- TABLE OF CONTENTS
- 8 CLEANING AND MAINTENANCE 45
- 1 ABOUT THIS MANUAL
- COPYRIGHT AND DISCLAIMER
- WARRANTY
- CLAIMING WARRANTY
- LIABILITY
- DISCLAIMER
- ASSISTANCE
- 2 THE URBAN ARROW FAMILY E-BIKE
- IMAGE 1: GENERAL OVERVIEW (SIDE VIEW)
- IMAGE 2: GENERAL OVERVIEW (TOP VIEW)
- IMAGE 3: HANDLEBAR WITH NYON DISPLAY
- 3 SAFETY
- WARNING
- CAUTION
- 4 BEFORE FIRST USE
- 4.1 BIKE FIT
- 4.1.1 SADDLEHEIGHTADJUSTMENT
- 4.1.2 HANDLEBAR/STEMADJUSTMENT
- 4.2 SETTINGUPTHELIGHTS
- 4.3 CONFIGURATION OF THE DISPLAY
- 4.3.1 CONFIGURATION OF THE NYON DISPLAY
- 4.3.2 THE NYON DISPLAY AND BOSCH E-BIKE CONNECT APP
- 5 GETTING READY TO BIKE
- 5.1 GATHERING FIRST EXPERIENCE
- 5.2 INFLUENCES ON THE OPERATING RANGE
- 5.3 SAFETYCHECKBEFOREEVERYRIDE
- 5.4TYRES
- 5.5 E-BIKE BATTERY CAPACITY CHECK
- 5.6 ACTIVATING YOUR E-BIKE
- 5.6.2 PLACING AND REMOVING THE E-BIKE BATTERY FROM THE BATTERY CRADLE
- 5.6.3 SWITCHING THE E-BIKE ON AND OFF
- 5.6.4 SWITCHING THE E-BIKE BATTERY ON AND OFF
- 5.7 OPENING, CLOSING AND ADJUSTING THE THREE POINT HARNESS
- ADJUSTING THE LENGTH OF THE SHOULDER BELTS
- TRANSPORTINGLUGGAGE
- 5.8 PARKING THE E-BIKE OR GOING FOR A RIDE
- 5.8.1 INCORRECT POSITION OF THE KICKSTAND
- 5.9 TURNING THE BIKE LIGHTS ON AND OFF
- 6 CHANGING SETTINGS DURING BIKING
- 6.1 ADJUSTING THE CADENCE
- 6.2 CHANGING THE ASSISTANCE LEVEL
- 6.3 SWITCH PUSH ASSISTANCE MODE ON AND OFF
- 6.3.1 SWITCHING THE PUSH ASSISTANCE MODE ON AND OFF WITH A NYON DISPLAY
- 6.4 RESETTING DISPLAY FUNCTIONS
- 6.4.1 RESETTING DISPLAY FUNCTIONS WITH A NYON DISPLAY
- 6.5 RESETTING ERROR CODE INDICATIONS
- 7 AFTER BIKING
- 7.1 LOCKS
- 7.2 CHARGING THE E-BIKE BATTERY
- CHARGING STATE OF THE E-BIKE BATTERY
- THE NYON DISPLAY CAN BE REMOVED DURING THE CHARGING PROCEDURE OR FITTED AFTER THE CHARGING PROCEDURE HAS STARTED
- AFTERCHARGING
- ONCE THE BATTERY IS CHARGED IT WILL SWITCH OFF. IF THE CHARGER IS NOT DISCONNECTED FROM THE BATTERY AFTER CHARGING, AFTER A FEW HOURS THE CHARGER WILL SWITCH ITSELF BACK ON, CHECK THE CHARGING STATE OF THE BATTERY AND BEGIN THE CHARGING PROCEDURE AGAIN IF NECESSARY
- 7.3 STORING THE E-BIKE BATTERY AND THE NYON DISPLAY
- TEMPERATURE
- 8 CLEANING AND MAINTENANCE
- 8.1 CLEANING
- 8.2 MAINTENANCE
- 8.2.1 FRAME MAINTENANCE
- 8.2.2 SPEEDSENSORCHECK
- 8.2.3 PUNCTURES
- 8.2.3.1 PREVENTINGPUNCTURES
- CHECK-UPS
- RIDING TIPS
- 8.2.4 MAINTENANCE CHECK
- 8.2.5 DISC BRAKE ADJUSTMENT
- 8.2.6 LUBRICATION
- 8.2.7 SPARES, ACCESSORIES AND SAFETY-CRITICAL PARTS
- 9 TRANSPORT
- 10 SOLUTIONS TO POSSIBLE PROBLEMS
- 11 SERVICE PLAN
- 12 DISPOSAL
- 13 EC DECLARATION OF CONFORMITY
- URBAN ARROW
- 14APPENDICES
- 14.1 APPENDIXATORQUEVALUES
- 14.2 APPENDIX B OVERVIEW MAINTENANCE
- SERVICE CHECK-UP AT THE DEALER
- INHOUDSOPGAVE
- 2 DE URBAN ARROW FAMILY E-BIKE
- 14BIJLAGEN
- GARANTIE
- 4.1.2 RÉGLAGEDUGUIDON/DELAPOTENCE
- 14ANNEXES
Brand : Urban Arrow
Model : Family Anniversary
Category : Electric bike