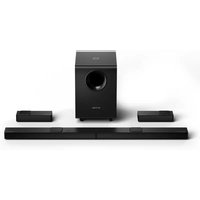
Nova S90 - Soundbar ULTIMEA - Free user manual and instructions
Find the device manual for free Nova S90 ULTIMEA in PDF.


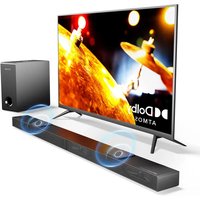
| Product Type | 5.1.2-channel soundbar with wireless subwoofer and surround speakers |
| Brand | ULTIMEA |
| Model | Nova S90 (U4420) |
| Soundbar Dimensions | 1008 x 38 x 76 mm (39.7 x 1.5 x 3.0 in) |
| Subwoofer Dimensions | 308 x 345 x 237 mm (12.1 x 13.6 x 9.3 in) |
| Surround Speaker Dimensions | 205 x 38 x 76 mm (8.1 x 1.5 x 3.0 in) |
| Net Weight | 10 kg (22.05 lbs) |
| Gross Weight | 12.6 kg (27.78 lbs) |
| Power Supply | AC 100-240 V, 50/60 Hz |
| Standby Power Consumption | < 0.5 W |
| Frequency Response | 35 Hz - 18 kHz |
| Bluetooth Version | 5.3 |
| Speakers | 5 x 3.1" (bar) + 4 x 1.8" (up-firing) + 2 x 3.1" (surround) + 1 x 8" (subwoofer) |
| Input Modes | eARC, HDMI IN1, HDMI IN2, OPTICAL, AUX, Bluetooth, USB |
| Audio Modes | Cinema, Music, Voice, Sport, Game, Night |
| Additional Functions | Bass, midrange, treble control; surround level; up-firing level; LED dimmer; mute |
| Maintenance and Cleaning | Clean with a soft, dry cloth. Do not use chemical products. |
| Safety | Do not open the device. Keep away from water and humidity. Unplug before cleaning. |
| Spare Parts and Repairability | Contact ULTIMEA customer support. Repair by a professional only. |
| General Information | Manufacturer warranty. Compliant with CE, FCC standards. Operating temperature: 0°C to 45°C. |
Frequently Asked Questions - Nova S90 ULTIMEA
User questions about Nova S90 ULTIMEA
0 question about this device. Answer the ones you know or ask your own.
Ask a new question about this device
Download the instructions for your Soundbar in PDF format for free! Find your manual Nova S90 - ULTIMEA and take your electronic device back in hand. On this page are published all the documents necessary for the use of your device. Nova S90 by ULTIMEA.
USER MANUAL Nova S90 ULTIMEA
natural_image
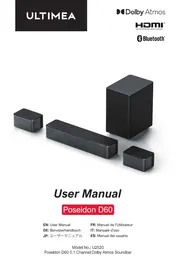
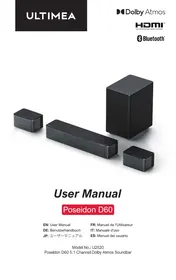
Black electronic audio equipment including a speaker tower and sound block, with no visible text or symbols on the main components.User Manual
Nova S90
EN: User Manual
01 User Manual English
Connection and Installation 02
natural_image
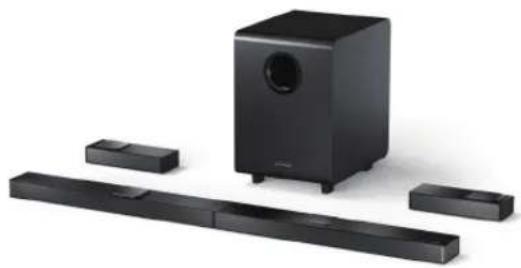
Black audio speaker module with sound block and four rectangular speakers (no text or symbols visible)Model No.: U4420
WE ARE READY TO HELP

Prefer video tutorial?
Setup guidance video, USER MANUAL or Trouble Shooting on ULTIMEA website.

@ultimea_official
support.ultimea.com

Surround Speaker
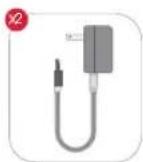
Power Adaptor
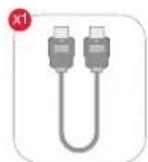
HDMI Cable

HDMI Adaptor
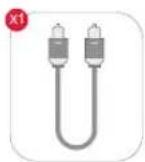
Digital Optical Cable
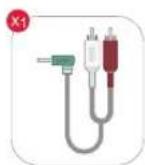
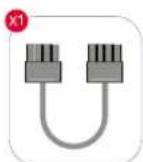
8-pin Cable for Soundbar Connection (140mm)

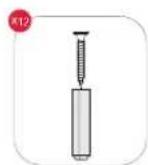
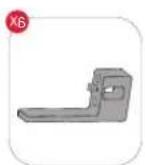
Wall BracketWall Mounted KlusemolanControl
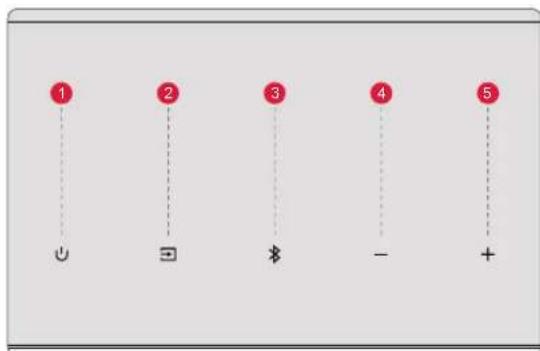
2 SOUNDBAR CONTROLS
flowchart
graph TD
    A["1"] --> B["✓"]
    C["2"] --> D["≡"]
    E["3"] --> F["✗"]
    G["4"] --> H["-"]
    I["5"] --> J["+"]
Control Panel
1 “💡”: Power Button
Press power button to power on / off.
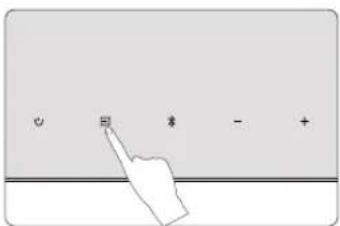
② “☐”: Input Mode
Press to switch channels: eARC-HD 1(HDMI IN1)-HD 2(HDMI IN2)-OPT(OPTICAL)-BT-AUX-USB.
③ “*”: BT
Press to switch to Bluetooth channel and enter pairing mode. Hold for 3 seconds to disconnect the current device and connect to a new device manually on your mobile phone / PC / TV (BT ID: Nova S90)
4 “—”: Volume Down
⑤ “+”: Volume Up
Remote Control
1 “∪”: Power Button Press to power on / off.
2 “☐”: eARC Press to switch to HDMI eARC channel.
3 "─": HD IN Press to switch to HDMI IN channel.
4 "☐": OPT Press to switch to OPTICAL channel.
5 "©": AUX Press to switch to AUX channel.
6 “*”: BT Press to switch to BLUETOOTH channel.
7 "☐": USB Press to switch to USB channel.
8 "○": SUB PAIR
Press and hold the button for 3 seconds to put the Soundbar in a state ready to pair with the subwoofer.
9 "☐": USB REPEAT
Press to switch between single loop playback and list loop playback.
10 “+”: Volume Up
11 “—”: Volume Down
12 “<”: Previous For BT and USB mode only: Skip to previous track.
13 > For BT and USB mode only: Skip to next track."": Next
14 "▶|I": Play / Pause For BT and USB mode only.
15 "": MUTE
16 " Light": LED DIMMER
Press to adjust display brightness in 5 levels. Press and hold for 3s to turn off the LED display.
17 "BASS MX": BASSMAX
Press to adjust bass level, the display will show: "JS-6", "JS-5", "JS-4", "JS-3", "JS-2", "JS-1", "JS 0", "JS 1", "JS 2", "JS 3", "JS 4", "JS 5", "JS 6".
18 "MIDRANGE": MIDRANGE
Press to adjust alto level, the display will show: "MR-6", "MR-5", "MR-4", "MR-3", "MR-2", "MR-1", "MR 0", "MR 1", "MR 2", "MR 3", "MR 4", "MR 5", "MR 6".
19 "TREBLE": TREBLE
Press to adjust treble level, the display will show: "T8-6", "T8-5", "T8-4", "T8-3", "T8-2", "T8-1", "T8 0", "T8 1", "T8 2", "T8 3", "T8 4", "T8 5", "T8 6".
20 "MOVIE
Press to switch to MOVIE mode, the display will show: "MOVI".
21 " musical: MUSIC
Press to switch to MUSIC mode, the display will show: "MUSC".
22 " VOICE
Press to switch to VOICE mode, the display will show: "VOIC".
23 “为”: SPORT
Press to switch to SPORT mode, the display will show: "SPRT".
24 "图": GAME
Press to switch to GAME mode, the display will show: "GAME".
25 " ”: NIGHT
Press to switch to NIGHT mode, the display will show: "NIGHT".
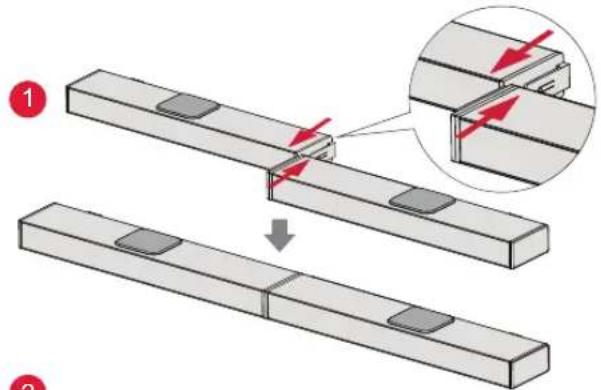
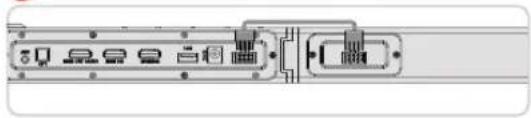
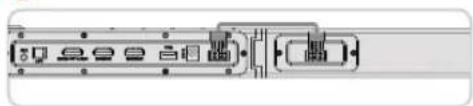
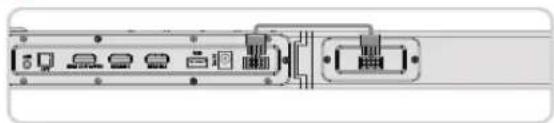
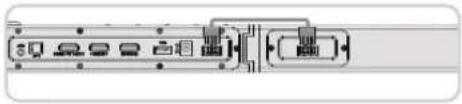
Set the two parts of the Soundbar on the same level and align the connection joints. Connect the two parts by pushing parallelly to combine as one piece.
Step 2
Plug in 8-pin Cable.
2
natural_image
Diagram of a dual-chamber electronic device with ports and connectors (no text or symbols)
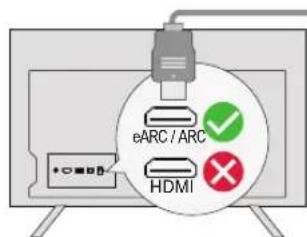
Step 1:
Connect one end of the HDMI cable to the eARC / ARC port on the back of your TV.
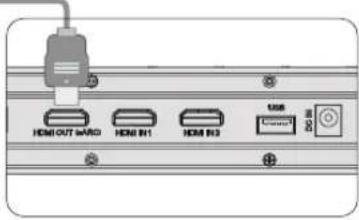
Step 2:
Then connect the other end into the HDMI OUT(eARC) port of the soundbar.
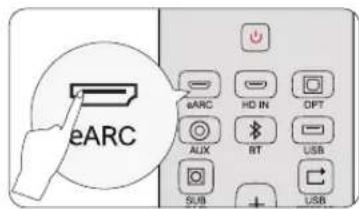
Step 3:
Press "eARC" button on the remote control to select "eARC" input.
Note:
Make sure your TV HDMI supports eARC, otherwise the Dolby Atmos audio signal cannot be transmitted.
Atmos: If you are watching movie in the Dolby Atmos format, please set the audio output on your TV to Pass Through:
TV Settings > Home > Settings > Sound > Digital Audio Output > Pass Through
DTS: If you are watching a movie in the DTS format, please set the audio output on your TV to PCM:
TV Settings > Home > Settings > Sound > Digital Audio Output > PCM
What's the difference between: HDMI IN, HDMI ARC, HDMI eARC?
HDMI IN is a standard HDMI input that allows you to connect devices to your TV or audio system. It supports audio and video signals, but it does not support audio return channel (ARC) or enhanced audio return channel (eARC) functionality.
HDMI ARC is a special HDMI port that supports two-way communication between your TV and audio system. This means that audio can be sent from your TV to your audio system, and audio system can send audio back to your TV.
HDMI eARC (Enhanced Audio Return Channel) is an updated version of HDMI ARC that supports higher quality audio formats such as Dolby Atmos and DTS:X.
Note: Please turn on the "CEC" function on your TV.
When eARC / ARC is connected, your TV remote control can control the soundbar and TV simultaneously:
1 Turn on / off
2 Adjust the volume
5 CONNECT TO OTHER DEVICE VIA HDMI IN1 / HDMI IN2
Step 1
Step 2
Step 3
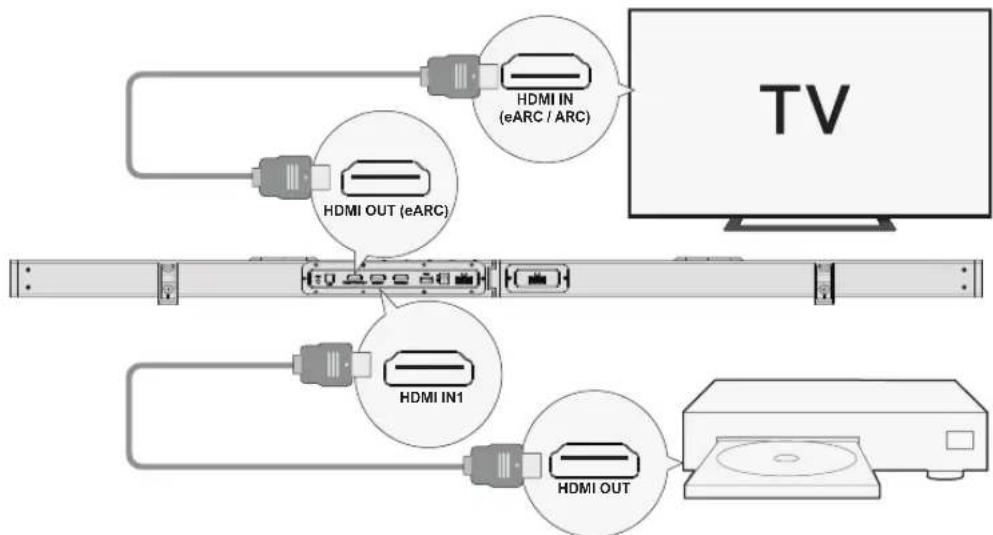
Step 1: Connect the HDMI Cable to the HDMI OUT (eARC) port on the Soundbar and the other end to the HDMI IN (eARC / ARC) port on the
Step 2: Connect the HDMI cable to the HDMI OUT port on the other device (Such as DVD or game console) and the other end to HDMI IN1 / HDMI IN2 port on the Soundbar.
Step 3: Press " [icon] " button on Soundbar or Remote Control to switch to HDMI IN1 / HDMI IN2 channel.
Note: Your TV HDMI needs to support eARC to transmit the Dolby Atmos audio format to your Soundbar.
EN
OPTICAL
AUX
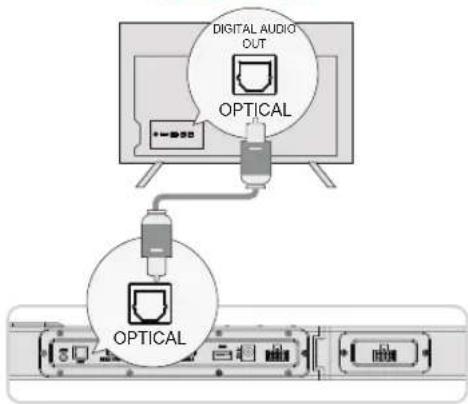
OPTION 1: OPTICAL
Make sure the TV's port is OPTICAL OUT, connect both sides of the cable to OPTICAL, for both the TV and the soundbar.
② Make sure the optical plug is inserted correctly as it shows in the picture. Do not insert the plug upside down and break the optical.
Note: If audio is coming from the internal TV speakers, mute or minimize the TV volume.
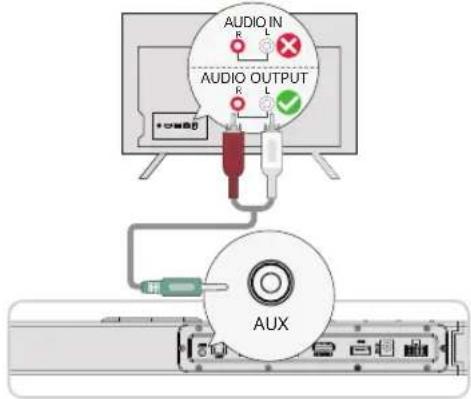
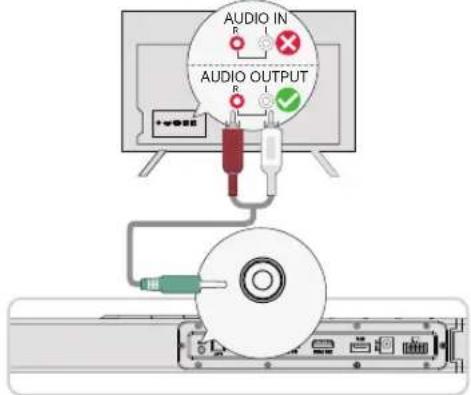
OPTION 2: AUX
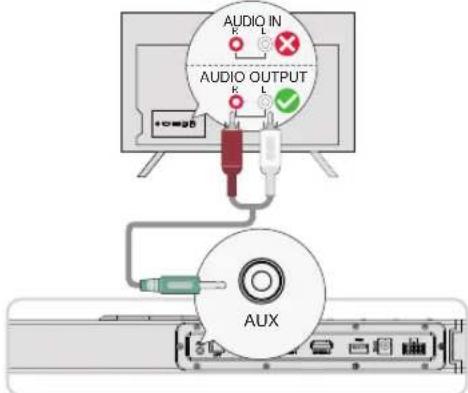
Connect the 3.5mm to RCA audio cable to connect to your TV's RCA AUDIO OUT port.
② Make sure the color of the cables ends matches the color of the TV ports.
Note: Please remember to unplug the AUX cable from TV and Soundbar when you want to switch other mode.
In Optical Mode: If there is no sound, try setting the TV audio output to PCM: TV Settings > Home > Settings > Sound > Digital Audio Output > PCM
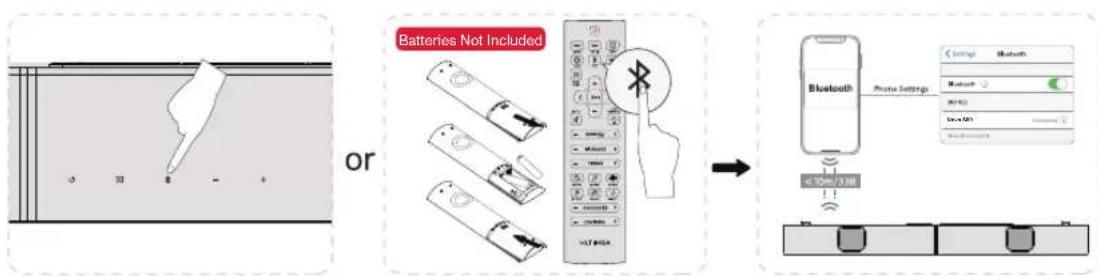
7 CONNECT TO BLUETOOTH
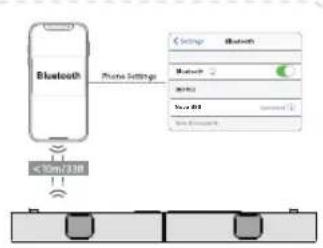
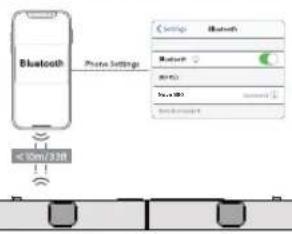
1 Press the "×" button on the soundbar or remote control to enter Bluetooth pairing mode.
2 Go to the Bluetooth setting on your phone, find and select "Nova S90" to connect the soundbar.
Note: If it's already in the Bluetooth mode and connected, press and hold " ✗" button for 3 seconds to disconnect current device and choose to connect to a new device manually on your mobile phone / PC / TV.
flowchart
graph LR
    A["Electric Vehicle Panel"] --> B["Batteries Not Included"]
    B --> C["Wireless Display with Bluetooth icon"]
    C --> D["Bluetooth Phone Settings"]
    D --> E["Device 2/18"]
8 PAIRING SUBWOOFER
natural_image
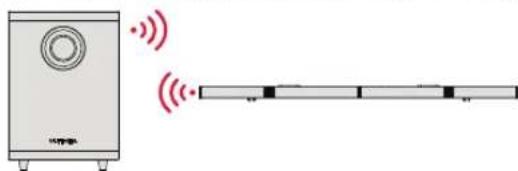
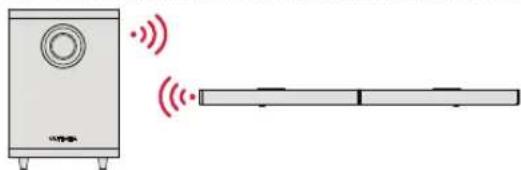
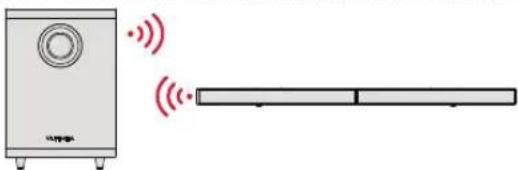
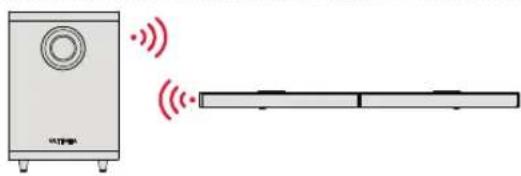
Diagram showing a speaker with sound waves and a rectangular electronic device (no text or symbols)The subwoofer has been paired with the soundbar in the factory.
However, you may need to re-pair it if there is no sound coming from the subwoofer.
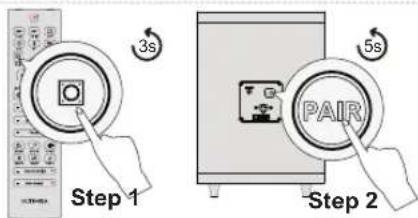
Step 1
Press and hold the "SUB PAIR" button on the remote control for 3 seconds, until the soundbar shows "SUB" flashing in the front.
Step 2
Press and hold the "PAIR" button on the subwoofer for 5 seconds, until the white LED light is flashing. The subwoofer is paired successfully when the white LED light is solid on.
Note: The 'SUB OUT' interface on the subwoofer is a reserved port. If you seek an enhanced bass experience, you can purchase an additional active subwoofer independently and connect it to this interface to upgrade your bass system, achieving the optimal bass effect you desire.
9 PAIRING SURROUND SPEAKER
EN
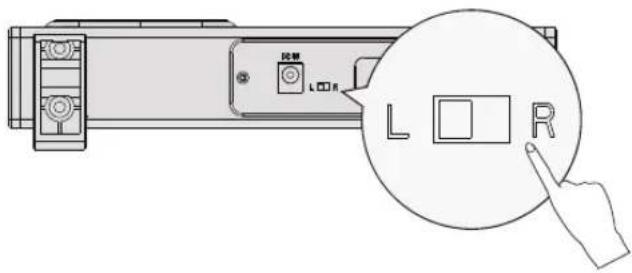
For a better listening experience, before doing the pairing, kindly make sure the buttons on the back of the surround speakers are switched one to "L" and the other to "R".
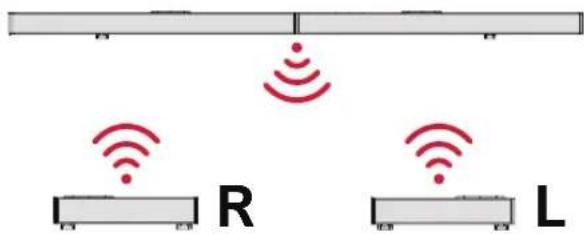
The surround speakers have been paired with the soundbar in the factory.
However, you may need to re-pair it if there is no sound coming from the surround speakers.
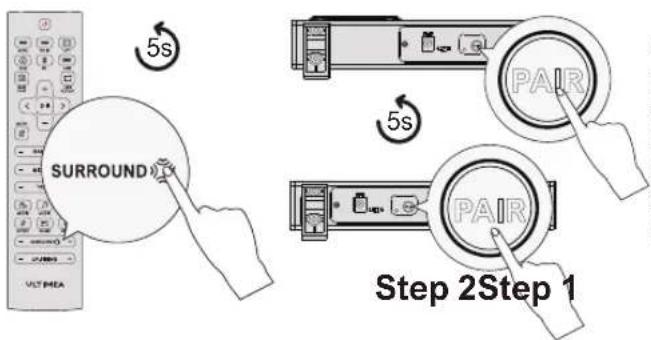
Step 1
Press and hold the "SURROUND" button on the remote control for 5 seconds, until the soundbar shows "SUR" flashing in the front.
Step 2
Press and hold the "PAIR" button on the surround speakers for 5 seconds, until the white LED light is flashing. The surround speaker is paired successfully when the white LED light is solid on.
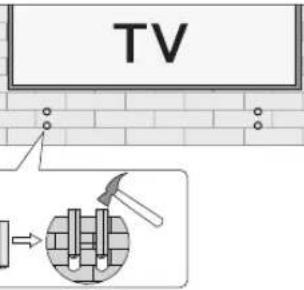
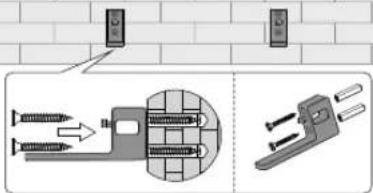
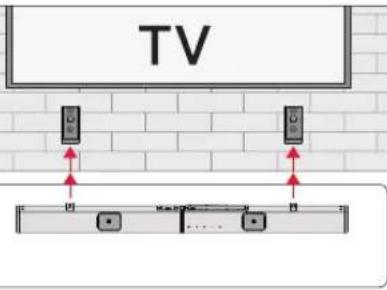
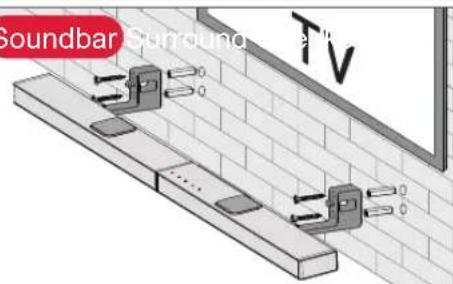
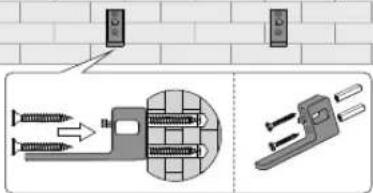
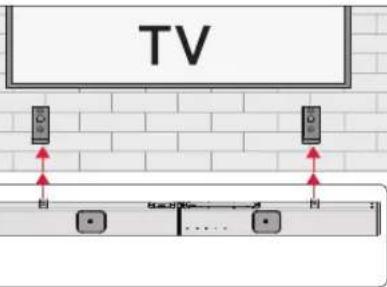
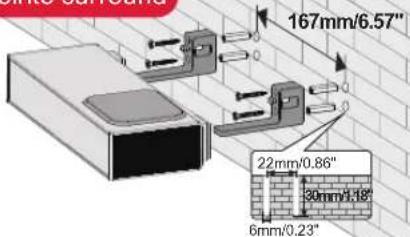
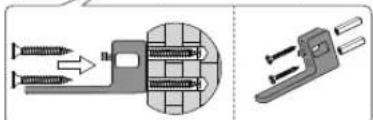
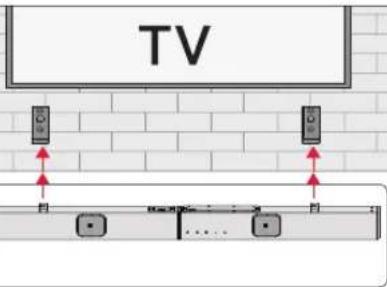
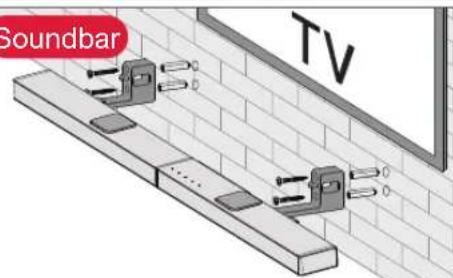
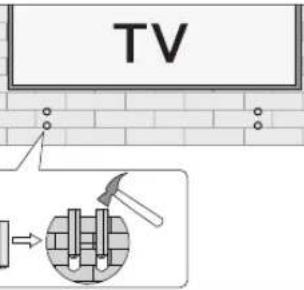
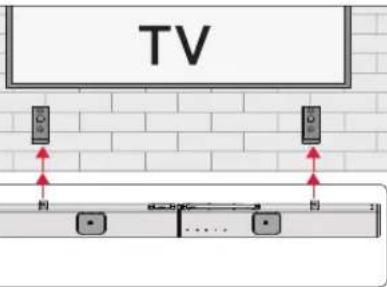
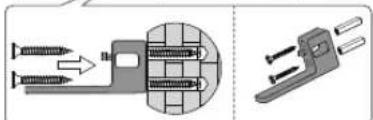
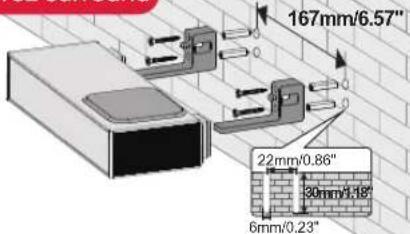
10 PLACEMENT OPTIONS
natural_image
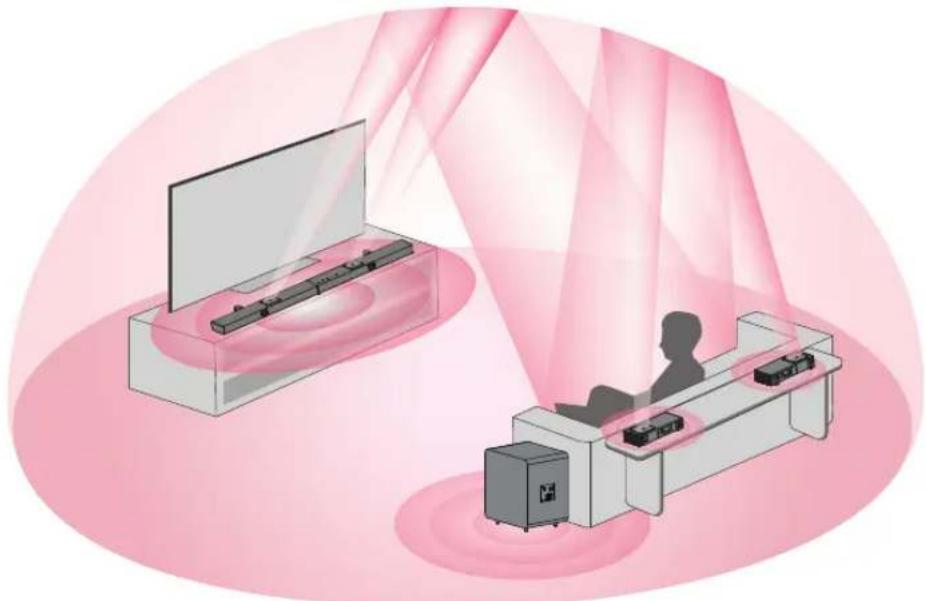
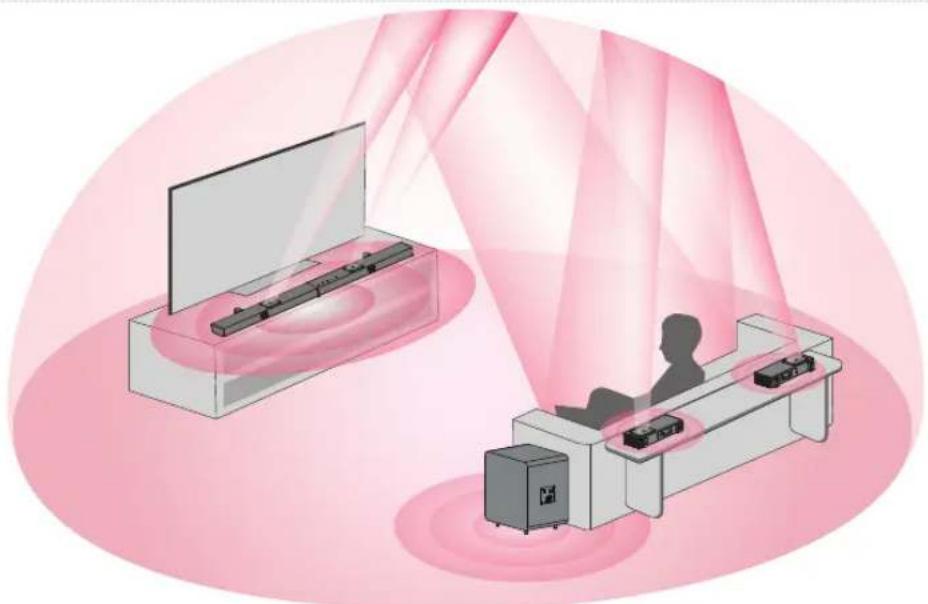
Illustration of a smart TV setup with two screens and a server, rendered in pink tones (no text or symbols)The soundbar and surround speakers should be placed at or near ear level.
EN
1
2
3
4
Soundbar
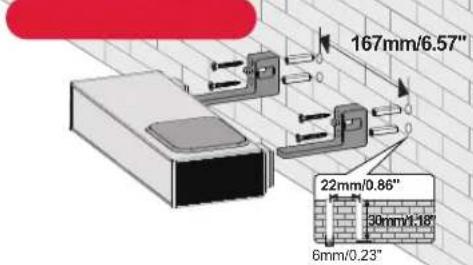

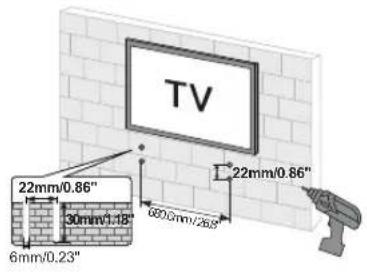
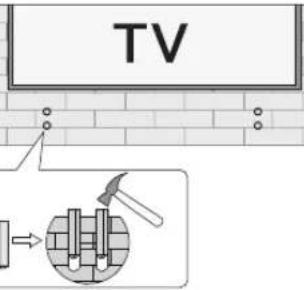
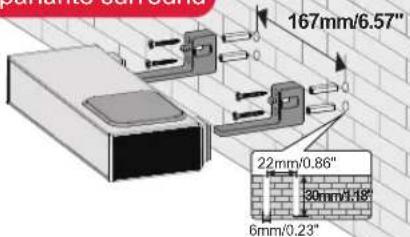
Note: Please use the HDMI Adaptor for easy plugging and unplugging of the HDMI Cable.
12 SPECIFICATIONS
| Model Number | U4420 |
| Power Supply | AC 100-240V, ~50/60Hz |
| Soundbar Drivers | (3.1" x 1.2") x 5 (Soundbar) + 1.8" x 4 (upward-firing Driver) + (3.1" x 1.2") x 2 (Surround Speaker) + 8" (Subwoofer) |
| Frequency Response | 35Hz - 18kHz |
| Standby Power | <0.5W |
| Operating Temperature 0°C - 45°C / 32°F - 113°F | |
| Bluetooth Version 5.3 | |
| Dimensions and Weight | ||
| Soundbar | 1008 (W) x 38 (H) x 76 (D)mm | 39.7" x 1.5" x 3.0" |
| Subwoofer | 308 (W) x 345 (H) x 237 (D)mm | 12.1" x 13.6" x 9.3" |
| Surround Speaker | 205 (W) x 38 (H) x 76 (D)mm | 8.1" x 1.5" x 3.0" |
| Packaging | 550 (W) x 314 (H) x 428 (D)mm | 21.7" x 12.4" x 16.9" |
| Net Weight | 10kg / 22.05lbs | |
| Gross Weight | 12.6kg / 27.78lbs | |
Benutzerhandbuch
natural_image
Black audio speaker module with sound block and four rectangular speakers (no text or symbols visible)Modell Nr.: U4420
WIR SIND BEREIT ZU HELFEN

support@ultimea.com

2
natural_image
Pure electrical connector diagram without any text, numbers, or symbols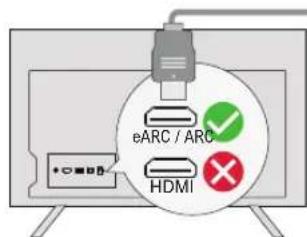
flowchart
graph TD
    A["TV Screen"] --> B["Optical"]
    B --> C["Optical Audio Out"]
AUX
OPTION 1: OPTISCH
flowchart
graph TD
    A["Bluetooth"] --> B["Phone Settings"]
    B --> C["<100V/238"]
    C --> D["Device 1"]
    C --> E["Device 2"]
8 SUBWOOFER KOPPELN
natural_image
Diagram showing a speaker with sound waves and a rectangular electronic device (no text or symbols)natural_image
Illustration of a smart TV setup with two screens and a control room, rendered in pink tones (no text or symbols)2
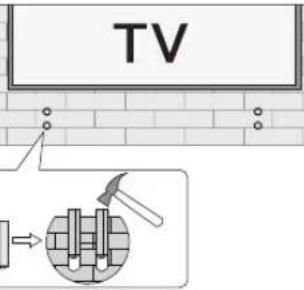
4
TV
3
TV
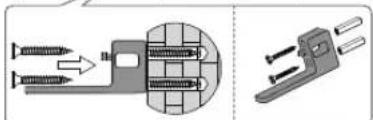
natural_image
Technical illustration of a mechanical clamp device with screw fasteners and a separate view showing internal components (no text or symbols)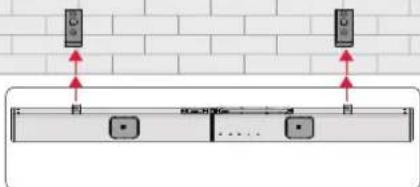
natural_image
Diagram showing two vertical-mounted devices connected to a horizontal panel with three square buttons, against a brick wall background (no text or symbols)Soundbar
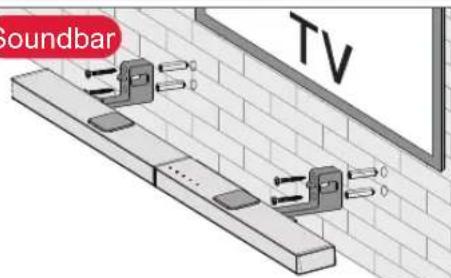

natural_image
Black audio speaker setup with a speaker tower, sound block, and rectangular speakers (no text or symbols visible)モデル番号: U4420
お手伝 いいた します

support@ultimea.com
JP
ビデオチュートリアルをご希望ですか?
ディスプレイは: “JS-6”, “JS-5”, “JS-4”, “JS-3”,
“15-2”, “15-1”, “15 0”, “15 1”, “15 2”, “15 3”, “15 4”, “15 5”, “15 6”.
2
natural_image
Diagram of a device rear panel with ports and connectors (no text or labels)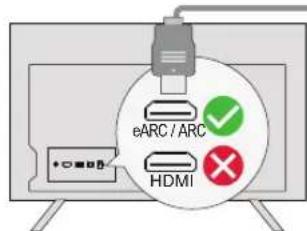
ステップ1:
ステップ3:
flowchart
graph TD
    A["TV Screen"] --> B["Optical"]
    B --> C["Optical Audio OUT"]
オプション1: 光学式
natural_image
Illustration of a speaker with sound waves and a rectangular electronic device (no text or symbols)natural_image
Illustration of a smart display setup with a monitor and control unit, no text or symbols present2
3
natural_image
Technical illustration of a mechanical clamp or bracket assembly with screws and a circular housing (no text or symbols)4
サウンドバ

natural_image
Black audio speaker setup with a speaker tower and four rectangular speakers (no text or symbols visible)“JS-5”, “JS-4”, “JS-3”, “JS-2”, “JS-1”, “JS 0”, “JS 1”, “JS 2”, “JS 3”,
"15 4,"15 5,"15 6".
18 "MIDRANGE": MIDRANGE
2
natural_image
Pure electrical circuit lines without any symbols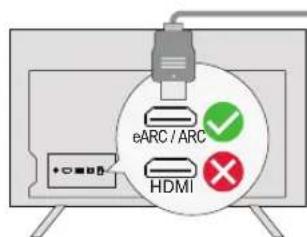
8 APPAIRAGE DU CAISSON DE BASSE
natural_image
Diagram showing a speaker next to a rectangular electronic device with sound waves (no text or symbols)10 OPTIONS DE PLACEMENT
natural_image
Illustration of a smart TV setup with a monitor and server, rendered in pink tones (no text or symbols)2

3
4
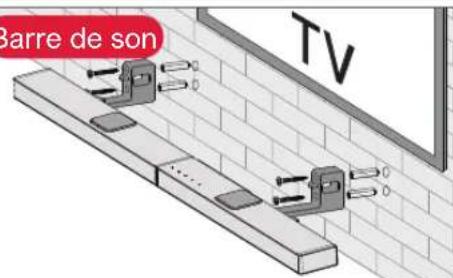
Enceinte surround

natural_image
Black audio speaker module with speakers and sound block (no text or symbols visible)Modello n.: U4420
SIAMO PRONTI AD AIUTARE

“JS-6”, “JS-5”, “JS-4”, “JS-3”, “JS-2”, “JS-1”, “JS 0”, “JS 1”, “JS 2”, “JS 3”.
“85 4”, “85 5”, “85 6”.
18 "MIDRANGE": MEDIO
“TB-6”, “TB-5”, “TB-4”, “TB-3”, “TB-2”, “TB-1”, “TB 0”, “TB 1”,
“T0 2”, “T0 3”, “T0 4”, “T0 5”, “T0 6”.
20 " : MOVIE
“SR-6”, “SR-5”, “SR-4”, “SR-3”, “SR-2”, “SR-1”, “SR 0”, “SR 1”, “SR 2”, “SR 3”, “SR 4”, “SR 5”, “SR 6”.
27 "UP-FIRING": UP-FIRING
Passo 2
natural_image
Diagram of a device rear panel with ports and connectors (no text or labels)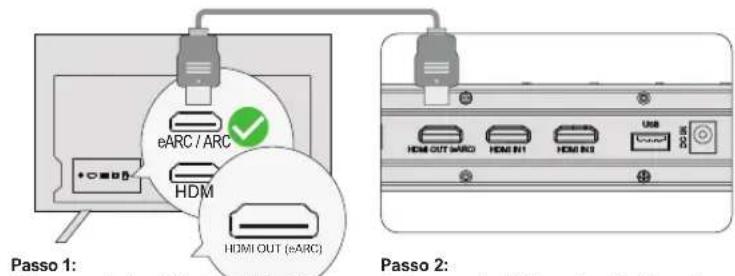

8 ACCOPPIAMENTO DEL SUBWOOFER
natural_image
Diagram showing a speaker with sound waves and a rectangular electronic device (no text or symbols)natural_image
Illustration of a smart TV setup with a monitor and server, emitting light beams to a person (no text or symbols)2
3
natural_image
Technical illustration of a mechanical clamp or bracket assembly with screws and a separate close-up view (no text or symbols)4
Soundbar
Altoparlante surround
natural_image
Black audio speaker setup with speaker, sound block, and rectangular speakers (no text or symbols visible)No de modelo: U4420
2
natural_image
Pure electrical circuit lines without any symbols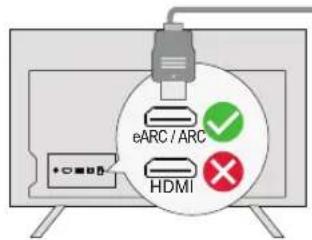
AUX
OPCIÓN 1: ÓPTICA
natural_image
Diagram showing a speaker next to a CD with sound waves, no text or symbols presentnatural_image
Illustration of a smart TV setup with a monitor and server, emitting light beams to a person (no text or symbols)2
3

4
Barra de sonido
natural_image
Technical illustration of a mechanical clamp device with screw fasteners and a separate close-up view (no text or symbols)Altavoz surround

Please read this user manual carefully and save it for future reference.
Do not make unauthorized alterations to the product, doing so may compromise safety, regulatory compliance, system performance, and may void the warranty.
- Avoid dropping.
- Do not disassemble.
- Do not submerge in water
- Avoid extreme temperatures.
- Do not use the device outdoors during thunderstorms.
- Use original or certified cables.
- Do not place dangerous items on top of this device (e.g. liquid filled objects, lit candles).
- Clean with a dry, soft lint-free cloth. Do not use any corrosive cleaner or oil
• To avoid hearing damage, do not listen for extended periods at high volume. - Do not expose the batteries to extreme heat sources such as direct sunlight or open flames.
• The ideal operating temperature for this product and its accessories is between 41°F/5°C and 95°F/35°C. - The adapter should be installed near the device and should be easily accessible.
- Do not use this product in environments of extreme heat or cold. Never expose this device to strong sunshine or wet environments.
PROPER DISPOSAL INSTRUCTIONS

This mark shown on the product or its packaging, indicates that this product should not be disposed of with other household waste at the end of its working life.
To prevent possible harm to the environment or human health from uncontrolled waste disposal, please separate this from other types of wastes and recycle it responsibly to promote the sustainable reuse of material resources.
Waste Electrical & Electronic Equipment
Household user should contact either the retailer where they purchased this product, or their local government office, for details of where and how they can take this item for environmentally safe recycling.
Business users should contact their suppliers and check the terms and conditions of the purchase contract. This product should not be mixed with other commercial wastes for disposal.
FCC REGULATORY COMPLIANCE
Any changes or modifications not expressly approved by the party responsible for compliance could void the user's authority to operate the equipment.
This device complies with Part 15 of the FCC Rules.
Operation is subject to the following two conditions:
(1) This device may not cause harmful interference.
(2) This device must accept any interference received, including interference that may cause undesired operation.
NOTE: This equipment has been tested and found to comply with the limits for a Class B digital device, pursuant to part 15 of the FCC Rules. These limits are designed to provide reasonable protection against harmful interference in a residential installation. This equipment generates, uses, and can radiate radio frequency energy, and if not installed and used in accordance with the instructions, may cause harmful interference to radio communications.
However, there is no guarantee that interference will not occur in a particular installation. If this equipment does cause harmful interference to radio or television reception, which can be determined by turning the equipment off and on, the user is encouraged to try to correct the interference by one or more of the following measures:
- Reorient or relocate the receiving antenna.
- Increase the separation between the equipment and the receiver.
- Connect the equipment to an outlet on a circuit different from that to which the receiver is connected.
- Consult the dealer or an experienced radio / TV technician for help.
This equipment complies with FCC radiation exposure limits set forth for an uncontrolled environment. This equipment should be installed and operated with a minimum distance of 20cm between the radiator & your body. This transmitter must not be co-located or operating in conjunction with any other antenna or transmitter.
ISED WARNINGS
This device contains licence-exempt transmitter (s) / receiver (s) that comply with Innovation, Science and Economic Development Canada's licence-exempt RSS (s). Operation is subject to the following two conditions:
(1) This device may not cause interference.
(2) This device must accept any interference, including interference that may cause undesired operation of the device.
The device meets the exemption from the routine evaluation limits in section 2.5 of RSS 102 and compliance with RSS-102 RF exposure, users can obtain Canadian information on RF exposure and compliance.
This transmitter must not be co-located or operating in conjunction with any other antenna or transmitter. This equipment should be installed and operated with a minimum distance of 20 centimeters between the radiator and your body.
Declaration of Conformity
We (Manufacturer is responsible for this declaration) Ultimea Technology (Shenzhen) Limited (Company name)
20th Floor, Building 4, Tianan Cloud Park, Bantian St., Longgang District Shenzhen, China 518000 (Company address)
Declare under our sole responsibility that the product Trade Mark: ULTIMEA
Product Name: Nova S90 7.1.4 Channel Dolby Atmos Soundbar Model No.: U4420
To which this declaration relates is in conformity with the essential requirement set out in the Council Directive on the Approximation of the laws of the Member States relating to RED Directive (2014/53/EU) & RoHS (2011/
65/EU) product is responsible to affix CE marking, the following standards were applied:
EN 55032:2015/A1:2020
EN 55035:2017/A11:2020
EN IEC 61000-3-2:2019/A1:2021
EN 61000-3-3:2013/A2:2021
ETSI EN 301 489-1 V2.2.3 (2019-11)
ETSI EN 301 489-17 V3.2.4 (2020-09)
EN IEC 62368-1:2020+A11:2020
IEC 62321-3-1:2013
IEC 62321-4:2013+A1:2017
IEC 62321-5:2013
IEC 62321-6:2015
IEC 62321-7-1:2015
IEC 62321-7-2:2017
IEC 62321-8:2017
Full Name: Yoyo.Yu
Position: Approbation Manager
Signature:
Place/Date: Shenzhen, China /Apr 19-2024
Trade Marks:
Dolby Atmos
Dolby, Dolby Atmos, and the double-D symbol are registered trademarks of Dolby Laboratories Licensing Corporation. Manufactured under license from Dolby Laboratories. Confidential unpublished works. Copyright © 2012-2021 Dolby Laboratories. All rights reserved.
Bluetooth®
The Bluetooth® word mark and logos are registered trademarks owned by Bluetooth SIG, Inc. and any use of such marks by Soundlab Technology Co., Ltd. is under license. Other trademarks and trade names are those of their respective owners.
HDMI ^TM
The terms HDMI, HDMI High-Definition Multimedia Interface, HDMI trade dress and the HDMI Logos are trademarks or registered trademarks of HDMI Licensing Administrator, Inc.
ULTIMEA
Nova S90 7.1.4 Channel Dolby Atmos Soundbar Model No.: U4420
Ultimea GmbH
Buchenring 57, 22359 Hamburg, Germany

UK CROSSBORDER LIMITED
7 Bell Yard London WC2A 2JR, UK United Kingdom
Made in China
Manufacturer: Ultimea Technology (Shenzhen) Limited
Address: 20th Floor, Building 4, Tianan Cloud Park, Bantian St.,
Longgang District, Shenzhen, China 518000
If you need our support, kindly reach out to our service team. We are always glad to help.


- User Manual
- Nova S90
- User Manual English
- WE ARE READY TO HELP
- SOUNDBAR CONTROLS
- Control Panel
- Remote Control
- Step 2
- Note:
- What's the difference between: HDMI IN, HDMI ARC, HDMI eARC?
- Note: Please turn on the "CEC" function on your TV.
- CONNECT TO OTHER DEVICE VIA HDMI IN1 / HDMI IN2
- EN
- OPTION 1: OPTICAL
- OPTION 2: AUX
- CONNECT TO BLUETOOTH
- PAIRING SUBWOOFER
- PAIRING SURROUND SPEAKER
- Step 1
- PLACEMENT OPTIONS
- SPECIFICATIONS
- Benutzerhandbuch
- WIR SIND BEREIT ZU HELFEN
- OPTION 1: OPTISCH
- SUBWOOFER KOPPELN
- お手伝 いいた します
- ビデオチュートリアルをご希望ですか?
- オプション1: 光学式
- APPAIRAGE DU CAISSON DE BASSE
- OPTIONS DE PLACEMENT
- SIAMO PRONTI AD AIUTARE
- Passo 2
- ACCOPPIAMENTO DEL SUBWOOFER
- OPCIÓN 1: ÓPTICA
- Please read this user manual carefully and save it for future reference.
- PROPER DISPOSAL INSTRUCTIONS
- Waste Electrical & Electronic Equipment
- FCC REGULATORY COMPLIANCE
- ISED WARNINGS
- Declaration of Conformity
- Dolby Atmos
- Bluetooth®
- HDMI TM
- ULTIMEA
Brand : ULTIMEA
Model : Nova S90
Category : Soundbar