Tapio I Pro - Soundbar ULTIMEA - Free user manual and instructions
Find the device manual for free Tapio I Pro ULTIMEA in PDF.

User questions about Tapio I Pro ULTIMEA
0 question about this device. Answer the ones you know or ask your own.
Ask a new question about this device
Download the instructions for your Soundbar in PDF format for free! Find your manual Tapio I Pro - ULTIMEA and take your electronic device back in hand. On this page are published all the documents necessary for the use of your device. Tapio I Pro by ULTIMEA.
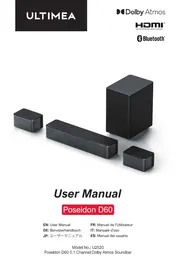
USER MANUAL Tapio I Pro ULTIMEA
natural_image
Line drawing of a cylindrical electronic device with a label 'BOSO' on its side (no other text or symbols)BEDIENUNGSANLEITUNG
MANUEL D'UTILISATION
MANUAL DEL USUARIO
MANUALE UTENTE
取扱説明書
www.Ultimea.com
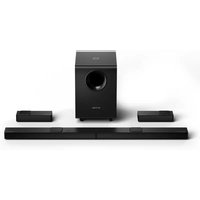
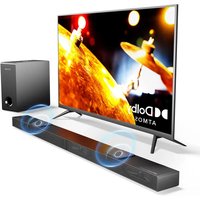
Thanks for purchasing Ultimea Tapio I Pro. This guideline aims to offer you details on setting up this soundbar so that you can enjoy the ultimate sound experience.
ACCESSORIES:

natural_image
Simple line drawing of a cylindrical object with a label '1' in the top-left corner (no other text or symbols)
natural_image
Simple line drawing of a remote control device with no text or symbols
text_image
User manual
natural_image
Simple line drawing of a telephone handset with a circular button (no text or symbols)
natural_image
Simple line drawing of a USB cable with a pin (no text or symbols)
natural_image
Simple line drawing of a U-shaped connector with two labeled terminals (L and R), no text or symbols present.
natural_image
Simple diagram showing four test tubes with different fill patterns, no text or symbols presentEN:
4 Power adapter
S Optical cable
③ AUX audio cable
7 Wall mounting bolts
FR:
text_image
5 ABC 6 OPT 7 USB 8 AUX IN 9 DC INEN:
① Power: Short press to turn on, long press to turn off.
Mode: Turn it on and then press to switch the mode.
② Short press for next song.
Long press for increasing volume.
● Short press for previous song
Long press for decreasing volume.
④ Play/Pause: Play/Pause in BT and USB mode.
⑤ ARC: Use to connect compatible devices using a HDMI cable (not provided).
6 OPTICAL IN: Use to connect compatible devices using an optical cable (provided).
USB IN: Connect to the flash drive for playing MP3/WAV files (FAT32 format and 64GB max)
- AUX IN: Connect to the compatible devices via the 3.5mm-RCA stereo jack cable (provided)
DC IN: Use to connect the DC power supply.
DE:
natural_image
Line drawing of a modern TV set with a flat-screen monitor on top (no text or symbols)EN:
Placement
Table placement
Place the soundbar on a solid surface.
FR:
Placement
Placement de la table
text_image
Diagram showing brick wall and pipe installation with a magnified inset illustrating the process.
text_image
3 T -
natural_image
Diagram of a room with brick wall, two water pumps, and a digital display unit (no text or symbols)Remote Control
Battery installation
1

natural_image
Simple 3D illustration of a cylindrical object with a curved top and a rectangular base, no text or symbols present.2

natural_image
3D diagram of a mechanical component with a curved top and rectangular base, no visible text or symbols1

natural_image
Simple 3D diagram of a cylindrical object with an arrow indicating direction (no text or symbols)EN:
Use remote control
The working range of remote is +/-30° in both Vertical and Horizontal Direction.
FR:
text_image
30° 30° 5metersDE:
text_image
F + + - NOT OK Cancel Change Change OK CancelEN:
| ∅ | Short press to turn on, long press to turn off | MUSIC | Music Mode/EQ 1 |
| ∅ | Mute/ Recover the Volume | MOVIE | Movie Mode/EQ 2 |
| BT | Go to BT Mode | NEWS/Game | News mode is displayed as EQ3/ Game mode is displayed as EQ4 |
| HDMI | Go to HDMI Mode | OPTICAL | Go to Optical Mode |
| DYNAMIC | To enhance the dynamic effects of different EQ modes such as Music/Movie/News/Games/3D, suitable for scenes of needing more powerful sound effects. | ||
| Hi-Fi | To adjust the sound effects on different EQ Modes such as Music/Movie/News/Games/3D to get clearer sound, suitable for some quiet scenes such as dialogue. | ||
| AUX/USB | Go to Aux/USB Mode | BASS+ | Increase the Bass |
| + | Volume Up | BASS- | Decrease the Bass |
| - | Volume Down | 3D | 3D Surround sound on/off, can only be turned on in movie mode |
| ◀◀ | Previous Track | ▶◀ | Next Track |
| ▶II | Play/Pause | ○/LED OFF | Short press button for Single loop or Full loop in USB mode /Short press to turn on/off the LED indicator in standby mode. |
DE:
text_image
Diagram showing connections between remote control, power input, and connected devices with labeled icons and labelsB. Connect to TV

text_image
ARC OPT USE AUX IN DC IN DIGITAL Optical cable BETTER HDMI ARC cable BEST TV 3.5mm to RCA audio cable GOODEN:
Use Remote Control or Button on Soundbar to change modes.
Note:
- Prior to usage, check whether your TV has HDMI ARC, Optical and Aux Output.
- Prior to using HDMI ARC connection, please ensure your TV supports HDMI ARC and HDMI Cable is not lower than HDMI 1.4.
- Turn on PCM settings of your TV When connected in Optical Mode in case there is no sound.
4.32 is the maximum volume of the soundbar.
DE:
C. Connect to Other Device

text_image
ARC HDMI ARC cable BEST OPT DIGITAL Optical cable BETTER AUX IN 3.5mm to RCA audio cable GOODEN:
Need to purchase one 3.5mm-3.5mm audio cable if there is only 3.5mm female output on your Devices.
DE:
D. Connect to Bluetooth Device

flowchart
graph LR
    A["1: Hand with 'BT' icon"] --> B["2: Hand pointing to 'Power Hub' button"]
    B --> C["3: Bluetooth On screen with Bluetooth signal"]
    C --> D["4: Display on iPhone with Wi-Fi signal"]
    D --> E["5: Touch of Bluetooth on tablet via Tapio I Pro"]
EN:
Short press "BT" button on the remote control to enter Bluetooth mode.
The BT bE will flash when entering the pairing mode, and bE will stop flashing once successfully paired
FR:
- Avoid dropping
- Do not disassemble
- Avoid extreme temperatures
- Don't use the device outdoors during thunderstorms
- Use original or certified cables
- Don't use any corrosive cleaner / oil to clean
- The products should not be exposed to dripping or splashing water
FR:
FCC Regulatory Compliance
Note: This equipment has been tested and found to comply with the limits for a Class B digital device, pursuant to Part 15 of the FCC Rules. These limits are designed to provide reasonable protection against harmful interference in a residential installation. This equipment generates, uses and can radiate radio frequency energy and, if not installed and used in accordance with the instructions, may cause harmful interference to radio communications. However, there is no guarantee that interference will not occur in a particular installation.
If this equipment does cause harmful interference to radio or television reception, which can be determined by turning the equipment off and on, the user is encouraged to try to correct the interference by one or more of the following measures:
-- Reorient or relocate the receiving antenna.
-- Increase the separation between the equipment and receiver.
-- Connect the equipment into an outlet on a circuit different from that to which the receiver is connected.
-- Consult the dealer or an experienced radio/TV technician for help.
Warning: changes or modifications not expressly approved by the party responsible for compliance could void the user's authority to operate the equipment.
RF Exposure Compliance
This equipment complies with FCC radiation exposure limits set forth for an uncontrolled environment. This equipment should be installed and operated with minimum distance 20cm between the radiator and your body. This transmitter must not be co-located or operating in conjunction with any other antenna or transmitter.
FCC Compliance Statement
This device complies with Part 15 of the FCC Rules. Operation is subject to the following two conditions: (1) This device may not cause harmful interference, and (2) this device must accept any interference received, including interference that may cause undesired operation.
Correct Disposal of This Product

(Waste Electrical& Electronic Equipment)
This mark shown on the product or its packaging, indicates that this product should not be disposed with other household wates at the end of its working life.
To prevent possible harm to the environment or human health from uncontrolled waste disposal, please separate this from other types of wastes and recycle it responsibly to promote the sustainable reuse of material resources.
Household user should contact either the retailer where they purchased this product, or their local government office, for details of where and how they can take this item for environmentally safe recycling.
Business users should contact their supplier and check the terms and conditions of the purchase contact. This product should not be mixed with other commercial wastes for disposal.
ULTIMEA
EU Representative: SHUNSHUN GmbH
Address: Römeräcker 9 Z2021, 76351 Linkenheim-Hochstetten, Germany
UK Representative: UK CROSSBORDER LIMITED
Address: 7 Bell Yard London WC2A 2JR, UK
Manufacturer: GuangDong Substanbo Technology CO., Ltd.
Address: 2508, Building4, Tian Cloud Park Phase II,
Bantian Street, Longgang District, Shenzhen, China 518100

support@www.ultimea.com

www.ultimea.com


@Ultimea
Made in China


RoHS
UKCA